Dreadlocks have evolved from a single cultural statement into a diverse, deeply personal expression of style and identity for women worldwide. Whether you’re just starting your locs journey or you’ve been rocking them for years, the variety of styles available goes far beyond what many people realize. The beauty of dreadlocks lies not just in the commitment and care they represent, but in the endless creative possibilities they offer—from sleek and polished looks for professional settings to bold, artistic styles that command attention.
What makes dreadlocks so versatile is that they work at literally every hair length and texture, and they adapt beautifully to your lifestyle, personality, and the moment you’re dressing for. You can transform your locs from a casual everyday style to an elegant updo in minutes. You can add color, gold cuffs, beads, or leather wraps to completely change the vibe. You can wear them down in their full glory or tuck them up for a completely different silhouette. The real magic is that dreadlocks give you permission to experiment—to try something, change it next week, and try something entirely different without damaging your hair or starting from scratch.
This guide walks through twenty distinct dreadlock styles specifically designed for different hair lengths, from short baby locs to waist-length dream locks. You’ll find styles for every occasion, every mood, and every part of your dreadlock journey. Some of these are beginner-friendly and require minimal styling tools. Others are more intricate and reward patience and creativity. All of them prove that dreadlocks aren’t a limiting choice—they’re actually a liberation into genuine, wearable versatility.
1. Long Locs with a Half-Up Crown Knot

This romantic, polished style works beautifully for medium to long dreadlocks (waist-length or longer) and creates an effortless-looking updo that still lets your full length shine. The crown knot takes just a few minutes but looks intentional and elegant, making it perfect for dates, dinners, or any time you want to feel extra put-together without the formal commitment of a full updo.
Why This Style Works So Well
The half-up crown knot creates beautiful visual balance by framing your face while keeping most of your locs flowing free. The technique naturally sculpts the top of your head and flatters almost every face shape, plus it keeps hair off your neck and shoulders if you’re dealing with heat or movement. The knot itself holds securely without needing a lot of styling products or taking forever to execute—even in humid conditions, it’ll stay in place for hours.
How to Create It Step-by-Step
- Section off a horizontal line of locs from temple to temple across the crown of your head
- Divide this section into two halves down the middle
- Twist each half slightly to create texture and grip
- Cross the right section over the left, then loop it back under and through to create a simple knot
- Tighten gently until it sits snugly against your scalp
- Pull a few locs loose around your face for a softer look
- Smooth any flyaways with a light misting of water and allow to air dry in place
Pro tip: Create more texture in the knot by starting the twist higher—this gives you more rope to work with and creates a bigger, more sculptural knot that photographs beautifully.
2. Shoulder-Length Locs with Braided Band Detail

For locs that hit around shoulder length or just below, adding a braided band woven through your locs creates dimension and structure while keeping everything contained. This style works especially well if you have thinner locs or uneven lengths, because the braid guides the eye and creates visual cohesion across the entire head.
The Visual Appeal of This Technique
The braided band acts like a crown or headband, instantly elevating what might otherwise be a simple, loose style into something carefully considered. The braid catches light and creates texture contrast, especially if you use thread, embroidery floss, or even colored yarn woven throughout. It’s the kind of small detail that shows you’re thoughtful about your styling without being overdone.
Installation and Styling Tips
- Choose three to five locs that run horizontally across the back of your head from ear to ear
- Begin a simple three-strand braid using thread or yarn as the fourth element, weaving it through as you braid
- Work the braid loosely—tight braids will pull on your locs and create tension
- Secure the end with a small elastic or by wrapping thread multiple times
- Tuck remaining locs over and under the braid to frame it gently
- The braid should sit about three to four inches from your scalp for the best visual balance
Worth knowing: If your braid feels too tight, loosen it immediately rather than waiting. Tension-related hair loss is cumulative, so it’s always better to err on the side of gentle styling.
3. Short Baby Locs in a Twisted Crown Updo

Baby locs (typically two to four months old) are still establishing themselves and can feel fragile, but that’s actually the perfect time for a twisted crown updo. This style works beautifully because it secures your young locs safely while still showing them off and creating visual interest.
Why This Works for Emerging Locs
A twisted crown gently encourages your baby locs to lock up more fully by keeping them in a twisted formation as they mature. The style creates a protective buffer because you’re not pulling the locs tight against your scalp—instead, you’re supporting them with gentle twists that actually help them find their shape. This is practical protection paired with genuine beauty.
Creating the Twisted Crown
- Take a section of locs from one ear, pulling them toward the back of your head
- Begin twisting them together loosely, adding new locs as you move along your crown
- Keep the twist about two inches away from your scalp (this reduces tension significantly)
- Work your way around to the opposite ear, then secure the twist with a small elastic or by wrapping thread
- Let remaining locs fall loosely around your shoulders
- You can create a second parallel twist below the first one for more detail if you want
Quick safety note: Check the tightness by putting one finger underneath the twisted section. You should be able to move it side to side easily. If it feels fixed and immovable, it’s too tight.
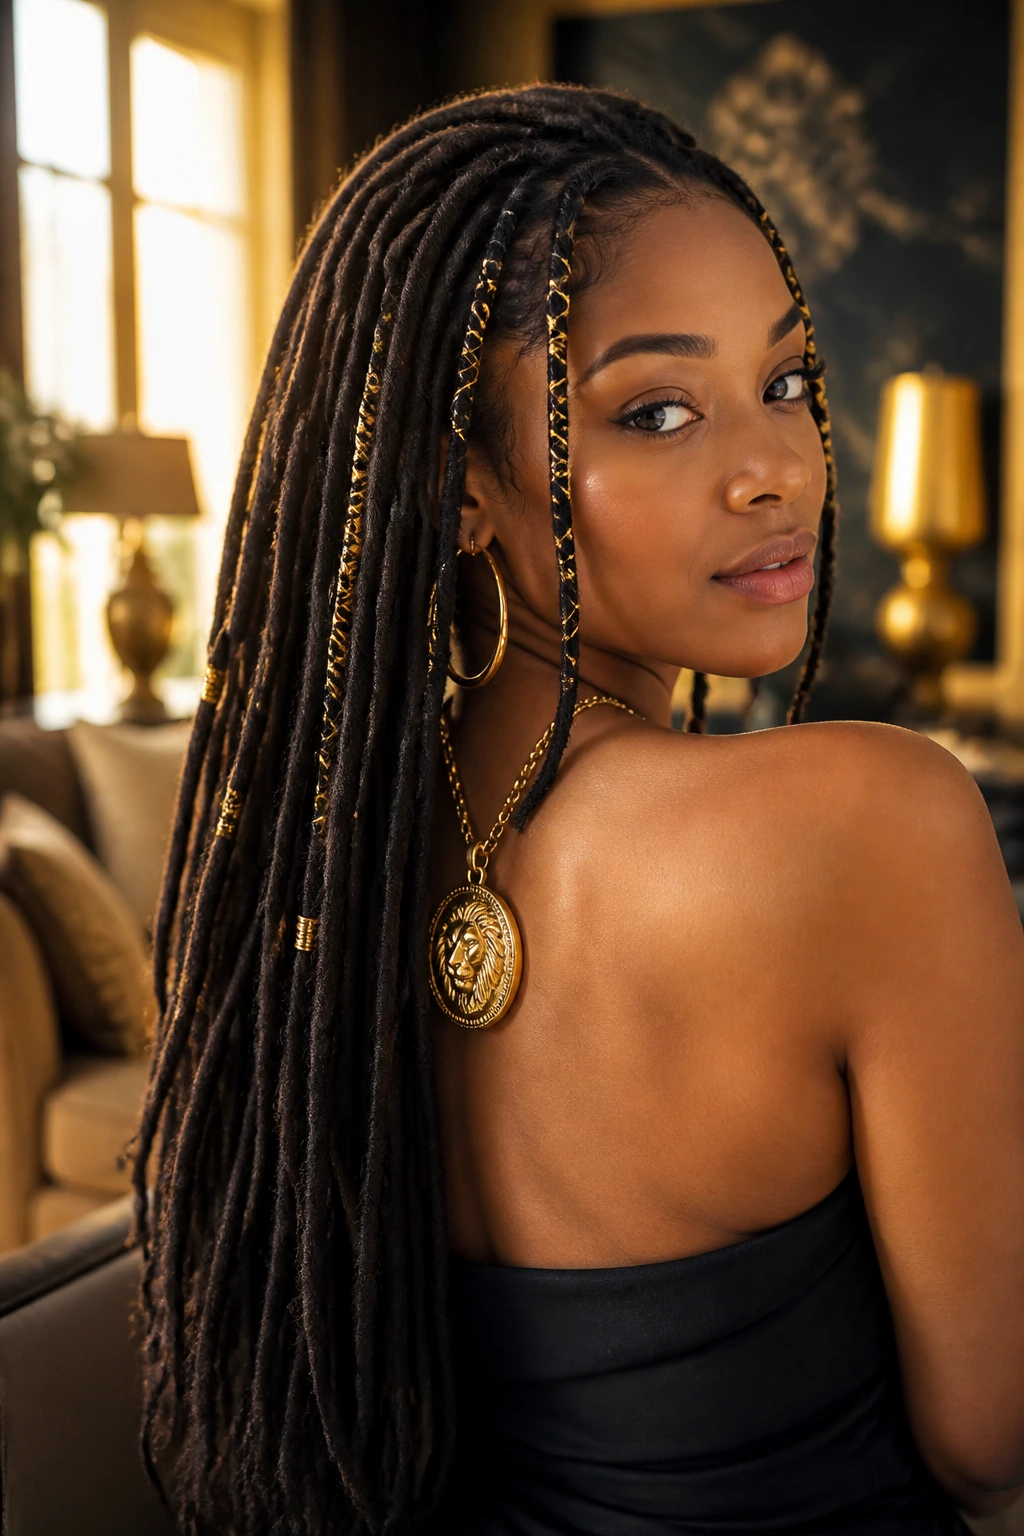
4. Waist-Length Statement Locs with Silver Cuffs and Beads

When you’ve got genuinely long locs (waist-length or beyond), wearing them down in their full glory with intentional metallic and beaded accents becomes a legitimate fashion statement. This style celebrates the length and maturity of your locs while showing they’re still an active, evolving part of your aesthetic.
Choosing the Right Metals and Beads
Silver, gold, and rose gold all read differently against dreadlocks, and choosing the metal that harmonizes with your skin tone elevates the whole look. Silver tends to feel cool and modern. Gold creates warmth and richness. Rose gold bridges both. Wooden beads add earthiness, while metal beads add geometric sophistication. The key is committing to one metal tone and possibly one bead style for cohesion—random mixing feels scattered rather than intentional.
Placement Strategy for Maximum Impact
- Place cuffs on alternating locs around the crown area (this creates a crown-like effect without an actual crown)
- Cluster three to five beads on individual locs near the ends to create visual interest at different heights
- Leave some locs completely unadorned to let them breathe visually
- Space metal and beaded locs several inches apart rather than placing them next to each other
- Step back and look in a full-length mirror to assess balance before finalizing placement
Pro tip: Take a photo from behind to check symmetry. Asymmetrical placement often looks intentional and cool, but true balance feels more polished.
5. Mid-Back Locs in a High Messy Bun

This casual, effortless-looking style works for locs hitting mid-back or longer and is genuinely perfect for hot days, gym sessions, or when you want your locs off your face and neck but still want to look intentional. The key to making a messy bun look intentional rather than hastily thrown together is the placement and the final shaping.
The Technique for an Intentional Messy Bun
- Gather your locs into a high ponytail at the crown, securing with an elastic
- Twist the ponytail loosely around its base in a circular motion to create volume
- Wrap the twisted length around and around the ponytail base to form the bun
- Secure with bobby pins tucked underneath where they won’t show
- Gently pull a few pieces slightly loose from the bun to create texture and softness
- Mist lightly with a hydrating spray rather than sticky gel to avoid that crunchy look
Why This Beats a Basic Ponytail
A high bun frames your face more flatteringly than a simple ponytail, shows off your scalp and locs’ maturity, and creates a finished look that works in professional, casual, and athletic settings. The texture of dreadlocks actually makes a messier bun look more intentional than a messy bun made from straight hair—the locs hold their shape beautifully without looking sloppy.
Quick reality check: A truly messy bun takes about ninety seconds to create once you’ve done it once. If you’re spending more than three minutes, you’re thinking about it too hard.
6. Shoulder-Length Locs with Gold Thread Wraps

Gold thread wraps add genuine glamour to shoulder-length locs and work beautifully for special events or just when you want to feel extra. The gold catches light and creates visual sophistication, and because you’re wrapping rather than adding permanent decorations, you can change the look completely by removing the wraps.
Selecting Thread and Placement
Choose real metallic thread rather than plastic “gold string” if your budget allows—it catches light more beautifully and photographs better. Start by wrapping thread around individual locs nearest your face (this frames your features) and then wrap select locs throughout the back for balance. Each wrap should be about one inch of actual wrapping, not the tiny token wraps you sometimes see.
Wrapping Technique That Stays Put
- Cut a length of thread about eighteen inches long
- Position the midpoint of the thread at the base of a loc
- Wrap one end of the thread around and around the loc, working downward
- Wrap the second end in the opposite direction, creating a crisscross pattern
- Tie the two ends together underneath the wrapped section and trim excess
- The wrapped section should feel secure but not so tight that it digs into the loc itself
Worth noting: Gold thread wraps stay in place better on locs that are at least three months old and fully locked. Younger locs may loosen the thread as they continue to tighten and mature.
7. Chest-Length Locs with Side-Swept Loose Braid

When your locs reach chest length, you have enough length to create a genuine braid while still maintaining volume and movement. A side-swept loose braid takes advantage of this length sweet spot and creates a romantic, accessible look that works for date nights, casual outings, and times when you want to feel polished without doing a full updo.
Creating a Braid That Feels Modern Rather Than Retro
- Sweep all your locs to one side of your head (over the shoulder works best)
- Section off three to four locs from the swept side to create your braid base
- Braid loosely, adding additional locs as you braid downward
- Allow the braid to extend all the way down and use an elastic to secure the end
- Gently pull sections of the braid outward to add texture and width (this is the key to making it feel current rather than tight and dated)
- Leave some locs unbraided and flowing for softness
Why Looseness Matters
A tight braid looks deliberately styled and formal. A loose, textured braid looks effortless and current. The pulled-apart braid aesthetic works beautifully with dreadlocks because the locs themselves already have texture—you’re just emphasizing it rather than creating false texture in straight hair.
Pro tip: Create the braid one day before you plan to wear it, then pull it apart and re-fluff it the morning of. Slightly aged braids photograph better and feel more relaxed.
8. Short Locs (Chin-Length) with Colorful Beads and Wraps

Shorter locs—the kind that hit around chin length—look absolutely striking when you lean into bold colors and decorative elements. The shorter length actually makes colorful accents pop more because they’re visible in every angle, and you’re not competing with excess length for visual attention.
Color Combinations That Complement Locs
Complementary colors (opposite on the color wheel) create the most striking contrast. If you have brown or black locs, jewel tones like emerald, sapphire, and amethyst pop beautifully. Copper and bronze create warmth without the same intensity. Pastels on dark locs also work, but they read more softly. Consider your skin tone when choosing: warm tones in your skin work well with gold beads and warm jewel tones, while cool skin tones harmonize beautifully with silver and cool jewel colors.
Strategic Bead Placement for Short Locs
- Focus bead and wrap placement around your face (chin-length locs frame your face directly, so this area matters most)
- Place beads on the tips of shorter locs to create visual interest at the ends
- Mix bead sizes—small, medium, and large together—rather than using all the same size
- Wrap some locs entirely and leave others bare for visual contrast
- Consider using colorful thread or yarn for wraps rather than only beads for variety in texture and visual interest
Worth knowing: Colorful beads read differently under different lighting. Test them in natural light, indoor lighting, and under evening lights if you’re going to wear them to special events.
9. Waist-Length Locs Half-Up with Twisted Side Sections

When you have genuinely long locs, the half-up style with twisted side sections creates the illusion of a sophisticated updo while keeping most of your length down. This works for weddings, special events, or just days when you want to feel particularly elegant.
Building the Twisted Side Sections
- Take a vertical section of locs from your temple
- Divide this section into two halves
- Twist each half around itself tightly
- Cross the two twisted sections over each other to create an X pattern
- Bring this X pattern toward the back of your head
- Do the same on the opposite side
- Gather these twisted sections along with a few inches of loose locs and secure at the back with an elastic
Why This Works for Long Locs
The twists create height and structure at the crown while the bulk of your locs remain free. From the front, you see the twisted details and the height—it reads as intentional and put-together. From the back, you see the full length and the gathering point that creates a gentle silhouette. It’s genuinely flattering and photographs beautifully from every angle.
Pro tip: Do these twists while your locs are slightly damp (mist with water) for the best grip. They’ll hold for hours and the slight dampness will dry out creating more texture.
10. Thigh-Length Festival Locs with Colorful Yarn Wraps

Festival season calls for maximum visual impact, and when you’ve got thigh-length or longer locs, wrapping sections with thick, colorful yarn creates the kind of look that stands out in crowds and photographs amazingly. This style is pure joy and self-expression without apology.
Choosing Yarn and Color Combinations
Choose chunky yarn (worsted weight or thicker) rather than thin yarn, which gets lost visually on mature locs. Jewel tones combined with metallics (like emerald with gold, sapphire with silver) create the most striking impact. Rainbow color combinations work beautifully on dark locs specifically. The key is committing to the look—half-hearted colorful wraps look tentative, while bold, generous wraps look intentional and confident.
Wrapping Technique for Visible, Secure Wraps
- Cut yarn into lengths about three feet long
- Wrap yarn around select locs throughout your head, creating a scattered pattern rather than wrapping every loc
- Focus wraps around your face and evenly spaced throughout the back
- Each wrap should be at least two to three inches of actual yarn wrapping
- Tie yarn ends underneath and weave the excess into the wrap itself so it doesn’t hang loose
- The goal is visible, chunky, intentional wraps—not delicate little accents
Quick note: If you’re planning to dance hard or be very active, secure the yarn ends extra well or use double knots. Movement and heat can loosen hastily-tied yarn.
11. Medium-Length Locs (Shoulder-Blade Length) in a Sleek High Ponytail

A sleek high ponytail is the ideal professional or polished-casual look for medium-length locs. The locs naturally give you texture without the work, so a high ponytail actually reads as more intentional and styled on you than on someone with straight hair, even though it takes the same two minutes to create.
Achieving a “Sleek” Ponytail with Textured Locs
- Brush or smooth your locs back gently with a paddle brush or your fingers
- Gather them high on your crown (not the very tippy top, but about two inches down—this looks more modern and flatters more face shapes)
- Secure with a sleek elastic (black, brown, or a matching color—avoid hair-colored elastics which can look dated)
- Run a thin line of edge control or gel along your hairline to smooth baby locs or flyaways
- Tuck the elastic under a single loc wrapped around the ponytail base, or leave it visible if you’re wearing it bold
Why Sleek Ponytails Work for Professional Environments
Dreadlocks in a high, tight ponytail read as intentional and professional in most work environments. You’re showing respect for formality while still being authentically yourself. The key is keeping it smooth at the crown and tight (but not uncomfortably tight) through the elastic.
Pro tip: Use a boar-bristle brush rather than a plastic paddle brush when smoothing the hairline. It distributes natural oils and creates genuine shine rather than just flattening the locs.
12. Long Locs with Alternating High and Low Buns

This playful style works beautifully for longer locs (waist-length and beyond) and creates visual movement and sophistication simultaneously. Instead of wearing a single bun, you create two or even three buns positioned at different heights, creating a sculptural look that’s genuinely stunning and unexpectedly elegant.
Placement and Creation Strategy
- Section your locs into two to three distinct areas from crown to nape
- Gather and twist each section into its own bun at its designated height
- The highest bun should sit at your crown, the next one approximately three to four inches down, and a third bun (if using one) at the nape
- Create some visual variation by making one bun tighter and one messier
- Leave a few locs flowing loose between the buns to soften the look
- Secure each bun with bobby pins and a light mist of setting spray
The Visual Impact of Multiple Buns
Multiple buns create a rhythmic pattern that the eye follows, and they actually allow you to contain very long locs without creating the heavy, matted-down effect of a single massive bun. The style works for special events but also reads as playful enough for regular wear.
Worth knowing: This style holds better on locs that are at least six months old and fully locked. Younger locs may have trouble maintaining multiple distinct buns throughout the day.
13. Chin-Length Locs with Leather Cuff Details

Leather cuffs add edge, sophistication, and genuine visual interest to shorter locs. Unlike beads, which add sparkle and femininity, leather cuffs create a bold, confident aesthetic that works beautifully in professional, casual, and alternative settings.
Selecting Leather and Placement
Look for real leather cuffs designed for locs (these typically have an opening in the back so you can slide them onto locs without needing to open them wide). Wide cuffs (about one inch or more) make a bigger visual statement than thin cuffs. Gold-toned hardware reads differently than silver, so choose based on your other jewelry and aesthetic. Position cuffs primarily on locs that frame your face for maximum visual impact.
Mixing Leather with Other Textures
Leather looks particularly striking when mixed with other materials. Pair leather cuffs with gold thread wraps for a luxe aesthetic. Mix leather with wooden beads for an earthy, grounded look. Combine leather with colorful yarn for edge-meets-expression. The contrast creates visual interest that pure leather alone might not achieve.
Pro tip: Invest in a few quality leather cuffs rather than many cheap ones. Real leather will outlast your locs themselves, while cheap synthetic leather cracks and peels quickly.
14. Back-Length Locs in a Romantic Crown Braid Updo

When your locs reach your back, you can create a full crown braid that incorporates almost all your hair while creating the kind of romantic, princess-like updo that photographs beautifully and works for weddings, special occasions, or just days when you want to feel genuinely special.
Creating a Crown Braid with Dreadlocks
- Take a section of locs from one temple
- Braid loosely, incorporating new locs as you move around your head in a semicircle from temple to temple (across the back)
- The braid should sit about two to three inches from your scalp (not touching it) to avoid tension
- Secure the end with an elastic and pin the braid up against your head, creating a crown effect
- Allow locs to drape freely below the braid—this is the romantic, flowing part that makes the style work
- Gently pull sections of the braid outward to add width and texture
Why Crown Braids Work for Special Events
A crown braid automatically elevates your look and shows intention and care without requiring a lot of tools or product. The romantic, accessible vibe works for almost any special event, and it’s genuinely flattering because it frames your face beautifully from the front while the back shows length and fullness.
Quick note: Crown braids hold better as the day goes on because the weight of your locs below helps anchor the braid. Create it shortly before your event rather than hours ahead.
15. Shoulder-Length Locs with Metallic Yarn Tassels

Tassels made from metallic yarn create movement, visual interest, and genuine playfulness. Unlike heavier decorations, metallic yarn tassels move with you and create shimmer and light-catching interest, perfect for when you want glamorous without heavy.
Creating DIY Metallic Tassels
- Wrap metallic yarn around your fingers (three fingers wide) about twenty times
- Slide the wrapped yarn off your fingers carefully
- Wrap another piece of yarn tightly around the middle, creating a gathered effect
- Cut through the loops on both ends
- Trim to your desired length (usually two to three inches for locs)
- Attach to individual locs by threading yarn through the tassel center and tying around each loc
Positioning for Maximum Movement
Position tassels on locs around your face and temples where they’ll catch light and frame your features. Space them throughout the back at different heights so movement creates a staggered shimmer effect. The more tassels you use, the more playful and festival-ready the look becomes. Fewer tassels create a more refined, intentional aesthetic.
Pro tip: Metallic yarn in silver reads cool and modern. Gold metallic creates warmth and richness. Rose gold bridges both beautifully.
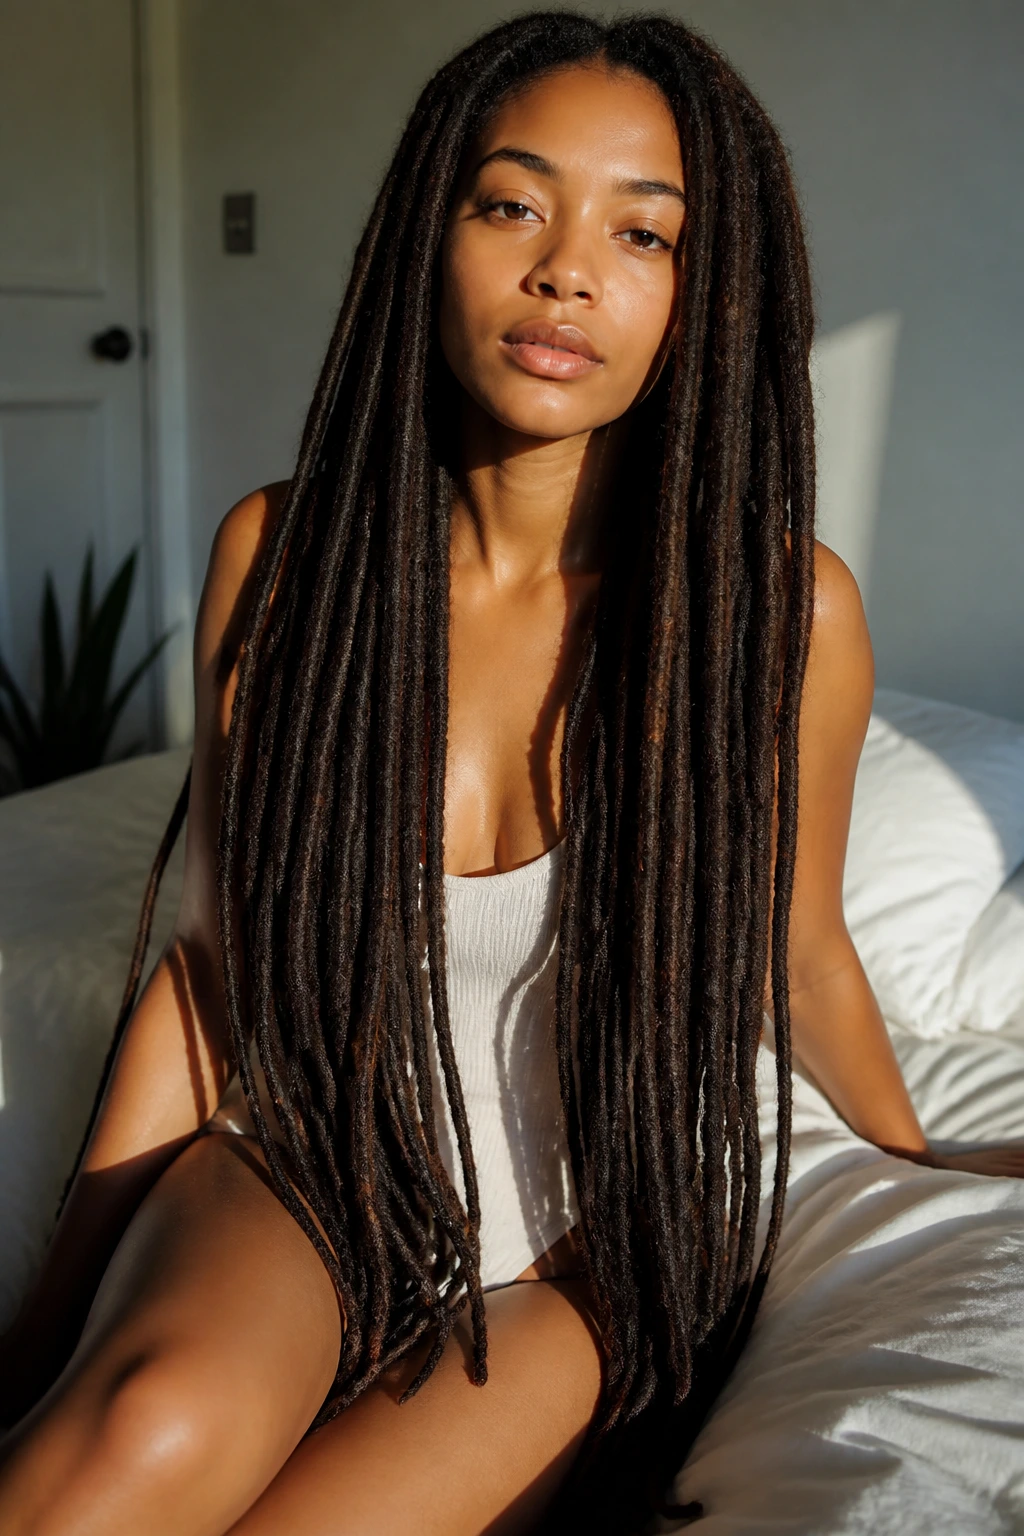
16. Very Long Locs (Waist and Below) with Simple Center Part and Loose Flow

Sometimes the most beautiful style is the simplest one. When you’ve got locs that have grown for years and reached extraordinary length, wearing them simply parted down the middle and flowing freely is genuinely stunning and shows off the full maturity and beauty of your locs.
Why Simple Works at Extreme Length
At waist-length and beyond, your locs are a work of art simply existing. Adding too much decoration or styling can actually diminish their impact. A center part creates symmetry and balance, and loose flow shows off length, thickness, and the individual character of each loc. This is confidence in its purest form.
Maintenance Details That Matter
- Keep the center part clean and defined by gently smoothing locs on each side
- Ensure your locs are well-moisturized and healthy—at this length, every loc’s health is visible
- Wear your locs down whenever possible to show them off (they’re a genuine accomplishment)
- Consider occasional deep conditioning treatments to maintain shine and health at this length
- Part your locs gently when sectioning—yanking at locs can create breakage, especially at longer lengths
Worth knowing: Locs at extreme lengths can be heavy, and that weight can create tension at the roots. Alternate wearing them down with occasional gentle updos to reduce constant root tension.
17. Medium Locs with Bohemian Shell and Bead Mix

Shell and bead combinations create a coastal, bohemian aesthetic that’s distinctly feminine and romantic. This works beautifully on medium-length locs and combines natural materials with intentional styling for a look that feels both free-spirited and carefully considered.
Sourcing Quality Shells and Beads
Look for actual shell beads rather than plastic shells—they’re not expensive, and the visual difference is significant. Mix sizes: use larger shells mixed with smaller seed beads for visual interest. Combine warm materials like wood, bone, and natural shells with cool materials like metal for contrast. The mix should feel intentional rather than random.
Strategic Placement for Bohemian Vibes
- Focus shell placement on locs that fall around your shoulders and chest (where they’ll be visible and catch light)
- Mix shells with smaller beads in clusters rather than spreading beads evenly
- Leave locs completely unadorned around the crown to keep the look light and not overwhelming
- Create depth by placing some decorations higher and some lower on individual locs
- Use thicker thread or thin cord to string multiple beads together for visual statement
Pro tip: Create bead strands ahead of time on separate cord, then tie them onto your locs rather than trying to attach individual beads. This is faster, holds better, and photographs more intentionally.
18. Short Locs (Neck-Length) in a Flat Twist Crown

A flat twist crown works beautifully on short locs and creates the kind of intricate, textured look that makes people ask how you did it. The good news: it’s actually not as difficult as it looks, and it’s a fantastic protective style that keeps short locs secure while showing them off.
Creating Flat Twists That Define Your Crown
- Take a small section of locs from one temple
- Divide into two strands
- Cross one strand over the other tightly, then add a new loc and continue twisting
- Work horizontally across your crown from temple to temple
- Create multiple rows of flat twists working from front to back for maximum detail
- Secure the final twist with a small elastic and pin if needed
Why Flat Twists Work for Protective Styling
Flat twists keep your locs secure without relying on heavy products or tight elastics. They look intentional and detailed, showing genuine care for your styling. On short locs especially, they create dimension and visual interest that reads as much more sophisticated than loose locs alone.
Quick safety note: Ensure each flat twist is comfortable and not pulling. You should be able to run your finger underneath easily. Flat twists should feel secure but not painful.
19. Back-Length Locs with Gold Foil Wraps and Statement Jewelry
Gold foil wraps create immediate glamour and sophistication, especially when paired with genuine statement jewelry. This is the style for times when you want to feel confident, elegant, and genuinely special.
Selecting and Applying Gold Foil Wraps
Gold foil wraps (sometimes called metallic foil wraps) are thin, flexible material that wraps around locs beautifully. They’re more substantial than thread but lighter than leather cuffs. Position wraps on select locs—primarily those framing your face and strategic locs throughout your back. Each wrap should be at least one and a half inches of visible gold for genuine visual impact.
Pairing with Statement Jewelry
Gold foil wraps pair beautifully with gold jewelry. Choose pieces that feel genuinely special: gold hoops if you wear earrings, a gold pendant necklace, gold rings. The gold echo creates cohesion and makes the entire look feel intentional and elevated. This is elegant without trying too hard.
Worth knowing: Gold foil wraps can eventually crack or peel, but they last for weeks with care. Avoid excessive heat (don’t apply heat styling tools directly to foil wraps) and they’ll maintain their shine beautifully.
20. Thigh-Length Locs with Minimal Styling (The “No Style” Style)
The final style is actually having no particular style at all—just your mature, beautiful locs in their natural state. This is confidence, fullness, and genuine self-acceptance. For locs that have reached thigh-length or beyond, this is often the most stunning option.
The Power of “No Style”
There’s something genuinely powerful about locs at full maturity, worn down without specific styling, decoration, or products. You’re letting your hair’s full length, thickness, and character speak for itself. This reads as secure, grounded, and authentically beautiful. It takes years of commitment to reach this point, and wearing your locs simply and freely honors that journey.
Maintenance That Shows Your Commitment
- Keep your locs clean with regular washing (dreadlocks actually clean easily with the right method)
- Deep condition regularly to maintain shine and health
- Get locs retwisted or maintained every four to six weeks depending on your texture
- Protect locs while sleeping with a silk or satin bonnet to prevent frizz and breakage
- Celebrate the full length and maturity by wearing them down frequently
Real talk: This is the style that takes the most time to achieve because it requires genuine maturity and health in your locs. But once you reach it, it’s the easiest style to maintain and the most genuinely beautiful.
Final Thoughts
The style you choose isn’t permanent. You can rock a sleek ponytail one day, colorful beads the next, and a romantic crown braid for the weekend. Dreadlocks give you freedom to express different versions of yourself at different times, in different moods, for different occasions. Whether you’re just starting your locs journey with short baby locs or you’re years in with locs past your hips, there’s a style here that speaks to who you are in this moment.
The real secret to beautiful dreadlock styling isn’t finding one perfect style—it’s understanding that dreadlocks are a genuinely flexible canvas for creative expression. Your locs will mature, evolve, and change over time. You’ll discover styling techniques that feel like second nature. You’ll develop a sense of what works with your face shape, your daily life, your aesthetic. And you’ll have the freedom to change it all next week if the mood strikes.
What matters most is that your locs feel healthy, that your styling respects them and doesn’t create unnecessary tension, and that you’re genuinely enjoying the styling process. The styles that look best are always the ones you’re actually wearing confidently, not the ones you’re forcing yourself into for the camera. Start experimenting with the styles here, adapt them to your specific hair length and texture, and make them your own. Your locs are uniquely yours—your styling should be too.