Homecoming deserves a hairstyle that makes you feel confident and special, but finding something that works with short hair can feel limiting if you don’t know where to look. The truth is, short hair offers some of the most flexible, flattering styling options out there — you can create texture, dimension, and polished looks that longer hair can’t always pull off as easily. Whether you’ve got a pixie cut, a bob, a lob, or an undercut, there are dozens of ways to elevate your look for the dance without extensions, complicated braiding, or styles that require hours at the salon.
Short hair homecoming styles thrive on texture, strategic placement, and creative accessorizing rather than pure length. A well-placed braid, some carefully crafted waves, a clever half-up arrangement, or even just the right amount of volume in exactly the right spot can transform a casual everyday style into something that photographs beautifully and turns heads on the dance floor. The best part? Most of these styles hold up through hours of dancing, don’t require you to keep your head perfectly still, and actually feel lighter and more comfortable than elaborate long-hair styles.
What follows are ten genuinely cute homecoming hairstyles designed specifically for short hair — each with exact styling steps, the products and tools that make a difference, and honest tips for making them work with your particular hair texture and length. Whether you’re going for romantic, edgy, polished, or playful, you’ll find something here that feels like you and fits the vibe you’re going for on homecoming night.
1. Textured Crown Braid
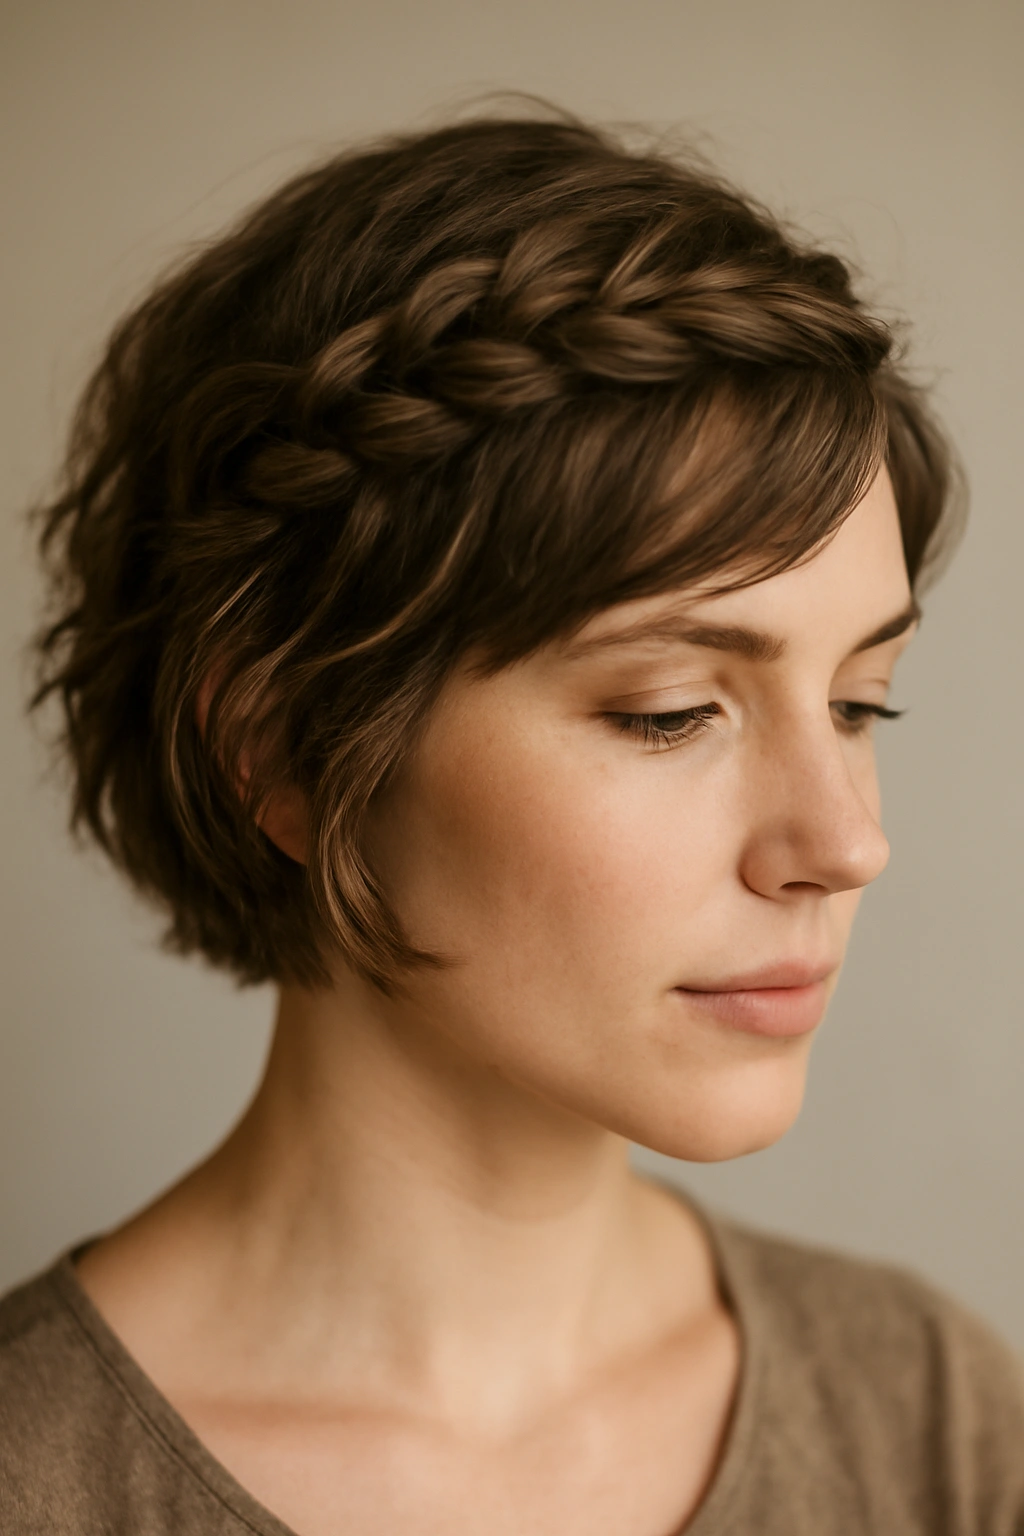
A crown braid works beautifully on short hair because it traces your face without requiring you to sacrifice length, and it’s instantly more interesting than a standard style. The braid sits along the top of your head, creating a romantic frame that draws attention to your face and looks elegant in photos. For short hair, this style benefits from slightly undone texture that makes it feel modern and intentional rather than formal or stiff.
Why It Works for Homecoming
Crown braids feel special and dressy without looking overdone, which is the sweet spot for homecoming. The braid adds dimension and visual interest on top while leaving the rest of your hair free to move, so you get both elegance and comfort. This style photographs beautifully from multiple angles, frames your face in the most flattering way, and works whether you’re going for romantic, boho, or polished vibes. It also suits virtually any short hair length from a chin-length bob to a longer pixie cut.
How to Create the Crown Braid
- Prep your hair with a texturizing spray or light mousse to give the braid something to grip — straight, smooth hair is much harder to braid
- Section off hair from one side of your head (about ear level), starting at the temple, and begin a loose Dutch braid (braiding under rather than over, which creates a raised, dimensional effect)
- Continue the braid around the back of your head, incorporating sections as you go, aiming for a braid that curves along your crown
- End the braid on the opposite side near your ear, and tuck the tail behind your ear or pin it subtly with a bobby pin that matches your hair color
- Gently pull and tease the braid slightly to loosen it and increase texture — a perfectly tight braid looks amateur, but a slightly relaxed braid looks intentional
- Pin any flyaways with a lightweight hairspray, and consider adding a delicate crystal or pearl hair pin at the front of the braid for a touch of shimmer
Pro tip: Do this style on hair that’s been washed the day before — day-old hair holds braids much better and has more natural texture to grip than freshly shampooed hair.
2. Sleek Side Sweep
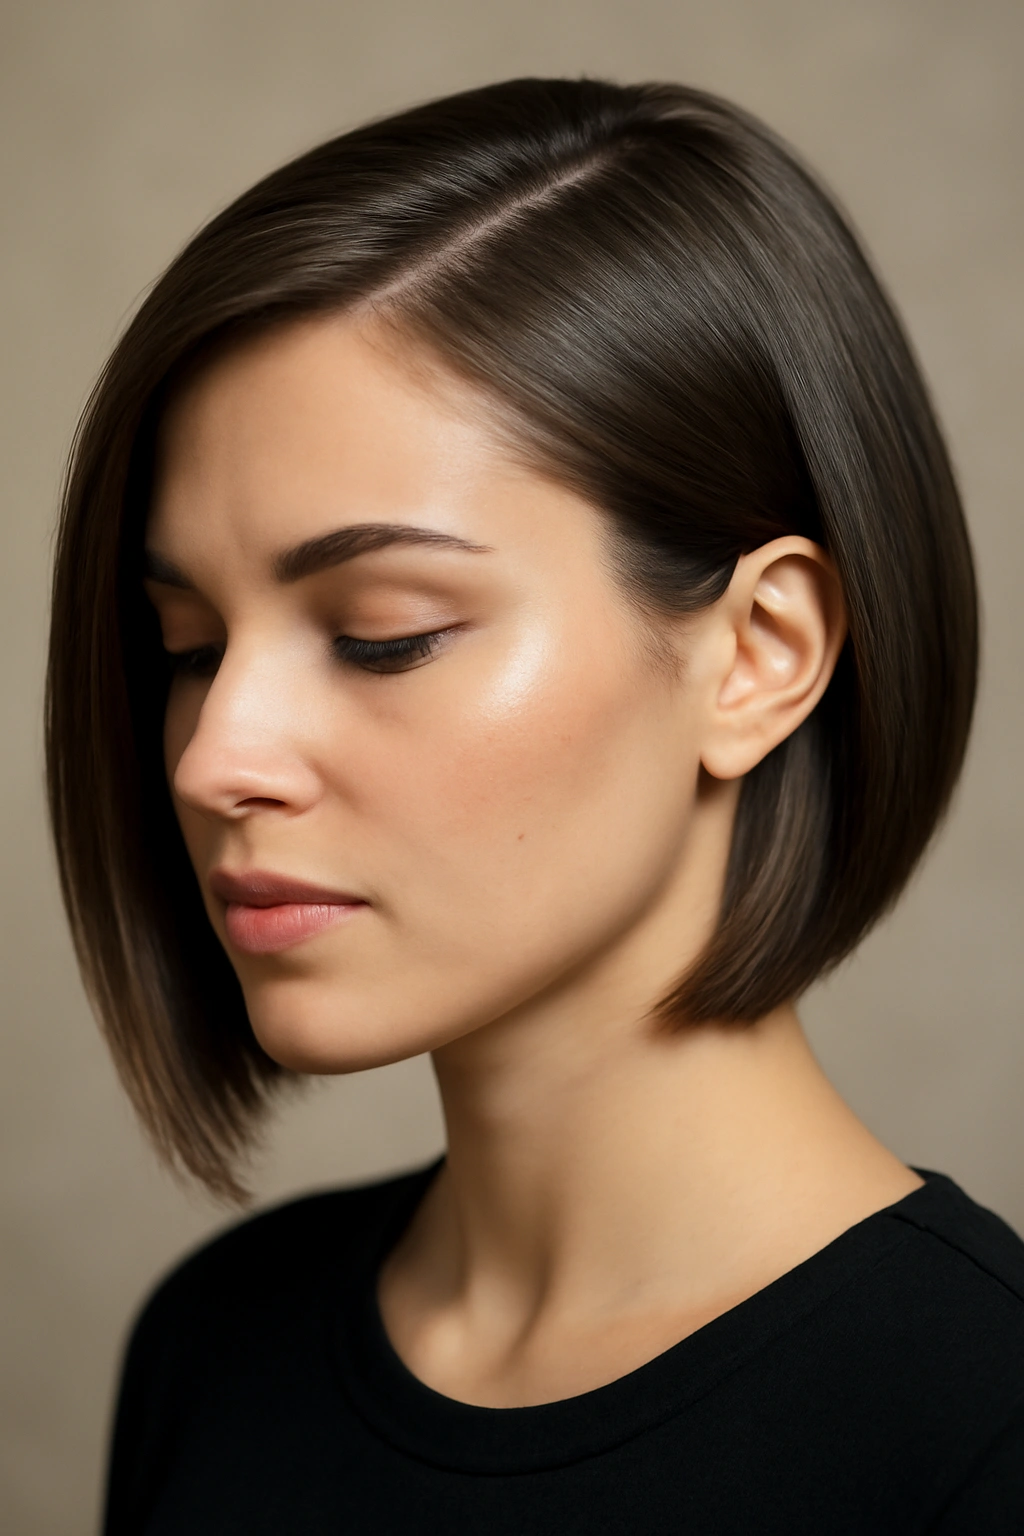
A sleek side sweep is modern, flattering, and requires less styling effort than elaborate updos, making it perfect for someone who wants to look put-together without spending an hour getting ready. You’re smoothly sweeping your hair to one side, creating a dramatic diagonal line across your head that’s inherently more interesting than a center part. This style works especially well for bobs and shoulder-grazing cuts.
Why It Works for Homecoming
The side sweep is unexpectedly sophisticated — it looks deliberate and styled without being fussy or overdone. It creates visual interest through direction and placement rather than braids or curls, which means it can work beautifully even on straight hair. The diagonal line created by the sweep is flattering for most face shapes, and it keeps hair off one side of your face while leaving movement and texture on the other side. You get that polished homecoming look without the time commitment.
How to Create the Side Sweep
- Start with hair that has some natural texture or body — blow-dry with a round brush, lifting hair at the roots, or use a texturizing spray if your hair tends to be flat
- Apply a smoothing serum to your hands and glide it through the hair you’re sweeping, concentrating on the lengths rather than soaking the roots
- Create a deep side part — instead of a traditional part, shift your part significantly to one side, almost to the outer edge of your eyebrow
- Using a boar-bristle brush, smooth the hair from your part down and over to the opposite side, creating that diagonal sweep
- Pin the swept hair gently underneath or behind your ear with bobby pins that match your hair color, securing it just enough that it stays swept through the evening but doesn’t look pinned up
- Smooth the top section with a light hairspray to tame flyaways while maintaining movement and shine
Pro tip: Choose which side to sweep based on which side of your face you prefer to have visible in photos — the side you sweep toward should be your best angle.
3. Twisted Half-Up Look
A twisted half-up style splits the difference between an updo and wearing your hair down, giving you volume and sophistication without full commitment to an updos. You’re creating two twists on either side of your head, wrapping them around the back, and securing them with a clip or pins. It’s romantic, wearable, and simple enough that you could actually recreate it if it falls slightly throughout the night.
Why It Works for Homecoming
The twisted half-up works for virtually every short hair length and texture because it doesn’t require your hair to be particularly long — the twists just need enough length to reach around to the back of your head and secure. It’s way more interesting than a simple half-up ponytail because the twists add dimension and movement, but it’s much easier than braiding. The style feels intentionally put-together without looking costume-y or overdone.
How to Create the Twisted Half-Up
- Start with dry or lightly damp hair with some texture — use a texturizing spray if needed to make hair easier to twist and hold
- Section off hair from above your right ear in a 2-inch-wide section, starting at the temple and extending back toward the crown
- Twist this section away from your face (twisting down toward your jaw rather than up toward the back of your head), maintaining a fairly loose twist — tight twists look immature
- Do the same thing on the left side, creating a similar twist
- Bring both twists around to the back of your head, crossing them or laying them parallel to each other
- Secure both twists with an ornate bobby pin, a small claw clip in gold or rose gold, or by twisting them together and pinning them with hair-colored pins
- Gently tease and loosen the twists slightly to create more texture and a more effortless appearance
- Use a light hairspray to secure the style while maintaining movement
Pro tip: If your hair is very short (pixie-length), you can create a single twist on each side and just pin them at the sides of your head rather than bringing them to the back.
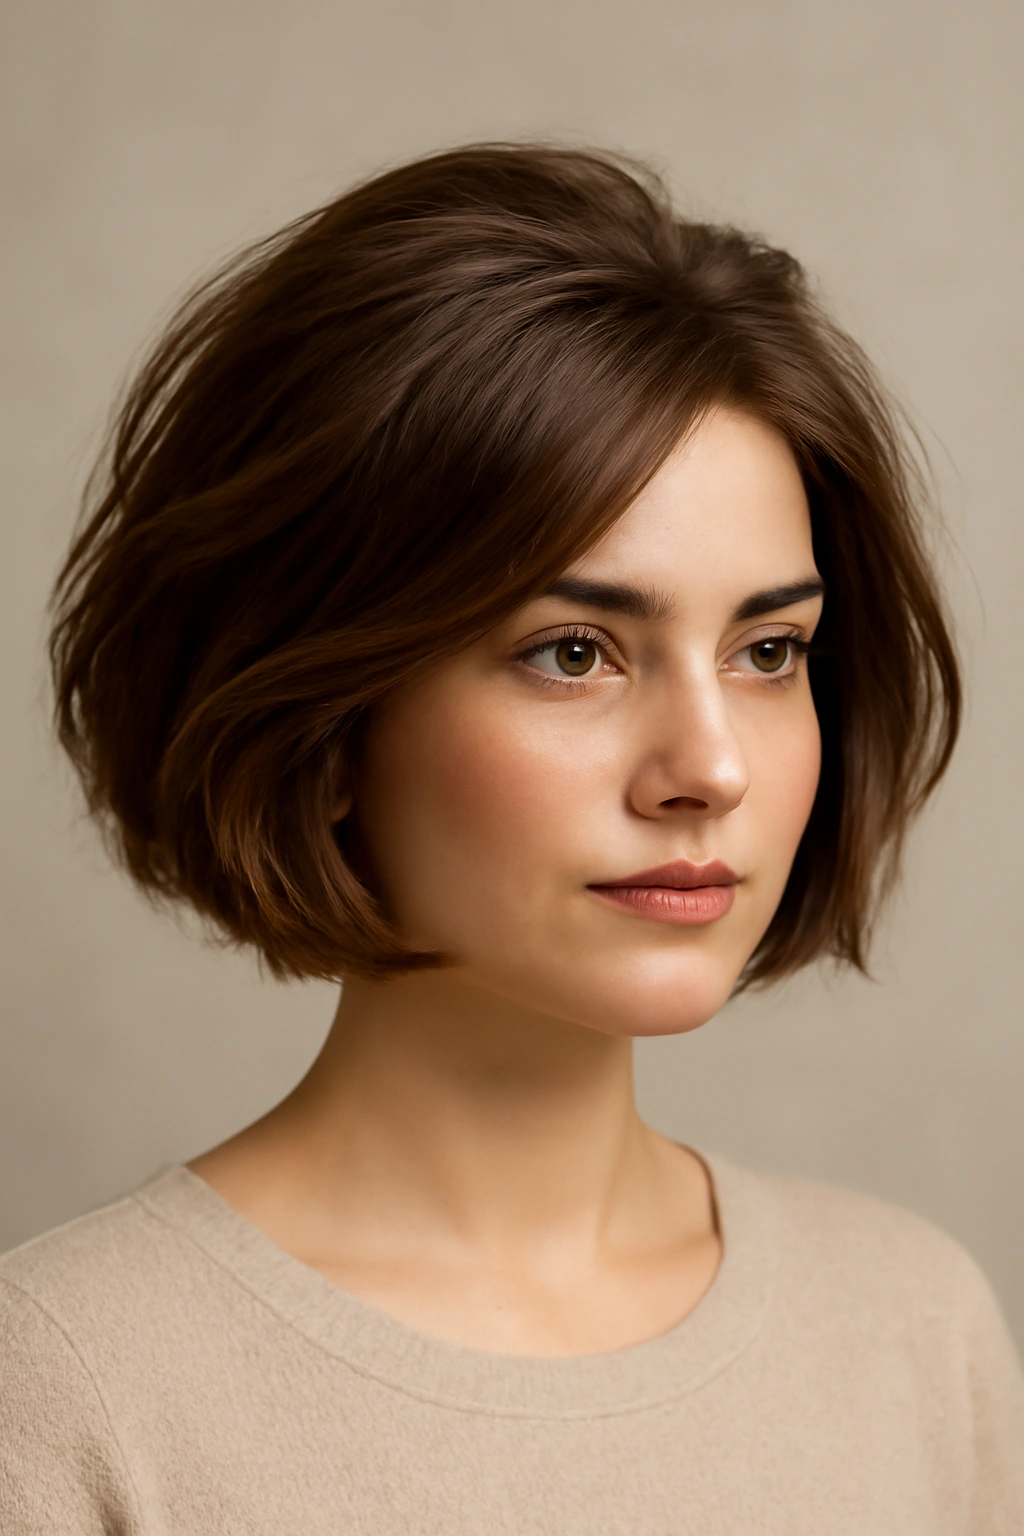
4. Pixie Shag with Texture
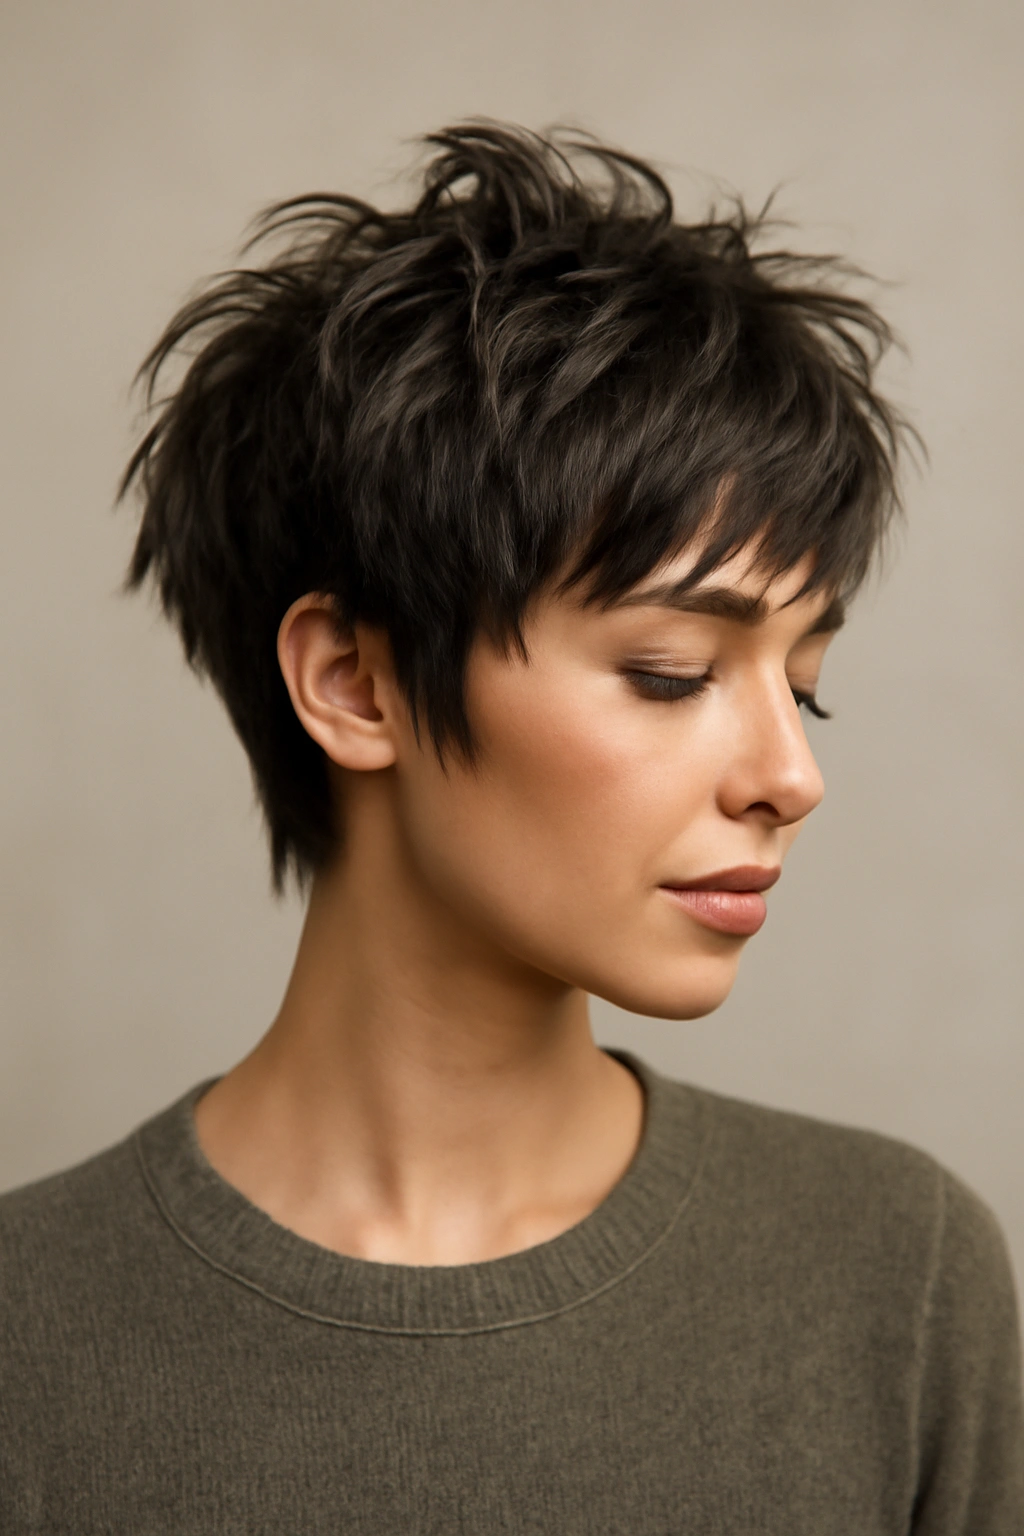
If you’re wearing a pixie cut or very short cut, lean into it with a shaggy, textured style that creates movement and dimension throughout your entire head. A pixie shag intentionally embraces shorter layers and uses product and styling direction to create a piece-y, modern look that’s youthful and bold. This is the ideal homecoming style if you love your short cut and want to show it off rather than mask it.
Why It Works for Homecoming
A pixie shag is fundamentally a statement style — it shows confidence and works beautifully for anyone who’s chosen short hair intentionally. The texture and movement make it interesting in photos, and the styled, piece-y quality reads as intentional and fashion-forward. Unlike longer styles, a pixie shag holds up perfectly through dancing and movement because the cut itself is designed to move. It suits edgy, modern, or tomboy-chic homecoming vibes beautifully.
How to Create the Pixie Shag
- Work with slightly damp hair that you’ve towel-dried (not soaking wet)
- Apply a volumizing mousse to your roots and massage it in, focusing on the crown where you want height
- Blow-dry your hair in multiple directions, lifting your roots and creating movement — don’t blow-dry it flat, but instead direct the airflow to create texture
- Once your hair is fully dry, apply a texturizing spray or matte clay product to the ends and through the mid-lengths, scrunchily running your fingers through to distribute it
- With your fingers (not a brush or comb), piece out sections of hair, working upward and backward to create a tousled, intentionally messy texture
- The goal is defined strands and visible texture throughout, not a smooth, uniform style
- Add a small amount of light shine spray to the tips if desired for a polished-but-textured finish
Pro tip: Ask your stylist for choppy layers and a shaggy cut specifically if you haven’t had one before — the cut itself is what makes a pixie shag work, not just the styling.
5. Low Twisted Ponytail
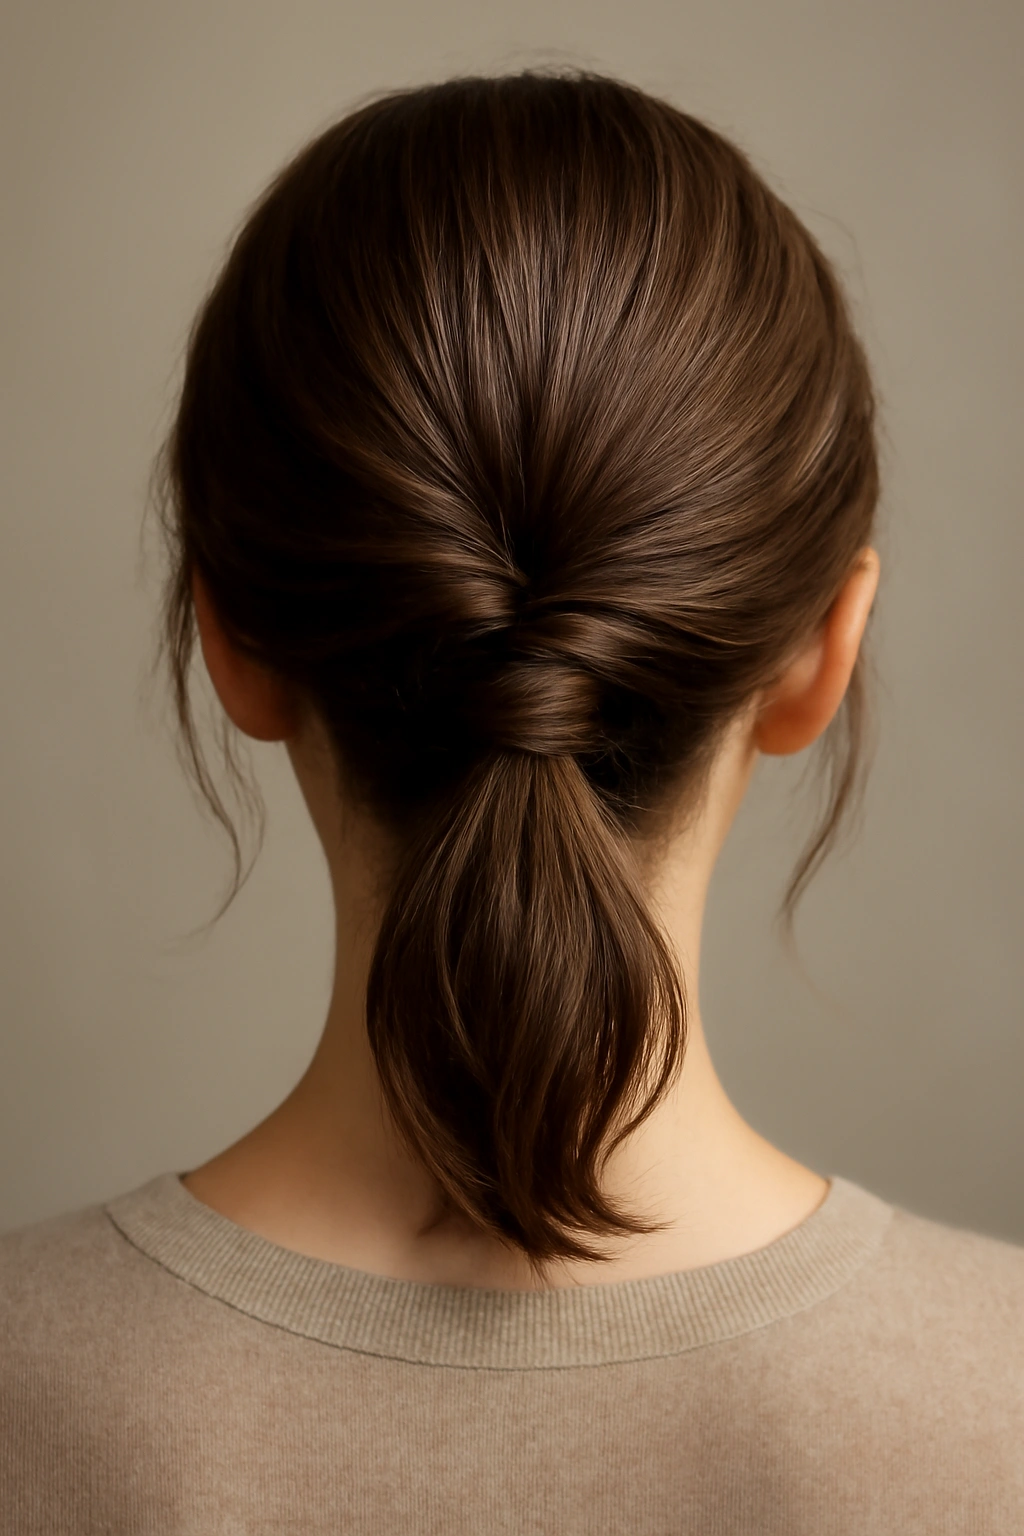
A low ponytail is the definition of elegant and simple, and adding twists around the base elevates it from everyday to special-occasion-worthy without requiring you to do anything complicated. You’re creating a low ponytail at the nape of your neck and wrapping twisted sections of hair around the elastic, creating texture and visual interest at the base. It’s the kind of style that lets your face and your outfit do the talking.
Why It Works for Homecoming
Low ponytails are effortlessly sophisticated and work for any hair length from a longer pixie to shoulder-length hair. The twisted wrap adds a detail that transforms a basic style into something intentionally styled, and the low placement is flattering and mature without looking overdone. This style photographs beautifully because it’s clean and uncluttered, and it stays secure through hours of dancing and movement. It also gives you the option to add a hair accessory — a delicate barrette, a silk hair tie, or even a small fresh flower — for extra personality.
How to Create the Low Twisted Ponytail
- Apply a smoothing serum and a light hairspray to your hair, then blow-dry it smooth with a round brush for a polished base
- Create a deep center or side part, depending on which direction feels more flattering for your face
- Gather your hair at the nape of your neck (very low, just above where your neck meets your shoulders) and secure it with a hair elastic that matches your hair color
- Take a small 1-inch section of hair from the side of your face and twist it gently, then wrap it around the base of your ponytail and secure it with a bobby pin
- Repeat this on the other side, creating a second twisted wrap on the opposite side of the ponytail base
- You can also take a thin section from the front of the ponytail itself, twist it, and wrap it around the elastic to completely hide the elastic
- Use a fine-tooth comb to smooth the ponytail tail, and apply a light hairspray to keep everything in place
Pro tip: Curl the ponytail tail with a 1.25-inch curling iron for loose waves that catch light and add movement, making the style feel less severe.
6. Face-Framing Curls
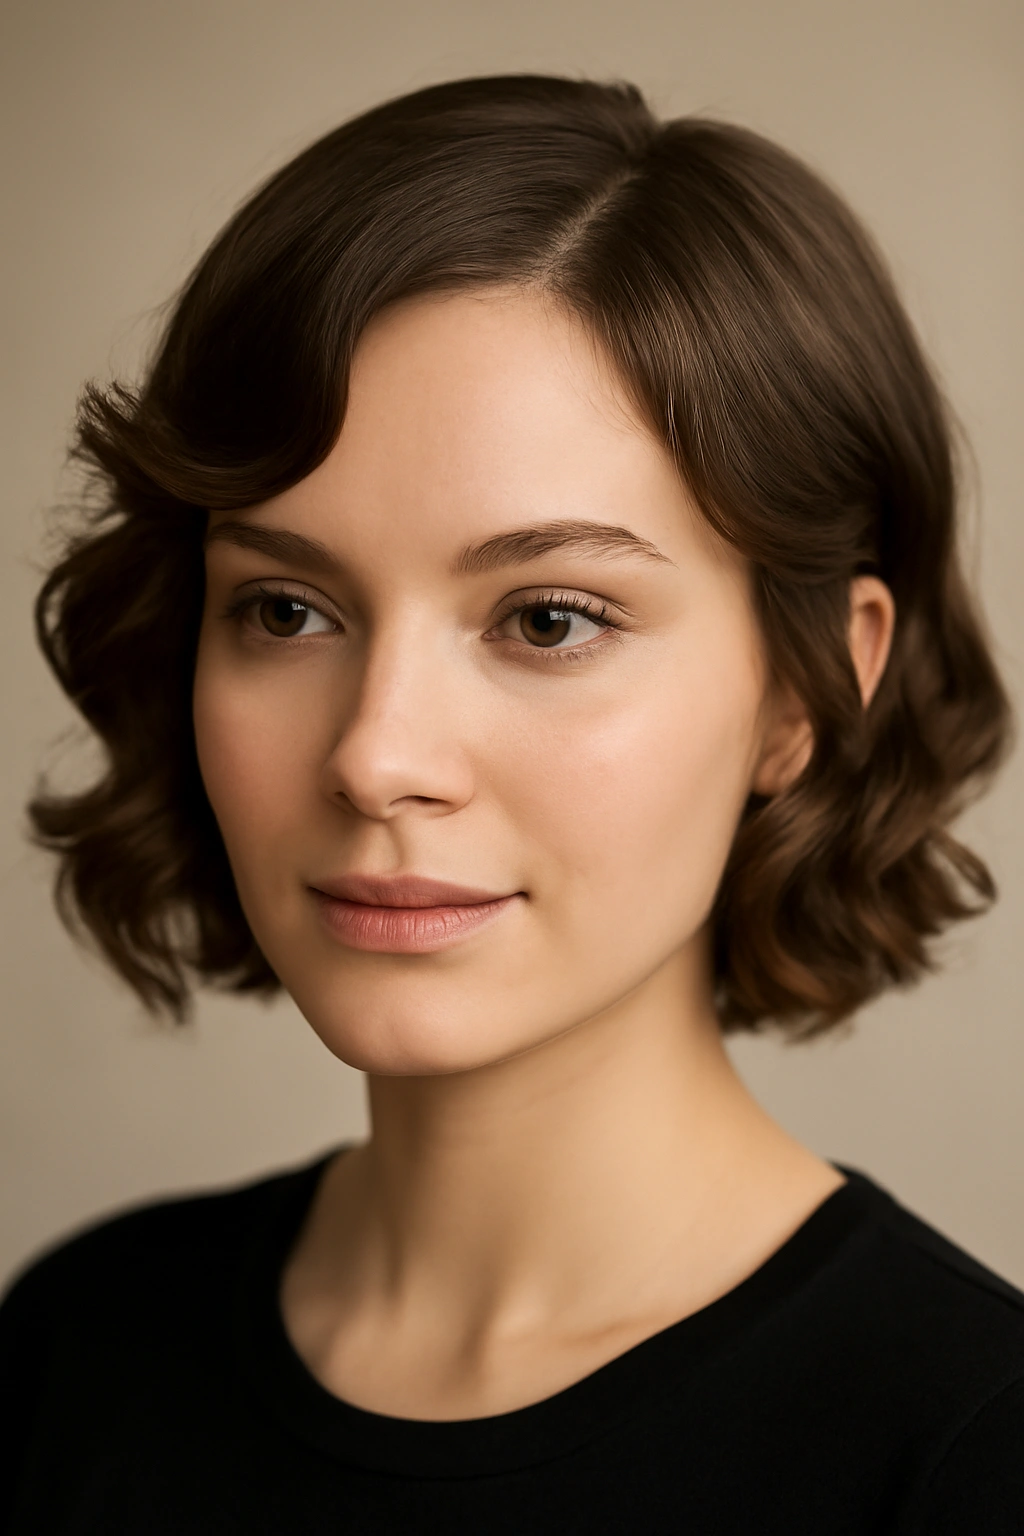
If you want all the impact of curls and waves but you’re working with shorter hair, face-framing curls are your answer. You’re creating soft, intentional curls only at the very front of your face — around your temples and cheekbones — while leaving the rest of your hair smooth or textured. This style is incredibly flattering because curls around the face open up your features and create a romantic, soft effect.
Why It Works for Homecoming
Face-framing curls work on any short hair length because you only need to curl the front sections, which means even very short hair can accommodate this style. The curls around your face are instantly youthful and romantic, and they’re the perfect amount of styling without looking over-the-top. This style photographs beautifully because curls catch light and create dimension, and the placement draws attention to your face and eyes. You get the benefit of curled hair without the commitment of full head curls, which can feel heavy or overdone.
How to Create Face-Framing Curls
- Start with hair that’s been blow-dried smooth as a base
- Section off a 2-inch section of hair on one side of your face, starting at the temple
- Using a 1.25-inch or 1.5-inch curling iron, wrap the section around the barrel, holding the iron horizontally and curling away from your face
- Hold the curl on the iron for 8-10 seconds (longer hold = tighter, longer-lasting curl), then gently release it and let it cool in your hand for a few seconds before releasing it completely
- Repeat on the other side of your face, curling away from your face on both sides for balance
- You can curl a few sections around your face, or just one small section on each side — adjust based on how curly you want the look
- Once the curls cool completely, gently separate them with your fingers or a wide-tooth comb to loosen them slightly
- Use a light hairspray to set the curls without making them stiff
Pro tip: Cool the curls down completely before touching them — curls are moldable while warm and won’t hold their shape if you release them too soon.
7. Faux Bob with Volume
If you have shoulder-length hair and want it to look shorter for homecoming, a faux bob creates that effect by pinning the underneath layer and creating volume and texture on top. You’re creating an illusion of a shorter, blunter cut without actually cutting anything. The style reads as bold and fashion-forward, and it creates interesting movement and dimension.
Why It Works for Homecoming
A faux bob is unexpected and interesting — it’s the kind of style that makes people do a double-take and ask how you did it. It works beautifully for creating visual interest without being overly complicated, and it gives you the benefit of length (for practicality) with the bold statement of a short cut. The style photographs well because of the texture and dimension, and it makes your hair look thicker and fuller. It’s also a low-risk way to experiment with a shorter look if you’ve been thinking about getting a cut.
How to Create the Faux Bob
- Start with hair that has some texture — use a texturizing spray or create waves with a curling iron before you start pinning
- Flip your head upside down and tease the roots at the crown and throughout the mid-lengths to create maximum volume
- Flip back up and smooth the top layer of hair with a boar-bristle brush and a smoothing serum
- Divide the underneath section (from ear to ear around the back of your head) into two halves
- Twist each half and pin it up and forward toward the crown, securing with bobby pins that are hidden under the top layer
- The pinned section should create a rounded, voluminous shape when you look from the back and sides
- The top layer should fall smoothly over the pinned section, creating the illusion of a blunt, full bob
- Use a light hairspray to tame flyaways and maintain the shape
Pro tip: Practice this style before homecoming so you know exactly how much hair to pin and how to hide the pins — the hidden pins should be completely invisible under the top layer.
8. Braided Halo Style

A braided halo is a romantic, ethereal style where a braid (or two thinner braids) wraps around your entire head like a crown, creating an angelic, dreamy effect. On short hair, this works beautifully with loose, textured braids that feel soft and modern rather than formal. The halo braid frames your entire face and works especially well with waves or texture throughout your hair.
Why It Works for Homecoming
Braided halos are inherently romantic and special-occasion-appropriate, which is perfect for homecoming. The halo effect is universally flattering because it frames your face on all sides, and it works for virtually any short hair length from chin-length bobs to shoulder-length layers. The style reads as intentionally styled without looking costume-y, and it photographs beautifully from multiple angles. A halo braid also keeps hair neatly contained without an updo feeling, so it’s comfortable for hours of dancing.
How to Create the Braided Halo
- Prep your hair with texturizing spray to make braiding easier
- You can create a single thick braid or two thinner braids that overlap — decide based on your hair density and length
- For a single halo braid: Begin on one side at temple level and start a Dutch braid (braiding under), incorporating hair as you go around the back of your head, ending on the opposite side temple
- For two halo braids: Create two thinner Dutch braids, one on the top half of your head and one on the lower half, weaving them together at the back
- Pull and loosen the braid(s) gently to increase texture and create dimension — braids should look effortless, not tight and perfect
- Pin the end of the braid where it meets the opposite temple, tucking the tail behind your ear
- Add waves or curls to the rest of your hair for a soft, romantic overall effect
- Use a light hairspray to secure the style
Pro tip: Practice your braid(s) a few times before homecoming — it’ll help you understand how to incorporate the right amount of hair and achieve the right level of looseness for the look you want.
9. Tousled Waves with Statement Clip

Sometimes the simplest approach is the most effective — gorgeous tousled waves throughout your entire head, paired with a statement hair clip or claw clip on one side, create instant polish and personality. You’re not doing anything complicated, but the combination of texture and an accessory transforms the look from everyday to special-occasion. This style is perfect if you love your natural hair and want to enhance it rather than dramatically change it.
Why It Works for Homecoming
Tousled waves work for any hair length and texture, and they’re flattering on everyone because the soft, undone nature of the style suits multiple aesthetics. A statement clip adds personality and shows you’ve put thought into your look without requiring complex styling skills. The waves catch light beautifully in photos, and the softness of the style is inherently romantic. This is also the most comfortable option if you want to feel like yourself while still looking intentionally styled.
How to Create Tousled Waves with a Statement Clip
- Apply a heat-protectant spray to damp hair
- Blow-dry your hair smooth as a base, lifting roots for volume
- Using a 1.25-inch or 1.5-inch curling iron, curl sections of your hair away from your face, holding each curl on the iron for 10-15 seconds
- Work in sections throughout your entire head, curling the front, sides, and back
- Once all sections are curled, run your fingers through your hair to break up the curls and create soft waves rather than defined ringlets
- You should have soft, piece-y waves throughout your hair — not uniform curls
- Choose a section on one side of your head and clip a statement hair clip there — this could be a claw clip in tortoiseshell, gold, or a decorative barrette
- Use a light to medium hairspray to hold the waves without making them stiff
Pro tip: Wait 5-10 minutes after you curl each section before touching it — letting curls cool completely will make your waves last much longer through the night.
10. Slicked-Back Elegant Look
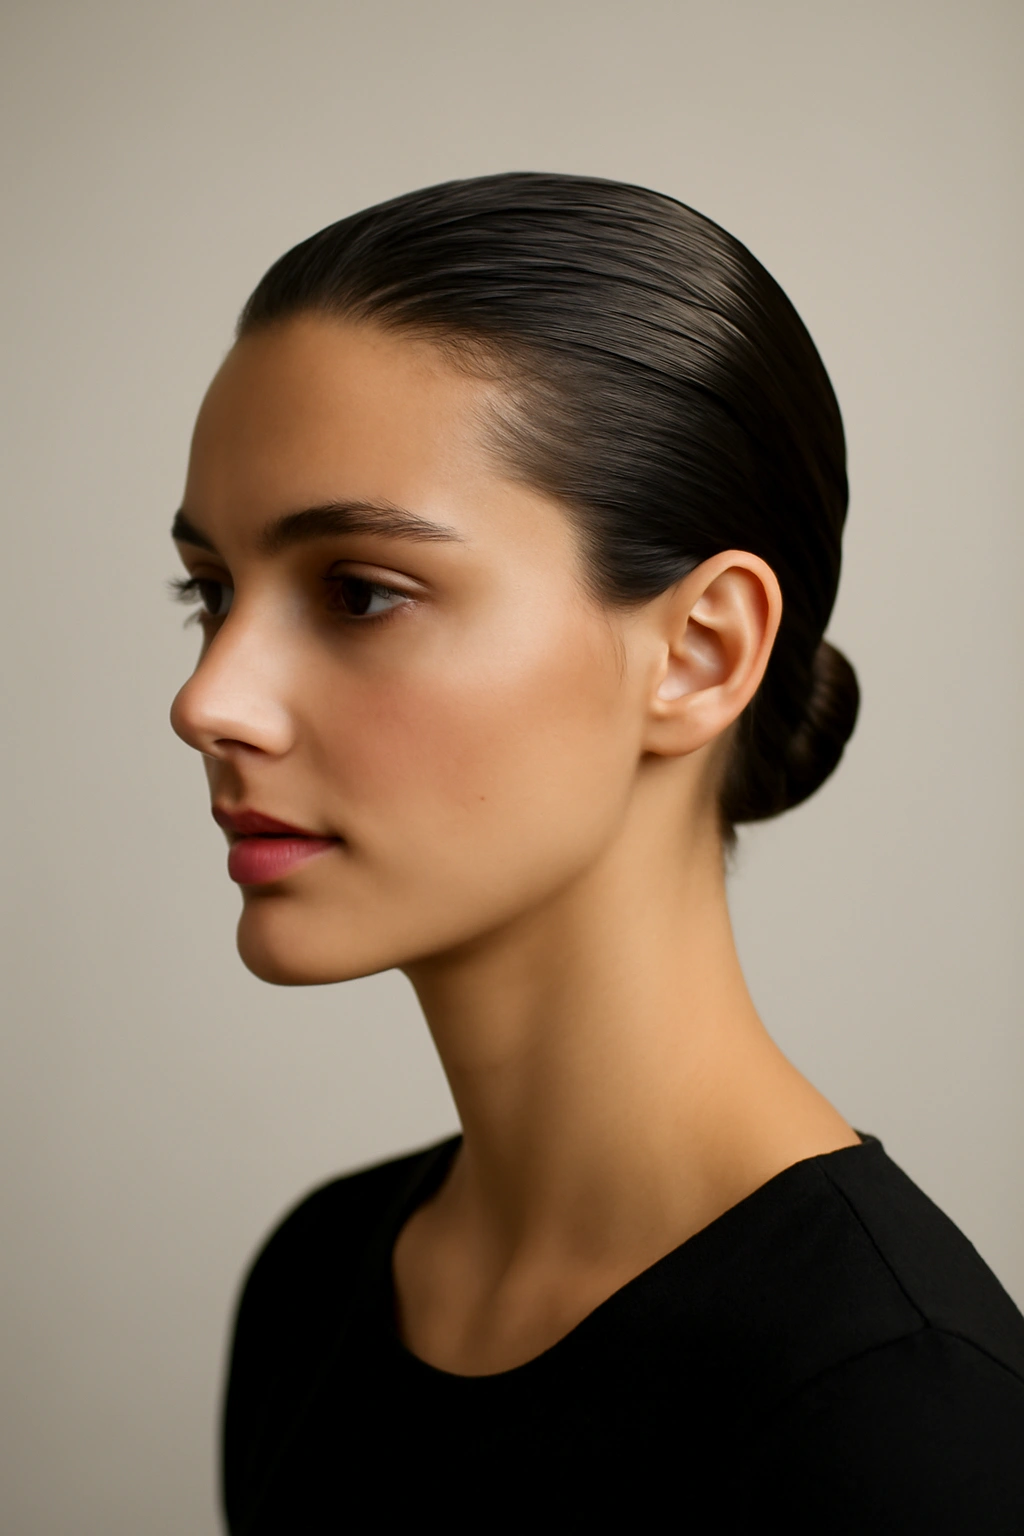
A slicked-back style is bold, modern, and surprisingly versatile — you’re smoothing your hair tightly back from your face and securing it low, creating a clean, polished aesthetic that’s perfect for showing off your face, makeup, and outfit. This works beautifully on short hair because the tightness of the look is intentional and flattering, not severe. It’s edgy enough to feel special but refined enough for a formal occasion.
Why It Works for Homecoming
Slicked-back styles are having a major moment in fashion because they’re modern, confident, and flattering when done well. The style emphasizes your facial features and bone structure, making it perfect if you’re proud of your makeup and complexion. It works on any short hair length and actually works better on shorter hair because the proportion is more balanced. The style is comfortable for dancing, stays in place through the evening, and photographs beautifully because there are no distracting wisps or layers — just clean, polished lines.
How to Create the Slicked-Back Elegant Look
- Start with hair that’s been shampooed and conditioned — this style works best on very clean hair
- While hair is still slightly damp, apply a smoothing serum to your hair, focusing on the mid-lengths and ends
- Blow-dry your hair smooth, directing the airflow downward to smooth the cuticle and create shine
- Apply a gel or smoothing cream to your hands and run them through your hair, smoothing everything back from your face and pulling it tightly away from your hairline
- Use a fine-tooth comb or a boar-bristle brush to smooth everything back, removing any bumps or flyaways
- Secure your hair at the back of your head with a low ponytail holder, a sleek bun, or just pin it flat against your head if you have very short hair
- Use a light hairspray to smooth any flyaways and secure the style, making sure the hairline is perfectly smooth
- Optional: add a delicate chain, a geometric hair clip, or a decorative barrette at the base for a touch of glamour
Pro tip: Use a gel specifically formulated for slicked-back styles — lighter products won’t hold the smooth style in place through the evening, and heavy oils can make your hair look greasy.
Final Thoughts

Your homecoming hairstyle should make you feel like the best version of yourself, and with short hair, that means finding a style that plays to your hair’s natural strengths rather than fighting against its length. Every style in this guide works specifically because it enhances rather than fights what you’ve got — whether that’s creating dimension through texture, using strategic placement to create impact, or simply polishing what you’re naturally working with.
The truth about short-hair styling is that you have more flexibility than you might think. You can do braids, you can do half-ups, you can do waves, and you can do everything in between. Choose the style that makes you feel most confident walking into homecoming, practice it once or twice before the big night so you know exactly how to recreate it, and don’t overthink it. The styles that feel effortless are the ones that make the biggest impact.