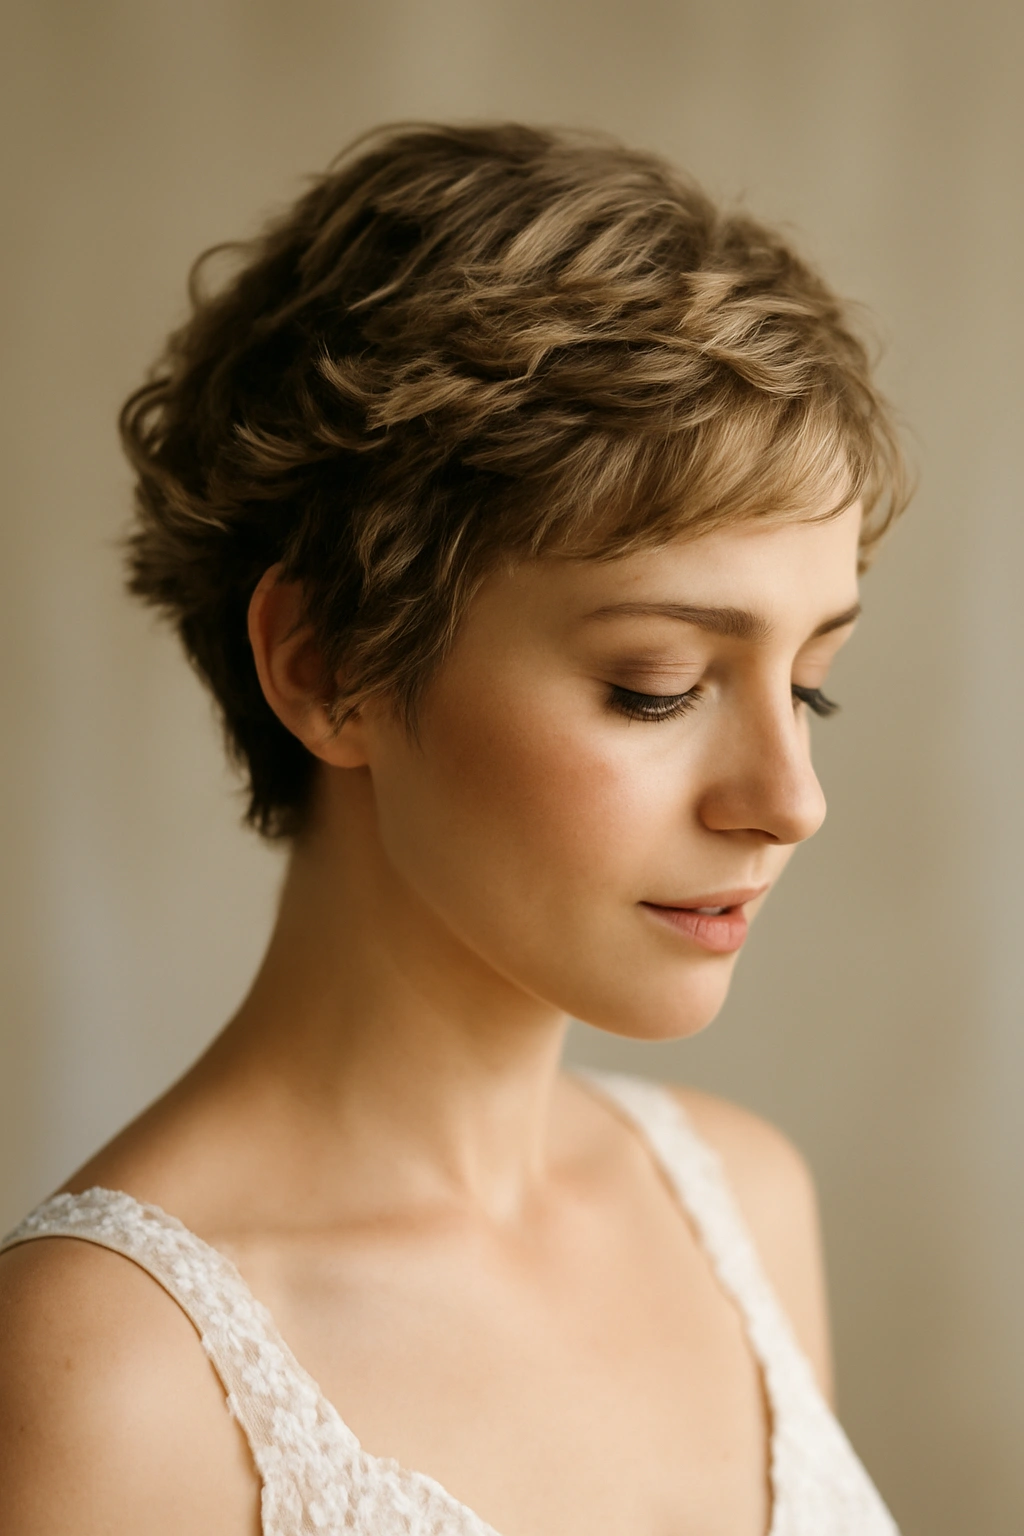
Short hair on a bride doesn’t mean limited options — it actually opens up possibilities that longer locks can’t pull off. The misconception that wedding hairstyles require floor-length tresses has kept countless short-haired brides second-guessing their cut, but the truth is that cropped, pixie, shoulder-length, and textured short styles create a stunning canvas for updos that feel modern, intentional, and incredibly romantic. The key difference? Short-haired updos prioritize texture, strategic pinning, and architectural design over sheer length. They reward precision and personality in ways that longer styles sometimes bury under layers.
What makes short-hair bridal updos so compelling is how they frame the face and draw attention to your features — your eyes, your smile, your collarbone, and the delicate nape of your neck. When styled with purpose, a short-hair updo becomes a sculptural element of your wedding look, not an afterthought. You’ve already chosen a cut that suits you; now you get to amplify that confidence with a style that plays to your hair’s natural strengths: movement, texture, and that enviable ability to look effortlessly polished without requiring three-hour styling sessions.
The updos in this guide range from romantic and soft to sleek and modern. Some work best with a little texture and waves; others shine with precision and clean lines. All of them are actually achievable — no unrealistic amount of volume, no miracles required. Each style includes real, practical details about how to execute it, what hair length and texture it works best with, and how to keep it locked in place through ceremony, reception, and dancing. Whether you’re rocking a chic pixie, a choppy crop, a textured shag, or a chin-length bob, you’ll find something here that feels authentically you.
1. Textured Crown Twist
A crown twist is the bridal updo that works for nearly every short-hair length and texture. This style winds a section of hair around the head like a halo, anchoring it with bobby pins as you twist, creating an effect that’s romantic without being fussy. The beauty of this approach lies in its flexibility — you can work with whatever natural texture your hair has, and in fact, tousled, lived-in texture looks more intentional than perfectly smooth hair.
Why This Works for Short Hair
The crown twist relies on width and dimension rather than length, which means even a chin-length bob can create a stunning halo effect. The twisting action adds visual interest and holds the style without requiring a ton of hair volume. This updo also flatters virtually every face shape because the softness of the twist (rather than a severe, pulled-back look) creates a romantic frame around your face. The placement of the twist can be adjusted — crown-forward for a delicate bridal look, or lower on the head for a more modern feel.
How to Execute It
Start with texture in your hair — either air-dry waves or loose curls created with a curling iron. Section off a piece of hair at one temple, approximately 2-3 inches wide, and begin twisting it away from your face, adding small sections of hair as you go around the back of your head toward the opposite temple. Use bobby pins to anchor the twist as you create it, tucking pins in so they’re hidden within the twist. Aim to create a loose, slightly undone appearance rather than a tight, controlled twist. Finish by gently pulling apart the twist to add volume and dimension — this technique, called “loosening” or “pancaking,” makes the braid look fuller and more textured. Secure any flyaways with lightweight hairspray.
Styling Notes and Modifications
If your hair is very short or fine, a thin crown twist that just skims the top of your head reads more elegantly than trying to create a thick twist that overwhelms your features. You can add small sprigs of baby’s breath, a delicate comb, or scattered pins for sparkle. For a more dramatic version, create two thinner twists that mirror each other and meet at the back, then secure them together and allow the ends to fall free or anchor them into a small knot.
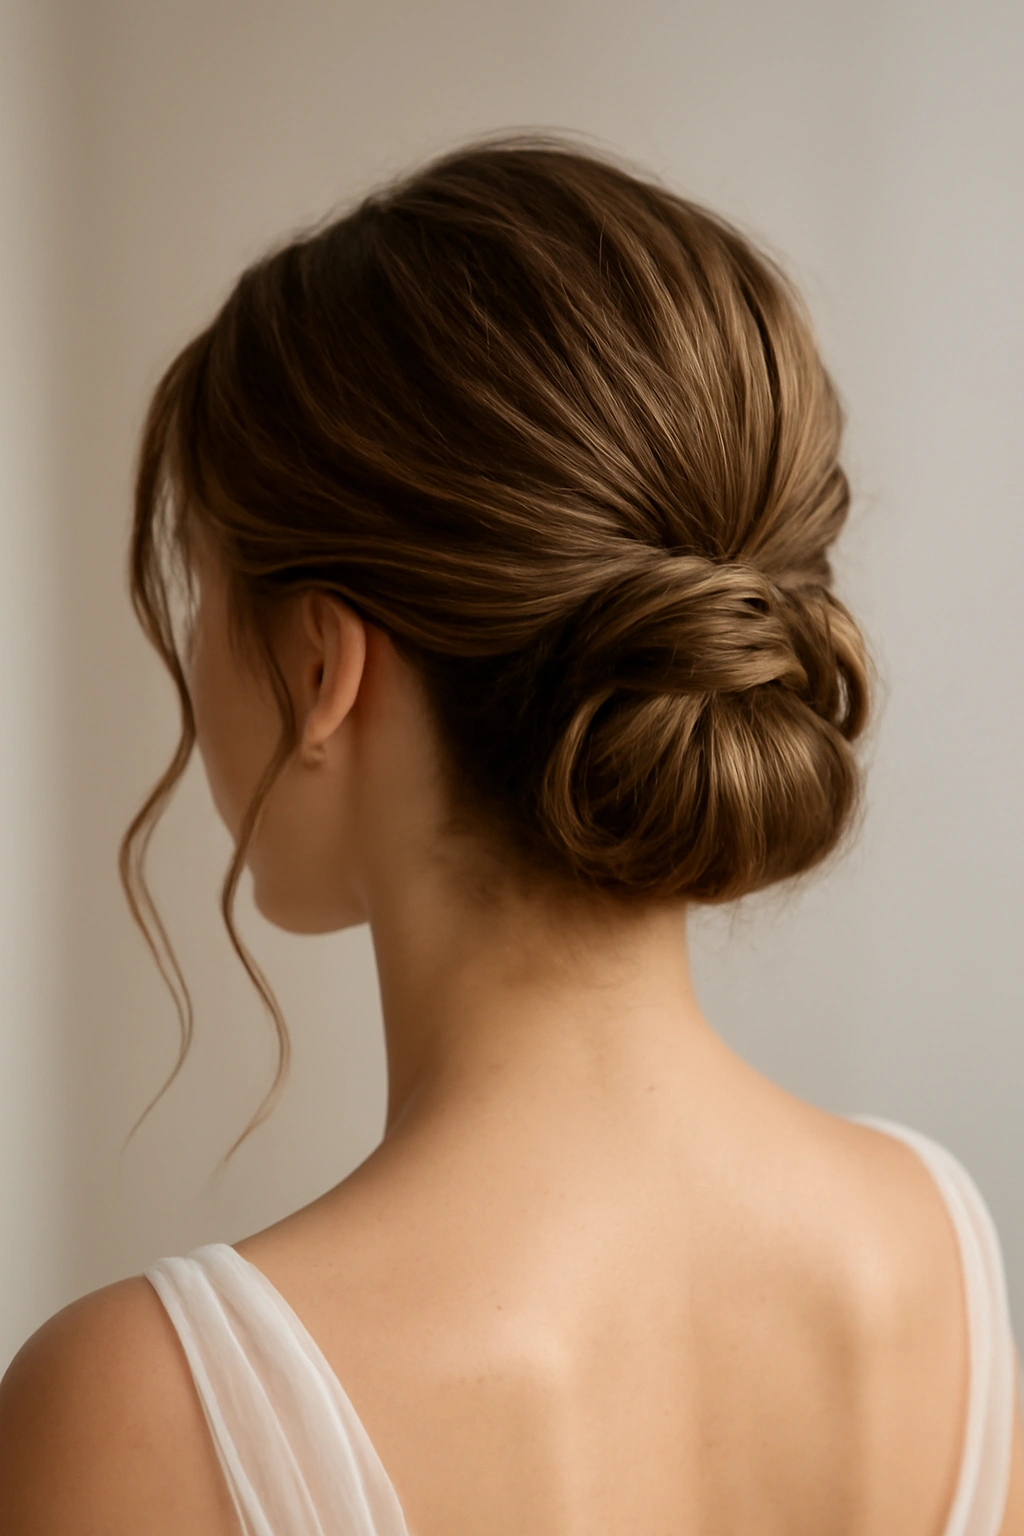
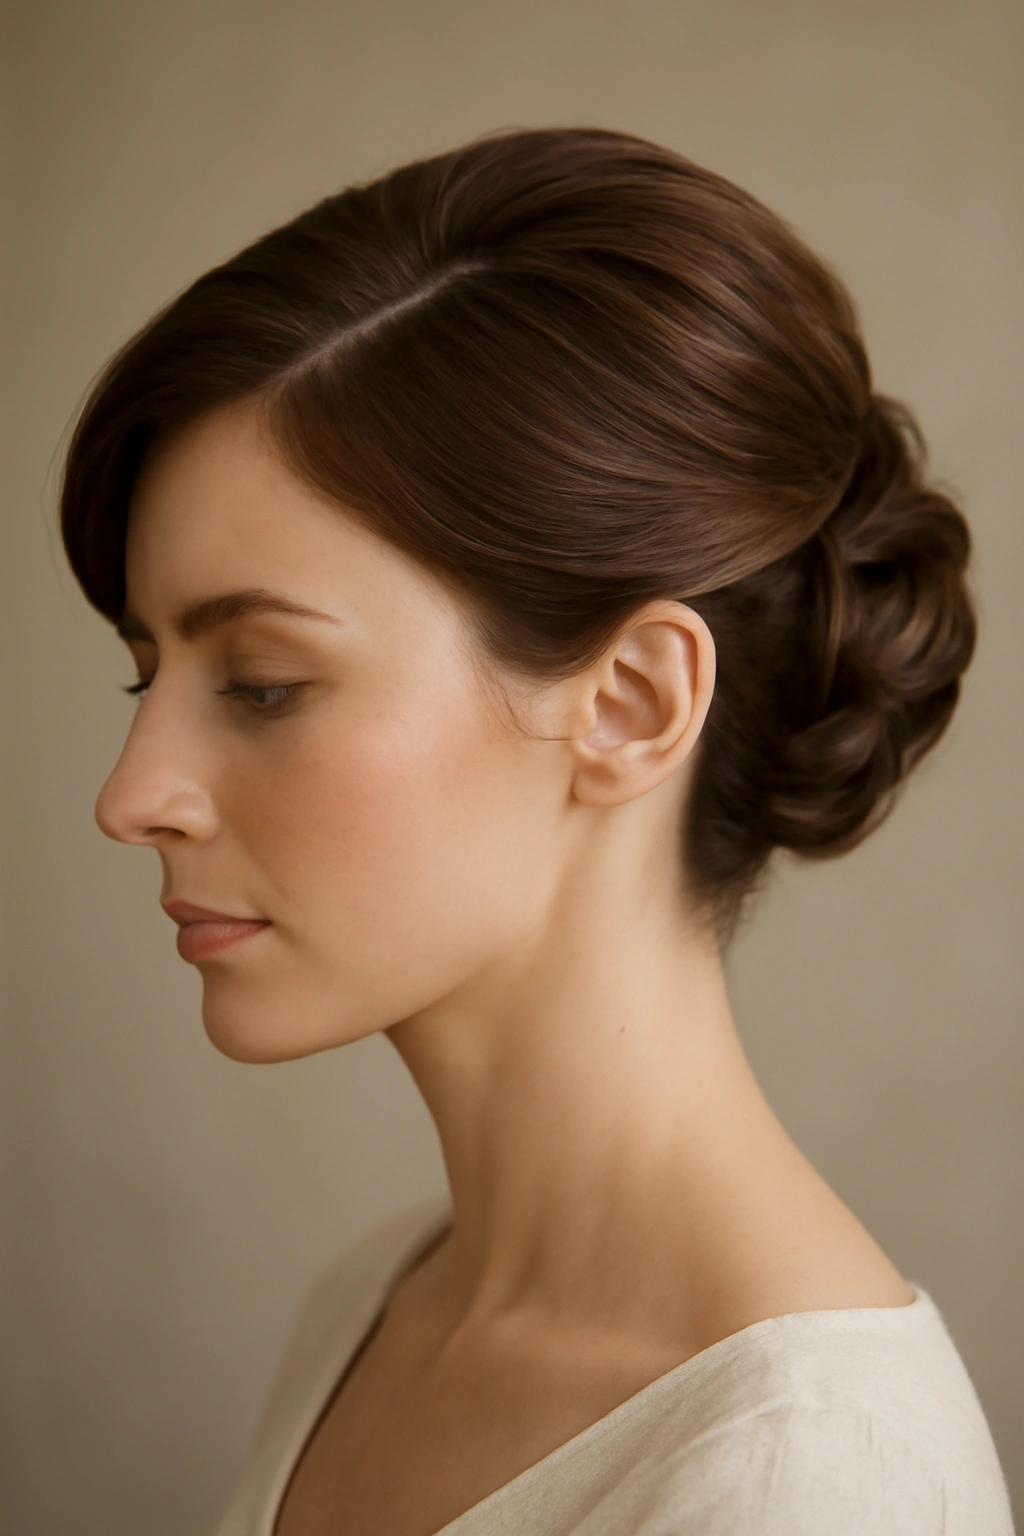
2. Low Sleek Bun with Face-Framing Pieces
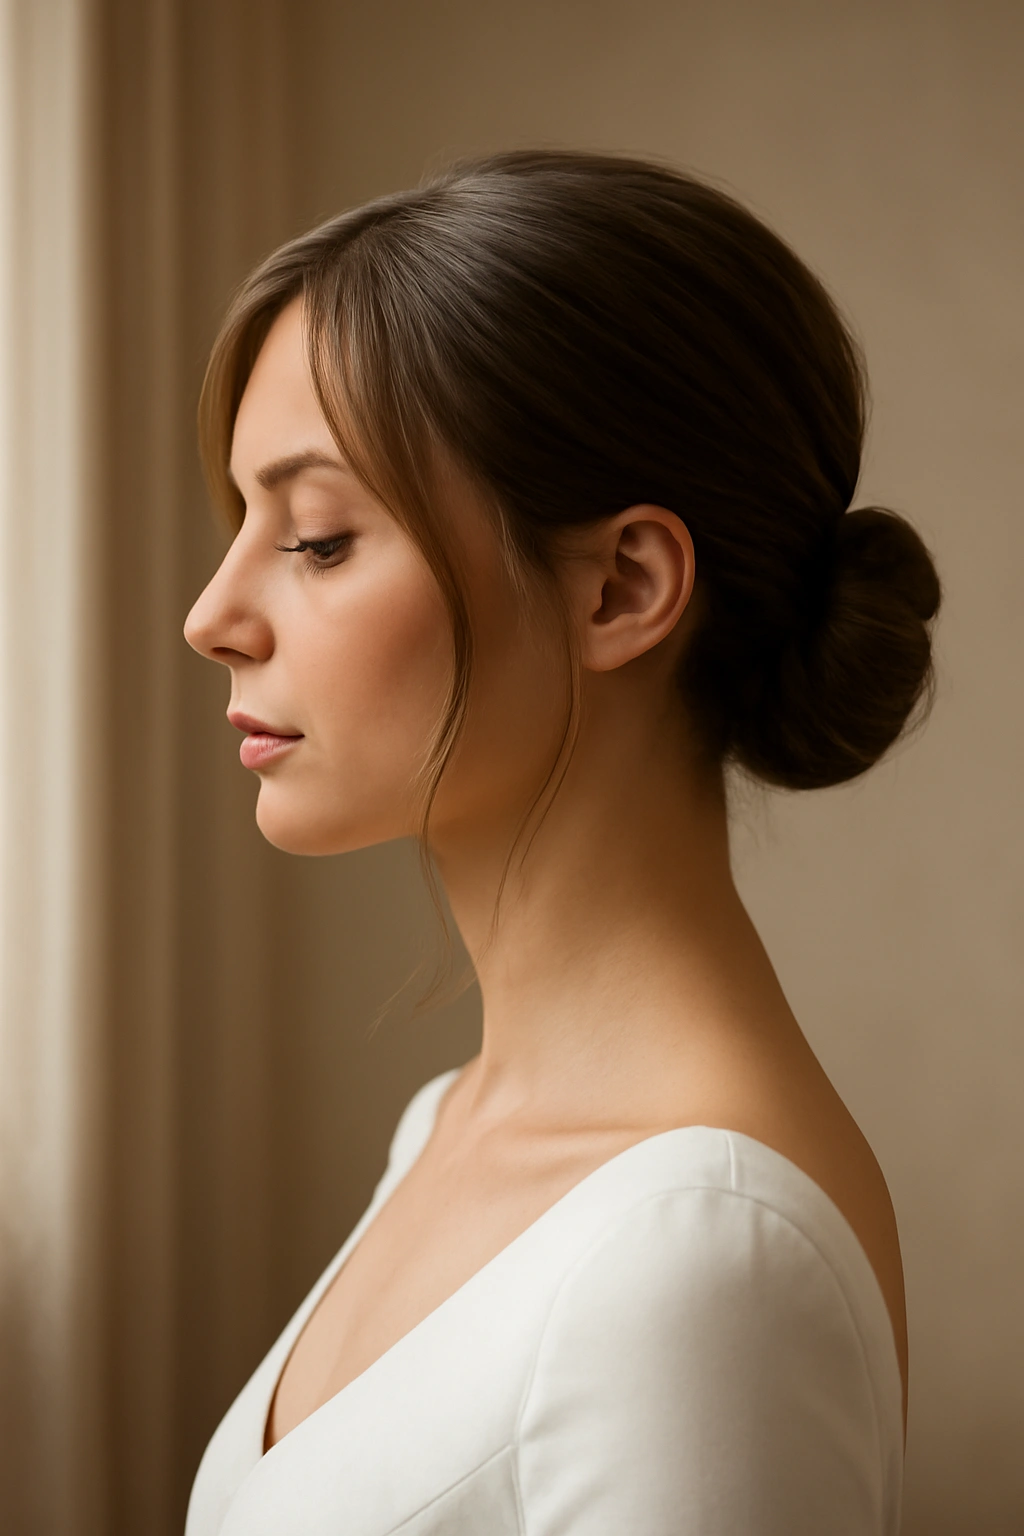
Sometimes the most timeless bridal look is also the simplest. A low bun — positioned at the nape of your neck, smooth and refined — signals pure elegance, especially when you deliberately frame your face with two or three wispy pieces that soften the style. This updo works exceptionally well for short hair because the clean lines emphasize bone structure and allow your wedding makeup and jewelry to take center stage.
Why This Works for Short Hair
A sleek low bun is the antidote to the feeling that short hair can’t be “formal” enough for a wedding. The polish and control of the bun style reads unmistakably bridal while your short length prevents the style from feeling heavy or dated. The face-framing pieces are the key detail — they break up the severity of the bun and create a softness that prevents the style from looking too austere. This approach also works brilliantly for brides with very fine or thin hair, because the low placement of the bun requires less hair volume than a higher placement, and the sleekness doesn’t emphasize sparse areas.
How to Execute It
Begin with freshly washed or dry-shampooed hair for maximum grip. Brush your hair straight back, smoothing it with a paddle brush and a lightweight smoothing cream or gel. Gather your hair at the nape of your neck — lower than you think feels right — and secure it into a low ponytail using a small elastic band. Twist the ponytail and wrap it around its base to form a compact bun, securing it with bobby pins as you go. The bun should sit snugly against your head, not floating away from it. Before you finish, extract two thin pieces from your face at the temples using a fine-tooth comb, and let them fall softly in front of your ears — these face-framing pieces should be loose and relaxed, the opposite of the sleek back. Finish the whole style with a light hairspray to maintain smoothness without creating a helmet effect.
Styling Notes and Modifications
If your short hair is wavy or curly, you may prefer to smooth it before creating the bun; conversely, if you want more texture, you can create the bun slightly looser and gently pancake it for added dimension. A delicate hair comb, a spritz of tiny white flowers, or a single ornate pin placed at the base of the bun elevates the style without overwhelming it. Some brides prefer a slightly off-center bun (twisted to one side rather than centered) for a more contemporary edge.
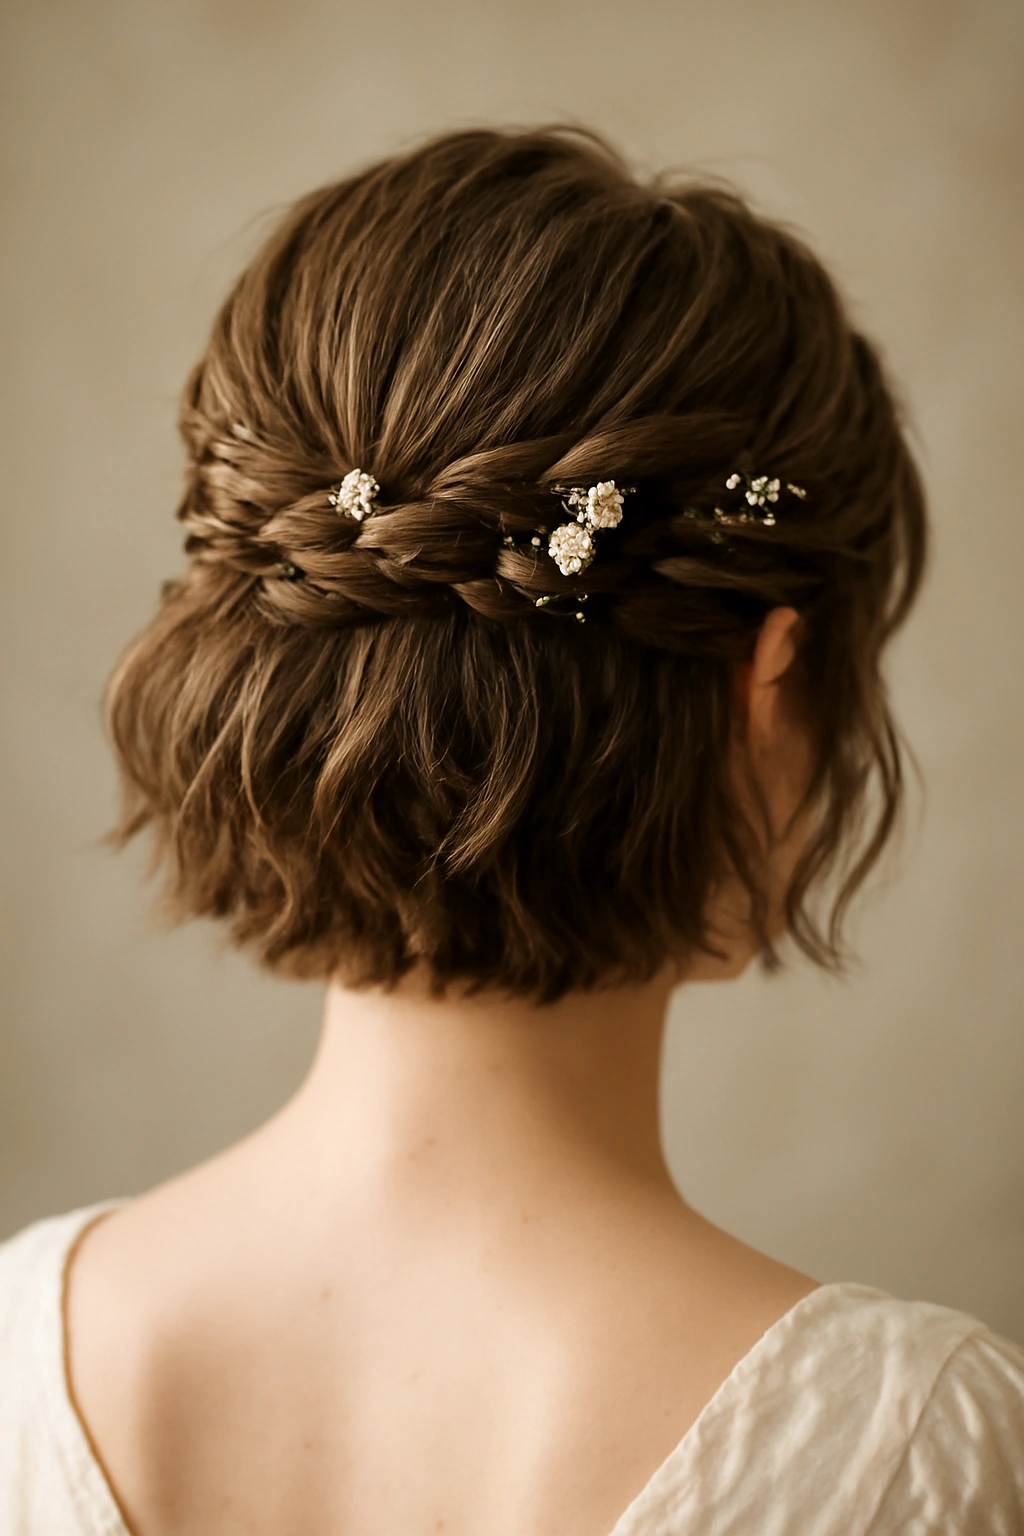
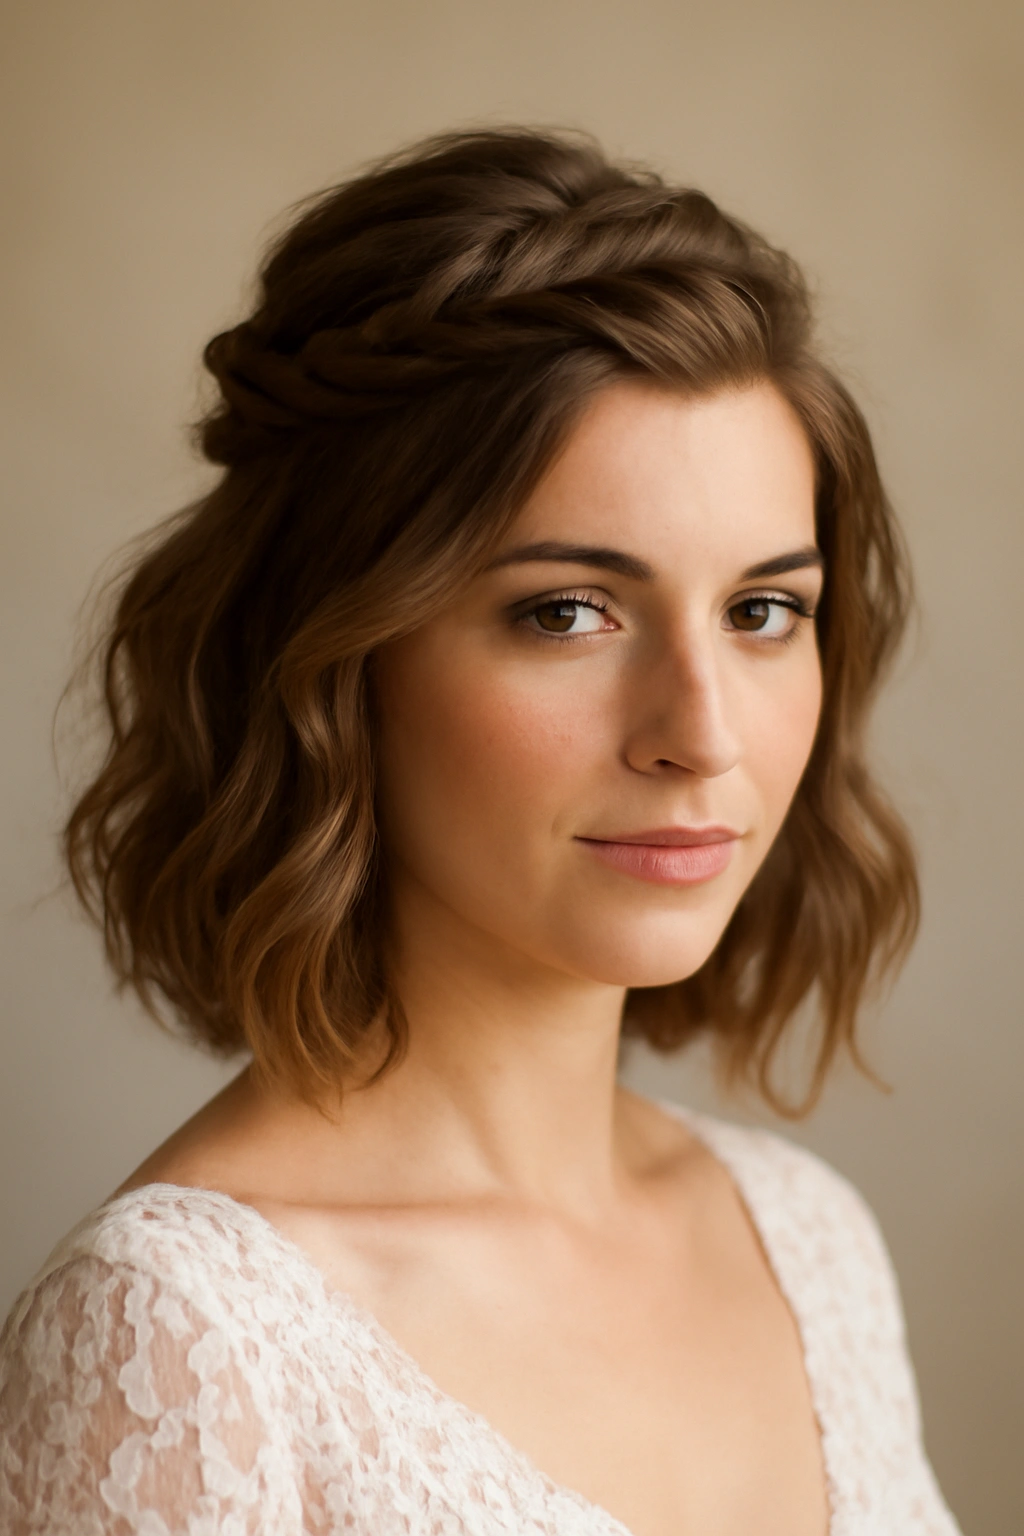
3. Braided Halo with Soft Waves

A braided halo combines the romantic appeal of braids with the flattering effect of a crown, and it’s remarkably achievable with short hair. Two or more thin braids wind around the head like a celestial frame, anchoring loose waves that fall around your face and shoulders. This style feels magical and intentional while remaining practical enough to survive a full wedding day.
Why This Works for Short Hair
The braided halo is forgiving of shorter lengths because the braids create the illusion of a full, dimensional style even if individual hair strands are shorter. Short hair also means you can braid more tightly without the braid looking restrictive — the overall effect reads as romantic rather than pulled-back. The waves that peek through the braid create movement and softness, and because you’re working with a smaller amount of hair overall, waves in short hair tend to look more defined and sculptural than waves in longer hair.
How to Execute It
Begin with wavy hair — use a 1-inch curling iron to create loose waves throughout, and let them cool completely before moving to the next step. Section off a thin piece of hair at one temple and create a French braid that runs across the back of your head toward the opposite temple, tucking additional hair into the braid as you go. As you braid, keep the braid loose and relaxed; you’ll tighten it later by gently pancaking the braid. Secure the end of the braid with a small elastic band and hide it with bobby pins tucked into the hair at that temple. If you want a fuller effect, create a second thinner braid that runs parallel to the first one, or create one thicker braid that you’ve pancaked generously. Gently pull apart the braid strands to add dimension. The waves should frame your face and fall freely — this contrast between the structured braid and the soft waves is what makes the style work.
Styling Notes and Modifications
The braided halo is more romantic when the braids feel organic rather than perfect. A few flyaways, a slightly crooked placement — these imperfections read as intentional bridal charm. You can weave tiny white flowers, baby’s breath, or delicate greenery into the braid as you create it. Alternatively, scatter small pearl pins or crystal hair clips throughout the braid and the surrounding hair for sparkle that catches the light as you move.
4. Pixie-Inspired Side Sweep with Accessories
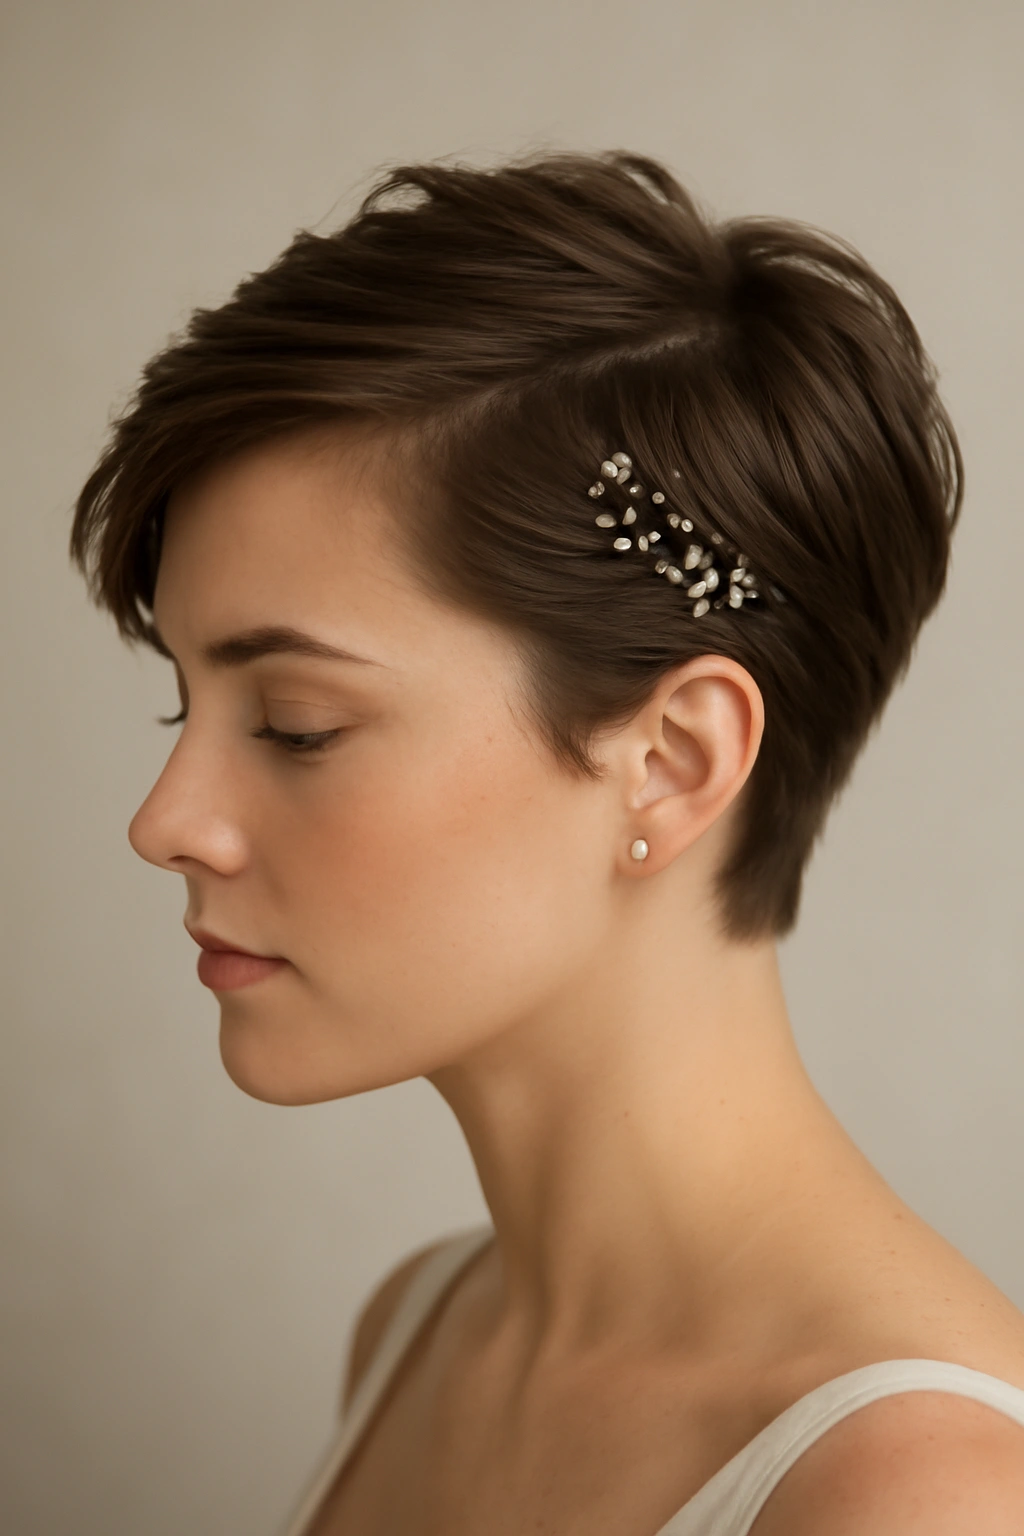
If you have a very short pixie or crop cut, you might wonder whether an updo is even possible — the answer is yes, and it’s surprisingly chic. A side-swept pixie updo uses the length at the top of your head and sweeps it across to the opposite side, securing it with elegant pins and allowing the short, textured pieces to create movement and dimension. This style reads as modern, sophisticated, and distinctly non-traditional, which some brides find deeply appealing.
Why This Works for Short Hair
A pixie cut’s strength is its texture and movement, not its length. By sweeping the longer sections to one side and securing them, you’re creating an updo that highlights the cut’s best features rather than trying to force it into a traditional bridal mold. The asymmetry is deeply flattering and feels intentional and confident. This style also works beautifully for brides with undercuts or very short sides, because the side-sweep naturally showcases the contrast in lengths.
How to Execute It
Apply a volumizing mousse to damp hair and blow-dry your pixie with a round brush, directing the longer sections toward one side. Once your hair is dry, use a fine-tooth comb to rake through the longer section (typically on top, swept to one side) and gently smooth it back on an angle. Use decorative bobby pins, clip pins, or a delicate hair comb to anchor the swept section on the opposite side of your head, tucking the pins into the shorter, textured hair for security. The shorter pieces should remain tousled and free — this contrast is essential to the style’s appeal. If you want a more polished finish, apply a light texturizing spray to the loose pieces to encourage them to stay in place while maintaining movement.
Styling Notes and Modifications
Decorative bobby pins become jewelry in this style — consider using gold, rose gold, or pearl-finished pins that coordinate with your wedding jewelry. A single delicate clip (a vintage hair comb, a crystal-encrusted barrette, or a small metal comb) can anchor the sweep more securely than multiple bobby pins and looks more intentional. This style is wonderful for brides who want to showcase their ears and jawline — pair it with statement earrings or an open-back wedding dress for maximum impact.
5. Twisted Half-Up with Floral Details
A half-up, half-down style is a classic bridal choice, and it translates beautifully to short hair. By creating twists from each side of your head that meet at the back and securing them with delicate flowers or other embellishments, you create a style that feels both polished and romantic. The down portion showcases your short hair’s texture and shape, while the twisted crown adds an elegant, intentional touch.
Why This Works for Short Hair
A half-up style on short hair is inherently flattering because it lifts the hair slightly, creating the illusion of more length without requiring actual length. The twists frame your face while the loose hair below maintains the modern, clean lines of your short cut. Short hair also means the “down” portion creates defined movement rather than hanging heavily — this creates a more youthful, energetic bridal aesthetic. The floral details add romance and texture without requiring an enormous amount of hair.
How to Execute It
Start with textured hair — waves or loose curls work beautifully. Create a section on one side of your head, roughly 2-3 inches from your part, and twist it loosely back toward the center of your head. As you twist, you can add small sections of hair or keep the twist thin and delicate — both approaches work. Secure the twist with a bobby pin at the center back of your head. Repeat on the opposite side, creating a mirror-image twist. When both twists meet at the back, you have several options: leave them as two separate twists and add embellishments to each, or gently combine the twists into one larger gathered section at the back. Add fresh flowers, a delicate comb, or decorative pins to the center where the twists meet.
Styling Notes and Modifications
This style is wonderfully versatile. You can create the twists tight and structured for a more formal look, or loose and relaxed for a softer aesthetic. If your hair is very short, make the twists quite thin and delicate so they don’t overwhelm your face. If you have more length or thickness, thicker twists read as more dramatic and romantic. Fresh flowers — a small cluster of baby’s breath, a few garden roses, or wispy ruscus — woven into the twists add freshness and tie your hair to your bouquet beautifully.
6. Slicked-Back Ponytail with Volume at Crown
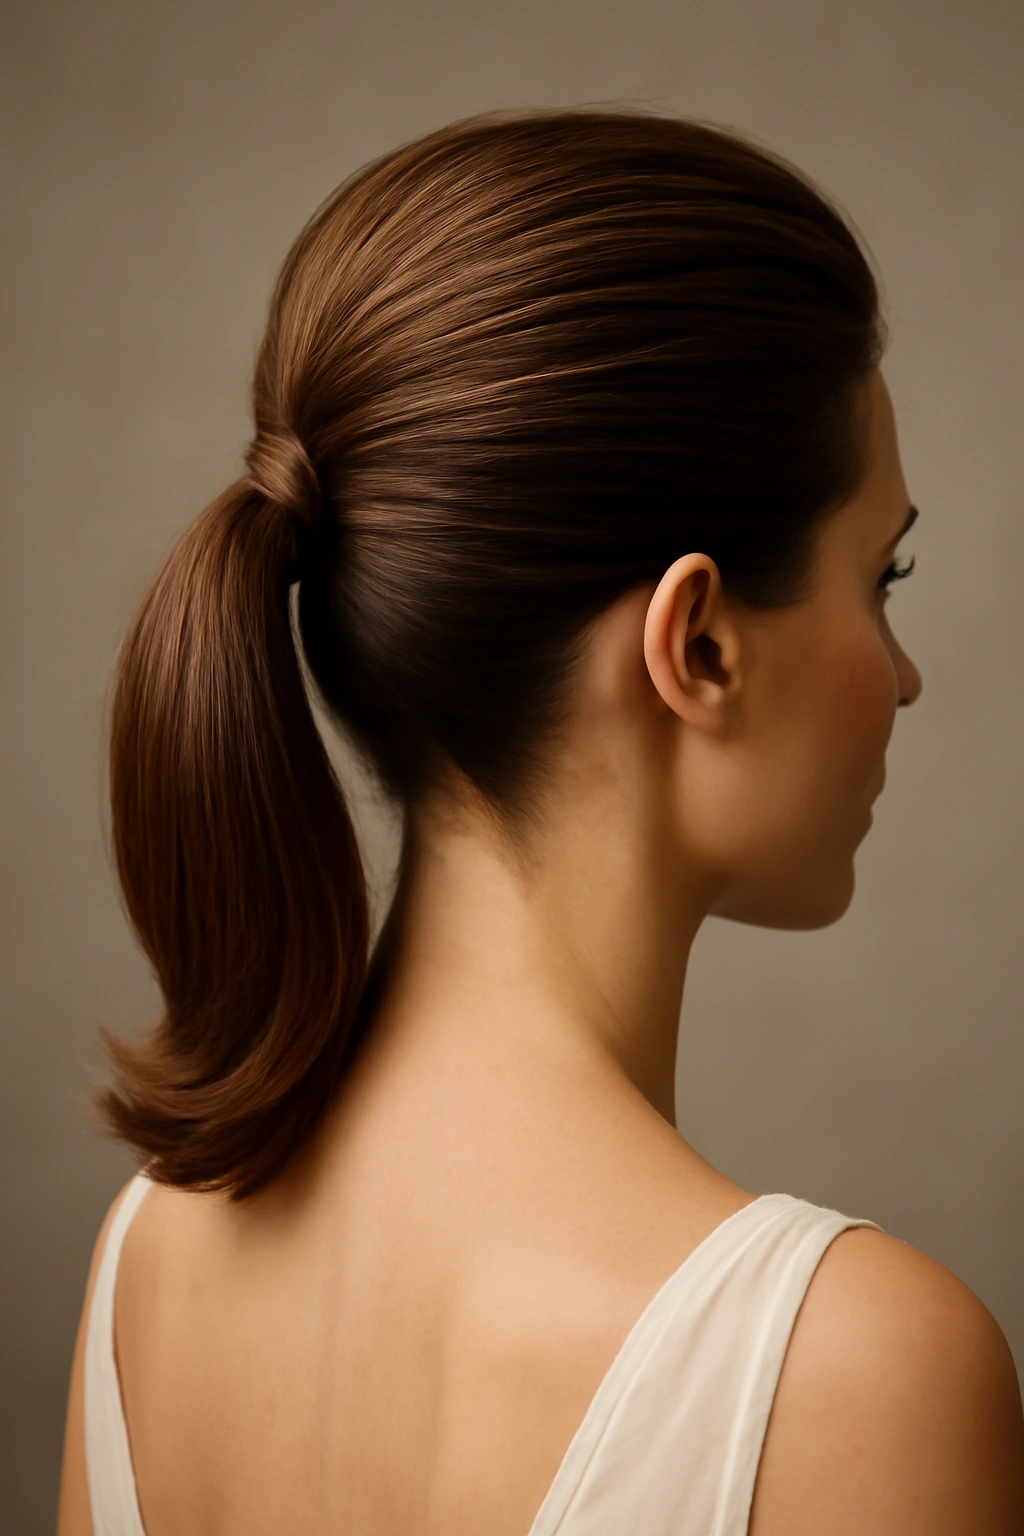
A sleek ponytail is often overlooked as a bridal style, but when executed with intention — maximum volume at the crown, a perfectly placed elastic, and strategic detailing — it’s absolutely bridal-appropriate. This approach combines the polish of a pulled-back style with the modern edge of a ponytail, creating something that feels both contemporary and romantic.
Why This Works for Short Hair
A short ponytail sits higher on the head than a long one, which means it naturally plays up height and creates an elegant line from the nape of your neck up through your crown. The shorter length also prevents a ponytail from feeling heavy or dated — instead, it reads as a deliberate, sharp style choice. For short hair with texture or curl, a ponytail contains the hair in a controlled way while still showcasing its natural movement once it’s released from the elastic.
How to Execute It
Begin with dry or air-dried hair. Apply a volumizing mousse to damp roots and blow-dry with a round brush, focusing on creating height at the crown and smoothing the sides gently but not too severely. Using a fine-tooth comb and smoothing cream, brush the sides and back of your hair smoothly back, but leave the very top section (from your front hairline to the crown) slightly fuller and tousled. Gather all your hair into a ponytail at the back of your head, positioning it at or slightly above the nape of your neck. Secure it with a small elastic band. Use bobby pins to anchor any loose pieces and to tease small sections of the crown area slightly for additional height — this creates a “poof” of volume directly behind your front hairline. Wrap a thin section of hair from the ponytail around the elastic to hide it, securing the wrap with a bobby pin tucked underneath. Finish with a flexible hold hairspray.
Styling Notes and Modifications
The ponytail itself can be left as a sleek tail, or you can twist or braid it for added texture. Some brides prefer to pancake the ponytail slightly, pulling apart the sections to create a fuller effect. Consider adding a delicate hair accessory near the elastic — a decorative comb, a piece of jewelry, a small cluster of flowers, or a silk ribbon wrapped around the base of the ponytail all elevate the style and make it feel intentional rather than casual.
7. Romantic Finger Waves with Pearl Pins
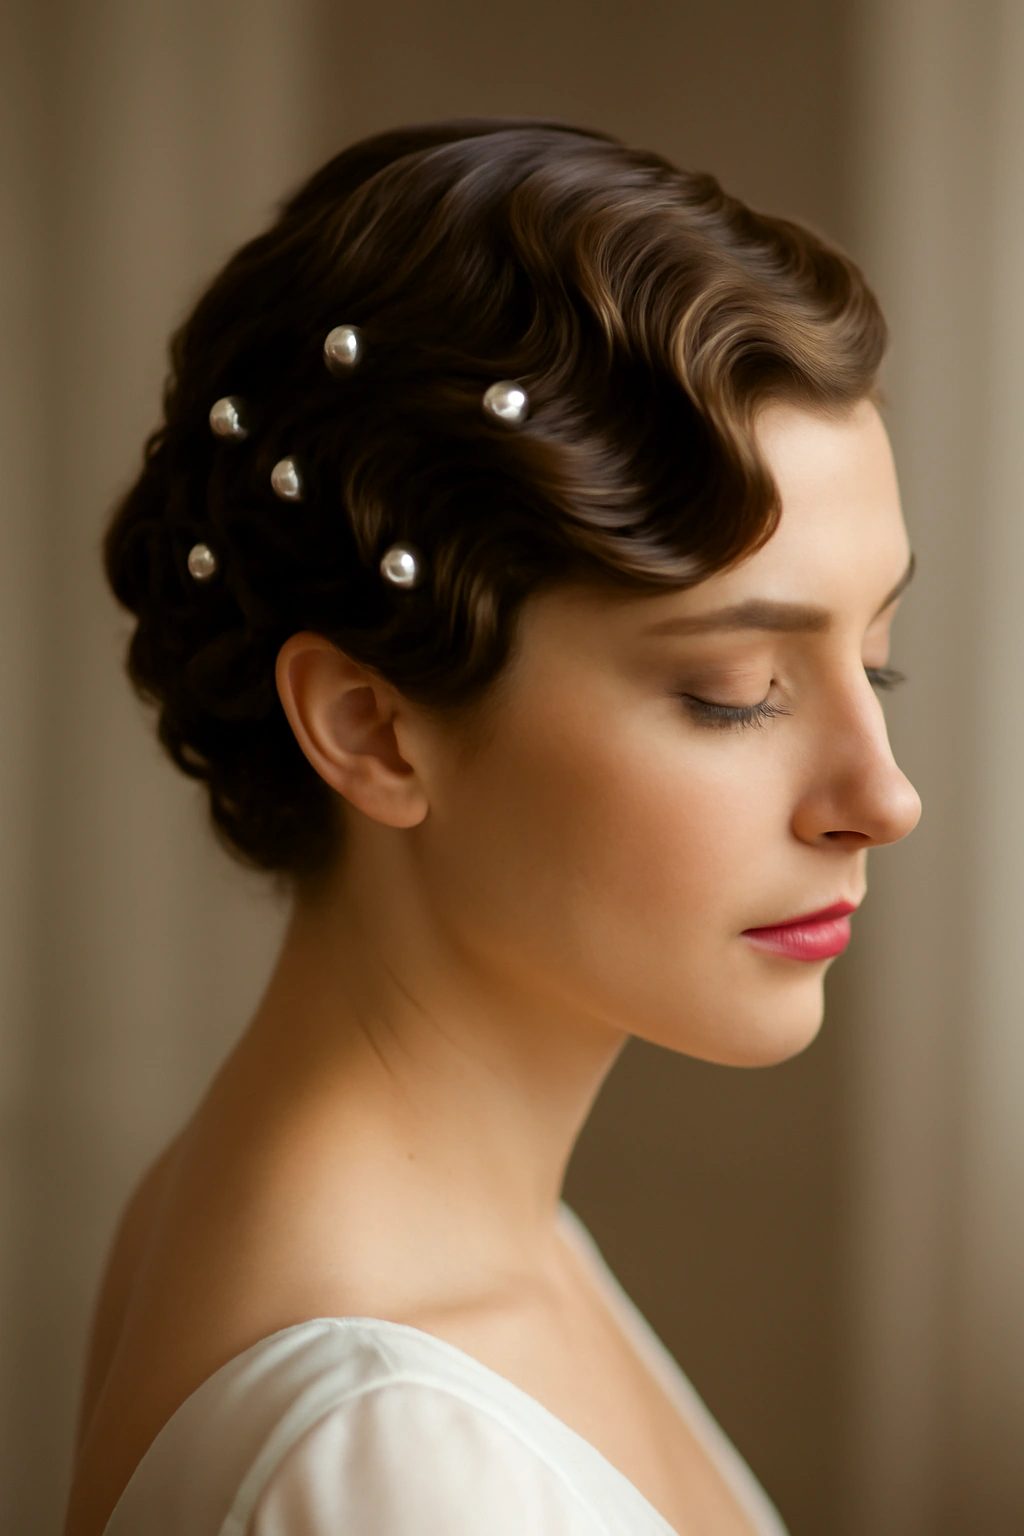
Finger waves are having a moment, and for good reason — they’re sophisticated, deeply romantic, and they work beautifully with short hair. This style uses classic 1920s-inspired wave patterns created with a fine-tooth comb and bobby pins, arranged to cascade around your head in a sculptural updo. Pearl pins and strategic styling lift certain waves to create height, while others fall softly, creating dimension.
Why This Works for Short Hair
Short hair is actually ideal for finger waves because the waves are defined rather than lost in length. The crisp, architectural quality of finger waves complements short hair’s modern, clean lines beautifully. Because you’re using the entire head as a canvas rather than relying on long strands to create volume, finger-waved short hair has an elegance and intentionality that longer versions sometimes lack. The style is also surprisingly practical — once the waves are pinned in place, they stay put through a long day.
How to Execute It
Begin with damp hair. Apply a wave-setting mousse or lightweight gel and use a fine-tooth comb to create waves — place the comb horizontally against your hair, push it upward to create an indent, then comb in the opposite direction slightly lower to create the next wave ridge. Continue this pattern around your entire head, creating a series of interconnected waves. Secure each wave pattern with bobby pins placed horizontally along the wave ridge — the pins should be hidden under the top layer of the wave. Allow your hair to dry completely (either air dry or use a low-heat blow dryer) while the pins are in place; this sets the wave pattern. Once dry, gently remove the pins. The waves will hold their shape. You can now arrange the waves to create an updo by pinning certain sections higher on the head to create lift and height, while allowing other sections to fall more loosely. Pearl or decorative pins can be placed visibly along the wave patterns as both functional and aesthetic elements.
Styling Notes and Modifications
Finger waves work best on hair that’s straight to slightly wavy naturally — very curly hair may fight the wave pattern. If your hair is quite curly, you can still create finger waves on straightened sections for a hybrid effect. Pearl pins placed every inch or so along the wave patterns add a vintage bridal elegance, as does the strategic placement of a decorative comb or clip that anchors one particularly beautiful wave at the back of your head.
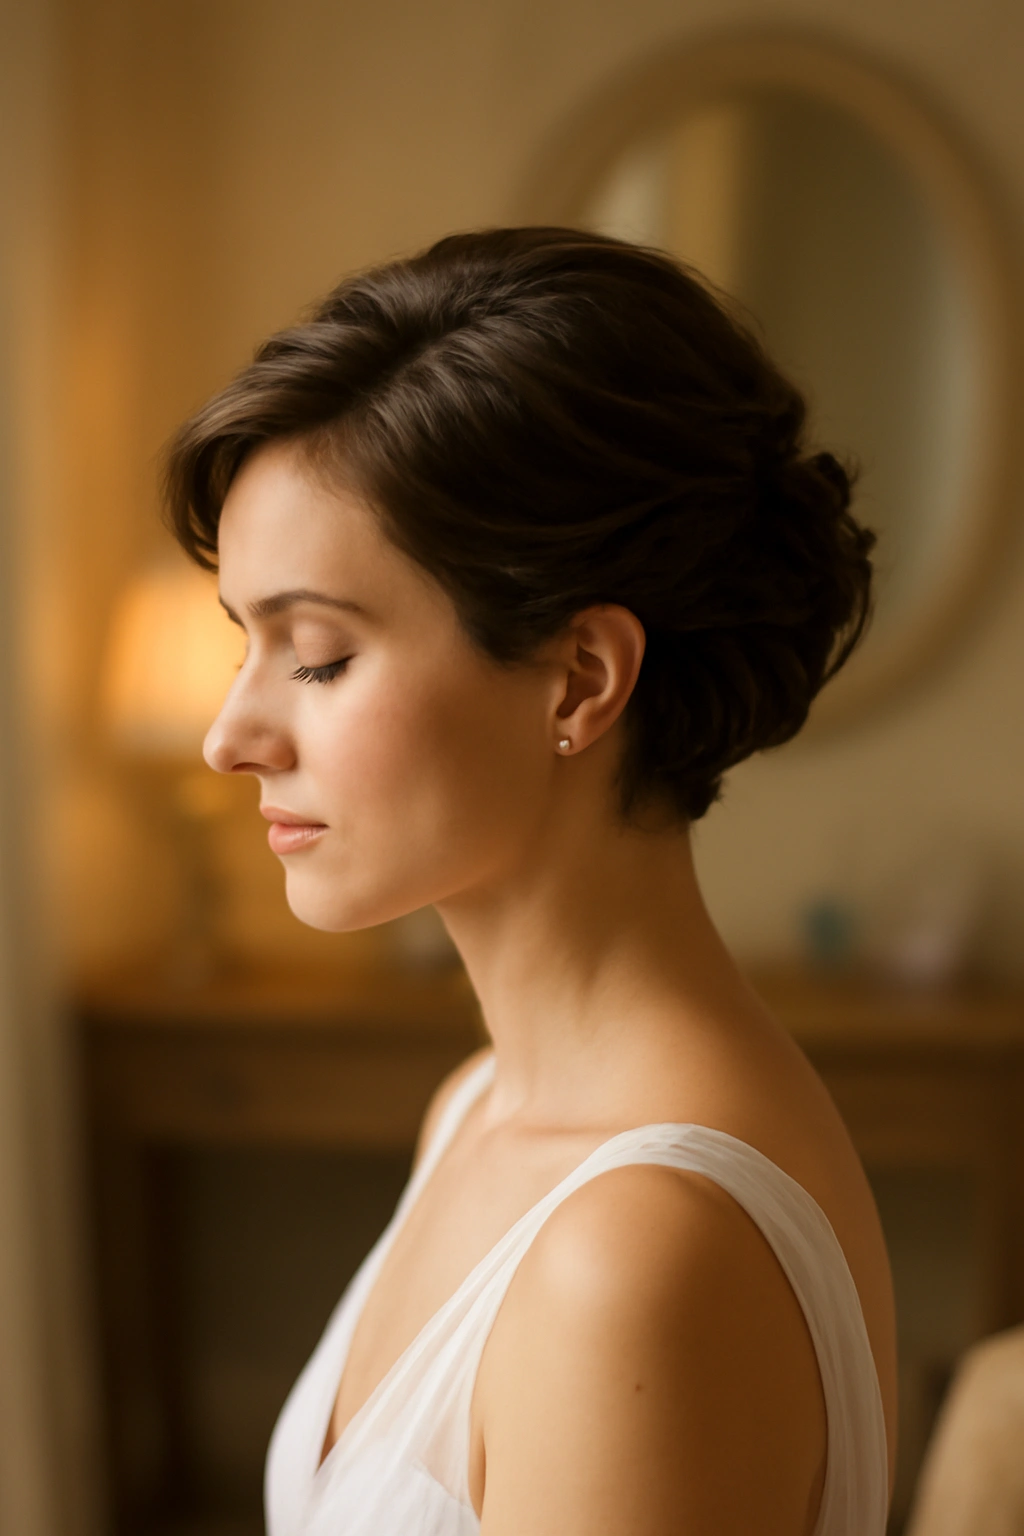
8. Knotted Low Bun with Tendrils
A knotted bun is a step beyond a simple twisted bun — it uses a knot-tying technique to create a bun that’s sculptural and interesting rather than simply rolled. Combined with carefully placed tendrils that frame your face, this creates a style that feels romantic, textured, and distinctly bride-appropriate without the severity of a sleek bun.
Why This Works for Short Hair
The knot technique creates dimension and visual interest without requiring an enormous amount of hair. Short hair’s natural texture and movement become assets here, as the knot anchors the bulk of the style while shorter, texturized pieces around your face create softness. This approach also works beautifully for brides with fine or thin hair, because the knot doesn’t flatten the hair and the low placement doesn’t draw attention to any sparse areas.
How to Execute It
Begin with air-dried wavy hair or create loose waves with a curling iron. Gather your hair at the nape of your neck, roughly 2-3 inches below where you’d typically place a ponytail elastic. Take the gathered section and tie it into a loose, simple knot — just as you would tie a knot with rope. Tuck the ends of the knot back underneath itself and secure everything with bobby pins, creating a sculptural bun shape. The knot should sit on the back of your head, anchored firmly but not pulled too tightly. Before you finish, extract three to five thin tendrils from around your face — at the temples, behind your ears, at the nape — and let them fall loosely, either straight or with a slight wave. These tendrils soften the style and create a romantic frame.
Styling Notes and Modifications
The beauty of this style is that it’s naturally textured and slightly undone-looking, which is very bridal. Don’t aim for perfection; aim for softness and movement. You can add a delicate hair comb, scattered pearl pins, or a few small flowers tucked into or around the knot. If your hair is very short, a single, thin knot works better than trying to create a large, complicated bun. For longer short hair (shoulder length or approaching it), you can create a slightly larger, looser knot with thicker strands.
9. Faux Bob Updo with Geometric Clips
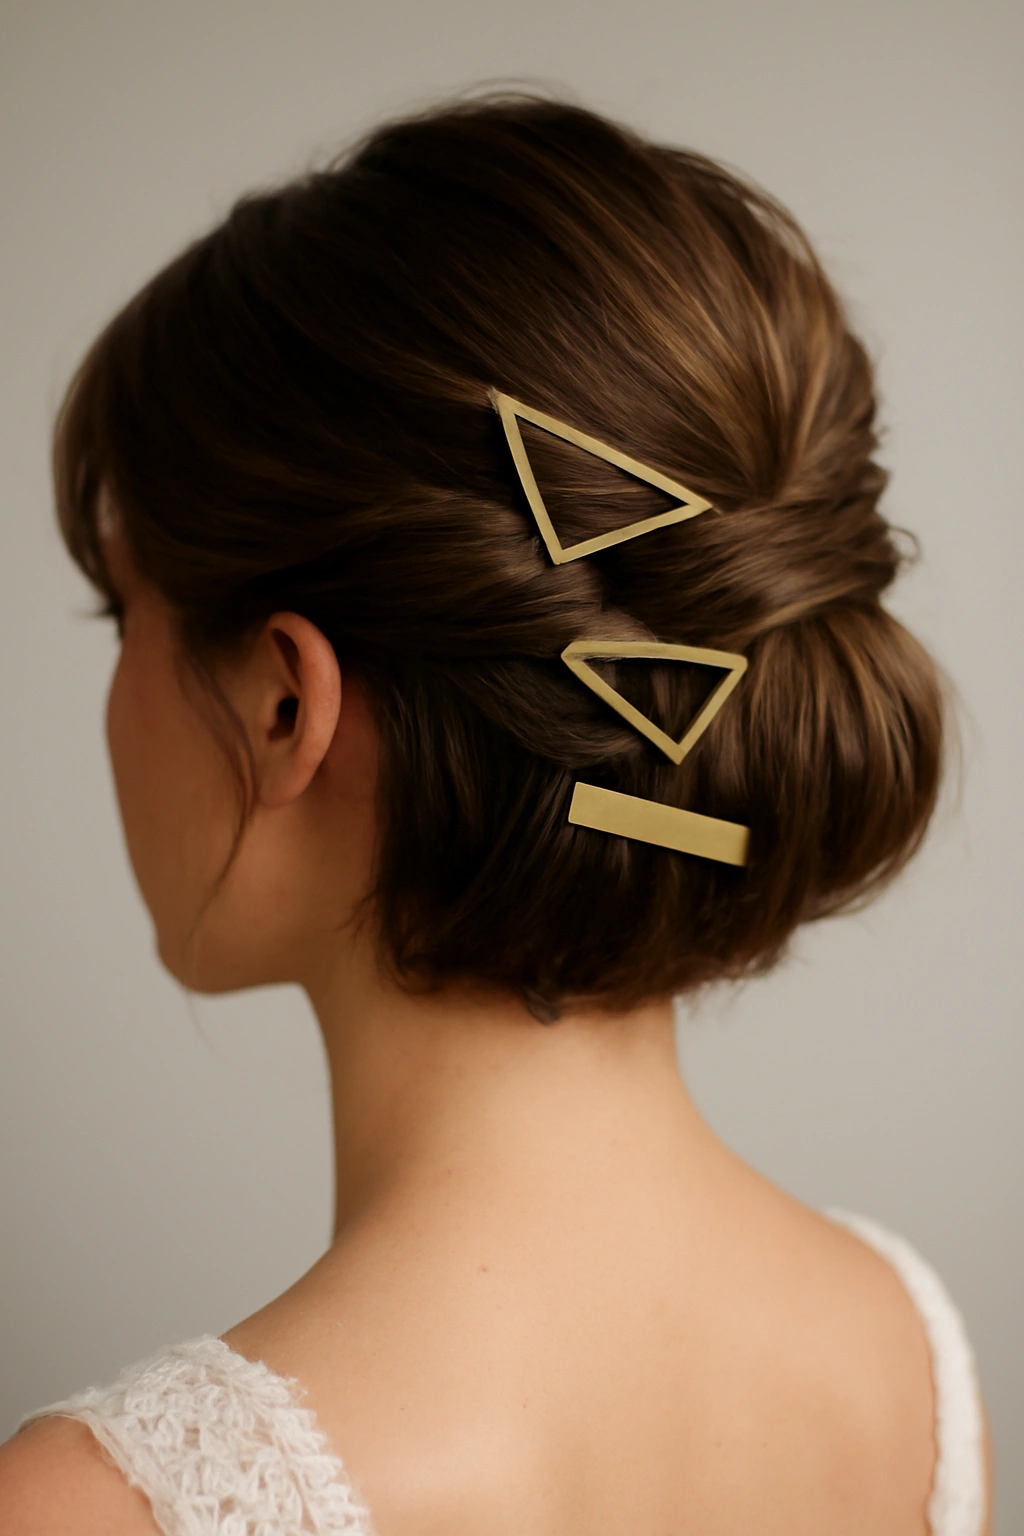
This is a playful, modern option for brides with shoulder-length or longer short hair. A faux bob updo works by taking hair from the back of your head, folding it upward, and securing it to create the visual illusion of a short bob, while the actual hair is pinned up and away. When combined with geometric hair clips placed in visible, intentional spots, the style reads as contemporary and fashion-forward while remaining completely bridal.
Why This Works for Short Hair
This style celebrates your actual hair length — it’s not trying to create length you don’t have, but rather playing with proportion and visual illusion in a clever, modern way. The geometric clips add an architectural element that coordinates beautifully with modern wedding aesthetics. This is a wonderful choice for brides who want a non-traditional updo that still feels intentional and styled.
How to Execute It
Begin by blow-drying your hair with some texture — a tousled, lived-in finish works best here. Take a section of hair from the lower back of your head (the thickness of the section depends on how much hair you have, but aim for a thick handful) and fold it upward, securing it against your head with bobby pins. This creates the visual “bob” at the back. The rest of your hair sits on top of or around this folded section. Place a geometric hair clip (a rectangular tortoiseshell clip, a gold cuff clip, or a minimalist metal clip) visibly at the point where the fold begins, securing it over the bobby pins so it doubles as both decoration and function. You can add a second geometric clip at the opposite temple or behind one ear for balance.
Styling Notes and Modifications
This style is quite versatile in terms of how you position the geometric clips and how many you use. One clip feels modern and minimal; two clips feel more intentional and styled. The “faux bob” section can be as thick or thin as you like — thicker creates a more obvious bob illusion, while thinner creates a subtler effect. Pair this style with an open-back or low-back wedding dress to showcase the architectural quality of the updo.
10. Curved Deep Side Part Updo
A deep side part is flattering on almost every face shape, and when you use it as the foundation for an updo, it creates an asymmetrical, elegant style that reads as distinctly bridal. The key is to create a curve or sweep from the deep part back toward the opposite side of your head, pinning the larger section up while allowing the smaller section to frame your face.
Why This Works for Short Hair
A deep side part emphasizes facial features beautifully and creates an instant sense of sophistication. Short hair accentuates a deep part even more dramatically than longer hair, because there’s no length to break up the line of the part. By sweeping hair back from a deep part, you create an elegant curved line that’s very flattering. This style also allows you to showcase one side of your face — wear your hair swept away from your ring side or toward your best angle, whatever feels right to you.
How to Execute It
Create a deep side part, taking the part about 1.5 to 2 inches from the center of your hairline toward one side. Style your hair with some texture — light waves or a soft tousled finish work beautifully here. The smaller section (from the deep part to the opposite temple) should fall freely, framing that side of your face. The larger section (the bulk of your hair) should be swept smoothly back and secured into an updo — you can create a low knot, a twisted bun, or a simple low ponytail with your choice of treatment. The curve created by the part and the direction of the sweep should feel natural and elegant.
Styling Notes and Modifications
You can add texture to the larger swept section by creating subtle waves or even a thin braid within it before anchoring it. A decorative comb or clip placed where the updo begins adds intentionality. Pearl pins scattered through the swept section create sparkle and catch the light beautifully. The smaller face-framing section can be left smooth or styled with a few more pronounced waves for contrast.
11. Twisted Front Crown with Loose Waves
This style begins with twists created at the very front of your hairline and progresses back toward the crown, creating a layered, romantic aesthetic. The rest of your hair flows in loose waves, so it feels like a half-up style with the structured elegance of an updo.
Why This Works for Short Hair
Front twists are incredibly flattering because they create lift and height right at the crown without pulling hair back severely. Short hair means these front twists are visible and impactful — they create an intentional frame for your face. The loose waves that fall below the twisted crown show off your short hair’s natural texture and movement, creating a balanced style that’s both structured and romantic.
How to Execute It
Begin with wavy or textured hair. Create a section on one side of your head, starting roughly at your temple, and twist it back toward the crown area. As you twist, add small sections of hair from the front, gradually building the twist as it progresses back. Secure the end with a bobby pin at the crown. Repeat on the opposite side, creating a mirror-image twist. The two twists should meet at or near the crown. You can secure them separately or gently gather them together with a final bobby pin, decorative clip, or small comb. The waves below should fall freely and naturally.
Styling Notes and Modifications
The twists can be as thin or as thick as your hair allows — thinner twists read as more delicate and romantic, while thicker twists feel more dramatic. You can pancake the twists slightly to add dimension and fullness. This style works beautifully with a delicate hairpiece, a small cluster of flowers, or a jeweled comb placed at the center crown where the twists meet. It’s also wonderful for showcasing chandelier earrings or statement ear jewelry, as the twisted crown opens up your ears and face.
12. Bubble Braid with Delicate Wrapping
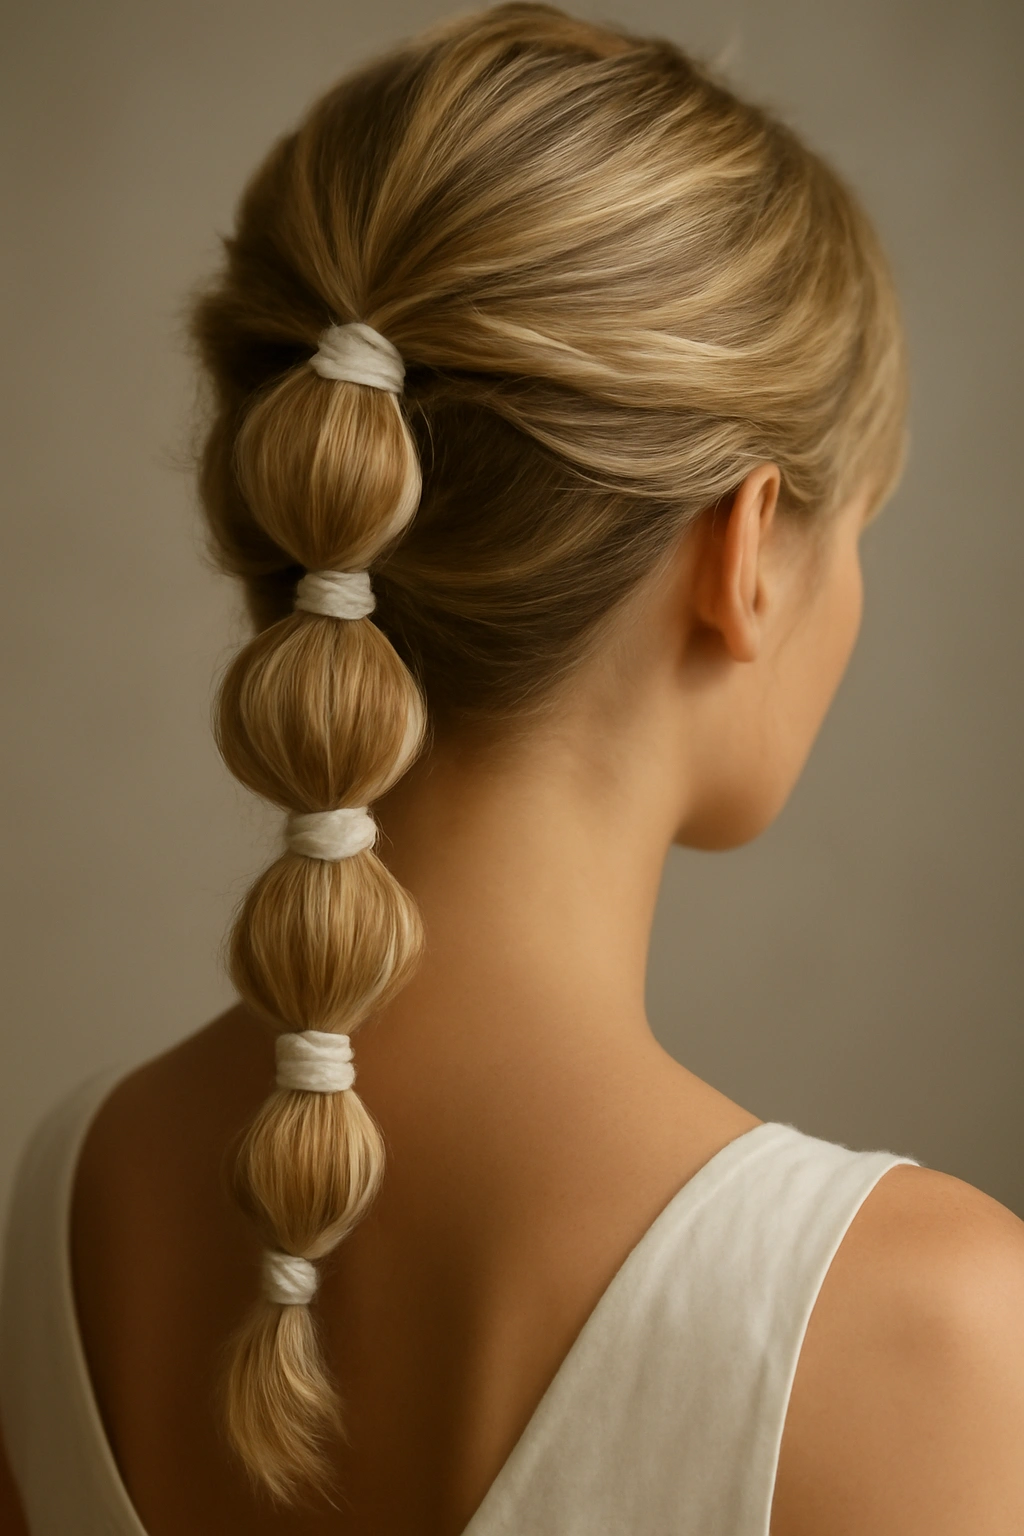
A bubble braid is playful, modern, and surprisingly romantic when executed with intention. This style creates a series of small sections (the “bubbles”) along a ponytail, each separated and enhanced with thin ribbon, thread, or delicate fabric wraps. For a bridal version, you create these bubbles at the back of your head while keeping the front loose and soft, resulting in a style that’s both whimsical and wedding-appropriate.
Why This Works for Short Hair
A bubble braid doesn’t require tremendous length — what it requires is a good ponytail base and strategic wrapping. With short hair, the “bubbles” are more proportional and the overall style reads as thoughtfully designed rather than fussy. The wrapping element is what elevates this from casual to bridal; delicate ribbon, silk thread, or fine fabric in white, blush, gold, or your wedding colors transforms a trendy style into something intentional and special.
How to Execute It
Begin with textured hair. Create a low ponytail at the nape of your neck and secure it with a small elastic band. Gather the ponytail into sections, securing each section with a thin elastic band placed approximately 1.5 inches below the previous band. Start with the section closest to the main elastic and work your way down. Now comes the key step: gently pull the hair between each elastic slightly outward and upward, creating a “bubble” effect. Use your fingers to shape each bubble so it’s full and round. Take a thin ribbon, silk thread, or delicate fabric strip and wrap it around the base of each bubble (right over the elastic), securing it with a small knot or bow. The wrapping should be visible and intentional — this is what makes the style feel special rather than casual.
Styling Notes and Modifications
The number of bubbles you create depends on the length of your ponytail — three to four substantial bubbles work well for short hair. You can wrap each bubble in the same color for cohesion, or vary the wrapping colors slightly for visual interest. The wrapping material is crucial; choose something that matches your wedding palette. You can also add tiny flowers or greenery into or around each bubble for a romantic flourish. This style is wonderful paired with an open-back dress or a dress with delicate back detailing, as the bubble braid showcases the back beautifully.
Final Thoughts
Short hair is not a limitation for bridal updos — it’s an invitation to think creatively about what makes an updo beautiful. Every style in this guide works because it respects your hair’s actual length and texture while elevating it with intention, precision, and strategic styling details. The confidence you carry as a bride matters infinitely more than the length of your hair, and a well-executed updo that you feel comfortable wearing will shine far brighter than a style you’re constantly adjusting or worrying about.
The best updo for you is the one that makes you feel like yourself, amplified. Whether you choose sleek sophistication, romantic texture, playful details, or architectural modernity, trust that your short hair can deliver every ounce of the bridal elegance you’re envisioning. Consult with your stylist at least two trials before your wedding day — this allows you both to test the durability of the style, practice the techniques that work best with your specific hair texture, and troubleshoot any concerns before the actual event. A good stylist will know how to anchor an updo properly so it lasts through your entire celebration, from the ceremony through dancing and beyond.
Your wedding day is about celebrating you, and that includes showing up exactly as you are — short hair and all. The styles in this guide are just starting points; your stylist may suggest modifications that make them work even better with your individual hair, or you might discover a hybrid approach that combines elements from several styles. The magic is in the collaboration and the confidence. Walk down that aisle knowing your hair looks absolutely stunning because it does.