Natural hair on a wedding day is an opportunity to celebrate texture, volume, and beauty in its most authentic form. There’s something powerful about walking down the aisle—or standing beside someone who is—with your hair styled in a way that honors your natural curl pattern, coil, or wave texture while still feeling elevated and special. The challenge isn’t finding updos that work with natural hair; it’s knowing which styles will hold throughout your event, which ones genuinely flatter your face and frame, and which ones you can actually manage without spending four hours in the styling chair or ending up uncomfortable by the reception’s second dance.
The updos that work best for natural hair aren’t borrowed from straight-hair styling playbooks. They’re intentionally designed to work with your texture rather than against it, which means they tend to be more forgiving, more durable, and honestly more interesting to look at. A beautiful natural hair updo has dimension, movement, and a lived-in elegance that feels modern and confident—even when it’s technically intricate underneath.
Whether you’re looking for something romantic and swept, bold and sculptural, sleek and polished, or relaxed and undone, there are natural hair updo options that will make you feel like the best version of yourself on your wedding day. Here are twelve of the most stunning, wearable, and wedding-worthy updos for natural hair that deserve serious consideration.
1. The Stacked High Bun with Face-Framing Tendrils

A stacked high bun is architectural and intentional—it sits at the crown with volume and presence, making it one of the most modern natural hair wedding updos available. The “stacking” technique creates layers and dimension rather than a tight, smooth ball, which works beautifully with natural texture and gives off effortlessly elegant energy.
Why This Works for Natural Hair
The stacked technique actually celebrates curl and coil texture rather than fighting it. By creating sections and securing each layer slightly offset from the one below, you get natural lift and visual interest that wouldn’t exist with a conventional bun. The face-framing tendrils soften the overall look and add movement without sacrificing the structured updo feel. This style photographs incredibly well because the volume and dimension catch light in a way that flat styles simply don’t.
How to Build This Look
- Blow-dry your natural hair with a diffuser to maximize volume and create a smooth base layer while preserving your curl pattern
- Section the hair into three or four horizontal layers from the nape of your neck upward
- Secure the lowest section into a bun using bobby pins and a small elastic
- Wrap the next section around that base and secure it, creating an offset, stacked effect
- Continue building upward until you reach the crown
- Pull two to three face-framing pieces and allow them to curl naturally, spritz them with texture spray for hold
Pro tip: Use spiral bobby pins instead of regular ones—they grip textured hair far better and won’t slip throughout your event, even if you’re dancing and celebrating for hours.
2. The Wrapped Bantu Knot Crown with Soft Release
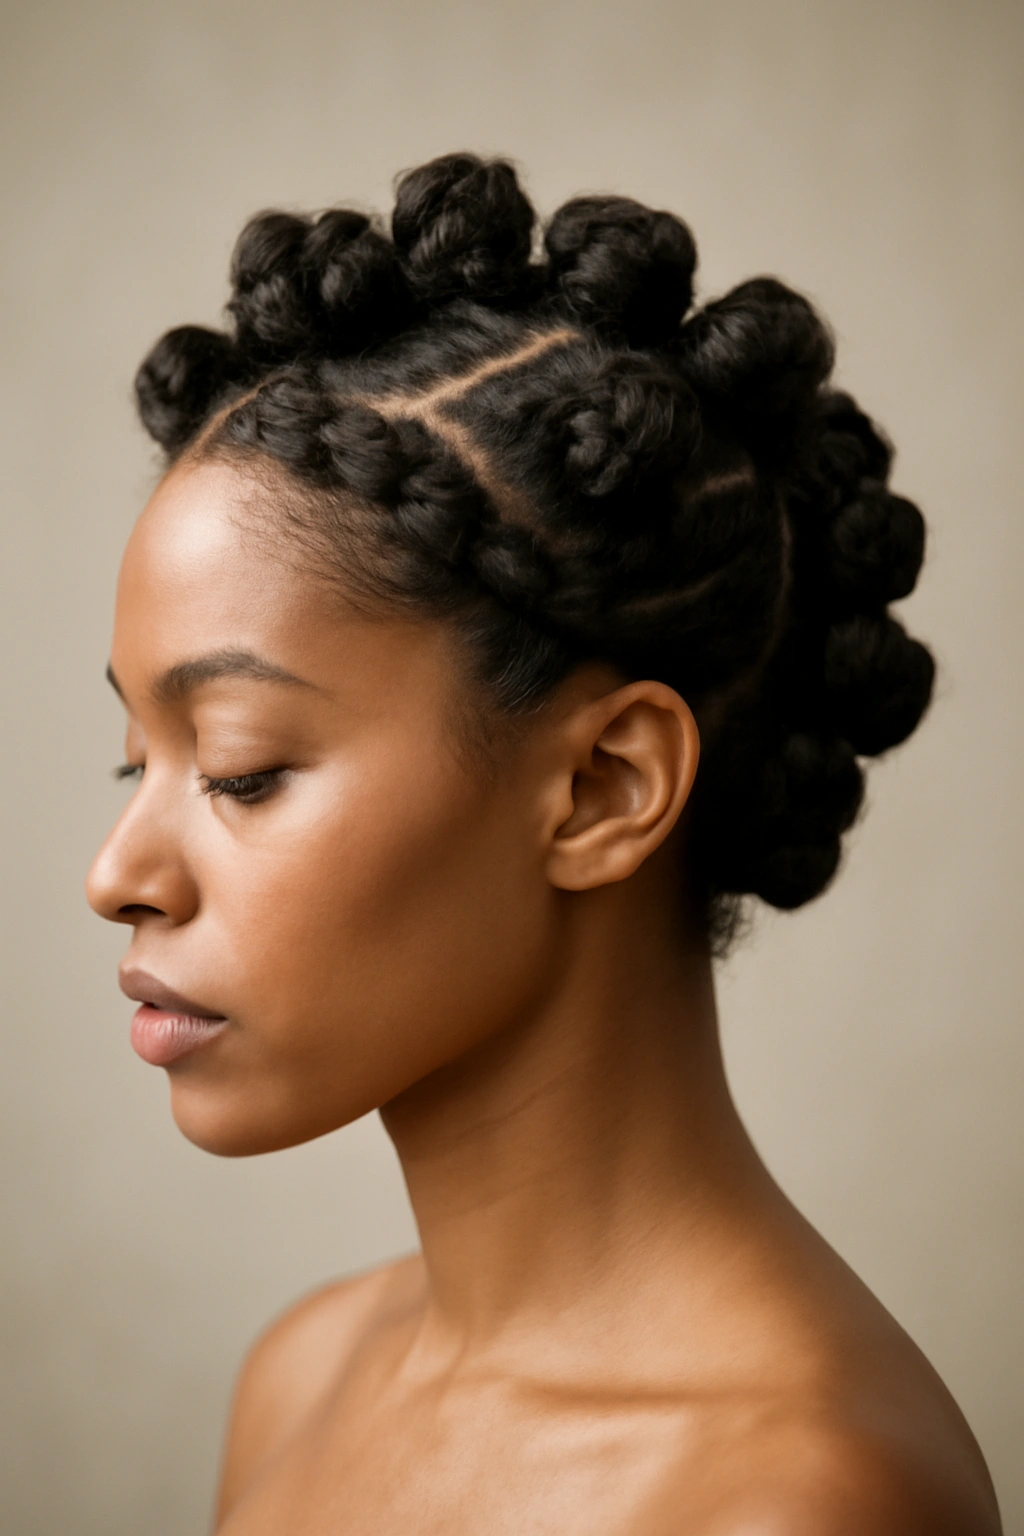
This style honors the cultural heritage of natural hair while creating an absolutely stunning bridal look that feels both traditional and contemporary. Bantu knots twisted into a crown around the head are romantic, textural, and photograph like a dream against any backdrop or veil.
Why This Works for Natural Hair
Bantu knots are made from natural hair texture, so they’re essentially working at the highest level with what you naturally have. When you create the knots in sections and wrap them around the head in a crown pattern, they create organic curves and soft spirals that no other technique achieves. The style is secure enough to last through a full wedding day, yet soft enough to feel romantic rather than overly formal.
Creating the Crowned Bantu Knot Effect
- Divide hair into 8-12 sections depending on the density of your natural hair
- Twist or coil each section tightly, then wrap it around itself to form a knot and secure with bobby pins
- Once all knots are created and secured, arrange them in a crown pattern around your head
- Gently pull the knots slightly to soften them and add dimension
- Optional: weave small flowers, delicate gold wires, or pearl sprays through the knots for bridal detail
- Finish with a lightweight holding spray that won’t weigh down the texture
Pro tip: Do a test run at least two weeks before your wedding to understand how long the style actually takes and whether you need additional bobby pins or adjustments for your specific hair density and curl pattern.
3. The Sleek Low Puff with Side Shave Detail
A low puff is refined, feminine, and surprisingly versatile—it can feel sporty or incredibly elegant depending on how you style the base and what details you add. A sleek, gathered puff positioned low at the nape of your neck creates an unexpected silhouette that’s flattering on most face shapes and works beautifully with a veil or without one.
Why This Design Works for Weddings
The low positioning feels mature and intentional rather than casual, which elevates it to bridal status. If your natural hair has been cut or styled with a fade or shaved detail on the sides, this updo perfectly showcases that design element while keeping the focus on the gathered, voluminous puff. The sleekness of the base contrasts beautifully with the texture and shape of the puff, creating visual interest and dimension.
Styling the Sleek Low Puff
- Apply a smoothing gel or mousse to damp hair and blow-dry straight with a paddle brush, focusing on the sides and back where you want the sleek effect
- Gather the hair at the nape of your neck into a smooth, tight base using a fine-tooth comb and elastic
- Tease the gathered section gently to create volume, then smooth the outer layer
- Secure with bobby pins inserted horizontally into the base for maximum hold
- Spray with flexible hold spray—not so much that it flattens the puff, but enough to last through dancing and movement
Worth knowing: This style works especially well if your natural hair has been shaped with a tapered or faded side cut, as it puts that design intentionally on display rather than hiding it under an updo.
4. The Two-Strand Twist Crown Bun
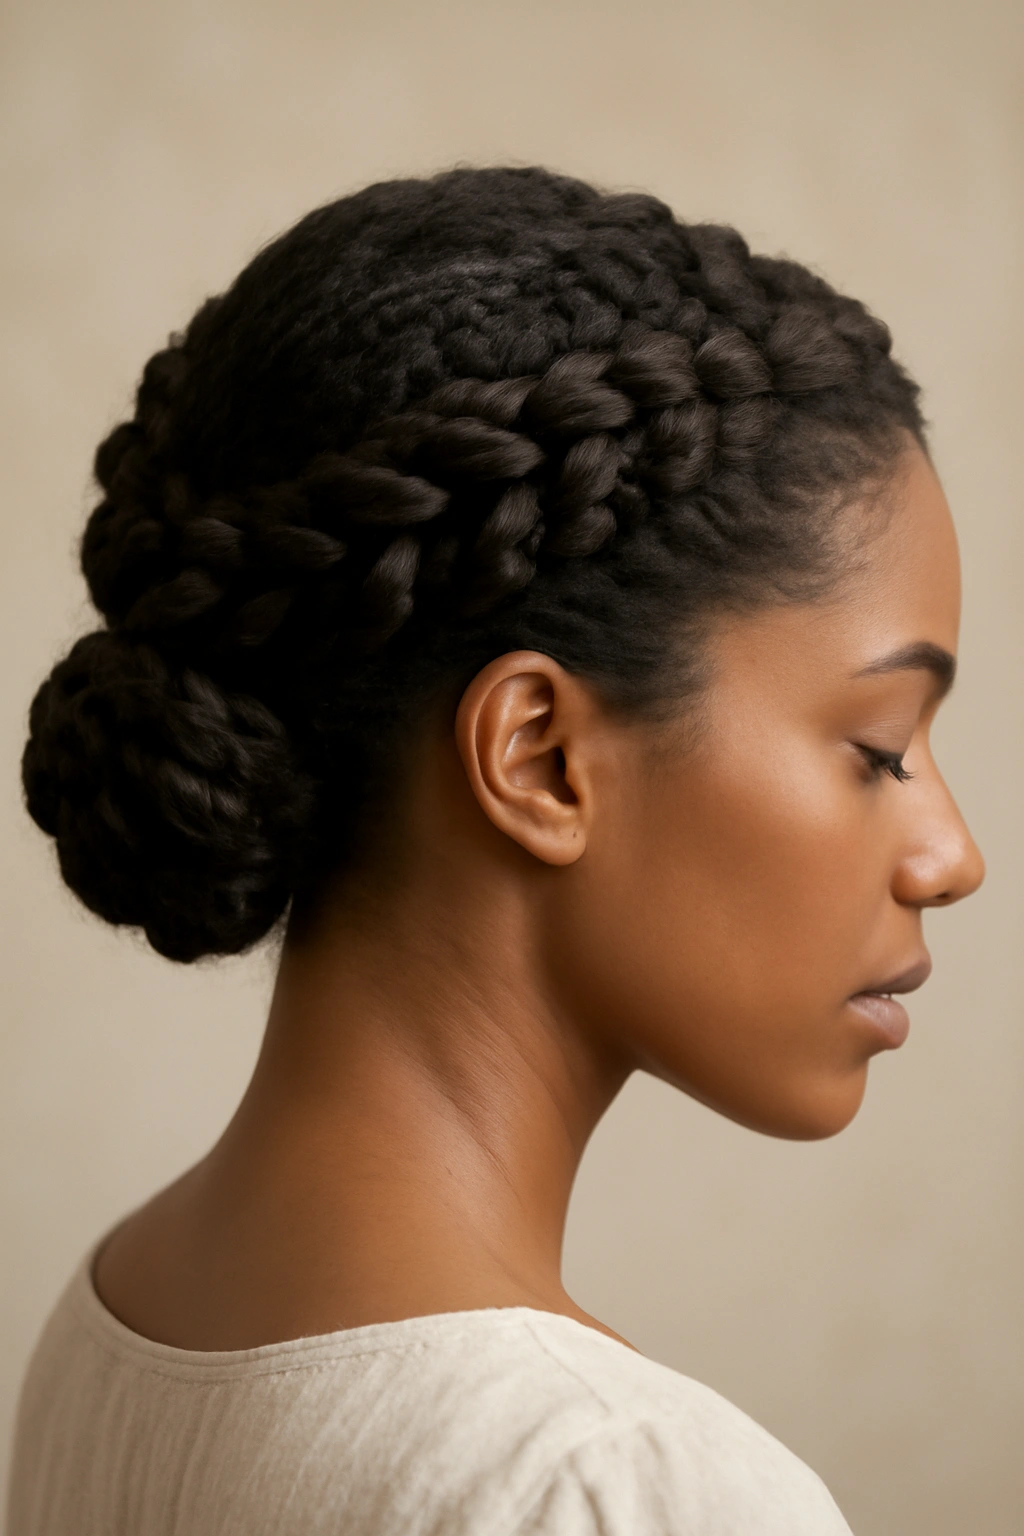
Two-strand twists are a foundational natural hair technique, and when you create them as a crown around your head and secure the ends into a bun at the back, you get a style that feels sophisticated, intentional, and genuinely beautiful. The twists themselves become the ornamental element—no additional flowers or jewelry necessary, though you certainly can add them.
Why Twists Create Bridal Magic
Two-strand twists are secure by nature, meaning they’ll hold for an entire wedding day without loosening or falling apart. The linear pattern of the twists creates visual structure and movement, while the bun at the back adds height and volume. The whole composition feels polished and put-together while remaining true to natural hair styling—you’re not forcing your hair into an unnatural shape, you’re enhancing what’s naturally there.
Building the Two-Strand Twist Crown
- Section damp hair into medium sections (usually 6-8 sections work well for a crown effect)
- Spray each section with a light, water-based mousse or styling cream
- Create two-strand twists starting at your hairline and spiraling back toward the nape of your neck
- As you create each twist, curve it around your head like you’re mapping out a crown
- Secure the ends with bobby pins as you go, curving them toward the center back
- Gather all the twist ends together at the nape and secure into a small bun
- Gently pull each twist slightly to add dimension and soften the look
Real talk: This style takes longer than a simple bun, but the visual payoff is substantial. Budget 60-90 minutes for professional styling, or 90-120 minutes if you’re doing it yourself.
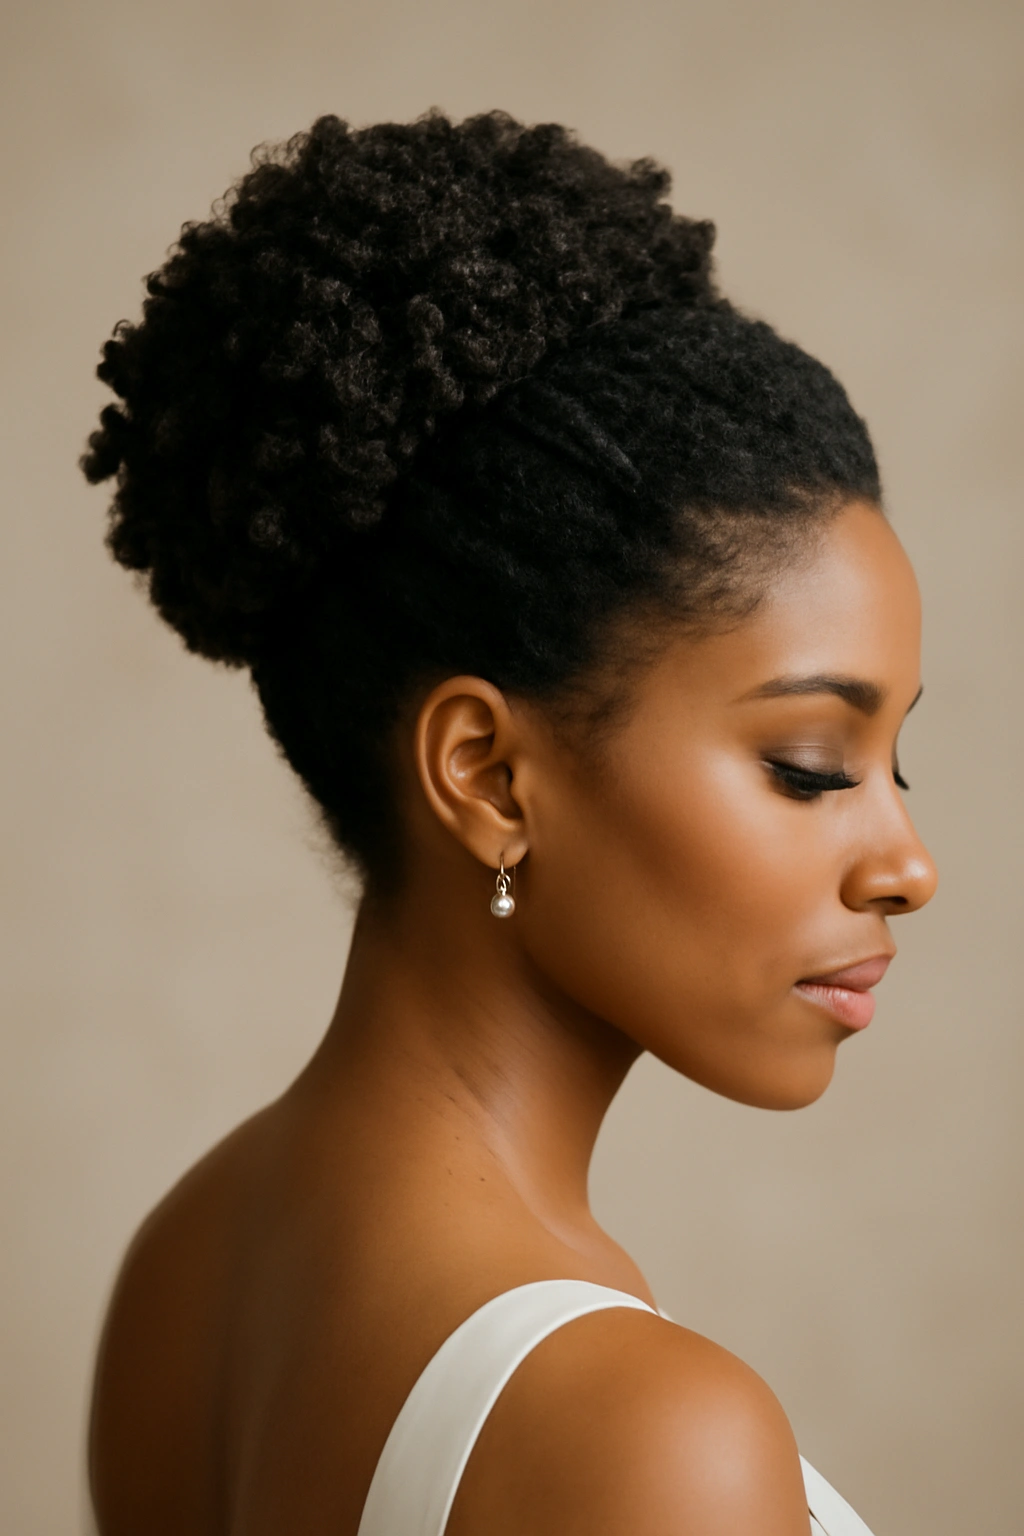
5. The Gathered High Top Knot with Swooped Sides
A gathered high top knot takes your natural hair’s volume and makes it work for you rather than against you. By smoothing the sides and securing the bulk of your hair high on your crown while allowing some pieces to swoop and curve around your face, you create a style that’s both modern and undeniably romantic.
Why High Knots Work for Natural Hair Volume
Natural hair often has inherent volume and texture—a style that gathers it all into one high point and celebrates that volume rather than trying to flatten or compress it feels fresh and confident. The swooped sides frame your face and soften what could otherwise feel severe, while the gathered knot itself becomes a sculptural focal point.
Creating the High Knot Effect
- Start with naturally dried hair or blow-dried hair with a diffuser to preserve curl pattern
- Use a paddle brush to gently smooth the sides and back, creating a sleek base
- Gather all the hair at the crown of your head into a high ponytail
- Twist or coil the ponytail and wrap it around itself to form a knot shape
- Secure thoroughly with multiple bobby pins—at least 6-8 for natural hair that has weight and volume
- Pull a few face-framing pieces and allow them to curve around your cheeks and jawline
- Finish with a strong-hold spray that won’t feel stiff or crunchy
Pro tip: Pull the knot slightly looser than you think you want it—natural hair often relaxes slightly throughout the day, and a knot that starts slightly loose will still look intentional and beautiful by the time you’re in the reception.
6. The Braided Halo Updo with Wrapped-In Length
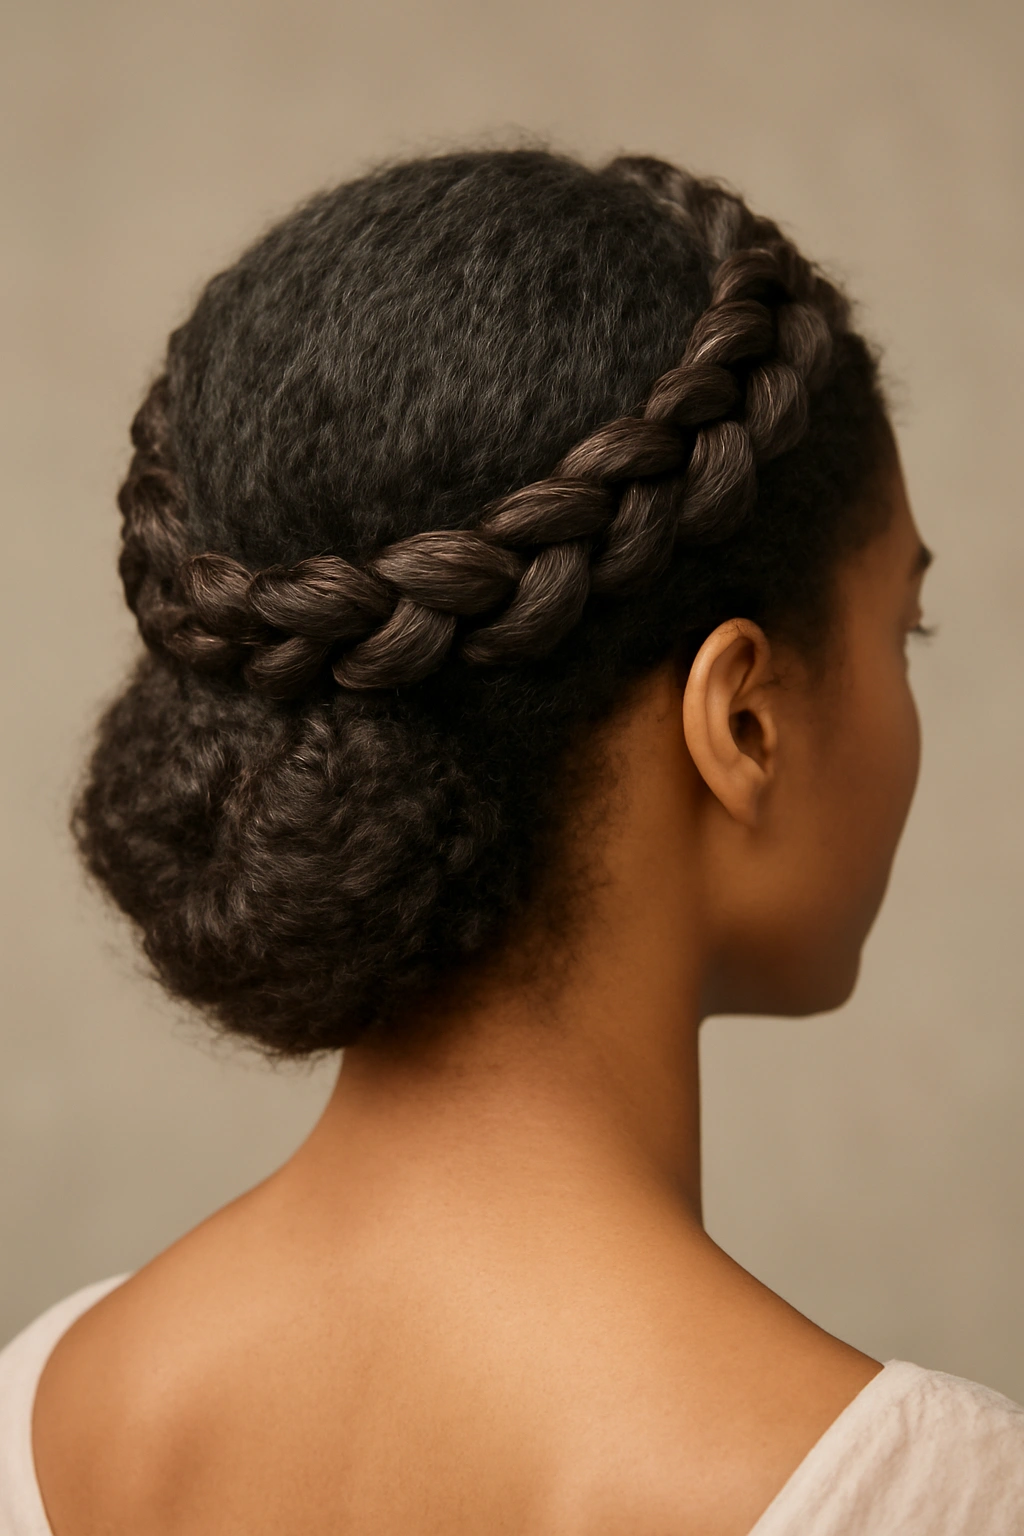
A braided halo is inherently romantic and works beautifully with natural hair’s texture. When you braid sections that create a circle around your head and then wrap in the remaining length for fullness and movement, you get a style that feels soft, wearable, and genuinely special without being over-the-top dramatic.
Why Braids Suit Natural Hair Texture
Braids grip and hold natural hair securely, meaning your updo will stay intact through a full day of celebration. The braids themselves showcase texture and pattern in a way that feels intentional and modern. Unlike styles that require your hair to be sleek and smooth, this updo actually looks better when your natural curl and coil pattern is visible within the braids.
Building the Braided Halo
- Work with damp or product-saturated hair for better grip when braiding
- Create a deep side part and begin a three-strand braid at the temple, braiding horizontally around your head as though you’re creating a crown
- Secure the end of the first braid with a small elastic as it meets the other side
- Gather the remaining hair and loosely twist or braid it, then wrap it around the base of the halo and secure with bobby pins
- Pull the halo braid very gently to add softness and dimension—this creates a fuller, less-tight appearance
- Add sprigs of baby’s breath, small flowers, or delicate greenery woven through the halo braid
Worth knowing: You can create this style with natural texture without smoothing, or you can blow-dry for a slightly more polished version. Both approaches work beautifully—the choice depends on your comfort level and how you want to feel on your wedding day.
7. The Faux-Hawk Updo with Textured Volume
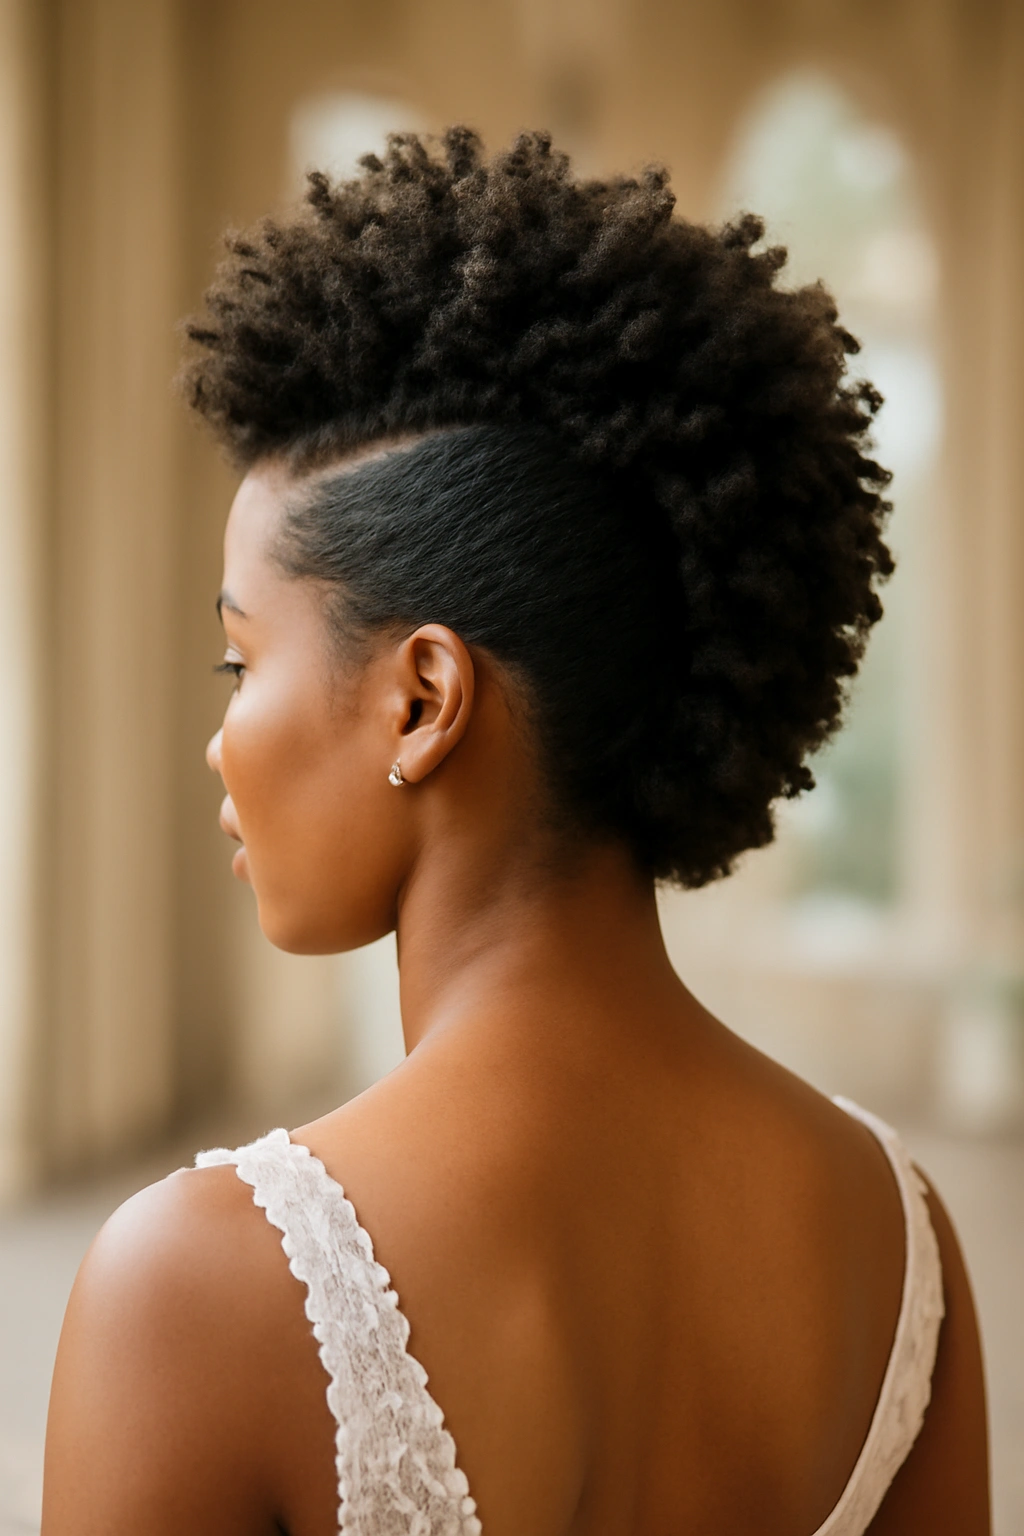
A faux-hawk adapted for a wedding day is bold, modern, and surprisingly romantic when done with the right styling approach. By gathering the sides sleekly and creating height and texture down the center, you make a statement while keeping your hair secured and elegant.
Why This Style Feels Bold Yet Bridal
The faux-hawk works especially well for natural hair because your curl, coil, or wave texture in the center section actually creates the dimension and movement that makes the style work visually. You’re not relying on backcombing or intense teasing—your natural texture does the heavy lifting. The sleek sides balance the boldness of the center, creating a look that feels confident and modern rather than edgy.
Creating the Wedding-Day Faux-Hawk
- Apply a smoothing cream or gel to the sides of your hair and blow-dry straight
- Gather the side sections into two sleek portions at the back and secure them together with bobby pins or a small elastic
- Leave the center section (from your hairline down to the nape) loose and textured
- Use a curling iron or twist the center section to enhance your natural pattern and create volume
- Gently backcomb or tease the center section very slightly to add height without making it look unkempt
- Secure the lifted center section loosely at the nape with bobby pins
- Finish with a strong-hold spray that allows the texture to remain visible
Insider note: This style photographs incredibly well in profile and from behind, so if you’re planning to walk down an aisle or have a first look situation, this is a style that will look stunning from every angle.
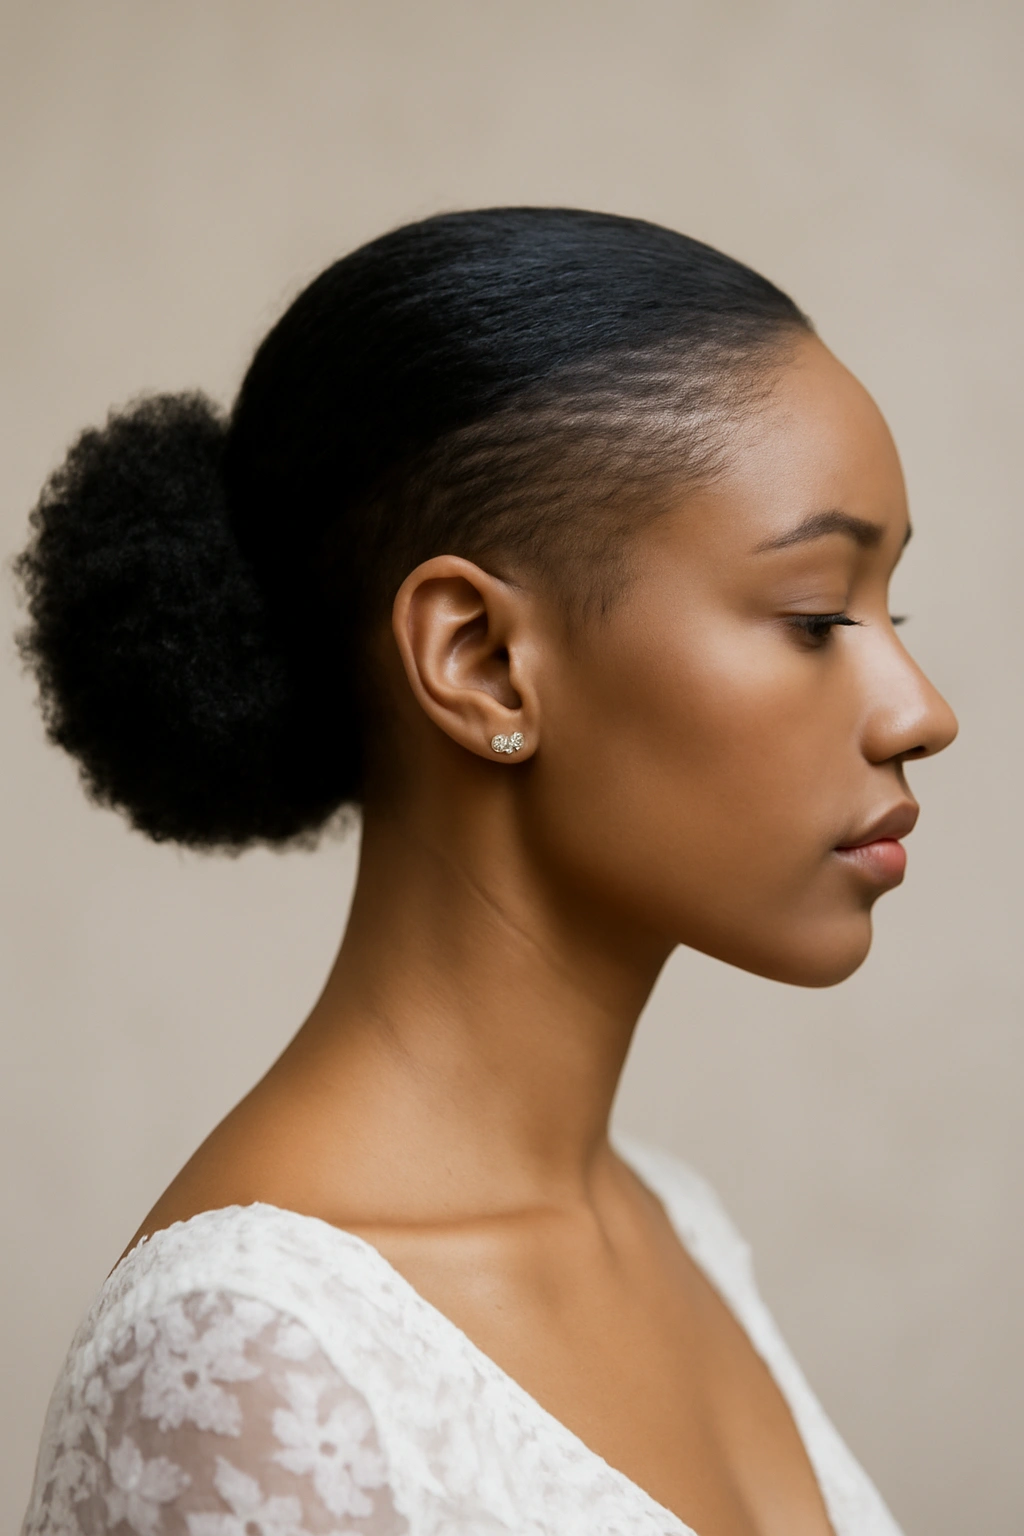
8. The Wrapped Ponytail Bun at the Nape
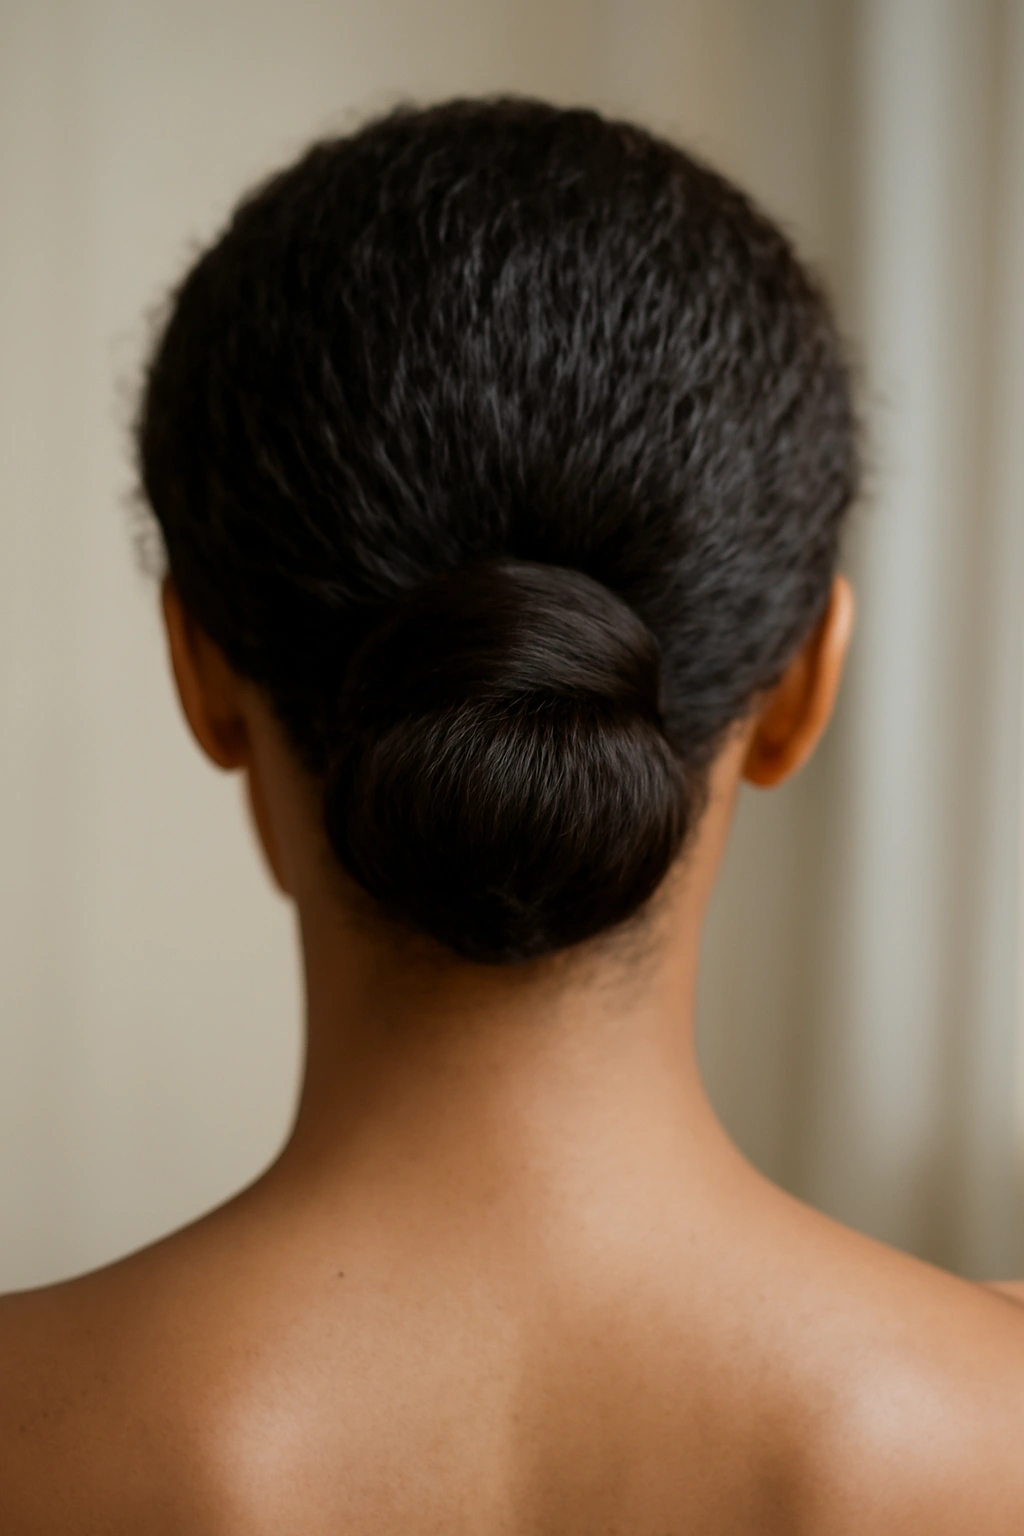
A wrapped ponytail bun is deceptively simple but feels incredibly sophisticated and romantic. By gathering your hair low, wrapping a section around the base, and securing it all into a soft bun, you create a style that looks intentional and polished without being overly complicated.
Why Low Nape Buns Suit Natural Hair
Natural hair buns at the nape feel more mature and elegant than higher placements, especially for a wedding. The low position also tends to be more comfortable for wearing a veil or a decorative comb, if that’s something you want. The wrapping technique creates visual interest and takes the style from simple ponytail to clearly intentional updo.
Building the Wrapped Nape Bun
- Apply a light styling cream to damp hair and blow-dry with a diffuser to enhance your natural texture
- Gather hair into a low ponytail at the nape of your neck, using a brush to smooth the crown area
- Take a small section from the base of the ponytail and wrap it around the elastic, covering it completely
- Secure the wrapped section with bobby pins inserted into the bun base
- Twist the remaining ponytail length gently and coil it around the elastic, securing with additional bobby pins
- Gently pull the bun to soften its shape and create dimension
- Finish with a flexible hold spray that keeps everything in place without the stiff, waxy appearance of heavy product
Pro tip: Use a velvet elastic instead of a standard hair elastic—velvet grips better, won’t slip throughout the day, and is gentler on natural hair.
9. The Side-Swept Coil-Out Updo
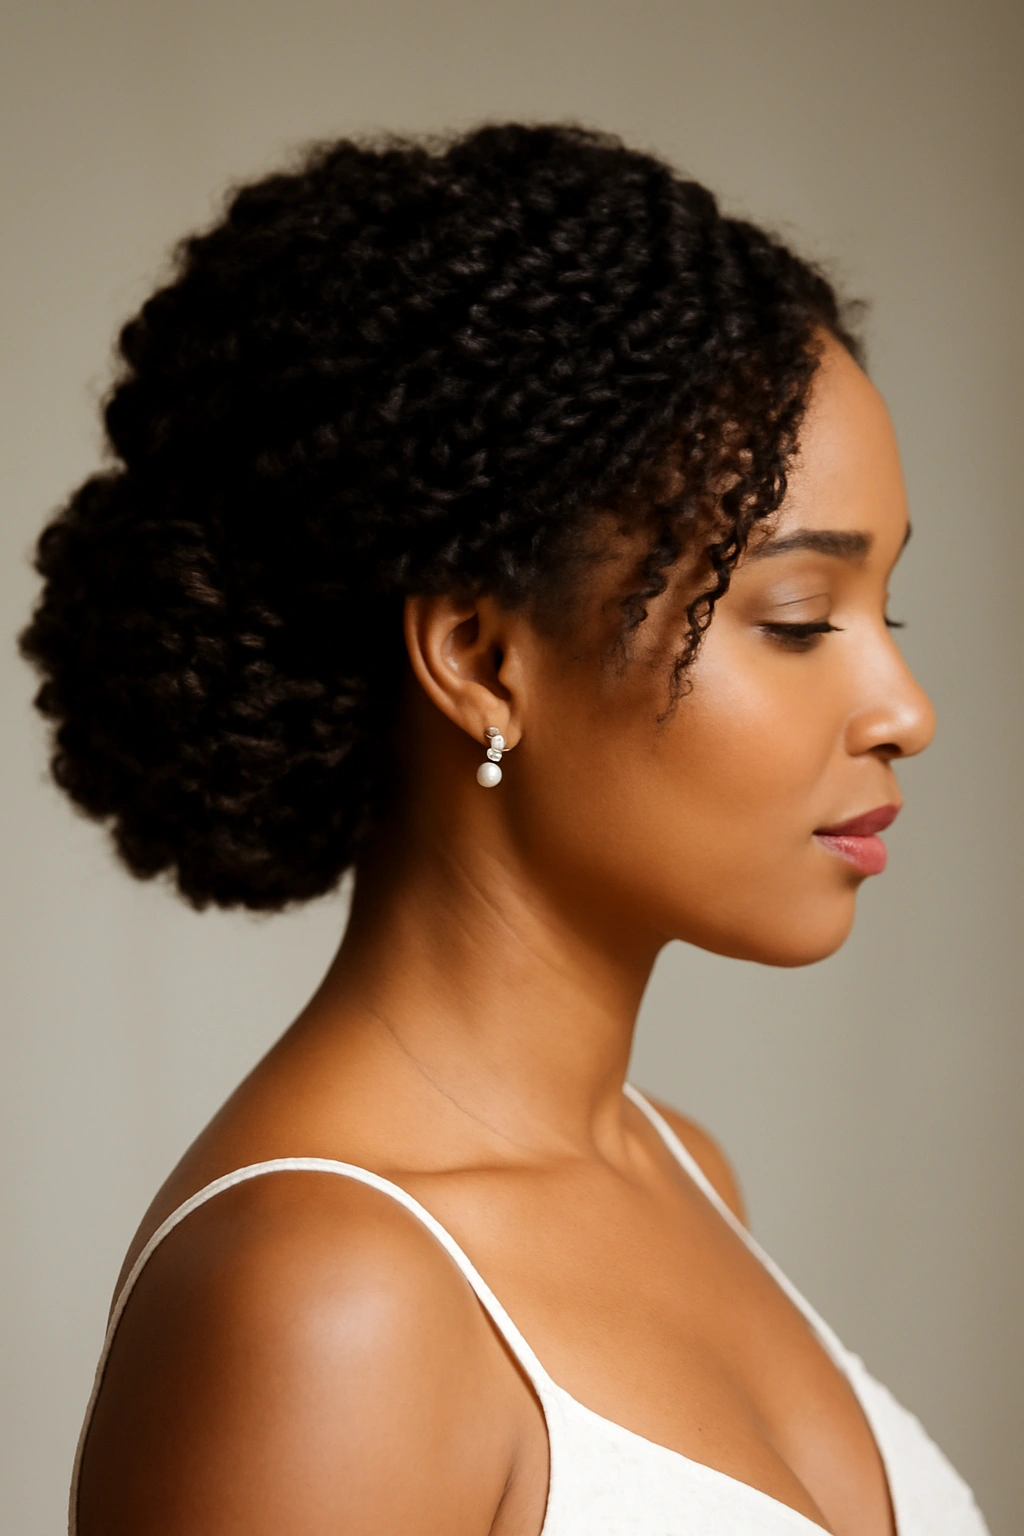
A side-swept updo that incorporates your natural coil-out pattern is romantic, textural, and celebrates everything beautiful about natural hair. By sweeping the hair to one side, gathering and securing it, and allowing coils to fall freely, you create a look that feels soft and effortlessly elegant.
Why Coil-Out Texture Works for Updos
Coils naturally create dimension, volume, and visual interest without any additional styling manipulation. When you incorporate them into an updo by sweeping the hair to one side and securing it while leaving coils visible, you’re showcasing your natural beauty in an intentional, bridal-appropriate way. The side sweep is inherently flattering and romantic.
Creating the Side-Swept Coil-Out Look
- Prepare your hair with a coil-out method at least the day before (apply product to damp hair and air-dry in sections for defined coils)
- Create a deep side part on your preferred side
- Gently gather the hair on the fuller side of the part and sweep it to the back of your head
- Secure with bobby pins hidden beneath the coil texture
- Allow coils from the swept section to fall down the side and back of your head
- Secure the remaining hair at the nape in a soft, textured bun or twisted knot
- Add a vintage comb, delicate hair pins, or small flowers to the secured section for bridal detail
Real talk: This style works best if you’ve done a coil-out specifically for the wedding, as the coils need to be well-defined and set. Plan your hair prep accordingly—a fresh coil-out the night before is ideal.
10. The Multi-Braid Wraparound Updo
Multiple braids wrapped around your head create a style that’s intricate and beautiful without feeling overly complicated or taking an unreasonable amount of time. By creating 3-4 independent braids and wrapping them around your head in different directions, you get visual complexity and dimension.
Why Multiple Braids Create Impact
Each braid shows off your natural hair texture differently depending on the direction and angle. When you layer them, you create depth and visual interest that reads as “this bride clearly put thought and intention into her style.” The multiple braids also distribute the weight and hold more evenly, making the style more comfortable to wear for an extended period.
Building the Multi-Braid Wraparound
- Section hair into 4 distinct areas: two temples, one back section, and one crown section
- Create a three-strand braid in each section, braiding toward the center-back of your head
- As each braid reaches the back, wrap it around the base of your head and secure with bobby pins
- Allow the braids to overlap slightly as you work, creating layered visual depth
- Gently pull each braid to soften it and create dimension
- Secure all four braids together at the nape with a small elastic, then hide the elastic with a wrapped section of hair
- Finish with a flexible hold spray
Worth knowing: This style is easier to create on damp hair with product applied for grip, so plan to style it relatively close to your event time while your hair is still slightly damp from your shower.
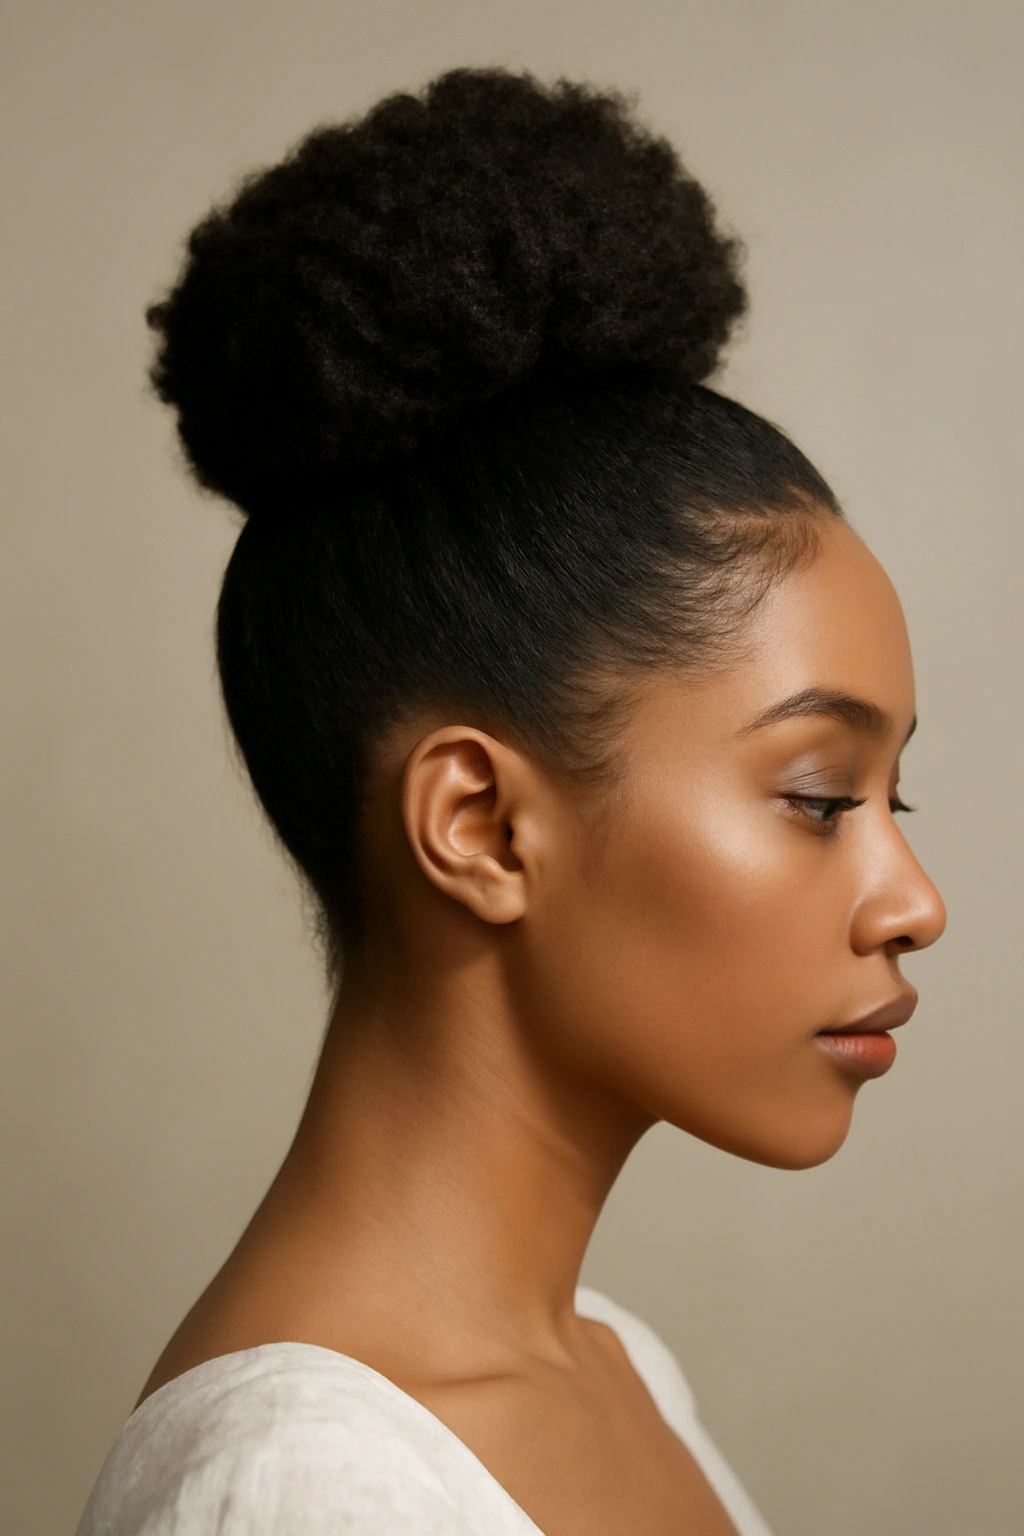
11. The Pineapple Bun with Decorative Pins
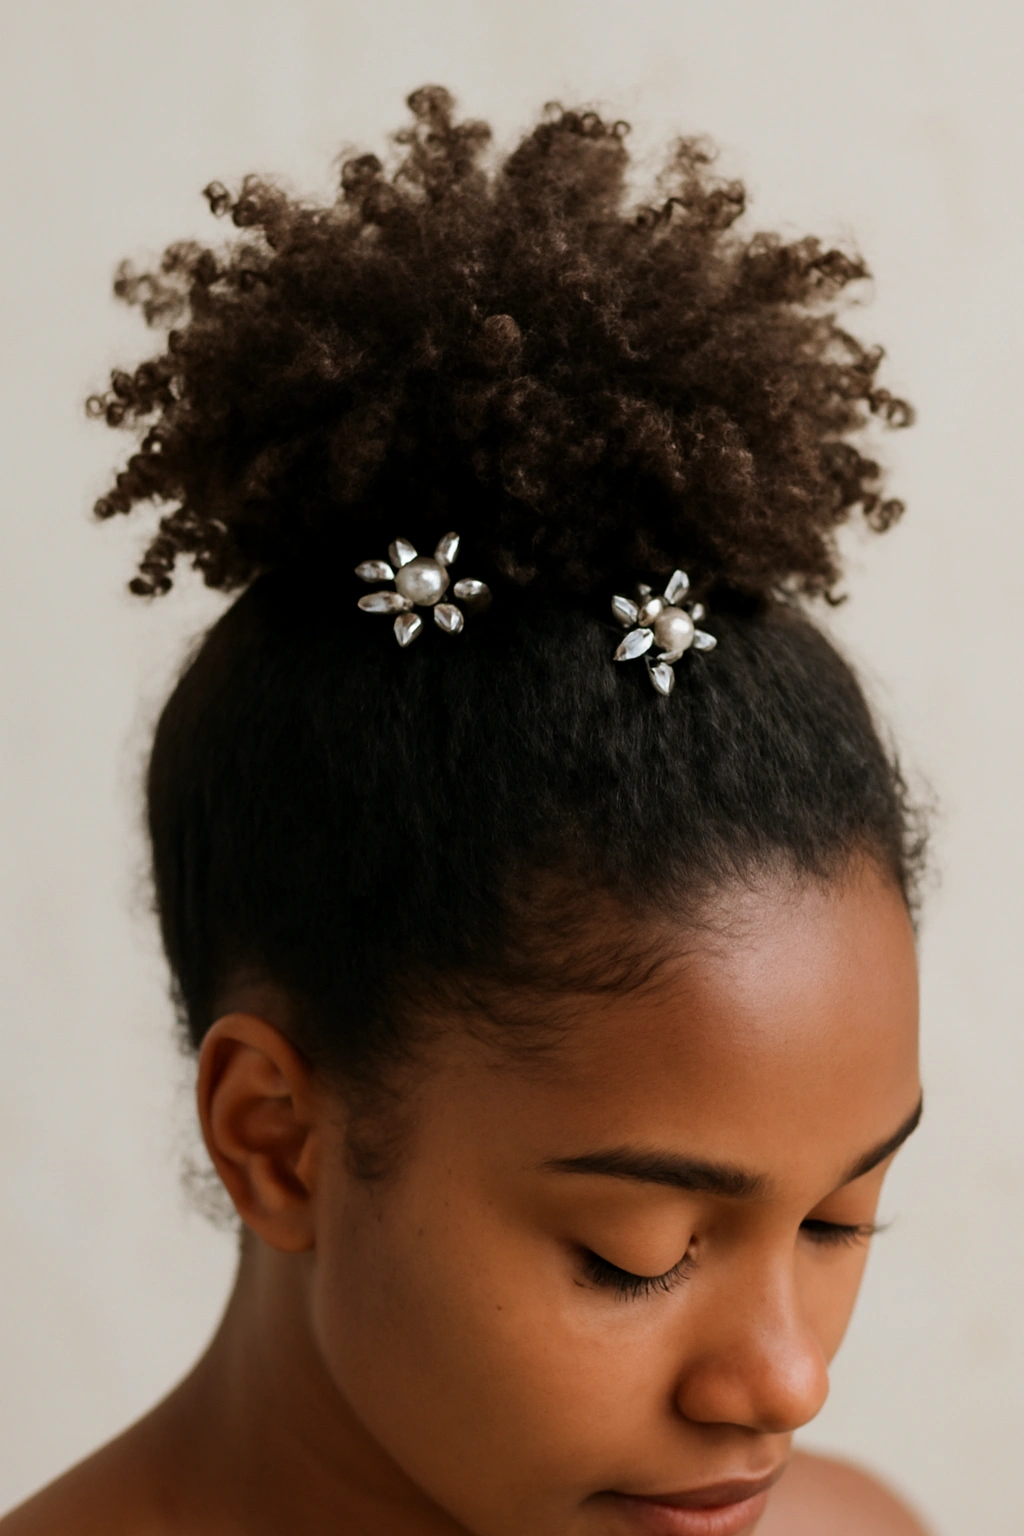
A pineapple bun—gathered high on the crown with the gathered section fanned out—is a style rooted in natural hair care but absolutely wedding-appropriate when styled with intention. By securing your natural coils or curls high and allowing them to cascade downward and outward, you create a style that’s undeniably beautiful and distinctly natural hair.
Why Pineapple Styling Works for Weddings
The pineapple technique is specifically designed to preserve curl pattern and prevent frizz, which means your curls or coils stay defined and beautiful throughout your event. When you style a pineapple with bridal accessories like decorative pins, delicate combs, or jewelry-like hair clips, it transforms from a protective style into a genuinely elegant updo. The height and volume feel modern and celebratory.
Creating the Bridal Pineapple Bun
- Gather hair at the crown of your head using a high, loose ponytail secured with a velvet elastic
- Gently fan the ponytail outward, allowing the natural curl or coil pattern to fall in all directions
- Secure the fanned section with decorative bobby pins or U-shaped hair pins placed throughout
- Add elegant hair pins, delicate comb details, or small jeweled clips along the secured section
- Allow some curls to fall and frame your face and the sides of your head
- Set with a light holding spray that keeps everything secure without weighing down your natural texture
Pro tip: If you want extra height and drama, tease the base section very gently before creating the ponytail—this adds lift without affecting how your curls fall in the pineapple.
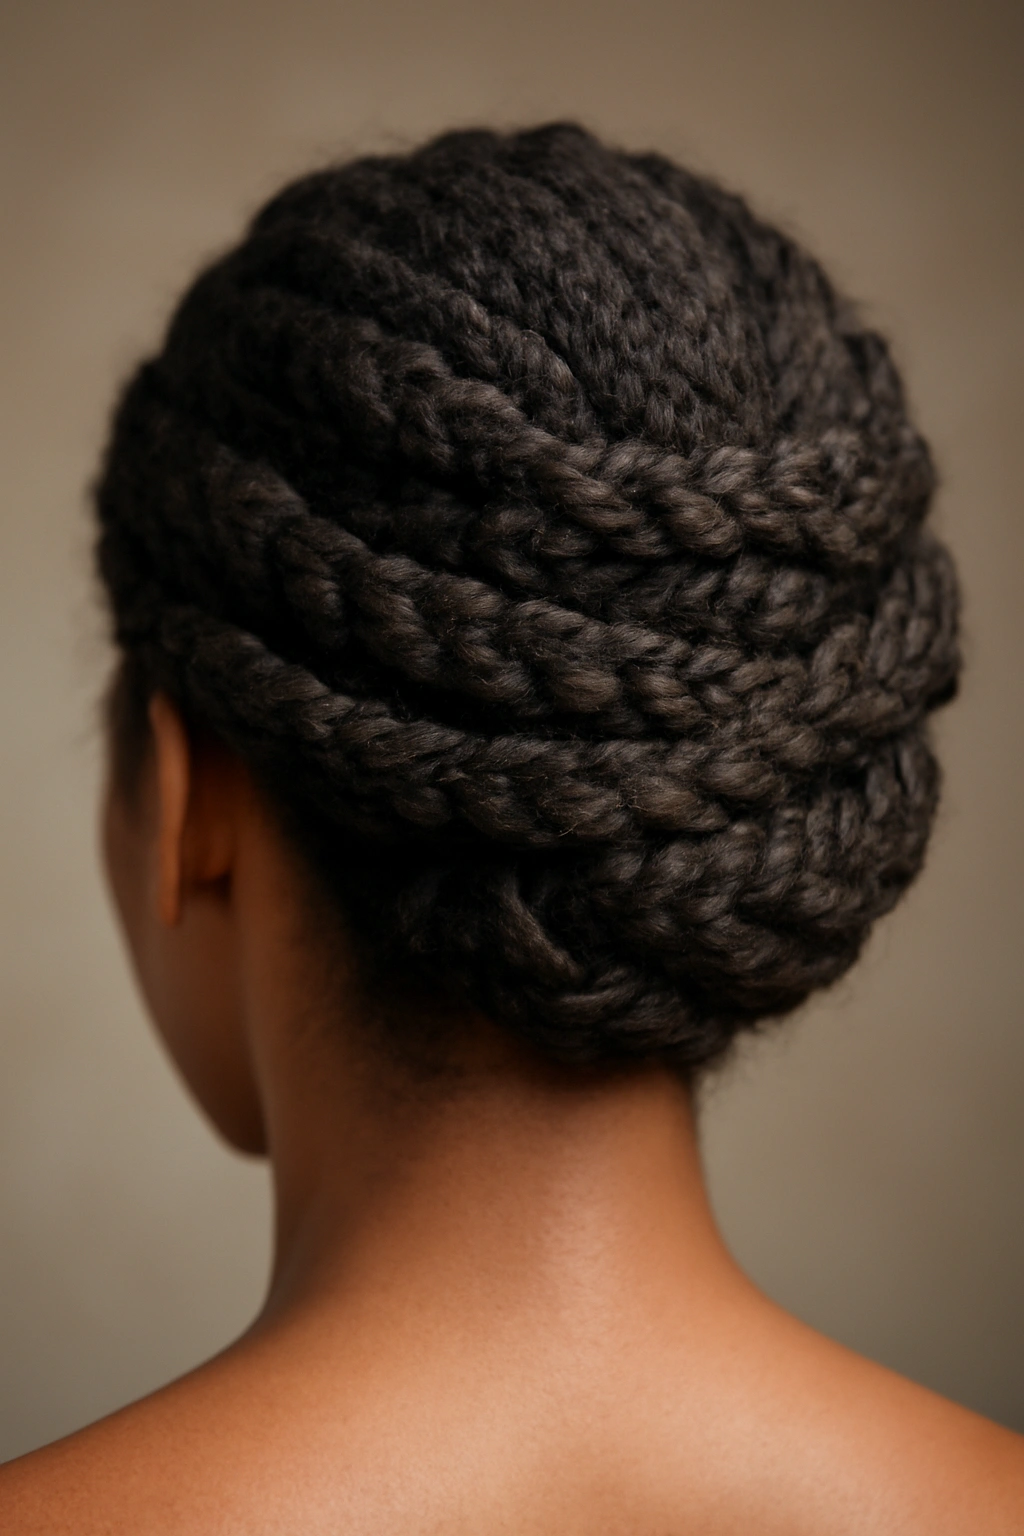
12. The Spiral Roll Updo with Layered Texture
A spiral roll is an architectural, visually striking updo that works beautifully with natural hair’s texture and dimension. By creating spiraling sections that roll upward and inward, then securing them in layers, you get a style that’s both sculptural and soft, modern and romantic.
Why Spiral Rolls Work for Natural Hair
Spiral rolls create their own shape and structure, meaning they don’t require your hair to be bone-straight or artificially smoothed. The spiraling motion actually showcases curl and coil texture beautifully while creating a clearly intentional, updo silhouette. This style feels especially bridal because it’s undeniably “done” without feeling stiff or unnatural.
Building the Spiral Roll Updo
- Work with damp hair that has light styling product applied for hold and definition
- Divide hair into 3-4 vertical sections from crown to nape
- Beginning with one section, roll it upward in a spiral motion, curving it toward the center back of your head
- Secure the rolled section with multiple bobby pins as you go
- Roll the next section similarly, layering it slightly over or beside the previous roll
- Continue until all sections are rolled and secured
- Gently pull the rolls slightly to add softness and dimension
- Use decorative bobby pins or add small flowers or sprays throughout the rolls for bridal detail
- Finish with a strong-hold spray
Insider note: This is one of the more time-intensive updo styles, so budget 75-90 minutes if you’re having it done professionally, or plan for a good practice session if you’re styling yourself.
Final Thoughts
Choosing a natural hair wedding updo means celebrating who you are while embracing the opportunity to feel extra special on a significant day. The twelve styles above represent different aesthetics—from sleek and polished to romantic and textured to bold and architectural—so there’s genuinely something that will resonate with your personal style and comfort level.
The most important thing isn’t which specific updo you choose; it’s that you select a style that makes you feel confident, beautiful, and authentically yourself. Natural hair updos have the advantage of being inherently forgiving—they’re designed to work with your texture rather than against it, which means they tend to hold better, look better throughout the day, and require less maintenance than styles that fight against your natural pattern.
Do a test run with your stylist at least two weeks before your wedding, and don’t hesitate to ask questions about how the style will hold, what products will be used, and whether adjustments can be made if something doesn’t feel quite right. Your wedding day should feel comfortable from the moment you wake up until the last dance, and that starts with a hairstyle that feels as good as it looks.