Braided updos are the Swiss Army knife of hairstyling — they look effortlessly elegant while actually being incredibly forgiving, they work for almost any hair texture and length, and they hold up beautifully whether you’re navigating a humid summer day or a long evening out. Medium and long hair are the perfect canvas for braided updos because there’s enough length to create genuine volume and depth without looking sparse or struggling to anchor the braid. The real magic happens when you combine multiple braiding techniques — say, a Dutch braid foundation with a loosely wrapped fishtail — because suddenly you’ve gone from “I did my own hair” to “I’ve been training with a professional stylist since childhood.”
The thing is, most people think braided updos require steady hands, perfect sections, and hours of practice. That’s only true if you’re going for competition-level perfection. The updos that actually look stunning in real life — the ones that make people ask where you got your hair done — are the ones that embrace a little texture, a few loose tendrils, and a bit of strategic “undone-ness.” That’s what separates an updo that reads as polished from one that reads as overthought and stiff. The styles below are all achievable for someone with basic braiding skills and a willingness to practice once or twice, and most of them actually improve if your braid isn’t perfectly even or if a few pieces escape the original plan.
What makes medium to long hair particularly forgiving for braided updos is that you have enough length to hide the mechanics. If a section doesn’t cooperate, you can tuck it into the braid, weave it through, or pin it with a bobby pin that nobody will ever see. Shorter braids are less forgiving — there’s nowhere to hide. But with medium or long hair? You’ve got options. You can create genuine architectural styles that would be impossible with chin-length hair, yet they still feel fresh and modern instead of looking like something from a period drama (unless that’s exactly what you’re going for, of course).
1. Classic Dutch Braid Crown
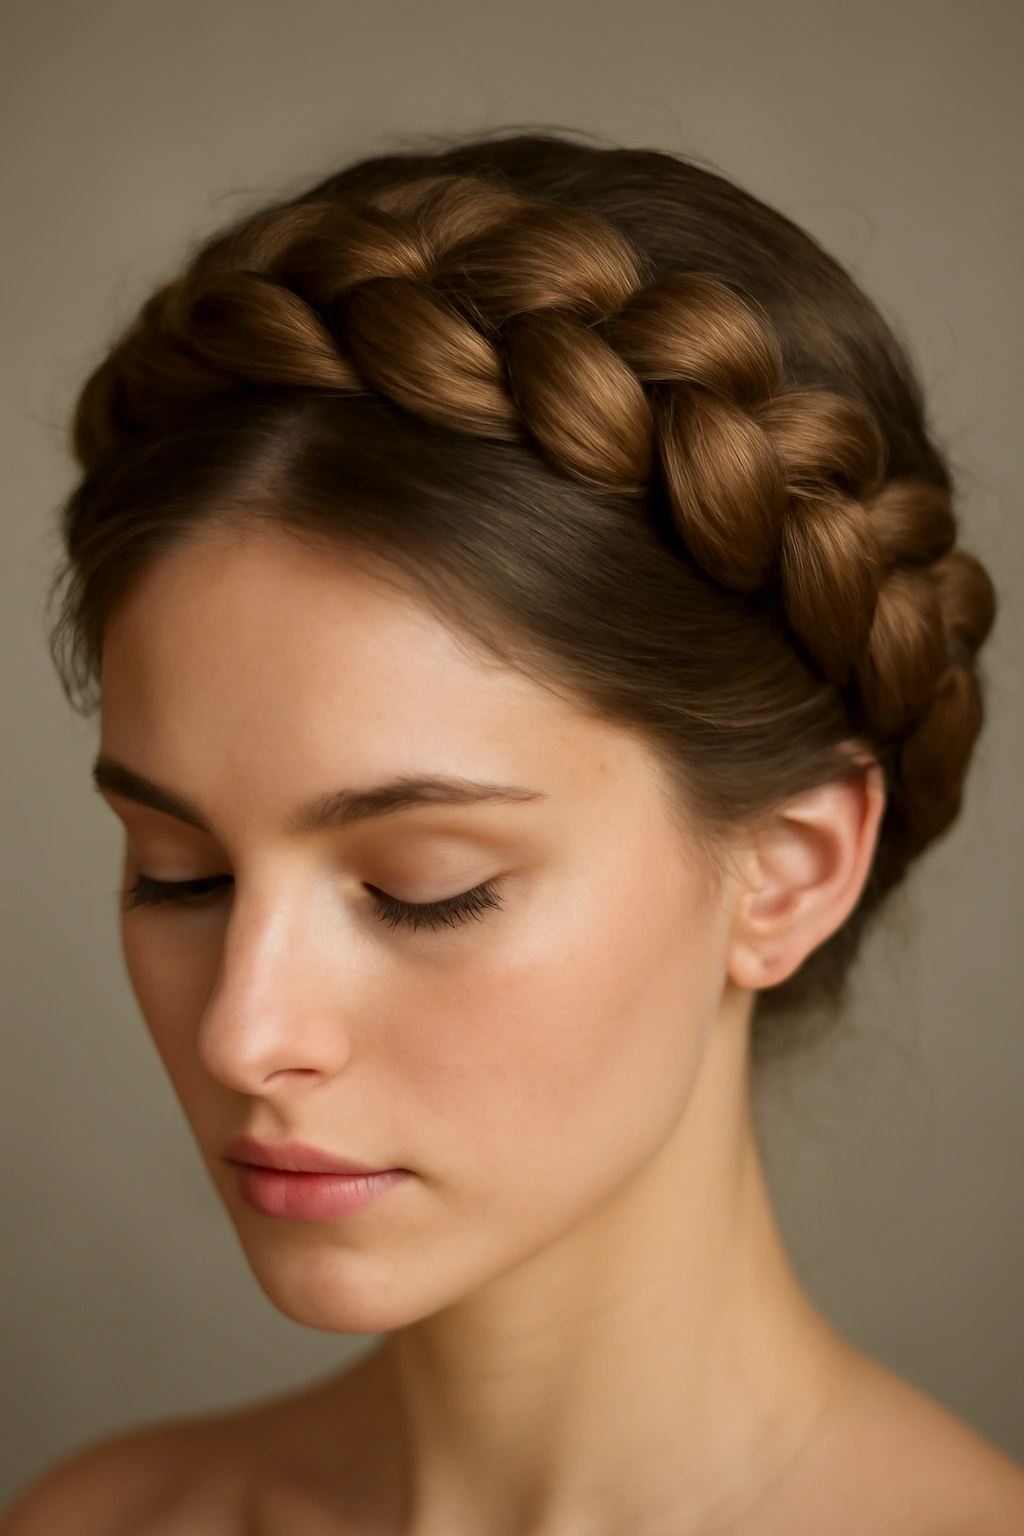
A Dutch braid crown is the updo that makes you look like you woke up five minutes before an important event and somehow still look flawless. This style wraps around your head like a circlet, anchoring both sides of your hair into an intricate braid that looks dramatically more complex than it actually is. The Dutch braid — which is like a French braid’s edgier sister, braided under instead of over — creates depth and visual interest that a standard crown braid simply can’t match. Because the braid is built outward rather than inward, it catches light differently and photographs beautifully from above, which is why it’s become the unofficial champion of special occasion photos.
Why This Crown Style Works So Well
The Dutch braid crown works because it takes the visual weight from your face and lifts it into an elegant frame instead. You’re creating a halo effect that emphasizes your cheekbones and forehead while securing hair that might otherwise fall into your face. The texture of the braid itself adds dimension — it’s not a smooth, polished style, but rather a style that says “I’m elegant AND interesting.” This is actually more visually forgiving than you’d think, because the three-strand structure naturally camouflages slightly uneven sections. If your left braid is a millimeter looser than your right, nobody notices except you.
How to Create Your Own Dutch Braid Crown
Start by creating a deep side part on whichever side feels more natural to you. Take a small section of hair at your temple on the fuller side of the part and begin a Dutch braid, working the braid under itself as you add sections. The technique is identical to a French braid except you’re incorporating hair by taking sections from underneath rather than over the top. Work this braid across the back of your head, keeping it anchored close to the scalp and maintaining even tension. When you reach the opposite temple, secure the tail with a small elastic. Now take the tail and weave it into a loose bun or knot at the nape of your neck, securing it with bobby pins. Pull gently on the braid edges to create a fuller, more voluminous appearance — this is called “pancaking” and it transforms a tight braid into a textured, romantic one.
Best for: Straight to wavy hair, any thickness, any face shape (the style is versatile enough to flatter everyone)
Difficulty level: Intermediate — you need to understand the Dutch braiding technique, but once you’ve done it a few times it becomes automatic
Pro tip: If your hair feels slippery or refuses to hold a braid, roughen up your texture with a texturizing spray or light dry shampoo before braiding. This gives the strands something to grip onto.
2. Fishtail Braid Wrapped Bun
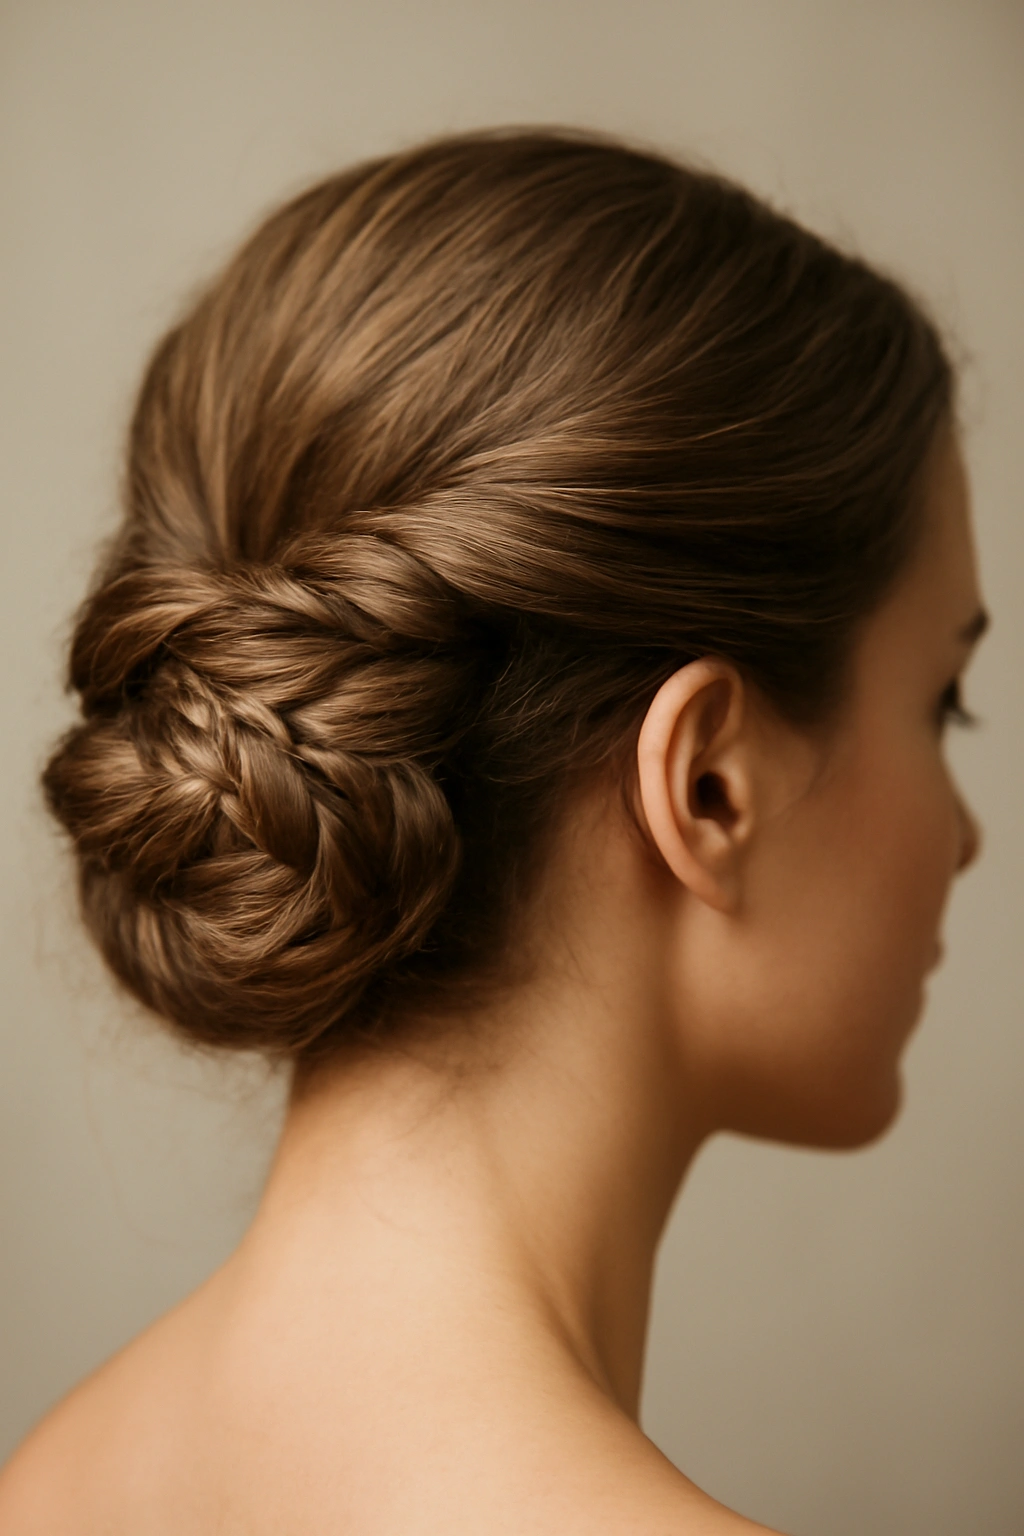
The fishtail braid is the updo world’s secret weapon for making thin or fine hair look dramatically fuller. Instead of the chunky three-strand appearance of a standard braid, the fishtail uses thin alternating sections that create an intricate, lacey texture. When you wrap this braid around itself into a bun, you’re creating a style that looks like it took professional salon training and actually only takes about eight minutes once your hands remember the motion. The wrapped appearance makes the bun appear larger and more textured than it actually is, which is why fishtail updos were practically made for anyone who’s ever wished their hair had more volume.
The Illusion of Volume
Here’s the secret that most updo tutorials skip: the fishtail braid doesn’t actually require more hair than any other braid, but the thin, interwoven sections create visual density. Each individual strand is barely visible because they’re so tightly woven into the neighboring sections. When you wrap this braid into a bun and gently pancake it, you’re essentially folding all that visual complexity into a compact shape. The result is a bun that looks three times as full as your actual ponytail would be if you just twisted it into a knot. This is why fishtail buns became the go-to updo for wedding photographers and special event stylists.
Creating the Perfect Fishtail Wrapped Bun
Gather your hair into a high or medium-height ponytail, depending on where you want the bun to sit. Secure it with an elastic that you don’t mind leaving in — you’ll be wrapping the braid around it. Divide the ponytail into two equal sections. Take a thin piece of hair from the outer edge of the right section and cross it over to join the left section. Take a thin piece from the outer edge of the left section and cross it to the right. Continue this alternating pattern all the way to the ends of your ponytail. The thinner you take each section, the more intricate and lacy your fishtail will look. Once you’ve finished the braid, gently pancake it by pulling on the edge sections to create a fuller, more textured appearance. Wrap the finished braid around the base of the ponytail, securing it with bobby pins as you go. Tuck the tail end underneath the bun and pin it securely.
Best for: Fine hair, thin hair, any hair type that benefits from the illusion of volume
Difficulty level: Intermediate — the fishtail motion is different from other braids and takes practice to execute smoothly
Holding power: Excellent — the interwoven structure naturally grips itself, so this bun stays put without much product
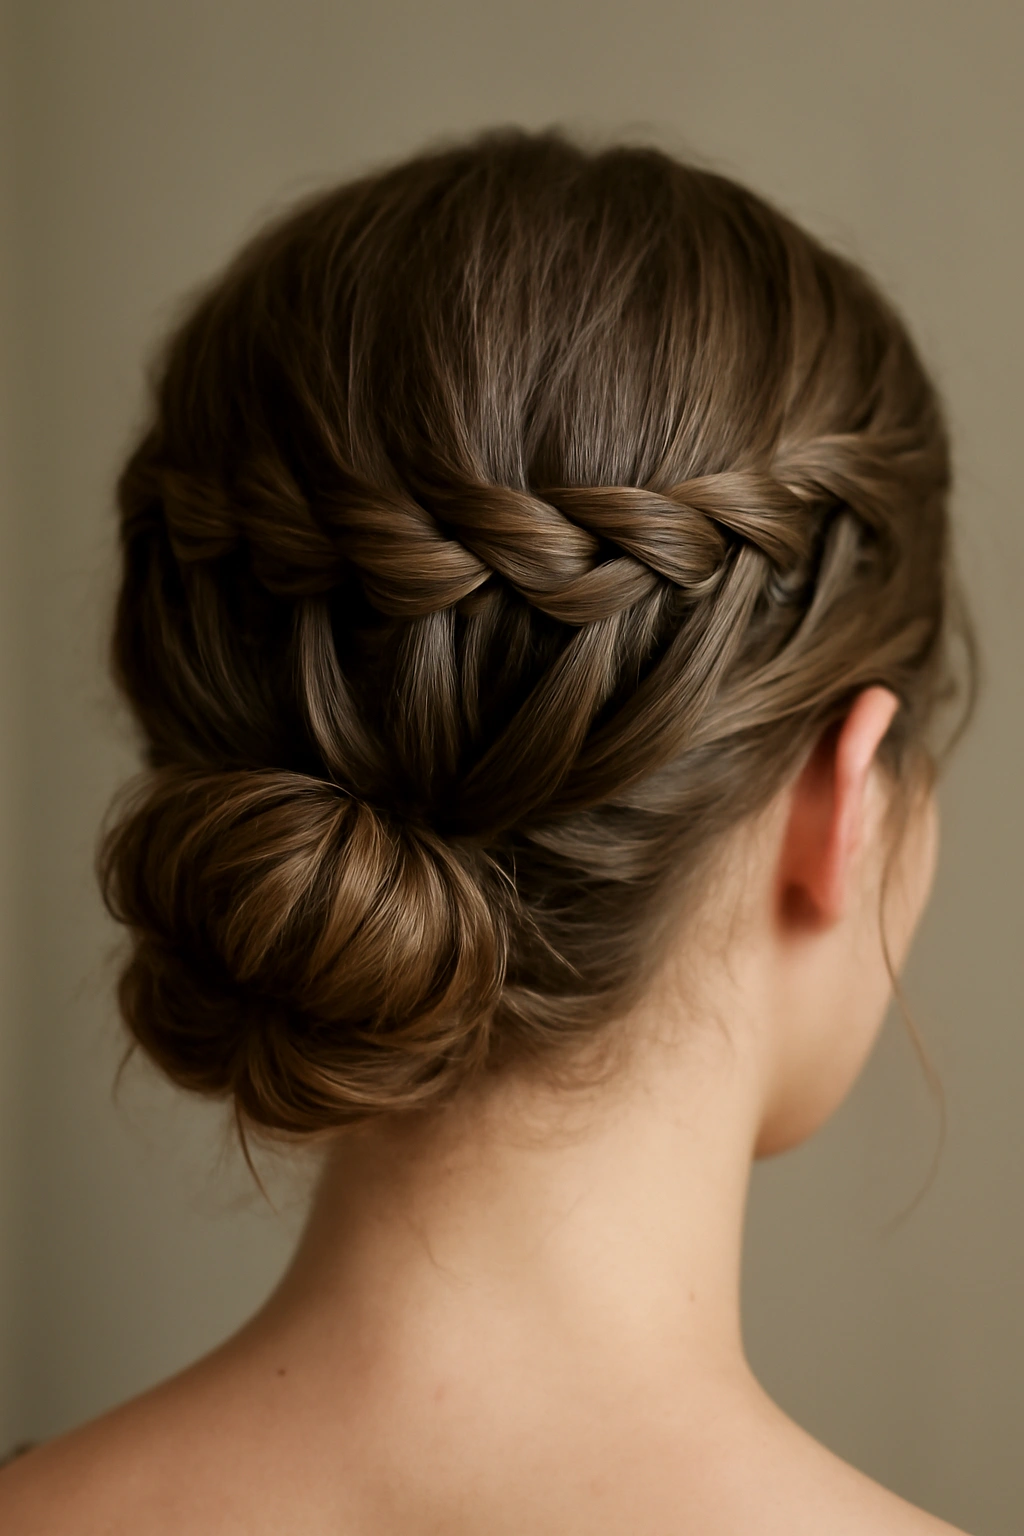
3. Side-Swept Rope Braid Updo
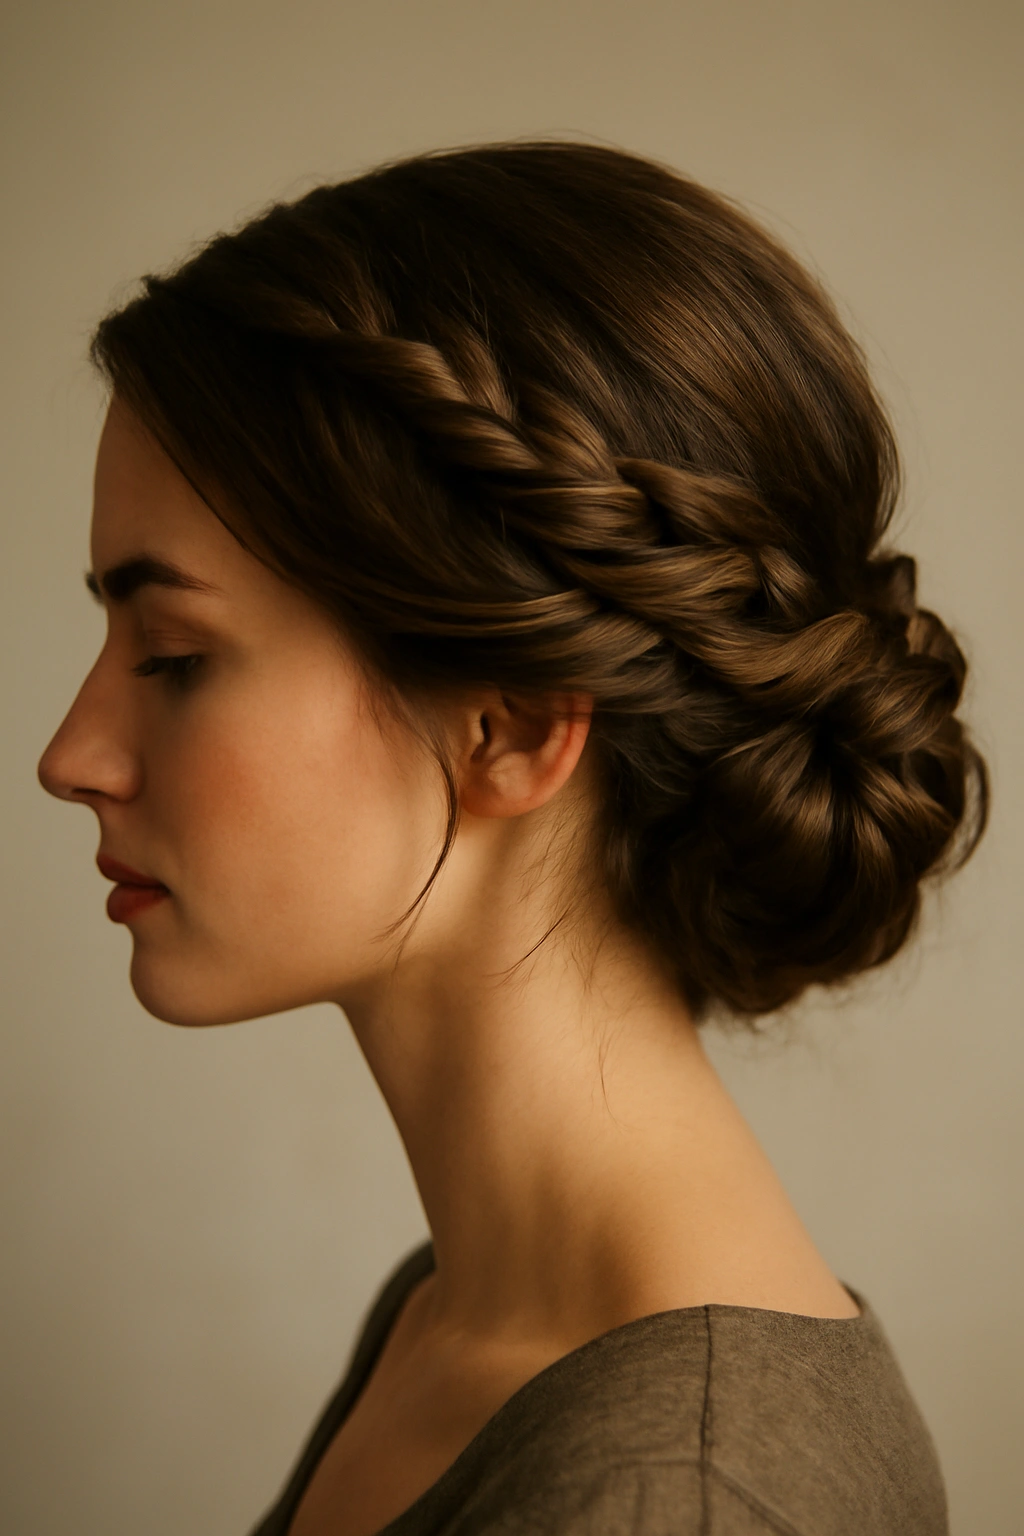
If you’ve ever felt intimidated by traditional braiding, a rope braid updo is the style that will convince you that you’re actually more skilled than you think. A rope braid is created by twisting two strands around each other instead of weaving three strands together, which sounds impossibly simple until you realize that it actually creates a more romantic, textured appearance than many traditional braids. When you wrap this side-swept across your head and into a low bun, you’re creating an asymmetrical updo that looks modern and effortlessly chic rather than formal and predictable.
Why Rope Braids Are Underrated
The rope braid deserves more credit than it typically gets. Most people skip rope braids in favor of traditional braids, but here’s the thing: rope braids are actually less technical to execute perfectly. There are fewer variables, fewer sections to keep track of, and if your rope isn’t perfectly even, it actually reads as intentional texture rather than a mistake. Rope braids are also incredibly moldable — you can create wild, loose rope braids for a bohemian vibe or tight, compact rope braids for a sleek, structured look, all using the exact same technique. The side-swept variation puts the braid on asymmetrical display, which immediately reads as intentional styling rather than a default ponytail.
Building Your Side-Swept Rope Updo
Start with your hair down and create a deep side part. Take a section of hair from above your ear on one side and divide it into two equal strands. Twist each strand clockwise (always the same direction) until both strands are tightly twisted. Then twist the two twisted strands around each other in the opposite direction (counterclockwise). This creates the rope braid. As you rope, incorporate additional hair from the sections below, continuously adding to both twisted strands to create a fuller braid that sweeps across the back of your head. Work toward the opposite side of your head, then gather your hair into a low side bun and secure it with an elastic. Wrap the rope braid around the bun base and pin it securely, tucking the tail end underneath.
Best for: All hair types, but especially those with natural texture (waves or curls enhance the rope effect)
Difficulty level: Beginner to Intermediate — the rope motion is simpler than traditional braiding but requires coordinating twisted sections
Styling note: Rope braids look particularly striking when you pancake them to reveal the twisted spiral structure
4. Double Braided Low Ponytail

The double braided low ponytail is the updo you choose when you want to look intentionally elegant but also deeply practical. You’re creating two separate braids that frame your face, which means any loose hair gets incorporated into one of the braids rather than escaping into your face. You’re securing everything into a low ponytail, which keeps the style from feeling too formal or high-maintenance. The result is an updo that works for a casual dinner, a professional setting, a garden wedding, or a regular Tuesday when you just want your hair to look like you tried without actually trying that hard.
The Framing Effect
Two braids flanking your face create a natural frame that actually works with most face shapes rather than fighting against them. The braids direct the eye downward along your cheekbones and jawline, which is universally flattering. Because you’re gathering everything into a ponytail rather than twisting it into a bun, the style has built-in flexibility — you can wrap the ponytail loosely and let a few waves escape for a romantic vibe, or you can braid or twist the ponytail section for a more polished look. This single style adapts to the occasion simply by changing how you finish the ponytail.
Step-by-Step: Double Braids Into Low Ponytail
Create a deep part or your natural part line. Take a section of hair from one side of the part, starting at your temple, and create a standard three-strand French braid working toward the back of your head. Repeat this on the other side, so you have two braids framing your face and meeting at the nape of your neck. Gather all your hair — including the braids and any loose hair — into a low ponytail at the nape of your neck and secure with an elastic. Now you have choices: leave the ponytail as-is for a soft look, twist it into a loose coil and pin it for a low bun, braid the ponytail section for additional texture, or wrap it loosely around the elastic base for a rose-bud effect. Pancake the braids gently to create more volume and romance.
Best for: Oval, heart, and square face shapes (though with styling adjustments it works beautifully on all face shapes)
Difficulty level: Intermediate — you need to manage two French braids simultaneously, which requires decent hand coordination
Timing: Takes about 10-12 minutes once you’ve practiced the motion a few times
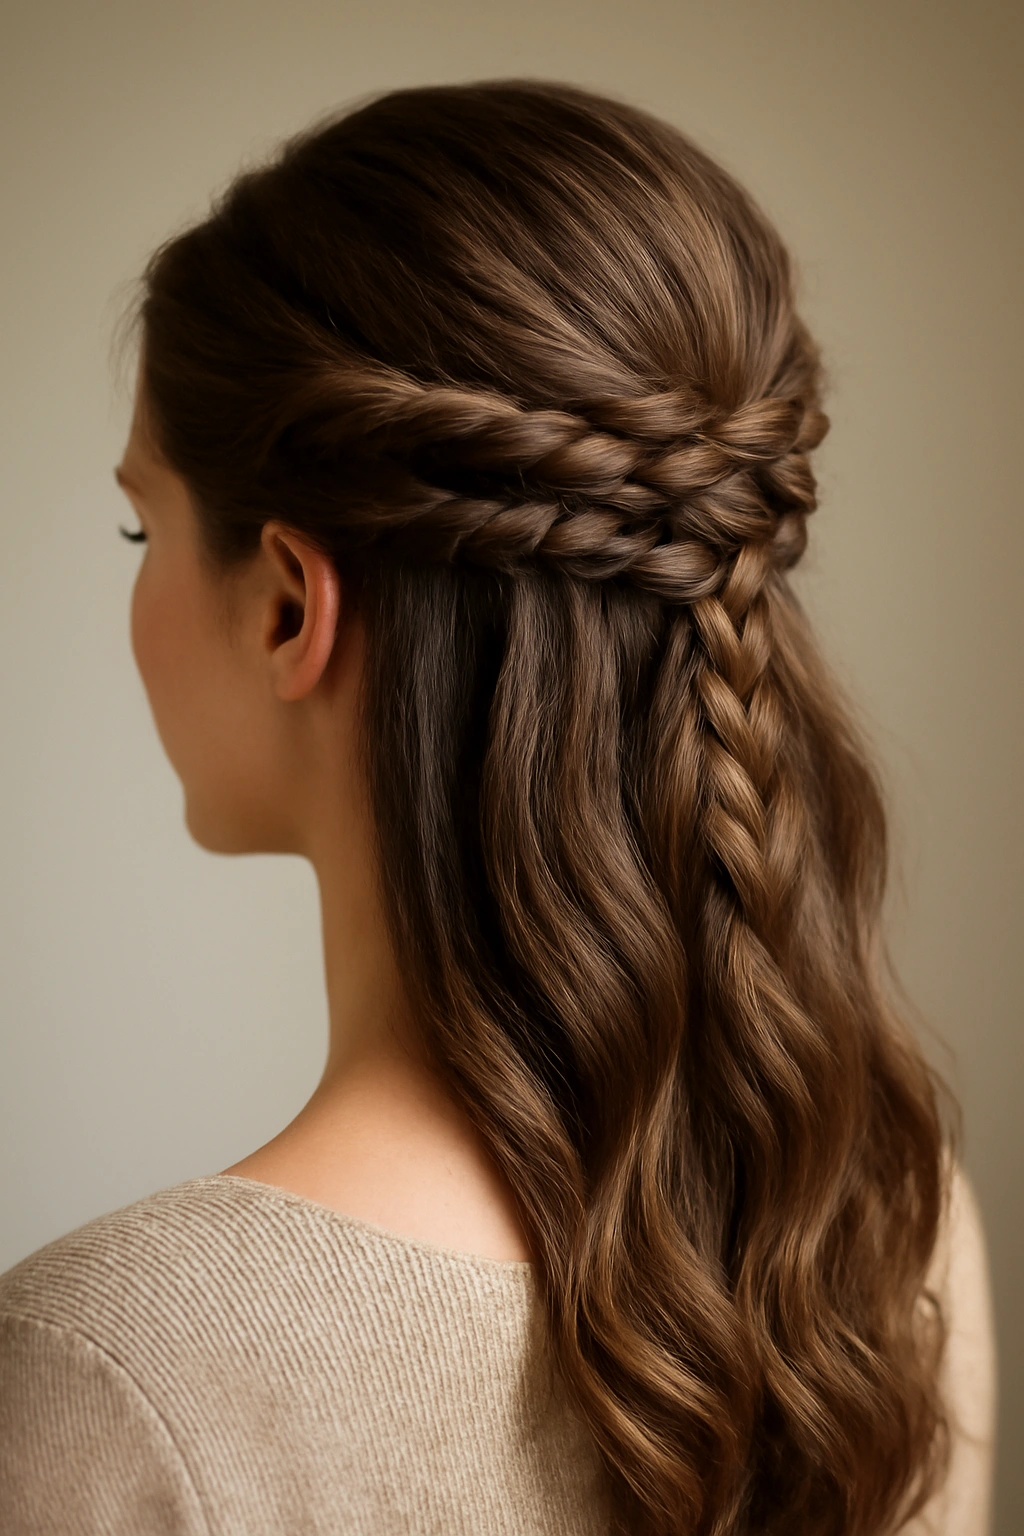
5. Halo Braid with Loose Waves

The halo braid is the updo that makes you feel like you’re wearing a crown, because you literally are. This style takes a single braid and wraps it around the crown of your head, creating a circlet effect that frames your face and emphasizes your features. The magic happens when you combine the structured braid with loose, flowing waves below — you’re creating a contrast between the intentional styling at the crown and the romantic undone quality of the waves. This is the updo that photographs like a dream and makes you look both polished and effortlessly put-together.
Creating Contrast With Texture
The reason halo braids work so beautifully is that they’re all about contrast. The braid is precise, architectural, and structured, while the waves beneath are soft, flowing, and romantic. This tension between precision and softness is what makes the style visually interesting. You’re not committing entirely to an updo, so the style doesn’t feel overly formal. You’re not leaving your hair completely down, so it doesn’t feel underdressed. It’s the Goldilocks of updos — just right for almost any occasion. The loose waves also mean that any texture your hair naturally has becomes an asset rather than something you need to straighten out.
How to Build Your Halo Braid
Start by creating loose waves throughout your hair using a curling iron, curling wand, or braiding method (braid damp hair before bed and release in the morning). You want these waves to hold, so use a light hairspray or texture product. Create a deep side part. Take a section of hair from one temple and create a Dutch or French braid, working the braid around the back and side of your head toward the opposite temple. Secure the braid end with a small clear elastic. Wrap the braid around to the opposite side of your head, positioning it as a crown, and pin it securely with bobby pins. The loose waves frame the braid, creating that critical contrast. Gently pancake the braid to create additional volume, and release any face-framing pieces from the braid for softness around your face.
Best for: All hair types, all face shapes, anyone who wants a romantic but intentional updo
Difficulty level: Intermediate — the braid work is standard, but positioning it as a halo requires planning
Occasions: Weddings, formal dinners, garden parties, anywhere you want to look elegant but not costume-like
6. Braided Knot Topknot
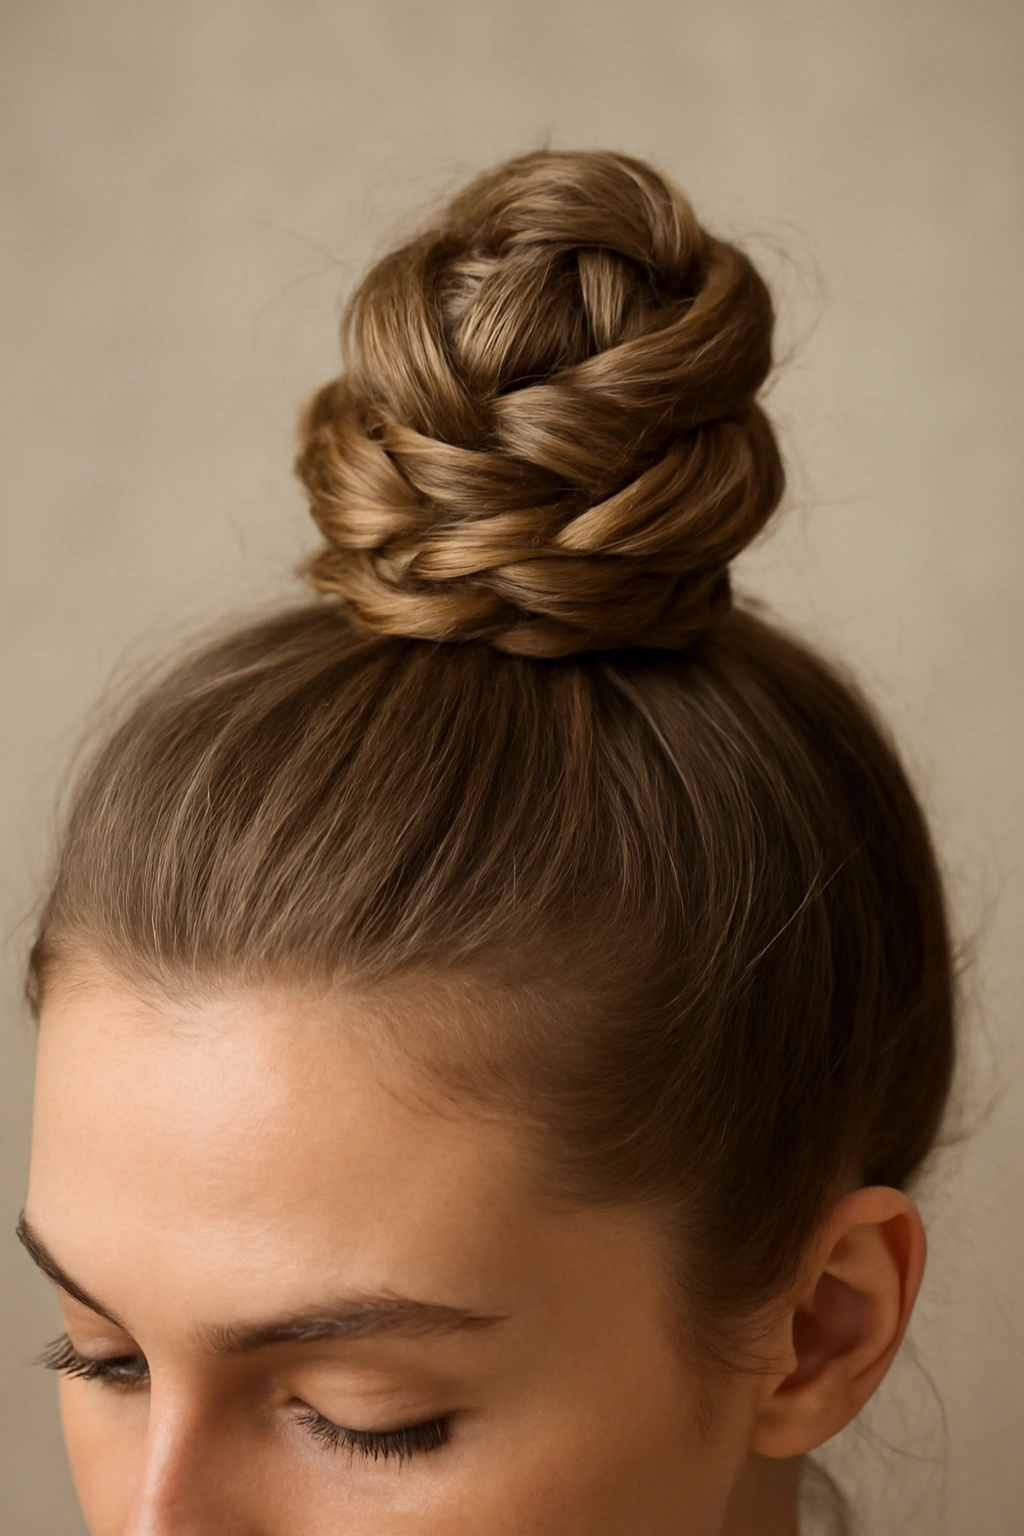
The braided knot topknot is what happens when you take the structured complexity of a braid and make it even more interesting by tying it in an actual knot. This creates a three-dimensional, sculptural topknot that’s completely different from a simple twisted bun. The braided knot sits high on your head and reads as intentionally styled rather than just a convenient hair-up solution. It’s also surprisingly stable — the knot naturally grips itself, so your topknot won’t slowly slip down throughout the day the way some updos do.
The Structural Advantage of Knots
Knots are underutilized in updo styling because people default to buns and twists without considering that knots actually provide a different kind of structural support. When you tie two braided sections into a knot, each section of the knot grips the adjacent section, creating a stable anchor point that doesn’t require much product or extensive pinning. The knot also creates visual interest from every angle — from the front you see the knot face, from the back you see the wrapped sections, from the side you see the three-dimensional shape. This multidirectional interest is why topknots work so well for occasions where you’ll be photographed or viewed from various angles.
Creating Your Braided Knot Topknot
Divide your hair into two equal sections with a center part. Create a French or Dutch braid with each section, working from your front hairline toward the crown of your head. You should have two braids meeting at the top of your head. Tie these two braids together in an actual knot, the way you’d tie two pieces of string together. Wrap the braided sections around the knot to create the topknot shape and pin securely. Pull gently on the braid sections to create volume and soften the look. Any tail ends get tucked underneath and pinned. For a softer look, pancake the braids as much as possible. For a sleeker look, keep the braids fairly compact.
Best for: Medium to long thick hair, or anyone willing to use a volumizing product to create the appearance of thickness
Difficulty level: Intermediate to Advanced — you need to manage two braids and then tie them together, which requires spatial planning
Confidence boost: This style turns heads because it’s obviously intentional but still accessible to DIY stylists
7. French Braid Messy Bun
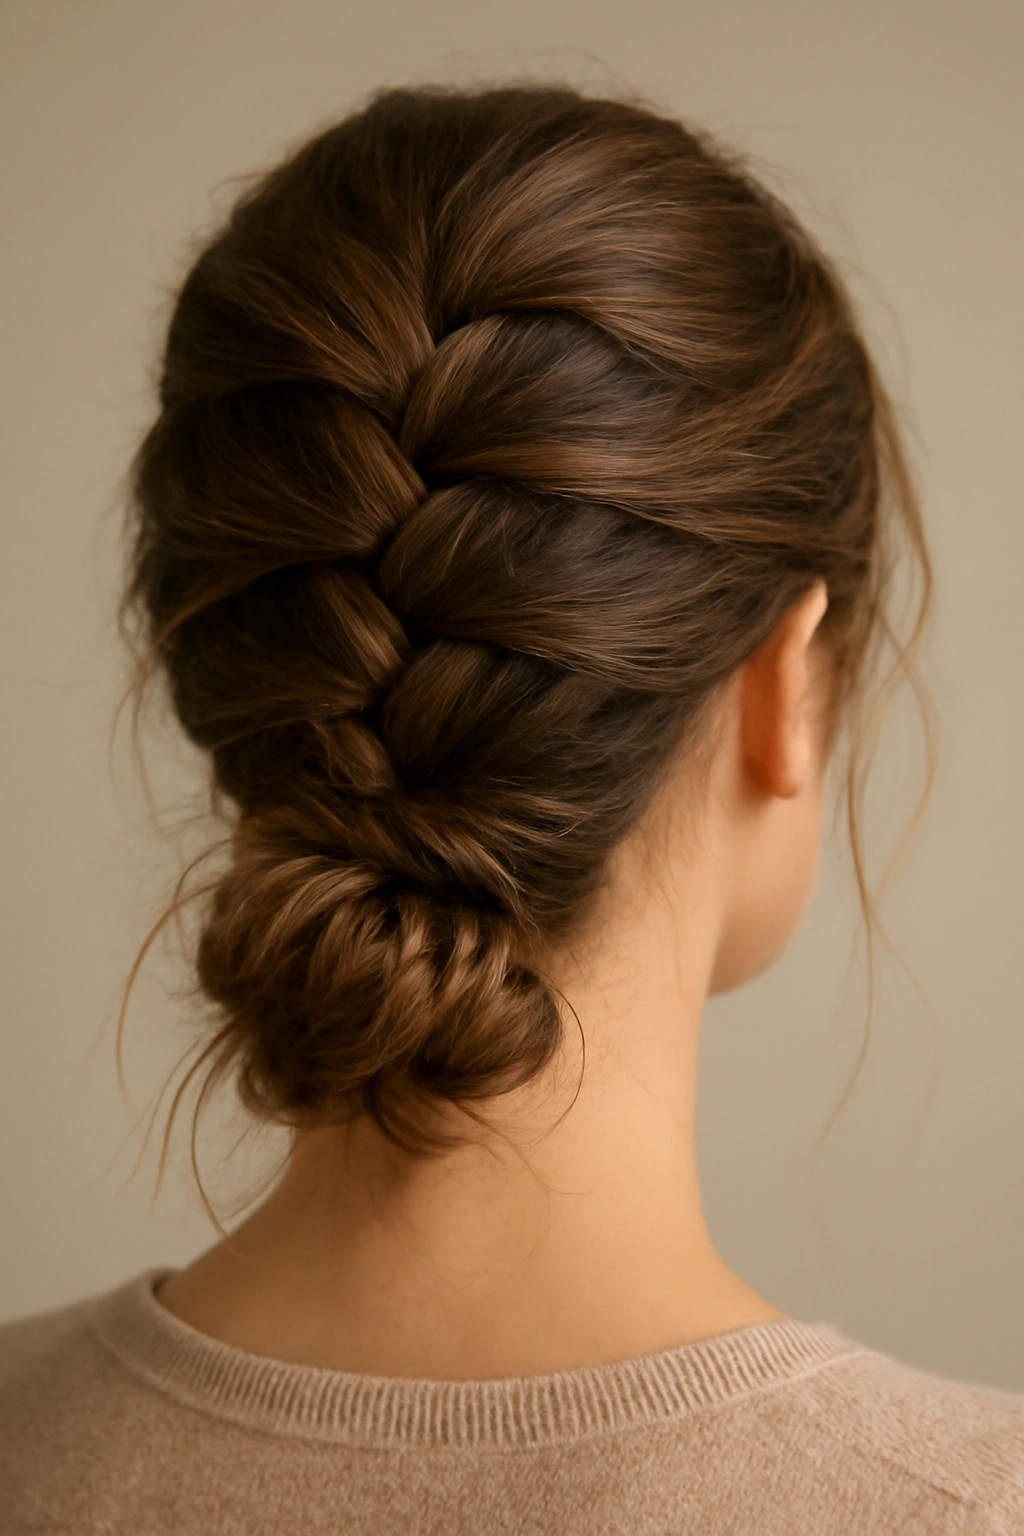
The French braid messy bun represents the sweet spot between “I made real effort” and “I didn’t stress about it,” which is honestly the look everyone actually wants. You’re creating a single French braid that runs down the center or slightly off-center of your head, then wrapping it into a low or mid-height bun at the nape of your neck. The bun is intentionally soft and undone, with pieces pulled free and texture encouraged. This is the updo you reach for on regular days when you want your hair off your neck but you’re also not getting ready for an event — you’re just living your life and wanting to look good doing it.
The Appeal of Intentional Messiness
Here’s the secret that separates beautiful from trying-too-hard: the messy bun has to look intentionally messy, not like you forgot to finish styling. You accomplish this by creating a structured braid, then deliberately loosening it and pulling out select pieces. Your braid becomes the anchor that prevents the whole thing from looking actually disheveled, while the pulled-out sections create the soft, romantic quality. This is why a French braid messy bun looks better than just twisting your hair into a knot — the braid provides visual interest and structure that justifies the looseness everywhere else.
Building Your French Braid Messy Bun
Create a deep side part or your natural part if you prefer. Take a section of hair from your crown and begin a French braid, working straight down the center or slightly off-center of your head. Incorporate hair as you go, maintaining gentle even tension. Work the braid all the way to the nape of your neck. Secure the braid end with an elastic. Pancake the braid by pulling gently on the edge sections to create a fuller, more textured appearance. Wrap the braided tail into a loose, soft bun at the nape of your neck and secure with bobby pins. Pull out a few face-framing pieces from the braid or the bun area and arrange them loosely. Use your fingers to massage the bun and create a deliberately undone appearance. A light texturizing spray helps maintain this without making it look stiff.
Best for: Anyone who wants a casual updo that still reads as intentional
Difficulty level: Beginner to Intermediate — French braiding is the only technical skill required, and the messiness actually camouflages imperfect technique
Best occasion: Daily wear, casual outings, situations where you want practicality without sacrificing style
8. Twisted and Braided Half-Up Style
The twisted and braided half-up is the updo that gives you the best of both worlds — you’re securing enough hair to keep it off your face and neck, but you’re leaving enough hair down to maintain volume and movement. You’re using two techniques — twisting and braiding — which sounds complicated but actually breaks the style into manageable pieces. Twist sections on one side, braid sections on another side, and bring everything together in the center back. You’ve just created an updo that looks like it required professional training but actually just required you to remember two different techniques.
Why Half-Up Works for Every Hair Length
Half-up styles are universally flattering because they work with every hair length, every hair texture, and every face shape. The secured section keeps hair away from your face while the down section maintains volume and framing. You’re not committing to a full updo, so if your hair is fine or damaged at the ends, those vulnerable pieces stay tucked into the half-up section. If your hair is thick and you want maximum volume, the down section delivers it. The half-up also works for casual situations and formal events — change your accessories and your makeup and the exact same hairstyle reads completely different.
Building Your Twisted and Braided Half-Up
Create a deep side part. On one side of the part, take a section near your ear and create a two-strand twisted section, adding hair as you go and working toward the back of your head. On the opposite side, take a section and create a three-strand braid, working the same direction. These sections should meet at the center back of your head. Secure all sections together with an elastic or decorative clip at the center back. The twists and braids anchor the secured portion while your hair below flows free. If you want additional security, create a second smaller braid or twist on each side and wrap those around the main secured section. Pancake your braids and twists for added volume and romance.
Best for: All hair types and lengths, particularly people with fine hair who want secure styling without full updos
Difficulty level: Beginner to Intermediate — combines basic techniques without requiring advanced skills
Versatility score: Very high — works for casual weekends, work environments, formal events with the right accessories
9. Waterfall Braid Into Tucked Bun
The waterfall braid is the technique that makes you look like you actually trained with a professional hairstylist, even though it’s incredibly achievable with a little practice. The waterfall effect is created when you drop strands from your braid and let them flow free, creating cascading waves that appear to flow out of the braid itself. When you wrap this waterfall braid into a tucked bun, you’re creating an updo that looks dramatically more complicated than it actually is. The falling strands create movement and romance, while the tucked bun keeps everything secure and put-together.
The Cascading Effect
What makes waterfall braids visually stunning is the movement. Your braid creates structure and architectural interest at the crown, while the falling strands create softness and flow. This is why waterfall braids photograph so beautifully — the camera captures the dimension and movement in a way that makes the style look editorial and polished. The technique is actually more forgiving than it appears because the dropped strands camouflage imperfect braid sections. If one part of your braid is slightly looser or uneven, the waterfall effect distracts from it.
Creating Your Waterfall Braid Bun
Start with your hair down and create a deep side part. Take a section of hair at your temple and create a standard three-strand braid, but with a twist: after you complete each braid rotation, drop the bottom strand and pick up a new section of hair from underneath to replace it. This creates the waterfall effect — the dropped strands flow free while your braid incorporates new hair. Continue this pattern around the back of your head toward the opposite side. When you reach the back, gather all your hair including the braid and the waterfall strands into a low bun and secure. Tuck the bun underneath itself to hide the elastic, creating a polished, finished appearance. The waterfall strands should fall freely, creating that essential cascading visual.
Best for: Medium to long hair with some natural wave or texture, all hair colors but especially striking with dimension or color-treated hair
Difficulty level: Intermediate to Advanced — the waterfall technique requires coordination and practice to execute smoothly
Show-stopping factor: Very high — this is the updo that makes people ask who did your hair
10. Spiral Braid Updo
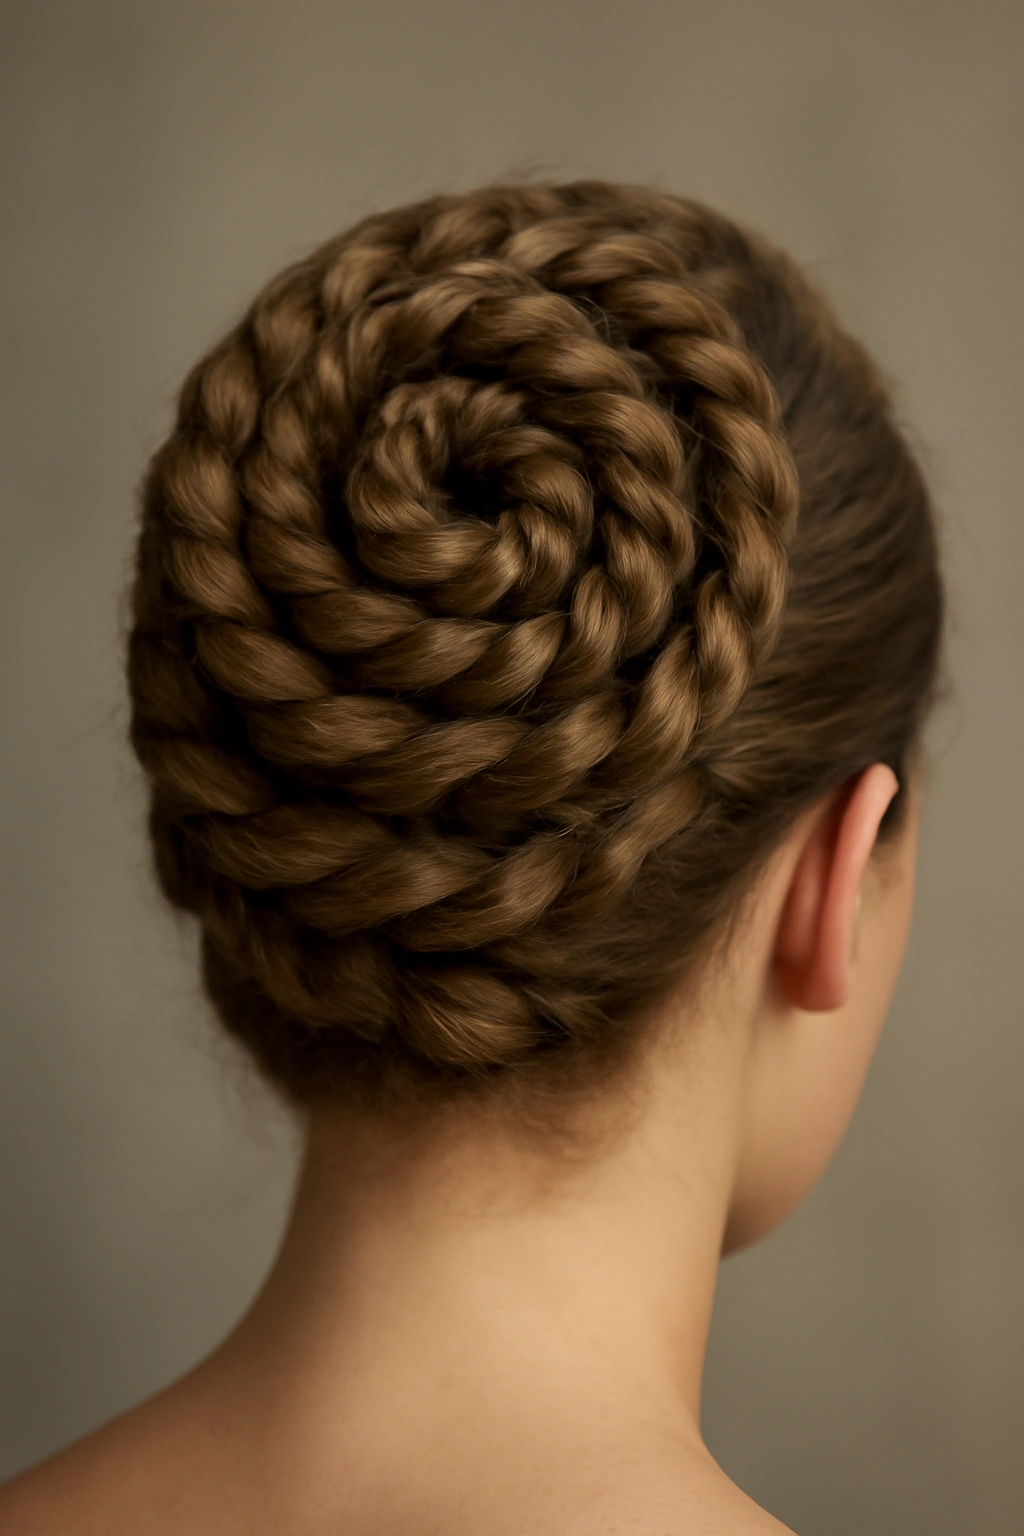
The spiral braid is a lesser-known braiding technique that creates a completely different visual effect than traditional three-strand braids. Instead of weaving three sections over and under each other, a spiral braid involves wrapping sections around a central core, creating a textured, rope-like appearance that’s visually unique. When you use spiral braids as the foundation for an updo, you’re creating something that immediately reads as artistic and intentional. The texture is so interesting that the updo works even without significant volume or perfect execution — the braid technique itself is the focal point.
The Unique Texture of Spiral Braids
Spiral braids create a dimensional, sculptural texture that other braiding techniques simply can’t replicate. Each rotation of the spiral creates a visual ridge that catches light and adds depth. When you incorporate multiple spiral braids into a single updo, you’re creating a style that looks completely different from any traditional braid updo. The technique also works beautifully on textured hair — if your hair naturally has waves, curls, or kinks, the spiral braid emphasizes and celebrates that texture rather than trying to smooth it away.
Building Your Spiral Braid Updo
To create a spiral braid, take three sections of hair. Wrap the right section around the center section, then wrap the left section around the new center section. Continue this wrapping motion, always moving sections around the core rather than over and under. The result should look like a three-dimensional spiral or twisted rope. You can create two spiral braids framing your face, or create multiple smaller spirals throughout your hair and gather them into an updo. Secure your spiral braids into a high or mid-height bun, wrapping them decoratively around the bun base. Pancake the spirals gently to create softness without losing the defined spiral shape. The texture is the point, so embrace it.
Best for: Textured hair, curly hair, anyone who wants a style that celebrates their natural texture
Difficulty level: Advanced — the spiral technique is different from standard braiding and takes practice to execute smoothly
Best occasions: Creative events, art openings, fashion-forward occasions, anywhere you want to make a distinctive style statement
Inspiration level: Very high — this is a style that makes people notice and remember your effort
Final Thoughts

Braided updos aren’t just for special occasions or people with natural styling talent. They’re accessible, achievable, and genuinely adaptable to your specific hair type, hair length, and personal style. The key is picking a style that matches your current skill level, giving yourself grace while you’re practicing, and embracing the imperfections that actually make updos look modern and beautiful rather than pageant-polished. Start with the French braid messy bun or the rope braid if you’re newer to updo styling — these are forgiving and look stunning even when they’re not technically perfect.
Once you’ve mastered the foundational techniques, experiment with the more advanced styles like the waterfall braid or spiral braid updo. Your hands will remember the motions faster than you think, especially if you practice once a week on a day when you’re not going anywhere specific. Set a timer, do your hair, and if it doesn’t turn out, you’re just going to redo it. This low-stakes practice is how you build confidence and muscle memory simultaneously.
The truth about braided updos is that they actually improve with practice and repetition more than almost any other hairstyling technique. Your hands learn the rhythm, your eyes learn how tight or loose to braid for the effect you want, and eventually you stop thinking about the individual steps and just execute the style. That’s when they become genuinely fun instead of stressful. You’ll find yourself braiding your hair the same way you’d tie your shoes — without thinking about it, just feeling your way through the motions. And that’s when the real magic happens, because that’s when your updos look effortless instead of labored.