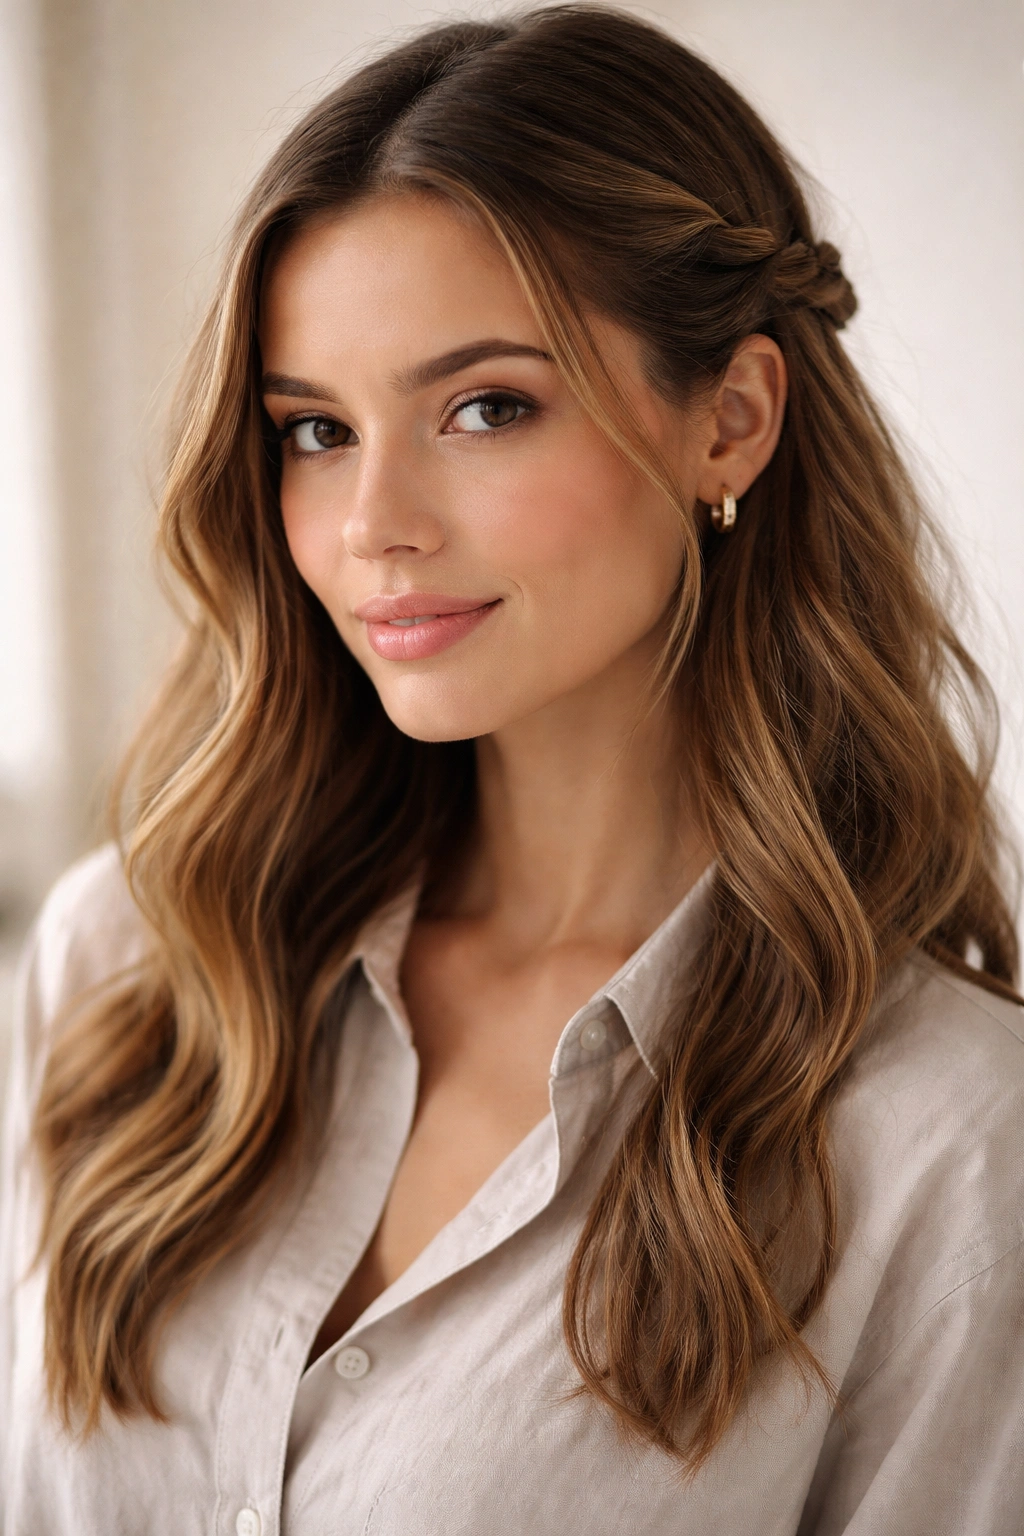
The magic of a casual shirt and jeans outfit lies in its versatility — it’s the foundation of effortless style, adaptable enough for coffee runs, weekend brunch, or working from home. But here’s what often gets overlooked: your hair is just as important as the clothes you wear. The right hairstyle can elevate a basic shirt-and-jeans combo from looking thrown-together to intentionally polished. Whether you’re someone who loves changing up your look or you’re in a styling rut with the same everyday outfit, your hair can completely transform how that casual ensemble reads.
The beauty of pairing hairstyles with casual clothing is that you have freedom. You don’t need elaborate, high-maintenance styles — in fact, some of the most effective looks for this kind of outfit are ones that embrace texture, movement, and a touch of intentional imperfection. The goal is to find a hairstyle that feels authentic to you while actually working with your hair type and your schedule. When your hair coordinates with your relaxed outfit, the whole look cohesive instead of accidental.
Over the next sections, you’ll find hairstyle ideas ranging from minimal-effort styles you can throw together in minutes to slightly more involved looks that are still manageable for everyday wear. Some work best with specific hair lengths or textures, while others are genuinely adaptable. Mix and match these ideas based on what resonates with your personal style, and don’t be afraid to tweak them to suit what actually works for your hair.
1. The Effortless High Bun
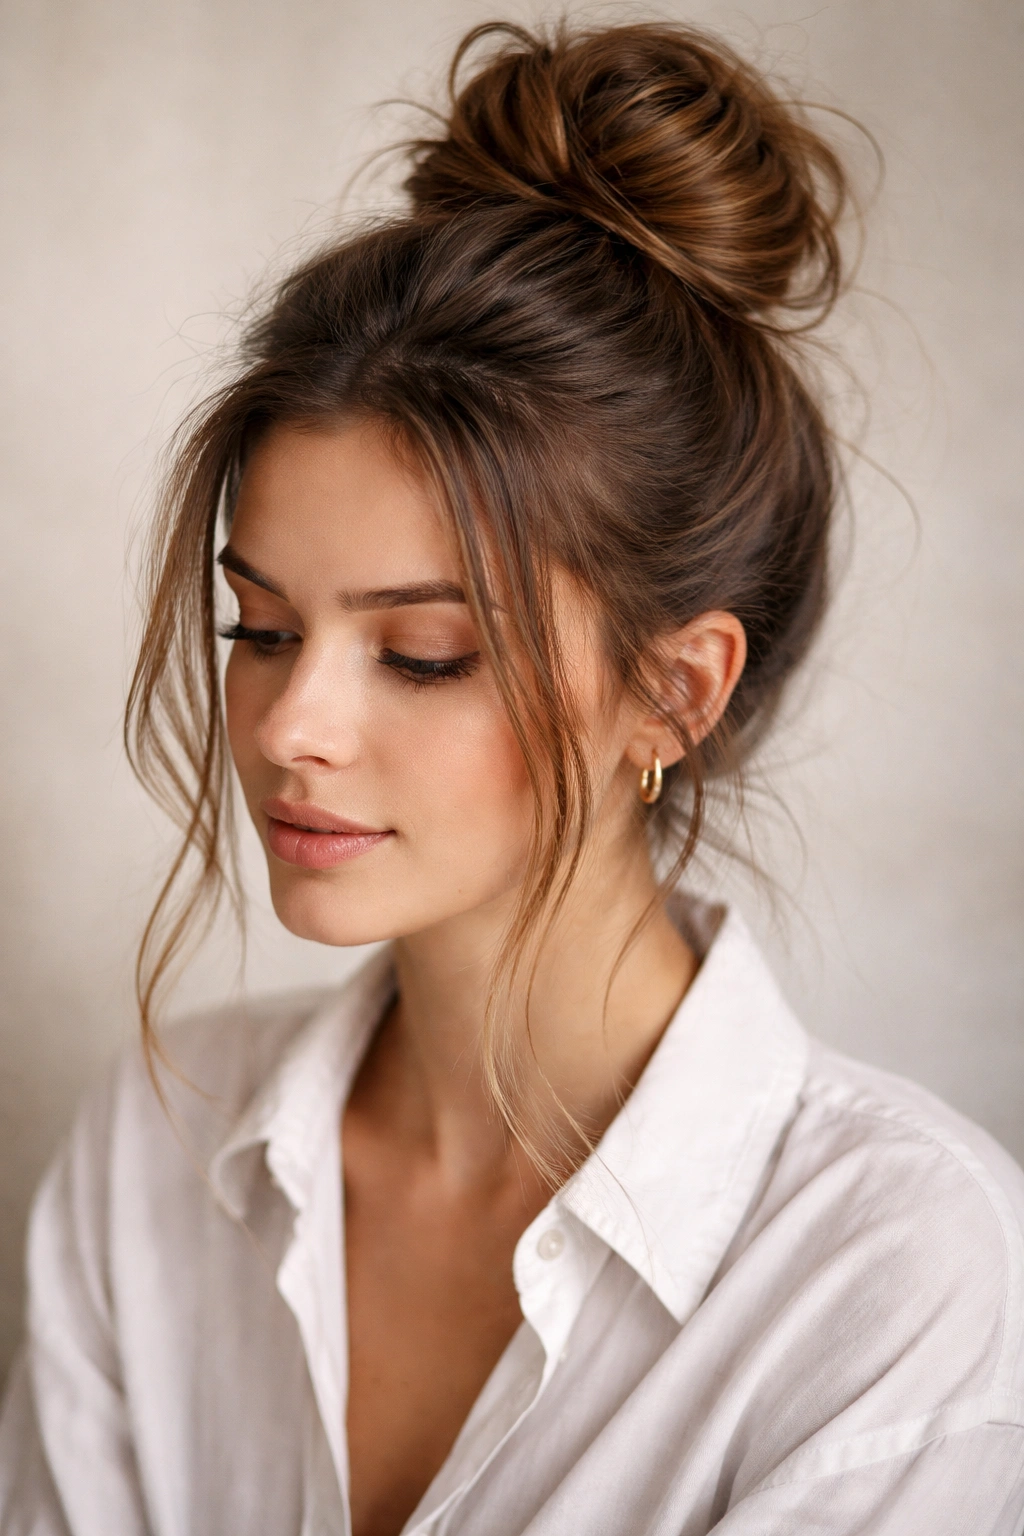
A high bun is the reliable workhorse of casual hairstyling — it looks intentional, keeps your hair out of your face, and honestly feels like barely any effort at all once you nail the technique. The key to making a high bun feel right for a shirt-and-jeans look is embracing its messiness. A perfectly smooth, tight bun can read as too formal or polished for a casual outfit, but a bun with a few face-framing pieces and visible texture feels relaxed and modern.
Why It Works With Casual Outfits
A high bun instantly elevates your face and neck area, which draws attention upward — perfect for casual outfits that are, by design, pretty low-key from the shoulders down. The bun also creates vertical visual interest without being fussy. It pairs particularly well with crew-neck tees, button-up shirts, and oversized cuts because it doesn’t compete with the neckline; it complements it. The style reads as “I have my life together” even when you threw it together in ninety seconds.
How to Create the Effortless Version
Start with hair that has some texture — either from a day-old wash or by running a texturizing spray through dry hair. Gather your hair at the crown (not all the way at the very top of your head, but where you’d expect a high ponytail to sit). Secure it loosely with a hair elastic, then twist the ponytail around itself and wrap it back onto the base, securing with bobby pins as you go. Pull out a few shorter pieces around your face intentionally, and gently tousle the bun itself to break up any smoothness. The bun should look lived-in, not constructed.
Best For
This works beautifully on straight, wavy, and curly hair types. If your hair is very fine or thin, use a lighter elastic and fewer bobby pins so you don’t create a visible dent or make the bun look weighed down. People with thick hair can actually go tighter since the weight distributes differently.
Quick Tips
Backcomb the section of hair where your bun will sit before wrapping — this creates texture and grip so the bun stays put all day without needing product or a million bobby pins. If you want extra texture, try a light sea-salt spray before creating the bun. And here’s something most people skip: pull out those face-framing pieces before you secure the bun entirely, not after. It gives you better control over which pieces come out and makes the final look more intentional.
2. Long, Loose Waves
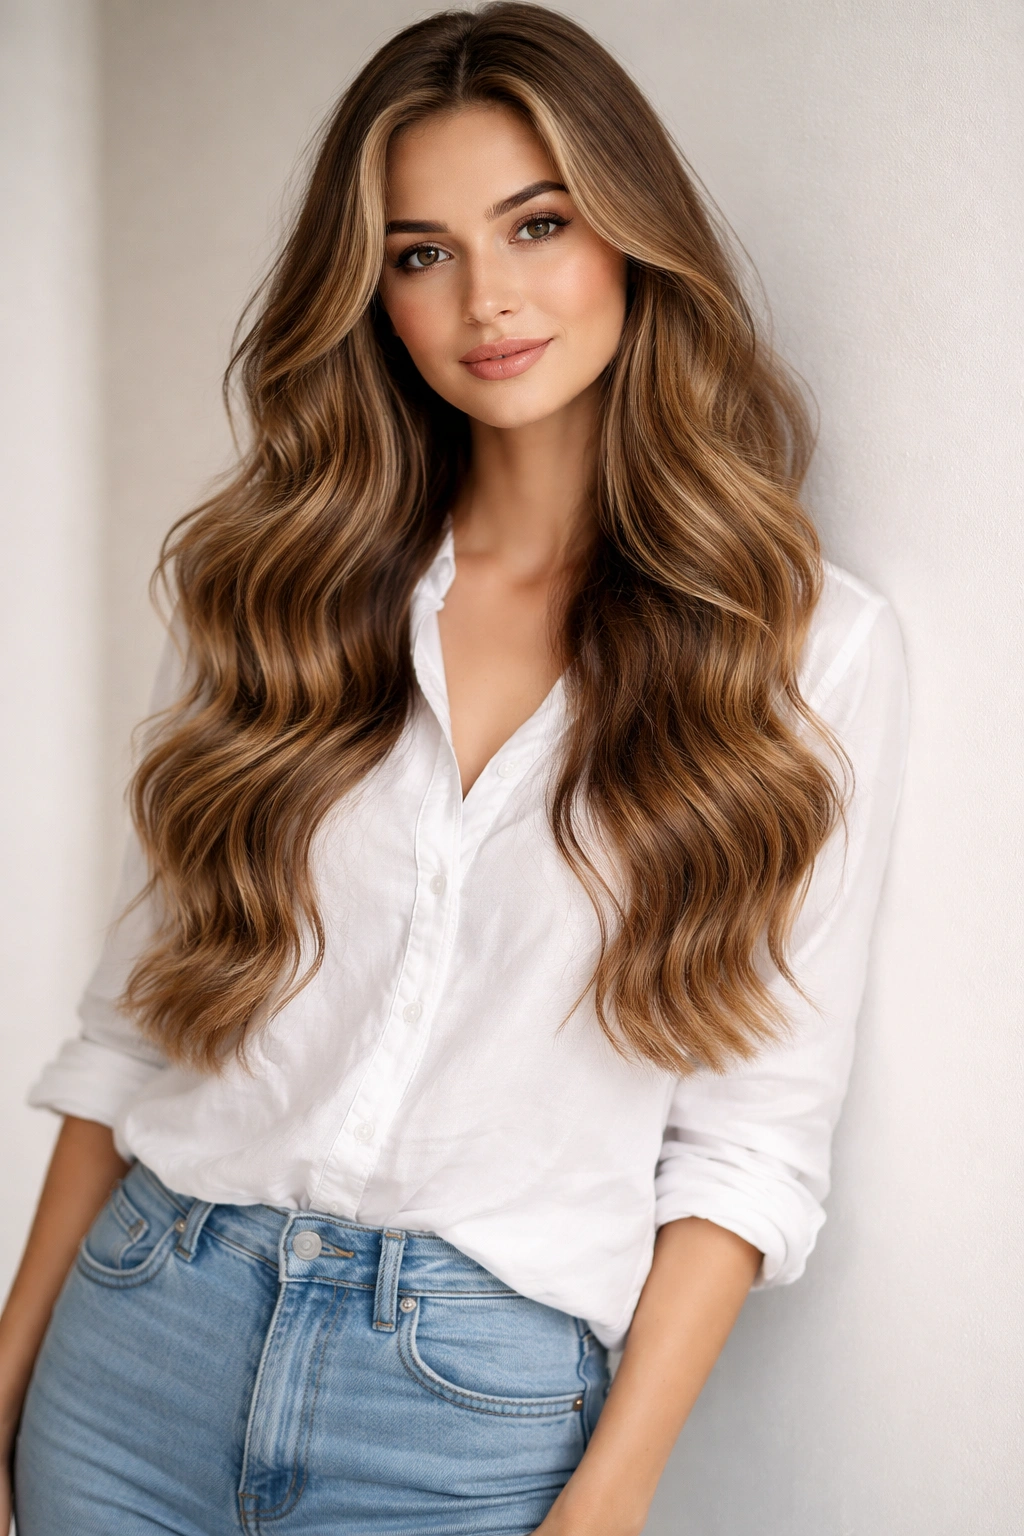
Loose waves are the hairstyle equivalent of a perfect Caslon linen shirt — they look simple until you realize they actually required some thought and styling. The appeal of waves with a casual outfit is that they’re undeniably pretty without being formal, romantic without being overdone, and they work with virtually every sleeve length and neckline. Waves add movement and dimension to your look in a way that just-washed-and-dried hair often doesn’t.
Why Waves Feel Right With Casual Basics
The gentle curves of loose waves soften the structured lines of a collared shirt or the geometric simplicity of jeans. They add a tactile, touchable quality to your appearance — instead of just wearing clothes, you’re wearing clothes with thoughtfully styled hair that suggests you actually spent time on yourself. Waves also have an interesting duality: they can feel beachy and relaxed, or polished and intentional, depending on how you style them and what products you use. That flexibility makes them perfect for outfits that already work across multiple contexts.
How to Create Waves That Aren’t Too Polished
Blow-dry your hair with a medium round brush, creating volume at the roots and a basic shape as you go. Once your hair is dry, take a one-and-a-half inch curling iron or waving tool and wrap sections loosely around it, holding for about five seconds, then letting the curl drop rather than clip it in place. Work through all your hair, alternating which direction you wrap the tool around the barrel — this prevents uniform ringlets and creates that “natural wave” texture instead. Once you’ve curled all your hair, flip your head and run your fingers through your waves to break them apart. This is the crucial step most people skip. Your waves should look tousled, not coiffed. A light texture spray or sea-salt spray can help them hold without making them feel stiff.
Best For
Waves work on all hair lengths from mid-chest down, and they adapt to every texture. If you have naturally wavy hair, you might only need to blow-dry and scrunch in some sea-salt spray. If you have pin-straight hair, you’ll need heat styling tools, but the time investment is still reasonable — fifteen to twenty minutes total. If you have naturally curly hair, you might skip the curl tool entirely and just use your fingers and some product to enhance and shape the curls you already have.
Quick Tips
The looser your waves, the longer they’ll last — tight curls relax quickly, so if you want waves to stay all day, they need to be quite loose. Waves always look better on second-day hair (hair washed the day before), so this is perfect for stretching out your wash cycle. And avoid putting your hands through your waves all day — every time you run your fingers through them, you’re encouraging them to relax. Resist the urge to fidget with perfect waves.
3. Slicked-Back Ponytail with a Statement
A slicked-back ponytail sounds severe, but when done with intentionality for a casual outfit, it reads as confident and architectural rather than harsh. The key is balancing the sleekness with something playful — a pouf at the crown, a piece of texture, interesting hair accessories, or a slight textural wave in the ponytail itself. This is the hairstyle for days when you want your outfit and your hair to make a clear statement together.
Why It Works With Casual Outfits
A slicked-back look has zero softness to it, which actually pairs beautifully with the softness and ease of a casual shirt-and-jeans outfit. It creates contrast. Your outfit says “relaxed,” your hair says “I’m put-together,” and together they say “intentional casual” rather than “I grabbed whatever was on top of the pile.” The style also works across different moods — it can feel sporty with minimal accessories, elegant with the right hair clips, or creative depending on what you do with the ponytail itself.
How to Create a Slicked Ponytail That Isn’t Too Severe
Start with hair that’s either freshly washed and blow-dried, or second-day hair that you’ve lightly misted with water. Apply a smoothing balm or gel to your hair, then use a fine-tooth comb to brush everything straight back into a high or mid-height ponytail, securing it with a strong elastic. Here’s the textural element that softens it: once you’ve secured the ponytail, use the comb to gently backcomb just the crown area, then smooth the surface. This creates a subtle pouf at the top. Alternatively, leave a few shorter pieces out around your hairline to break up the severity. For extra texture, you could also lightly wave the ponytail itself with a curling iron, creating loose waves that hang rather than a sleek tail.
Best For
This works beautifully on all hair textures and works especially well if you have longer hair (shoulder-length or beyond) because it gives you an actual tail to style. If you have shorter hair, you can still create this look with a shorter ponytail at the nape of your neck, though it reads slightly differently.
Quick Tips
Use a small amount of product applied only to the roots and perimeter — you don’t want your entire ponytail soaked in gel, just enough hold that it stays in place. If you’re using a gel that shows when wet, apply it only while your hair is damp, not while it’s soaking. For a ponytail that holds all day, use a thin elastic (which grips better) and secure it twice — cross the elastic twice around the hair rather than once. And consider adding a clip, scrunchie, or small hair tie at the base of the ponytail or an inch down the length. It’s functional for keeping things in place, but it’s also the design element that makes this look feel intentional rather than basic.
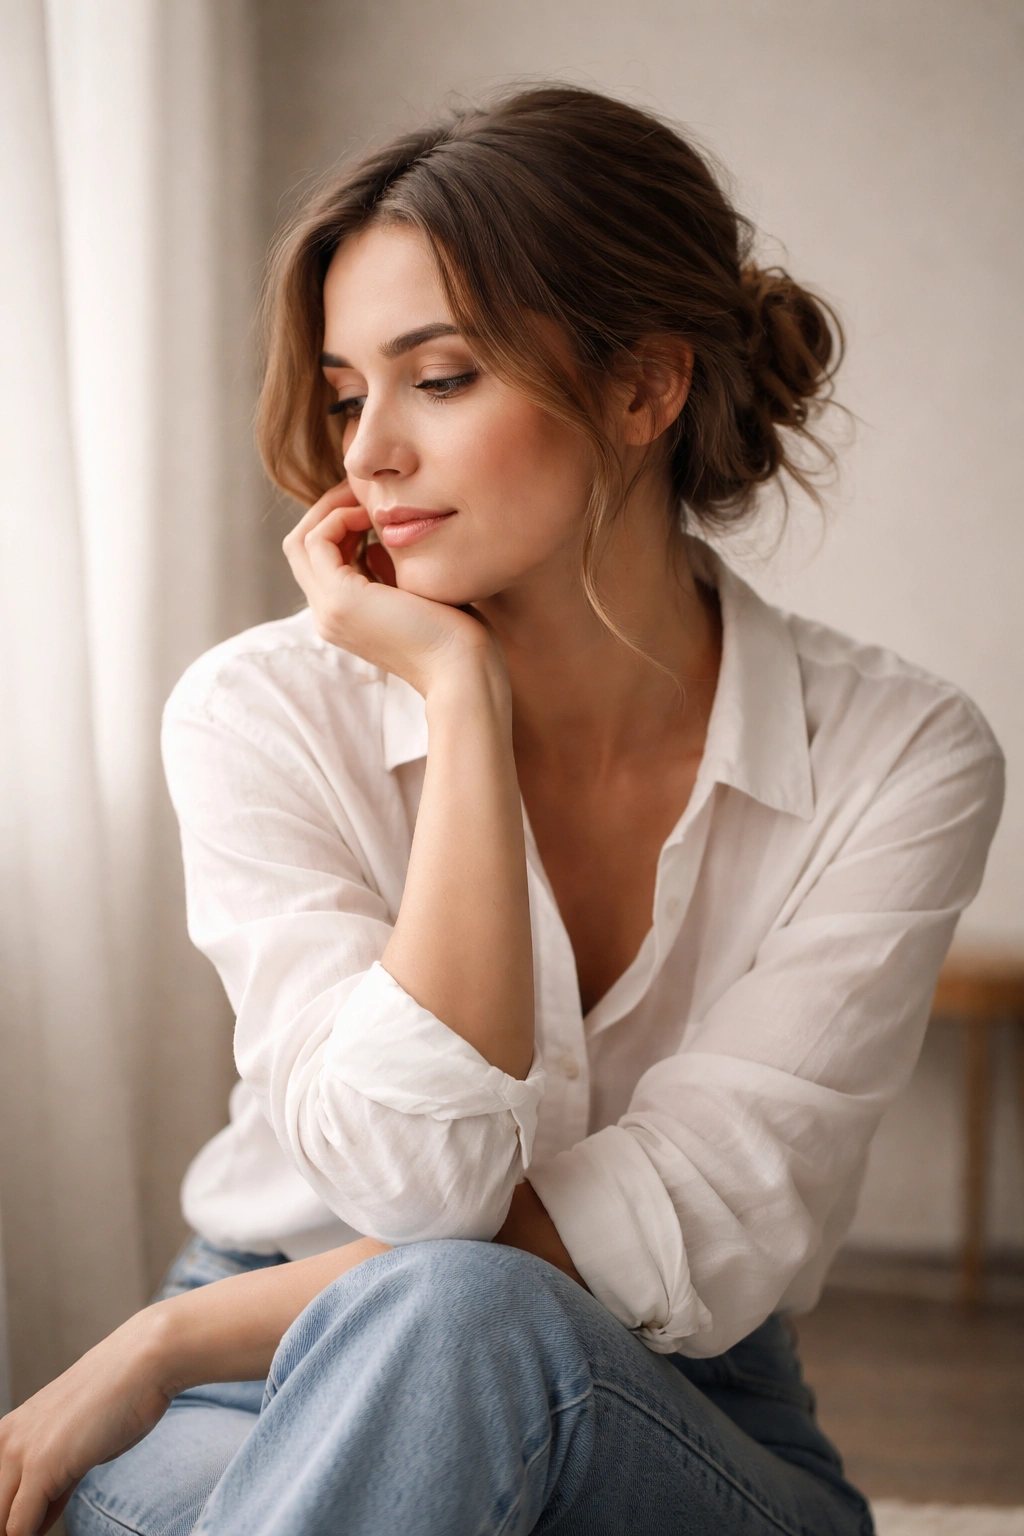
4. Textured Half-Up Style
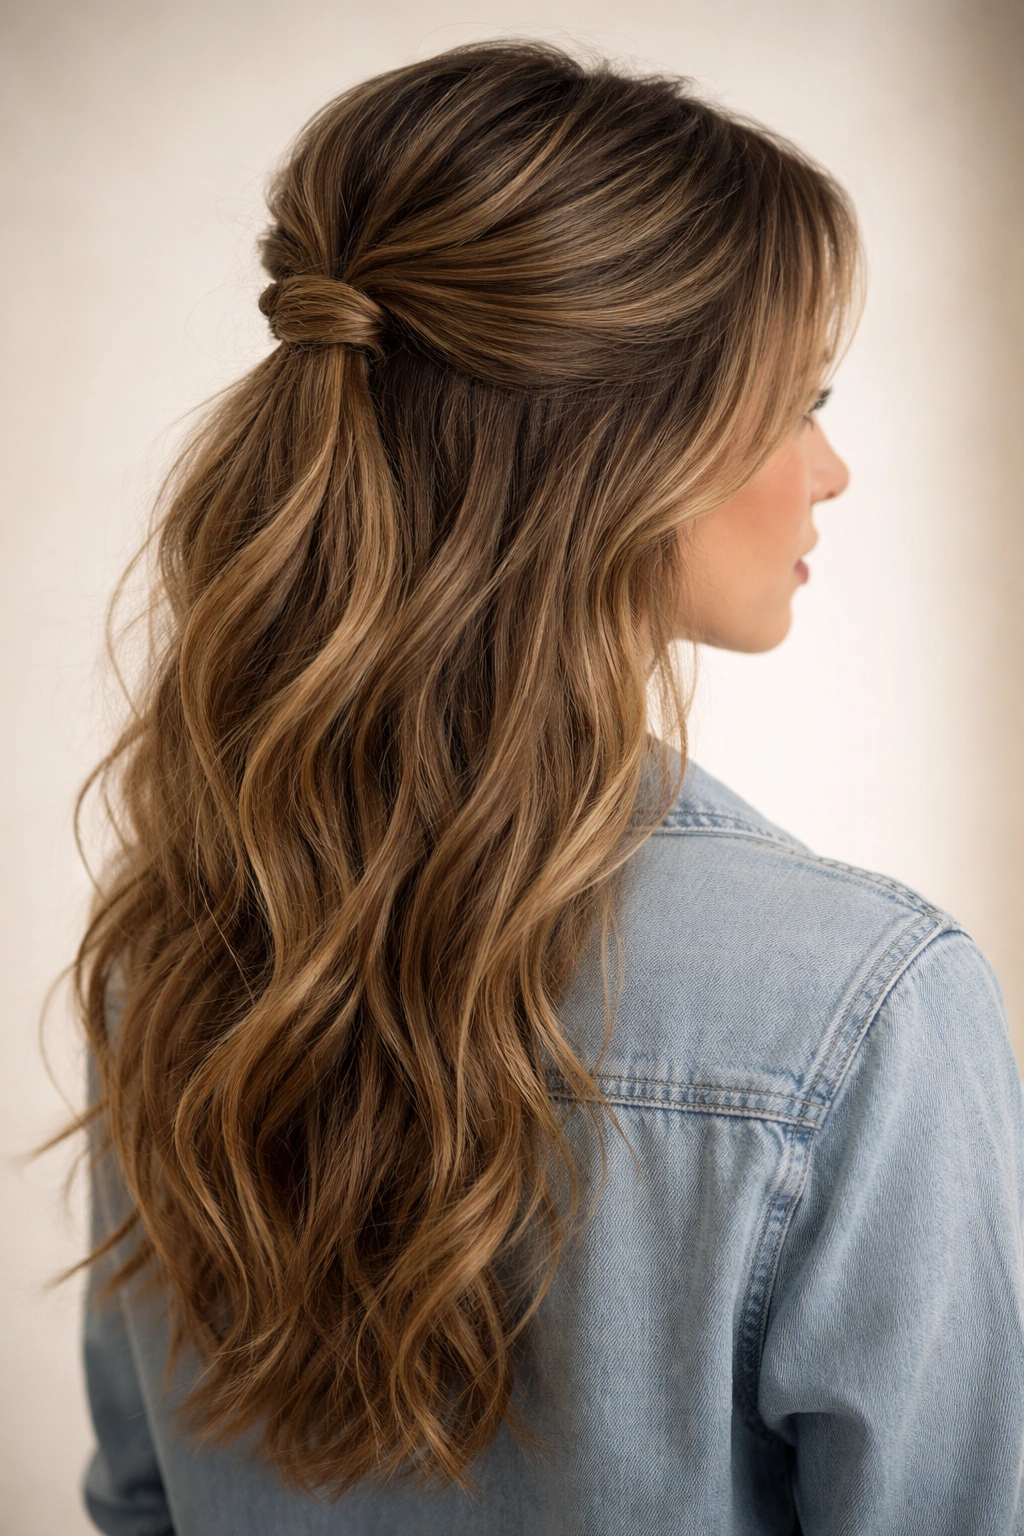
A half-up hairstyle occupies the sweet spot between “let’s style this” and “I want my hair down” — you’re committing to enough styling to look polished, but not so much that you’re doing a full updo. When you add texture, it becomes a hairstyle that works beautifully with casual outfits because it’s clearly intentional but not overdone. The texture adds dimension and makes the style feel modern rather than formal.
Why Half-Up Works With Casual Clothes
The beauty of half-up is that it keeps hair off your face and neck while still letting you wear it down — your hair frames your face and shoulders without obscuring your outfit. It creates vertical interest without the formal quality of a full bun or updo. Half-up styles also feel modern and relatable in a way that more traditional styles don’t. They’re a staple of casual dressing precisely because they bridge that gap between “I made an effort” and “but not that much effort.”
How to Create Texture in a Half-Up Style
Start by creating volume at your crown — use a volumizing mousse on damp roots, blow-dry upside down, or backcomb your roots before blow-drying normally. Once your hair is dry, you can lightly wave the bottom section if you want extra texture, or just work with what you have. Gather the top half of your hair (from ear to ear across the crown) and secure it with a small elastic at the back of your head. Rather than leaving it at that, add texture: gently loosen the section where you’ve secured it, pulling forward at the front and sides to create a soft, poufy crown. If the style feels too polished, pull out a piece or two at the sides to frame your face, and use a texture spray to give all your hair more grip and movement.
Best For
This style works on every hair length from chin-length up, and every texture. If you have finer hair, keep the half-up section smaller (less weight pressing down). If you have thick, heavy hair, you might backcomb for better grip. If you have natural texture like waves or curls, you don’t even need to add much — just secure the top section and let the texture do the work.
Quick Tips
The trick to a half-up that doesn’t slip out is using a textured hold (backcomb) or a light product at the roots before securing. Once you’ve secured the ponytail, immediately loosen it slightly — this creates that soft, intentional pouf that makes the style look modern. The less perfect it is, the better it looks with casual clothes. And use bobby pins to anchor a couple of pieces at the sides; it might look like one hairstyle to you, but it’s actually multiple pieces working together to look effortlessly styled.
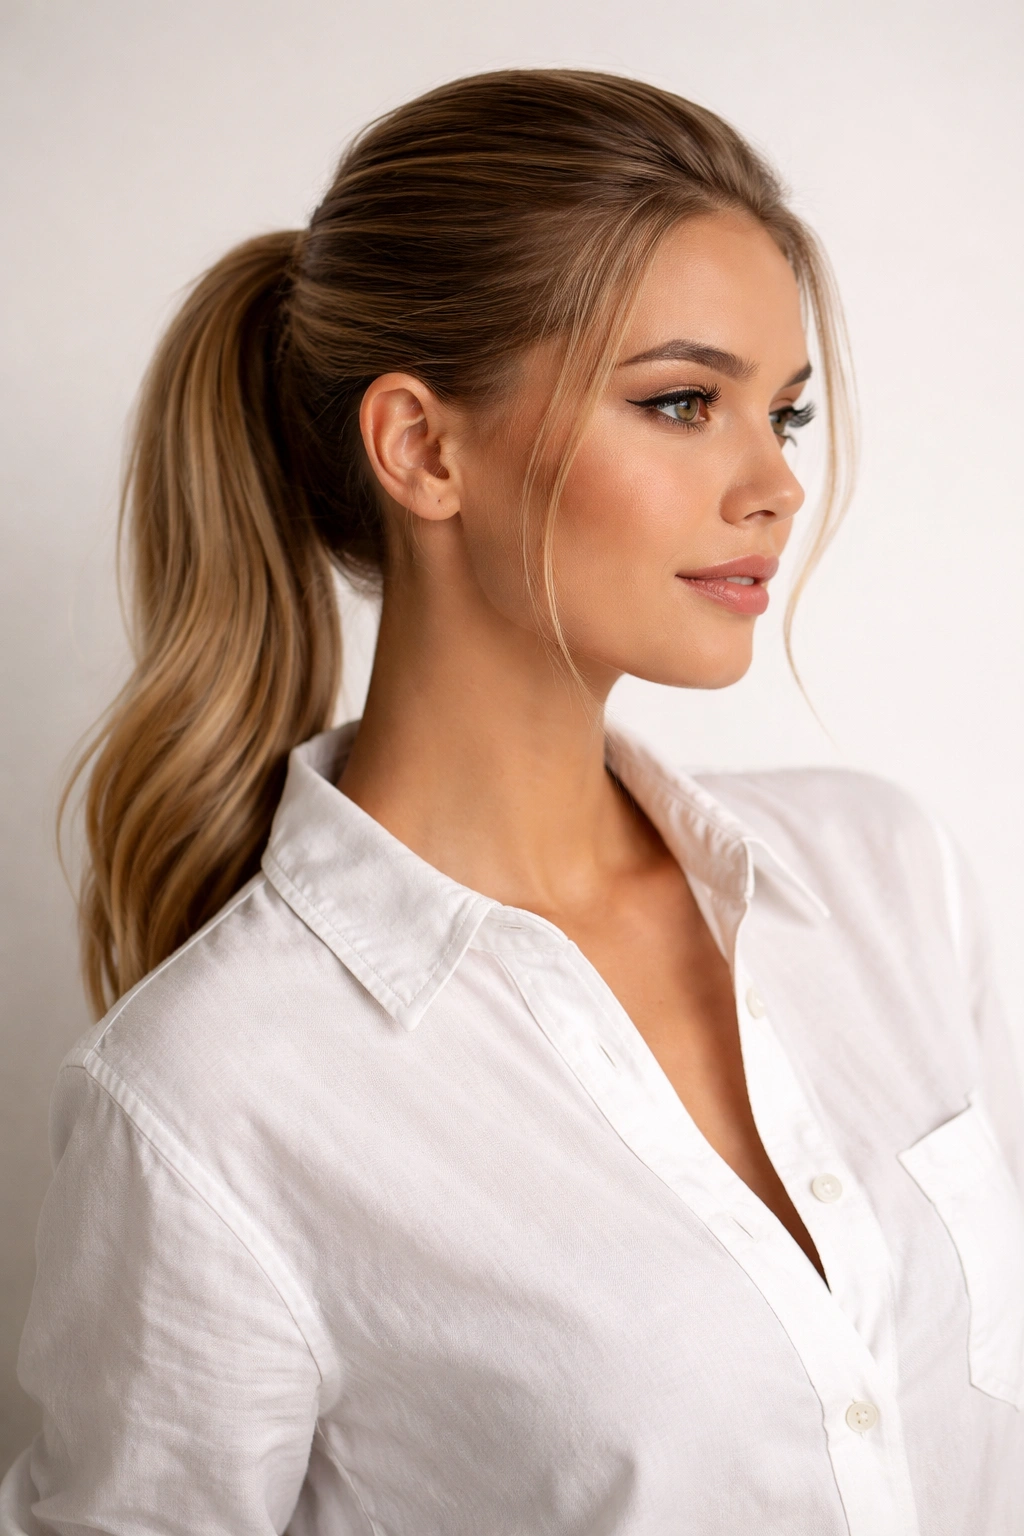
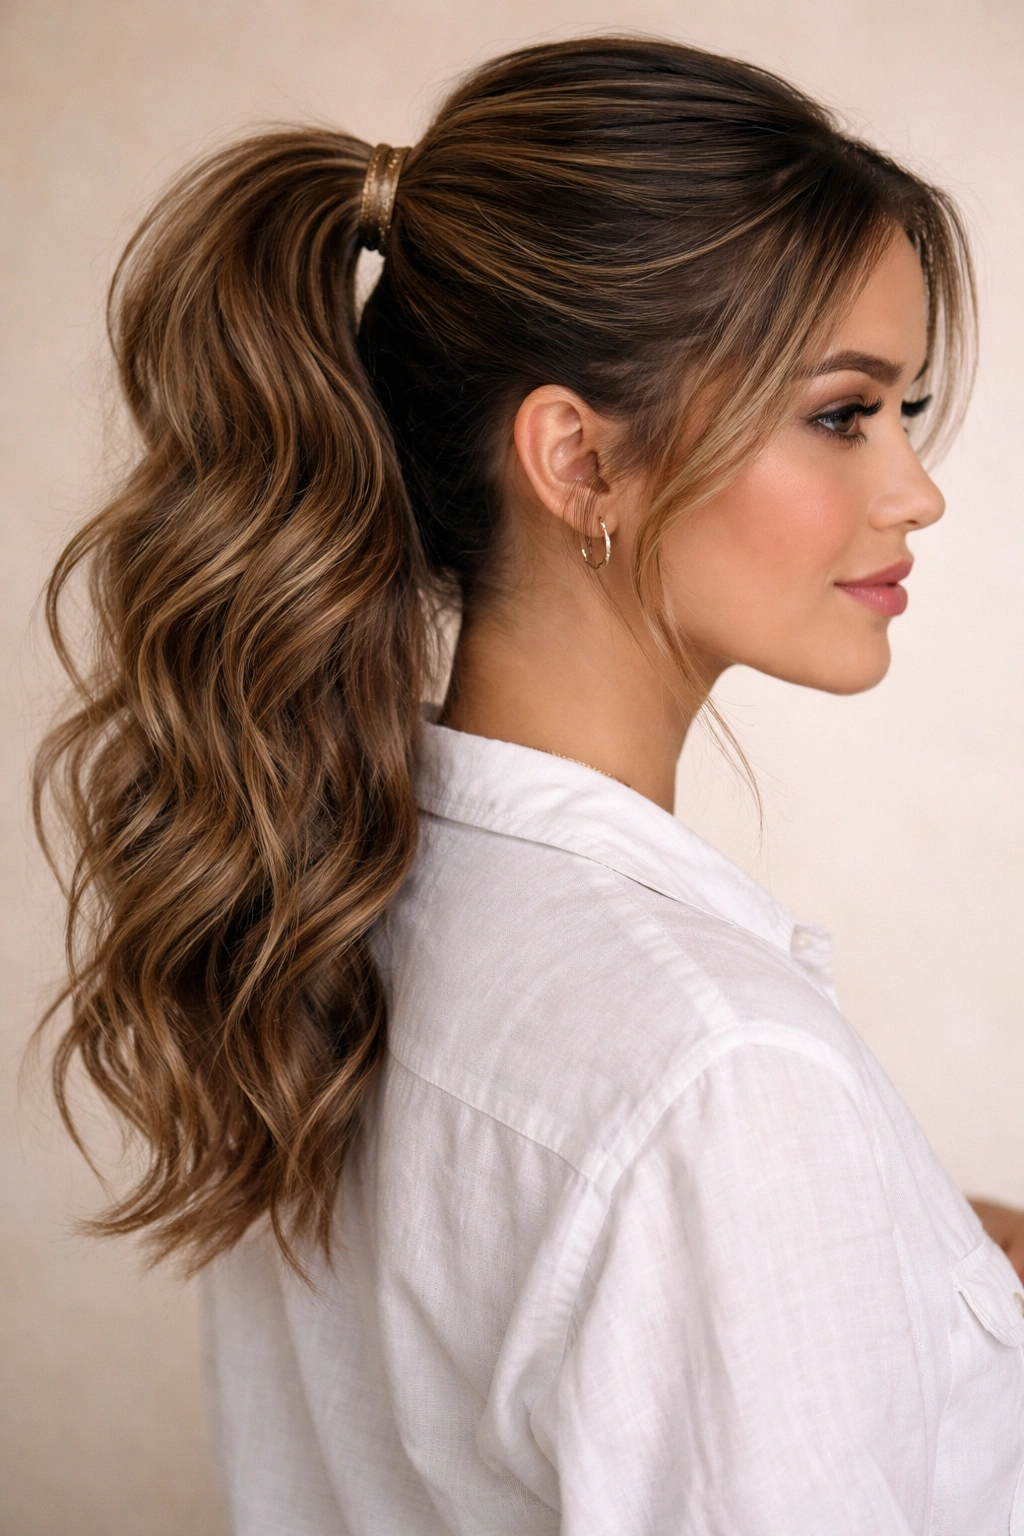
5. Sleek Low Ponytail with Shine
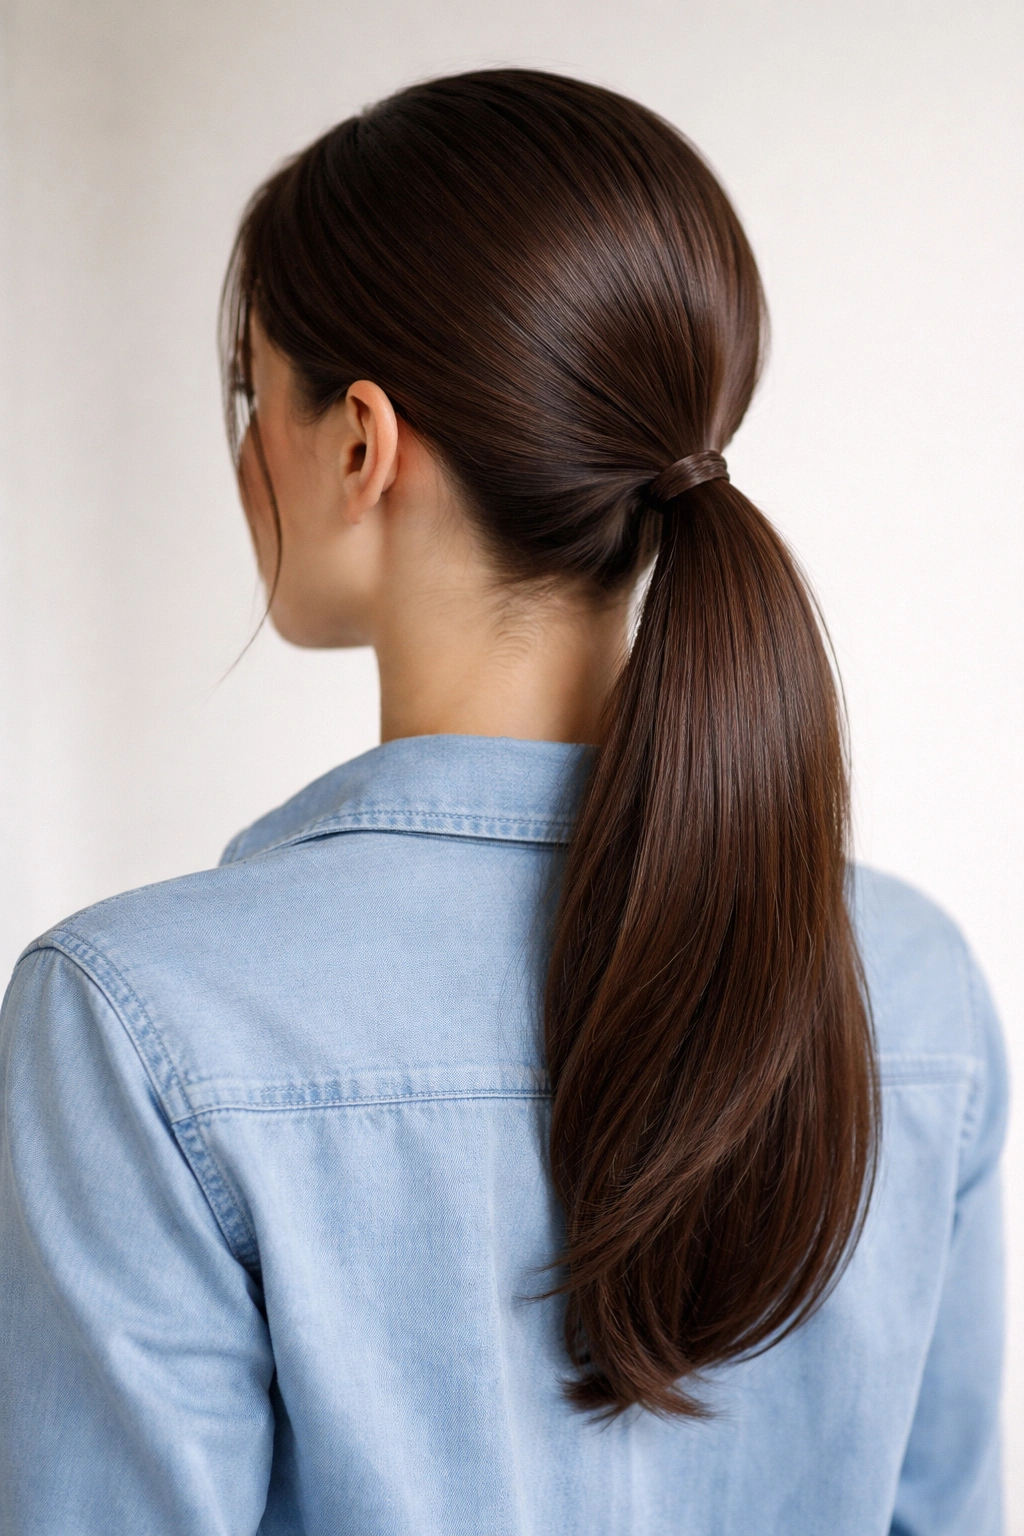
A low ponytail is the definition of simplicity, and there’s real power in that simplicity, especially when paired with a casual outfit. The difference between a low ponytail that looks boring and one that looks intentional is shine and placement. A low ponytail positioned slightly off-center at the nape of your neck, with glossy, smooth hair, has a quiet elegance that reads beautifully against casual basics. It’s the opposite of “trying too hard,” but it’s clearly a hairstyle you chose.
Why Low Ponytails Ground Casual Outfits
The lower position of the ponytail creates a long line down your back, which visually extends your silhouette and creates a sense of calm and restraint. Low ponytails don’t fight with your outfit for attention — instead, they complement it. They’re particularly stunning with loose, flowing shirts or relaxed button-ups because they echo that same sense of ease. A low ponytail also feels chic in a way that requires minimal effort, which is exactly the spirit of casual dressing.
How to Create a Low Ponytail With Intentional Shine
Start with shiny hair — this could mean using a smoothing serum after your shower, a shine spray, or just making sure your hair is well-moisturized before styling. Brush your hair back smoothly, gathering it at the nape of your neck (imagine a line running ear-to-ear just above the base of your head). Secure it with a thin elastic that matches your hair color — this makes the elastic virtually disappear visually. For extra polish, take a thin section from the secured ponytail and wrap it around the base, securing that piece with a bobby pin underneath. This hides the elastic and adds a finished touch. Apply a light shine spray to the ponytail itself to boost luminosity, and you’re done.
Best For
This works on hair shoulder-length and longer. It’s particularly stunning on straight or wavy hair because the shine reads even more visibly. If you have curly or textured hair, you could still create this look, but you might embrace the natural texture rather than smoothing everything down.
Quick Tips
Don’t pull your ponytail too tight — it’ll show stress on your hairline and feel uncomfortable. A low ponytail should feel relaxed enough that you could fit a finger or two between the elastic and your head. The wrapped-base detail really does make a difference in how finished the look appears, and it takes literally ten extra seconds. And here’s something specific: if your ponytail looks a bit flat or thin, backcomb just the underneath section before securing. You’ll add volume without it being visible from the front.
6. Messy Waves With Textured Volume
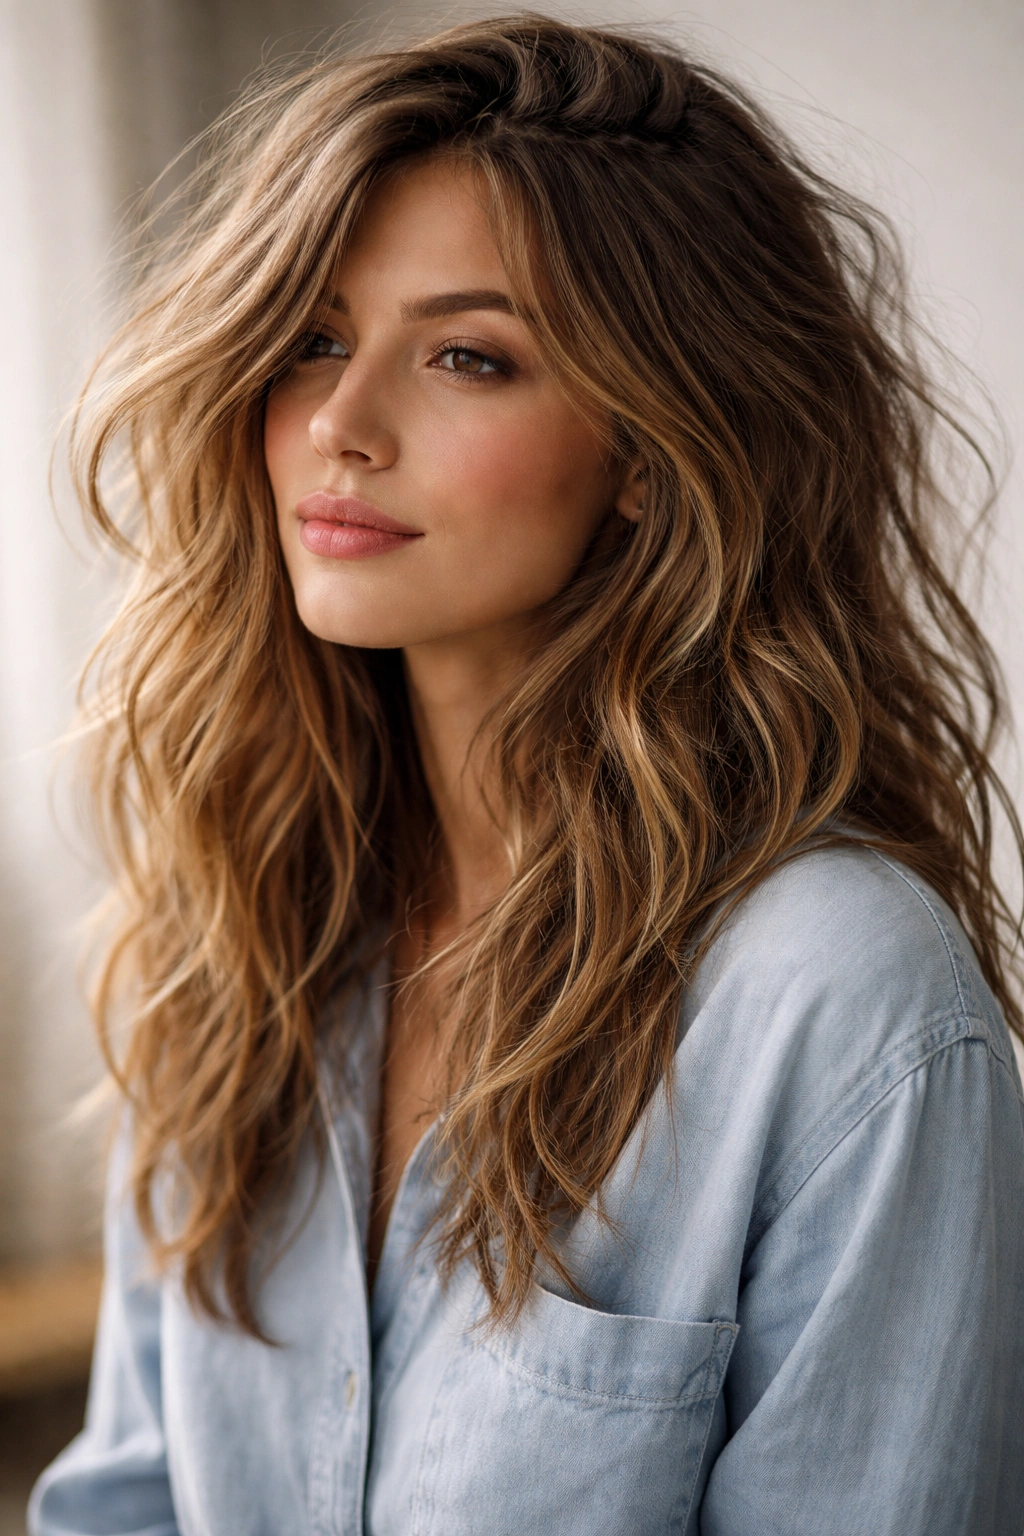
Textured waves that veer into “lived-in” rather than “freshly blown out” territory are perfect for casual outfits because they feel effortlessly pretty. The goal is waves that look like they happened naturally, or at least like you didn’t spend an hour perfecting them. Texture spray and backcombing are your friends here. This is a hairstyle that works even better on second-day hair, which makes it incredibly practical for everyday wear.
Why Messy Texture Works With Casual Basics
Messy waves have an honesty and approachability that polished, perfect waves don’t. They suggest you have a life that doesn’t revolve around maintaining pristine hair — which, let’s be real, fits perfectly with the whole casual clothing aesthetic. Textured, slightly undone waves also adapt to multiple outfit contexts within your casual wardrobe. Wear them with a fitted tee, and they feel sporty. Wear them with an oversized linen shirt, and they feel bohemian. They’re genuinely versatile.
How to Create Intentionally Messy Waves
If you’re working with second-day hair, spray it lightly with texture spray. If you’re starting with freshly washed hair, blow-dry it first, then apply texture spray. Working in sections, take a one-and-a-half inch curling iron and wrap hair loosely around it, but don’t heat-set — just let the curl drop immediately. The looser you wrap, the messier and more textured the result. Move through your entire head, alternating directions. Once you’ve finished, run your fingers through your hair, actually disturbing the wave pattern to break it apart. Add a tiny bit more texture spray, scrunch with your hands, and you’re finished. The key is not touching it too much after this point — the more you mess with it, the more texture you’ll lose.
Best For
This works on all hair lengths mid-shoulder and longer. Textured hair types like waves or curls will achieve this look much more easily. Straight-haired people can do it with a heat tool, but they might need a stronger hold product to keep the texture throughout the day.
Quick Tips
Texture spray is the MVP here — use a good one, not the cheapest drugstore version. The quality of the spray actually impacts how well your waves hold and how natural they look. And backcombing section by section before or while you curl actually speeds up the process and guarantees more texture. If you backcombed your roots while you blow-dried, your waves will last significantly longer. One more thing: sleep on this hairstyle if possible. Waves always look better on day two or three than they do immediately after styling.
7. Space-Parted Straight Hair With Edge
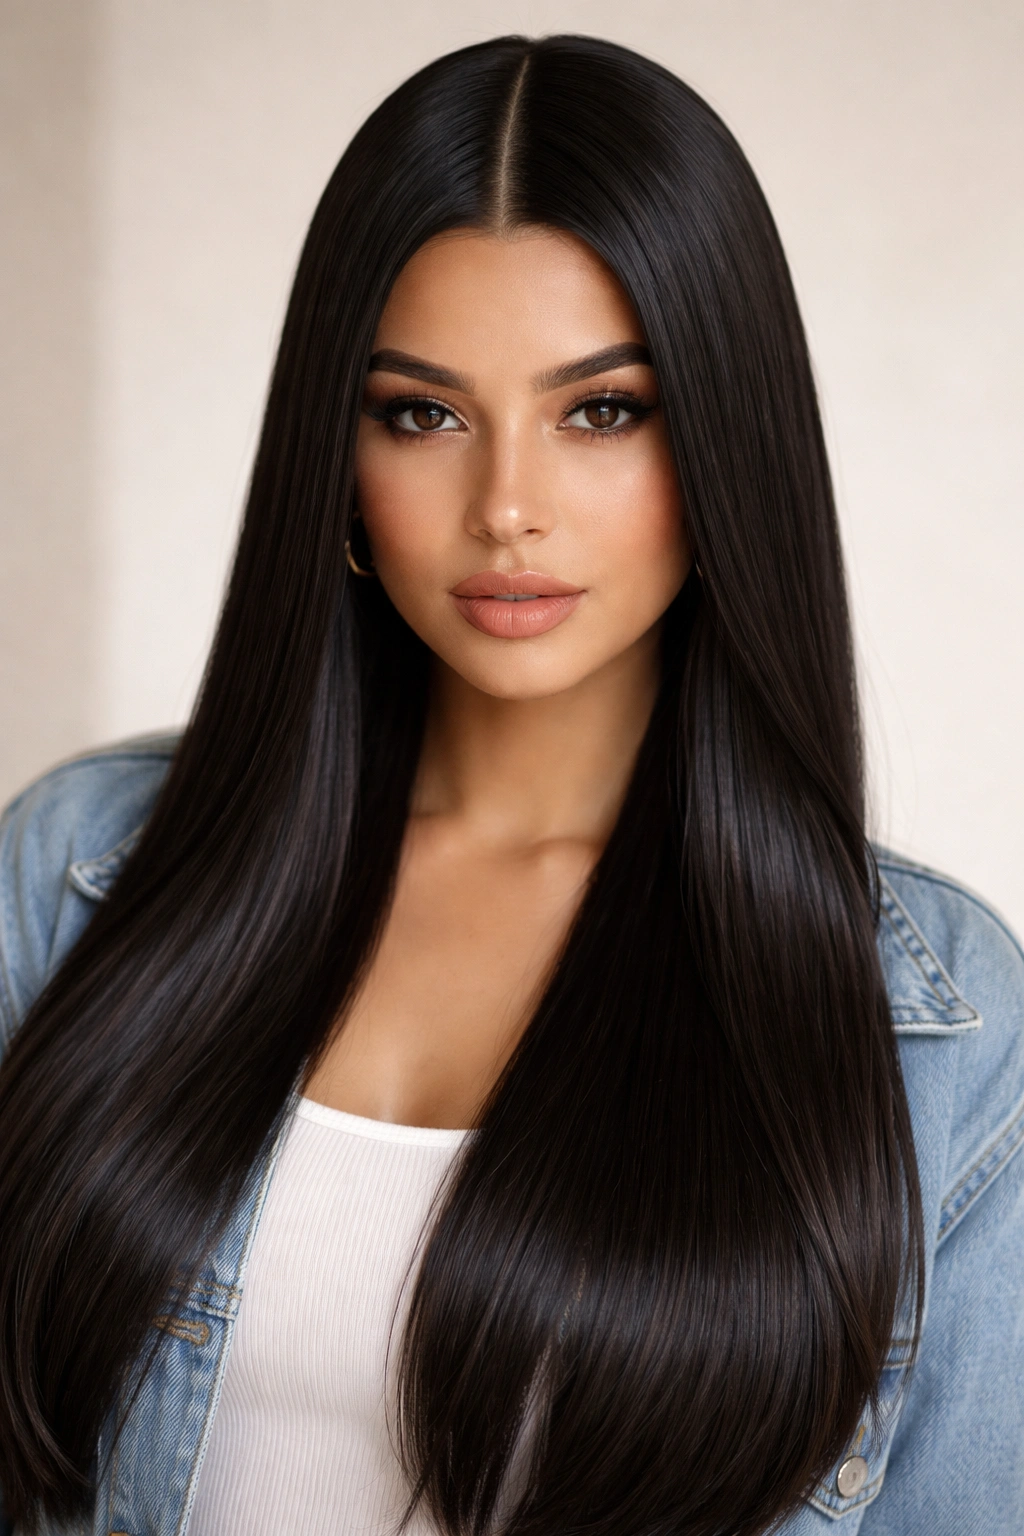
Sometimes the most sophisticated look is just straight, shiny hair worn down, but with intentional styling choices that elevate it. A sharp, geometric part paired with sleek hair says “I know what I’m doing” while still being appropriate for casual wear. The key is making the part deep and visible, and ensuring your hair is genuinely shiny and smooth, not just “not dirty.” This hairstyle is particularly striking with certain casual outfits — it pairs especially well with minimal jewelry and classic pieces.
Why Straight Hair With Intentional Styling Works
Straight hair that’s clearly been styled — not just dried, but actually tended to — has a purity and clarity that makes casual outfits read as more intentional. A sharp part creates a line that’s almost architectural, which contrasts beautifully with the soft, relaxed silhouette of an untucked shirt or the clean lines of well-fitting jeans. This hairstyle works because it’s simple but obviously chosen.
How to Create Glossy Straight Hair With Definition
Start with clean, damp hair. Apply a smoothing serum or argan oil throughout, focusing on the mid-lengths and ends. Blow-dry with a paddle brush, using the brush to smooth the hair as it dries. For serious smoothness, let your hair air-dry to about 70 percent, then use a flat iron on low to medium heat to smooth each section. Part your hair where you want it — traditionally a side part creates asymmetry and visual interest, though a middle part works beautifully too. Use the pointed handle of a rattail comb to actually carve out your part line, making it visible and sharp. Apply a shine spray as a final step, focusing on the roots and the part itself to emphasize the line.
Best For
This obviously works best on naturally straight or manageable hair, or people willing to use heat styling. If you have wavy or curly hair, this would require significant heat and product to maintain, which might not be worth it for you.
Quick Tips
The shine factor is absolutely crucial here — dull, straight hair can look a bit lifeless, while glossy straight hair looks expensive and intentional. Invest in a good shine serum and a quality shine spray. The part itself needs to be sharp and visible; spend the time creating it properly with a comb rather than just running your fingers through. And here’s something specific: if you’re wearing this hairstyle with a casual outfit, avoid overly styled makeup or accessories. Let your hair be the design element. Minimal makeup and simple jewelry make this hairstyle shine without looking overdone.
8. Braided Crown With Loose Ends
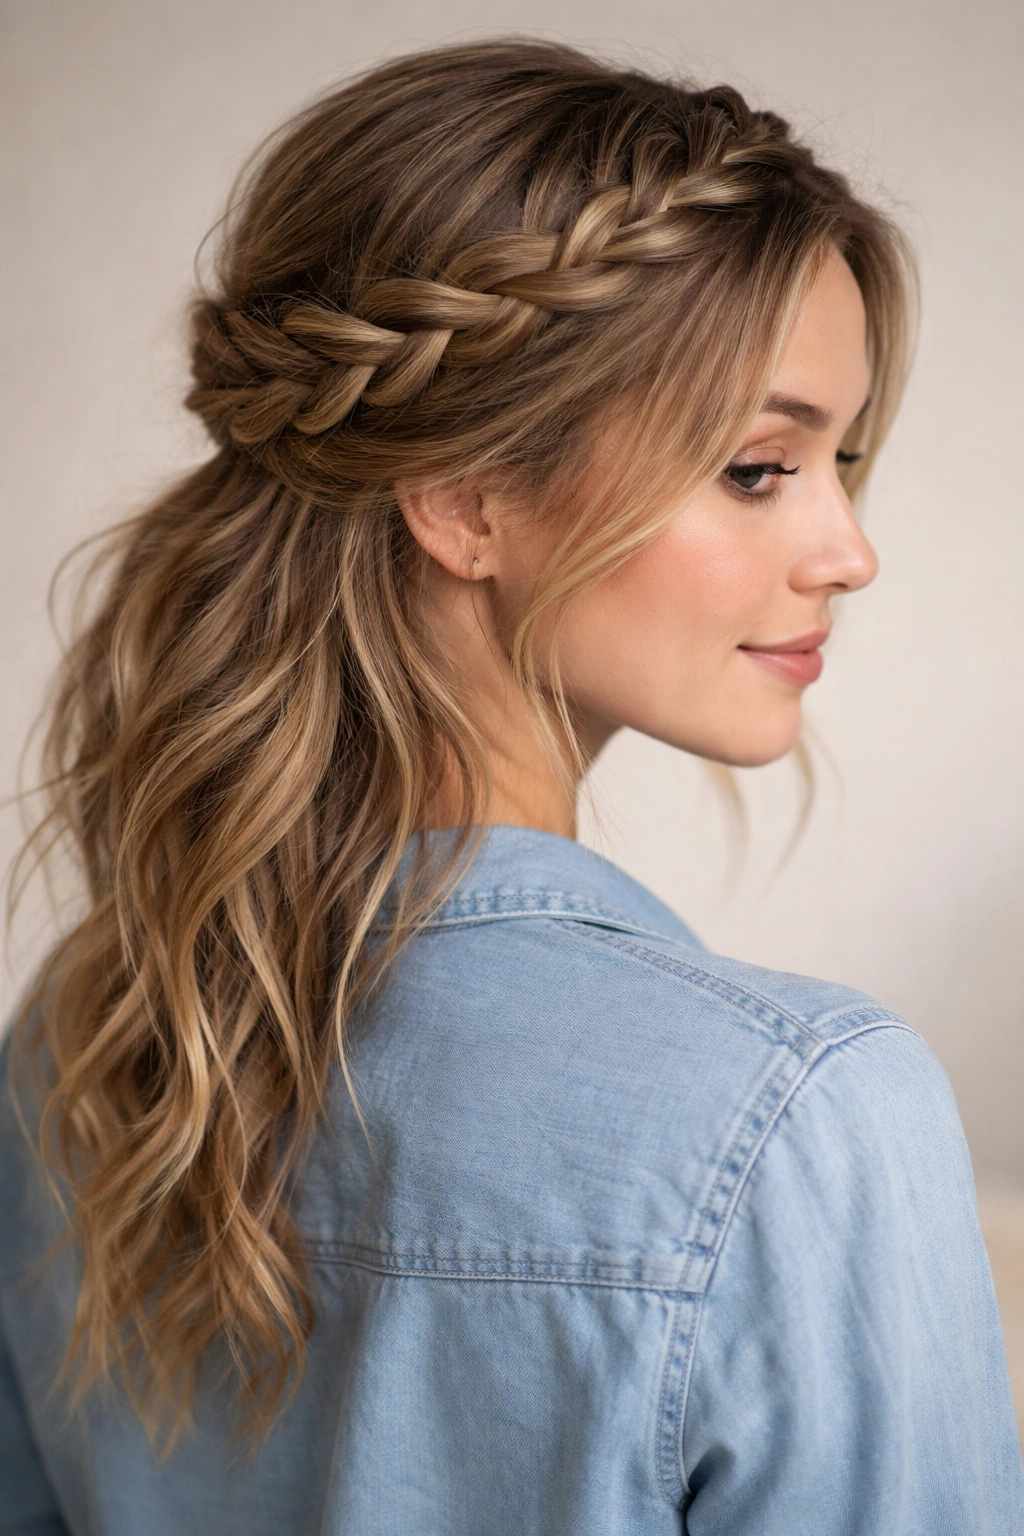
A braided crown sounds more complicated than it actually is, and it’s a hairstyle that instantly elevates a casual outfit into something that feels more thoughtfully put-together. A braid that travels from one side of your head to the other, secured in the back, creates a romantic, intentional look while still working with the ease and simplicity of casual basics. The key is making the braid loose enough that it looks soft and natural rather than tight and formal.
Why Braids Work With Casual Outfits
Braids have an interesting quality — they can read as either bohemian and relaxed or as more formally romantic, depending on how tight and polished they are. A loose, slightly undone braid with a casual outfit reads as effortlessly stylish rather than like you’re heading to a formal event. Braids also keep some hair off your face without creating the severity of a pulled-back style, and they add visible texture and interest that elevates a simple outfit.
How to Create a Loose Braided Crown
Start with hair that has some texture (second-day hair works beautifully, or hair that you’ve applied texture spray to). Take a section of hair from above one ear, about two inches thick. Begin a loose three-strand braid, braiding that section across the back of your head toward the opposite ear. Don’t braid tight — you want the braid to have give and softness. When you reach the other side, secure the braid with a small, clear elastic. Gently loosen the braid by pulling out the edges, making it look less structured and more textured. Leave a couple of inches of loose hair hanging at the bottom of the braid (just don’t braid all the way to the ends). Secure the braid at the back of your head with bobby pins that match your hair color, tucking them underneath so they’re not visible.
Best For
This works on all hair lengths from mid-shoulder up. It works on all hair textures, though it’s easiest on wavy or textured hair that naturally has grip. If you have very fine or slippery straight hair, backcomb the section you’re about to braid to give it more texture and hold.
Quick Tips
The looser your braid, the more modern and effortless it looks. Spend actual time loosening it after you’ve secured it — pull the sides of the braid out, let it get a bit messy. If this is your first time braiding, practice a few times before styling your hair for the day. And here’s something people miss: if your braid feels slippery or loose, use a tiny dab of texture spray on the braid section before you begin. It gives you much better grip and means you won’t have hair escaping by the end of the day.
9. Twisted Pieces Pinned Back
Sometimes you want your hair down but pulled back just enough to keep it out of your face. Twisted pieces pinned back achieves exactly that — it’s softer than a half-up, more intentional than just wearing your hair loose, and it genuinely keeps hair off your face without making you feel restricted. This hairstyle takes about three minutes to create and works beautifully with every type of casual outfit.
Why This Works for Casual Outfits
Twisted pieces feel modern and approachable rather than fussy or overly styled. You’re showing that you made some effort without committing to an actual hairstyle. It pairs well with absolutely every neckline and outfit type because it’s not creating any visual competition — you’re just moving hair out of the way in an intentional fashion. It’s also one of those hairstyles that actually makes you feel better (hair off your face, less hot, less in your way) while also looking intentional.
How to Create Twisted Pieces
Take a one-inch section of hair from above one ear, twist it loosely (not tightly), and secure it at the back of your head with a bobby pin. Repeat on the other side. You now have two twisted pieces pinned back. Optionally, take one more section from the crown or the side and twist it, creating a third anchoring pin. The whole process takes about ninety seconds. For a slightly more elaborate version, after twisting, gently loosen the twist slightly by pulling at the edges, creating a softer, more textured look.
Best For
This works on all hair lengths from chin-length up. It works on all hair textures. If your hair is very slippery or fine, backcomb the sections you’re about to twist to give them more grip. The twist will hold better if your hair has at least a little texture.
Quick Tips
Use bobby pins that match your hair color — even then, they might be slightly visible, but with the right color match, most people won’t notice them. If you want to hide the pins completely, tuck them under the twist itself. And for the love of all things, don’t make your twists too tight. A loose twist that looks almost unraveled is more attractive than a tight, controlled one, especially with casual outfits.
10. Textured Ponytail With Wrapped Base and Accessory
This is the elevated version of the basic ponytail — you’re not just tying hair back, you’re creating an actual hairstyle with texture, intentionality, and a small design detail that makes it feel curated. By adding texture to the ponytail itself and dressing it up with a small accessory detail, you transform a simple style into something that reads as genuinely put-together. This hairstyle works because it’s clearly not effortless, but it also doesn’t look like you spent hours on it.
Why Elevated Ponytails Work With Casual Outfits
When you add texture and a small accessory detail to a basic ponytail, you’re signaling intentionality without overcompleting. You’re wearing a casual outfit, but your hair says “I made some choices.” That combination — casual clothes, thoughtfully styled hair — is actually the definition of modern casual dressing. It’s not trying too hard, but it’s not trying too little either.
How to Create a Textured Ponytail With Polish
Start by blow-drying your hair with volume. You can create waves with a curling iron, light backcombing, or just by using a volumizing product and a round brush. Gather your hair into a high or mid-height ponytail, securing it with an elastic. Take a thin section from the ponytail and wrap it around the base of the ponytail, securing that wrapped section with a bobby pin underneath. This hides the elastic and immediately makes the ponytail look more finished. Now, work texture into the ponytail itself: if you haven’t already, lightly wave it with a one-and-a-half inch curling iron, or backcomb it subtly for more grip. Finally, add a small accessory — a jeweled clip, a metal claw, or even a small velvet scrunchie — either at the base of the ponytail or an inch or two down the length. This small detail transforms the hairstyle from basic to intentional.
Best For
This works on all hair lengths from shoulder-length up. It works better with some texture (whether natural or created), but you can make it work with straight hair too — the key is the wrapped base and the accessory.
Quick Tips
The wrapped-base detail is so easy but makes such a difference — it takes literally ten seconds and completely changes how finished the ponytail looks. When choosing an accessory, pick something that complements your outfit but doesn’t match it exactly. If you’re wearing a simple outfit, your hair accessory can be a tiny bit more decorative. If your outfit is already visually interesting, keep the accessory minimal. And here’s something specific: position the wrapped section and accessory where light catches them — this draws the eye and makes them feel intentional rather than like an afterthought.
Final Thoughts
The relationship between your hair and your outfit is more influential than most people realize. A casual shirt and jeans is a blank canvas, and your hairstyle is the brushstroke that brings the whole picture into focus. Whether you choose something that takes three minutes like twisted pieces or something that requires a curling iron and texture spray like messy waves, the goal is the same: you’re making a choice that says “I know what I’m doing” while keeping the ease and simplicity that makes casual dressing so appealing.
The ten styles above are frameworks, not rigid rules. A high messy bun works better if you add your own texture preferences. A braided crown can become whatever you need it to be based on how tight or loose you make it. The low ponytail works with your hair type when you adapt the technique. The real skill in hairstyling for casual outfits is understanding what works with your specific hair texture, your face shape, and the time you actually have available, then modifying these ideas to fit your reality.
What makes a hairstyle actually work with a casual outfit is the intersection of intentionality and ease. You want it to look like you care, but not like you spent an hour perfecting it. That balance is where the magic is. Try a few of these, see what actually works for your hair and your life, and give yourself permission to stick with the ones that make you feel good. That’s the definition of good style anyway.