The shape of your face is one of the most powerful styling tools at your disposal, yet most people don’t leverage it when choosing a new hairstyle. A round face has wonderful qualities — soft features, youthful proportions, and a balanced width and length. But it does benefit from intentional cuts and styling that add definition and elongate the overall silhouette.
The key principle is surprisingly simple: you want to create the illusion of more vertical length while adding angles and texture that break up the natural softness of a round face shape. Length, layers, volume at the crown, and styles that emphasize the cheekbones all work in your favor. Strategic hair placement — whether through side parts, face-framing layers, or directional movement — instantly shifts how the face appears.
This isn’t about hiding your face shape. It’s about working with your natural features to bring out your best angles and create the exact vibe you’re after. The right hairstyle for a round face doesn’t feel like a mask — it feels like the truest, most sculpted version of you. Whether you’re drawn to short and choppy, long and flowing, or something in between, there’s absolutely a cut and style that’ll make you feel genuinely confident.
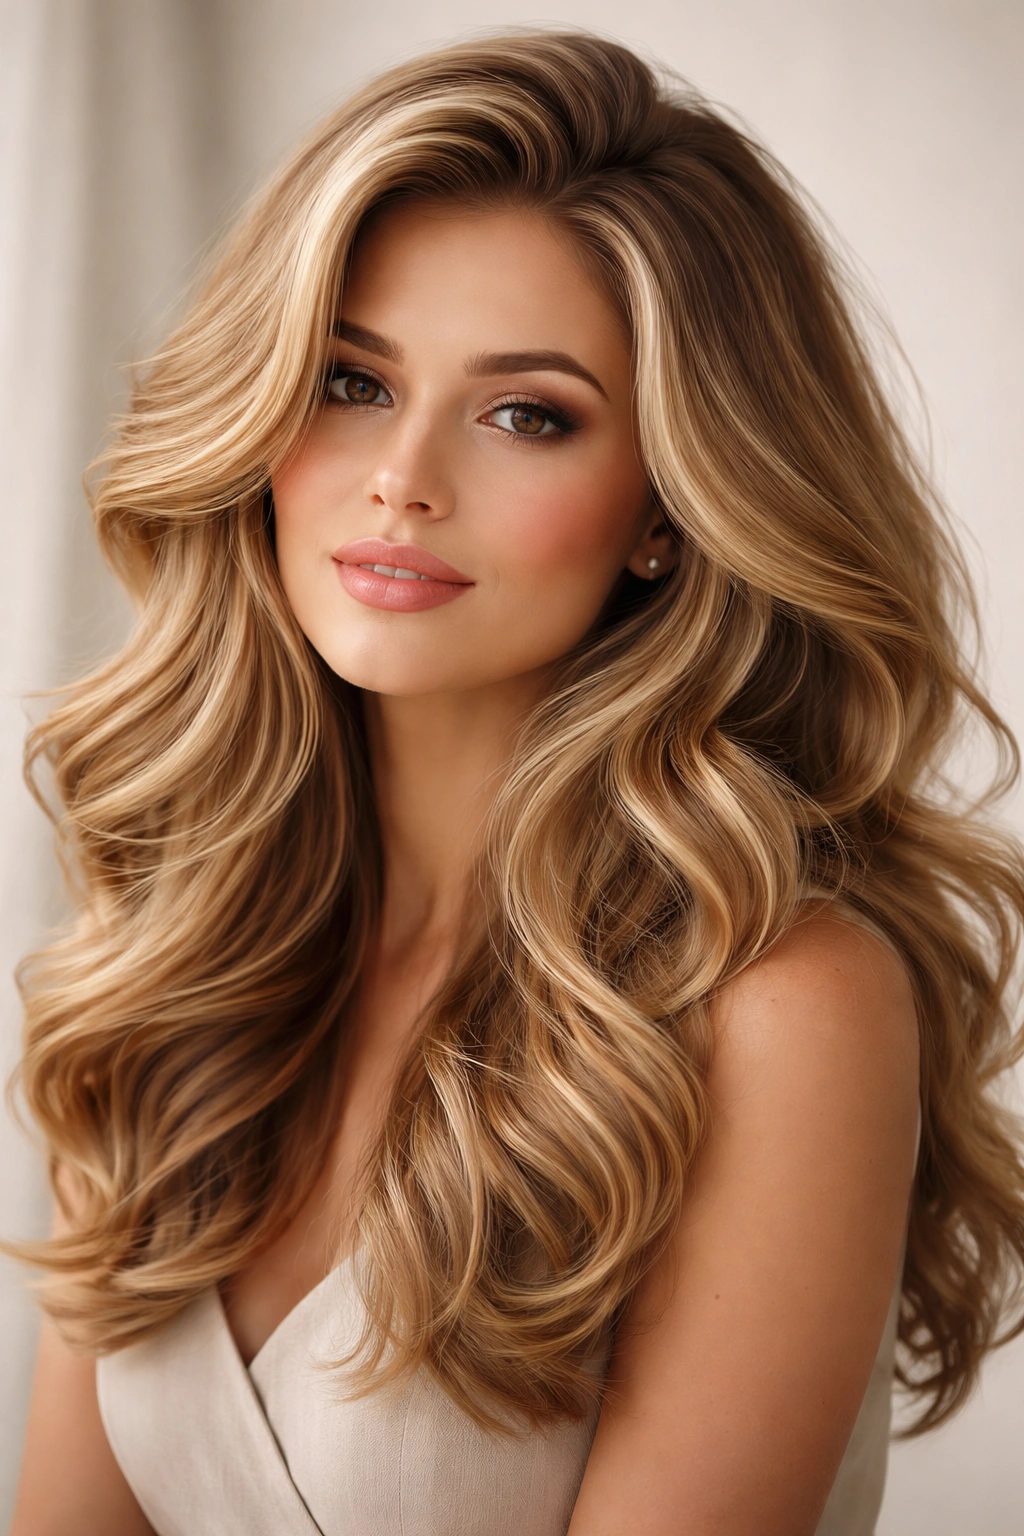
1. Long Straight Layers
Sleek, straight hair with long layers is one of the most reliable choices for round faces because it creates pure vertical lines while the layers add movement and prevent the style from looking flat or heavy. Long straight hair naturally elongates the face, and strategically placed layers prevent any sense of thickness around the jaw and chin area.
Why It Flatters Round Faces
Straight hair with layers gives you both length and dimension. The vertical line is what does the heavy lifting here — it visually stretches your face, counteracting the rounded proportions. Layers cut through any bulk at the lower half of your face, making your jaw appear more defined without actually changing its shape. The individual pieces break up the heaviness that straight, blunt hair can sometimes create.
How to Style It
- Use a paddle brush and a blow dryer on medium heat to smooth your hair straight as you dry, focusing on directing the roots away from your face for added lift at the crown
- For extra shine and smoothness, apply a serum to damp hair before blow-drying
- A flat iron on medium to high heat (depending on your hair texture) creates that sleek finish
- Part your hair slightly off-center rather than directly down the middle — this adds visual interest and prevents symmetry that emphasizes roundness
- Keep the layers roughly every 2-3 inches from mid-length downward so they’re visible and functional
Best For
This works beautifully for straight, wavy, or textured hair, though you’ll need regular trims every 6-8 weeks to keep the layered effect sharp. If your hair is naturally wavy or curly, you’ll either need to straighten it regularly or ask your stylist for a cut that works with your natural texture using layers.
2. Textured Lob
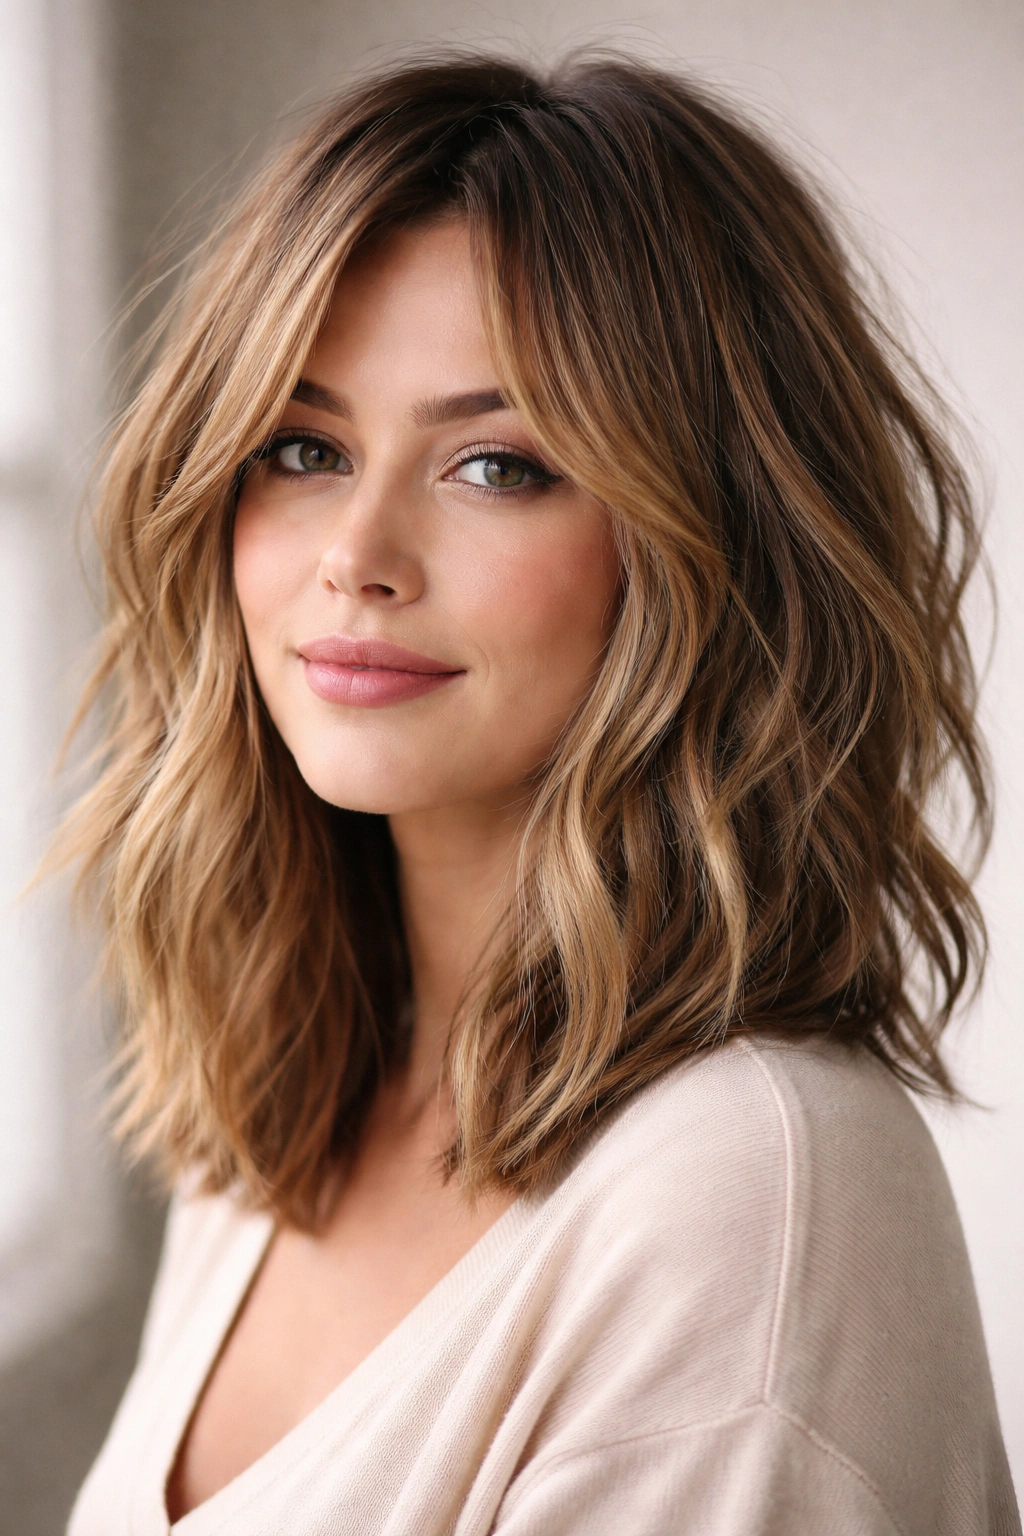
A textured lob (shoulder-length bob) sits right at the collarbone and uses choppy, piece-y layers to create movement and dimension. The key difference from a blunt lob is the texture — lots of choppy, slightly jagged layers that catch light and create visual interest rather than one solid block.
Why It Flatters Round Faces
Texture creates the illusion of less volume, which is exactly what a round face benefits from. Those choppy layers break up any roundness at the jawline and create a slightly undone, directional feel that’s instantly flattering. The shoulder-length placement isn’t too short (which can emphasize width) and isn’t so long that it feels heavy. It’s the sweet spot of length paired with strategic texture.
How to Style It
- Apply a texturizing spray or sea salt spray to damp roots for grip and movement
- Blow-dry with a round brush, flipping your head over for extra volume at the crown, then flip back and smooth the top layer
- Use a curling iron or wand on medium heat to create soft waves or bends throughout, focusing on curling pieces away from your face
- Scrunch the waves gently with your fingers while the iron is still warm to create that choppy, lived-in texture
- A light pomade or texturizing paste throughout adds definition to individual pieces
Best For
Medium to thick hair textures thrive with this style. Fine hair can work with a textured lob, but you’ll want your stylist to cut fewer layers so it doesn’t look too thin. This is also a great option if you have naturally wavy or curly hair — the layers work with your texture rather than against it.
3. Side-Swept Bangs with Volume
Side-swept bangs that angle from longer on one side to shorter on the other create an immediate sense of asymmetry and angles. Pair them with volume built into the crown and you’ve got a style that instantly reshapes how your face appears.
Why It Flatters Round Faces
Side-swept bangs are magic for round faces because they create diagonal lines, which visually narrow the face. The longer side of the bangs extends down past the cheekbone, creating a slimming effect, while the volume at the crown adds length. Asymmetry is your friend when dealing with round proportions — it disrupts the symmetry that emphasizes the roundness.
How to Style It
- Ask your stylist to cut the bangs so they’re longer on one side (typically around cheekbone length) and shorter on the other (around the brow bone)
- Blow-dry your hair in the direction the bangs naturally want to fall, using a round brush to create subtle bend
- A flat iron can smooth the bangs or add a subtle wave, depending on your preference
- Style the crown with volume by blow-drying the roots upward, even if the rest of your hair is smooth
- On non-wash days, a dry shampoo at the roots maintains that crown lift
Best For
Side-swept bangs work on most hair types and lengths. You need to be willing to style them daily (or at least blow-dry them), so this is best for people who enjoy a styling routine. If you have very thick bangs, they can feel heavy — ask your stylist to thin them out to prevent a flat, blunt appearance.
4. Choppy Shag
A modern shag is like a textured lob’s wild cousin — layers throughout with lots of choppy, undone texture and movement. It’s shorter in the front (usually around chin-length) and longer in the back, creating an almost feathered effect when done well.
Why It Flatters Round Faces
The choppy nature of a shag creates visual texture and movement that draws the eye throughout the style rather than letting it settle on the face shape. Layers at every level add dimension, and the shorter front layers frame the face in a flattering way without being a true bang. The asymmetrical flow — longer in back, shorter in front — creates disguised angles that work beautifully with round proportions.
How to Style It
- Apply a sea salt spray or texturizing product to damp hair for grip and hold
- Blow-dry with your head flipped upside down to create root lift and natural texture
- Once dry, flip back and use a curling iron to enhance the choppy layers, curling pieces away from your face
- Run your fingers through to break up the curls into a more natural, undone texture
- A light layer of dry shampoo on day two actually improves the style, adding grip and texture
Best For
Medium to thick hair textures work best with a shag because the layers are visible and intentional. Fine or thin hair can do a shag, but ask your stylist for fewer, more strategic layers to prevent it from looking wispy or thin. This style requires regular trims (every 4-6 weeks) to maintain the choppy shape.
5. High Ponytail with Loose Tendrils
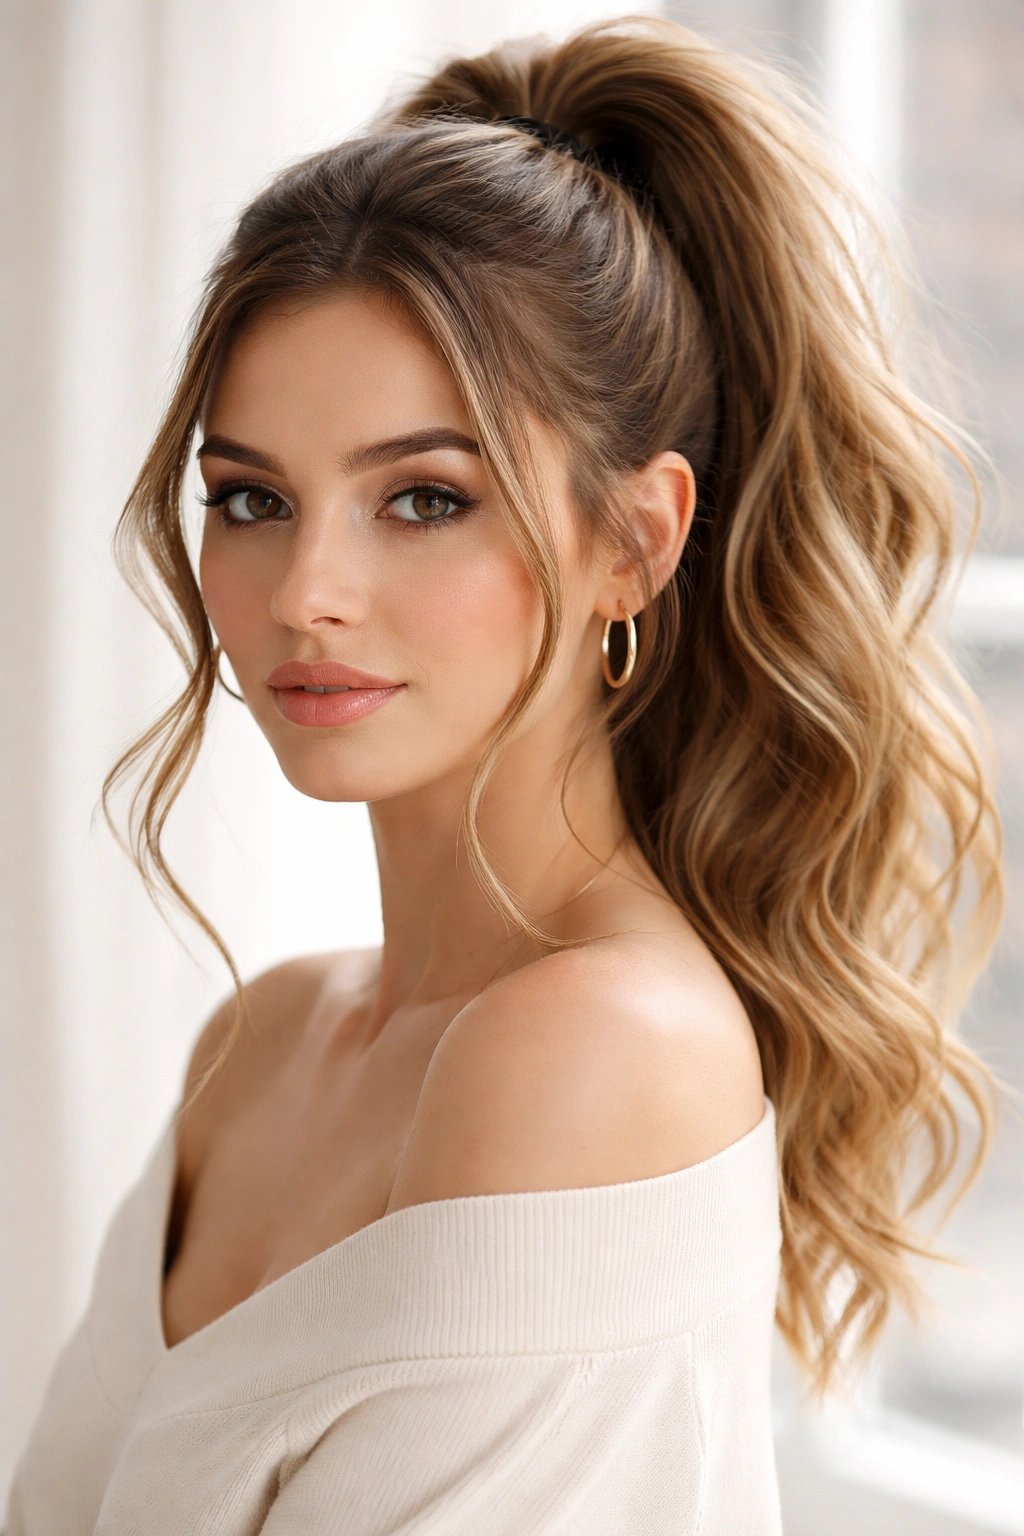
A high ponytail sits at the crown, pulling hair up and back and creating instant lift and elongation. The key to making it flattering for round faces is leaving soft tendrils around the face that gently frame rather than fully expose.
Why It Flatters Round Faces
A high placement automatically elongates your face by drawing everything upward, countering roundness. The loose tendrils (rather than a slicked-back, fully exposed look) frame your face softly and add texture around the cheekbone area, creating subtle definition. The high position also draws attention upward to your eyes and forehead, away from the jaw and chin.
How to Style It
- Start with slightly textured or wavy hair — if your hair is freshly washed and smooth, apply a texturizing spray to damp roots
- Blow-dry your hair, creating volume at the crown, then flip upside down and blow-dry again for extra lift
- Use a fine-tooth comb to smooth the top layer and sides, then gather hair at the crown (higher than your natural part)
- Secure with a elastic or hair tie, making sure the base sits snugly at the crown
- Gently pull a few thin pieces out around your face and ears, leaving them to frame naturally
- Smooth the pulled-back section with a light smoothing serum or gel so it looks intentional, not flyaway
Best For
Long to medium-long hair works best for a high ponytail. Any hair texture can work as long as you style appropriately for your texture. If you have fine hair, avoid slicked-back looks and instead use softer, looser textures. If you have thick, curly hair, embrace the texture rather than fighting it.
6. Deep Side Part with Highlights
A genuinely deep side part — not just a regular side part, but one that’s quite exaggerated, with one side having minimal hair — creates instant asymmetry and angles. When paired with subtle or bold highlights, it becomes a powerful face-shaping tool.
Why It Flatters Round Faces
Asymmetry is the secret weapon against roundness. A deep side part creates an angular line across the top of your head and reveals more of one side of your face than the other, which visually narrows your overall appearance. Highlights add dimension and draw the eye throughout the hair rather than to the face shape itself. The combination is transformative.
How to Style It
- Blow-dry your hair with a round brush, directing the larger side back and the smaller side forward
- Use a metal rat tail comb to create a clean, defined part line
- Smooth the larger side back with a light smoothing cream or serum
- The smaller side can have texture or waves, or stay smooth — whatever works for your style
- Refresh the part daily with a comb and a tiny bit of gel or cream to keep it sharp
- If you choose highlights, ask your stylist to place some around the face-framing area to emphasize the asymmetrical part
Best For
This works on any hair length (short to long) and texture. Straight hair makes the part look sharpest, but wavy and curly hair can absolutely do this too — just keep the part defined and refresh it daily. You’ll need regular touch-ups if you’re doing highlights, so plan for maintenance every 6-8 weeks.
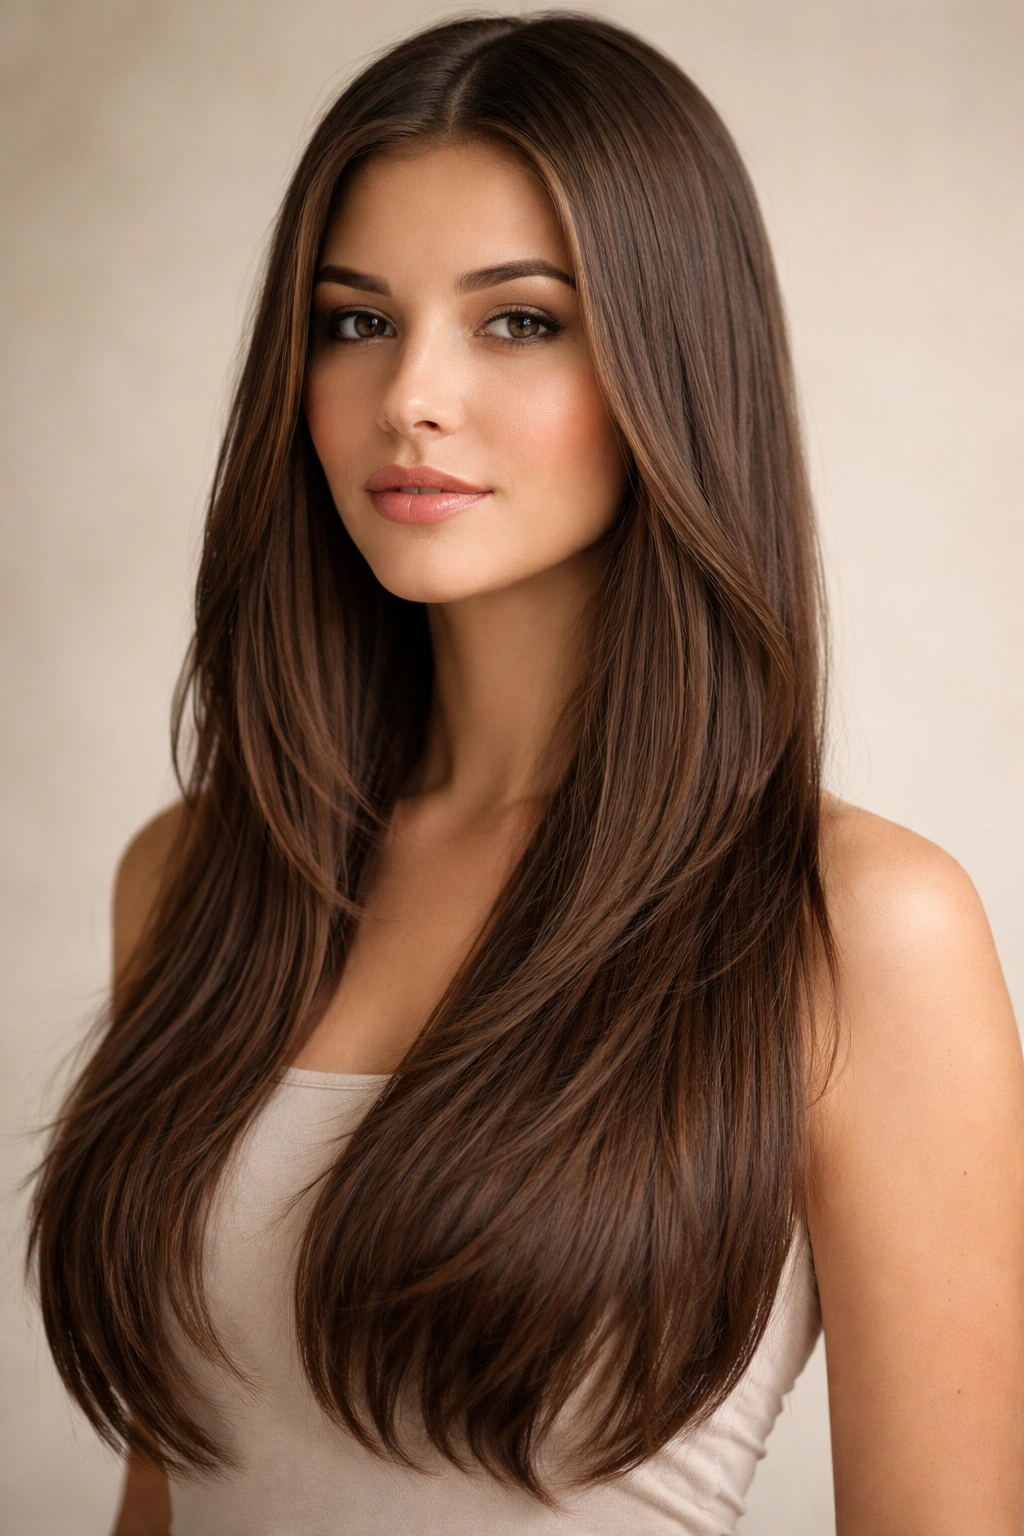
7. Sleek, Long Straight Hair
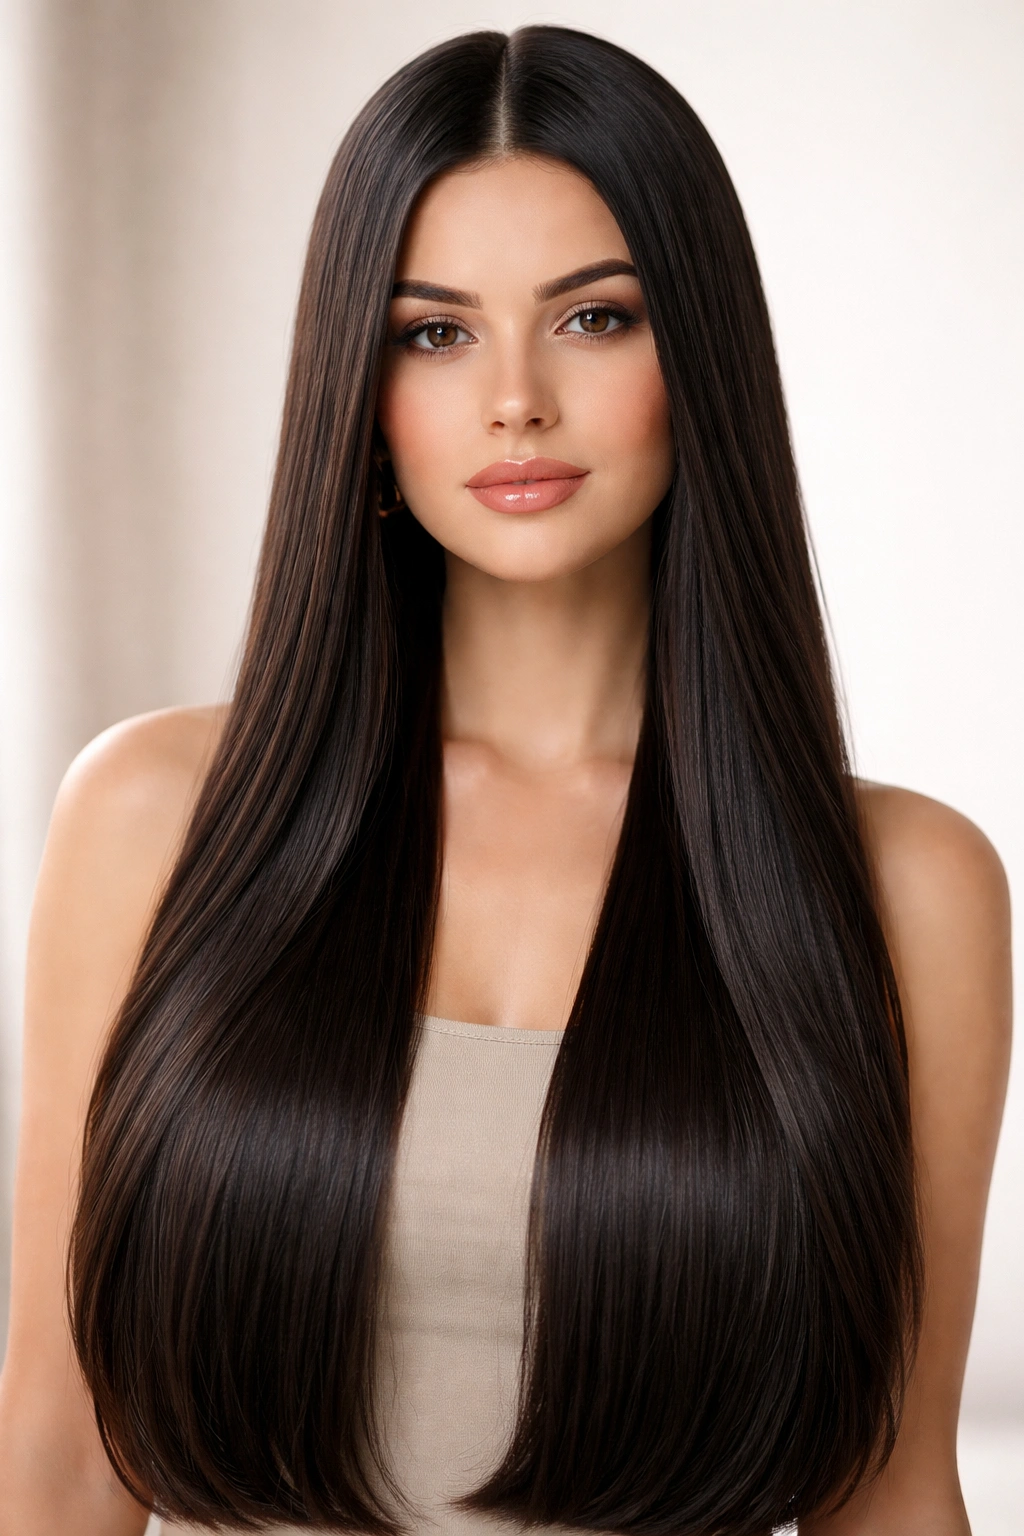
Sometimes simple is best. Long, straight hair (past the shoulders, ideally to the bra strap or beyond) creates uninterrupted vertical lines that inherently elongate any face shape.
Why It Flatters Round Faces
Length is the primary tool here. The longer your hair, the more it stretches your overall proportions vertically, minimizing the appearance of roundness. There’s no texture to bulk things up, no layers to create width — just clean, vertical lines. For round faces, longer often feels better than shorter because it gives maximum elongation.
How to Style It
- Maintain a routine that keeps your hair smooth — regular blow-drying or flat ironing if that’s your style
- A center part or off-center part both work; just avoid a deep side part that might make the style feel too directional
- Regular deep conditioning is crucial because long hair needs it to look healthy and shiny
- Trims every 8-10 weeks keep the ends healthy and prevent a stringy appearance
- A light serum on damp ends before blow-drying adds shine and smoothness
- On days you want texture, add subtle waves with a curling iron, but keep them loose and flowing rather than tight
Best For
Naturally straight or wavy hair that you can blow-dry smooth works best here. Curly hair can be straightened, but that requires either daily heat styling or a straightening treatment. If you have very fine hair, extremely long styles can feel thin — aim for mid-back length rather than beyond. Thick hair thrives with this style and looks effortlessly polished.
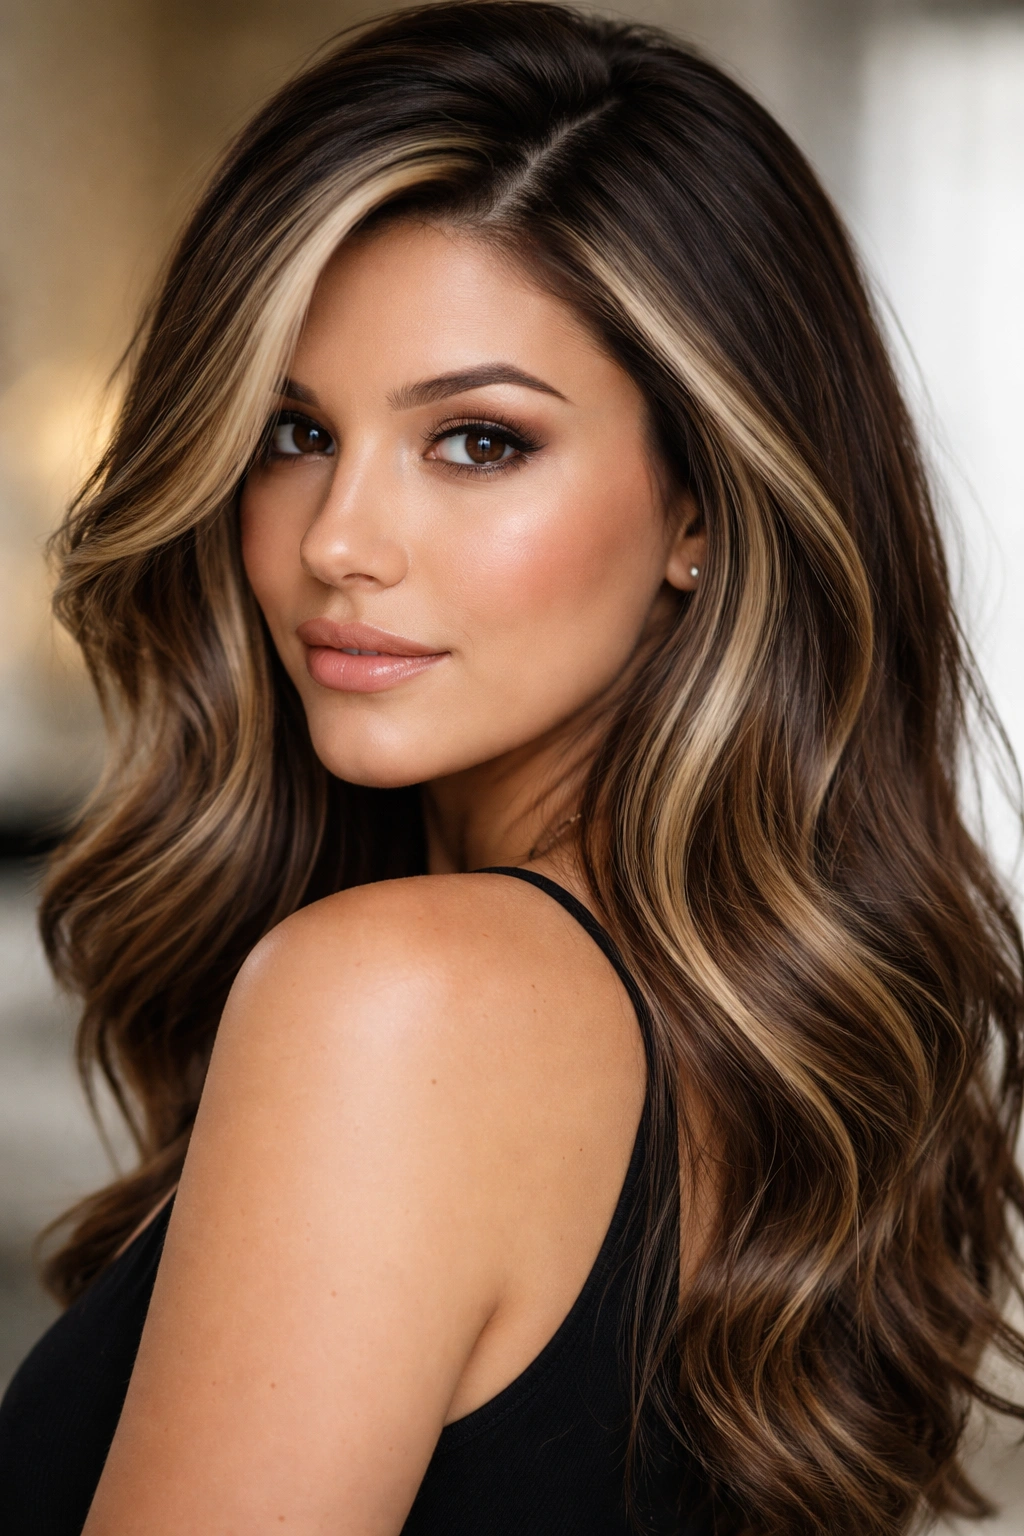
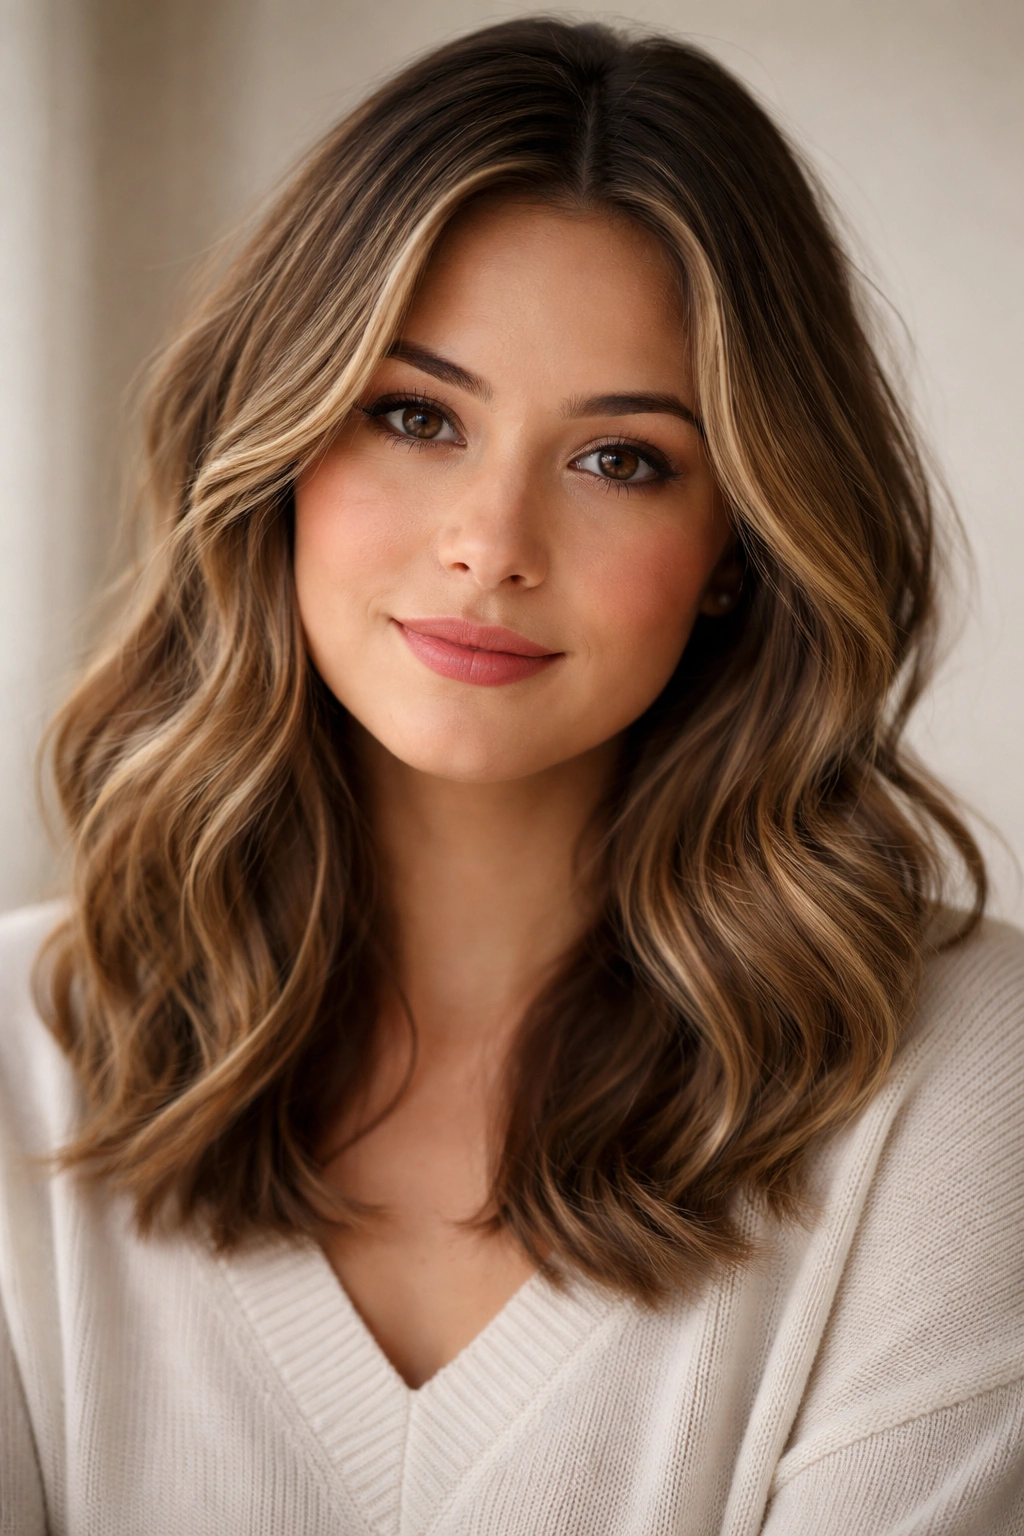
8. Voluminous Waves
Big, bouncy waves throughout your hair create movement, texture, and visual interest that distracts from face shape. The volume — particularly at the crown — creates elongation that counters roundness.
Why It Flatters Round Faces
Waves and texture create a sense of movement that prevents your gaze from settling on the face shape. The volume, especially if you build it at the roots and crown, adds height and elongation. Waves also create subtle angles and shadows throughout the hair that prevent a flat, heavy appearance. The overall effect is softer and more dimensional than roundness allows.
How to Style It
- Start with slightly damp hair and apply a volumizing mousse or spray to the roots
- Blow-dry using a diffuser attachment if you have wavy or curly hair, or a round brush if you have straight hair — focus on creating volume at the crown
- Once dry, use a 1.25-inch or 1.5-inch curling iron to create waves throughout, wrapping sections around the barrel and releasing for loose, flowing waves
- Alternate the direction you wrap the iron — this creates more natural, multidimensional waves
- Once all sections are curled, let the waves cool for a few minutes, then gently run your fingers through to break them apart into softer waves
- A light texturizing spray or sea salt spray adds hold and prevents the waves from falling flat
Best For
Medium to long hair works best for voluminous waves — short hair can look poufy rather than wavy. Straight hair needs heat styling to achieve waves, while naturally wavy or curly hair just needs enhancement and styling products. This look typically lasts 1-2 days depending on your hair type, so plan for regular styling.
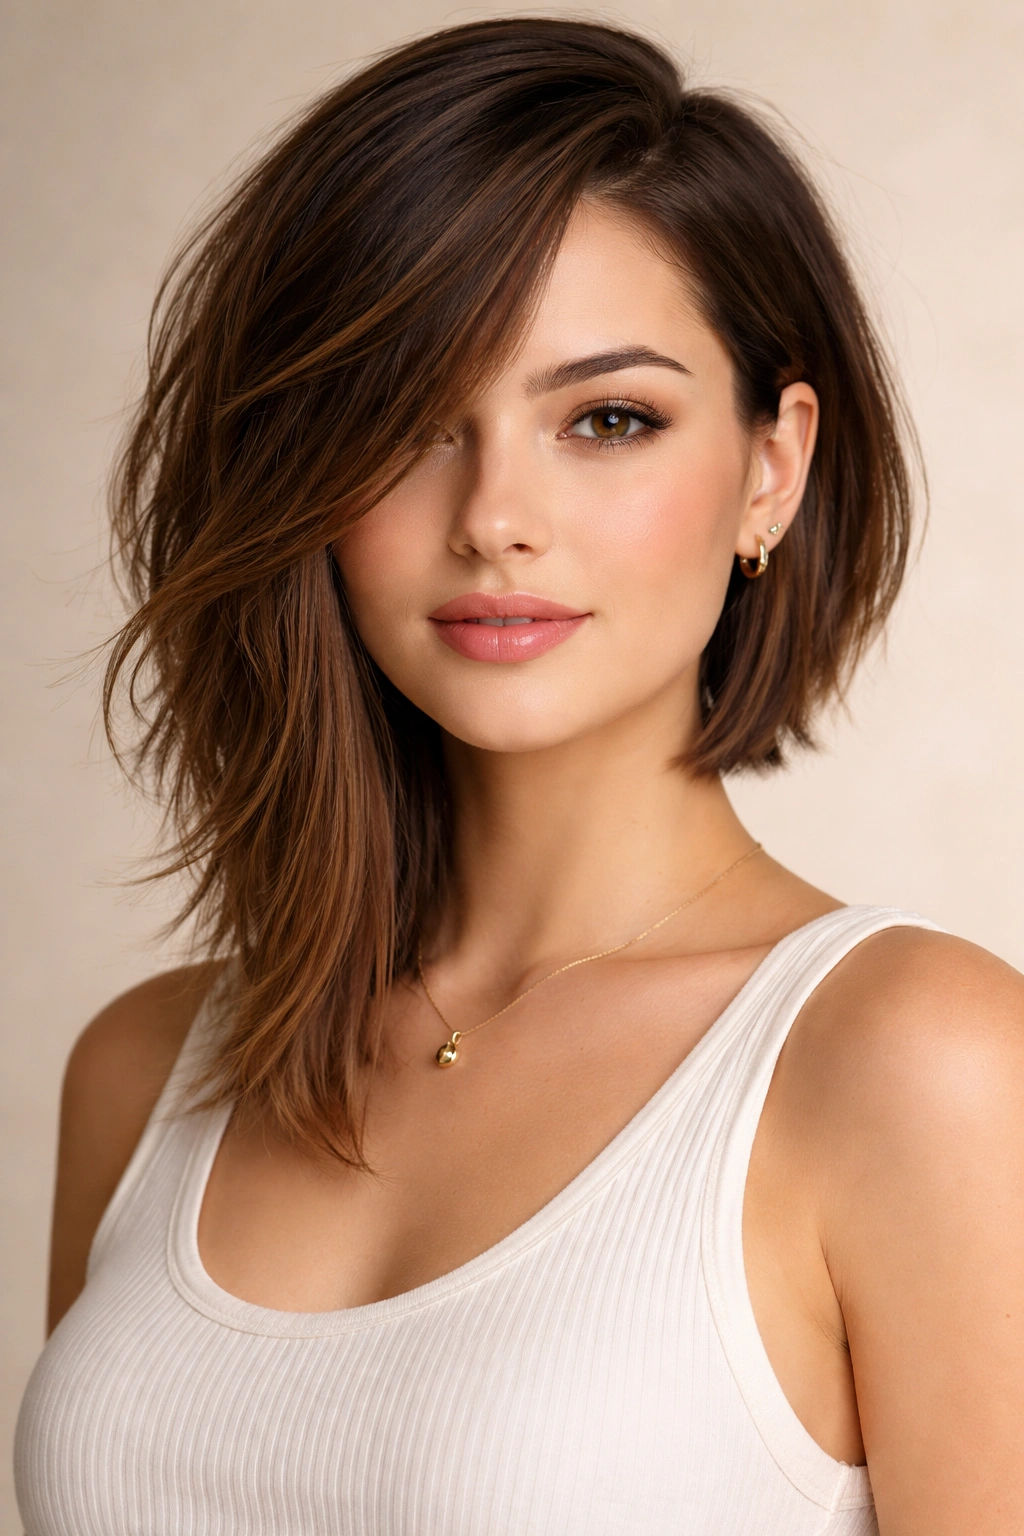
9. Angled Bob
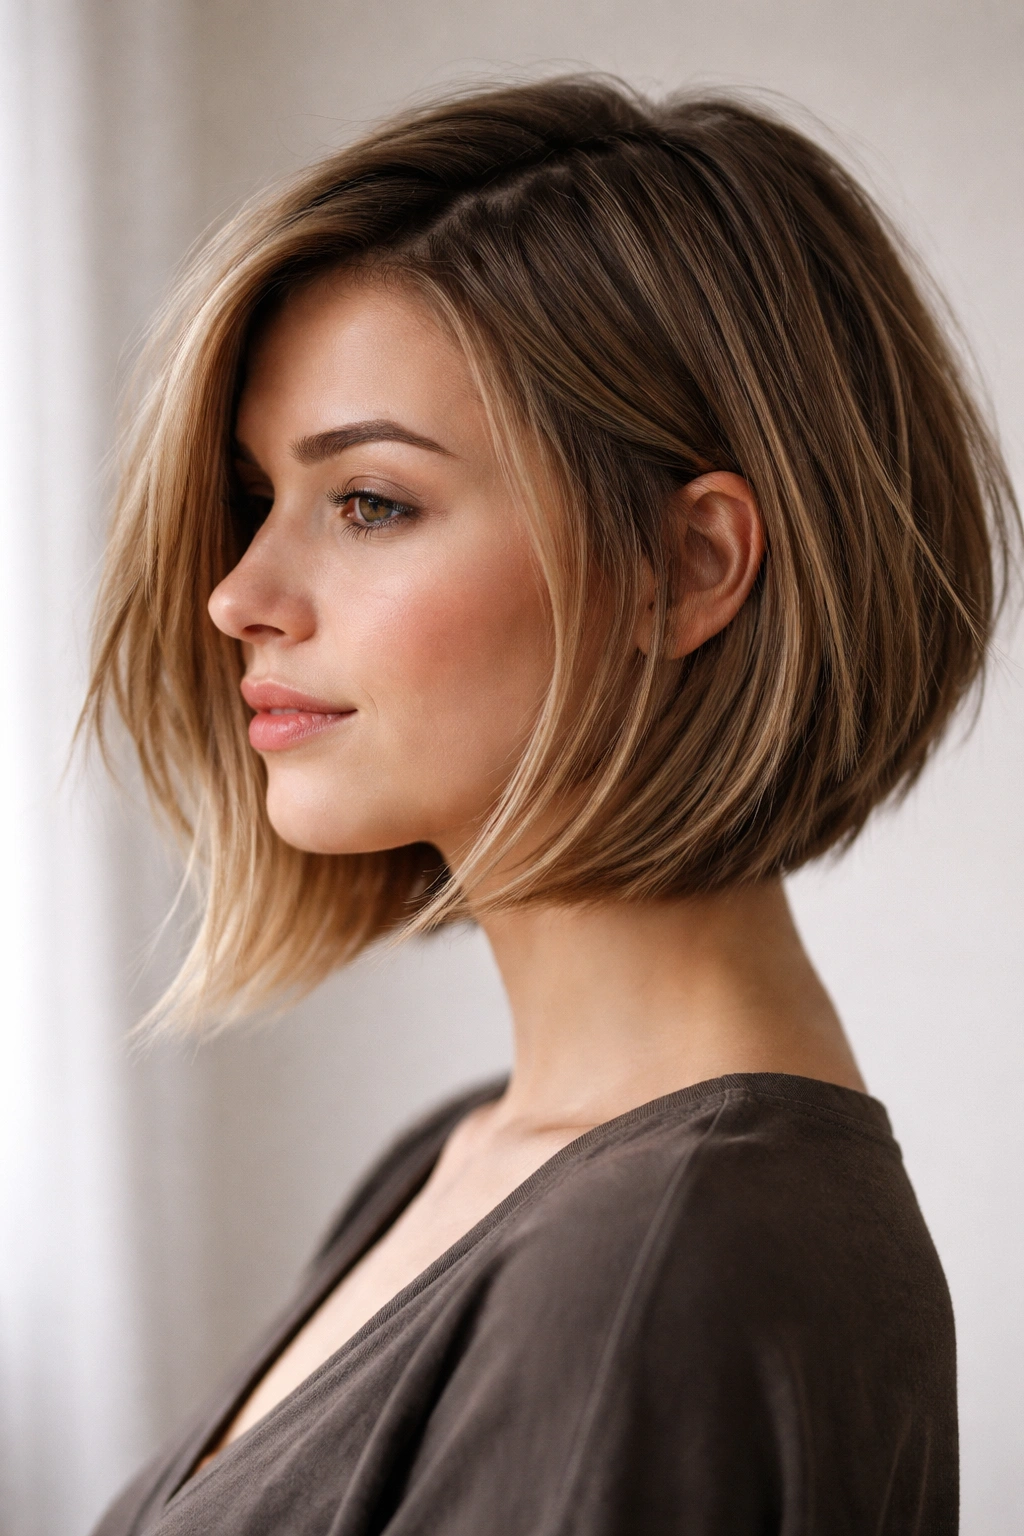
An angled bob is longer in the front (around chin-length or slightly longer) and shorter in the back, creating a diagonal line across your head. Modern versions use choppy layers for texture rather than a blunt, severe angle.
Why It Flatters Round Faces
The angled shape creates a visual elongation on one side of your face while the layers add texture and movement. An angled bob (longer front, shorter back) specifically draws attention toward the face-framing side, and if styled with waves or texture, it’s incredibly flattering for round features. The shorter back prevents any sense of heaviness while the longer front adds length where you need it.
How to Style It
- Ask your stylist for an angled cut with choppy layers throughout — not a blunt, severe angle
- Blow-dry with your head flipped upside down for root volume, then flip back and smooth the top section
- Use a curling iron or wand to create soft waves throughout, emphasizing the face-framing front sections
- Style the longer front pieces to fall away from your face slightly rather than directly in front, creating a frame effect
- A light texturizing spray holds the waves and adds grip between wash days
Best For
Medium-length hair (chin-length to shoulder-length) works best for an angled bob. Straight, wavy, and curly hair can all do this cut — just adjust your styling to match your natural texture. This cut requires trims every 6-8 weeks to maintain the angle as hair grows out.
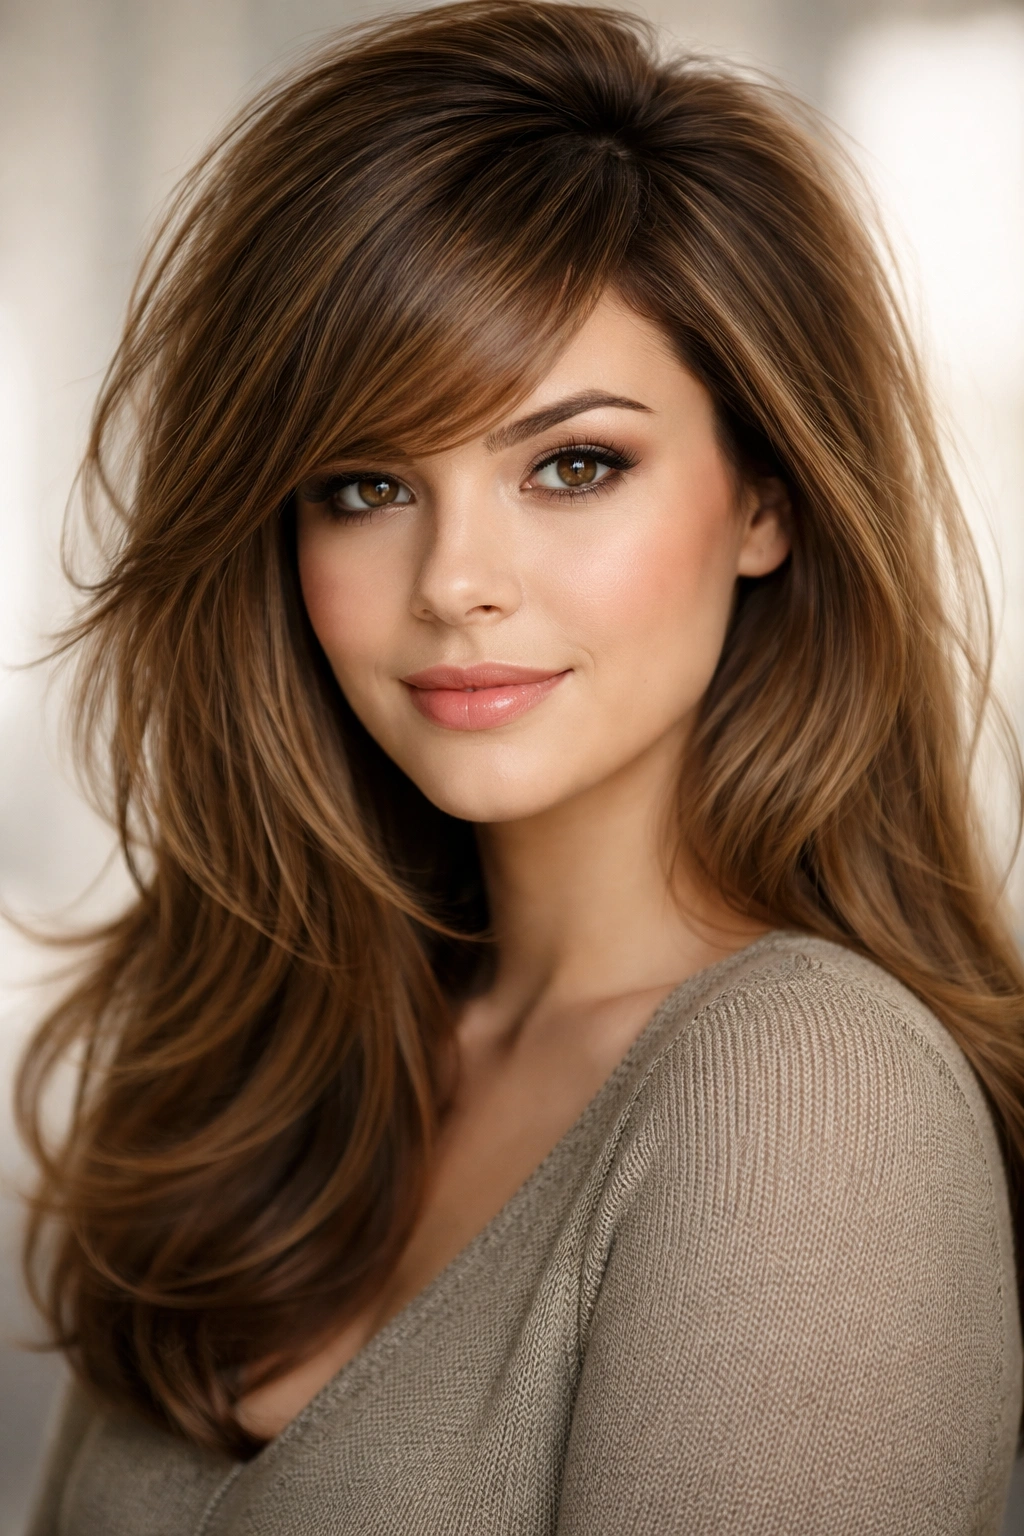
10. Wispy Bangs with Layers
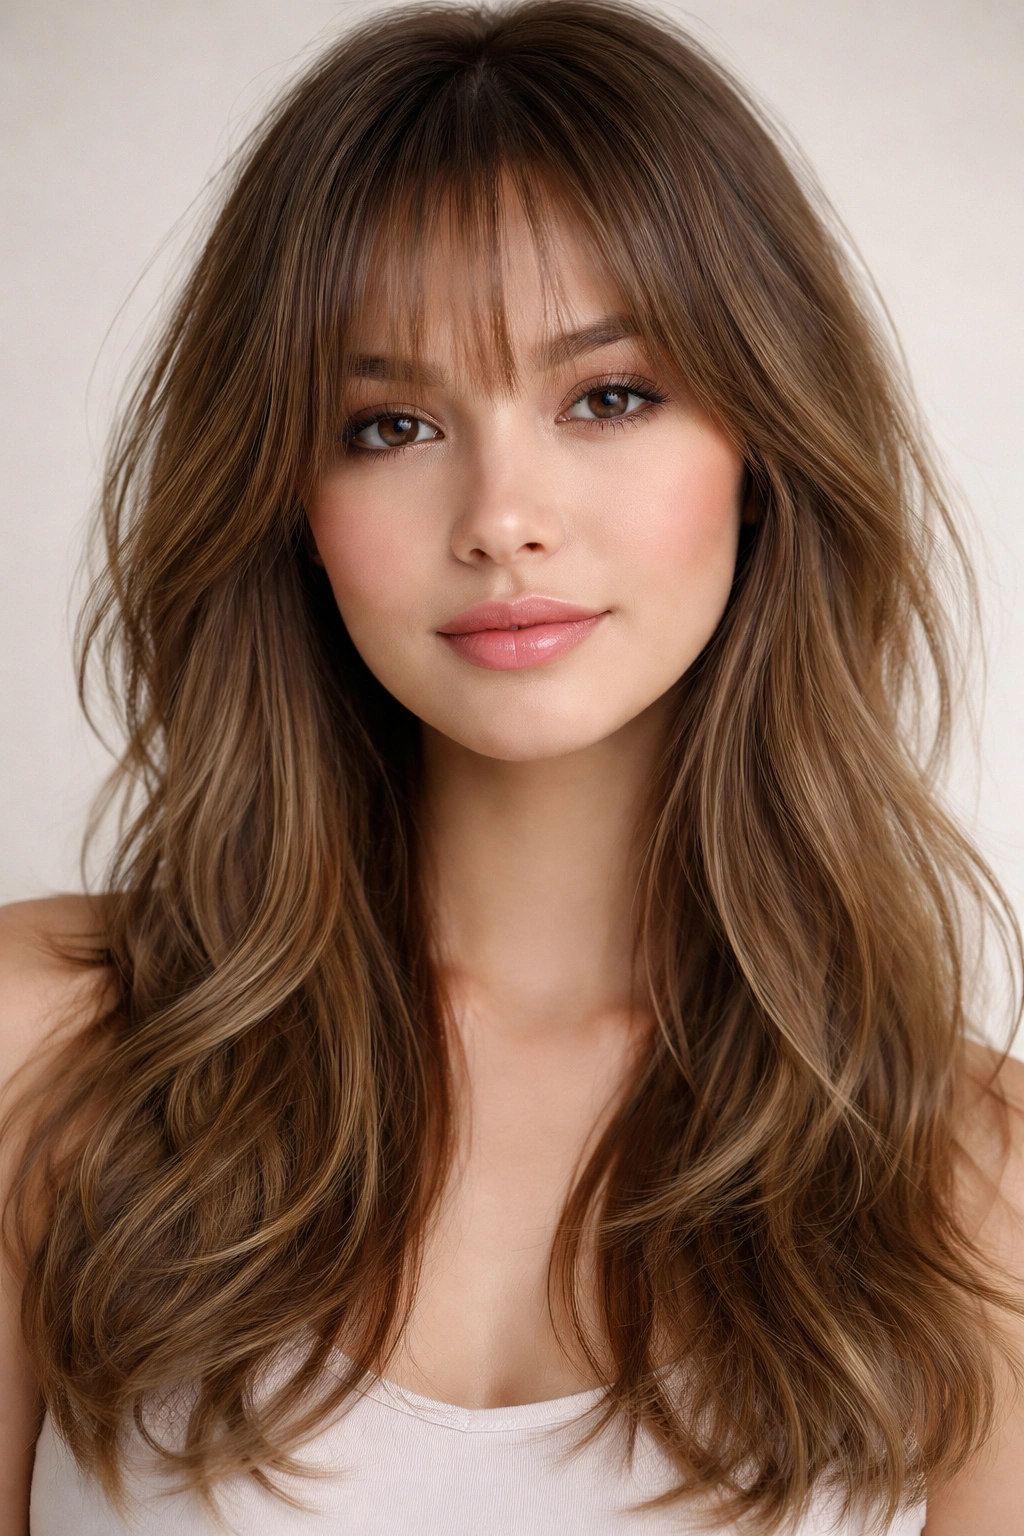
Wispy bangs are soft, feathered bangs that skim across your forehead without creating a heavy line. Pair them with layers throughout and you’ve got a style that’s face-framing and flattering.
Why It Flatters Round Faces
Wispy bangs create a soft line across your forehead that breaks up the roundness without being blunt or severe. The layers throughout add movement and prevent weight, while the wispy texture is inherently flattering rather than stark. This style feels modern, soft, and intentionally styled rather than accidentally baby-faced.
How to Style It
- Ask your stylist for choppy, wispy bangs that sit around mid-brow and require regular styling (not blunt bangs that fall straight)
- Blow-dry the bangs as you dry your hair, using a small round brush to create a subtle wave or bend
- For a more tousled look, apply texturizing spray to damp bangs before blow-drying
- Use a curling iron to add a soft curve to the bangs, curling away from your face
- On non-wash days, lightly mist the bangs with dry shampoo and style with your fingers for texture
- The layers throughout should be visible and choppy, not blended into one length — ask your stylist specifically for this
Best For
Straight, wavy, and naturally textured hair all work with wispy bangs. You’ll need to style them regularly, so this is best for people who don’t mind a styling routine. Trims every 4-6 weeks keep the wispy texture sharp and prevent the bangs from becoming too long or heavy.
11. Space Buns for Texture
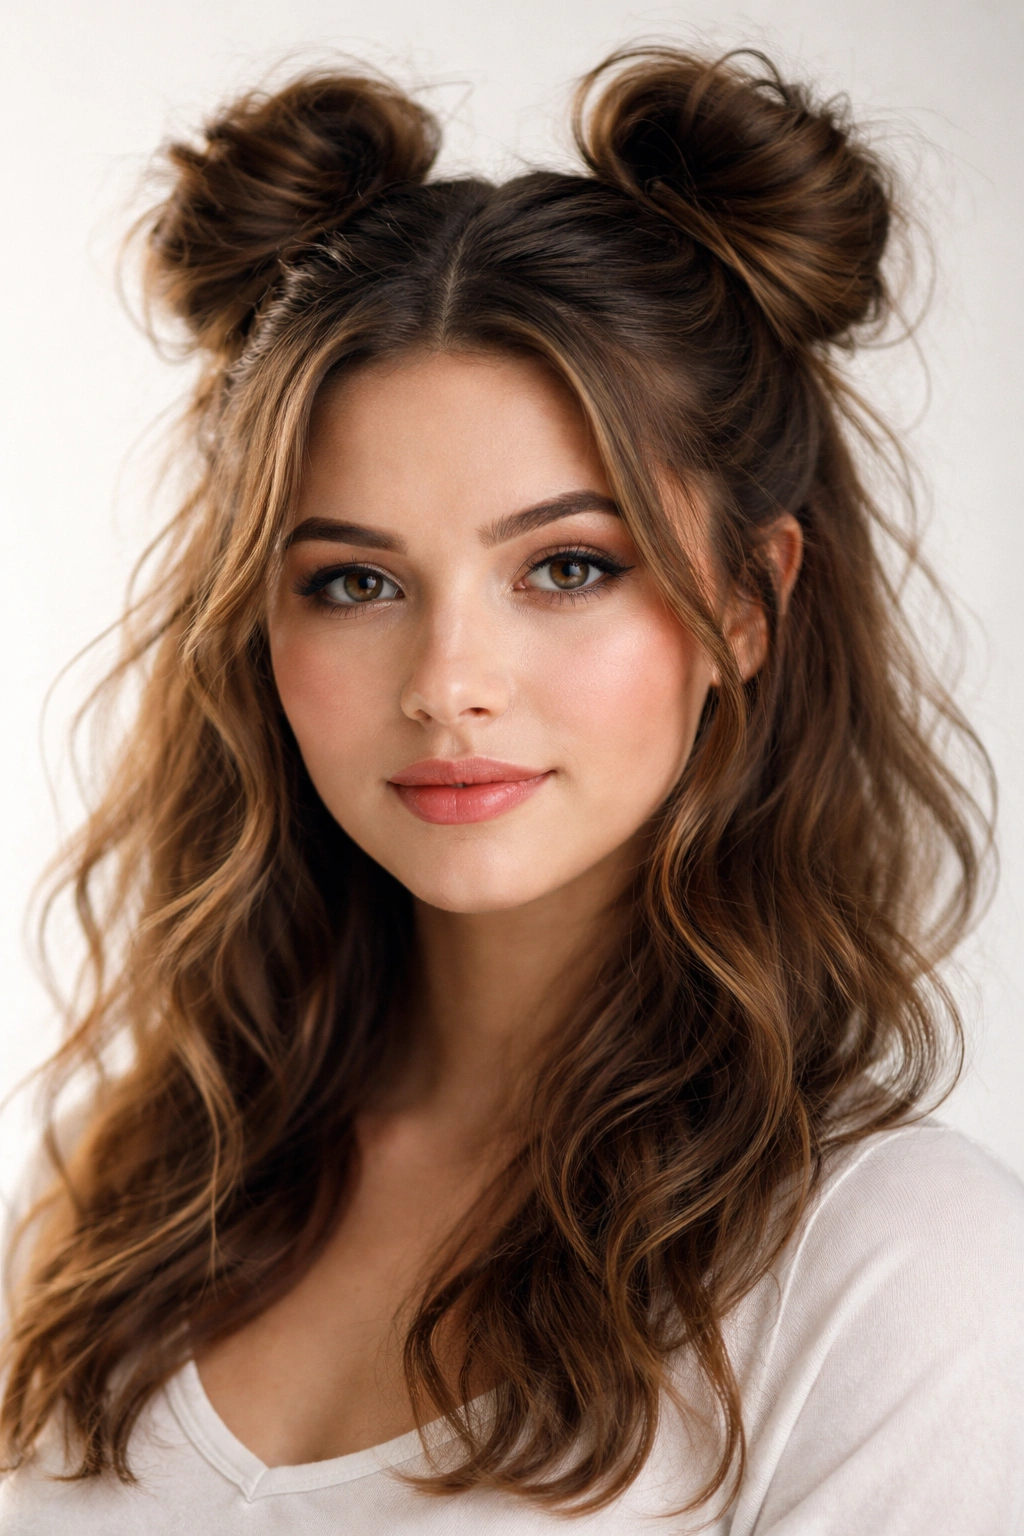
Two buns positioned at the crown (higher than you’d think) create playful height and volume while the loose, textured style around the buns creates softness and dimension that flatter round faces.
Why It Flatters Round Faces
Space buns automatically create height at the crown, elongating your face proportions. The texture around the buns (rather than sleek, tight buns) softens the style and prevents it from looking too severe. The overall effect is youthful and dimensional, with visual interest that prevents the eye from focusing on face shape.
How to Style It
- Start with textured or wavy hair — if your hair is freshly washed, apply texturizing spray to damp roots
- Blow-dry your hair with volume at the crown and throughout
- Create two sections by parting your hair down the center from forehead to nape
- Gather each section at the crown (very high up, not at your natural part line) and secure loosely with an elastic
- Gently pull sections of each bun to create a messy, undone look — this isn’t about neat, tight buns
- Leave a few pieces loose around your face and ears to frame softly
Best For
Medium to long hair works best for space buns. Any hair texture can do this, though you’ll want some natural wave or texture (or apply texturizing product) to prevent the buns from looking too thin or severe. This is a fun, casual style rather than an everyday look for most people.
12. Half-Up Style with Height
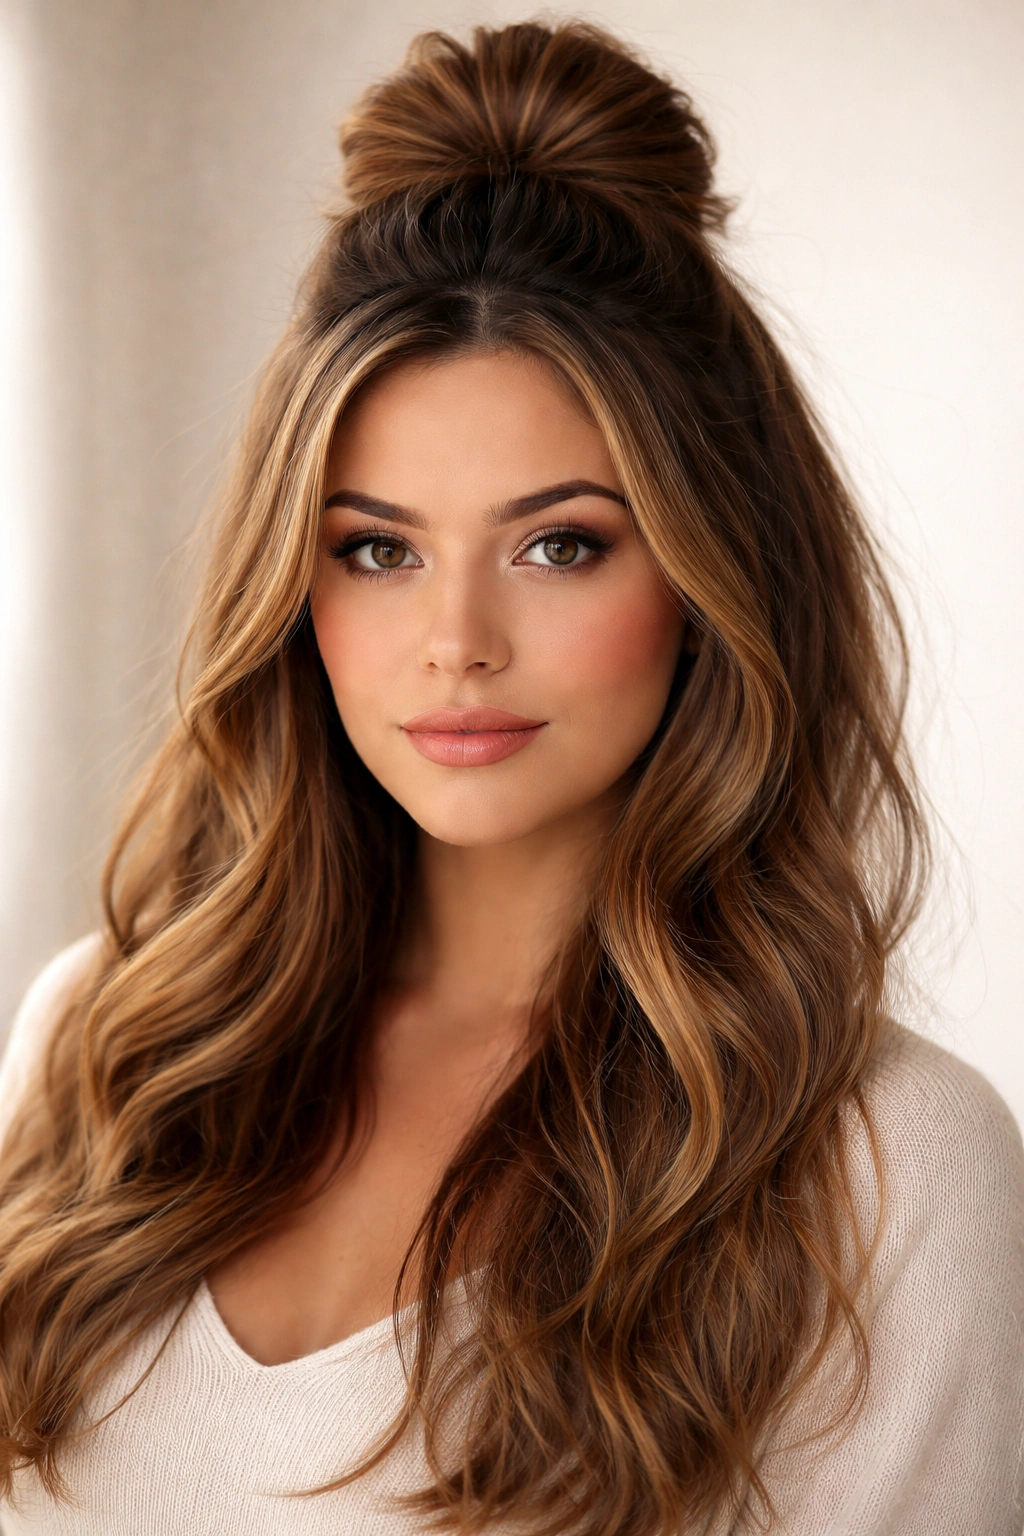
A half-up hairstyle (half your hair in a bun or ponytail at the crown, half down) combines the elongation of an updo with the softness of down hair. The key is building serious height in the crown.
Why It Flatters Round Faces
The lifted section at the crown creates elongation while the down section frames the face softly. The height is what does the heavy lifting here — it stretches your overall proportions vertically. This style bridges casual and polished, giving you definition without looking severe or overly done.
How to Style It
- Blow-dry your entire head with volume at the roots and crown
- Take a section from your temples back to the crown and gather it into a small bun or ponytail, securing tightly so it doesn’t slip
- Gently pull the bun or ponytail slightly to create a fuller, less sleek appearance
- Leave the remaining hair down, and if desired, add waves with a curling iron
- Pull a few face-framing pieces out around your ears and face so the style feels soft rather than tight
- The key is height — the gathered section should sit visibly above your natural part line
Best For
Medium to long hair is best for this style. Any hair texture works, though you’ll want to style it to match your natural texture (waves for wavy hair, straight for straight hair). This is a versatile, everyday-to-special-occasion style that works for most face shapes but is particularly flattering for round ones.
13. Braided Crown
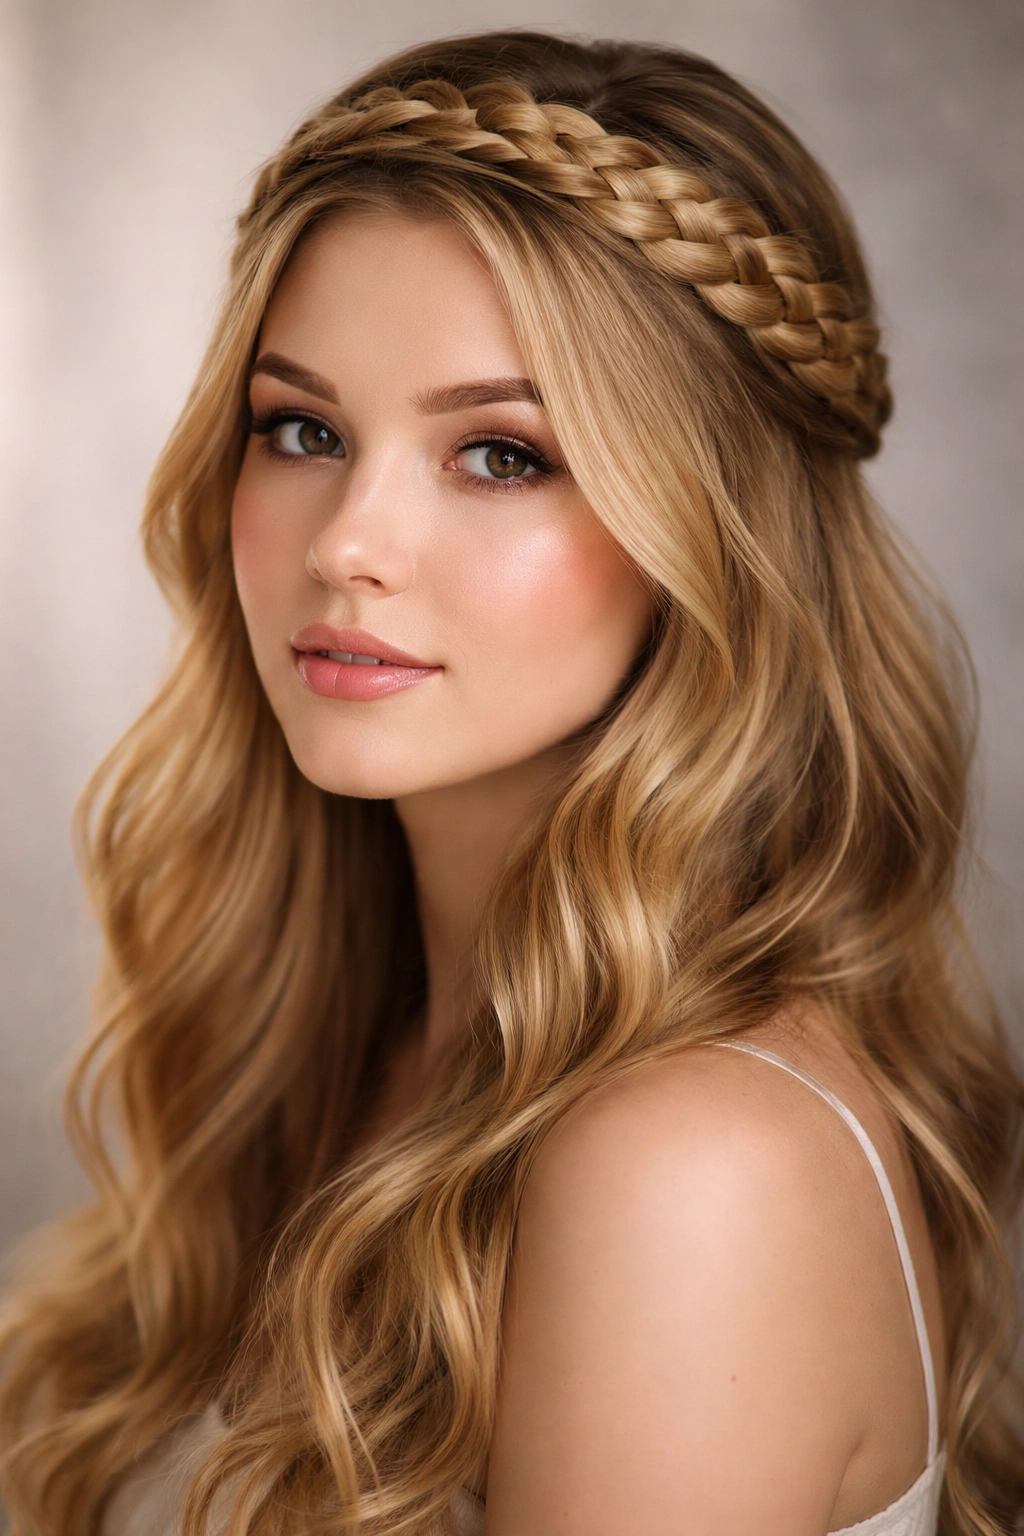
A braided crown style involves one or more braids woven around your head like a halo, with the remaining hair down or partially down. It’s romantic, flattering, and surprisingly easy to do.
Why It Flatters Round Faces
The braided line creates an angular element that disrupts roundness, while the overall style is soft and flattering rather than harsh. The placement of the braid draws attention upward and around your face rather than directly to your face shape. Braids add texture and visual interest that makes the style feel intentional and polished.
How to Style It
- Start with slightly textured or wavy hair — freshly washed, smooth hair is harder to braid
- Create one or two braids starting from one side of your head, weaving around toward the back or other side
- You can do a Dutch braid (braid over rather than under) for a fuller appearance, or a regular three-strand braid for a delicate look
- Gently pull the braid slightly to create a fuller, less tight appearance
- Leave the remaining hair down and add soft waves if desired
- Pin the braid in place at the back with bobby pins that match your hair color
Best For
Medium to long hair with enough texture to hold a braid works best. Straight hair needs some texture or product for grip, while naturally wavy and curly hair braids beautifully. This is a romantic, special-occasion style or a casual weekend look depending on how you style the down hair.
14. Asymmetrical Cut
An asymmetrical cut is dramatically different lengths on each side of your head — one side might be chin-length while the other is much longer, or one side is short and textured while the other is long and sleek.
Why It Flatters Round Faces
Asymmetry is the ultimate round-face antidote. By creating different lengths and weights on each side, you instantly disrupt the symmetry that emphasizes roundness. The eye follows the angles and asymmetry rather than settling on your face shape. This style makes a bold statement and is inherently flattering for anyone with a round face.
How to Style It
- Work with a stylist experienced in asymmetrical cuts — this is a precision style that requires skill
- Styling depends on your specific cut, but generally you’ll blow-dry with the longer side smooth or wavy and the shorter side textured
- The shorter side might be styled with texture or volume, while the longer side creates elongation
- This style is very directional — it works best styled intentionally rather than haphazardly
- Trims every 6-8 weeks maintain the asymmetrical shape as hair grows
Best For
This is a bold choice that works on any hair length or texture, but it requires regular styling and maintenance. It’s best for people who are comfortable with a statement hairstyle and don’t mind a bit of styling effort. If you have very thick or curly hair, work with a stylist to ensure the cut accounts for texture.
15. Messy Top Knot with Face-Framing Pieces
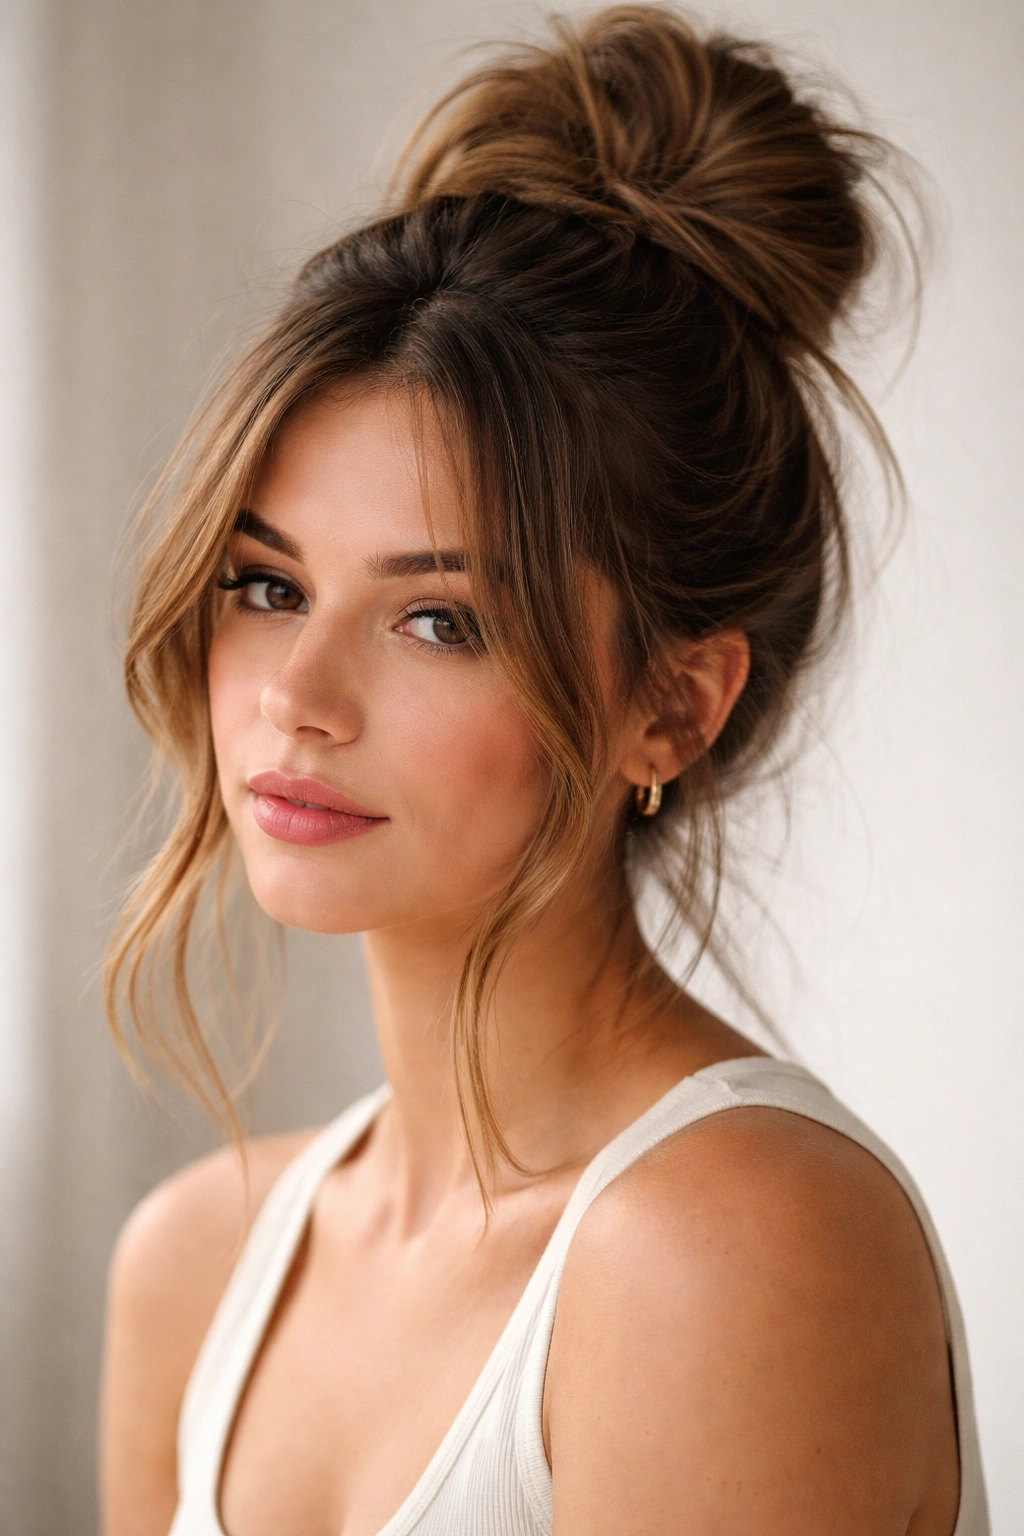
A messy (not sleek) top knot positioned high on your head, with soft pieces framing your face, combines playful height with flattering softness. It’s the casual cousin of a formal updo.
Why It Flatters Round Faces
The high placement of the knot creates immediate elongation and draws attention upward, away from face shape. The messiness and texture prevent any sense of severity, while the face-framing pieces add softness. This style works because it’s both elevated and undone — intentionally casual in a way that’s deeply flattering.
How to Style It
- Start with textured or wavy hair — the messier and more lived-in the better
- Create volume at your roots and throughout by blow-drying with your head flipped upside down
- Flip back and gather your hair very high at the crown, creating a small ponytail with an elastic
- Twist or gently tease the ponytail section to create a messy bun, securing with bobby pins
- Gently pull sections of the bun to make it fuller and less neat
- Pull soft face-framing pieces out around your ears and face, letting them fall naturally
- This should look effortless rather than polished — embrace the messiness
Best For
Medium to long hair works best, though short hair can do a top knot if you have enough length to gather at the crown. Any hair texture works — in fact, textured and curly hair naturally creates the messy, undone look this style requires. This is a casual, everyday style that’s also acceptable for many casual-to-business-casual settings.
Final Thoughts
Your face shape is genuinely one of the most useful tools for finding a hairstyle that feels like you. Round faces benefit from length, layers, texture, and any element that creates angles or asymmetry — but more importantly, they benefit from styles that feel confident and intentional rather than like you’re trying to hide something.
The reality is that none of these cuts or styles will magically change your face shape, nor should they. What they do is create visual lines, texture, and dimension that emphasize your best features and create flattering proportions. A great cut paired with smart styling choices makes you feel genuinely confident in your own skin.
The best hairstyle for a round face isn’t about following rules — it’s about finding a stylist who understands how hair can flatter your specific features, then committing to the styling routine that hairstyle requires. A perfect cut will fall flat without proper styling, just as perfect styling can’t salvage a cut that doesn’t work for your face and hair type.
Consider your lifestyle, how much styling you genuinely want to do daily, and what version of yourself you want to present to the world. Then find a stylist who gets it and trusts their expertise. You deserve a hairstyle that makes you feel incredible every single time you catch your reflection.