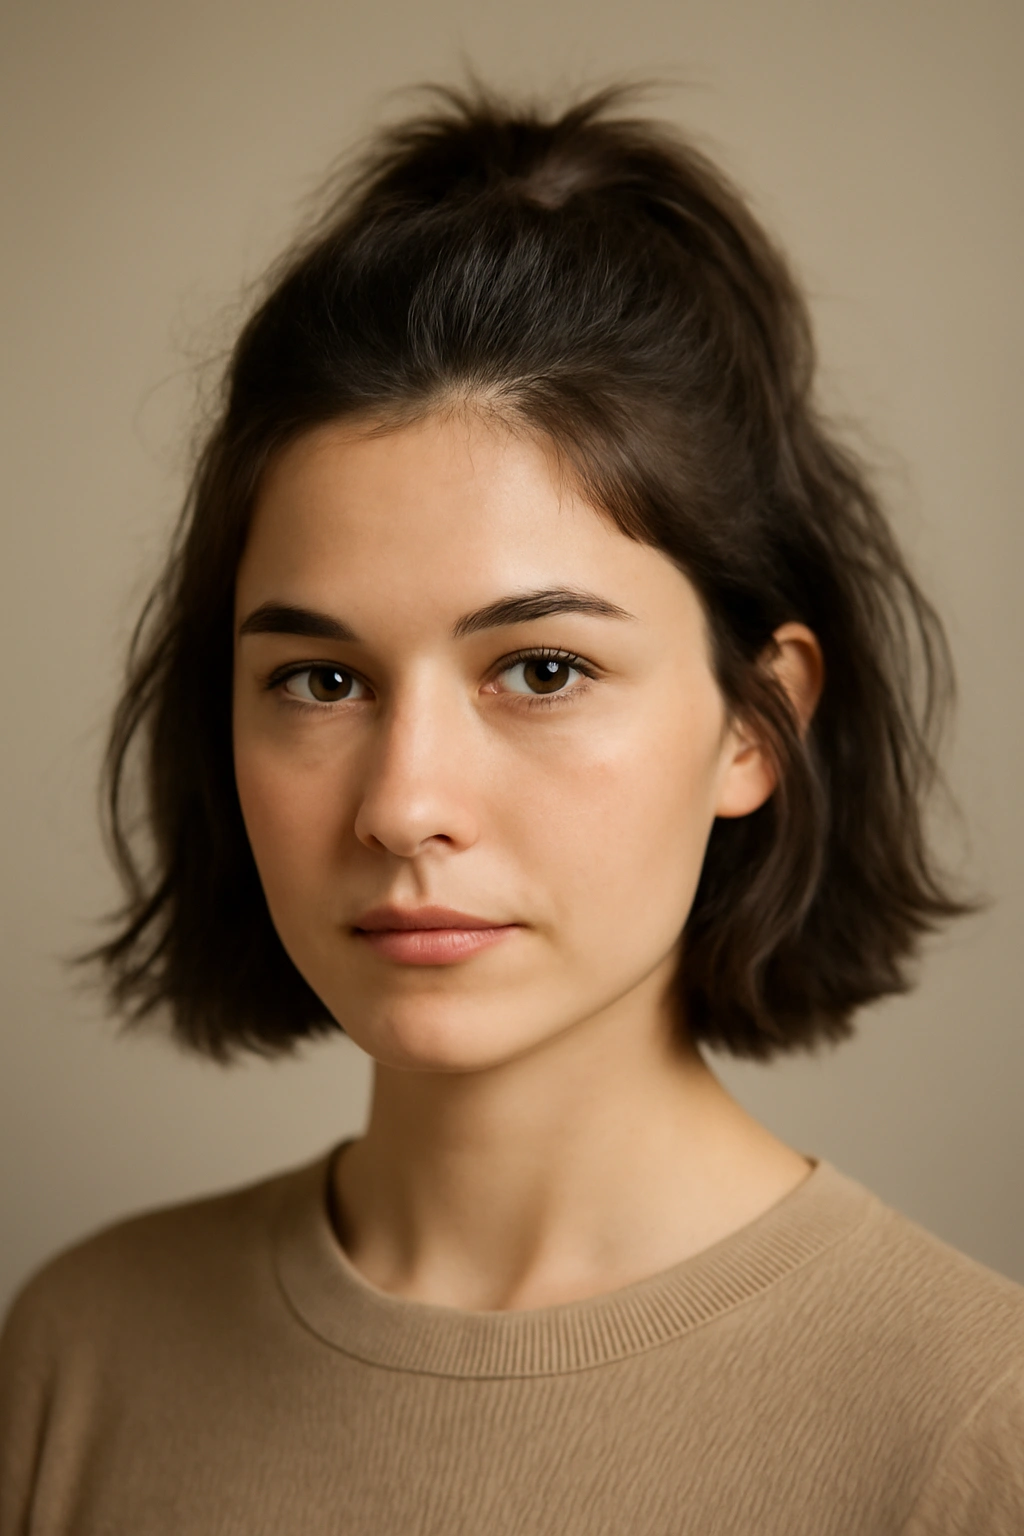
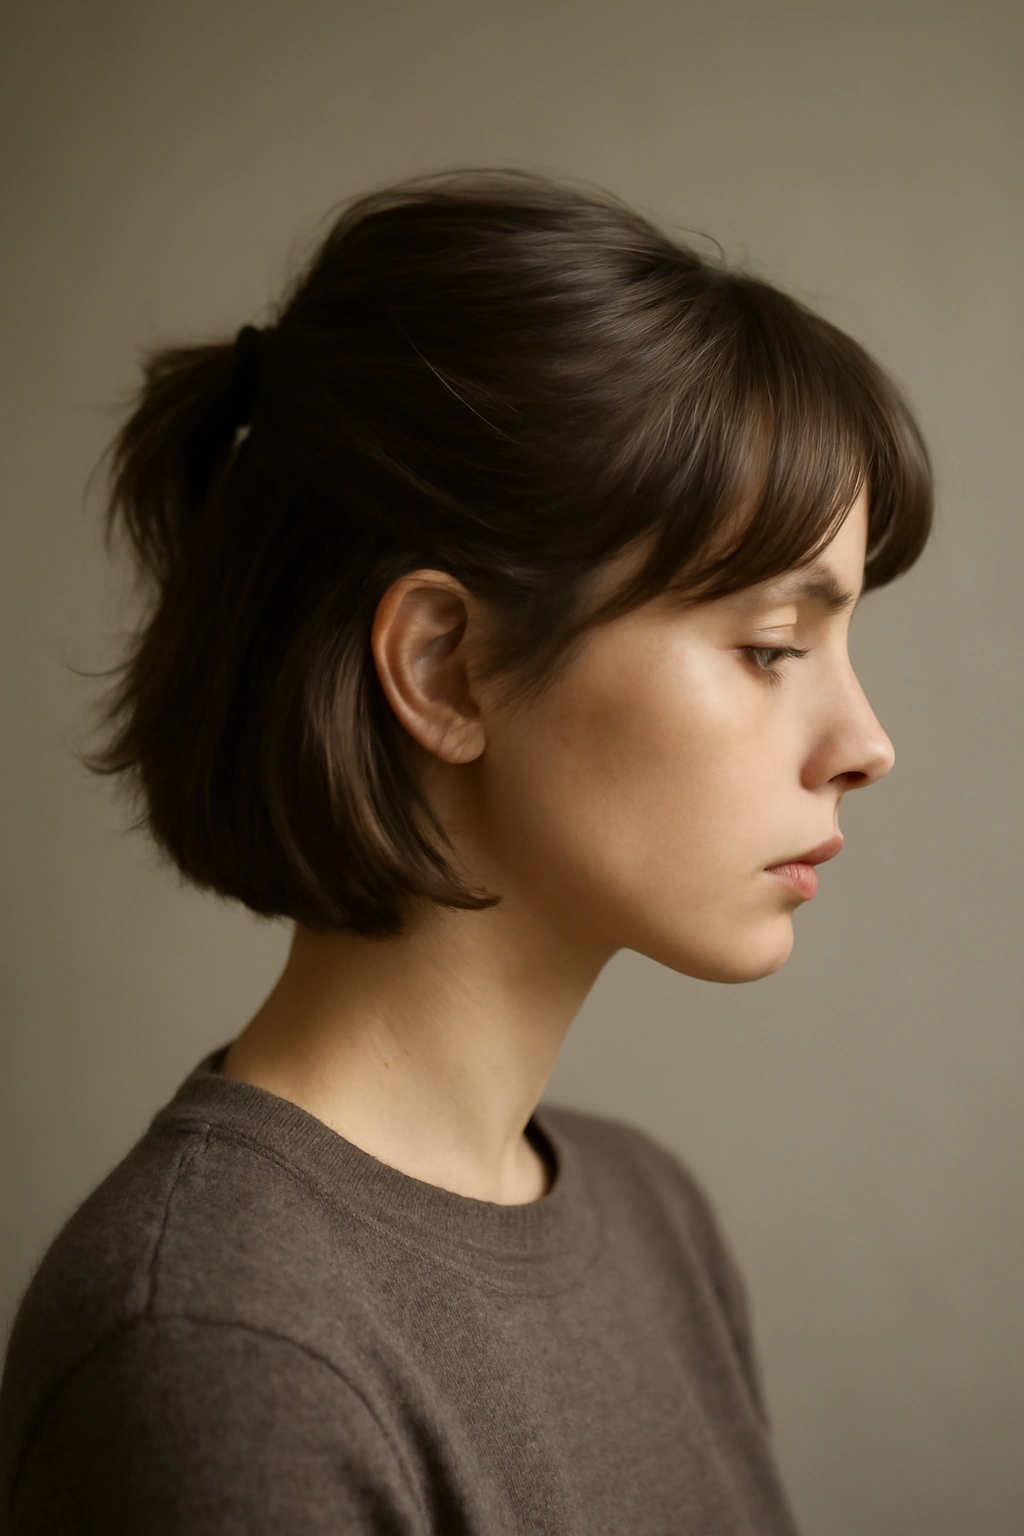
Short hair doesn’t mean giving up on half-up hairstyles — it actually opens up a whole new world of styling possibilities that feel fresh, modern, and way easier to execute than you might think. The beauty of a half-up style on short hair is that it creates instant dimension and texture without requiring the full commitment of a full updo or the casualness of wearing your hair completely down. Whether you have a pixie cut, a short bob, or layers that fall just past your shoulders, there’s a half-up style that’ll work with your hair type and face shape.
What makes half-up styles so versatile is that they work across every situation — casual coffee runs, office days, dinner dates, weekend events, even a quick grab-and-go morning when you need to look put-together without spending twenty minutes styling. You can dress them up with bobby pins and waves or keep them relaxed and textured for a more effortless vibe. The styles in this guide range from minimalist and sleek to romantic and braided, so you’ll find something that matches your personal style, whether you’re into polished looks or intentionally undone hair.
Best of all, most of these styles work with your natural texture — whether your short hair is straight, wavy, or curly. You don’t need special tools or complicated techniques. A few bobby pins, maybe some texturizing spray, and a bit of confidence are really all you need to pull off any of these styles. Let’s walk through each one with the specific technique so you can recreate them with certainty.
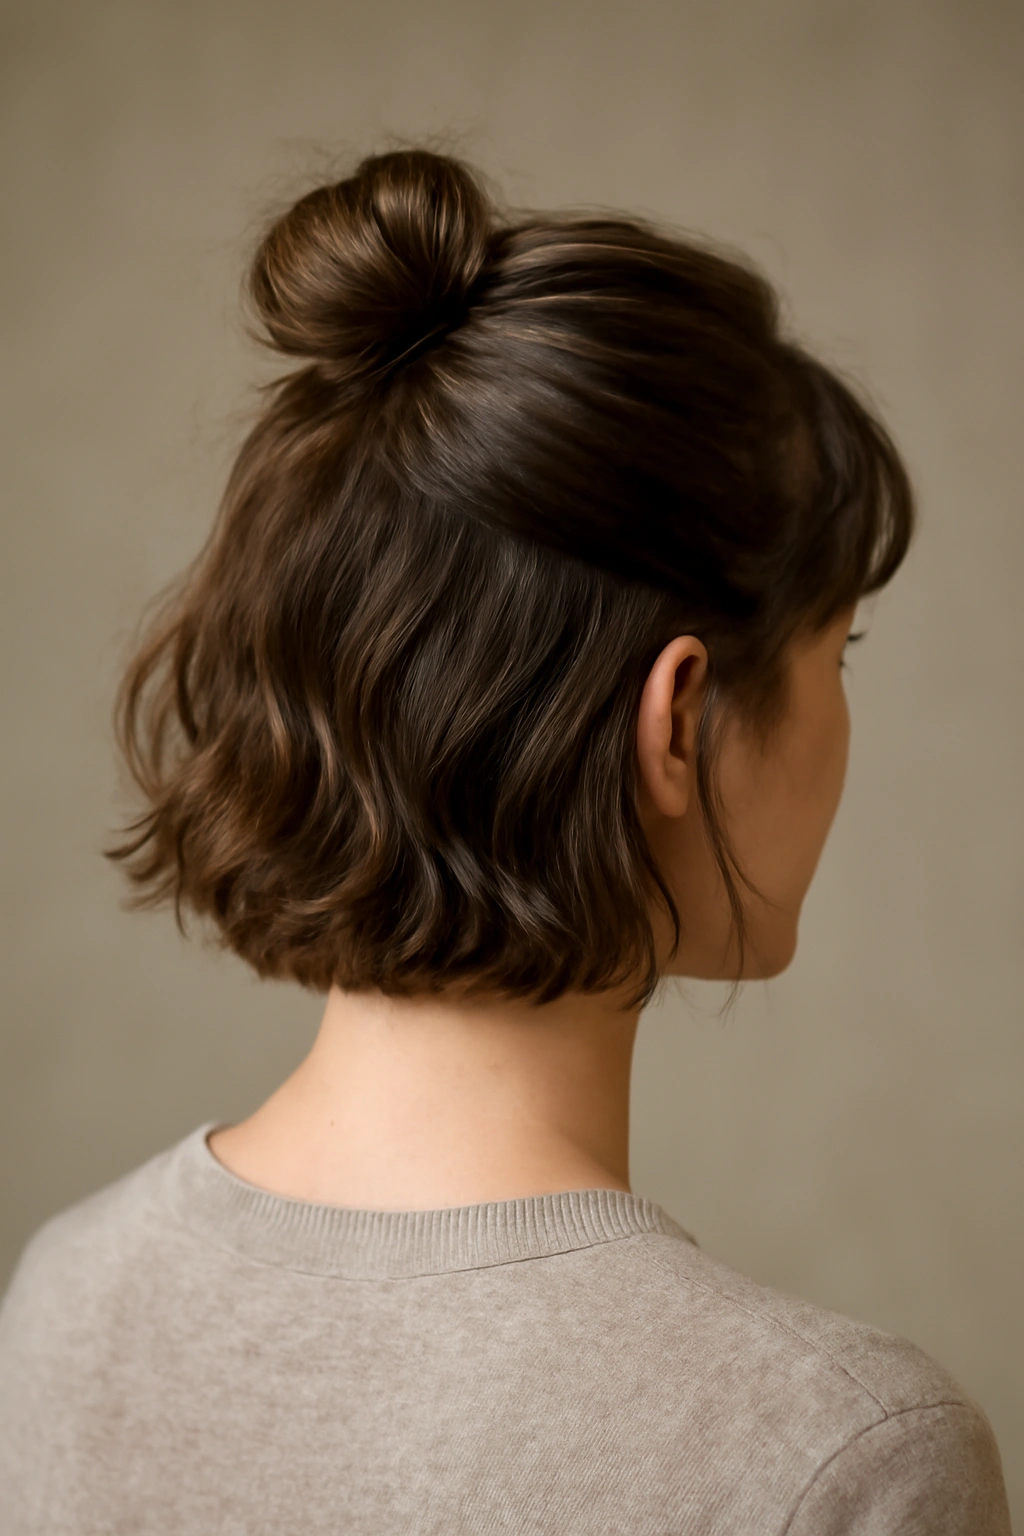
1. The Half-Up Ponytail — Classic and Effortless
This is the foundation of half-up styling, and it’s the one that works on literally every hair length and texture. The magic is in the execution — you’re gathering just the top section of your hair (roughly from your temples back to about where you’d draw a line ear-to-ear across the crown) and securing it into a small, neat ponytail at the back of your head.
Why It Works for Short Hair
On short hair, this style creates immediate lift and volume at the crown while leaving the pieces around your face and the lower section of your hair down and free. It’s the perfect visual trick when you’re having a flat-hair day, and it instantly looks intentional rather than like you just threw your hair up. The proportion feels balanced on shorter lengths because the ponytail sits high enough that it doesn’t overwhelm your features.
How to Get It Right
- Start with slightly textured hair (second-day hair is actually ideal, or use dry texture spray for grip)
- Use a fine-tooth comb or your fingers to gently gather the top section, starting just above your ears and working back toward the crown
- Secure with a small elastic or a bobby pin and elastic combination for a more invisible hold
- Pull out a few wispy face-framing pieces for softness and to avoid that ultra-sleek look that can feel too severe
- If you want extra polish, smooth the ponytail section with a flat iron before securing it
Pro tip: Flip your head upside down before gathering your hair — this reverses gravity and gives you instant volume that stays once you flip back up and secure your ponytail.
2. Half-Up Bun with Texture
This one feels more intentional than a simple ponytail and adds a sculptural element that photographs beautifully. You’re doing everything exactly as you would for a half-up ponytail, but instead of leaving the gathered section as a ponytail, you’re twisting it and wrapping it around itself to form a small bun at the crown.
What Makes It Different
The bun creates a focal point at the back of your head that draws the eye upward, which is especially flattering on rounder face shapes. It also has an inherently more polished appearance than a ponytail, so it reads as more intentional and works better for situations where you want to look a bit more dressed up. The texture and slight messiness is what keeps it from looking overly formal or too tight.
Building a Bun That Actually Stays
- Gather your half-up section and secure it loosely with a small elastic
- Gently tease the ponytail with a fine brush to add grip and texture (this helps it stay secured as a bun)
- Twist the entire ponytail loosely around itself, then wrap it into a circular coil
- Secure the bun with 3-4 bobby pins inserted from underneath, at different angles, into the base of the bun
- Gently tug a few pieces loose around the face and around the base of the bun for a softer, less constructed look
- Use a lightweight texturizing spray or sea salt spray to enhance the texture and keep strays in place without stiffness
Worth knowing: If your short hair is very fine or slippery, tease more generously before twisting, and consider using a texturizing mousse throughout your hair before styling — this gives everything better grip.
3. The Twisted Half-Up with Volume
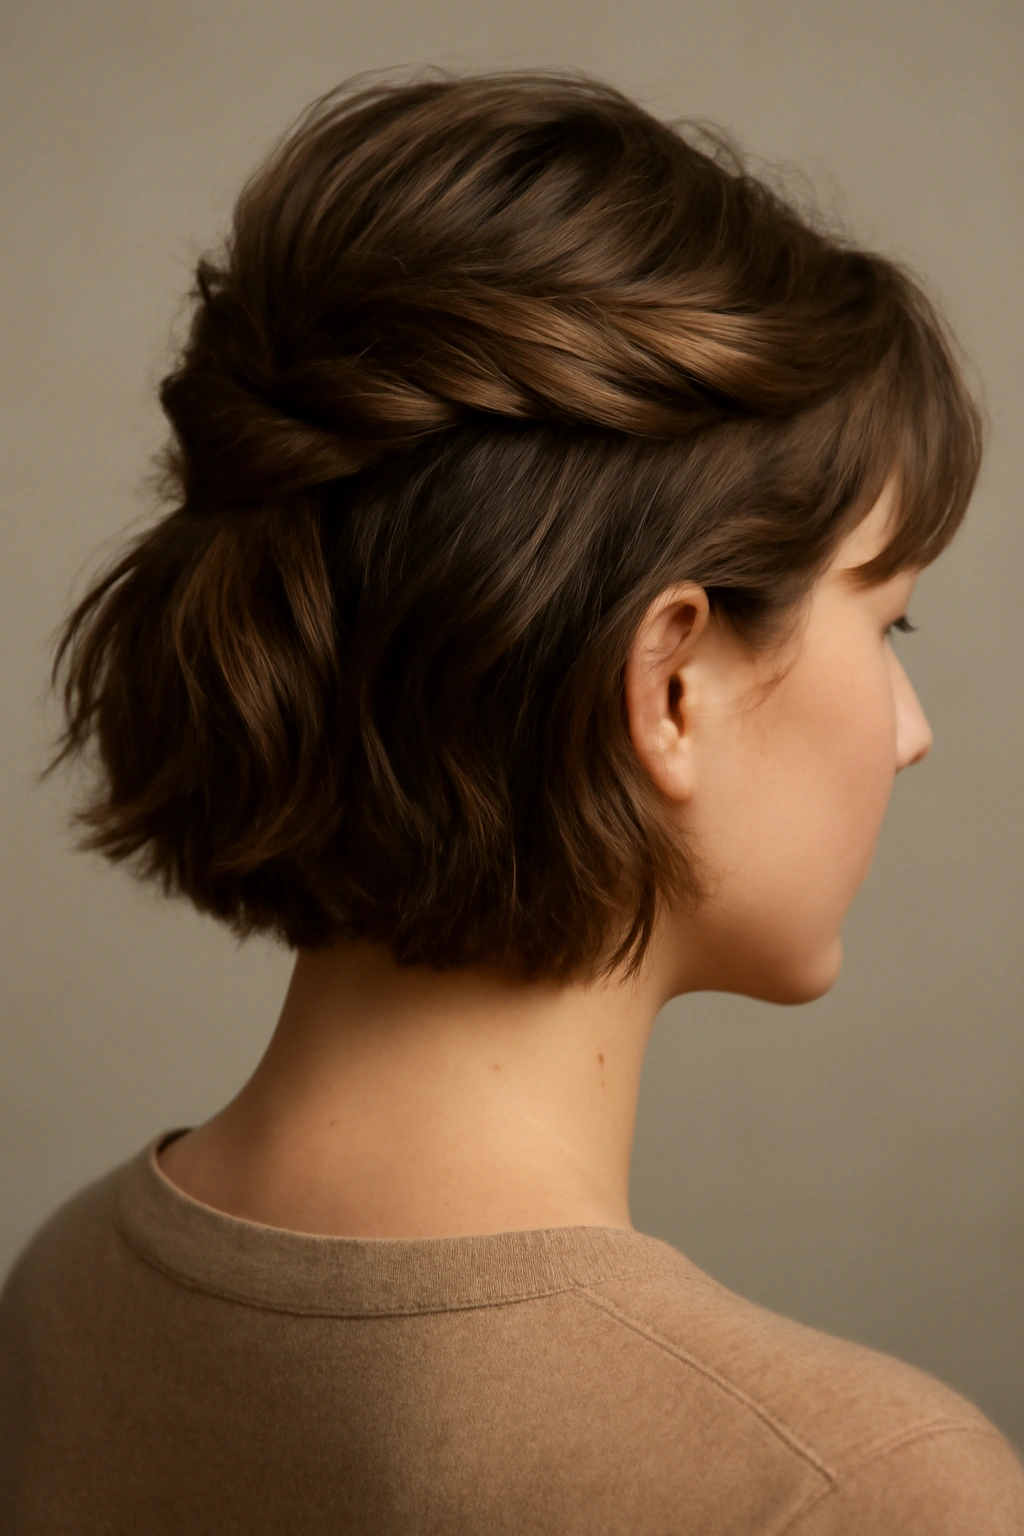
This style swaps the central ponytail for a twisted section, which creates a completely different visual effect. You’re gathering your top section and twisting it (rather than keeping it straight) before securing it at the back of your head. The twist itself becomes a design detail, not just a functional element.
How This Creates Dimension
Twisting one continuous section creates a rope-like texture that’s visually interesting and catches light differently than a straight gathered section. It also feels more artistic and less utilitarian than a regular half-up ponytail, so it works beautifully when you want something that’s put-together but not strictly formal. The twist naturally creates volume and dimension because the twisting motion loosens the hair slightly and makes it take up more visual space.
Getting the Twist Just Right
- Begin with your top section, gathered as if you were making a half-up ponytail
- Instead of securing it immediately, take that gathered section and twist it away from your face in a continuous spiral
- Keep twisting until you reach the ends of your half-up section, then secure the twisted section at the back with a bobby pin or small elastic
- The twist should feel firm enough to hold but not so tight that you’re pulling on your scalp
- For added volume, gently pull at the twist to loosen it slightly and create more texture and visual interest
- Pin a few face-framing pieces that have come loose, or leave them intentionally to soften the look
Insider note: Mist the gathered section lightly with hairspray before twisting — the light hold makes the twist stay more defined and sculptural throughout the day.
4. Half-Up with Braided Section
For short hair, you don’t need a full head of braids to create serious visual interest — you can braid just the section you’re gathering for your half-up, which adds incredible detail and texture without overwhelming your shorter length. This works whether you do a single thin braid, a thicker three-strand braid, or even a quick Dutch braid.
Why Braids Elevate the Style
A braid instantly communicates effort and intention, even if it takes just ninety seconds to create. On short hair, a braided half-up reads as more special and thoughtfully styled than an unbraided version, but it’s not so elaborate that it reads as costume-y. The braid structure also naturally holds everything in place better than a twisted or straight gathered section, so if you’re dealing with fine hair or active day ahead, the braid’s inherent grip is an advantage.
Braiding Technique for Beginners
- Divide your gathered half-up section into three equal parts
- Cross the right section over the middle, then the left section over the middle, continuing this pattern down the length of the hair
- Keep the braid tension consistent — not so tight that it pulls at your scalp, but firm enough to hold its shape
- Once you reach the ends, secure with a small clear elastic
- Very gently pull at each section of the braid to loosen it and add texture (pulling from the side edges of the braid, not from the ends, gives you the most control)
- Use bobby pins to secure the braid at the base where it meets the rest of your hair
Pro tip: Three-strand braids are actually more forgiving than they look — if you’re nervous, start the braid slightly lower on your head and braid the section that’s already gathered, rather than trying to gather and braid simultaneously.
5. The Sleek Half-Up with Undercut Detail
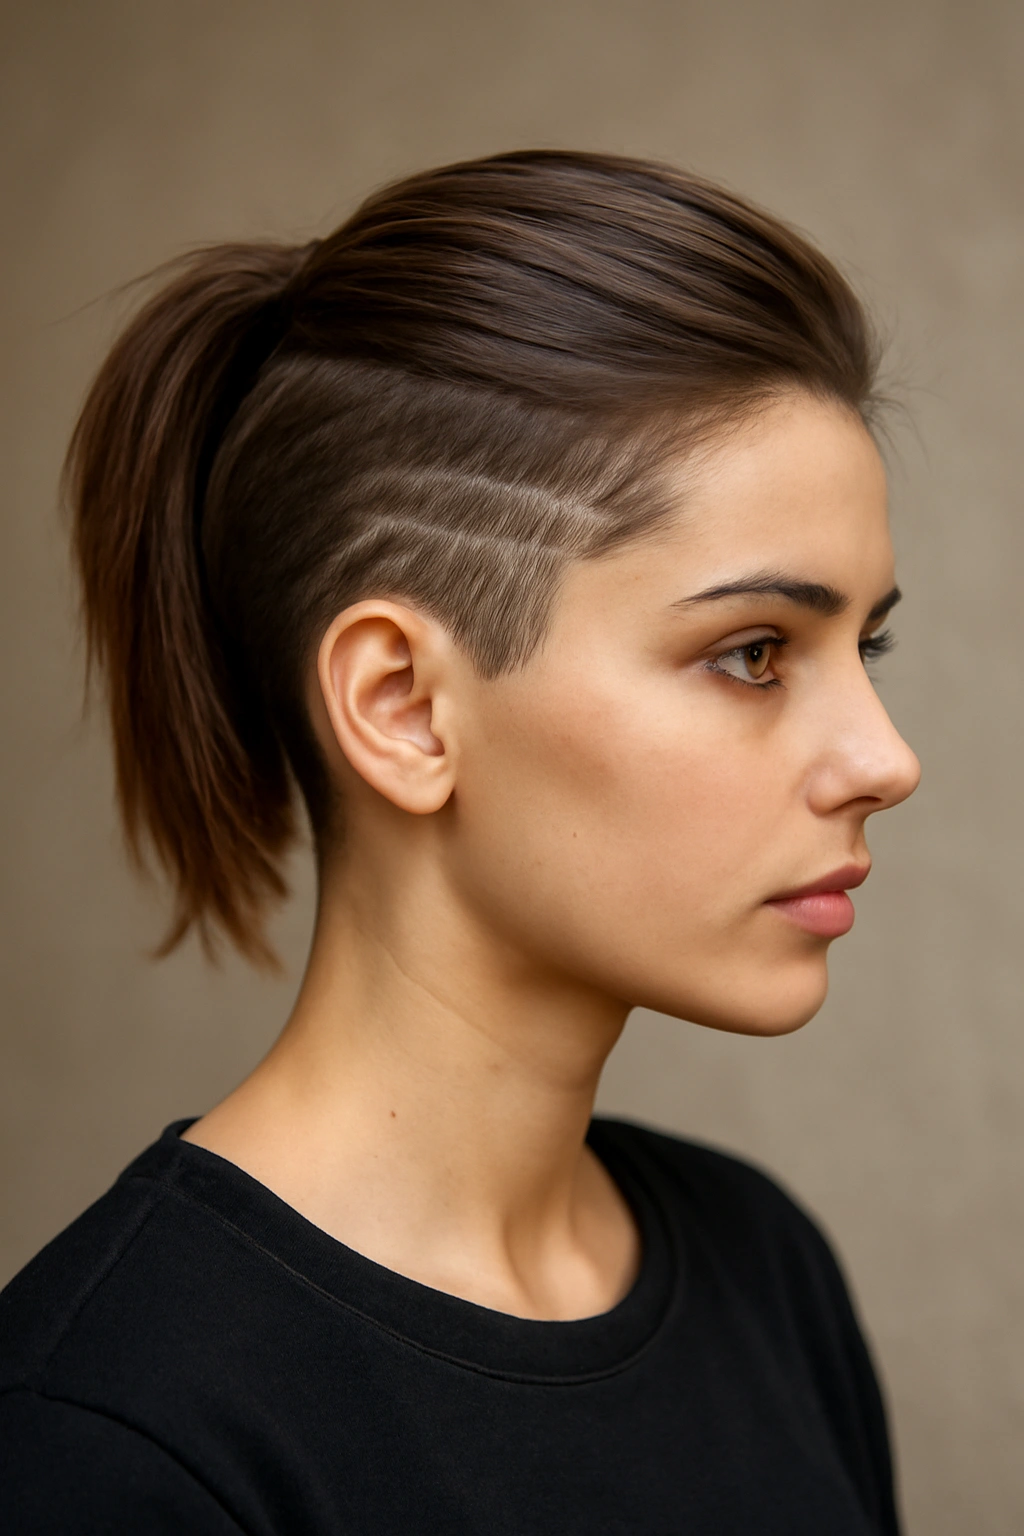
If you have an undercut or shaved section on the sides or back of your short hair, a sleek half-up style showcases it beautifully. The contrast between the neat gathered top and the closely cropped or faded sides creates a modern, intentional look that feels very current without relying on trends that’ll feel dated quickly.
Making the Undercut Part of the Look
The whole idea here is to keep everything else polished and controlled so your undercut becomes the focal point. This means using smoothing creams and serums to make the top section gleam, pulling the half-up section tight enough to show off clean lines, and letting the undercut show without distraction. It’s a high-impact look that requires minimal styling effort but delivers maximum visual interest.
Achieving Maximum Sleekness
- Apply a smoothing cream or edge control to your hands before styling (this helps hair lie flat and smooth)
- Use a fine-tooth comb to gather your top section, combing it smooth as you go to remove any texture or flyaways
- Secure the gathered section with a clear elastic at the crown, pulling it tight enough that the line is clean but not so tight that it causes discomfort
- Use an edge control or smoothing cream to lay down any flyaways at your hairline and temples
- If your undercut has grown out slightly, a fresh clipper trim the day before styling makes this look even sharper
- Consider a light shine spray to make both the gathered section and your undercut gleam
Worth knowing: The sleeker and more polished this style is, the more you want to use a hold spray or smoothing serum to protect it — this isn’t the place for a soft, undone vibe.
6. Half-Up Pigtails — Adult Version

Pigtails on short hair are nothing like the little-kid version — on an adult, a half-up pigtails style reads as playful and modern rather than childish. You’re gathering and securing two small sections instead of one central section, which creates a totally different silhouette and personality. This one works particularly well if you have layers or shorter pieces around your face that you want to control.
Why Two Sections Change Everything
Instead of one focal point at the back of your head, two sections create symmetry and movement from both sides. It’s inherently more playful and less formal than a single half-up section, but it’s still pulled back enough to show your face and keep hair out of your way. The two sections also make the style feel less solemn and more fun, which is why it works beautifully for casual settings and creative industries where personality is celebrated.
Securing Two Sections Properly
- Divide your top section into left and right halves, drawing an imaginary vertical line down the center of your head
- Gather the right side first, using a comb to smooth it back toward the right side of the crown, then secure with a small elastic or bobby pins
- Repeat on the left side, matching the height and position as closely as possible so the two sections look intentional and balanced
- Leave a section of hair down the center of your crown (roughly two to three inches wide) to create a clean visual separation between the two pigtails
- Pull out a few wispy pieces near your face on each side to soften the look and prevent it from feeling too structured
- If you want added personality, braid each pigtail section or twist it before securing
Pro tip: If your two sections aren’t landing at exactly the same height, use bobby pins to position them identically — the visual balance is what makes this style work.
7. Curved Half-Up with Pin Waves
This style incorporates vintage pin waves into your half-up styling, which sounds complicated but is actually a beautiful way to add texture and dimension without needing to curl your entire head. You’re creating shallow waves in the gathered section and the left-down hair, then securing everything as a half-up style. It’s the kind of look that appears effortless but has clear intentionality.
Understanding Pin Waves
Pin waves are shallow, sculpted waves that you create by sectioning hair, pinning it into a wave shape, and allowing it to set. You don’t need hot tools — just bobby pins, a bit of product, and time. On short hair, they create incredible dimension and texture, and they feel very modern when combined with a half-up silhouette.
Creating Waves Without Heat
- Lightly mist your entire hair with a texturizing spray or sea salt spray to add grip
- Take a one-inch section of hair from your part, and place a bobby pin horizontally against your head to create a shallow wave curve
- Place another pin directly next to the first one, in the opposite direction, to form a second wave
- Continue this pattern across the top section of your hair, working back toward where you’ll secure your half-up
- Leave the pins in for 10-15 minutes (or until your hair dries if you used a styling spray)
- Gently remove all the pins, finger-comb the waves to loosen them, and then gather your half-up section
- Secure with an elastic at the back, allowing the waves to show and cascade down
Insider note: This style works best when you do it the night before and sleep on the pins, or apply it fresh and let it set for at least twenty minutes. Rushing the set time means the waves fall out quickly.
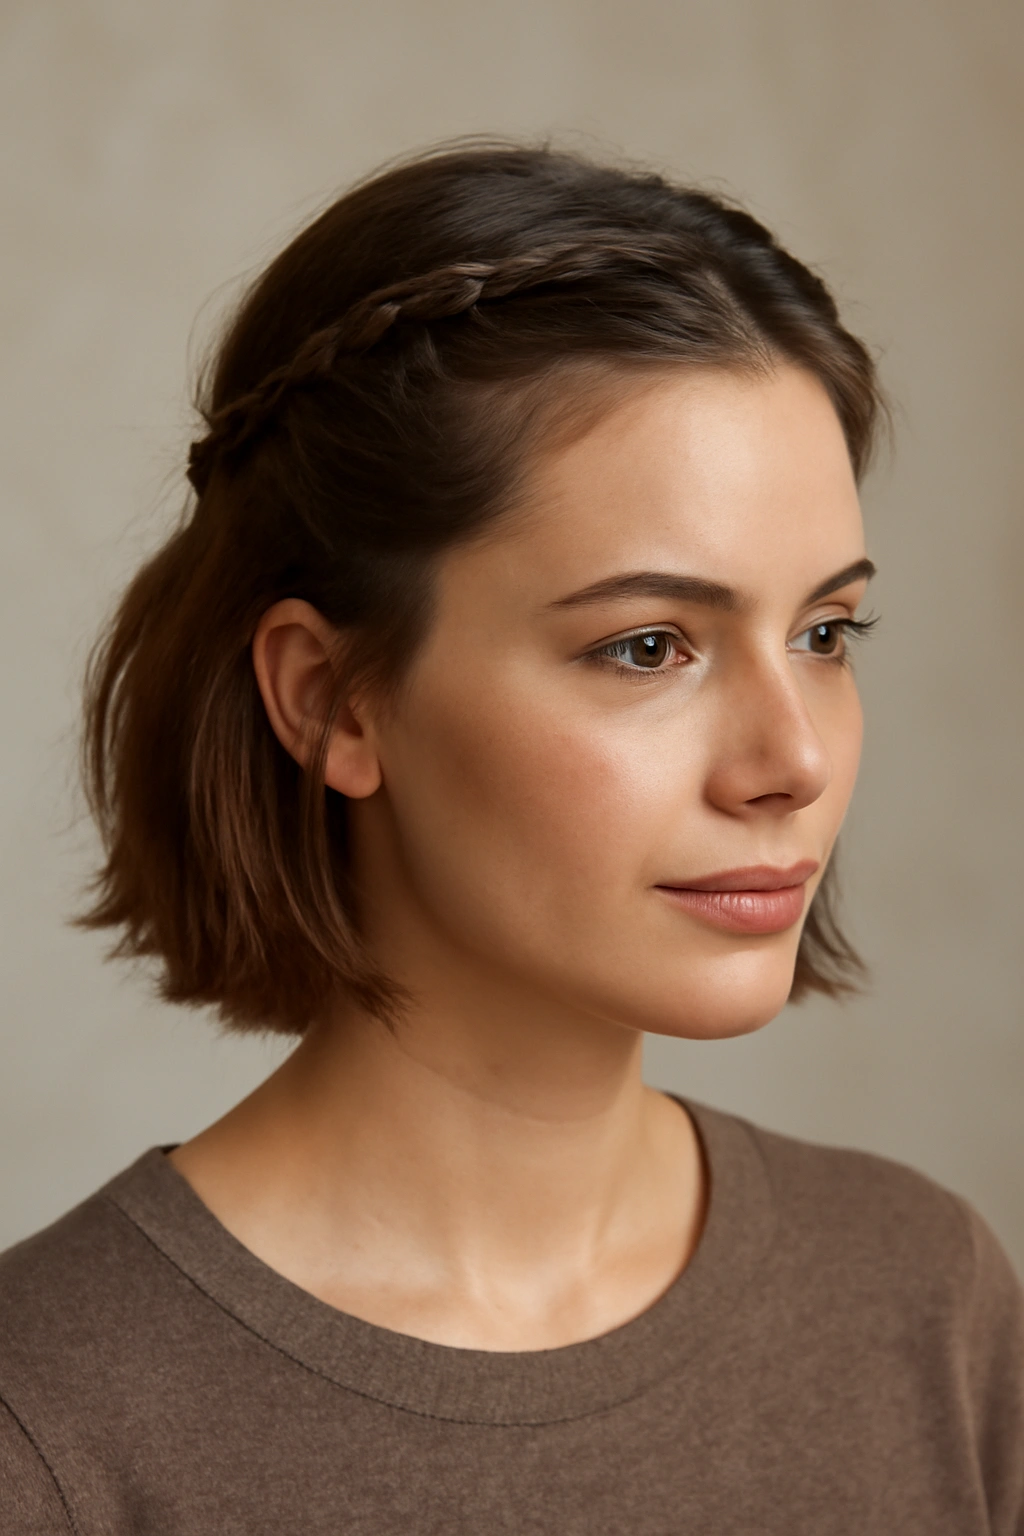
8. The Half-Up Crown Braid
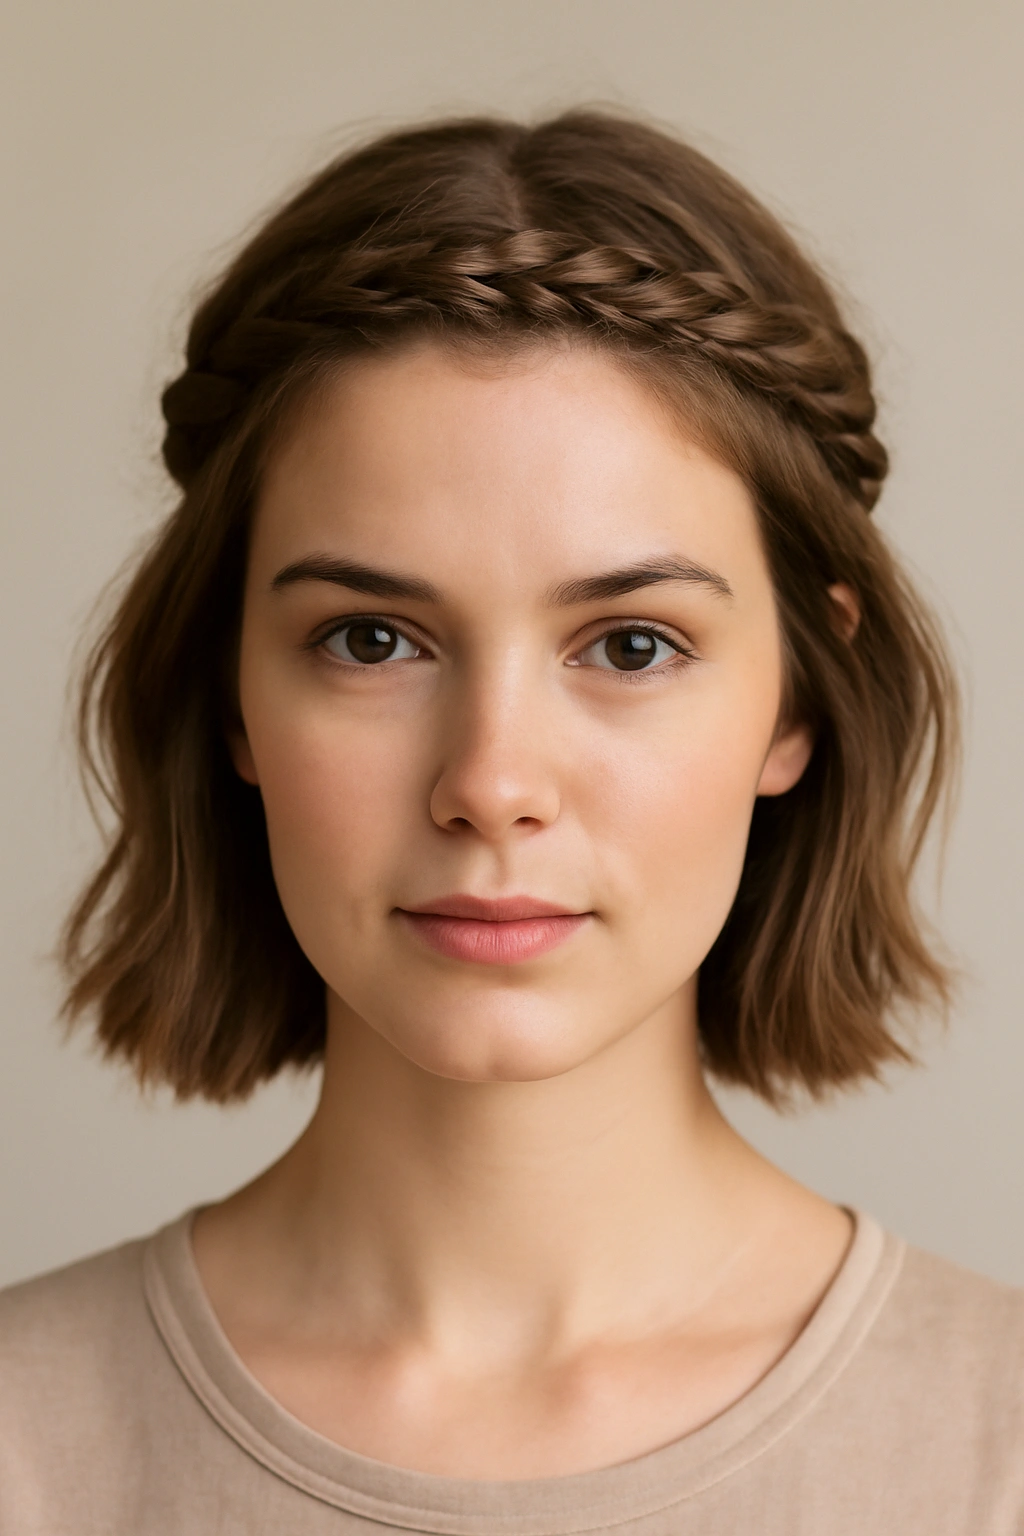
A crown braid that only spans the top half of your head is a stunning variation that feels special but isn’t nearly as complicated as a full crown braid would be. You’re creating one braid that starts at one side of your head and curves around the back to meet the other side, securing it at the nape of your neck or just above where your hair naturally ends.
What Makes This Feel Elegant
A braid that curves around your head automatically draws the eye upward and frames your face beautifully. It also has an inherent elegance because it follows the natural contour of your skull. On short hair, this style is especially striking because the braid becomes the main visual feature, and the hair below it shows off layers or texture beautifully.
Mapping Out Your Crown Braid
- Start the braid on one side of your head, just above your temple
- Gather three small sections and begin a standard three-strand braid, working horizontally across the back of your head rather than vertically down
- As you braid, gradually incorporate new hair into each section as you move across, which creates a French-braid effect and builds the braid visually as it crosses your head
- Continue until you reach the opposite side of your head, at approximately the same height where you started
- Secure the end with a small elastic or bobby pin
- Gently pull at the braid to loosen it and add dimension (this step is essential — a tight braid looks constrictive on short hair, but a slightly loosened one looks intentional and beautiful)
Worth knowing: If your short hair makes it difficult to continue a full crown braid, you can create a partial crown braid (just the back half) and secure it with pins that blend into your hair color.
9. Messy Half-Up with Face-Framing Layers
This style is specifically designed for short hair with layers and texture, and it leans entirely into undone, effortless energy. You’re creating a half-up style but deliberately leaving pieces down, slightly tousled, around your face and mixed throughout the secured section. It’s the opposite of sleek and polished — it’s intentionally relaxed.
Embracing the Textured Aesthetic
The whole point is that this should look like you threw your hair up without thinking too hard, even though that casual appearance actually requires intentional styling choices. The messiness is the design — it’s not a failure to execute a cleaner version. This style works beautifully on shorter lengths because you don’t have enough hair to actually look unkempt; instead, the pieces that fall down just frame your face and add softness.
Creating Intentional Messiness
- Start with textured hair (a texturizing spray or dry shampoo applied the night before gives you great texture to work with)
- Gather your half-up section loosely, don’t overthink the precision of what you’re grabbing
- Secure it with a small elastic, but don’t pull it tight — leave it slightly loose so pieces can escape
- Deliberately pull out wispy pieces around your hairline, temples, and near your ears
- Ruffle your hands through the gathered section to break up the structure and create that undone quality
- Use a light texturizing spray or sea salt spray rather than a heavy hold product — you want the style to have movement, not be cemented in place
Pro tip: The key to messy looking intentional rather than accidental is leaving the same pieces out every time you style it this way — consistency makes it look like a chosen style rather than a styling mishap.
10. The Half-Up Bobby Pin Design
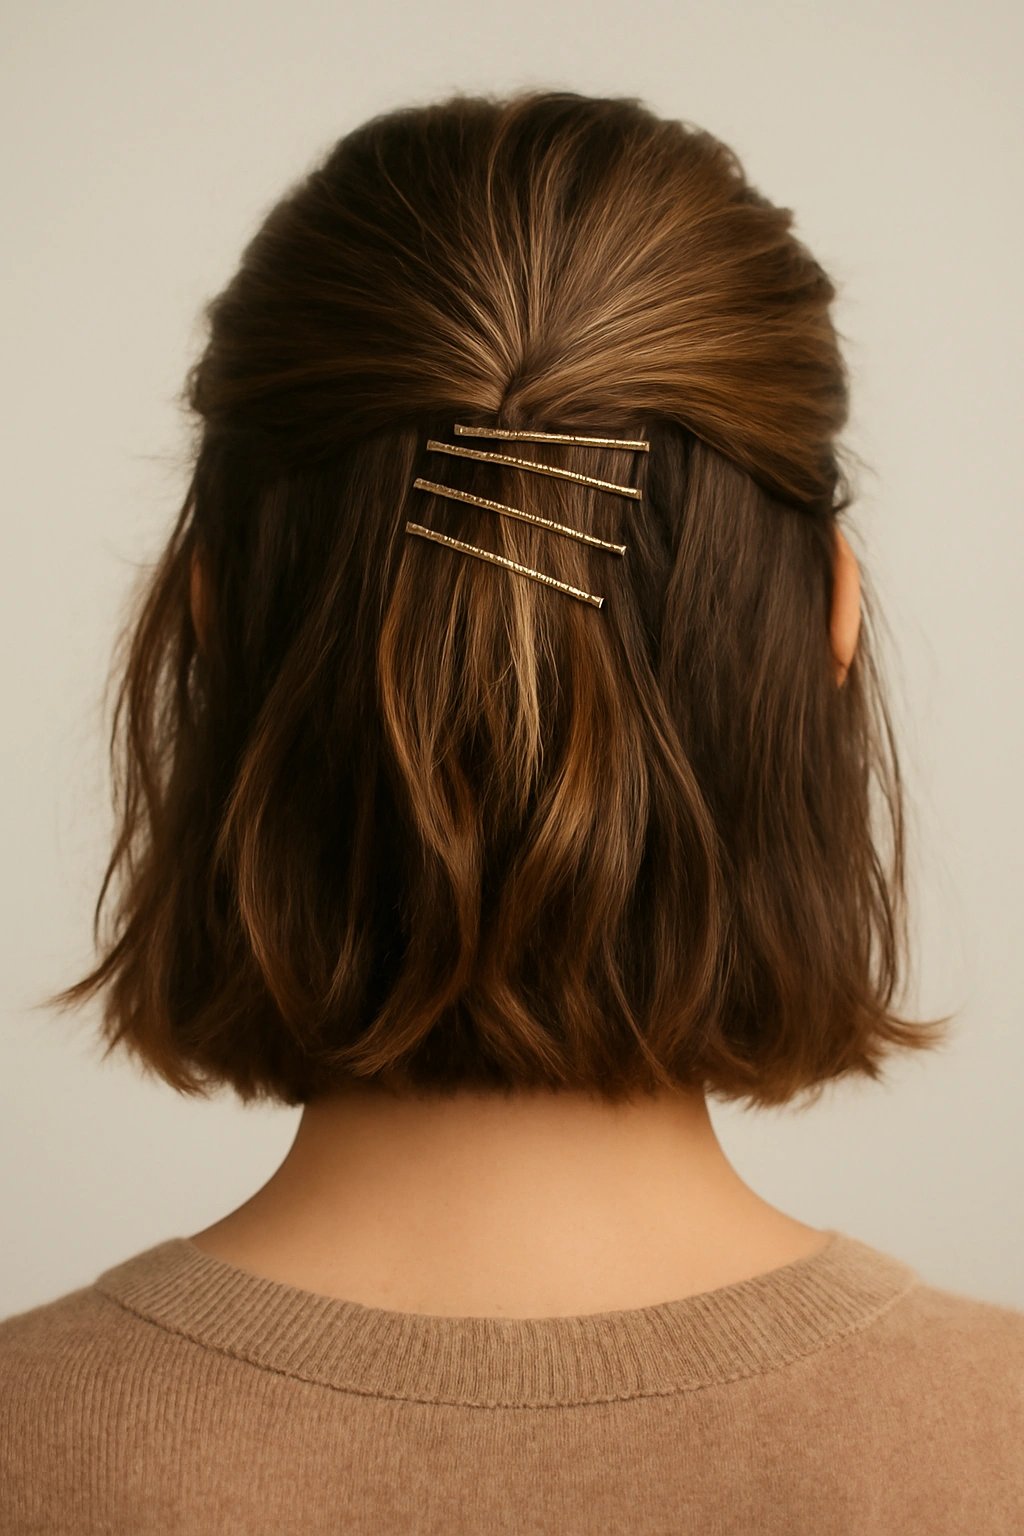
This final style is all about the visual detail of the pins themselves becoming part of the design. Instead of hiding your bobby pins and using them functionally, you’re using them decoratively. You gather your half-up section and instead of securing it with a hidden elastic, you use multiple bobby pins (or decorative pins in a contrasting color) arranged visually at the base of your gathered section.
Making Hardware Part of Your Aesthetic
This is a trend that feels very modern and intentional, and it works beautifully on short hair because the pins themselves become a focal point without overwhelming your head. You can go minimal with just two or three pins in a straight line, or more elaborate with a fanned or geometric arrangement. The key is that the pins should be visible, so choose ones that coordinate with your aesthetic — gold, silver, tortoiseshell, or even colorful enamel pins all read differently and create a different vibe.
Securing with Style
- Gather your half-up section as you normally would, but instead of using an elastic, hold the gathered hair in your hand
- Insert the first bobby pin horizontally through the base of your gathered section, locking it in place against your scalp
- Add a second and third pin (or more, depending on how full your gathered section is and how bold you want the design to be)
- Arrange the pins in a line, a fan, or any geometric pattern that feels right to you
- Make sure all pins are inserted firmly so your gathered section doesn’t slip or shift during the day
- Step back and look at the arrangement from different angles to make sure it reads well from the sides and back
Insider note: This style looks even more intentional if you let a few soft pieces escape around your face and neck — it prevents the bobby pin detail from feeling too architectural or severe.
Final Thoughts
Half-up styles on short hair are the perfect bridge between completely down and fully up, giving you a way to show off your face and style while still having your hair off your neck and out of your way. The best part is that most of these styles take just a few minutes to execute once you’ve done them a couple of times. The first attempt might feel fiddly, but by your third or fourth time trying a specific style, you’ll develop the muscle memory and intuition to do it without thinking.
What really matters is choosing a style that matches your hair texture, face shape, and personal style. You don’t have to try all ten — pick two or three that resonate with you, practice them a few times, and then experiment from there. The beautiful thing about short hair is that if a style doesn’t work out, you can remove the pins and try again in two minutes without damage. That means you have total freedom to play and experiment until you find your favorites. Start with whichever style appeals to you most, and build your collection from there.