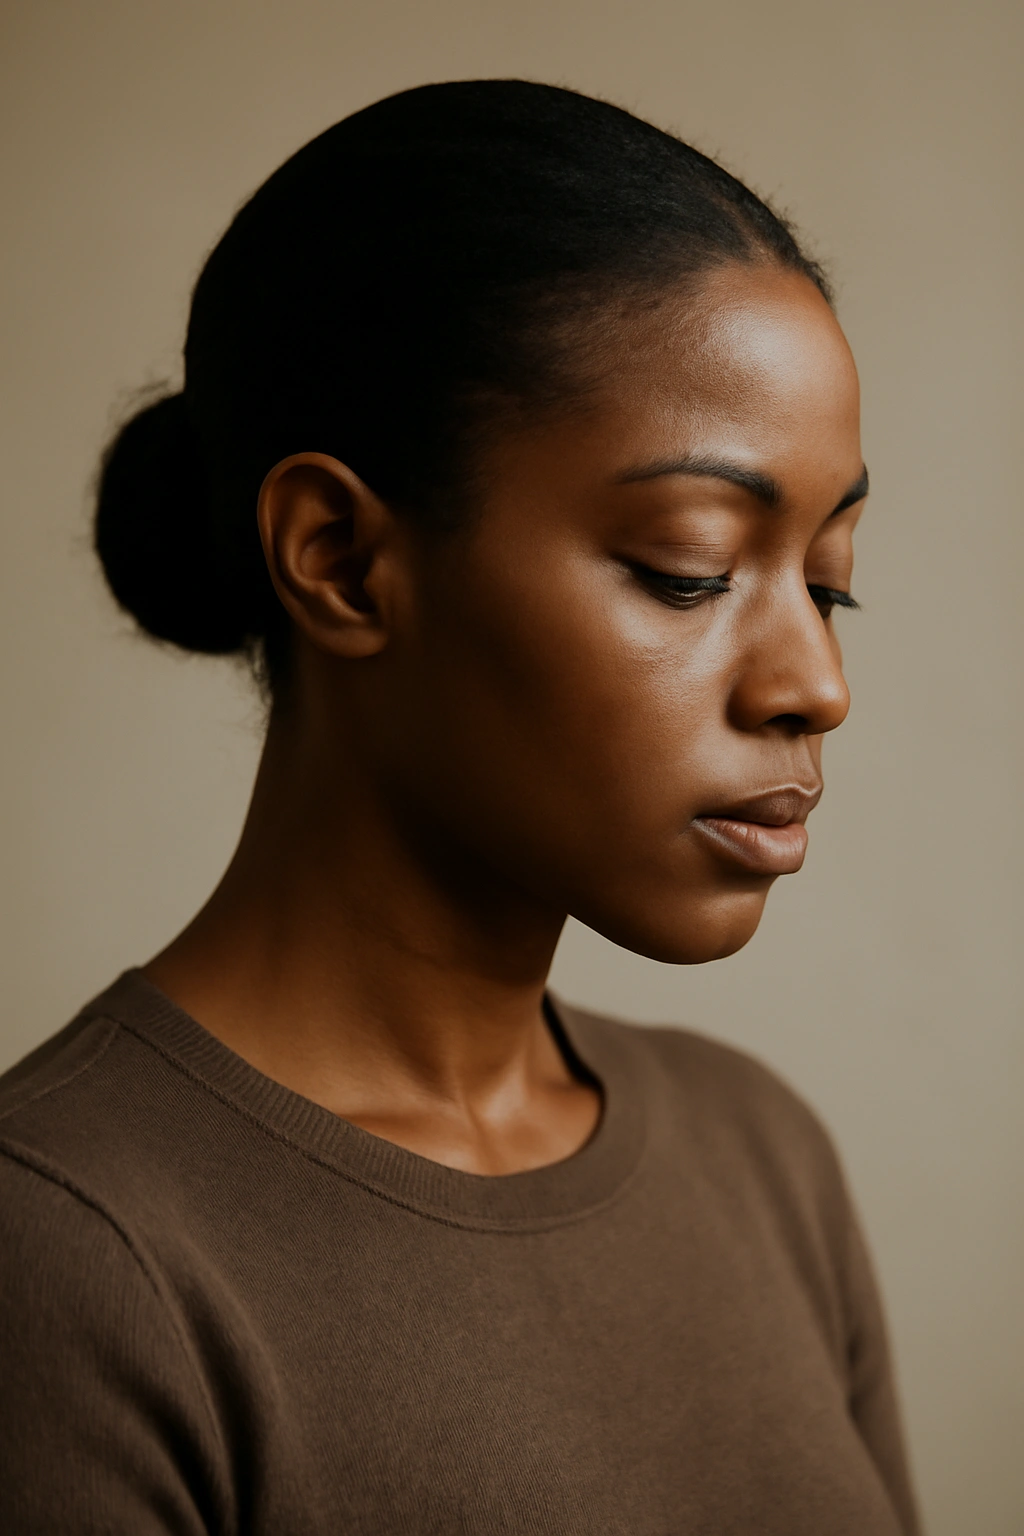
There’s something undeniably powerful about a pushback hairstyle. When your hair is swept back from your face, pulled cleanly away from your forehead and secured at the crown or back, it’s not just a hairstyle—it’s a statement. You’re showcasing your face, your confidence, and your scalp in a way that demands attention. For Black women, the pushback look has become a go-to style that works for literally every occasion, from a casual day running errands to a red-carpet event. It’s protective, versatile, polished, and incredibly flattering, which explains why once you start wearing pushback hairstyles, you’ll keep coming back to them again and again.
The beauty of the pushback aesthetic is that it works across virtually every hair texture and length. Whether you’ve got natural coils, loose waves, braids, or locs, there’s a pushback variation that’ll become your new favorite. The style serves multiple purposes: it keeps hair off your face, it can be done quickly without much fuss, and it automatically looks intentional and put-together. Beyond aesthetics, pushback hairstyles are actually a smart choice for hair health—when styled correctly, they distribute tension evenly and don’t place stress on your hairline or edges the way tighter styles can.
What’s really changed the game for pushback hairstyles in recent years is how accessible they’ve become and how many creative variations have emerged. You’re no longer limited to one look—you can customize pushback styles with different textures, accessories, parting patterns, and finishes depending on your mood, your face shape, or what vibe you’re going for. The versatility means you can rock the same basic pushback concept in five completely different ways throughout the week. Let’s dive into the 10 pushback hairstyles that Black women are styling on repeat, with everything you need to recreate them yourself.
1. Sleek Gel Pushback
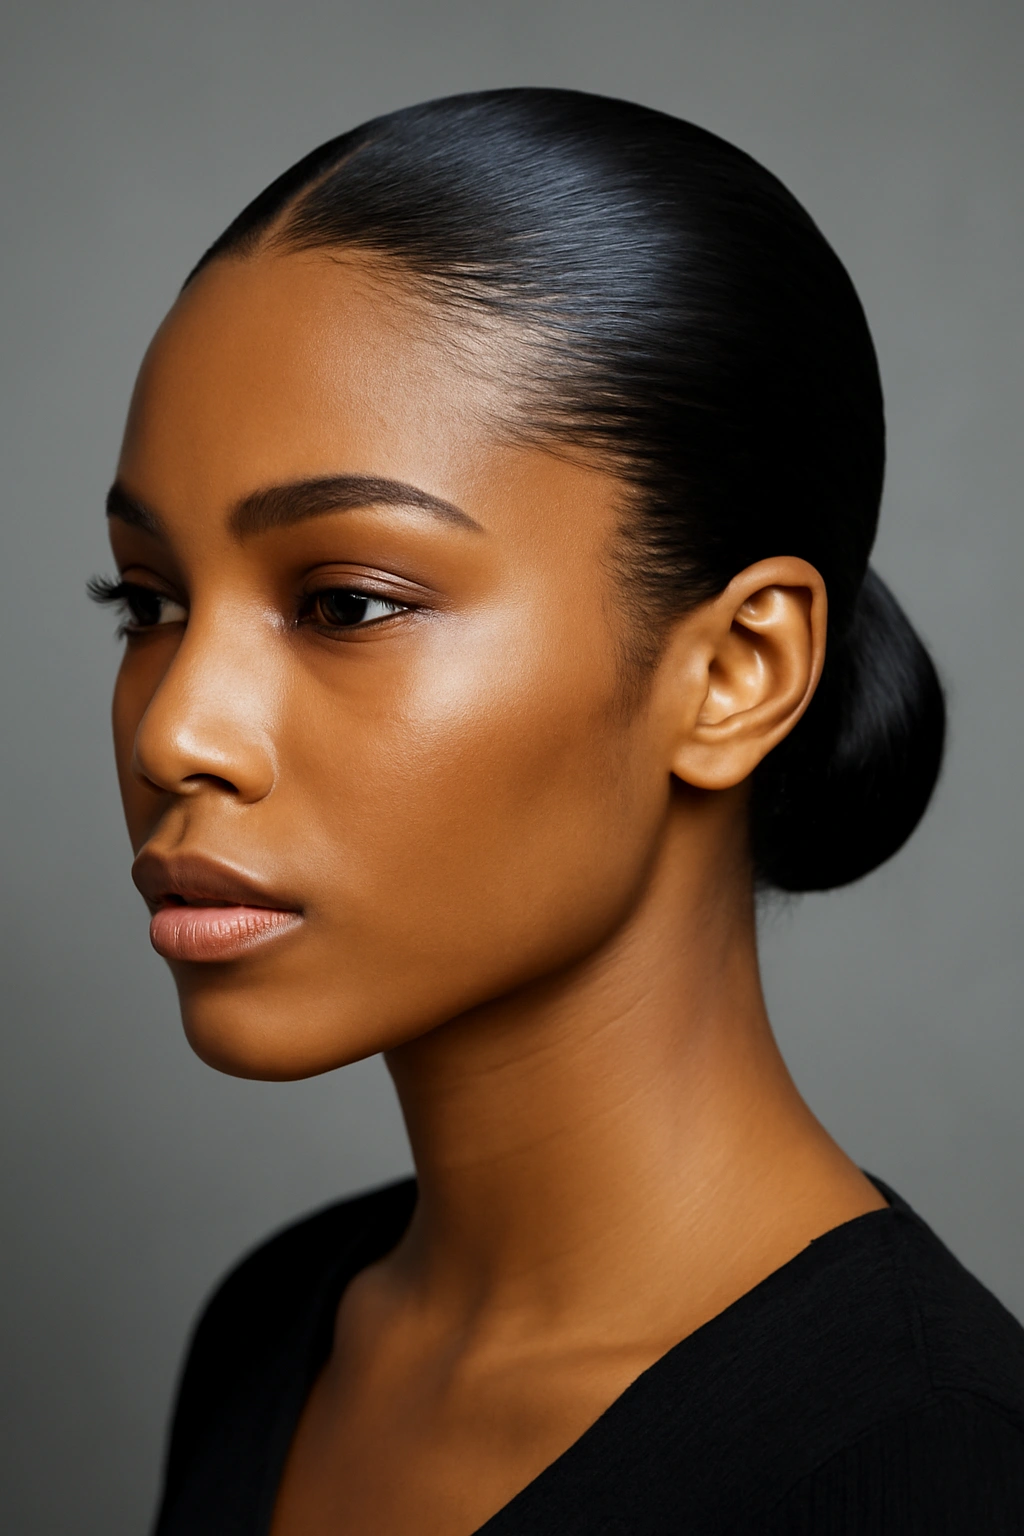
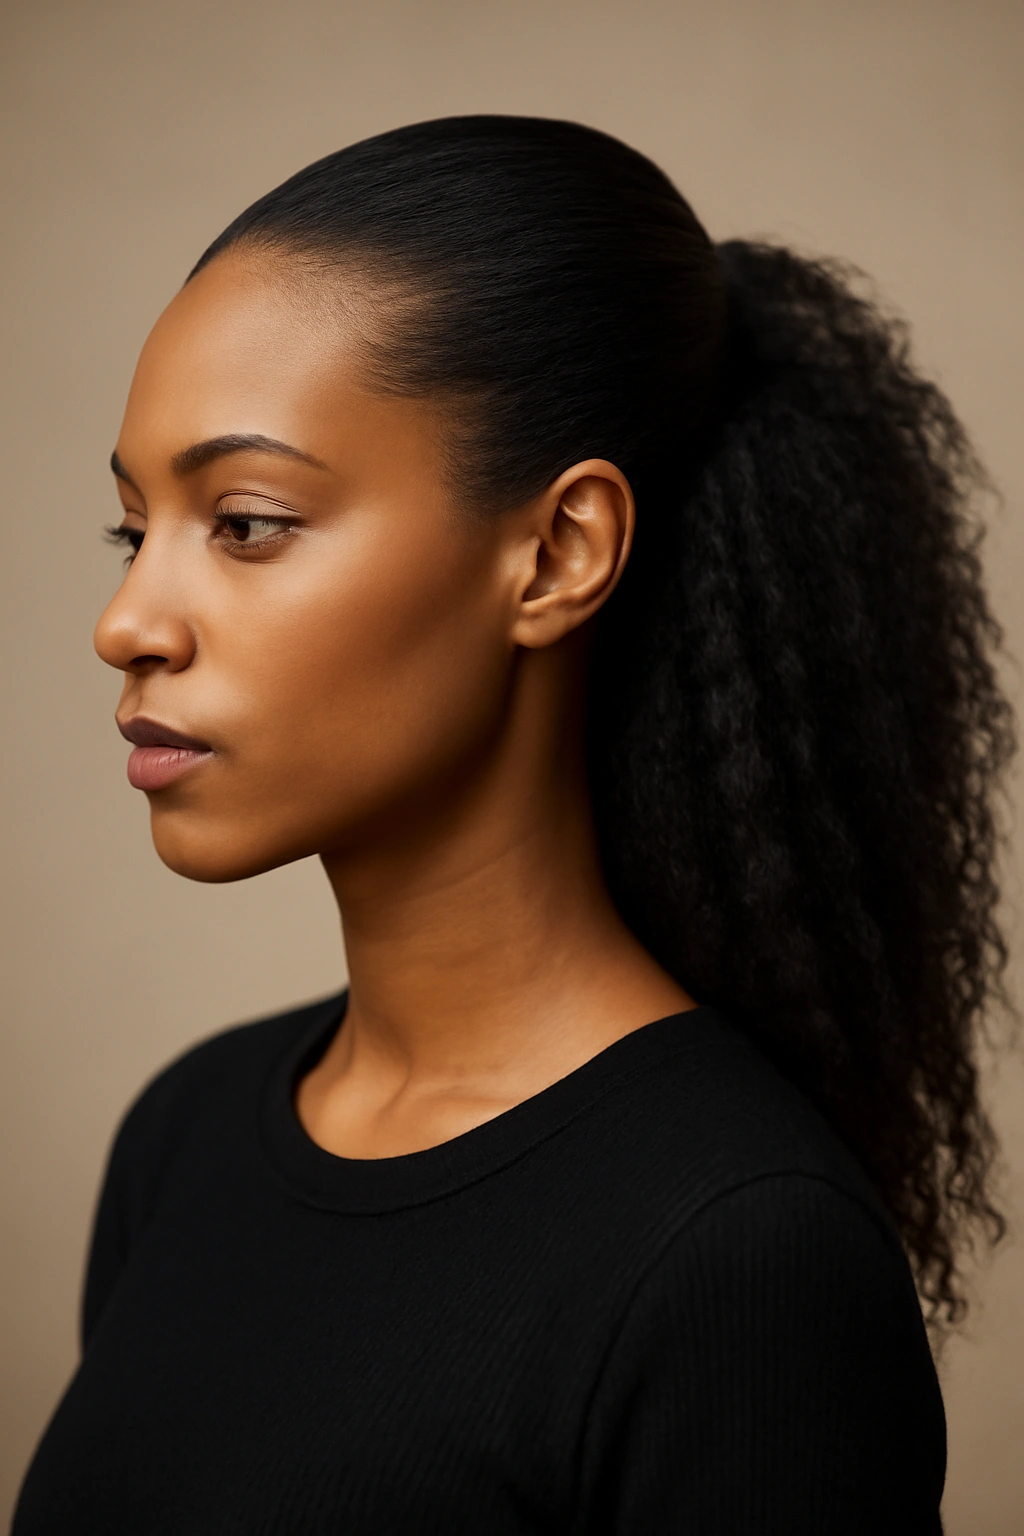
The sleek gel pushback is the foundation of all pushback styles. This is the version you reach for when you want maximum polish and a finished look that lasts all day. The entire crown and front section of your hair gets smoothed back with a strong-hold gel, creating a clean, glossy surface that catches the light. Everything is pressed down flat from your hairline to the back of your head, then secured with an elastic or clip at the nape. The result is undeniably sleek—your hairline becomes a design element, and your face gets maximum framing with zero hair obstruction.
Why This Version Works Best
A sleek gel pushback works because it’s supremely practical and genuinely gorgeous simultaneously. The gel isn’t just there for hold—it creates shine and definition that makes the style look intentional and crafted, never accidental. This is the pushback hairstyle that reads as polished in any setting, whether you’re at work, at a wedding, or just wanting to feel put-together on a regular Tuesday. The sleekness also elongates the face and highlights your features, making it especially flattering for angular face shapes.
How to Get That Perfect Sleek Finish
- Use a gel specifically formulated for Black hair—brands like Cantu, Eco Styler, or SheaMoisture create hold without the crunchiness that comes with some gel products
- Apply gel to damp hair section by section, smoothing each section down with a fine-tooth comb or your palm in the direction you want it to go
- The key is patience—work through your hair in small, manageable sections rather than trying to slick everything back in one go
- Let the gel fully dry before touching your hair; this takes about 20-30 minutes and allows the style to lock in and develop shine
- Once dry, you can gently lay edges with a small brush dipped in edge control for an even more refined finish
Pro Tips for Long-Lasting Sleekness
The sleek gel pushback can last 5-7 days if you protect it properly at night. Use a silk or satin bonnet, scarf, or pillowcase to prevent frizz and maintain the sleek finish while you sleep. If you notice flyaways emerging after a few days, you can refresh the style by spritzing a light mist of water mixed with gel and smoothing it back down. For maximum longevity, avoid running your hands through your hair repeatedly during the day—the more you touch it, the faster the sleekness breaks down.
2. Curly Puff Pushback
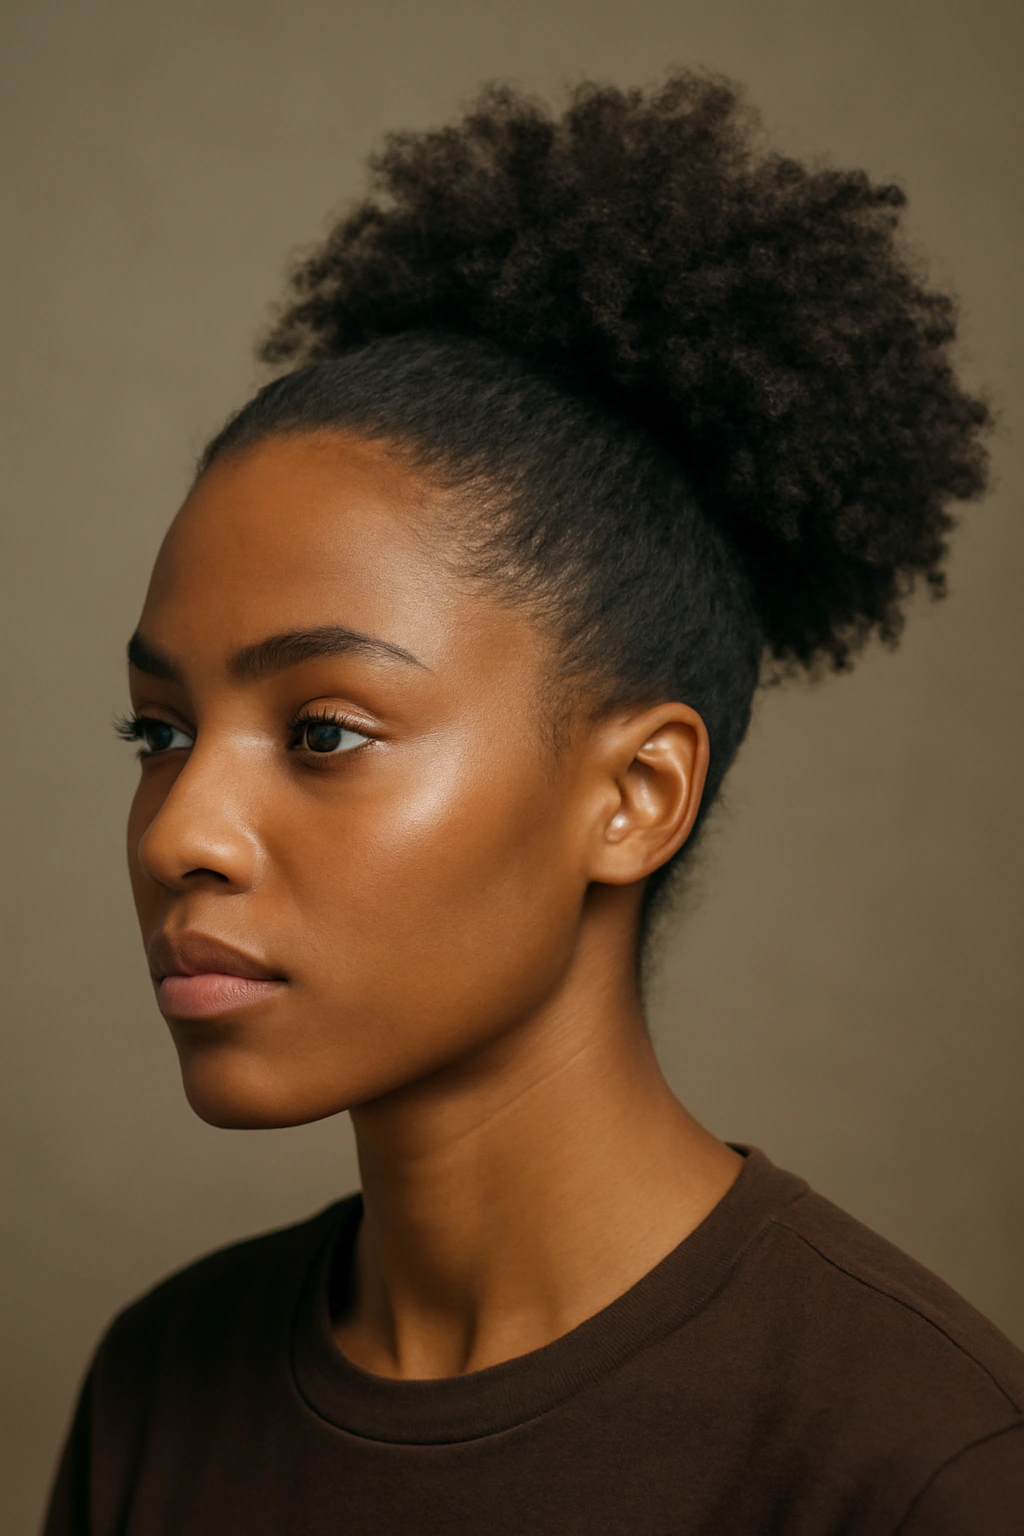
This is the pushback style for when you want to celebrate your natural curl pattern instead of flattening it down. With a curly puff pushback, your hair is swept back from your face and secured at the crown, but instead of sleeking it down, you let your curls or coils spring free in a beautiful, voluminous puff at the back. Your hairline is clean and off your face, creating a defined frame, while your natural texture becomes the focal point. It’s the perfect hybrid between protective and playful.
What Makes Curly Puffs So Appealing
The curly puff pushback is all about celebrating texture without sacrificing the clean, intentional look that makes pushbacks so great. You get the face-framing benefit of having your hair pulled back, but you also get volume, movement, and the visual interest that comes from displaying your natural curl pattern. This style reads as effortlessly chic—like you didn’t try too hard, even though there’s definitely some method to it. It also requires significantly less styling product than the sleek version, which is easier on your hair and feels lighter throughout the day.
Styling Steps for a Perfect Curly Puff Pushback
- Start with clean, damp hair and apply your regular curl-defining products (leave-in conditioner, curl cream, or gel) throughout
- Use a wide-tooth comb or your fingers to gently detangle, working through sections
- Push all your hair back from your face and secure at the crown with a clip or elastic—don’t worry about smoothing; you want to maintain curl definition
- Let your curls air dry or use a diffuser attachment if you’re blow-drying to enhance curl definition and minimize frizz
- Once dry, gently flip the puff around or reshape it with your hands to create the volume and shape you want
Customization Options for Texture Variation
The beauty of the curly puff pushback is how much you can modify it based on your hair type and desired volume. If you have very tight coils, the puff will be denser and more compact, which creates a sleek, rounded silhouette. If you have looser waves or medium curls, the puff will be larger and fluffier, with more movement and airiness. You can also add texture products like mousse before drying for extra lift, or use a plopping technique (wrapping wet hair in a microfiber towel) to enhance curl definition while you’re drying.
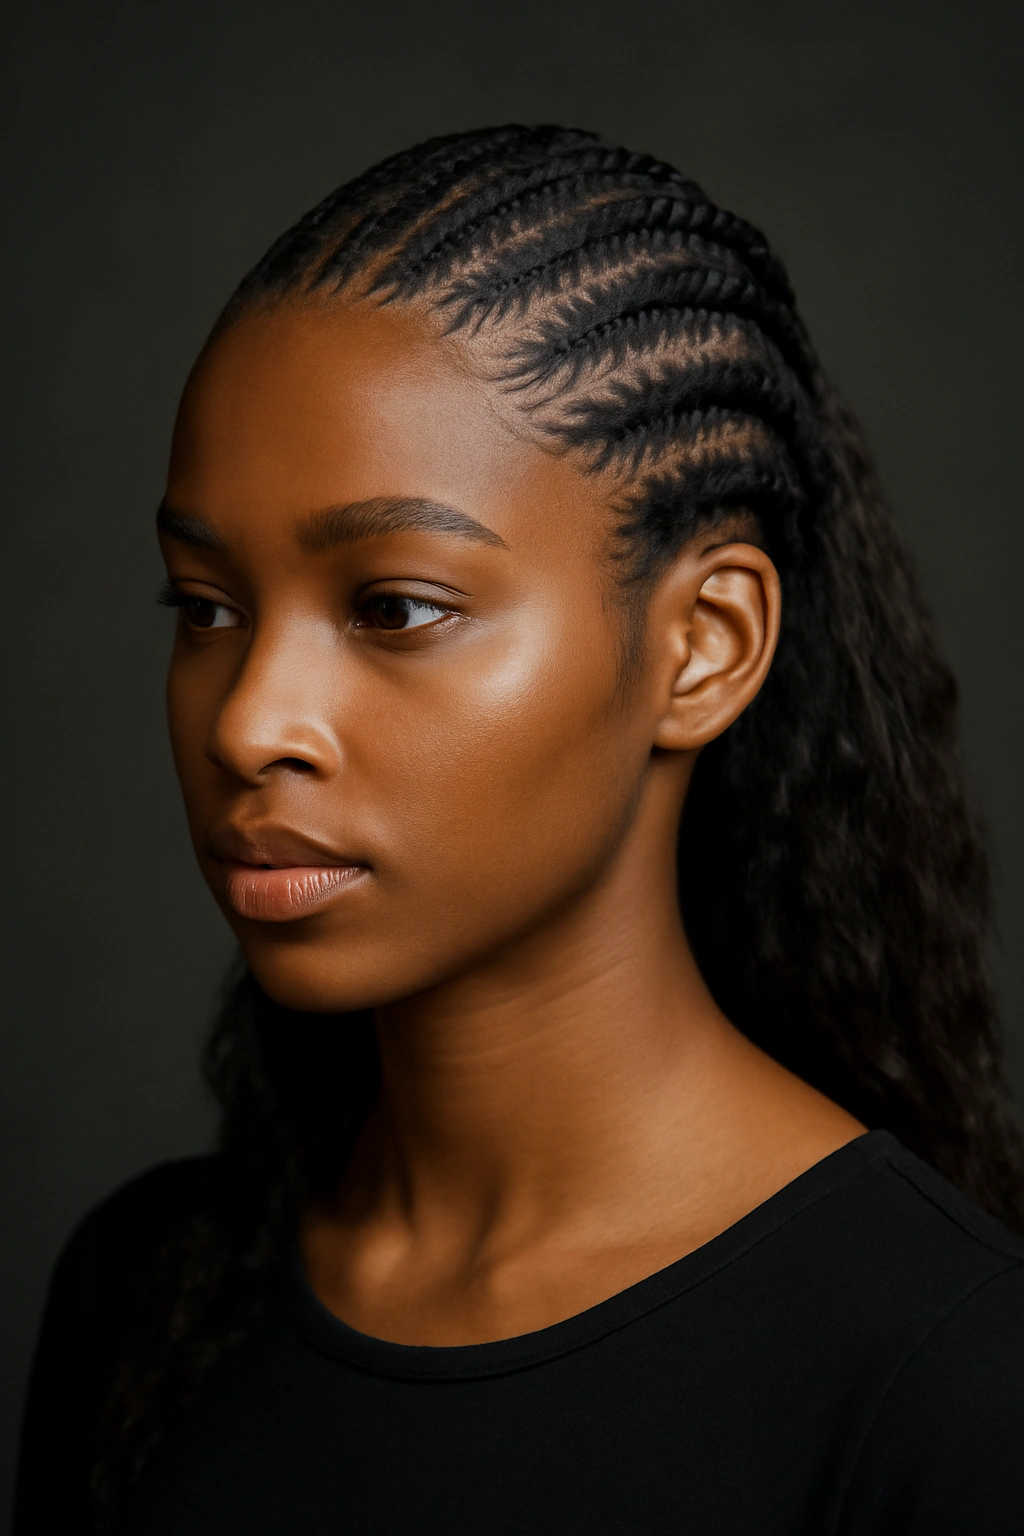
3. Braided Pushback Crown
A braided pushback crown combines the elegance of braids with the clean aesthetic of a pushback hairstyle. Instead of using gel to slick everything back, you create one or more braids that start at your hairline and travel back toward the crown, securing the front section while the rest of your hair remains loose or styled separately. This style is incredibly versatile—you can do two small Dutch braids on either side, a single center braid, or even a halo effect with braids that wrap around the crown.
Why Braids Transform the Pushback Look
Braids immediately elevate the pushback aesthetic into something more intentional and textured. They add a visual element that makes the style feel crafted and designed, rather than simply functional. Braids also allow you to secure your hair without harsh gels or heavy products, which is better for your scalp and hairline in the long run. The braided pushback crown is especially flattering for medium-length and longer hair, where you have enough length to create substantial braids that become a focal point.
Creating the Perfect Braided Pushback Crown
- Section your hair from your hairline back to about the middle of your head, depending on how much you want to braid
- Start your braid(s) at the hairline using either a Dutch braid (braid over) or French braid (braid under) depending on your preference—Dutch braids pop visually and sit on top of the hair, while French braids integrate more seamlessly
- Braid all the way back to the crown area, then secure the ends with small elastics
- Leave the remaining hair at the back loose or style it however you want—in a puff, a bun, in loose waves, or even in a second or third braid that cascades down
Texture and Braid Style Variations
You can modify this style endlessly based on your hair type and the effect you want. Flat twists instead of braids create a more sculptural, geometric look. Smaller, thinner braids feel delicate and refined, while thicker braids feel bold and statement-making. If you’re braiding longer hair, you can create intricate patterns—two braids that spiral around the head, or even braids that intertwine with each other for a really dramatic effect. The style works beautifully for both protective styling and a polished everyday look.
4. Twisted Pushback
Twists are to braids what a whisper is to a shout—they’re subtle, elegant, and surprisingly versatile. A twisted pushback uses two-strand twists to secure the front section of your hair, creating a softer, more elegant look than braids while still achieving that clean, pushed-back aesthetic. You can create one center twist, two side twists, or even a small network of twisted sections that work together to frame your face beautifully.
The Sophistication of Twist-Based Pushbacks
Twists have a naturally sophisticated quality, especially when they’re well-executed with tension that’s tight enough to hold but not so tight that it stresses your hairline. Unlike braids, which have a more structured geometric quality, twists feel organic and flowing. A twisted pushback reads as refined and intentional without looking try-hard—it’s the kind of style that makes you look like you woke up and effortlessly put yourself together. Twists also work beautifully on virtually every curl pattern, from loose waves to tight coils.
How to Create a Twisted Pushback Section
- Take a section of hair from your hairline about 2-3 inches wide
- Divide that section into two parts and begin twisting them around each other, taking in hair as you go (similar to adding to a regular two-strand twist)
- Continue twisting back toward the crown, maintaining even tension so the twist looks neat and secure
- Secure the end with a small elastic and tuck any loose pieces
- Repeat on the other side if you’re doing two twists, or use a single center twist for a different look
Styling Variations and Finishing Options
Once your twists are secure, you have multiple options for how to style the rest of your hair. You can leave the back section loose in a puff, create additional twists or braids throughout, twist everything into a bun, or even unravel the twists at the bottom section for a twisted-out wavy texture. The style works for both protective styling and a polished everyday aesthetic. You can also add shine products, gems, metallic clips, or decorative hair jewelry to the twists to make them even more special.
5. Slicked Back High Pony with Sculpted Edges
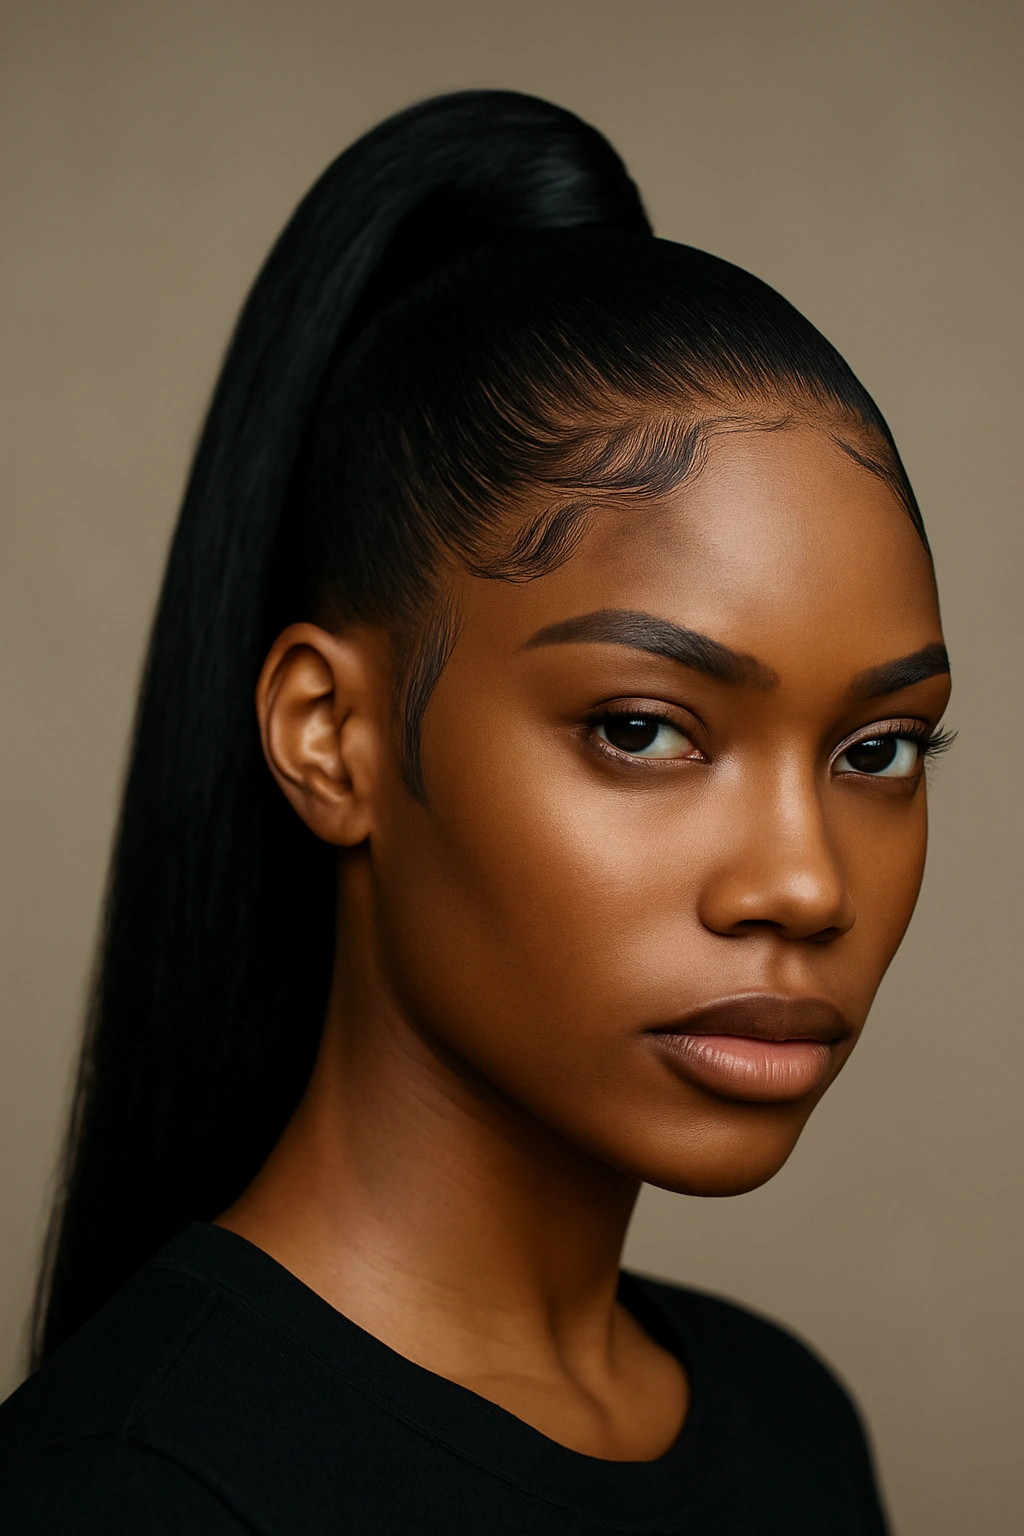
This is the pushback style that goes beyond just pushing your hair back—it’s about creating graphic, sculpted edges that frame your face with precision. Everything gets slicked back tightly with gel, but the focus is on clean, defined edges around your hairline. Your baby hairs are laid down meticulously in a sharp, almost architectural pattern, and your entire front section is pulled into a high ponytail at the crown. It’s bold, it’s modern, and it’s undeniably powerful.
The Power of Sculpted Edges
Sculpted edges transform a simple pushback into a complete statement. When your edges are sharp and geometric, it completely changes the energy of the style—it goes from casual to intentional instantly. This is the version you wear when you want to command a room, when you’re feeling your confidence, or when you want a style that photographs beautifully and holds all day. The precision required in laying the edges makes the style feel especially curated and personal.
Creating Perfectly Sculpted Edges
- Apply a strong-hold edge control (not regular gel—edge control is thicker and stickier) to your hairline and baby hair section
- Use a small, fine-tooth brush to smooth the edge control downward and outward, creating sharp, clean lines
- You can create geometric patterns—perfectly straight lines, curves, or zigzags—by angling the brush differently in different sections
- Take your time with this step; rushing will result in uneven edges, so give yourself 5-10 minutes to really perfect the sculpting
- Once shaped, let the edge control fully dry to lock the edges in place
Making Your Edges Last All Week
Sharp edges can maintain their sculpted quality for 5-7 days if you protect them properly. Sleep with a silk bonnet or on a silk pillowcase to prevent friction that breaks edges down. If edges start to frizz or lose definition after a few days, you can refresh them by dampening your hairline lightly with a spray bottle and re-laying them with a brush and edge control. Some women refresh their edges midweek just to maintain that graphic quality.
6. Pushback with Side Part
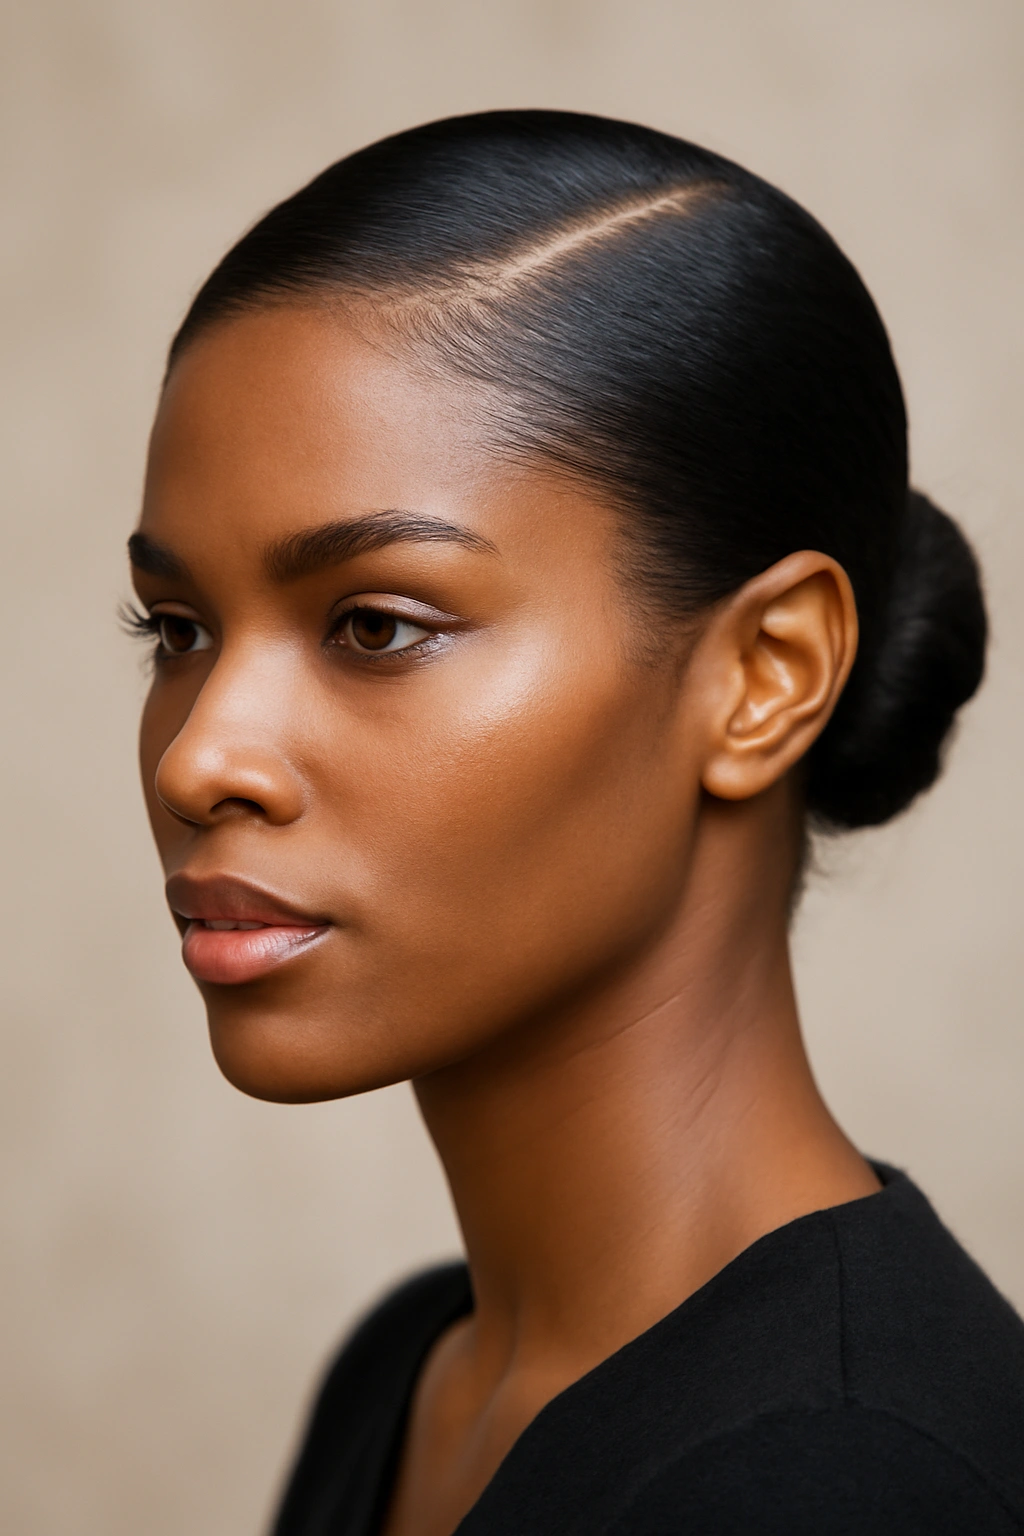
A pushback with a deep side part adds an asymmetrical element that’s extremely flattering and feels slightly more relaxed than a center part. Instead of pushing everything back equally, you’re creating a dramatic side part that sits far over on one side of your head, then pushing the smaller section from that part back along with the rest of your hair. This creates movement and visual interest while maintaining that clean, pulled-back aesthetic.
How a Side Part Changes the Whole Vibe
The side part creates an asymmetrical balance that’s naturally flattering to most face shapes, especially round or square faces where the angle helps create definition. It also feels less severe than a centered pushback—there’s a softness to the asymmetry that makes the style feel more approachable and less severe. The side part version also photographs beautifully because the angle of your hair flowing to one side creates dimension and movement. It’s the perfect choice if you like the idea of a pushback but want something that feels slightly less intense.
Creating a Perfect Deep Side Part
- Start with your hair damp or freshly moisturized
- Using a rattail comb, create a deep diagonal part that starts at your hairline on one side and travels back toward the crown
- The part should be dramatic—aim for creating a line where roughly 60-70% of your hair is on one side and 30-40% is on the other
- Smooth the smaller section back with gel and secure it, then push the larger section back as well, or style it into a pony, bun, or puff
- Use a small brush to define the part line once your styling products are dry
Pairing Your Side Part with Different Finishes
The side part works beautifully with a slicked-back finish using gel, but it also pairs well with a curly puff where you maintain some texture while keeping everything pushed back. You can also create braids or twists on the smaller side and leave the larger side loose. The key is maintaining that defined side part throughout your styling process—it’s what makes this version distinctive and what creates the flattering asymmetry.
7. Accessorized Pushback with Clips, Gems, and Jewelry
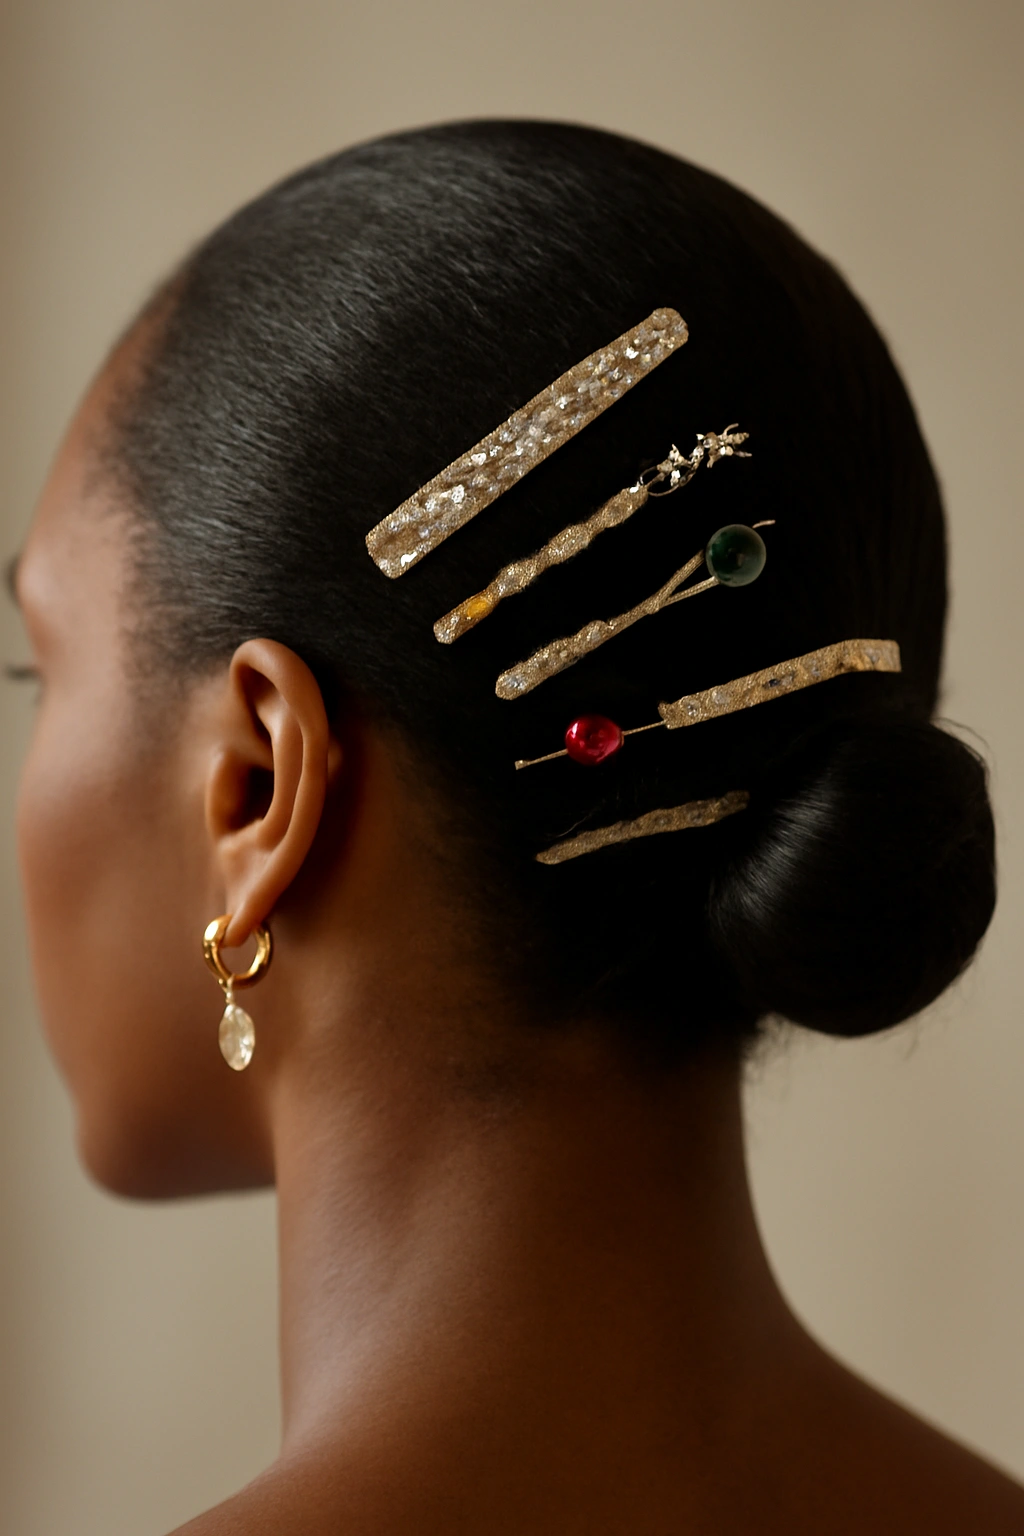
This is the pushback style that transforms into a complete moment through the strategic use of hair accessories. You’re still getting all the functional benefits of pushing your hair back off your face, but now you’re adding decorative elements that make the style feel special and celebratory. Metallic clips, rhinestone hair jewelry, colored barrettes, elegant hair cuffs, or even small decorative combs can be strategically placed throughout the back section to catch light and create visual interest.
Making Accessories Part of Your Styling Strategy
Accessories are no longer just functional—they’re a legitimate design element that can completely transform a basic pushback into something statement-making. The key is choosing pieces that complement your outfit, your skin tone, and your personal aesthetic. Gold accessories feel warm and luxe; silver feels cool and sleek; colorful clips feel playful and bold. You can go subtle with a single strategic clip, or you can layer multiple pieces for a more maximalist, fashion-forward vibe.
How to Place Accessories for Maximum Impact
- Place your first accessory at the point where your hair is secured (usually the crown)—this can be a large clip, a cuff, or a statement piece that anchors the whole look
- Add secondary pieces along the back length of your hair, spacing them evenly—try clips every 2-3 inches for a polished, intentional pattern
- Consider mixing metals and finishes (matte and shiny, gold and silver) for a more modern, curated effect
- Make sure any clips are actually gripping your hair securely; they should stay in place all day without slipping or getting loose
- Step back and look at your style from multiple angles to ensure the placement feels balanced and intentional
Accessory Ideas for Every Aesthetic
For minimalist elegance: Choose one large, architectural clip in matte gold or silver placed at the center back of your head. Opt for geometric shapes that complement your face structure.
For fun and playful: Layer multiple colorful clips in different finishes and sizes throughout the back section of your hair. Mix metallics with enamel colors for a more creative effect.
For special occasions: Look for pieces with rhinestones, pearls, or decorative elements that catch light and create sparkle. Hair cuffs that wrap around sections of your hair feel especially luxe.
For understated glamour: Choose delicate pieces with fine details—thin hair clips, small decorative combs, or minimalist gold or silver hair jewelry that feels precious without being loud.
8. Laid Baby Hairs Pushback
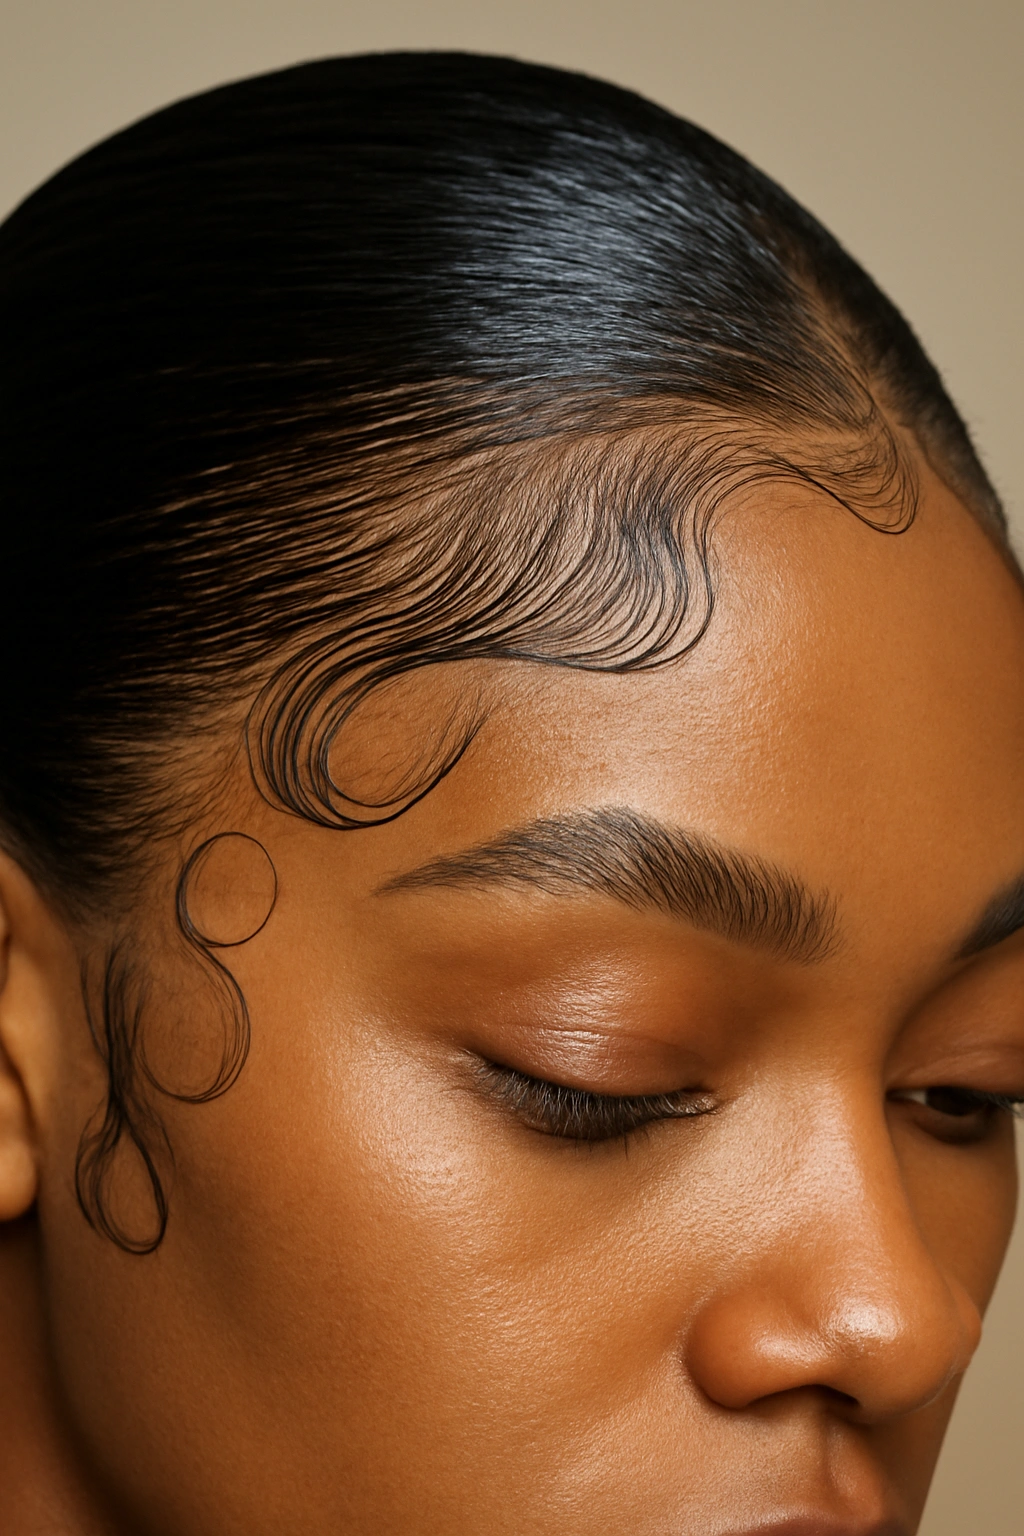
This version focuses intensely on the baby hair game—the small, delicate hairs along your hairline that frame your face. With a laid baby hairs pushback, your entire front section is smoothly pushed back with gel, but the real artistry happens at your hairline, where your baby hairs are meticulously laid down in decorative patterns. This could be simple waves, sharp geometric lines, delicate swoops, or intricate designs that become a focal point of the entire style.
Why Baby Hairs Deserve Their Own Moment
Baby hairs might seem like a small detail, but when they’re laid properly, they completely transform your entire look. A laid hairline makes you feel polished, intentional, and put-together in a way that few other styling details can match. The precision required in laying them shows that you care about the details of your appearance, and that translates into looking more refined overall. This version is especially popular because it elevates even a casual outfit into something that feels thoughtful and curated.
The Art of Laying Baby Hairs Perfectly
- Use a small, fine-tooth brush or a specialized edge brush with synthetic bristles
- Apply edge control (thicker than regular gel, with more hold and grip) to your baby hair area
- Starting at one side of your hairline, brush your baby hairs downward and smooth them along your face, following the natural curve of your hairline
- Create patterns by changing the direction of your brush strokes—waves are created by brushing in curved motions, geometric lines by brushing straight, and swoops by following the natural flow of your hairline
- Work section by section, taking your time to ensure each section is smooth and placed exactly where you want it
Advanced Baby Hair Design Patterns
Once you’ve mastered the basics, you can get creative with your baby hair designs. Some women create wavy patterns that flow across their entire hairline. Others prefer clean, sharp lines that create a geometric frame. Some create sculptural swoops that curl upward or follow the contours of their face. The patterns are entirely personal and can be customized to match your face shape, your outfit, or your mood. The important thing is taking the time to lay them properly so they stay in place throughout your day.
9. Half-Up Pushback
A half-up pushback takes the concept and makes it more relaxed and casual—instead of pushing everything back completely, you’re pushing back just the front section and securing it while leaving the back half of your hair down. This creates a style that’s pushed-back and polished on top while maintaining volume and movement below. It’s the perfect middle ground if you love the aesthetic of a full pushback but want something that feels slightly less severe or that showcases more of your length.
When a Half-Up Works Best
The half-up pushback is ideal for when you want a polished front while celebrating your length or showing off styled back sections. It works beautifully with curly puffs (pushing back the front while keeping a big puff down below), with long straight styles, and with styles that have different textures throughout. It also feels less protective and more fashion-forward than a full pushback, so it’s perfect for times when you want something that looks intentionally styled rather than purely functional.
How to Create a Half-Up Pushback Section
- Determine where you want the division—roughly at the level of your ears is a good starting point, but you can adjust based on your hair length and what you prefer
- Push the front section back and secure it with a clip, elastic, or both
- Style the back section however you like—leave it completely down, create a puff, add braids or twists, use a texturizing product for waves, whatever matches your aesthetic
- The division point is important; it should be clean enough that it looks intentional, but you can disguise the line with curls or movement if you prefer something softer
Versatile Styling Options for the Back Section
With the front section secured, the back section is your canvas. You can blow-dry it straight and sleek for a contrast with the pushed-back top. You can curl it with a curling iron or flexi-rods for romantic waves. You can braid it or add twists. You can even create a second puff below the first elastic for a stacked effect. The style works across multiple occasions because the front section keeps you looking put-together while the back section allows for personal expression and creativity.
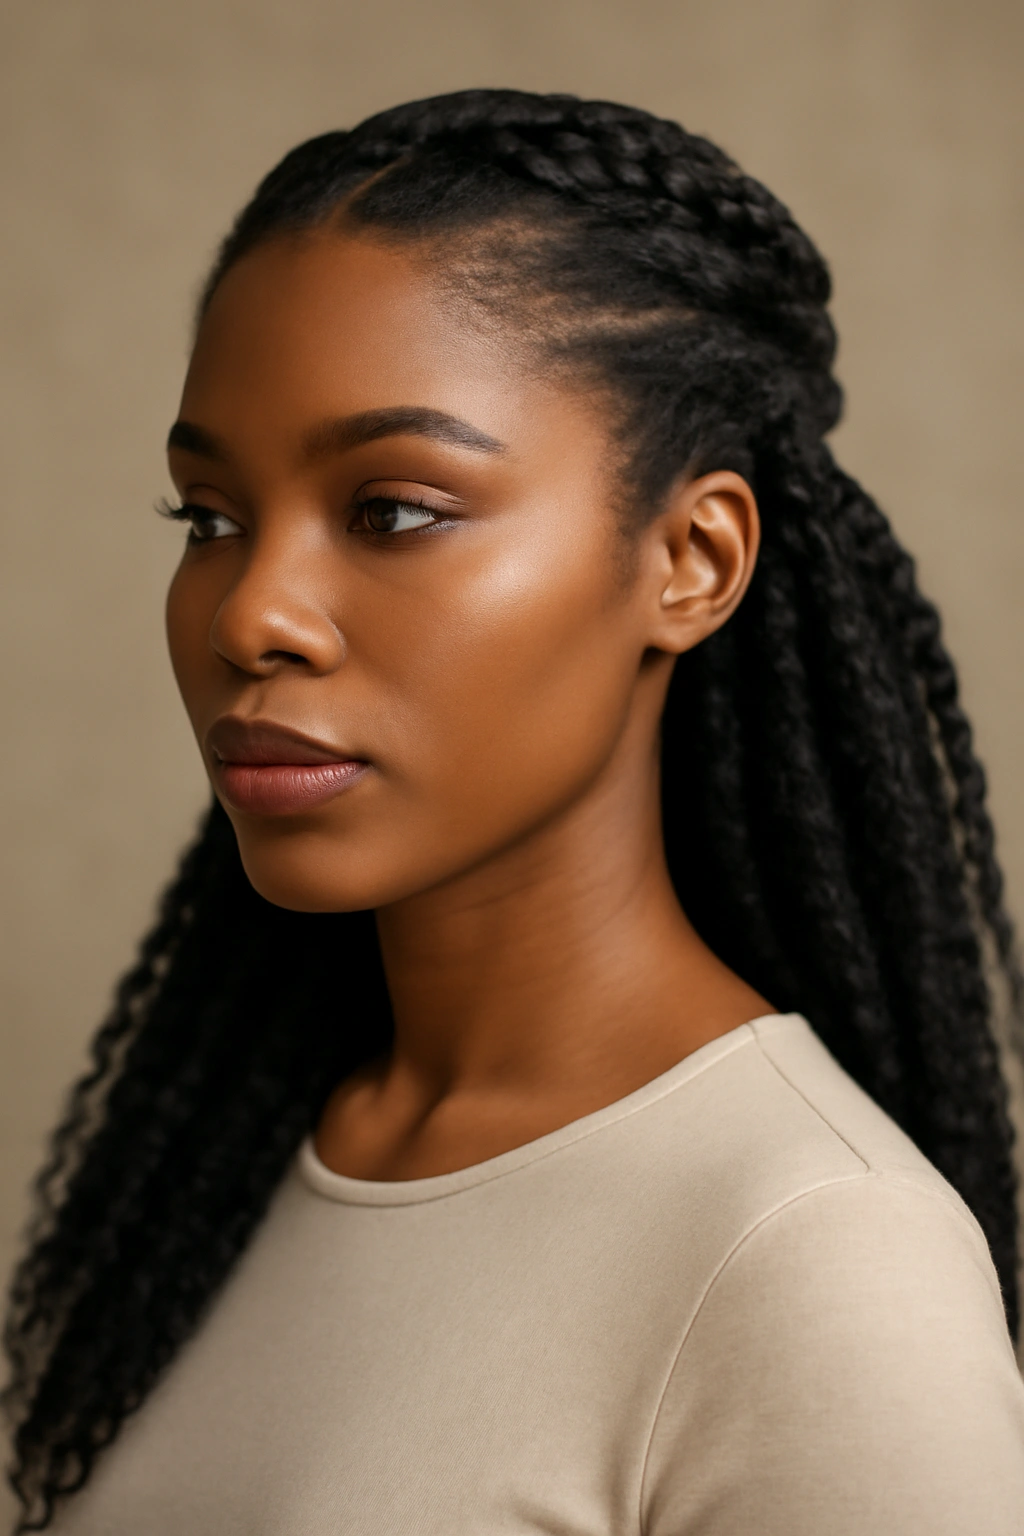
10. Pushback with Faux Locs or Extensions
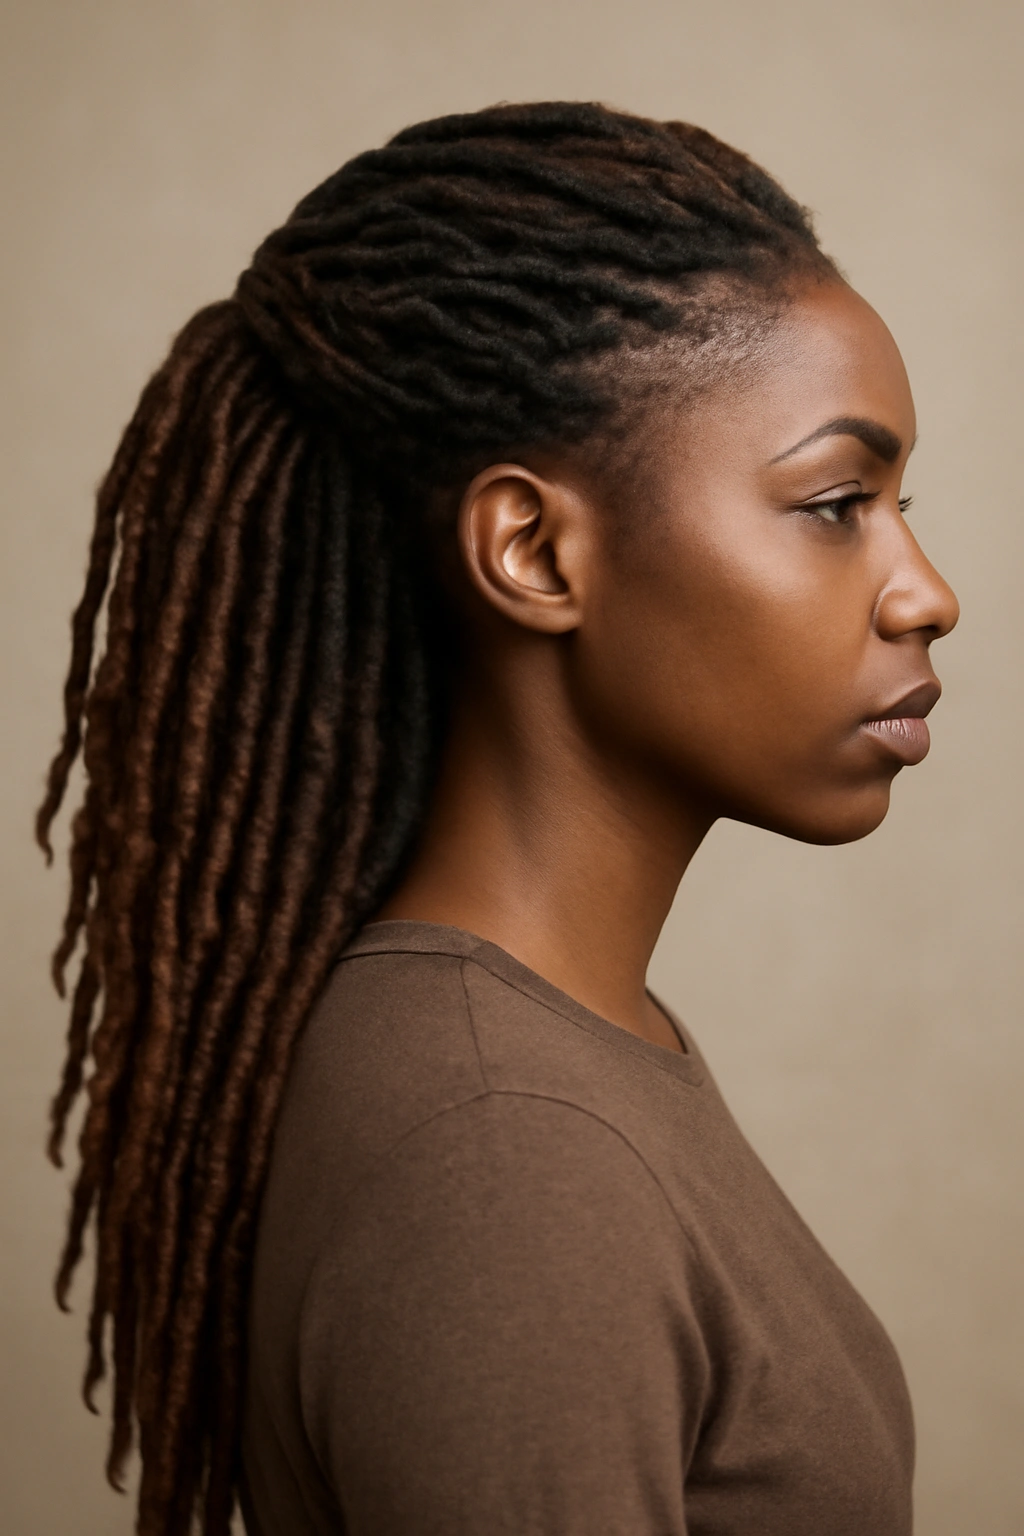
For a more dramatic, statement-making pushback, this version incorporates faux locs or braided extensions throughout your hair. You’re still pushing everything back off your face, but now you’ve added significant length, volume, and texture through extensions or faux locs. This creates a really striking, bold look that feels bohemian, creative, and undeniably eye-catching. The extensions can be a matching color to your natural hair or a completely contrasting shade for extra drama.
Why Extensions Elevate the Pushback Concept
When you add extensions or faux locs to a pushback style, you completely transform the impact. Instead of a sleek, polished look, you get something bohemian and artistic. Instead of a minimalist aesthetic, you get volume and texture everywhere. The weight and drape of extensions create movement that wouldn’t be possible with your natural hair alone, and the length extends the visual line of your hair downward, creating a longer, more elongated silhouette. This version feels especially special and festival-ready.
Installing and Styling Pushbacks with Extensions
- If you’re installing faux locs, you can either have them professionally installed or create them yourself depending on your skill level and your natural hair length
- Alternatively, you can install crochet braids or other braided extensions and style them into locs or twists
- Once installed, you can style exactly as you would a regular pushback—slick everything back with gel, create braids, add clips and accessories, or mix different textures throughout
- The weight of extensions means you might need a stronger elastic or clip to hold the pushback securely; test the security before committing to this style for an entire day
Maintenance Tips for Pushbacks with Extensions
Extensions require more maintenance than natural hair alone. Protect your extensions at night by putting them in a loose braid or wrapping them in a silk scarf to prevent tangling and maintain any twisted or braided patterns. Wash extensions less frequently than you would natural hair—every 2-3 weeks is usually sufficient. Use lightweight products that won’t build up on extensions. When your natural hair grows out and the extensions need to be removed, gently uninstall them to avoid damaging your natural hair underneath.
Final Thoughts
The pushback hairstyle has cemented itself as a legitimate go-to for Black women across every hair type, length, and lifestyle because it actually delivers on multiple levels. It’s functional and keeps hair off your face; it’s protective when styled correctly; it’s incredibly flattering for virtually every face shape; and it works across casual and formal settings. The 10 variations above barely scratch the surface of what’s possible—the real magic is in taking these concepts and personalizing them to match your hair, your face, your style, and your mood.
What makes pushback hairstyles so compelling is that they never feel outdated or trendy in a temporary way. They’re timeless because they’re fundamentally about working with your hair in a way that’s both practical and beautiful. Whether you’re reaching for a sleek gel version for a professional setting, a curly puff for comfort, or a fully accessorized moment for a celebration, the pushback concept delivers. Start with whichever version speaks to you, experiment with variations, and before long, you’ll have multiple pushback styles in your regular rotation. The versatility is genuinely unmatched, and once you start incorporating pushback hairstyles into your styling repertoire, you’ll wonder how you ever styled without them.