There’s something undeniably magical about a well-executed braid. Whether you’re walking into a casual lunch or making a grand entrance at a wedding, the right braided hairstyle can transform your entire look—boosting confidence, adding texture, and showcasing personality in ways that feel both effortless and intentional. The beauty of braids lies in their versatility: they work on short hair and long hair, suit formal occasions and beach days, and range from minimalist and refined to bold and statement-making.
The challenge most people face isn’t whether braids can work for them—it’s knowing which style suits their hair length, face shape, and the specific event they’re preparing for. A Dutch braid that dazzles on someone with thick, waist-length hair might look sparse or overwhelming on someone with collarbone-length strands. A delicate crown braid reads romantic for a garden brunch but might feel too subtle for a black-tie evening. This is where real knowledge matters: understanding not just how to braid, but which braid creates the exact impact you want.
What you’ll discover in the styles below is that braids have evolved far beyond the basic three-strand technique. Modern braiding techniques create dimension, visual interest, and a sense of intention that plain styles simply cannot match. Some of these styles are genuinely beginner-friendly, while others benefit from practice—or even a professional hand. More importantly, these 25 styles span every conceivable hair length and occasion, so whether you’re working with a pixie cut, shoulder-length waves, or floor-sweeping length, you’ll find multiple options that feel authentically you.
1. Classic Three-Strand Braid

The foundation of all braiding starts here, and for good reason. This timeless style takes just minutes to master and creates an instantly polished look that works whether your hair is freshly washed or styled two days ago. The simplicity is deceptive—a well-executed three-strand braid reads as intentional and elegant, not lazy or basic.
Why This Braid Never Goes Out of Style
A clean, symmetrical three-strand braid flatters nearly every face shape and works across all hair types. The key is tension: braiding with consistent, gentle pressure creates a smooth, refined appearance, while looser braiding feels more casual and romantic. Three-strand braids also work beautifully with minimal styling, making them perfect when you need to look polished without spending an hour on hair.
Best Ways to Wear It
- Worn down the center back for an understated everyday look
- Woven to the side for a softer, more romantic feel
- Secured at the nape for a chic updo variation
- Slightly loosened and textured for a lived-in, undone vibe
- Paired with face-framing layers for added softness
Pro tip: Braid damp (not soaking wet) hair for the smoothest results—moisture helps the sections grip each other and prevents flyaways.
2. Dutch Braid

If the classic braid feels too simple for you, the Dutch braid is where things get interesting. Sometimes called an “inside-out” braid, this style creates that coveted thick, dimensional appearance by crossing sections under each other rather than over. The visual impact is instantly more dramatic and intricate, even though the technique is only slightly different from a standard braid.
What Makes Dutch Braids Stand Out
The under-crossing technique creates a raised, sculptural appearance that photographs beautifully and catches light differently than a regular braid. Dutch braids work particularly well for adding volume to finer hair types—the visual texture created by the braid style compensates for hair that might otherwise look flat. The raised appearance also makes the braid a focal point rather than a secondary styling detail.
Making It Work for Your Hair
- Works best on textured or slightly wavy hair—perfectly straight hair can be trickier to grip
- Thicker hair creates a more pronounced, visually impressive braid
- Practice at shoulder level before attempting crown placements
- Slightly damp hair holds the under-crossing technique better than bone-dry strands
- A light texturizing spray adds grip without looking greasy
Worth knowing: Dutch braids hold their shape longer than regular braids, making them ideal for busy days when you need your style to last.
3. French Braid

The French braid remains a red-carpet staple because it photographs beautifully and works on virtually any hair length. This elegant style starts at the crown and gradually incorporates hair as it travels down the back of the head, creating a unified, flowing look that feels both intricate and wearable. It’s the go-to choice for anyone wanting to look polished without overtly formal styling.
Why French Braids Dominate Formal Events
A well-executed French braid creates the impression of careful, intentional grooming while still leaving the face completely open and unframed. The braid itself becomes a visual centerline that adds interest to the back of the head, which matters tremendously for events where you’ll be photographed from multiple angles. French braids also photograph incredibly well because the braid has dimension and depth rather than lying flat.
Techniques to Perfect This Look
- Start at the crown with a small three-strand section and gradually add sections from the left and right sides
- Keep tension consistent—too tight creates discomfort and a flat appearance, too loose looks unfinished
- Angle the braid slightly to one side for a softer, more romantic version
- Finish with a tight elastic for everyday wear, or leave the end slightly loose and textured for events
- Pancaking (gently loosening sections) creates a fuller, more voluminous appearance
4. Fishtail Braid

The fishtail braid might look complicated, but it’s actually surprisingly intuitive once you understand the two-section technique. Instead of dividing hair into three sections, you work with two thick sections and repeatedly pull small pieces from the outside of each section into the center. The result is a braid with incredible texture and visual interest—it catches light beautifully and has an undeniably trendy, effortless appeal.
What Makes Fishtail Braids So Visually Striking
Fishtail braids create an intricate, interwoven appearance that suggests significant styling effort, even though the technique becomes natural after a few attempts. The braid has a narrower, more delicate appearance than thick braids, making it especially flattering on finer hair types. The textured, slightly choppy appearance of a fishtail also pairs beautifully with beachy waves or other undone styling.
How to Perfect Your Fishtail Technique
- Divide hair into two equal sections at the base where you want the braid to start
- Take a thin piece from the outside of the right section and cross it over to the left section
- Take a thin piece from the outside of the left section and cross it over to the right section
- Continue alternating sides, keeping tension even throughout
- The smaller the pieces you pull, the more intricate and refined the braid appears
Insider note: Slightly textured or wavy hair holds the fishtail braid much better than perfectly straight hair—consider using a light texturizing spray before starting.
5. Crown Braid

A crown braid wraps around the head like a halo or tiara, creating an impossibly romantic, princess-adjacent look that works beautifully for weddings, anniversaries, and any event where you want to feel genuinely special. This style works across all hair types and lengths—the placement around the head creates the illusion of fuller, thicker hair, while the wrapped style keeps hair off the face while still feeling loose and romantic.
Why Crown Braids Create Magic
Crown braids frame the face beautifully while keeping hair secured and off your shoulders, which matters if you’re wearing a strapless or off-shoulder dress. The circular placement creates a graceful, intentional quality that reads as special-occasion appropriate without feeling costume-y. The style also photographs gorgeously from above and at angles, which makes it a favorite for weddings and formal events.
Creating Your Crown Braid
- Start with two side braids, one on each side of the head, beginning just above the ear
- Braid each side loosely, working slightly upward and backward toward the back of the head
- When braids meet at the back, secure one side and continue the other braid across the back to the opposite side
- Pin the braids in place using bobby pins that match your hair color
- Pancake and loosen the braids slightly for a fuller, more romantic appearance
6. Side Braid

The side braid is the effortless workhorse of braided styles—simple enough to do in five minutes, but polished enough for date night or casual events. By shifting the braid to one side of the head instead of centering it, you create an asymmetrical look that feels modern and intentional. The side position also means the braid becomes a visible focal point rather than something centered at the back of the head.
What Makes Side Braids Work Every Time
A side braid creates the impression of more hair volume because it’s positioned where it frames the face and creates visual interest on one side of the head. The asymmetry also makes the style feel less formal than a centered braid, so it works beautifully for casual occasions while still looking intentionally styled. The braid itself draws attention to the side of the face it’s on, which can be strategic for framing your features.
Styling Your Side Braid Perfectly
- Start the braid at one ear and braid down and back at a diagonal angle toward the opposite shoulder
- Create gentle texture by loosening sections as you go—this reads as more romantic than a tight braid
- Finish the braid at shoulder level or slightly lower, depending on your hair length
- Secure with a small elastic or a decorative clip for added visual interest
- Leave face-framing pieces loose around the starting point for softness
7. Waterfall Braid

A waterfall braid is the braiding equivalent of an optical illusion—sections of hair appear to “cascade” down while thicker braided sections flow alongside them. This semi-braided style is perfect if you love the idea of braids but want to maintain visible waves and texture throughout your hair. The technique is moderately complex, but once you understand the pattern, it becomes almost meditative to execute.
Why Waterfall Braids Feel Effortlessly Elegant
The waterfall braid combines structure (the braid) with flow (the cascading sections), creating a look that feels carefully styled without being rigid. This style works beautifully on long hair because the waterfall sections have room to move and catch light. The technique also feels special and intentional—it’s distinctive enough that people notice the styling effort without it reading as overly formal or fussy.
Mastering the Waterfall Technique
- Start with a thin three-strand braid at the top of one side of the head
- Instead of adding new sections into the braid on one side, let those sections fall free—this creates the “waterfall” effect
- Continue braiding by adding new hair to replace the sections you let fall
- Continue this pattern as you work toward the back of the head
- The cascading sections create beautiful waves when released
- Works best with longer hair and existing waves or curls
Pro tip: Waterfall braids hold their shape better on day-old hair or hair that’s been lightly texturized with sea salt spray.
8. Boxer Braids

Boxer braids are two Dutch braids running parallel down the back of the head, creating a bold, athletic, undeniably statement-making look. This style is perfect for anyone who wants serious visual impact—the double braids create symmetry and fullness while keeping hair completely off the face and neck. Originally worn by athletes, these braids have evolved into a versatile style that works for everything from gym sessions to music festivals.
What Makes Boxer Braids a Bold Choice
Double braids create visual weight and impact that a single braid simply cannot achieve. The parallel placement adds symmetry to the back of the head, which is particularly flattering if you have a longer or narrower face shape. The fully-off-the-face placement also showcases your features and neck, making this style especially good for highlighting face structure or showcasing jewelry.
Creating Perfect Boxer Braids
- Part hair down the center from forehead to nape, creating two equal sections
- Starting with the right section, create a Dutch braid from the crown down to the nape
- Repeat on the left side, keeping both braids the same tension and tightness
- Both braids should reach the nape at approximately the same point
- Secure each braid separately with matching elastics
- Pancake both braids evenly for a fuller appearance
9. Rope Braid

A rope braid is technically a twist rather than a traditional braid, but the visual result is so beautiful and intricate that it deserves a place in any braiding repertoire. This two-section style creates a spiraling, twisted appearance that looks far more complicated than it actually is. Rope braids work on virtually any hair length and texture, making them genuinely accessible for beginners.
Why Rope Braids Create Instant Visual Interest
The twisted, spiral appearance of a rope braid catches light beautifully and creates dimension that reads as intentional and stylish. Unlike traditional braids that require careful sectioning and consistent tension, rope braids are more forgiving—the technique is simple enough that slight variations actually add to the textured, organic appearance. Rope braids also work beautifully on finer hair types because they create visual texture without requiring thick sections.
The Simple Rope Braid Technique
- Divide hair into two equal sections at the base where you want the braid to start
- Twist the right section clockwise (toward the back of the head) while twisting the left section counterclockwise (toward the front)
- Cross the twisted right section over the left section, maintaining the individual twists as you cross them
- Continue this pattern down the length of the hair
- The opposing twists naturally interlock, creating the rope effect
- Secure at the end with a small elastic
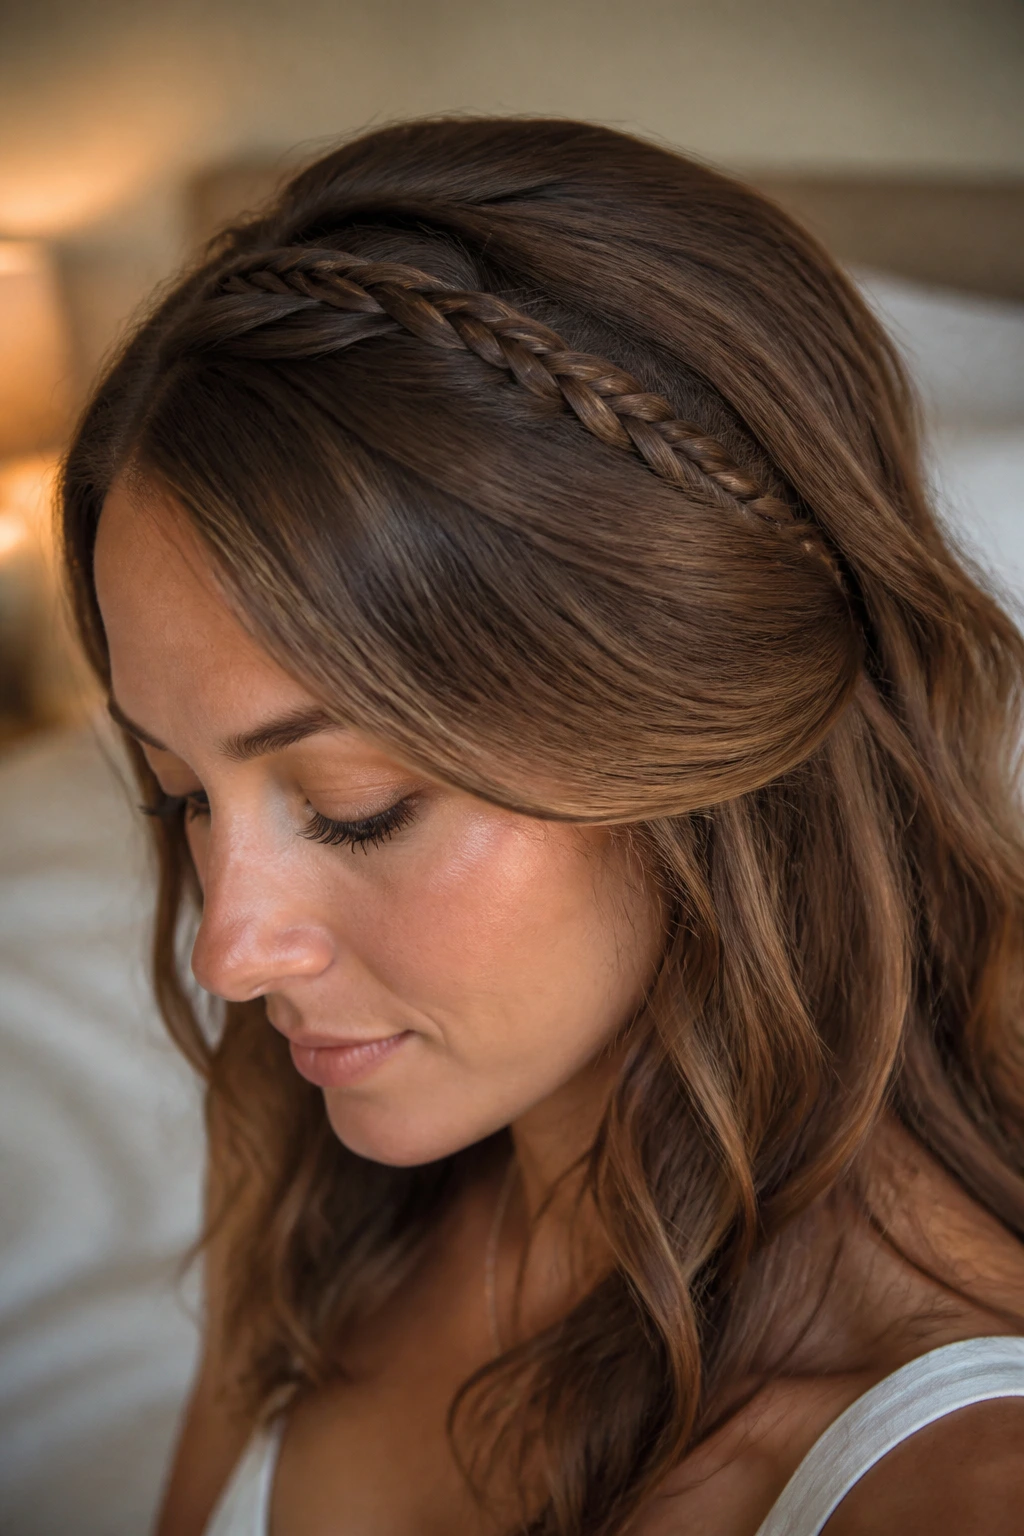
10. Halo Braid with Loose Waves

A halo braid paired with loose waves creates a dreamy, romantic aesthetic that’s absolutely perfect for weddings, engagement parties, or any occasion where you want to feel like the best version of yourself. The braid circles the head like a crown while the rest of the hair falls in soft waves, combining structure with romance in a way that few styles can match. This is genuinely a statement look that signals special occasion without being overdone.
Why This Combination Works So Well
The braid provides visual interest and intentionality at the crown, while the loose waves maintain softness and movement elsewhere. This combination photographs beautifully from every angle—the structured braid from above, the soft waves from the side, and the complete effect from the front. The look also feels less rigid than an entirely braided style, making it suitable for ceremonies, receptions, and celebration gatherings.
Building Your Halo Braid with Waves
- Start with pre-made loose waves or curls throughout the hair (using a curling iron or overnight braiding)
- Create a crown braid or halo braid around the head as described in the crown braid section
- The waves should begin beneath the braid line
- Secure the braid with pins that match your hair color
- Add a delicate hair comb, pearl pins, or small flowers to the braid for extra elegance
- Pancake the braid gently to create fullness without disrupting the overall shape
11. Twisted Updo with Braid Detail

A twisted updo with braid details is the sophisticated, polished choice for anyone attending black-tie events, formal dinners, or occasions where you want to look genuinely elevated. This style incorporates one or two thin braids woven into a twisted updo, creating visual interest and texture while maintaining the refined appearance that formal occasions demand. The braids add personality without making the style feel casual or undone.
What Makes This Updo Different
Unlike traditional updos that can feel austere or overly formal, incorporating braid details adds movement, texture, and a sense of personality. The braid elements break up what could otherwise be a flat, rigid updo, creating instead a style that feels both formal and thoughtfully executed. This is the kind of hairstyle that prompts compliments from strangers because it clearly required skill and intentionality.
Constructing Your Twisted Updo
- Create two thin side braids, starting just above the ears and working backward
- Gather the remaining hair into a low ponytail at the nape, incorporating the loose braid ends
- Twist the ponytail around itself to create a spiral bun shape at the nape
- Wrap one of the side braids around the base of the bun, securing with bobby pins
- Wrap the second braid around in the opposite direction
- Secure all pins and smooth any flyaways with hairspray
12. Milkmaid Braid

The milkmaid braid (also called a lace braid or halo braid variation) wraps braided sections around the head like a crown, then the remaining hair tumbles in waves beneath—creating a “milkmaid” aesthetic that feels whimsical, romantic, and incredibly photogenic. This style works beautifully on medium to long hair and is perfect for outdoor events, garden parties, and any occasion with a romantic or casual-elegant dress code.
Why Milkmaid Braids Feel Effortlessly Romantic
The combination of structured braids around the crown with soft waves beneath creates visual interest at multiple levels. The style photographs beautifully because it has texture, dimension, and asymmetrical movement. The romantic, pastoral aesthetic works for bridesmaids, outdoor weddings, festival attendance, or any event where you want to feel whimsically beautiful without appearing overly formal.
Creating Your Milkmaid Braid
- Create pre-made waves throughout the hair using a curling iron or overnight braiding method
- Start with a thin braid or Dutch braid at one side of the head, beginning just above the ear
- Braid at a diagonal angle, working upward and back toward the crown
- Pin the braid in place at the back of the head
- Create a matching braid on the opposite side, working toward the same point
- The two braids should meet and intertwine slightly at the back, creating a halo effect
- Release the remaining waves, which should cascade beautifully beneath the braids
13. Infinity Braid

The infinity braid is a visually stunning variation where two braids spiral together, creating the illusion of continuous, interwoven movement. This advanced technique creates an incredibly polished appearance that works beautifully for special occasions where you want to showcase serious braiding skill. The visual complexity of this style makes it perfect for anyone who has mastered basic braiding and wants to level up.
What Makes Infinity Braids Truly Special
The interlocking spiral pattern creates depth and dimension that reads as exceptionally skillfully executed. This style catches light beautifully and has a hypnotic quality that draws eyes to it. The infinity braid is perfect for anyone wanting to make a statement without resorting to bright colors or unusual styling choices—the technique itself is the statement.
Executing the Infinity Braid
- Part hair down the center from crown to nape
- Create a Dutch braid down the right side of the center part, starting at the crown
- Create a Dutch braid down the left side of the center part, starting at the crown
- As you continue braiding, angle each braid toward the center line, so they gradually intertwine
- At the lower portion of the hair, the two braids should spiral around each other, creating the infinity pattern
- Secure both braids together at the end with a single elastic
Worth knowing: This braid requires significant practice and works best on textured or slightly damp hair that holds its grip well.
14. Bubble Braid

A bubble braid is a playful, modern style where a single braid is divided into distinct sections and each section is gently puffed out (pancaked) to create bubble-like shapes running down the length of the braid. This technique transforms a basic braid into something far more visually interesting and contemporary-feeling. It’s perfect for anyone wanting to add a trendy, intentional detail to their styling.
Why Bubble Braids Work on Every Hair Type
The pancaking technique works beautifully on straight hair, wavy hair, curly hair, and everything in between. Thicker hair creates more dramatic bubbles, while finer hair creates a delicate, refined bubble effect. The style is playful enough for casual events but can be elevated for more formal occasions depending on whether you opt for precise, tight bubbles or looser, more romantic ones.
Creating Perfect Bubbles
- Start with a three-strand braid down the center back, or a side braid—your preference
- Once the braid is complete, gently pull sections of the braid out to create bubble shapes
- Work from the crown downward, creating bubbles of relatively equal size
- Pull more vigorously for dramatic, voluminous bubbles; pull gently for refined, delicate bubbles
- Secure the braid with a small elastic at the end
- The bubbles should appear regularly spaced and roughly uniform in size
- Set with hairspray to hold the bubble shapes throughout the day
15. Spiral Braid

A spiral braid is a single braid that wraps around the head in a circular pattern, creating a snail-shell or spiral aesthetic. This style is perfect for medium to long hair and works beautifully for special occasions where you want something visually distinct from standard down-the-back braiding. The circular wrapping creates visual interest from multiple angles.
What Makes Spiral Braids Visually Distinctive
The spiral pattern creates the appearance of movement and flow, while the braid itself remains stationary and secure. This style works particularly well on camera and photographs beautifully from above. The spiral placement also creates a sense of intentionality and careful styling that reads as more sophisticated than a simple back braid.
Constructing Your Spiral Braid
- Start with a three-strand braid at one side of the crown
- As you braid, gradually angle the braid in a circular pattern, working around the back of the head
- Continue the spiral pattern, working the braid around the head in a counterclockwise or clockwise direction (your preference)
- The braid should complete approximately one full rotation around the head before reaching the lower hair
- Secure with bobby pins along the back of the head and elastic at the end
- Pancake the braid to create fullness and dimension
16. Half-Up Braid

A half-up braid combines the best of both worlds—a braided top section that keeps hair off the face and neck, while the bottom half remains loose and flowing. This style is endlessly versatile, working for casual outings, semi-formal events, and everything in between. The half-up approach is also perfect for anyone who loves the look of braids but wants to maintain the softness of loose waves.
Why Half-Up Braids Work for Almost Everything
This style keeps hair completely out of your face while maintaining movement and softness below the braid line. The half-up approach works on virtually any hair length—even shorter styles can accommodate a small half-up braid. The versatility means you can dress this style down with a casual outfit or dress it up with formal attire simply by changing what you pair it with.
Creating Your Half-Up Braid
- Section off the top half of your hair, starting from one temple and working to the opposite temple across the crown
- Clip the bottom half out of the way temporarily
- Create a braid (three-strand, Dutch, fishtail—your choice) using only the top section
- Secure the braid with a small elastic
- Release the bottom half of your hair, which should cascade naturally beneath the braid
- For a fuller look, pancake the braid slightly
- Consider adding a decorative clip or comb at the base of the braid for extra interest
17. Ponytail with Braided Wrap

A simple high or low ponytail transformed by wrapping a thin braid around the base creates a polished, intentional look that takes just a few minutes to achieve. This style works beautifully on all hair types and is perfect for anyone wanting a pulled-together appearance without investing significant styling time. The braided wrap adds visual interest that elevates a simple ponytail into something more refined.
What Makes This Variation So Effective
The braided wrap around the elastic creates the visual effect of careful styling while actually being quite simple to execute. The braid also covers the elastic, creating a neater, more finished appearance than a plain ponytail. This is an excellent style for office settings, casual dates, or any occasion where you want to look intentionally styled without appearing to have spent hours on your hair.
Building Your Braided Ponytail Wrap
- Create a high or low ponytail at the crown or nape, securing with an elastic
- Section off a small piece from the ponytail (approximately 1-2 inches wide)
- Create a three-strand or rope braid using just that small section, working the length of it
- Wrap the braid around the base of the ponytail, covering the elastic completely
- Pin the end of the braid to the underside of the ponytail with a bobby pin that matches your hair color
- Adjust the ponytail tightness and shape to your preference
18. Accented Braid with Ribbon

A traditional braid becomes instantly more special when you weave ribbon, yarn, or decorative thread through it, adding color, texture, and visual interest in a way that transforms the entire aesthetic. This technique works beautifully for festive occasions, costume parties, music festivals, or any event where you want to add an element of visual playfulness. The ribbon option also allows you to customize your braid color without commitment.
Why Ribbon-Accented Braids Feel Special
Adding ribbon or thread to a braid creates visual interest, adds color without dyeing your hair, and signals that your styling is intentional and carefully thought through. The ribbon catches light beautifully and photographs well from multiple angles. This technique works on any braid style—side braids, Dutch braids, fishtail braids—making it endlessly versatile for different occasions and aesthetics.
Weaving Ribbon Into Your Braid
- Choose a ribbon that coordinates with your outfit or desired aesthetic (silk ribbons work best)
- Secure one end of the ribbon at the base where you’ll start your braid with a small hair tie or knot
- Begin braiding normally, but incorporate the ribbon as if it’s one of the three sections
- The ribbon naturally weaves through the braid as you work
- The ribbon should be visible but not so prominent that it overwhelms the braid structure
- Secure both the braid and ribbon end together with an elastic
- The ribbon remains woven throughout the length of the braid, creating consistent visual interest
19. Lace Braid
A lace braid is a thin, delicate braid that sits on top of the hair surface rather than incorporating hair completely. This technique creates the visual effect of delicate lacework and is perfect for anyone wanting subtle, elegant braid details without significant styling. Lace braids are particularly beautiful as accents in updos or running down the center of loose waves.
What Makes Lace Braids So Refined
The delicate appearance of lace braids creates visual interest without the heaviness of traditional braids. This style works beautifully on fine hair and is perfect for anyone wanting the aesthetic of braids without making their hair appear thinner. Lace braids also work wonderfully as accent elements in more complex hairstyles, adding detail without overwhelming the overall look.
Creating Delicate Lace Braids
- Section off a thin piece of hair from where you want the lace braid to start
- Create a very thin three-strand braid using only that small section
- Pin this braid in place along the surface of your hair, following a natural line down the back or to the side
- The braid should appear as if it’s resting on top of the hair rather than integrated into it
- Secure the lace braid with bobby pins that match your hair color, placed at intervals along the length
- Multiple thin lace braids can be placed parallel to each other for added visual interest
20. Braided Crown with Accessory

A braided crown base upon which you can place a delicate hair comb, fresh flowers, pearls, or other accessories creates an instantly elevated, special-occasion-ready hairstyle. This approach combines the romantic, polished appearance of a braided crown with the opportunity to personalize it with accessories that suit your specific event. The combination feels both timeless and contemporary.
Why Accessorized Braided Crowns Photograph Beautifully
The braid provides structure and visual interest, while the accessory adds a focal point and personal touch. This combination is perfect for weddings, engagement parties, anniversary celebrations, or any significant event where you want to feel genuinely special. The accessory draws attention to the back of the head, which is important for events where you’ll be photographed from multiple angles.
Building Your Accessorized Crown
- Create a crown braid or halo braid as described in previous sections
- Pancake the braid to create fullness and a romantic, undone appearance
- Choose an accessory that coordinates with your dress, theme, or personal style (hair comb, fresh flowers, pearl sprays, decorative clips)
- Position the accessory at the highest point of the crown braid, typically at the back or slightly off-center
- Secure the accessory with bobby pins, ensuring it’s positioned securely
- Step back and verify the accessory placement from multiple angles, including how it looks in profile
21. Braided Extensions and Volume Enhancement

If your natural hair is fine, thin, or shorter than you’d prefer, braided styles can be created with temporary or permanent extensions that add volume, length, and the ability to execute styles that wouldn’t be possible with your natural hair alone. Extensions don’t just add length—they add weight and texture that make braids appear fuller and more dramatic. This option opens up possibilities for anyone who loves braided aesthetics but has limitations with their natural hair.
When Extensions Transform Your Braid Possibilities
Extensions allow you to create thicker, more visually impressive braids regardless of your natural hair thickness or length. Braids created with extensions hold their shape better, appear fuller and more intentional, and create the dramatic visual impact that makes these styles so appealing. Extensions also allow you to experiment with braided styles without worrying about damaging your natural hair through repeated tight braiding.
Understanding Extension Options for Braiding
- Clip-in extensions offer temporary volume and length, perfect for special events without long-term commitment
- Tape-in extensions provide medium-term wear (6-8 weeks) and feel more natural during daily activity
- Sew-in or fusion extensions offer longer-term wear but require professional installation and maintenance
- Extensions work best for creating Dutch braids, boxer braids, and any styles requiring significant volume
- Consult with a professional about which extension type suits your hair, lifestyle, and braiding goals
22. Braided Updo for Medium-Length Hair

Medium-length hair presents a unique challenge for braids—too short for dramatic length, but long enough to create genuine braiding possibilities. A braided updo solves this by creating the appearance of length and fullness while keeping everything secured close to the head. This style is perfect for anyone with shoulder-length to collarbone-length hair who wants to explore elaborate braided styles.
Why Medium-Length Braided Updos Work So Well
The secured placement close to the head creates the illusion of more hair while keeping shorter lengths from appearing stringy or thin. Updos created from medium-length hair read as sophisticated and intentional because they clearly required skill to execute. The style also works beautifully for professional settings, formal events, and any occasion where you want to look genuinely polished.
Constructing a Braided Updo on Medium Hair
- Create two side braids, beginning just above each ear, working toward the back of the head
- At the back, gather the loose hair along with the braid ends into a low ponytail or bun position
- Twist or coil the ponytail into a small bun at the nape
- Wrap one braid around the base of the bun, securing with bobby pins
- Wrap the second braid around in the opposite direction
- Pancake both braids slightly for fullness and dimension
- Smooth any flyaways and secure with hairspray
23. Dutch Braid to Side Ponytail

Combining a Dutch braid down the side of the head that transitions into a ponytail creates a hybrid style that feels both braided and romantic. This style works beautifully on long hair and combines the visual interest of a braid with the softness of a ponytail. The transition point between braid and ponytail becomes a natural anchor point for securing everything in place.
What Makes This Combination Work
The Dutch braid provides visual texture and intentionality at the crown, while the ponytail maintains movement and softness below. The style works beautifully from both the front (where you see the side-swept braid) and the back (where you see the full ponytail). This is an excellent option for anyone wanting the best of both braided and non-braided aesthetics.
Creating Your Braided Ponytail Transition
- Start a Dutch braid at one side of the crown, just above the temple
- Work the braid at a diagonal angle, moving downward and backward toward the opposite shoulder
- As you braid, gradually gather more hair so the braid naturally expands
- When the braid reaches shoulder level, stop braiding and gather all remaining hair (including the braid end) into a side ponytail
- Secure the ponytail with an elastic that matches your hair color
- Pancake the braid slightly for added dimension
- Consider wrapping a thin braid or ribbon around the ponytail elastic for a finished look
24. Boxer Braids with Decorative Elements

Boxer braids (the double Dutch braids) become instantly more statement-making when you add decorative elements like beads, cuffs, or colorful bands at intervals along the braids. This style is perfect for anyone wanting to make a bold, playful aesthetic statement, whether for music festivals, bold personal style, or any event where braids should be a focal point rather than a subtle detail.
Why Decorated Boxer Braids Feel So Bold
Adding decorative elements transforms functional boxer braids into genuine statement styling. The additional visual elements catch light and movement, making the braids more noticeable and intentional. This style works beautifully on darker hair (where metallic or colorful accents stand out) and for anyone with confident personal style who doesn’t mind being visually distinctive.
Adding Embellishments to Your Boxer Braids
- Create two parallel Dutch braids down the back of the head, as described in the boxer braids section
- Metal cuffs: Slide decorative metal cuffs over the braids at regular intervals, securing with small elastics beneath the cuff
- Beads: Thread beads onto the braids before braiding, or add them afterward by threading a small piece of thread through the braid and attaching the bead
- Colored elastics: Use colored hair elastics at the base and end of each braid, or at intervals along the braids for rhythmic visual interest
- Ribbons: Weave colorful ribbons through the braids, or wrap them around the braids at specific points
- Step back frequently to evaluate the visual balance and spacing of decorative elements
25. Braided Low Ponytail for Everyday Elegance

A simple braided low ponytail combines practicality with refined style, creating an everyday hairstyle that reads as intentionally styled without requiring significant time or advanced braiding skill. This is the workhorse style for anyone wanting to incorporate braids into their regular rotation without investing an hour on hair preparation. The low placement is flattering across different face shapes and professional settings.
Why Low Braided Ponytails Are Endlessly Wearable
This style keeps hair neatly secured while maintaining softness and movement. The low placement works beautifully in professional settings, with both casual and formal clothing, and photographs well from most angles. The simplicity of the style means it works whether your hair is freshly washed or a few days old, making it genuinely practical for regular wear.
Executing Your Braided Low Ponytail
- Create a low ponytail at the nape of your neck, securing with an elastic that matches your hair color
- Section off a thin piece from the ponytail (approximately 1-2 inches)
- Create a three-strand braid using just that section
- Wrap the braid around the ponytail elastic, covering it completely
- Secure the braid end with a bobby pin tucked underneath the ponytail
- For a more polished appearance, pancake the braid section slightly
- This style works beautifully with loose waves in the ponytail section or with sleek, straight styling depending on the occasion and your preference
Final Thoughts

The remarkable thing about braided hairstyles is how they transform not just your appearance, but how you feel. Whether you opt for a simple three-strand braid you can execute in five minutes or invest time in mastering a more complex technique like the infinity braid, the act of intentionally styling your hair sends a message—to others and to yourself—that you’re worth that effort and attention.
The styles in this collection span from beginner-friendly options (a three-strand braid, a side braid, a ponytail wrap) to more advanced techniques that genuinely benefit from practice and perhaps professional guidance. The secret to finding your braided style isn’t about choosing the most complicated option—it’s about understanding which styles suit your hair length, texture, and the specific occasions that matter to you. A perfectly executed simple braid is infinitely more beautiful than a sloppy complicated one.
Start with whichever styles call to you. Practice them when you have time, knowing that every single attempt makes you more confident and skilled. Watch tutorials, reference photos, maybe even schedule a professional appointment to learn a technique you’re struggling with. Over time, braiding becomes intuitive—your hands learn the motions, and you can execute styles while barely thinking. At that point, braided hairstyles become something you reach for rather than something you attempt—and that’s when they truly transform your entire styling repertoire.