You just got the invitation, you’re excited about the celebration, and then reality hits: you need your hair to look absolutely flawless. The pressure of finding a wedding-appropriate hairstyle is real, especially if you’re thinking about dropping serious money at a salon when you could pull off something equally stunning at home. The good news? You absolutely can create a polished, elegant wedding guest hairstyle without any professional equipment beyond what most people already have in their bathroom drawers.
The secret to DIY wedding hair isn’t complicated—it’s about understanding which styles actually hold up throughout a full day of celebrating, which techniques work with your hair texture, and which products genuinely make the difference between “I tried” and “I got professionally done.” This guide walks you through twelve hairstyles ranging from romantic and loose to sleek and sophisticated, each one designed to be achievable for anyone, whether you’re experienced with styling or picking up a curling iron for the first time.
These aren’t the finicky styles that fall apart after thirty minutes of dancing. They’re tested, forgiving, and they work because they play to what your hair naturally wants to do rather than fighting against it. You’ll learn the exact technique for each style, what products actually help, and the honest truth about timing—how far in advance you can prepare and what you can fake on the day-of.
1. Soft Waves with Half-Up Clip
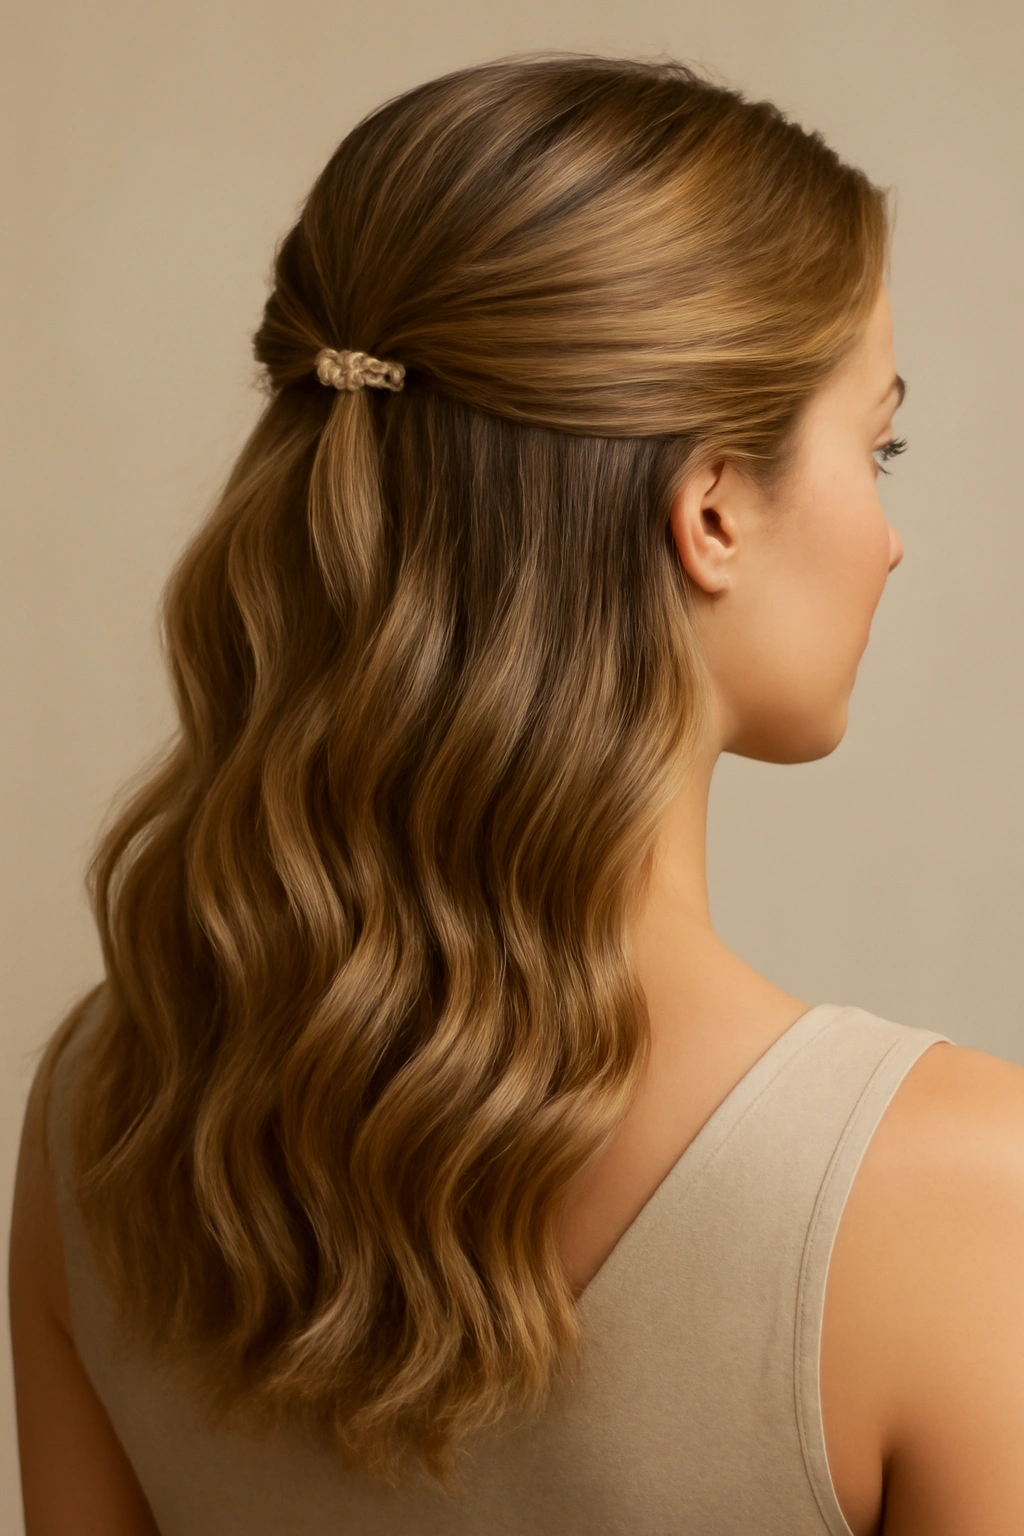
This is the hairstyle that looks effortlessly elegant without screaming “I spent three hours getting ready.” Soft waves flowing down your back with the front section clipped up creates movement and sophistication while keeping hair off your face—perfect for ceremonies where you’ll be photographed and receptions where you’ll be moving around.
How to Create the Waves and Secure the Top Section
Start with slightly damp hair and apply a heat protectant spray from roots to ends. Blow-dry your hair straight or with a slight wave, depending on your natural texture. Once completely dry, take a 1.5-inch curling iron and wrap sections around the barrel away from your face, holding for about eight seconds before releasing. Work through all your hair, alternating the direction of the wrap to create natural-looking waves rather than consistent ringlets. The key is not spiraling the iron down the full length—instead, wrap the mid-lengths and ends, leaving the roots wavy but not curled.
Once your waves are set, take a section from each temple and twist it back gently, bringing both sections together at the crown. Secure with a decorative clip, bobby pin, or small hair claw. The beauty of this style is that it looks intentional but not overdone.
What You Need and Pro Tips for Longevity
You’ll need a curling iron (1.5 inches works universally), heat protectant spray, and a light-hold hairspray. Skip heavy product—the whole point is that the waves look soft and natural, not lacquered. If your hair doesn’t hold waves well, spritz each section lightly with hairspray before curling, then spritz again after. The clip choice matters more than people realize; a tortoiseshell or metallic claw looks modern and elevated, while a dainty bobby pin creates a more delicate feel.
This style holds well for six to eight hours without touching up, even in humid conditions, because the waves aren’t fighting against your hair’s natural movement. If waves start falling by the evening, a light spritz of dry shampoo at the roots adds grip without looking wet.
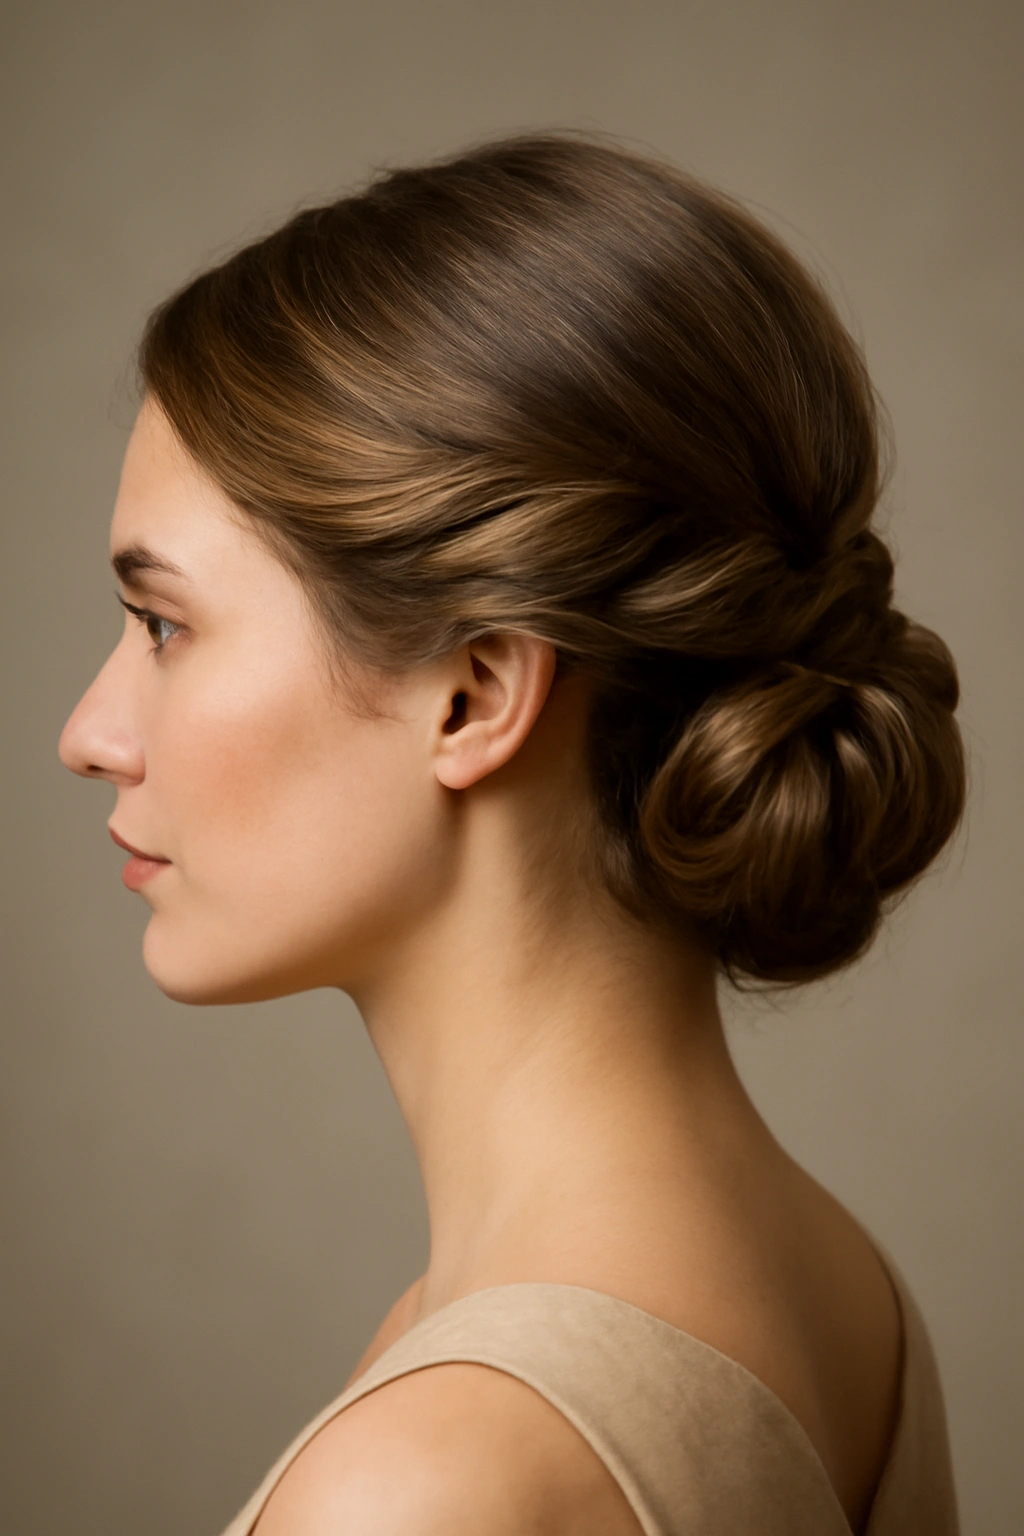
2. Sleek Low Bun

When you want to project absolute polish and elegance, a low bun is unbeatable. It’s sophisticated enough for a formal ceremony, practical enough to wear through dinner and dancing without frustration, and it photographs beautifully without looking overdone. The key to making it look high-end rather than corporate is the finish—texture and a few strategically placed pieces make all the difference.
Building the Bun with Volume and Movement
Start with completely dry hair. Apply dry shampoo at the roots and massage it in; this gives grip so the bun doesn’t slip as the day goes on. Flip your head upside down and brush your hair backward with a paddle brush to gather all the hair at the base of your neck, creating a low ponytail. Use an elastic band—preferably one in a matching color to your hair so it blends.
Here’s where the elevated version differs from a basic bun: before wrapping the ponytail into a bun, backcomb the ponytail section lightly with a fine-tooth comb. This creates texture and makes the bun look fuller and less severe. Twist the backcombed ponytail and wrap it around the base in a circular motion, securing with bobby pins as you go. Don’t make it perfectly round or geometrically tight; slightly loose and organic looks more elegant.
Finishing Touches That Elevate the Look
Pull a few shorter pieces around your face—one on each side if you have layers, or two from the front if you don’t. These pieces shouldn’t be so loose they fall out; pin them lightly behind your ear so they frame your face subtly. A light mist of hairspray keeps everything in place while still allowing the texture you created to show.
Add a delicate hair accessory if the dress code feels formal enough—a pearl hair comb, a thin metal hair stick, or decorative bobby pins worn visibly add a finishing-touch sophistication. Avoid anything overly ornate; you want the hairstyle itself to be the statement, with accessories as subtle accents.
3. Textured High Ponytail with Face-Framing Pieces
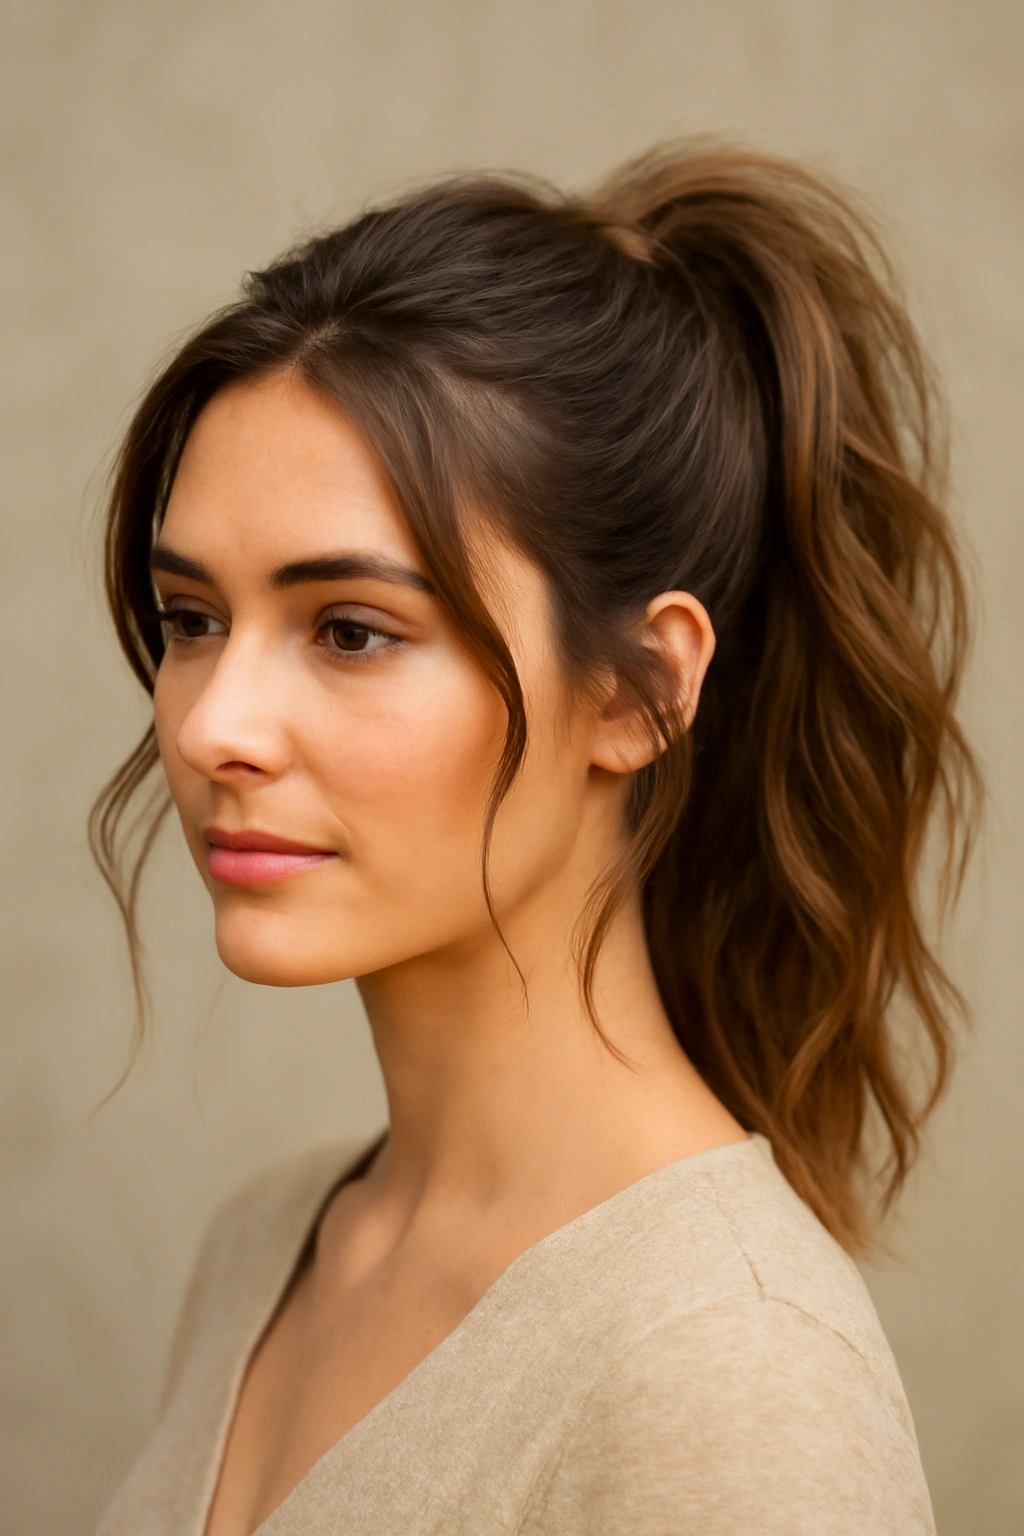
A high ponytail can feel youthful and playful rather than trying-too-hard when you add texture and keep it slightly undone. This style works beautifully for outdoor weddings, garden ceremonies, or receptions with a less formal vibe. It’s also practical—your hair stays completely off your neck and face while still looking intentional and styled.
Creating Volume and Texture in the Ponytail
Blow-dry your hair with your head upright, using a round brush to add volume at the roots. Once dry, use a curling iron or wand to add waves throughout your hair, working section by section. The goal isn’t uniform curls but rather organic texture with varying wave directions. This texture is what prevents a high ponytail from looking severe.
Gather your hair at the crown (higher than you might instinctively go—true high ponytails sit near the top of your head, not the back). Smooth the front and sides with a fine-tooth comb, but let the back section remain slightly textured. Secure with an elastic, then take a small subsection from the ponytail itself and wrap it around the elastic to hide it. Pin that wrapped section underneath the elastic and let the rest of the ponytail flow down.
Adding Frame and Movement
Before finalizing, pull a one-inch piece from each temple and pin it loosely behind your ear on either side, leaving a soft wave framing your face. These pieces prevent the ponytail from looking pulled-back-too-tight while adding a romantic softness. They’re also practical—they catch flyaways and hair that escapes from the elastic as the day goes on.
A texturizing spray applied to the ponytail section (not the roots) adds grip and makes the hair look fuller and more interesting. If you’re concerned about the ponytail dropping as you move around, a light hairspray mist helps, but avoid anything so heavy that it weighs down the texture you just created.
4. Romantic Braided Crown
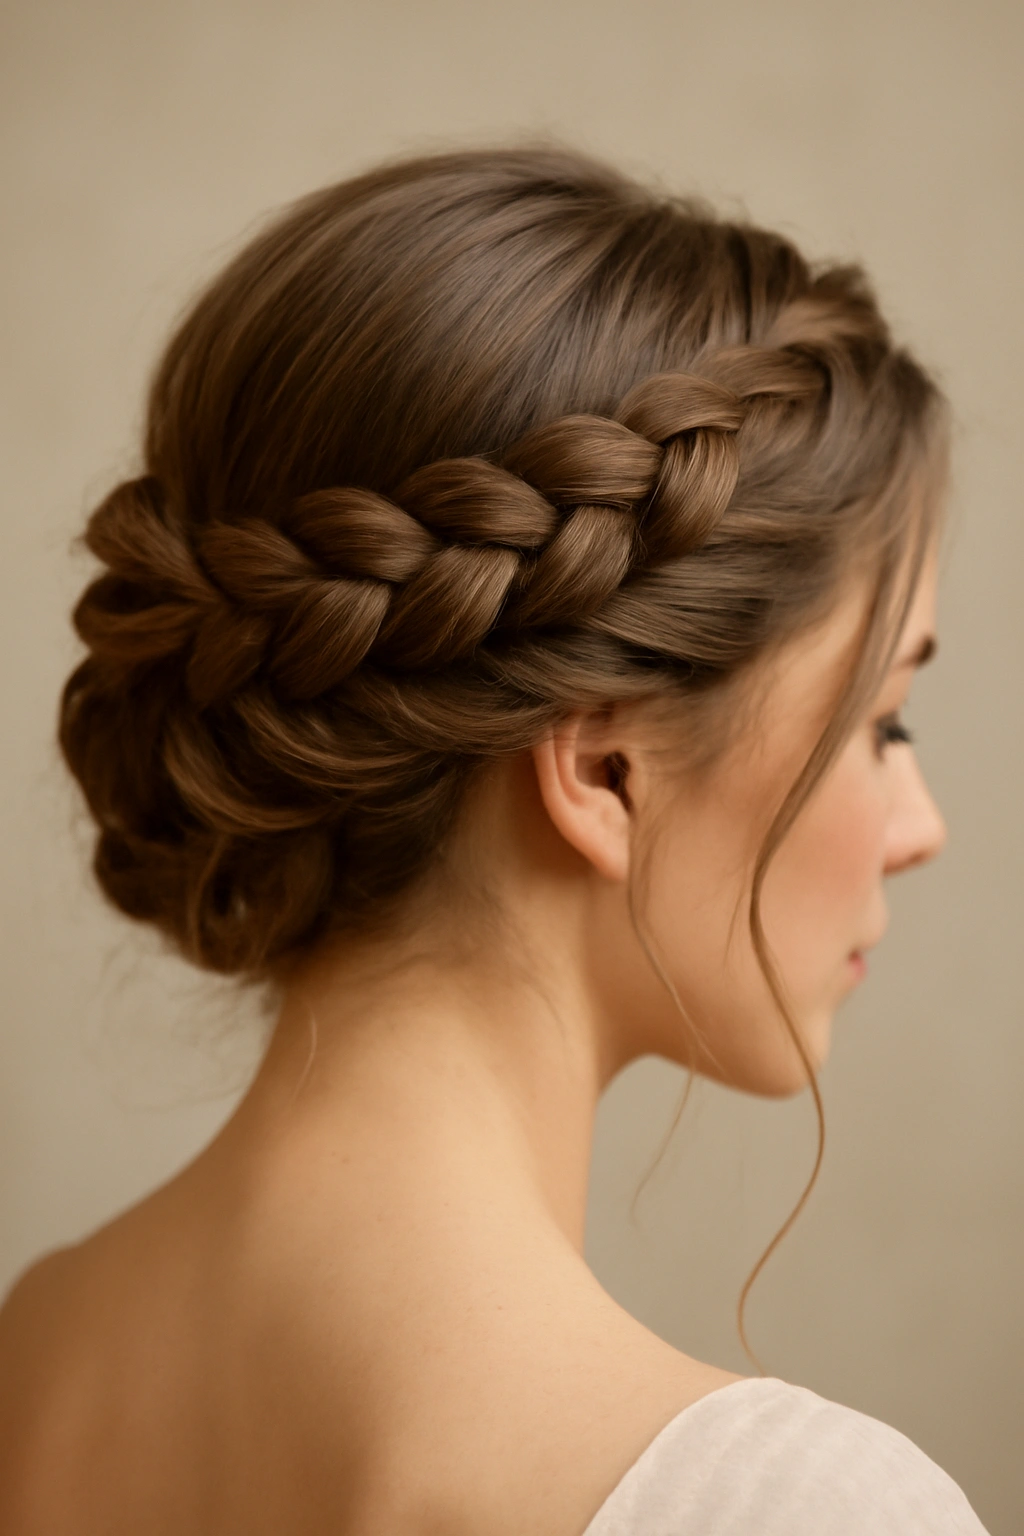
A braided crown that wraps around your head reads as bridal-adjacent without actually being a bridal hairstyle, making it perfect if you want something that feels special and intentional without stepping on the bride’s toes. It works with both long and shoulder-length hair, and the braid adds visual interest and texture that flatters most face shapes.
Mastering the Basic Crown Braid Technique
Start by sectioning your hair. Take a small section from above your right ear and begin a three-strand Dutch braid (braiding backward, weaving strands under rather than over each other). As you braid toward the back of your head, add small subsections of hair from the surrounding area, incorporating them into the braid as you go. This creates a fuller, more ornate look than a regular three-strand braid.
Continue braiding around the back of your head toward the left side, adding hair as you go. Once you reach the left ear, you’ll have incorporated most of your hair into one continuous braid that crowns your head. Finish with a simple three-strand braid and secure the end with a small elastic, tucking it underneath so it’s hidden. Use bobby pins to secure the braid to your head at multiple points, pinning under the braid so the pins don’t show.
Styling for Maximum Impact
After braiding, gently pull at the edges of the braid to loosen it slightly and add width and texture. This “pancaking” technique is worth the extra thirty seconds—it transforms a tight, thin braid into something fuller and more visually interesting. Work your way around the entire braid, pulling gently at the edges.
If you have hair that doesn’t braid easily or tends to slip out, apply a light texturizing spray before braiding. You can also pin small pieces of baby’s breath or small white or cream flowers directly into the braid for an extra romantic touch, securing them with bobby pins underneath the braid so they look as though they’re woven in. Finish with a very light hairspray that holds without weighing anything down.
5. Loose Curls with Decorative Pins
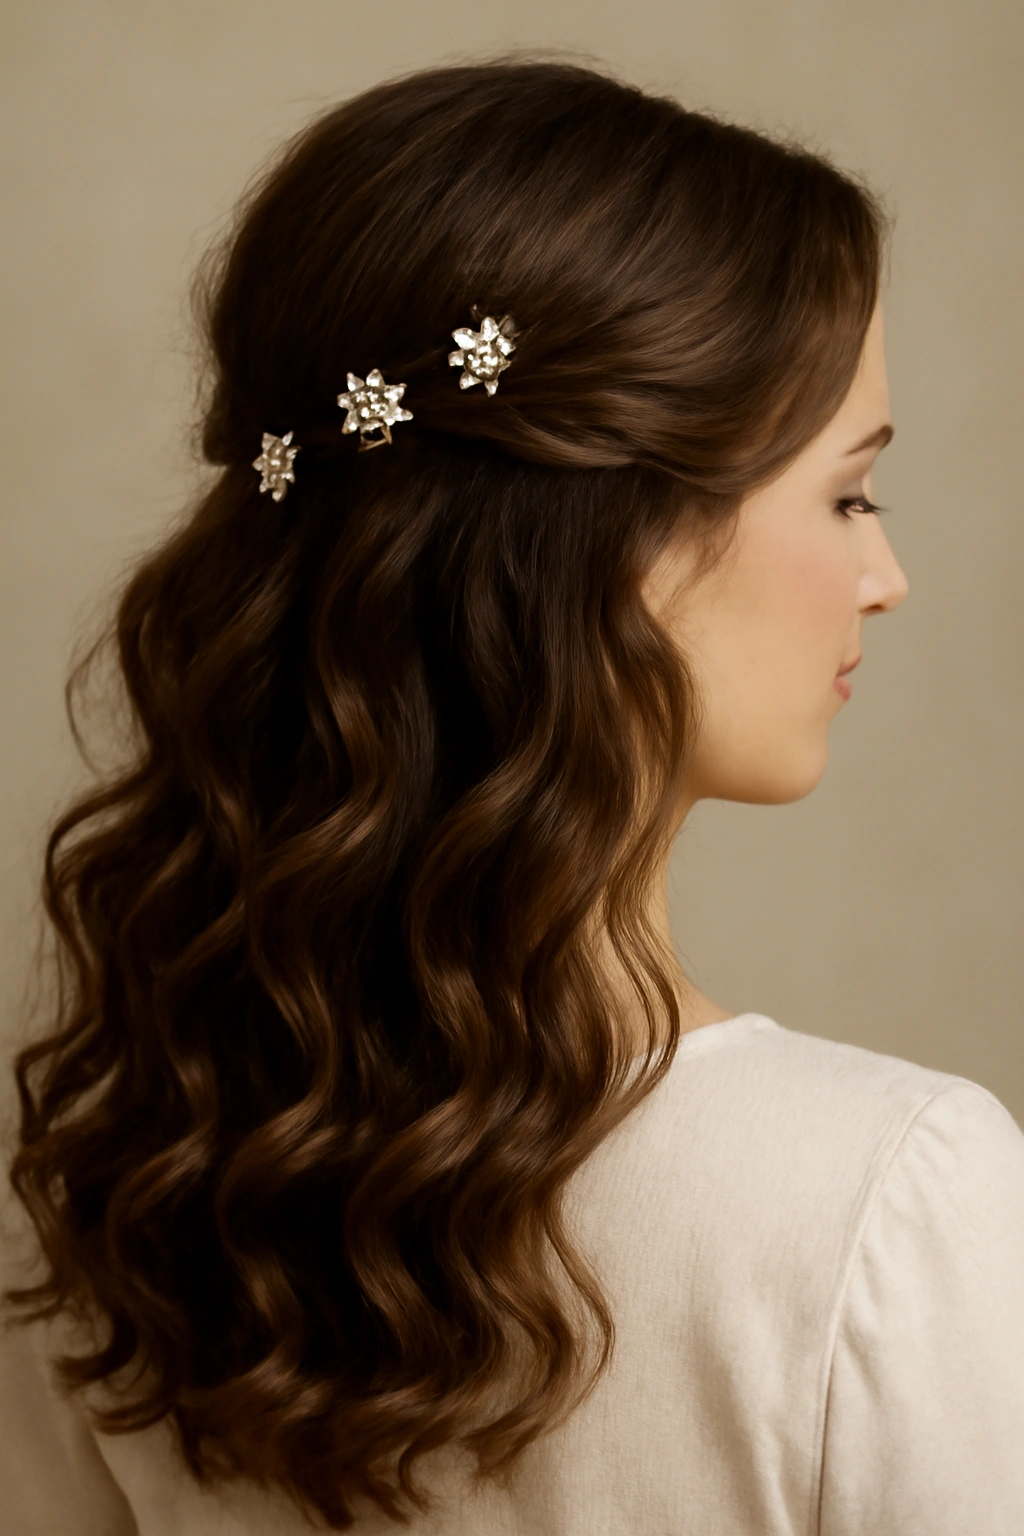
Sometimes the most elegant hairstyle is the one that looks the least like you tried. Loose curls worn down with strategic decorative pins creates a look that’s romantic, special, and completely achievable without significant styling skill. The pins become the focal point, making the whole thing feel intentionally styled rather than just “I curled my hair.”
Creating Lasting, Loose Curls
Apply a heat protectant to damp hair before blow-drying. Once your hair is completely dry, divide it into four or five sections using clip dividers. Working one section at a time, wrap hair around a 1.5-inch or 2-inch curling iron (larger barrel = looser curls), holding each section for about ten seconds. Wrap the hair around the barrel loosely rather than pulling it tight—you want the curl to have room to breathe.
Release each curl and let it cool in your hand or in an upright position rather than letting it drop immediately. As the curl cools, it sets better. Once all sections are curled and cooled, run your fingers through your hair gently to break up the curls into waves rather than uniform ringlets. The goal is texture and movement, not perfect spiraling curls.
Securing with Pins and Product
Once your curls are set, choose decorative pins that coordinate with your outfit. Pearl hair pins, vintage-style gold or silver combs, or delicate crystal pins all work beautifully. Place three to five pins throughout your hair—at different heights, not in a straight line—securing them in a way that looks intentional. Some people pin them at the crown, some along one side, some scattered throughout. There’s no “correct” placement; choose what feels balanced to you.
A very light hairspray helps hold everything in place without creating a crunchy texture. If you’re concerned about curls falling flat by the end of the night, you can lightly spray each curl with hairspray as you create it, but one final light mist once everything is pinned is usually sufficient. The beauty of this style is that even if curls relax a bit, they still look intentional and soft.
6. Twisted Side Updo
A side updo is inherently elegant and works for virtually every hair type and length. The twisted version (rather than braided) is slightly easier to execute and looks equally sophisticated. The asymmetry is flattering, the off-to-the-side placement is romantic, and it stays put all day.
Building the Twist and Securing It
Blow-dry your hair straight or with a slight wave, using a round brush to add volume at the roots. Once completely dry, take a one-inch section of hair from behind your left ear (or right ear if you prefer the opposite side) and begin twisting it away from your face. Keep twisting, gradually adding more hair to the twist as you move toward the back of your head, similar to the technique for a Dutch braid but with two strands rather than three.
Continue adding hair and twisting until you’ve incorporated a substantial section—approximately half to two-thirds of your hair, depending on how you like it. Secure the end of the twist with a bobby pin, then use additional bobby pins to secure the twisted section against the back of your head. The pins should be hidden under the twist, not visible on top.
Adding Polish and Preventing Slippage
Take the remaining loose hair and gently pull it upward, tucking it under and around the twisted section, using bobby pins to secure it in place. This creates a fuller, more textured updo rather than a spare, tight style. Pull a small piece of hair from the front section (before you started twisting) and let it frame your face, pinning it behind your ear.
Use a fine-tooth comb to smooth down any flyaways, then lightly spray with hairspray. If your hair is particularly slippery, apply dry shampoo at the roots before starting; the texture provides crucial grip. You can also apply a tiny bit of texturizing spray to the twisted section itself, which adds grip and prevents the twist from loosening as you move.
7. Voluminous Bubble Ponytail
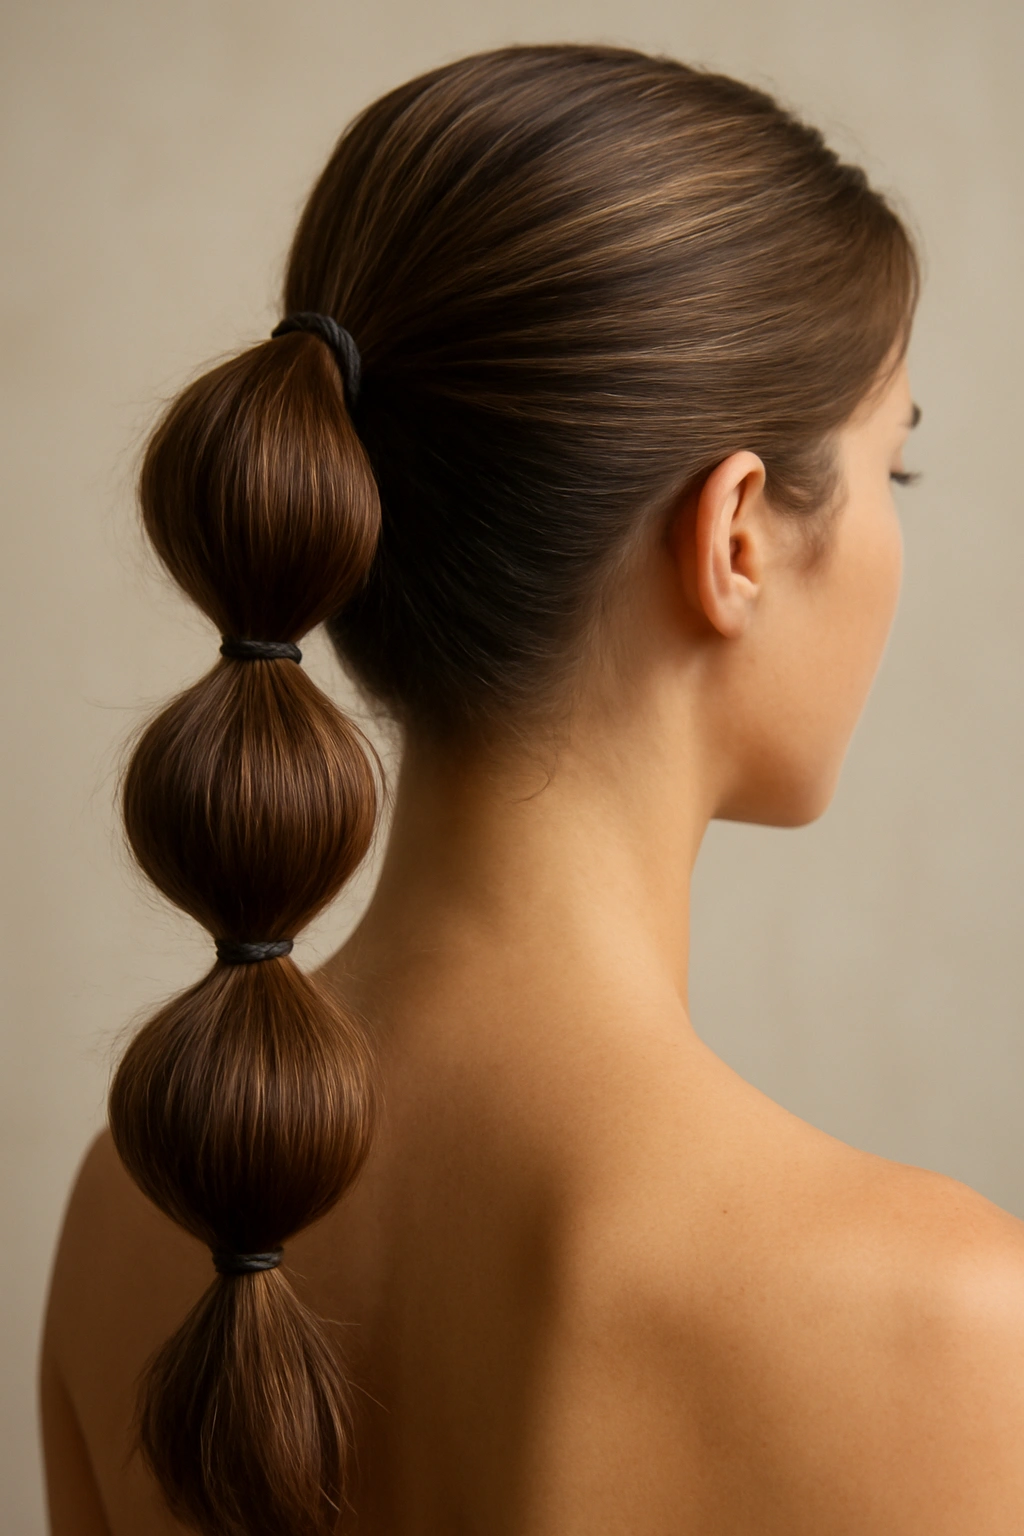
The bubble ponytail has become incredibly popular, and for good reason—it’s eye-catching, modern, and surprisingly easy to execute. It reads as trendy without being inappropriate for a wedding, and it’s especially great if you love the idea of a ponytail but want something that feels more special and designed.
Creating Individual “Bubbles” with Strategic Elastics
Start by creating a high ponytail using an elastic band that matches your hair color. Make sure the ponytail is pulled tight and smooth—loose ponytails won’t maintain distinct bubbles as the day goes on. Secure it at the crown of your head.
Here’s where the bubble magic happens: divide the ponytail into three or four equal sections, each roughly three to four inches in length from top to bottom. Using additional elastic bands (same color as your hair), wrap each section tightly to create distinct “bubbles” stacked vertically. The first bubble is from the elastic holding the main ponytail to the first smaller elastic. The second bubble is the section between the first elastic and the second elastic, and so on down the length.
Adding Texture and Volume to Each Bubble
Once all your bubbles are sectioned off with elastics, the key to making them look expensive and interesting is adding volume. Very gently pull at the outer edges of each bubble, fluffing it outward. This makes each bubble appear fuller and more dimensional. Work through all the bubbles, creating consistent fullness.
For extra polish, you can pull a tiny subsection of hair from each bubble and wrap it around the elastic below it to hide that elastic, securing it with a bobby pin underneath. This takes your look from “cute” to “elevated.” Finish with a light spray that holds without feeling sticky or crunchy. This style genuinely holds for eight-plus hours because the sectioning with elastics is so secure—even if hair escapes, the overall structure remains intact.
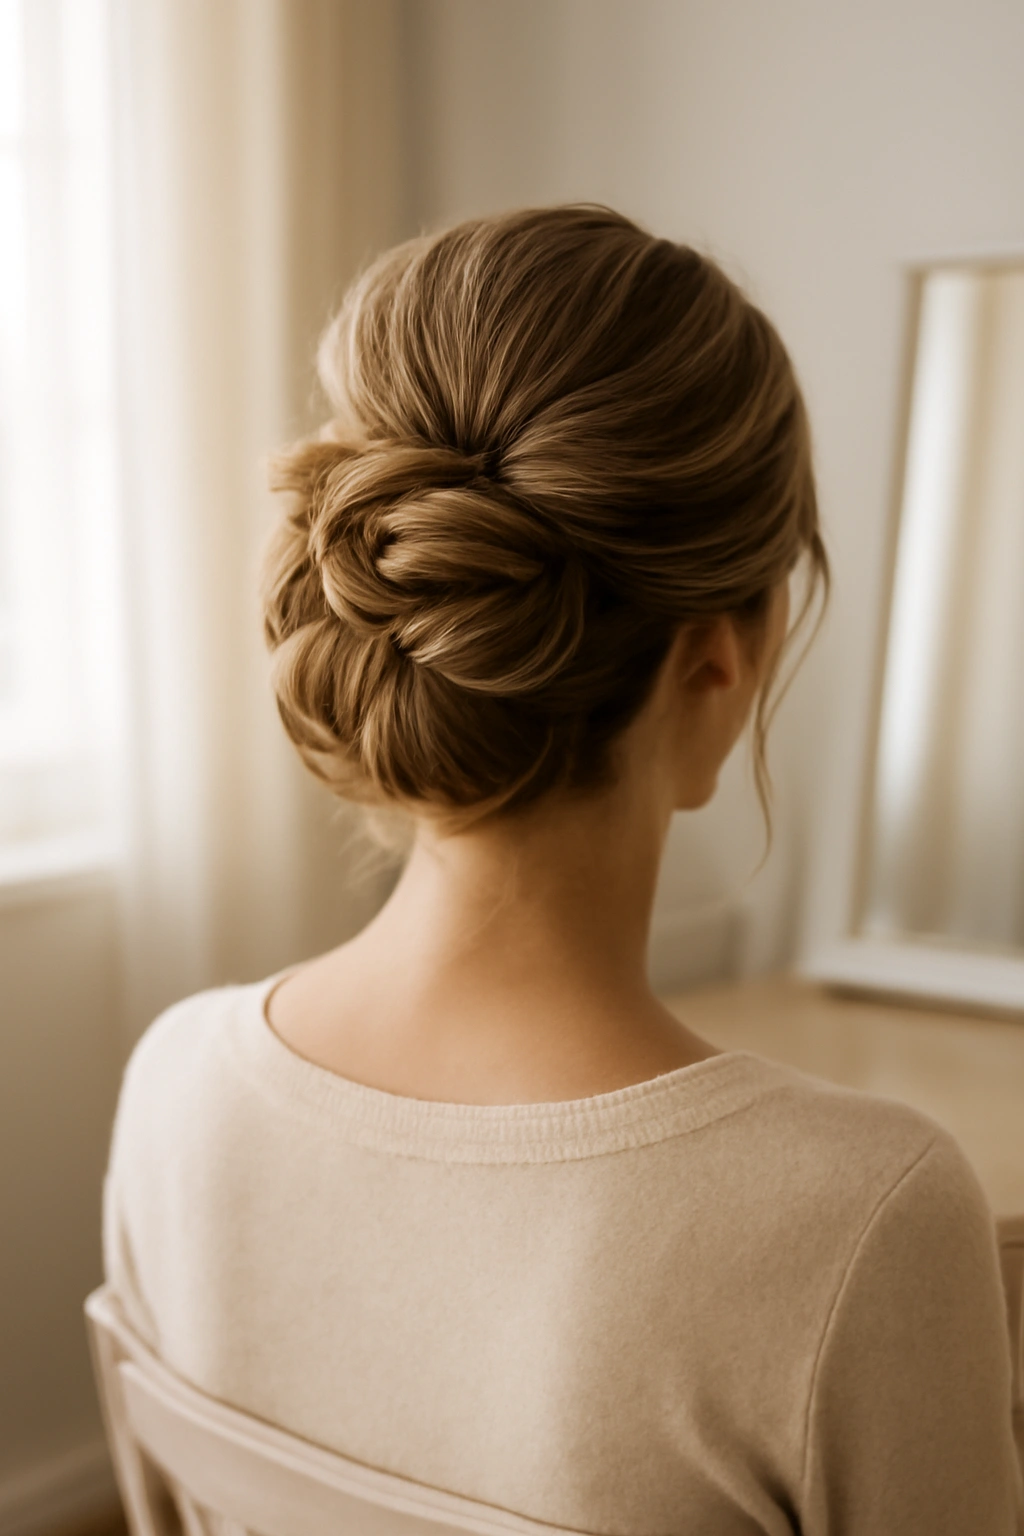
8. Undone Low Chignon
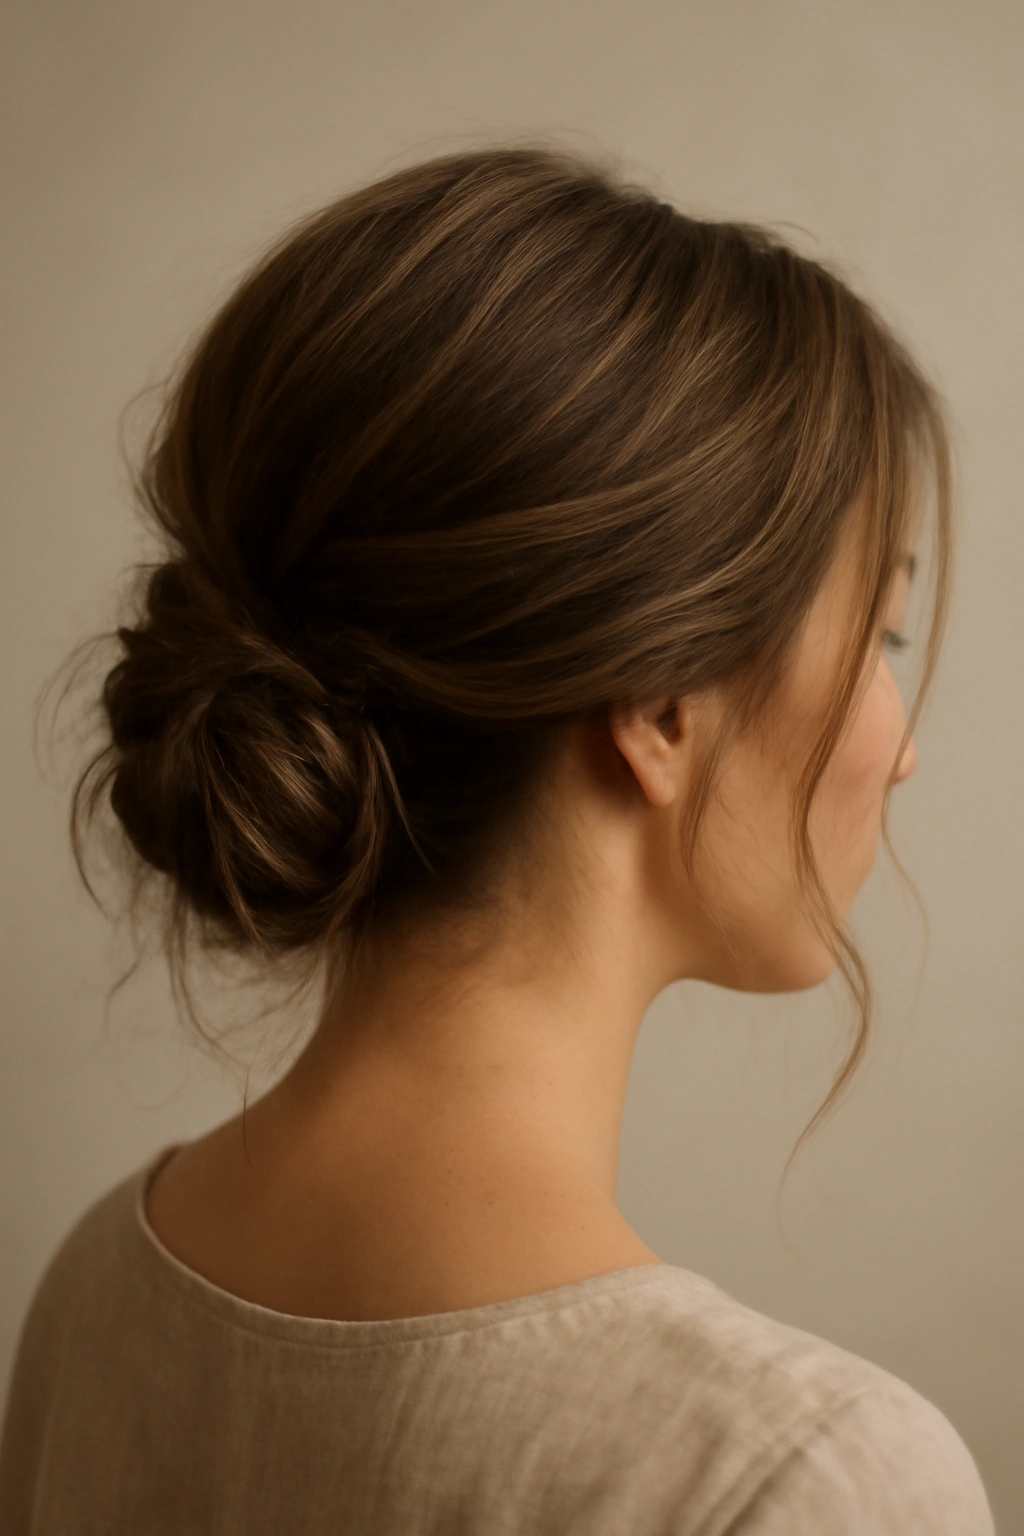
A chignon is the sophisticated cousin of a bun, and when executed with an intentionally loose, slightly disheveled quality, it reads as romantic and effortless rather than uptight. It’s perfect for weddings where you want to look polished but not overdone, and it works beautifully with both straight and curly hair.
The Technique for Organized Looseness
Blow-dry your hair (straight, wavy, or curly based on your preference). Once dry, gather hair into a low ponytail at the nape of your neck, but don’t make it perfect—leave some pieces around your face unclipped and let a few strands escape from the section you’re gathering. Secure the gathered section loosely with an elastic.
Twist the ponytail and loosely wrap it into a circular shape at the base of your neck, securing with bobby pins as you go. The key here is not making it tight or perfect. You’re aiming for a shape that’s clearly intentional but looks like you didn’t obsess over every strand. Pull gently at the wrapped section to create texture and slightly loosen it.
Creating the Polished-But-Soft Effect
Pull a few pieces of hair completely out, letting them fall around your face and neck. These shouldn’t be so loose they immediately fall out, but they should have movement and look like part of the design. Pin some of these pieces gently behind your ears, leaving others to frame your face. Apply a light texturizing spray to areas that feel too slick.
Finish with just enough hairspray to hold the structure without making anything feel stiff. The whole effect should look like you have a lot of hair, much of which you decided to arrange casually at the back of your head. This style is incredibly forgiving—if a piece falls out, it looks intentional. If the bun gets slightly messier as the day goes on, that actually enhances the aesthetic.
9. Side-Swept Long Waves
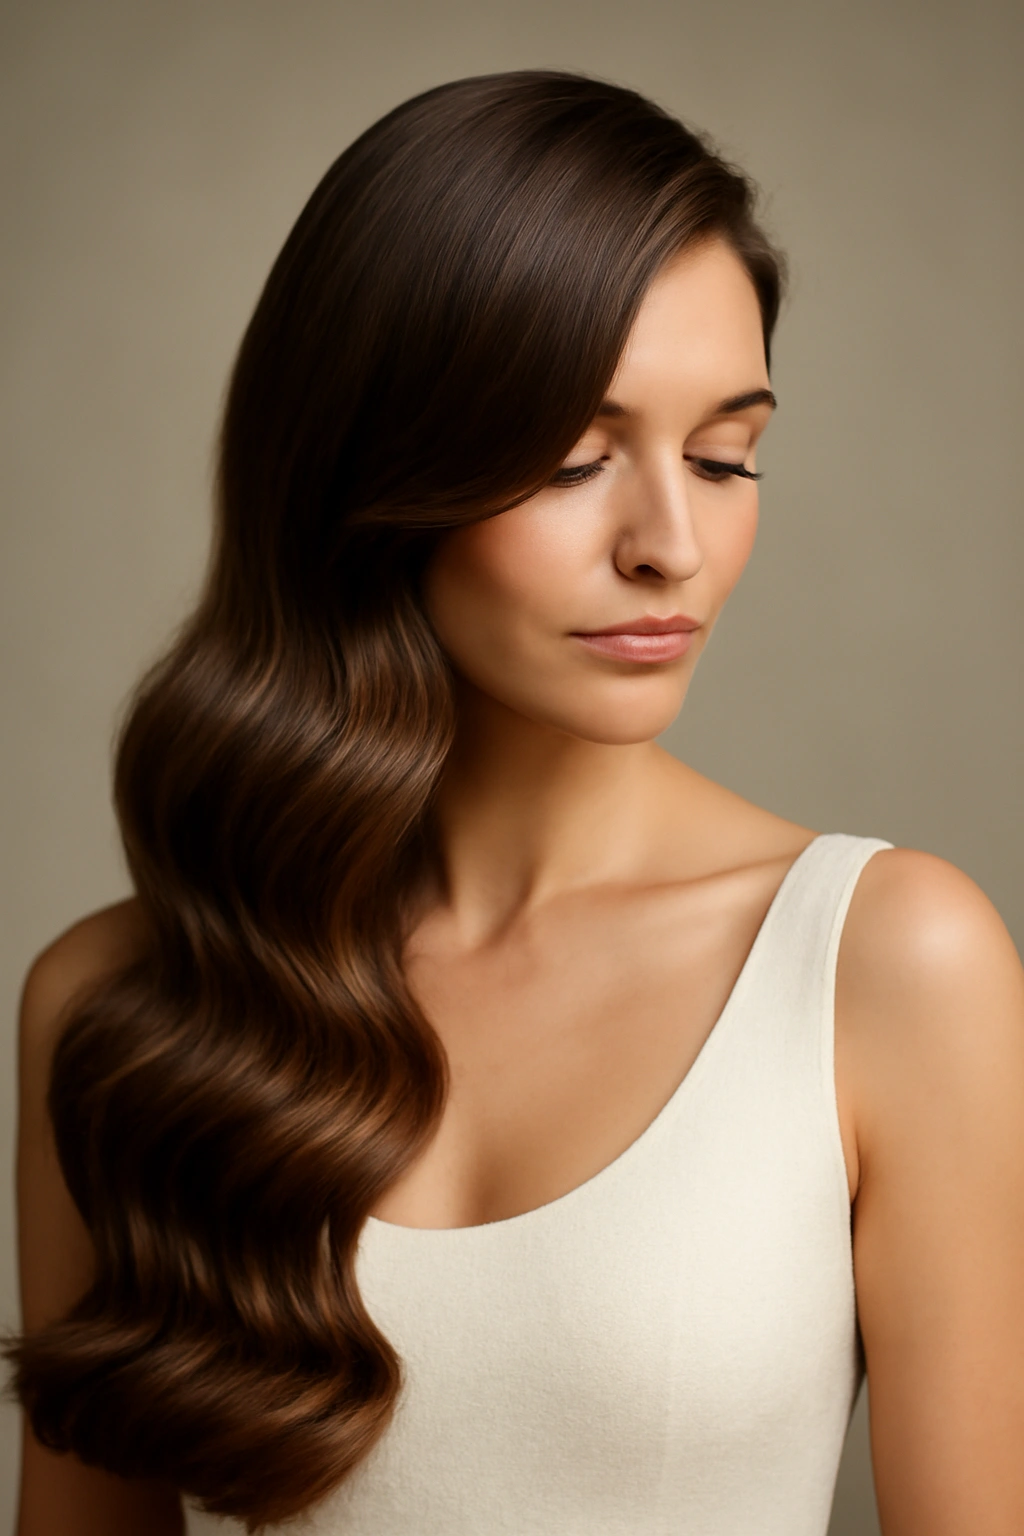
Sometimes the most striking wedding hairstyle is simply done well. Long waves swept to one side create a glamorous, timeless look that flatters almost everyone and requires no complicated techniques—just good execution of straightforward tools and methods.
The Foundation: Creating Waves That Last
Apply heat protectant spray to damp hair and blow-dry completely. Use a paddle brush while blow-drying to create smooth, sleek hair—the smoother your base, the more polished your waves will look. Once completely dry, divide your hair into four or five sections using large clips.
Working one section at a time, wrap hair around a 1.5-inch or 2-inch barrel curling iron, holding each wrap for about eight to ten seconds. The key is wrapping the iron away from your face on one side and toward your face on the other side, so when you brush them out, they create consistent wave direction. Release each curl and let it cool before moving to the next section.
Directing the Waves and Setting Them
Once all sections are curled and cooled, use your fingers to gently break up the curls into waves. You can also use a wide-tooth comb for a smoother wave pattern. Now comes the side-sweep: create a deep side part and direct all your hair toward one side, using a brush to smooth it. Secure the hair on the back side with a few bobby pins hidden in the hair, so it stays swept.
Finish with a flexible hairspray that holds without crunching. The waves should move when you move, not feel locked in place. This style holds beautifully for ten-plus hours, and even if waves relax slightly, the overall swept-to-the-side shape remains intact. Pair it with your face-framing face and you have something that looks expensively done.
10. Boho Dutch Braids
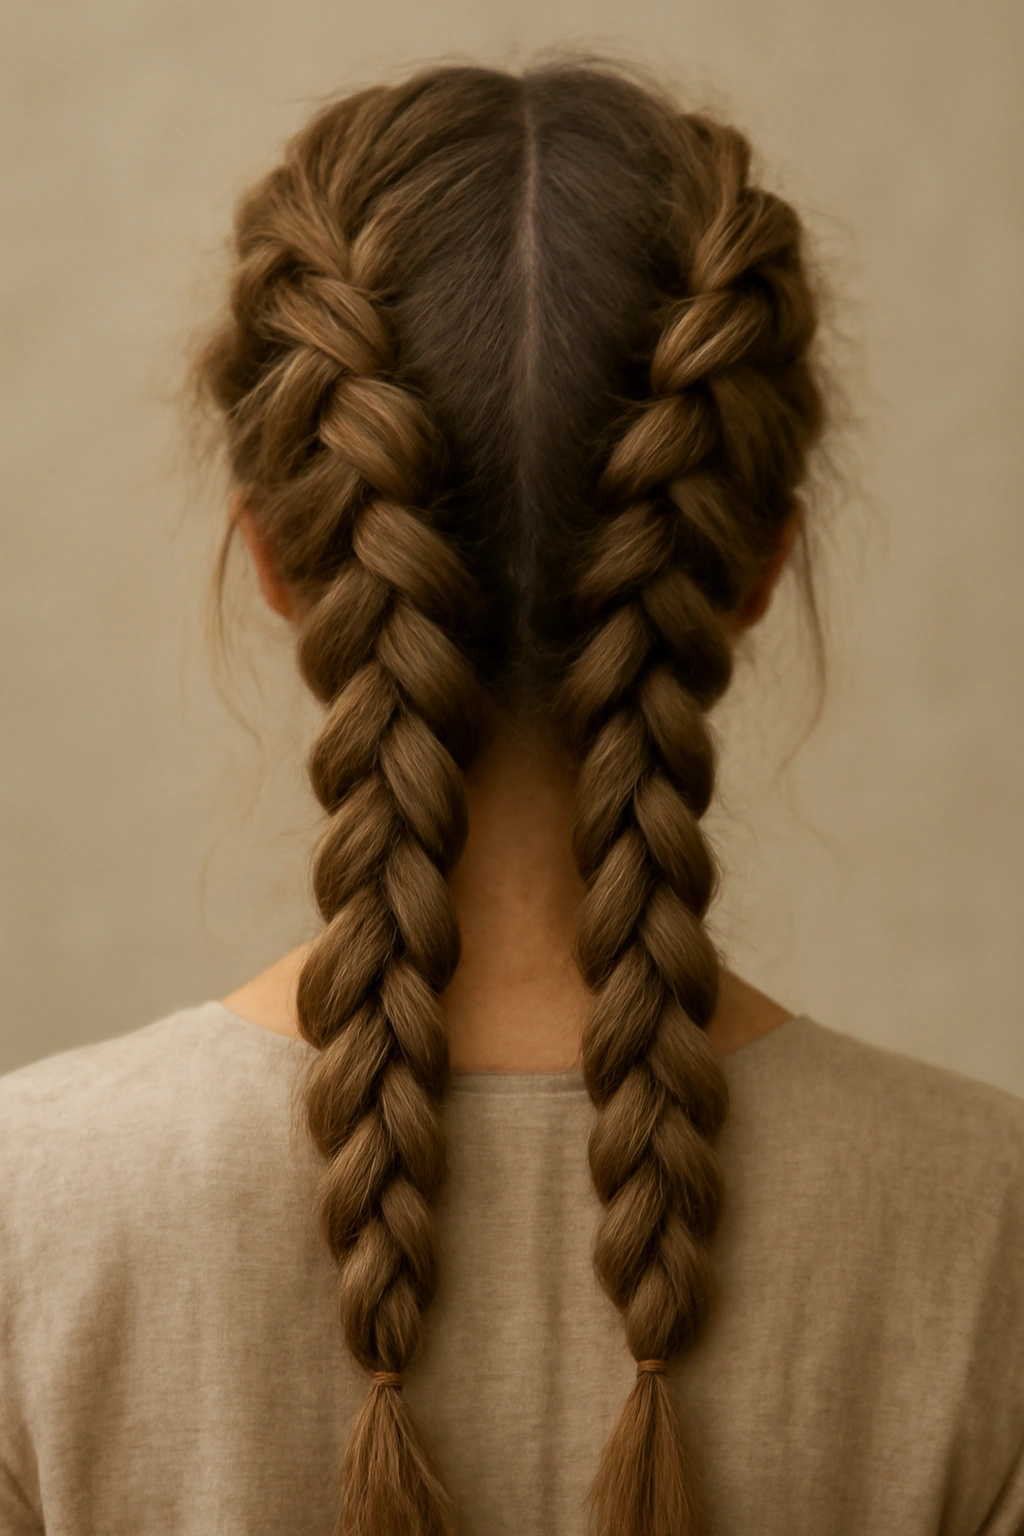
Two Dutch braids running down the back of your head create a romantic, bohemian look that’s Instagram-worthy but still wedding-appropriate. This style works especially well for outdoor weddings, garden ceremonies, or celebrations with a less formal vibe. It’s also surprisingly forgiving to execute.
Executing Two Dutch Braids Simultaneously
Begin by creating a center part down the back of your head. Take a section from one side and begin a Dutch braid (weaving under rather than over) near your temple, braiding diagonally back toward the center part. Add sections as you go, incorporating more hair as you braid toward the back of your head. Once you reach the center, secure the braid with a small elastic.
Repeat on the other side, creating a mirror-image Dutch braid that also ends at the center back. You now have two braids converging at the back of your head, creating a crown-like or halo effect. For extra romantic effect, you can gather the two braids together at the bottom, combining the ends and securing them as one, or keep them separate.
Adding Texture and Embellishments
Once both braids are secured, gently pull at the edges of each braid to loosen and pancake them, creating fuller, more textured braids. Work through the entire length of each braid, creating consistent width and volume. This step is essential—tight braids look amateur, while slightly loosened braids look intentional and expensive.
Tuck a few small flowers into each braid, securing them with bobby pins underneath so they appear woven in. Baby’s breath, small white or cream roses, or eucalyptus sprigs all work beautifully and add a romantic, elevated feel. Finish with a light hairspray. This style genuinely lasts all day and actually becomes slightly prettier as the day goes on, with braids relaxing into softer waves.
11. Sleek High Ponytail with Accessories
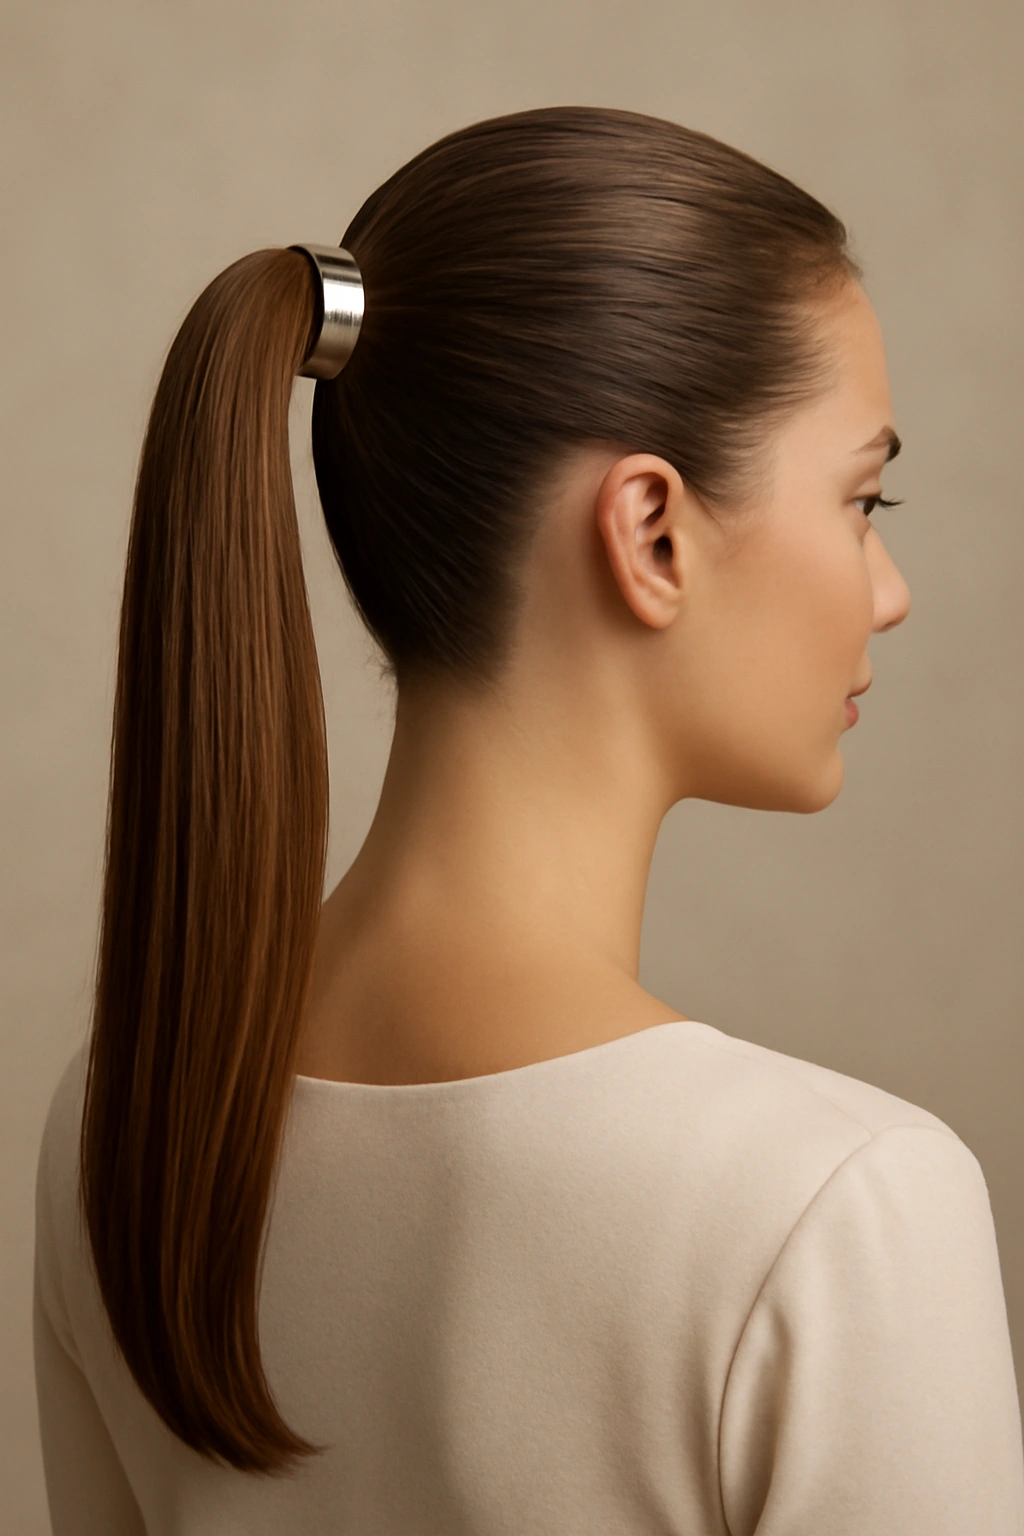
A sleek high ponytail is pure sophistication when executed well—no texture, no undone pieces, just polish and shine. It’s the style that looks effortlessly expensive and works for virtually every face shape and outfit color. The accessories are what elevate it from simple to special.
Creating Smoothness and Shine
Use a fine-tooth comb or paddle brush to smooth your hair completely, applying a smoothing serum or light oil to create shine and prevent frizz. Blow-dry if needed, making sure every piece is smooth and lying flat against your head. Any bumps or texture will be visible in this style, so smoothness is non-negotiable.
Gather all your hair at the crown of your head, pulling it upward firmly and smoothly. Use an elastic band to secure it tightly. Once secured, take a small subsection from the ponytail itself and wrap it around the elastic, securing it with a bobby pin underneath. This hides the elastic and creates a more polished appearance. Use a fine-tooth comb to smooth down any flyaways and ensure the top section is sleek.
Choosing and Placing Accessories
This is where your accessory choice makes a dramatic difference. A thin metallic hair cuff wrapped around the base of the ponytail adds modern polish. A delicate hair stick or comb adds elegance. A silk ribbon wrapped around the elastic creates romantic sophistication. Whatever you choose, make it something that complements your outfit and the formality level of the wedding.
Apply a hairspray that’s strong enough to hold everything in place throughout the day but doesn’t make hair feel sticky or stiff. The shine should be obvious and intentional—use a smoothing serum or hair oil on the ponytail section specifically to enhance that polished appearance. This style is absolutely foolproof—once the elastic is secure and flyaways are tamed, you’re genuinely done, and it will hold perfectly for the entire day.
12. Tousled Half-Up Waves
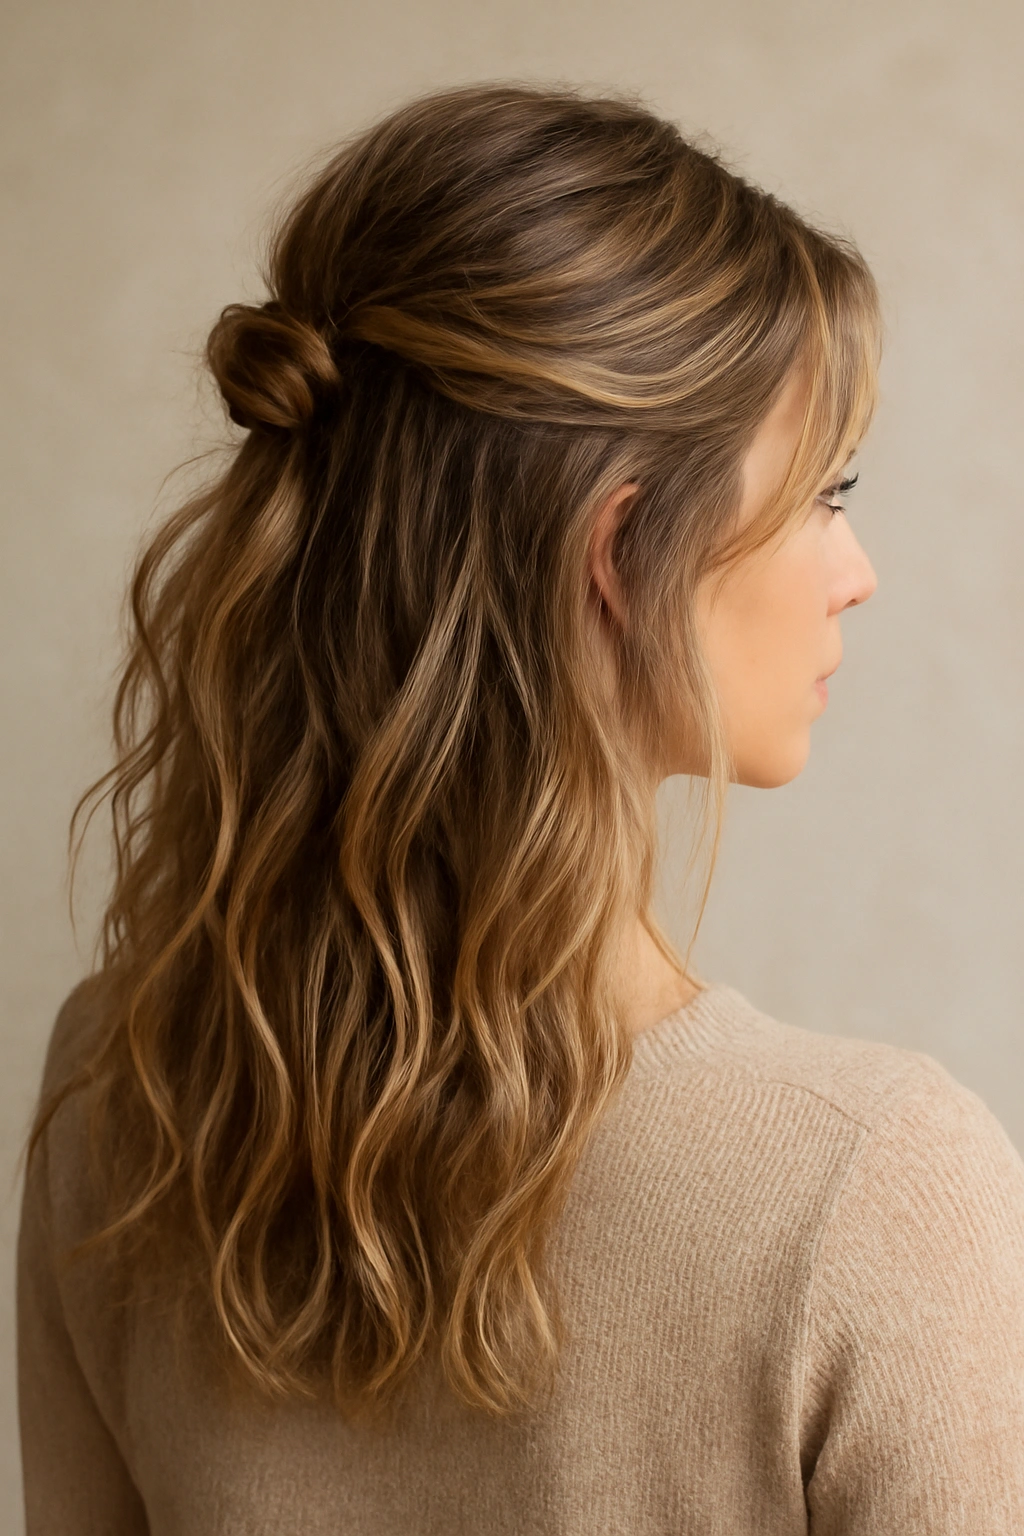
The half-up style splits the difference between wearing hair down and putting it up, which is perfect for people who want to avoid their face feeling heavy but don’t want their hair completely secured. When tousled with waves, it reads as romantic and intentional rather than simply “partially styled.”
Building Waves and the Half-Up Section
Apply heat protectant to damp hair and blow-dry completely, using a round brush to add volume at the roots. Once dry, curl your hair using a 1.5-inch curling iron, working through all sections and curling in varied directions to create organic-looking waves. Let each curl cool before moving to the next section.
Once all your hair is curled and cooled, run your fingers through it to break up the curls into softer waves. The key is not creating perfect ringlets but rather texture and movement. Now take a section from each temple—approximately one inch wide from each side—and bring them to the back of your head. You’re not making a full ponytail, just gathering these two sections. Secure them together with a bobby pin or small elastic, centered at the back.
Adding Volume and Dimension
Gently backcomb the half-up section at the crown to add volume and lift. This prevents the half-up from looking flat or pulled too tight. Let the remaining waves fall freely down your back and shoulders. Pull a small piece of wavy hair free around one ear, letting it frame your face softly.
Finish with a flexible hairspray that holds without crunching—you want the waves to move and feel soft, not locked in place. This style is incredibly forgiving. Even as waves relax throughout the day, they still read as intentionally wavy rather than falling flat, and the half-up section stays secure regardless of what happens to the waves below it. It’s one of the most elegant yet casual options, perfect for receptions where you’ll be eating, dancing, and moving around freely.
Final Thoughts
Each of these twelve styles proves that professional salon results are completely achievable at home when you understand the techniques, invest in decent tools, and approach the process methodfully. The difference between a hairstyle that falls flat and one that stays picture-perfect all day usually comes down to understanding your hair’s texture, using the right products for that texture, and allowing adequate time for curls or waves to cool before you move around.
The most important preparation happens the day before the wedding. Wash your hair with a moisturizing shampoo if your hair is dry, or a clarifying shampoo if it’s oily—clean hair holds style better than day-old hair in most cases, but not so clean that it’s slippery and difficult to grip. If your hair struggles to hold style, apply a light texturizing spray to damp roots before blow-drying; the texture provides the grip that prevents styles from sliding.
Choose your style based on three things: the formality level of the wedding (more formal calls for sleeker or more intricate styles; casual weddings allow for softer, looser approaches), your comfort level executing the technique (if you’ve never braided before, don’t learn on wedding day), and honestly, what makes you feel confident. You’ll shine brightest in a hairstyle that makes you feel like yourself, just elevated and intentional. Every single one of these styles accomplishes exactly that.