Short hair at a wedding? Absolutely. The misconception that long, flowing locks are the only option for bridal and special-occasion styling needs to stop—because short hair has so much more to offer. Short styles are inherently romantic when they’re thoughtfully accessorized, professionally cut, and styled with intention. They photograph beautifully, feel incredibly comfortable throughout a long day of celebration, and honestly, they exude a confidence and modern edge that longer styles sometimes struggle to achieve.
The secret to making short hair wedding-worthy isn’t about fighting its natural length—it’s about leaning into the cut’s texture, shape, and movement. The right accessories, strategic styling choices, and professional finishing techniques transform a short cut into something absolutely stunning. Whether you prefer classic elegance, romantic softness, or bold editorial glamour, there’s a short hair wedding style that’ll make you feel like the best version of yourself on the day that matters most.
1. Textured Pixie with Delicate Hair Pins
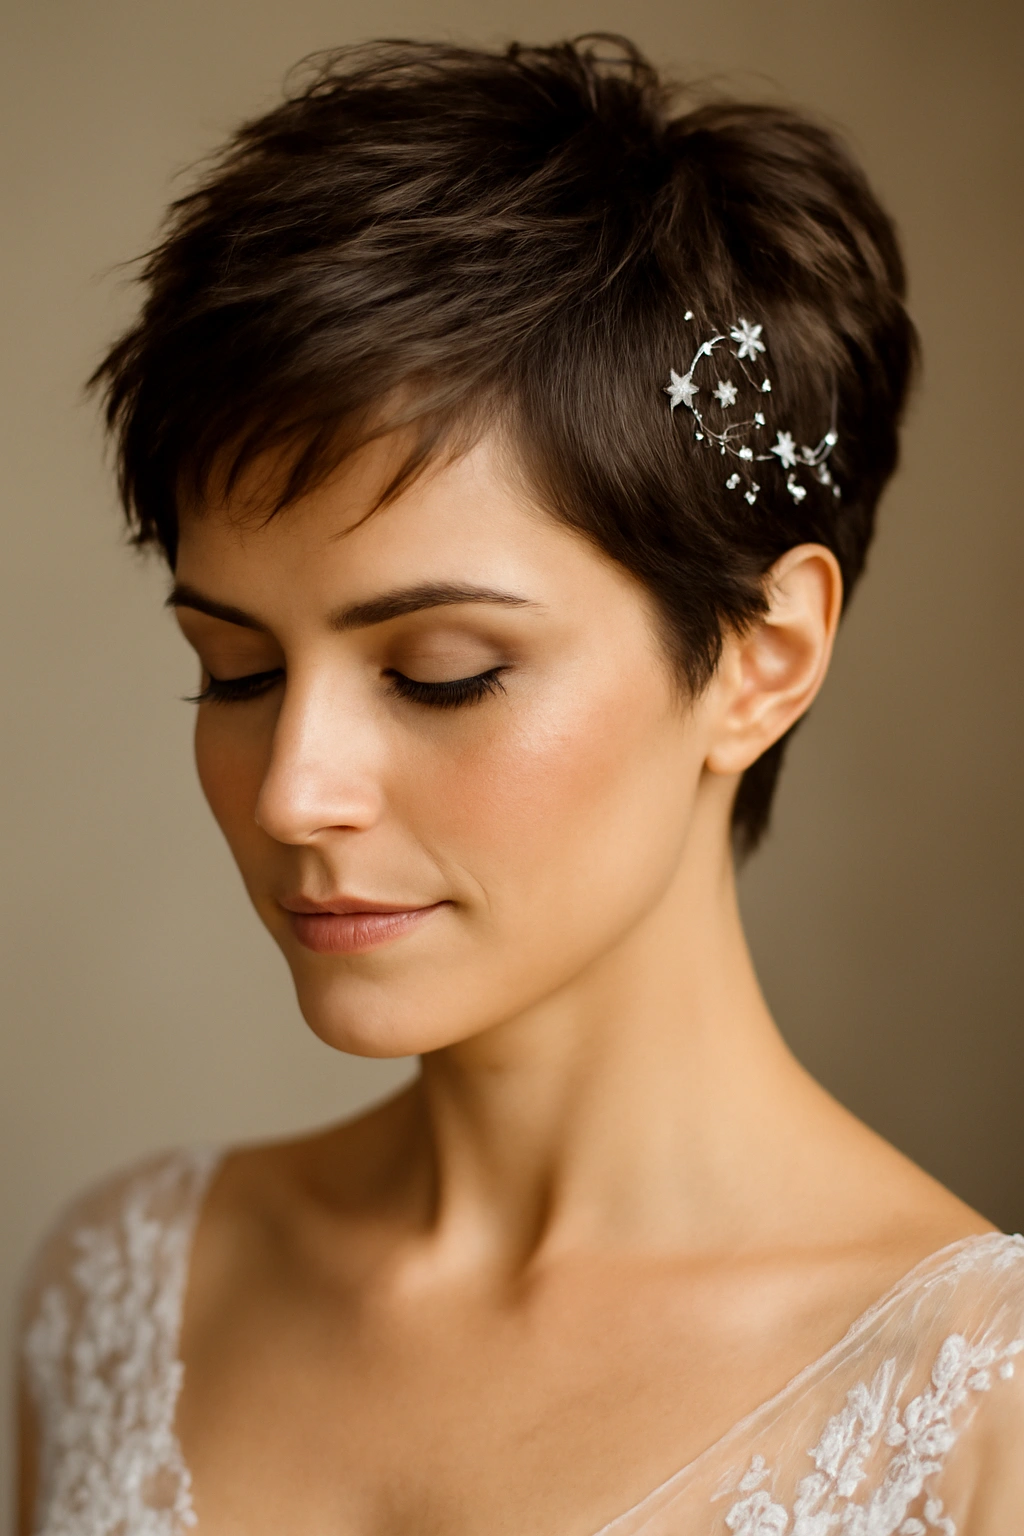
A textured pixie cut brings unexpected romance to weddings, especially when you embrace the movement and dimension built into the cut itself. Rather than sleek and severe, focus on emphasizing the choppy layers and tousled texture that give a pixie its modern appeal. Use a texturizing spray or lightweight styling cream to enhance natural separation between sections, then strategically place delicate gold, pearl, or crystal hair pins throughout the crown and sides.
Why This Works for Weddings
The beauty of a textured pixie is that it reads as intentional and polished without requiring hours of styling. The pins catch light beautifully in photographs—those close-up shots and candid moments will show off the subtle sparkle. This style works exceptionally well for modern, outdoor, or non-traditional weddings where personality matters more than strict formality.
Styling and Accessory Ideas
- Use bobby pins in a matching metal finish to your jewelry for a cohesive look that doesn’t feel costume-y
- A textured pixie pairs perfectly with a statement earring since your ears and neck have full visibility
- Delicate pins should be distributed asymmetrically across the crown rather than in a rigid pattern—this feels more intentional and artistic
- Mist finished hair with a light-hold hairspray to keep texture in place without stiffening it
- Consider a subtle hair shine spray to add subtle luminosity without making hair look greasy
Pro tip: Have your stylist show you exactly where to place pins during your trial—not everywhere looks equally photogenic on your specific head shape.
2. Sleek Low Bun with a Modern Twist
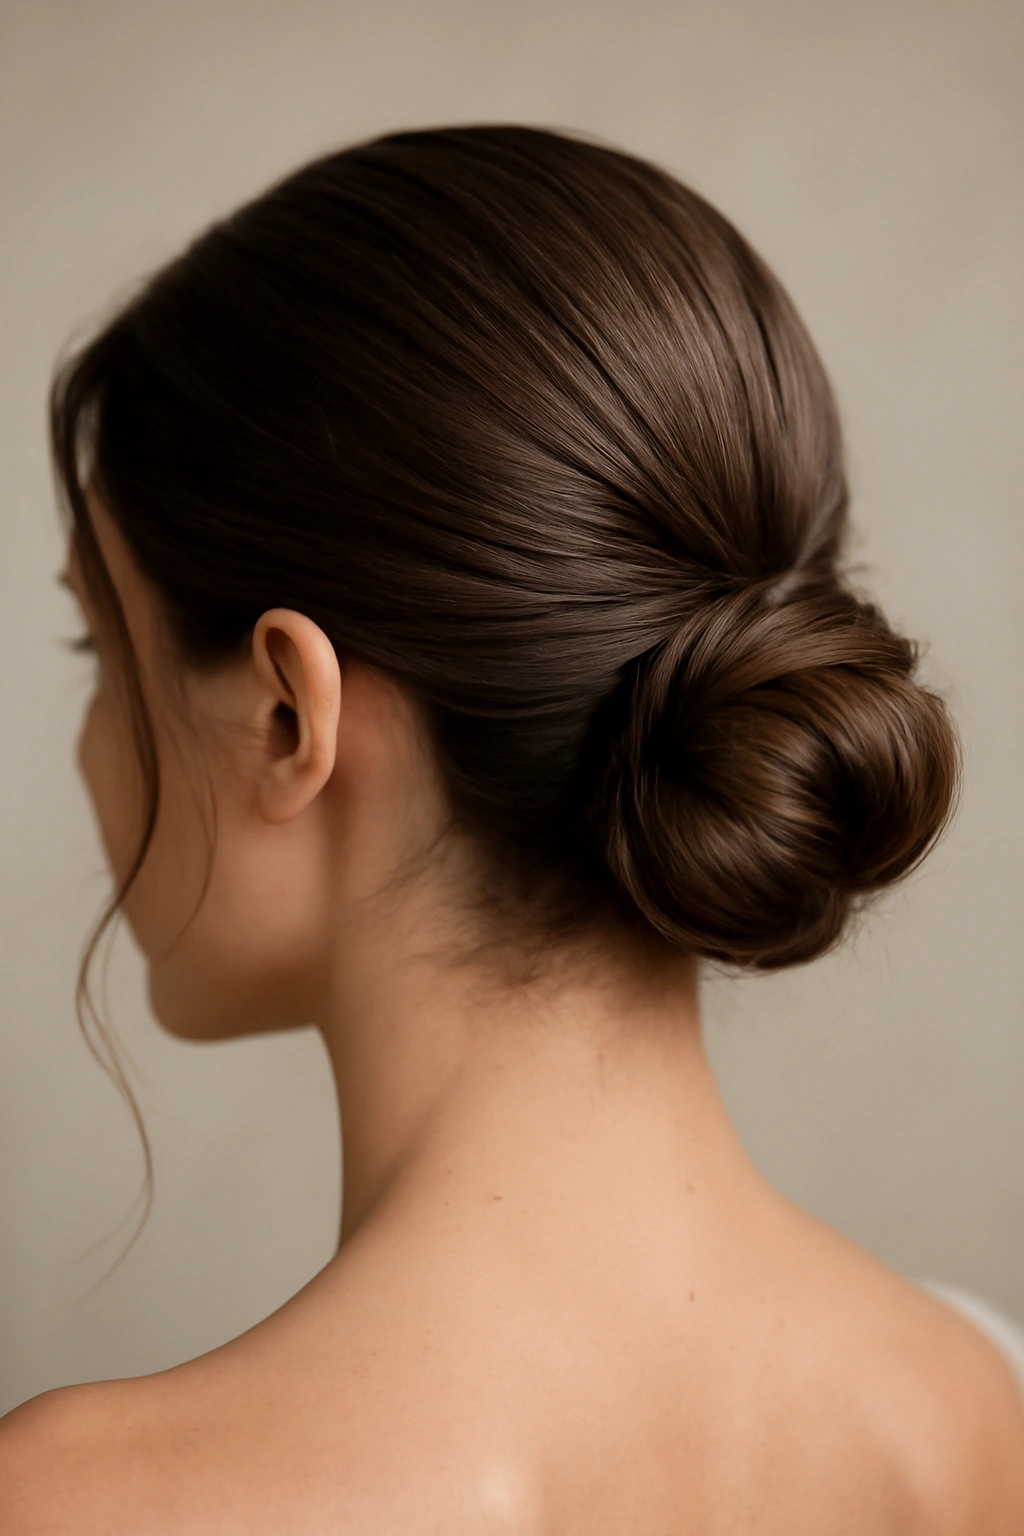
A low bun stays timeless for a reason, but transform it from basic to bridal-worthy by incorporating modern elements. Instead of a perfectly smooth, polished bun, create one with intentional texture—a slight puff at the base, a few delicate tendrils left loose around the face, and perhaps a subtle twist or knot detail visible in the finished style. The “twist” could be a thin braid woven around the base, a decorative hair fork, or an asymmetrical positioning that feels more fashion-forward than traditional.
What Makes This Version Special
A textured low bun reads as high-fashion and editorial rather than corporate or overly formal. It’s elegant without feeling stuffy, and it’s forgiving enough that even if some pieces come loose during dancing and celebration, the overall effect remains intentionally undone and romantic. This style works beautifully with dramatic makeup or minimal makeup—the focus stays on the clean, sculpted neckline and face.
How to Style It and Keep It in Place
- Use a boar-bristle brush to create a sleek base, then gently backcomb at the crown to create subtle texture and grip
- Gather hair into a low ponytail at the nape of your neck, positioned slightly off-center for modern interest
- Twist or braid the ponytail before wrapping it around itself—the texture adds dimension and prevents slipping
- Use flexible bobby pins that grip textured hair better than smooth ones, and cross them over each other for security
- Set with a medium-hold hairspray that allows movement without being rigid
Worth knowing: Practice this style several times before your wedding date—low buns take practice to position perfectly, and muscle memory helps tremendously.
3. Side-Swept Short Waves with a Hair Comb

Create soft, romantic waves throughout short hair by using a waving iron or curling technique to add gentle S-curves from root to tip. The key is making waves look natural and lived-in rather than bouncy and overdone. Once your waves are set, sweep your hair dramatically to one side and secure it with a vintage or ornate hair comb positioned where the bulk of hair shifts. This creates movement, elegance, and a distinctly bridal silhouette.
Why Side-Swept Works Beautifully in Photographs
Side-swept styles create flattering angles in photos—they elongate the face, frame features beautifully, and give the illusion of more volume and length than the actual cut provides. The asymmetry reads as intentional and fashion-forward. A comb adds a vintage-inspired detail that elevates the entire look without feeling costume-like.
Creating and Maintaining the Waves
- Start with texture spray applied to damp hair before blow-drying to enhance wave-holding capacity
- Use a 1.25-inch curling iron, curling away from the face and alternating directions for natural movement
- Once cooled, gently run fingers through curls to break them up and create waves rather than ringlets
- Secure the swept side with the comb positioned at the point where hair naturally folds over
- Use flexible bobby pins under the comb, hidden by the waves themselves, to ensure security throughout the day
Insider note: Have your stylist practice positioning the comb during your trial—a fraction of an inch difference changes the entire look’s balance and how it photographs.
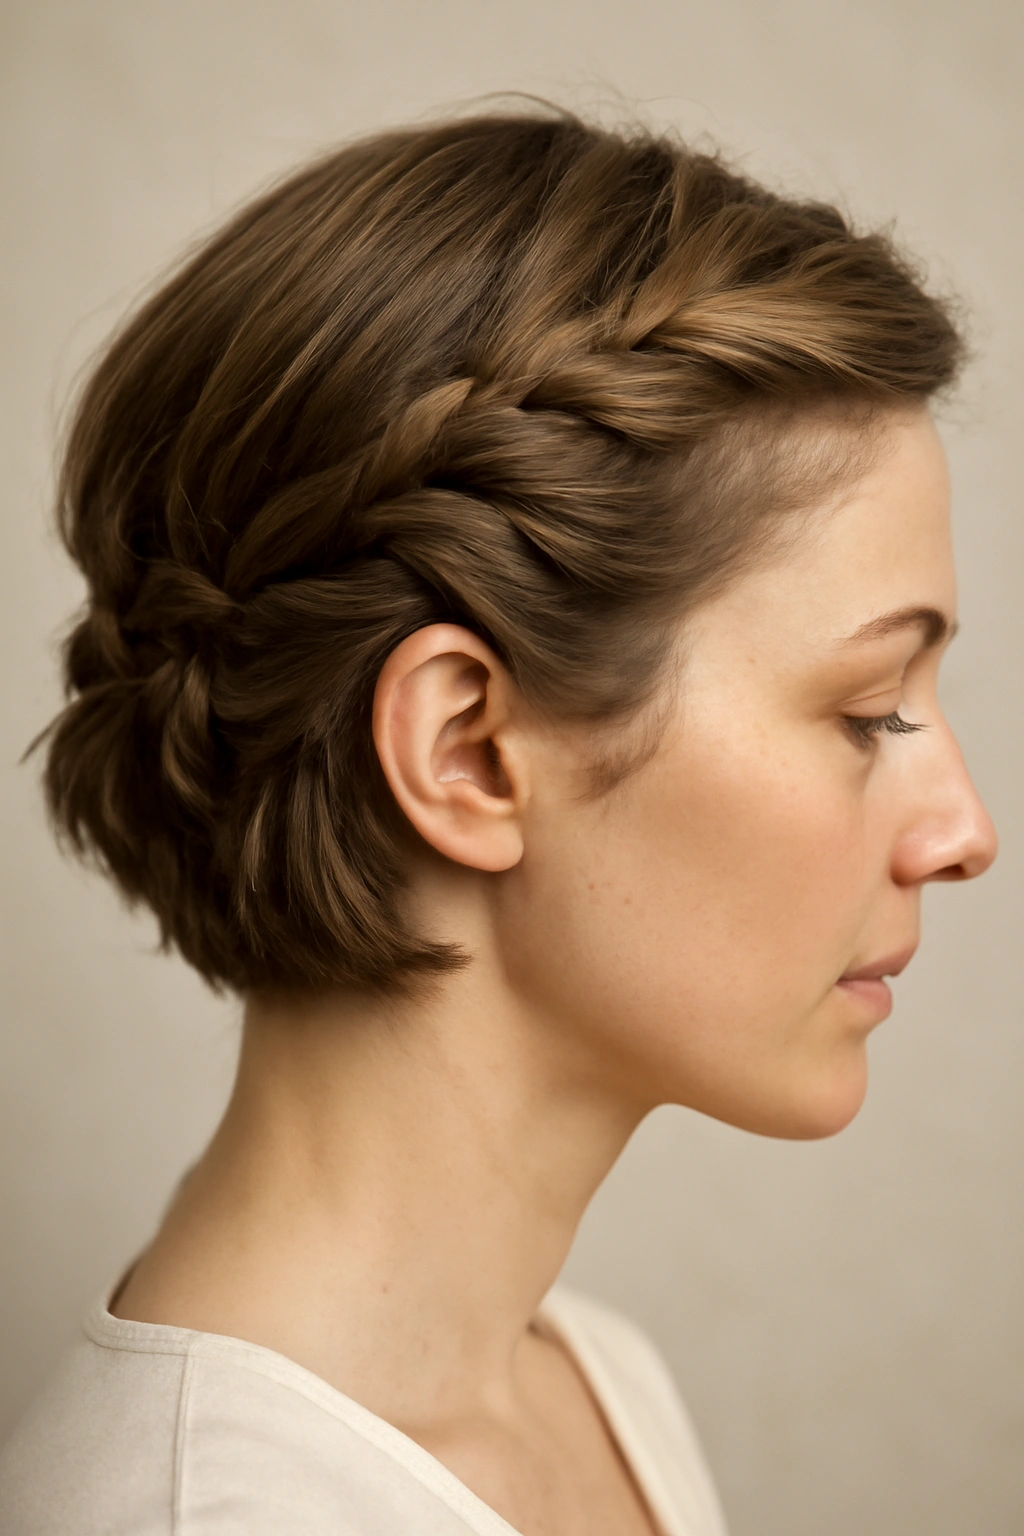
4. Tousled Crop with Subtle Braids
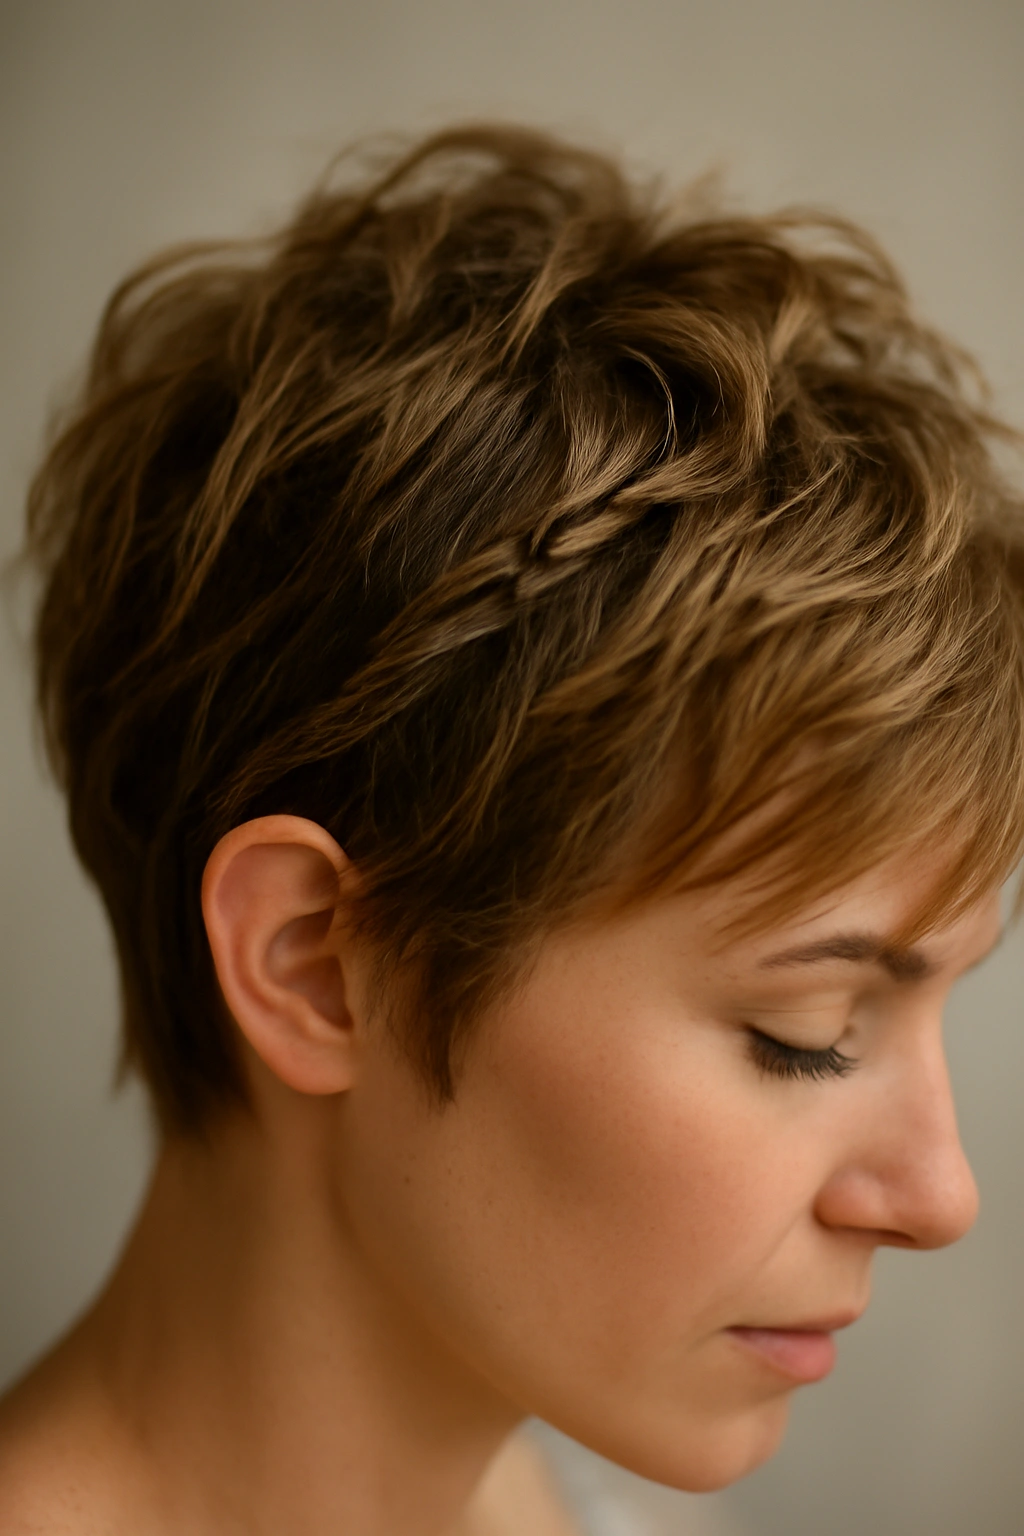
A tousled crop cut becomes undeniably bridal when you add subtle braiding elements throughout. Incorporate thin French braids, Dutch braids, or simple three-strand braids woven through the textured crop—some braids can be visible accents, while others weave invisibly through textured sections. The braids add dimension, texture, and a handcrafted quality that reads as “I really did something special for this occasion.”
The Art of Braiding Textured Short Hair
Textured, choppy crops are actually ideal for braiding because the irregular lengths add natural interest to the braid pattern. The braids don’t need to be perfectly geometric—slightly loose, slightly imperfect braids photograph better and feel more organic. Consider braiding only one side, creating a subtle crown effect, or weaving braids through the back while leaving the front face-framing pieces unbraided.
Styling Steps and Tips
- Start with damp hair, apply a texturizing spray or sea salt spray, and blow-dry for maximum grip
- Braid before styling curls or waves—braids hold better in textured hair and can anchor other elements
- Use bobby pins that match your hair color to secure braid ends invisibly
- Add soft waves or texture to the unbraided sections using a curling iron or waving technique
- Finish with a light-hold spray that allows movement and flexibility without looking stiff
Pro tip: Take a close-up photo of your trial with the braids in place—sometimes braids read differently in person than they do in photographs, and you’ll want to see exactly how they’ll look in wedding photos.
5. Half-Up Short Ponytail with Face-Framing Pieces
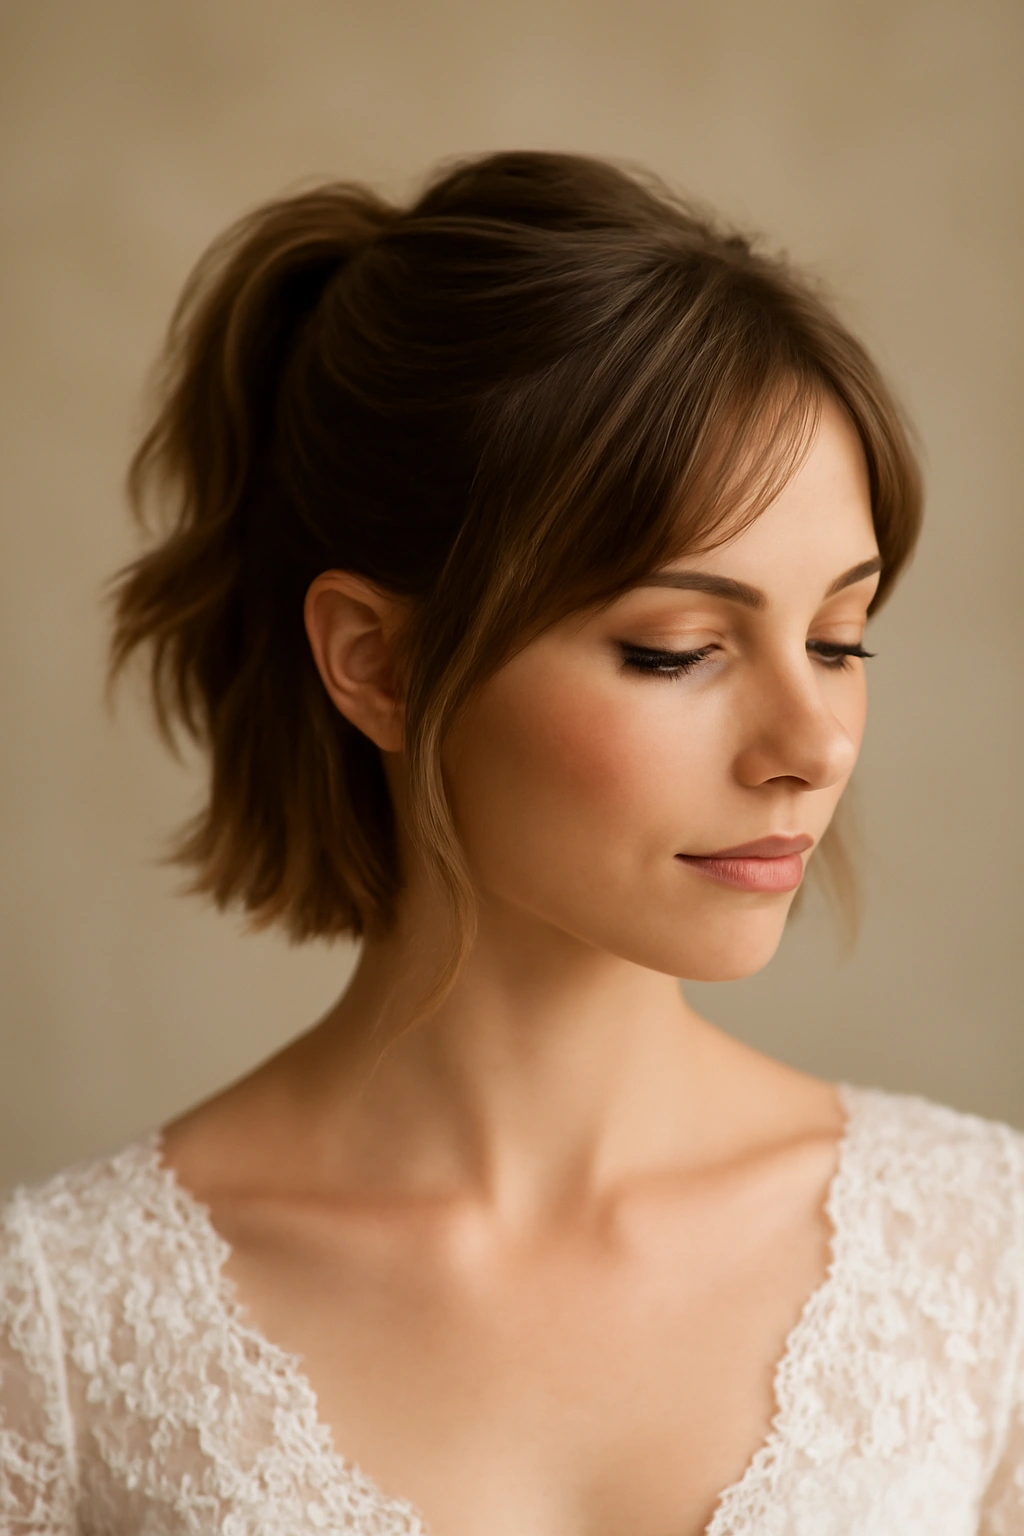
A half-up style works beautifully on short hair when you gather the top section into a small, elegant ponytail while leaving delicate pieces around the face loose and softly styled. This style bridges the gap between a fully-up style (which can feel severe on very short hair) and a completely down style (which might feel too casual for a wedding). The result feels intentionally romantic and purposeful without being over-the-top.
Why Half-Up Flatters Short Hair So Well
Short hair can sometimes feel like there aren’t many styling options, but half-up proves that false. This style adds height at the crown, frames the face beautifully, and creates visual interest through the contrast of gathered and loose sections. It’s forgiving—if a few pieces slip out during the day, they add to the soft, romantic feeling rather than looking unfinished.
How to Create and Secure It
- Create a small, delicate section at the crown—roughly the size of a half-dollar or larger, depending on your hair thickness
- Gather this section into a tiny ponytail positioned slightly higher than where your natural crown is, using a thin elastic in a matching color
- Leave at least two thin sections on either side of the face completely loose—these frame features and soften the overall effect
- Gently tease the gathered section to add subtle volume at the crown
- Curl or wave the loose face-framing pieces for softness, and lightly curl the gathered ponytail section as well
- Secure the ponytail base with bobby pins hidden underneath the elastic, and use flexible pins to anchor the loose face-framing pieces if needed
Worth knowing: The smaller and more delicate the gathered section, the more feminine and romantic it appears—don’t gather too much hair into a half-up on short lengths.
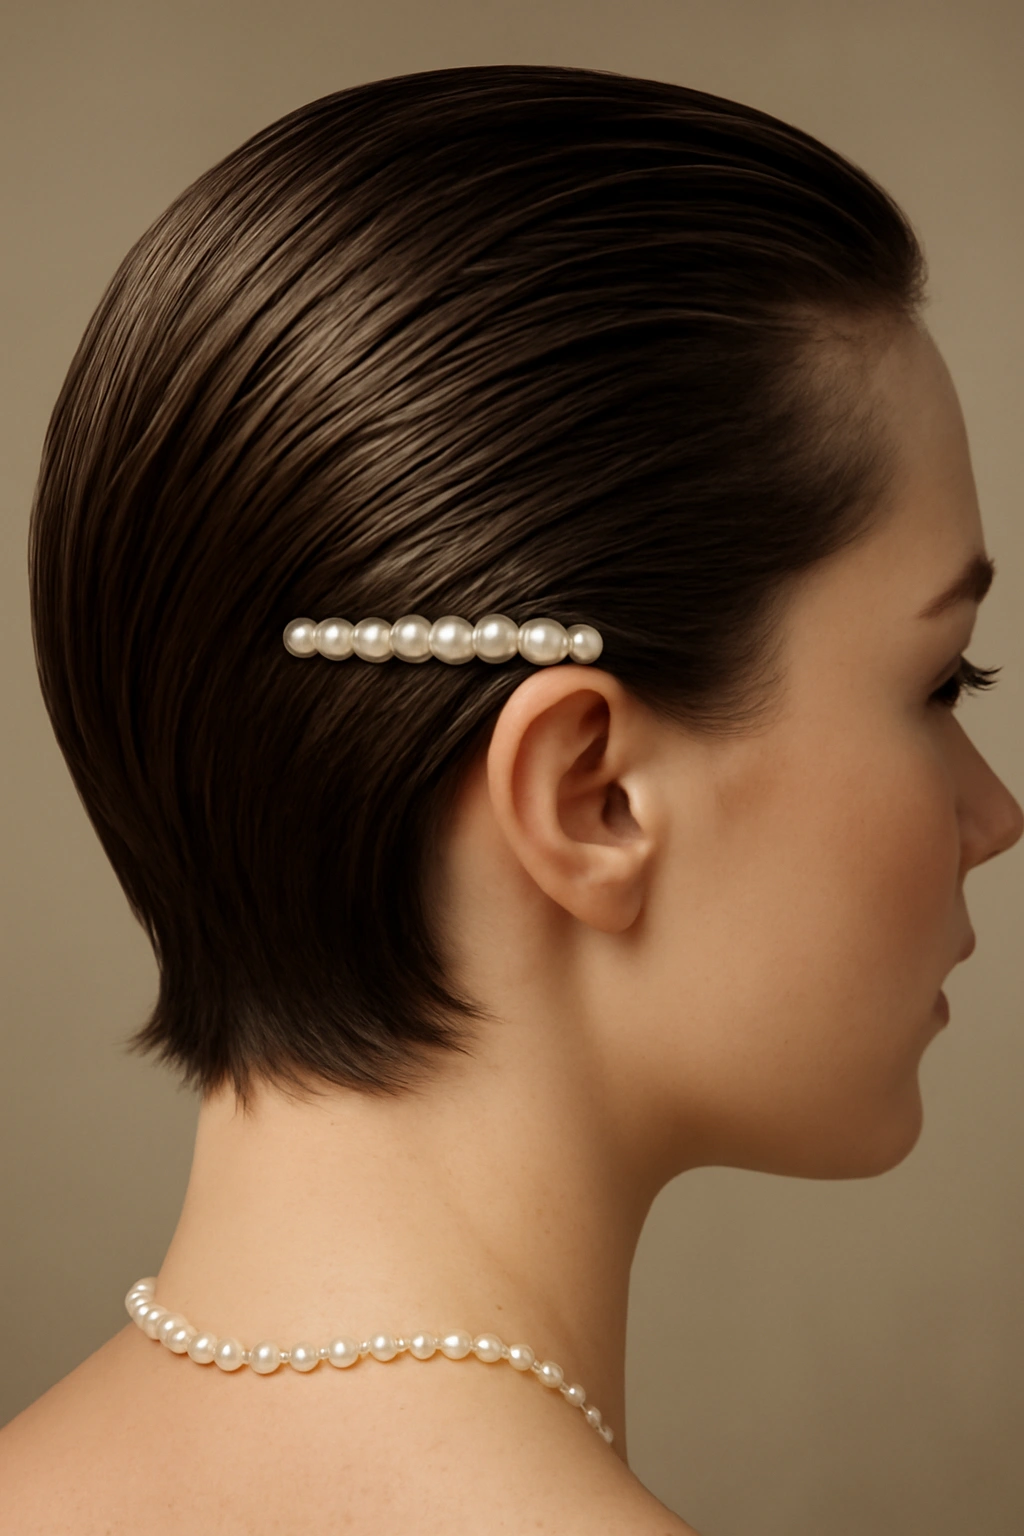
6. Slicked-Back Short Hair with Pearl Accessories
For a bold, fashion-forward wedding look, slick your short hair straight back against your head and accentuate the sleek surface with pearl clips, combs, or a pearl-studded hair chain. This style is unapologetically modern and editorial—it removes all softness and instead highlights cheekbones, your face shape, and any dramatic makeup you’re wearing. It’s perfect for minimalist weddings, courthouse ceremonies, elopements, or anyone who wants to look like they stepped off a high-fashion runway.
The Power of Slicked-Back Styling
A slicked-back look requires confidence, but it delivers a level of sophistication and modernity that soft, romantic styles simply can’t match. It’s undeniably photogenic, especially for close-up shots where the clean lines of your face are the primary focus. Pearl accessories add luxury and softness to the starkness, creating visual interest without compromising the style’s modern edge.
Achieving a Flawless Slicked-Back Look
- Start with clean, damp hair and apply a smoothing serum or anti-frizz cream—any flyaways will be visible, so preparation matters
- Use a fine-tooth comb and a strong-hold gel or pomade, working section by section from the crown backward
- Brush hair tightly against your scalp using deliberate, smooth strokes—no bumps or loose sections
- Secure at the nape of your neck with bobby pins and flexible clips that hold without creating visible ridges
- Place pearl accessories (clips, a delicate hair comb, or a chain) along the slicked-back surface where they’ll catch light
- Set with a strong-hold hairspray, and consider using a smoothing balm on flyaways for ultimate polish
Pro tip: Practice this look multiple times—achieving a truly slicked-back style without bumps or loose hair takes technique and muscle memory.
7. Soft Curls with Flower Crown
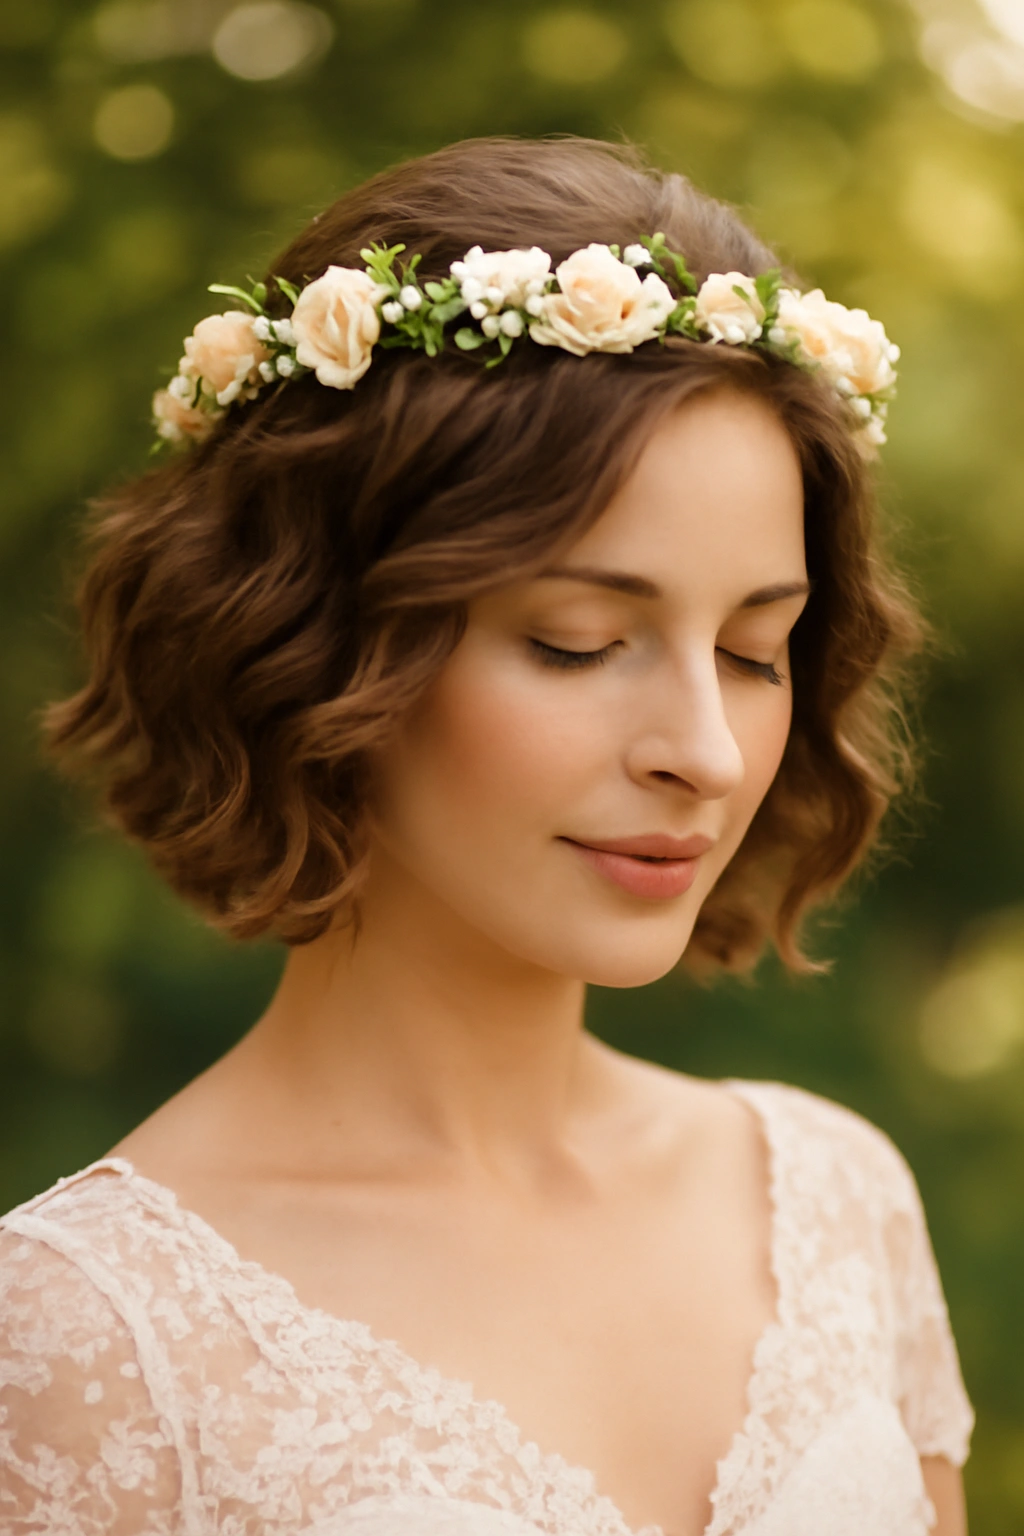
Create soft, romantic curls throughout short hair and top with a delicate flower crown for a look that feels garden-party-chic, whimsical, and utterly bridal. This style works beautifully for outdoor weddings, garden ceremonies, or anyone who wants a distinctly romantic aesthetic. The curls add volume and dimension to short hair, while the flower crown adds a whimsical focal point that reads as intentional special-occasion styling.
Making Curls Look Voluminous on Short Hair
Short hair can actually hold gorgeous curls beautifully—the shorter length means curls have more bounce and definition. The key is creating full, voluminous curls rather than tight ringlets. You want the curls to add visible dimension and presence, not just create texture. Curls that start at the roots and extend to the ends read as fuller and more romantic than curls that only wave the outer sections of short hair.
Styling Curls and Securing the Flower Crown
- Apply a texture spray to damp hair before blow-drying to enhance curl-holding capacity
- Use a 1.5-inch curling iron, curling sections away from the face and alternating directions
- Let curls cool completely before touching them—this sets the curl shape and increases longevity
- Once cooled, gently run fingers through curls to break them up and create softer waves rather than tight ringlets
- Construct or purchase a lightweight flower crown that won’t strain your roots (heavy crowns slip and cause headaches)
- Secure the crown with bobby pins hidden among the curls, ensuring even weight distribution across your head
- Mist with a flexible-hold hairspray that allows curls to move and bounce without feeling stiff
Insider note: Test how your specific flowers will look in your wedding photos—some colors photograph beautifully while others look flat or washed out depending on your lighting and skin tone.
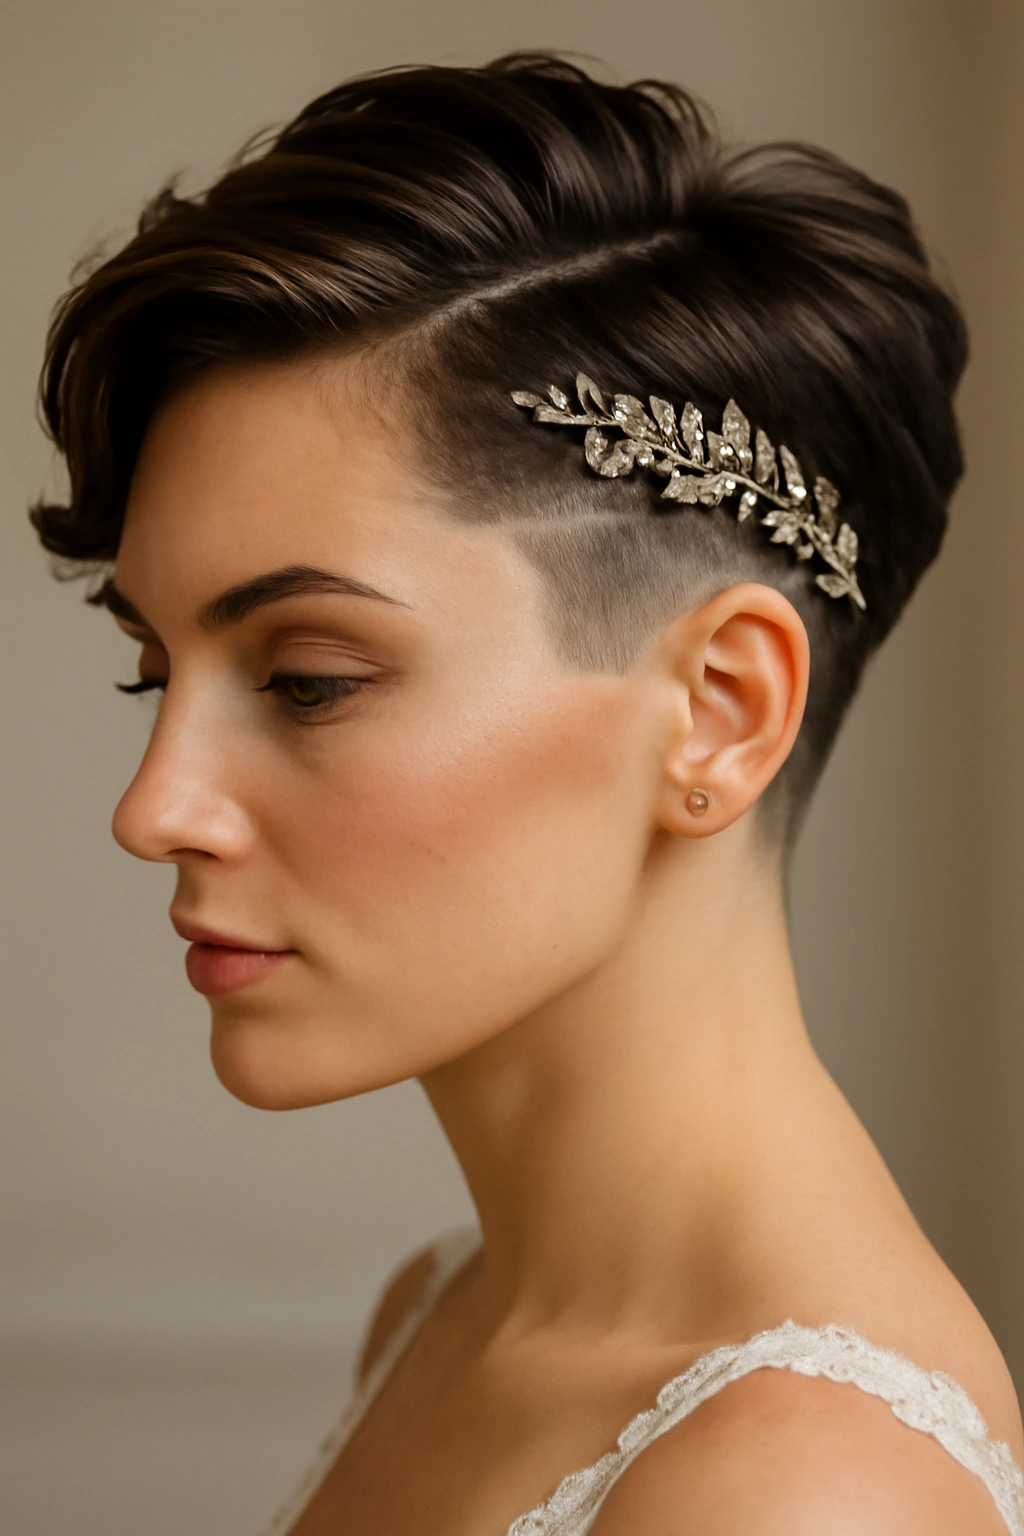
8. Sharp Undercut with Decorative Side Piece
If you have an undercut or shorter sides and longer top, use your wedding day as a chance to showcase this bold, modern cut. Style the longer top section with waves or texture, and feature the clean lines of the undercut as a design element. Add a decorative comb, geometric hair clip, or delicate chain across the shaved or shorter section to highlight the cut’s architectural beauty rather than hide it.
Why Undercuts Are Secretly Bridal
An undercut is undeniably modern and edgy, but when styled intentionally for a wedding, it becomes incredibly chic and fashion-forward. It shows confidence and individuality—qualities that shine brighter in wedding photos than cookie-cutter conformity. The contrast between the textured top and clean sides creates visual interest and architectural beauty that photographed gorgeously.
Styling Your Undercut for Maximum Impact
- Style the longer top section first—soft waves, curls, or texture all work beautifully
- Leave the undercut exposed and clean, perhaps even dusting it with a light powder for a subtle shimmer
- Position a decorative element (comb, clip, or chain) horizontally or diagonally across the undercut section
- Make sure any accessory is secured with flexible bobby pins that won’t damage or irritate the shorter sections
- Consider a subtle hair shine spray on the exposed undercut to add luminosity without looking greasy
- If you have color contrast (like a lighter undercut against darker top hair), this adds even more visual drama and dimension
Worth knowing: The day of your wedding, avoid unnecessary touching or running your hands through the undercut—oils from your hands can make it look less clean and sharp.
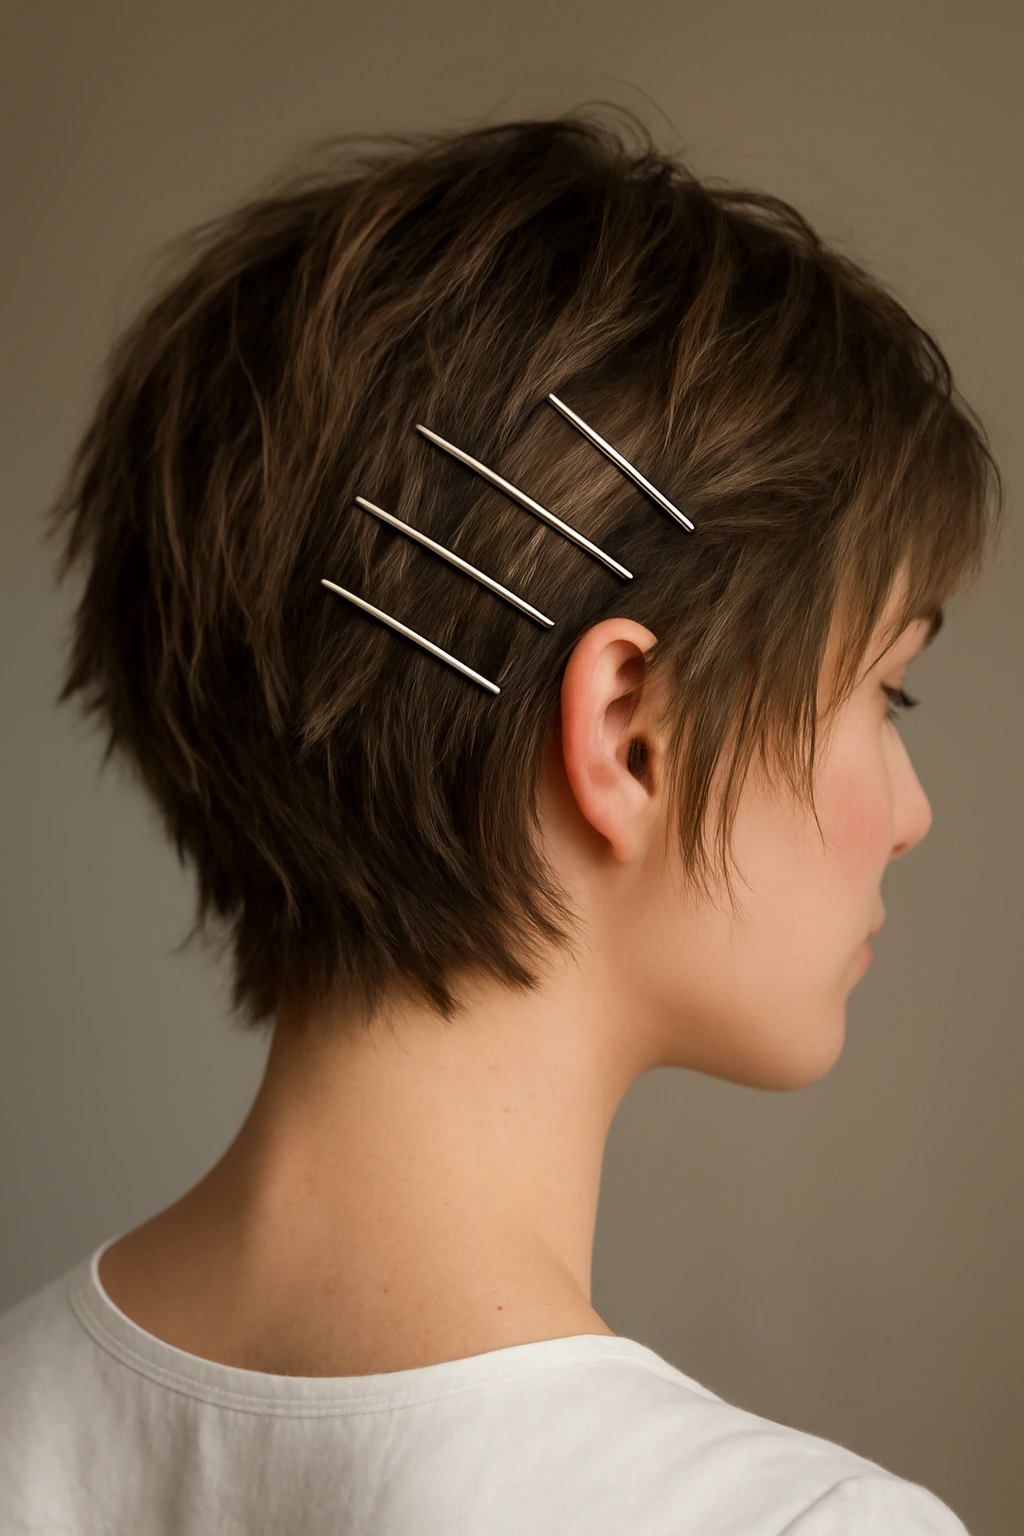
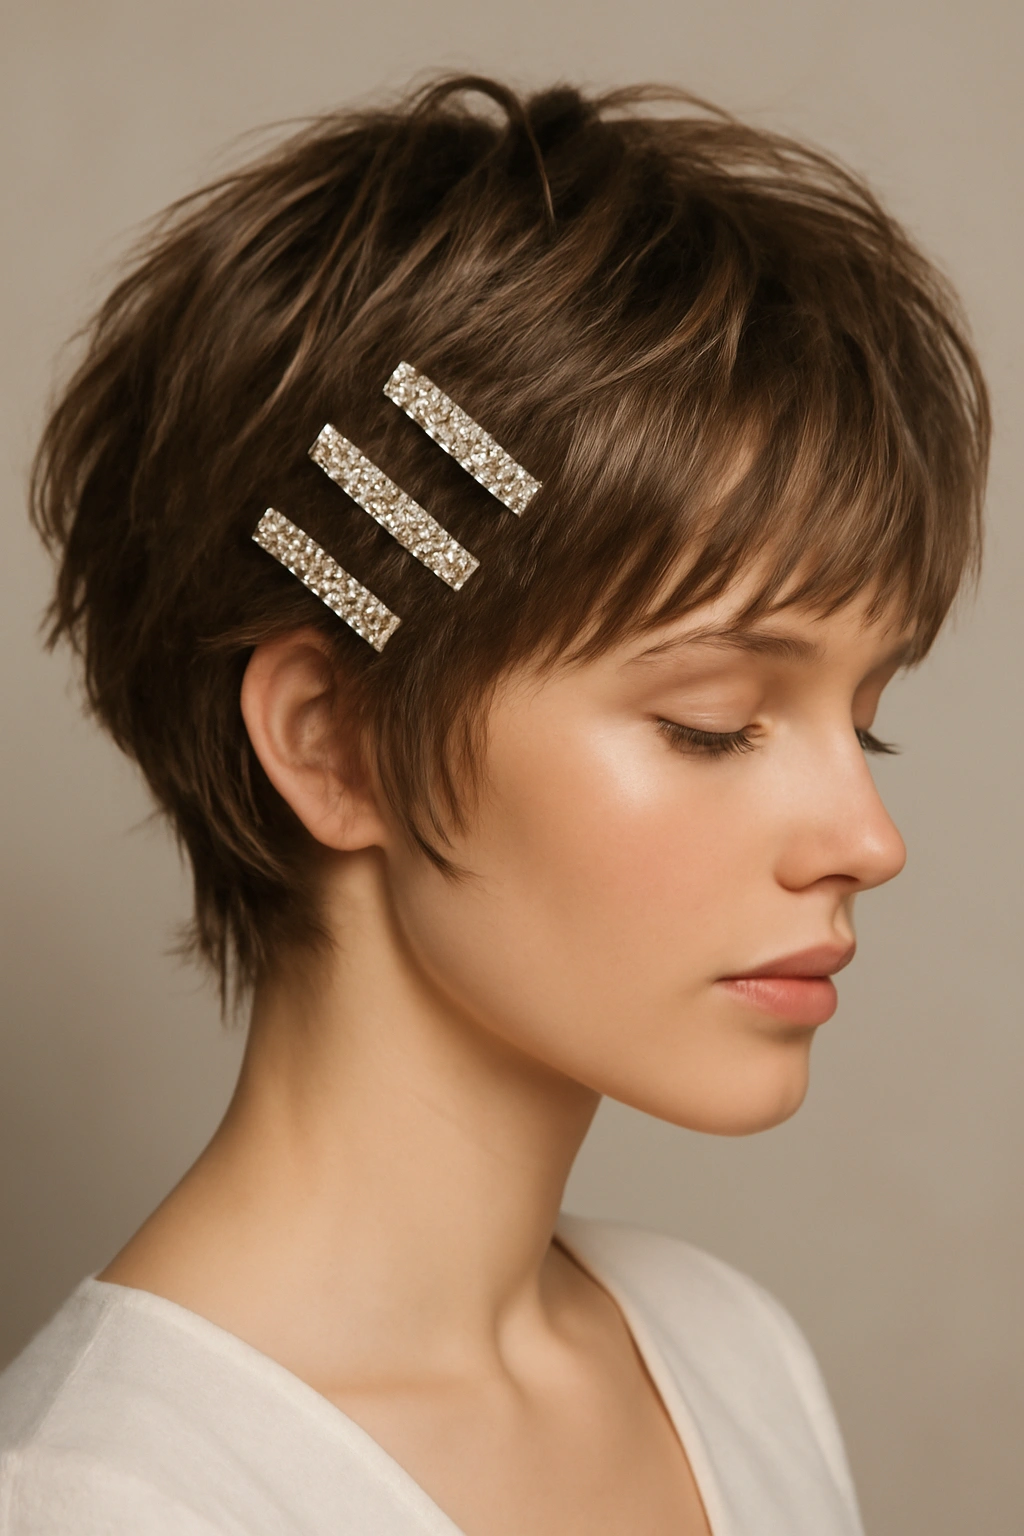
9. Choppy Layers with Metallic Bobby Pins
Short, choppy layers are inherently interesting, and metallic bobby pins become the jewelry of your hair when styled correctly. Rather than hiding pins, make them a feature. Use gold, rose gold, silver, or even rose-gold pins positioned visibly throughout the choppy layers. The pins catch light beautifully in photographs and add a subtle luxe element without requiring additional accessories or a complicated styling technique.
The Visual Impact of Intentional Pin Placement
Choppy layers already create natural texture and movement. Metallic pins positioned through that texture add depth, dimension, and a thoughtful, artistic quality. The pins read as styling choice rather than necessity—they’re intentional jewelry elements integrated into the hair itself. This approach works beautifully for modern, creative, or artistic weddings where personality matters.
How to Pin and Style Choppy Layers
- Start with textured, choppy hair—avoid over-smoothing the layers
- Apply texture spray or sea salt spray to enhance separation between layers
- Blow-dry with your fingers, creating movement and dimension rather than a sleek surface
- Position metallic pins through the layers at varying heights, angling them slightly forward or at diagonal angles
- Avoid clustering all pins in one area—distribute them throughout the crown and sides for visual balance
- Use bobby pins that match your chosen metal tone (if you’re wearing rose gold jewelry, use rose gold pins)
- Ensure each pin is securely fastened—test by gently pulling on the hair around each pin
Pro tip: Choose bobby pins that are visibly decorative or have small details that catch light—plain, basic pins don’t read as intentional jewelry the way fancier pins do.
10. Romantic Short Curls with Vintage Hairpiece
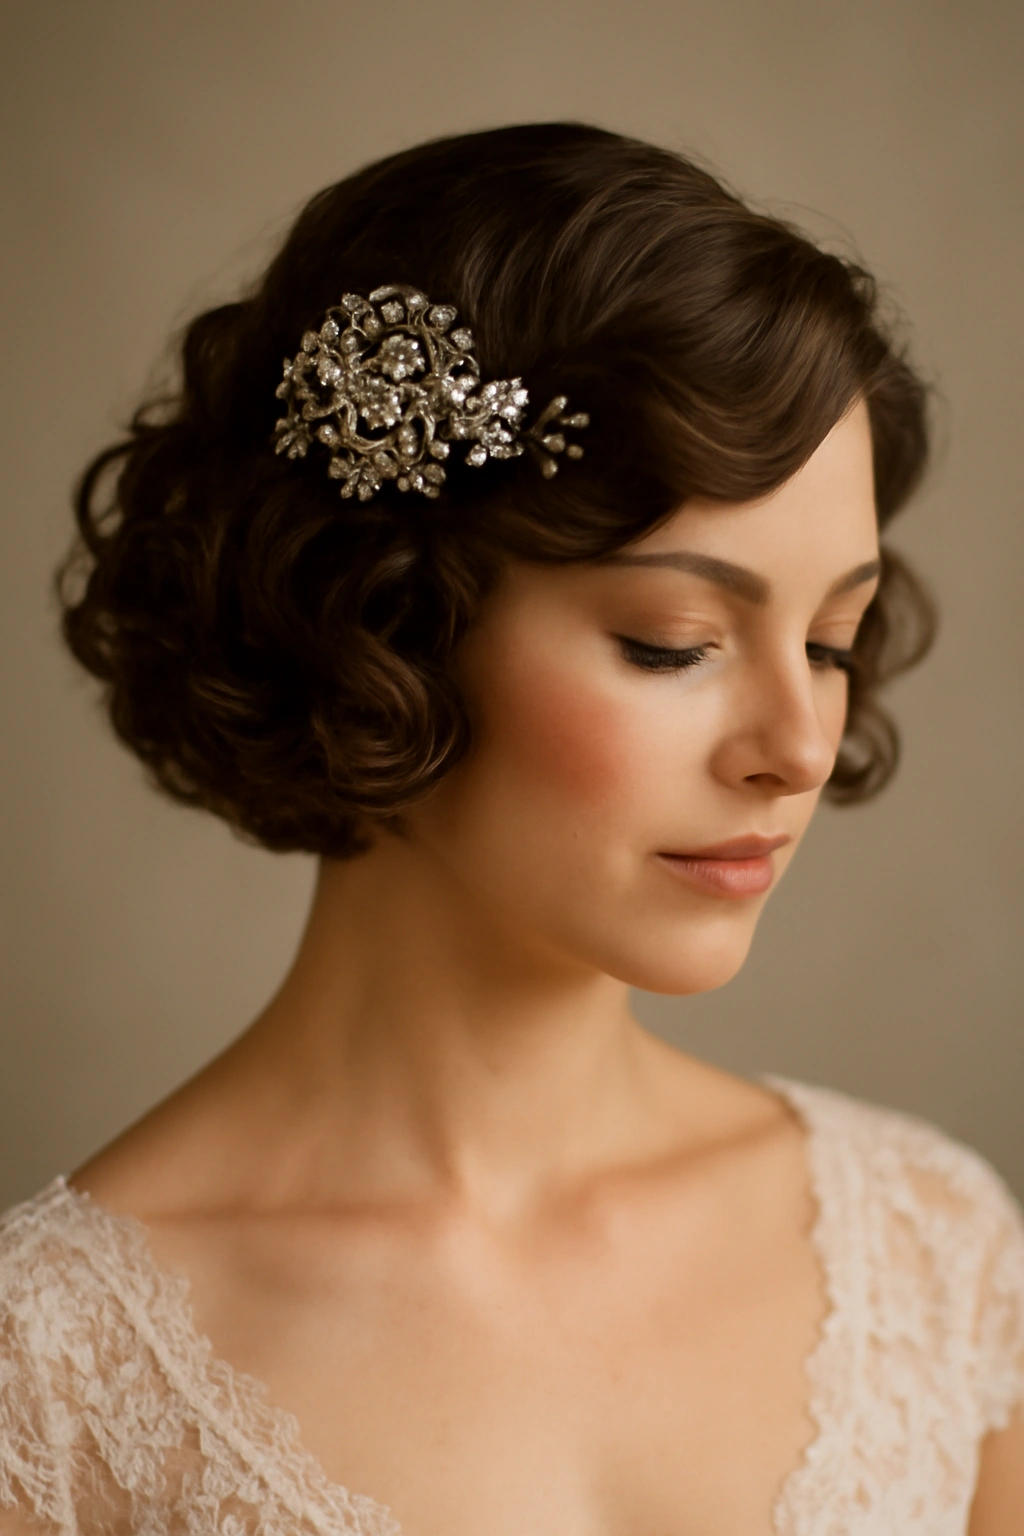
Create soft, romantic curls throughout short hair and incorporate a vintage-inspired hairpiece—perhaps a jeweled hair comb, a delicate beaded headpiece, or an ornate vintage clip. The combination of soft, feminine curls with an heirloom or vintage-feeling accessory creates elegantly romantic styling that feels both timeless and special. This works beautifully if you’re incorporating family heirlooms or achieving a classic, romantic wedding aesthetic.
Building the Romantic Aesthetic
The key to romantic styling on short hair is creating full, soft curls that add visible volume and dimension. Pair these curls with a vintage or heirloom piece that speaks to your personal history or aesthetic. The combination reads as thoughtfully bridal without feeling like you’re trying too hard or being overly trendy. Soft curls plus a vintage element equals timeless elegance.
Styling Curls and Positioning the Piece
- Create uniform, soft curls throughout using a 1.5-inch curling iron—curl all sections away from the face for a cohesive look
- Let curls cool completely, then gently break them up with fingers to create soft waves rather than tight ringlets
- Position the vintage hairpiece where it’ll be most visually flattering—typically at the crown, to one side, or securing a small section
- Ensure the piece is secure with bobby pins; vintage pieces are often delicate and require careful anchoring
- Make sure the weight is distributed evenly so the piece doesn’t create uncomfortable pressure on your head
- Balance the accessory with your other jewelry—if the hairpiece is ornate, keep earrings simpler, and vice versa
- Mist curls with flexible-hold hairspray, being careful not to spray the hairpiece itself if it has delicate beading or crystals
Insider note: Have your stylist secure the hairpiece during your trial and have you wear it for an hour or two—comfort matters when you’re wearing something all day.
11. Geometric Cut with Minimalist Jewelry
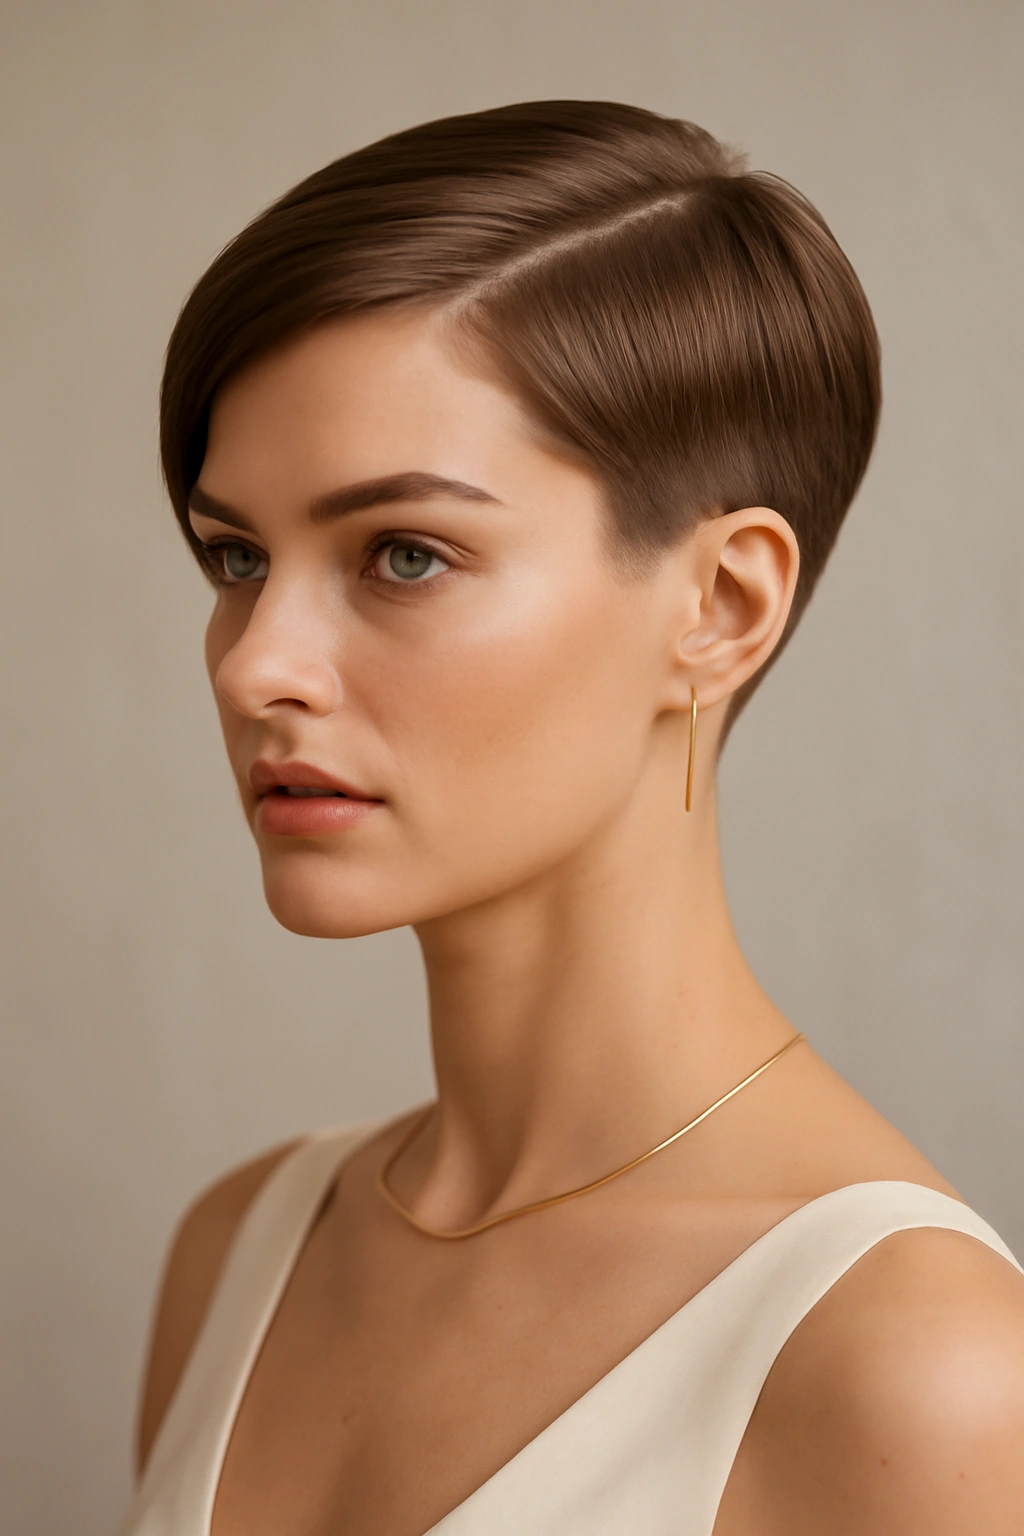
A geometric, architectural short cut becomes ultra-modern and editorial when styled with absolutely minimal hair jewelry. If you have a sharp, angular cut—perhaps with a blunt fringe or precise lines—let the cut itself be the statement. Style hair sleekly or with subtle texture, skip most hair accessories, and instead focus on clean, minimalist jewelry and makeup. This approach celebrates the cut’s design rather than covering it up with flowers or elaborate pins.
The Confidence of Letting Your Cut Speak
A well-executed geometric cut is stunning on its own—it doesn’t need adornment. This styling philosophy works beautifully for modern, minimalist, or non-traditional weddings where clean lines and architectural design feel more bridal than traditional romance. The focus shifts entirely to your face, makeup, and the gorgeous cut framing them.
Styling a Geometric Cut for Maximum Impact
- Keep styling simple and clean—either sleek with a light smoothing product, or softly textured with a texture spray
- Avoid anything that disrupts the clean lines of the cut itself
- If you use any accessories, keep them minimal—perhaps a single delicate hair clip or a thin metallic headband
- Focus on impeccable makeup and simple jewelry; let these elements carry the sophistication while your hair showcases the cut’s architecture
- Ensure every hair is perfectly placed—when styling is minimal, precision matters tremendously
- Use a strong-hold hairspray to maintain the cut’s shape without making it look rigid or stiff
- Consider a subtle hair shine spray to add luminosity to the clean lines of the cut
Pro tip: This approach works beautifully if you’ve invested in a high-quality geometric cut from a skilled stylist—a great cut deserves to be seen without distraction.
12. Tousled Pixie with Beaded Hair Chain
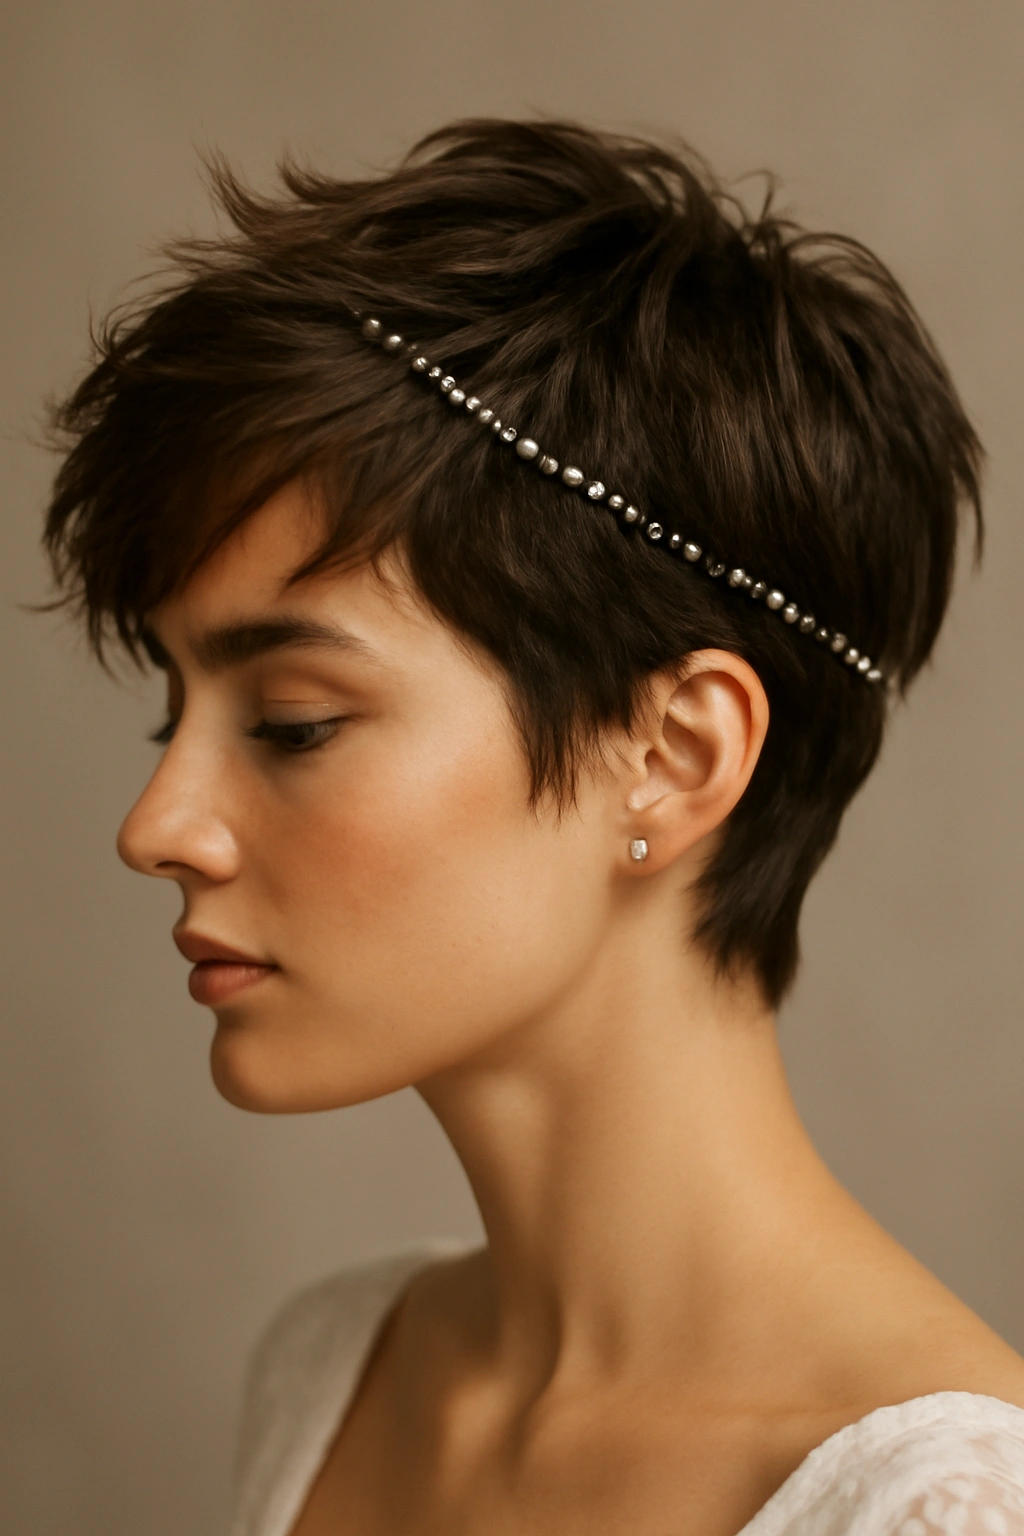
A tousled pixie with a beaded hair chain is the sweet spot between edgy and romantic. Style your pixie with deliberate texture and movement, then drape a delicate beaded chain through the texture, securing it with bobby pins. The chain adds femininity and special-occasion intention to the modern, edgy pixie cut. This hybrid approach appeals to anyone who wants to feel both cool and bridal on their wedding day.
Why Pixies Plus Chains Are Unexpectedly Bridal
A pixie cut alone reads as edgy and modern—it’s not traditionally “bridal.” But add a delicate beaded element, and suddenly it feels intentional and special-occasion. The contrast between the short, sassy cut and the delicate chain creates visual interest and a modern take on femininity. This style appeals to anyone who’s had a pixie cut and doesn’t want to compromise their personal style for wedding conventions.
Styling the Pixie and Securing the Chain
- Create texture throughout the pixie using a texturizing spray and blow-dry with your fingers
- Position the beaded chain across the crown, from one side to the other, or diagonally depending on the chain’s length and your preference
- Secure the chain with bobby pins at both ends and at least one point in the middle—even lightweight chains can slip during a long day
- Make sure bobby pins aren’t visible; tuck them under the chain or hide them within textured sections
- Choose a chain that coordinates with your jewelry—if you’re wearing silver, use a silver-toned chain; if gold, match that
- Ensure the chain’s weight is distributed evenly so it doesn’t create pressure or discomfort throughout the day
- Lightly mist with flexible-hold hairspray to maintain texture without stiffening the look
Worth knowing: Have your stylist test the chain’s security during your trial—you need confidence that it won’t shift or slip during photos, dancing, or movement.
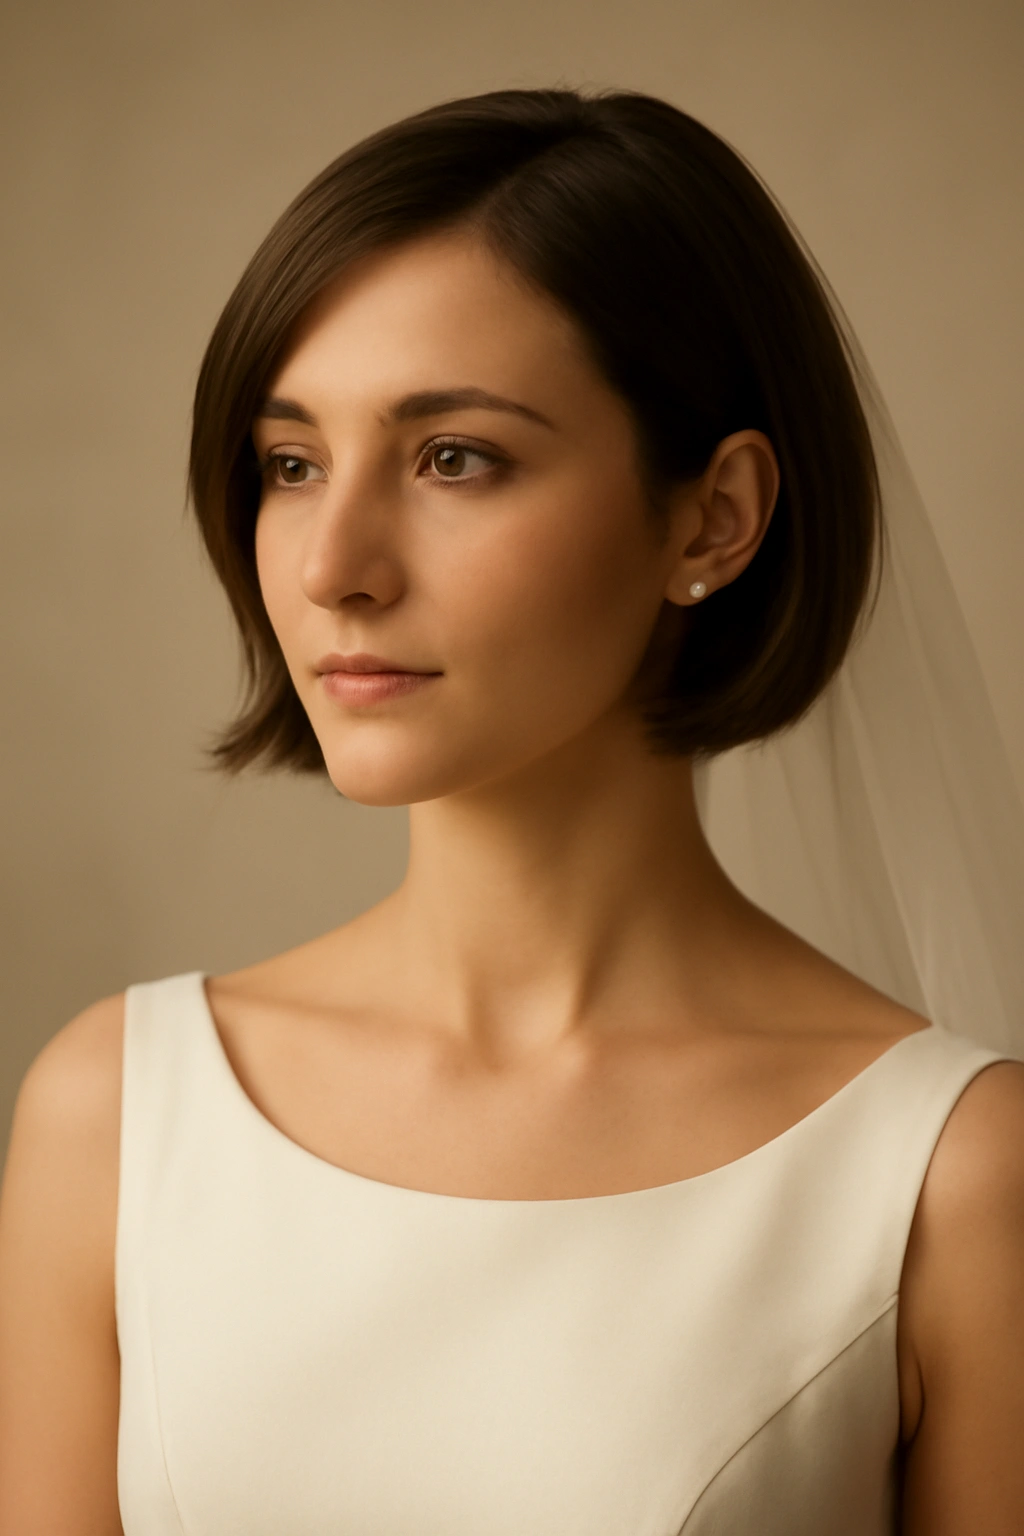
13. Classic Bob with Center Part and Headband
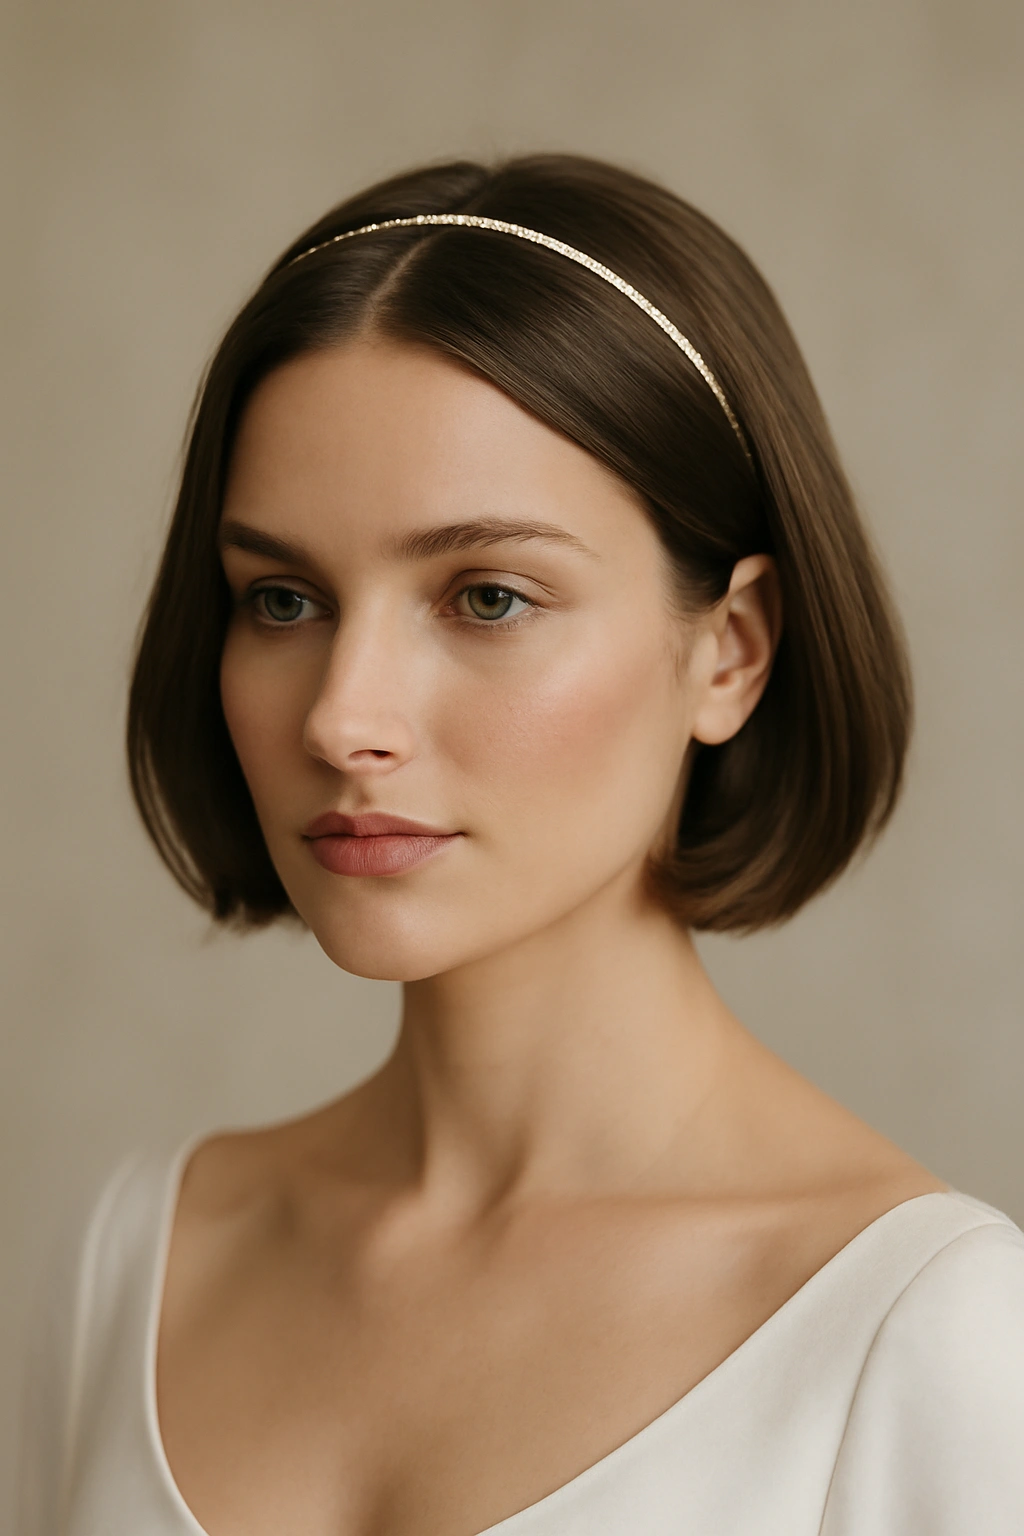
A blunt or layered short bob becomes timelessly bridal when styled with a precise center part and a delicate headband. The center part elongates the face and creates a balanced, symmetrical appearance. The headband adds a subtle touch of special-occasion intent without being costume-like. This is an elegant, classic approach that works beautifully for anyone who loves the simplicity and sophistication of a well-cut bob.
The Timelessness of a Bob Plus Headband
A short bob is inherently chic and sophisticated. Add a headband—whether it’s a simple metal band, a pearl-adorned style, or a delicate wire crown—and it becomes wedding-appropriate without losing its modern edge. This styling suits traditional and non-traditional weddings alike because it’s elegant without being overly romantic or trendy.
Achieving the Perfect Center Part and Securing the Headband
- Create a precise center part from your hairline straight down the back of your head using a fine-tooth comb
- Style both sides of the bob identically—slightly curved under if the cut is blunt, or tousled if it’s layered
- Use a smooth, lightweight product to define the shape without making it look stiff or greasy
- Position the headband where it sits most comfortably on your head—typically where the widest part of your bob is, or slightly higher on your crown
- Ensure the headband is secure with bobby pins hidden underneath; it should feel stable and comfortable
- Create a small amount of texture or wave in the bob so the headband has something to grip; sleek hair can cause bands to slip
- Use flexible-hold hairspray to maintain the style without sacrificing movement and natural-looking shine
Pro tip: During your trial, wear the headband for several hours to ensure it doesn’t cause discomfort or leave marks on your head—you’ll be wearing it all day, and comfort is paramount.
14. Textured Crop with Floral Accents

A textured crop cut is inherently modern and youthful. Enhance it with carefully placed floral accents—individual flowers or small sprigs tucked into the textured sections—for a look that’s both edgy and undeniably romantic. Unlike a full flower crown, individual flowers scattered through the texture feel more modern and artistic. This approach works beautifully for anyone who loves floral elements but wants to maintain their crop cut’s cool, contemporary vibe.
Balancing Edgy and Romantic
A crop cut reads as confident and modern. Flowers alone read as romantic and soft. Together, they create an unexpectedly beautiful contrast—edgy meets romantic, contemporary meets traditional. This balance appeals to brides who refuse to compromise their personal style for wedding conventions. The scattered florals add intention and special-occasion energy without erasing your personal aesthetic.
Placing Flowers in a Textured Crop
- Textured, choppy crops are ideal for flower placement because irregular lengths hold individual blooms naturally
- Choose small flowers or delicate sprigs that won’t weigh down short hair or create uncomfortable pressure
- Consider color—flowers should coordinate with your dress color, skin tone, and overall aesthetic
- Place flowers asymmetrically across the crown and sides rather than clustered in one area; this reads more artistic and intentional
- Secure each flower with a bobby pin or floral wire bent into a small hook; avoid glue, which damages hair
- Start with fewer flowers during your trial, then add more if the look feels unfinished; it’s easier to add than remove
- Gently mist the entire look with flexible-hold hairspray, being careful not to spray flowers if they’re delicate
Insider note: Choose flowers that will hold up throughout the day—delicate petal blooms may wilt, while hardier flowers maintain their appearance for hours.
15. Side Knot with Twisted Sections
Create a small, elegant knot to one side of your head by twisting a small section from the crown, bringing it around, and securing it into a knot shape. This styling technique adds dimension and visual interest without requiring significant length. The twisted sections around the knot add texture and movement, creating a look that’s both intricate and achievable on short hair. It’s perfect for anyone who wants their styling to look involved and thoughtful without being overly complicated.
The Visual Interest of a Side Knot
A side knot draws the eye to that area, creating an intentional focal point. It adds height and dimension in a way that’s flattering to nearly all face shapes. The twisted sections surrounding the knot add an artisanal, handcrafted quality that photographs beautifully. This style strikes a perfect balance between looking effortlessly chic and deliberately styled for a special occasion.
Creating the Side Knot and Twisted Details
- Begin with textured, slightly damp hair—texture helps sections grip and hold without slipping
- Take a 2-3 inch section from your crown and twist it tightly as you bring it to one side of your head
- Wrap the twisted section around itself to create a small, elegant knot
- Secure the knot with multiple bobby pins, ensuring complete security; small knots can work loose if not properly anchored
- Create additional thin twists on either side of the knot for visual texture and interest
- Secure these twists with bobby pins hidden within the texture; they should feel seamlessly integrated into the knot
- Leave delicate pieces around your face loose and slightly curled for softness and framing
- Set the entire look with flexible-hold hairspray that allows movement without losing structure
Pro tip: Practice creating a side knot multiple times before your wedding—the security and positioning matter tremendously for comfort and photogenic appearance.
16. Feathered Layers with Diamond Hair Clips
Feathered, choppy layers create natural movement and texture on short hair. Emphasize these layers with precisely placed diamond or crystal hair clips that catch light beautifully in photographs. The clips can be subtle or more prominent depending on your aesthetic, but their placement transforms the casual layering into intentional, special-occasion styling. This approach works beautifully for anyone who loves sparkle and shine on their wedding day.
Creating Feathered Texture and Placing Clips Strategically
Feathered layers require a skilled cut—the layers must be precisely shaped to create the feathered effect naturally. Once the layers exist, styling is about emphasizing their movement. Diamond or crystal clips placed through the layers add luxury, shimmer, and special-occasion intention. The clips catch light in photographs, adding visual interest and sparkle without overwhelming short hair.
Styling Feathered Layers and Securing Clips
- Work with a stylist experienced in creating feathered layers; this cut requires precision
- Apply texture spray to damp hair before blow-drying to enhance the feathered effect and provide grip for clips
- Blow-dry using your fingers or a diffuser, emphasizing the direction of the layers for maximum feathering
- Once dry, gently shape the layers with your fingers to enhance their natural movement
- Position diamond clips through the feathered sections at varying heights and angles; avoid clustering them in one area
- Ensure each clip is securely fastened with the clip’s built-in grip or additional bobby pins hidden underneath
- Choose clips that coordinate with your jewelry—if you’re wearing white diamonds, use matching clips; if colored stones, match those
- Lightly mist with flexible-hold hairspray to maintain the feathered effect without stiffening the layers
Worth knowing: Diamond and crystal clips can be expensive; consider renting them for the day if you don’t plan to wear them regularly after your wedding.
17. Bleached Undercut with Bold Color
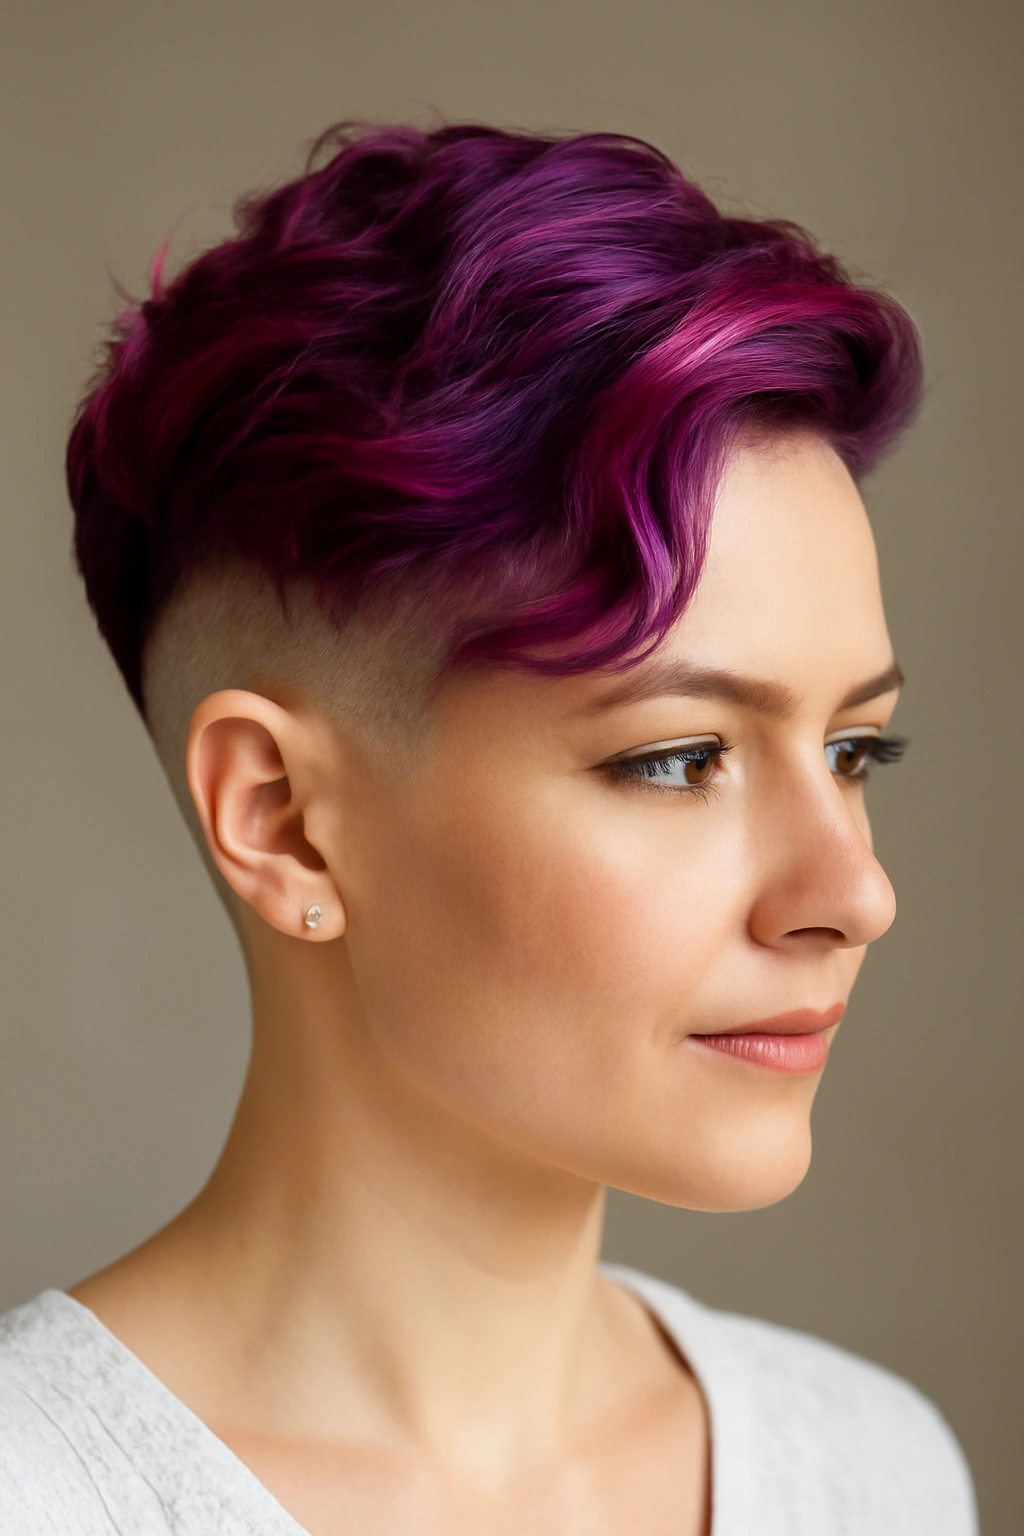
If you have an undercut and natural hair color, consider semi-permanent color in a bold shade on top—think jewel tones, pastels, or metallics—for an absolutely modern, artistic wedding look. Style the longer top with waves or texture in your bold color, letting the bleached or lighter undercut peek through underneath. This approach is undeniably non-traditional, but it celebrates individuality and confidence in a way that reads as utterly bridal on the right person and at the right wedding.
When Bold Color Works as a Wedding Choice
Bold color isn’t traditional, but it’s undeniably striking and photogenic. If you’ve been considering colored hair or already have it, your wedding day is a perfect occasion to lean fully into that aesthetic. This approach works beautifully for elopements, non-traditional ceremonies, artistic weddings, or any celebration where personal expression takes priority over convention. The result is simultaneously edgy and intentionally beautiful.
Styling and Coloring Considerations
- If you don’t already have an undercut, consider temporary tattoo-style designs instead; don’t shave your hair for a temporary look
- Choose semi-permanent color over permanent for flexibility; you can refresh or change it if needed
- If bleaching your hair, work with a skilled colorist who understands bridal timing—you need hair to be healthy and strong enough for styling
- Style the colored top section with waves, curls, or texture that complements your dress and overall aesthetic
- Keep makeup and jewelry relatively minimal so the bold color can be the statement element
- Ensure the color will photograph well in your specific lighting and against your dress color; take test photos during your trial
- Apply a color-protecting hairspray to maintain vibrancy throughout the day
- Consider bringing touch-up color or temporary color spray to your wedding in case any parts fade or lighten
Pro tip: Have a candid conversation with your stylist about the longevity of your chosen color and what touch-ups might be necessary during the wedding day.
18. Soft Waves with Delicate Netting

Create soft, voluminous waves throughout short hair and incorporate delicate bridal netting or tulle as a hair accessory. The netting can be positioned as a subtle crown element, woven through the waves, or positioned to one side. This style is romantic, vintage-inspired, and undeniably bridal without feeling costume-like. The netting adds a fairytale quality while the soft waves provide modern softness and movement. This is a beautiful choice for anyone wanting a classic, romantic wedding aesthetic on short hair.
The Vintage Romance of Bridal Netting
Bridal netting instantly reads as wedding-appropriate, adding intention and formality even to short hair. Paired with soft waves, netting creates a romantic, ethereal quality. Unlike a veil attached to a comb, netting worn as a hair accessory feels more contemporary and less formal, making it suitable for various wedding styles and aesthetics. The delicate mesh catches light beautifully in photographs, adding visual interest and dimension.
Creating Waves and Incorporating Netting
- Create soft, voluminous waves throughout using a 1.5-inch curling iron—curl all sections away from the face
- Let curls cool completely, then gently break them up with fingers to create soft waves rather than tight ringlets
- Lightly backcomb at the crown to add subtle height and texture that helps accessories sit well
- Purchase delicate bridal netting from a fabric or bridal store, or create a simple crown using netting and wire
- Position the netting where it sits most comfortably—as a crown element, woven through waves, or secured to one side
- Anchor with bobby pins hidden within the waves; ensure even weight distribution so it doesn’t create uncomfortable pressure
- Balance the netting with minimal other jewelry; let it be the statement piece
- Mist the completed look with flexible-hold hairspray, being careful not to spray the delicate netting itself if it requires preservation
Insider note: Practice wearing the netting for extended periods during your trial—delicate accessories can sometimes create pressure points or discomfort you won’t notice for the first few minutes.
Final Thoughts
Short hair isn’t a limitation for wedding day styling—it’s an opportunity to show confidence, creativity, and personal style in ways longer hair sometimes can’t. The eighteen styles above prove that short hair can be romantic, elegant, modern, artistic, or bold, depending on what you envision for yourself on your special day.
The most important element of any bridal hairstyle is that it makes you feel beautiful and comfortable. Spend time with your stylist during consultations and trials, bring inspiration photos that show exactly what appeals to you, and be honest about your hair’s natural texture, density, and how it typically behaves. A knowledgeable stylist can adapt any of these approaches to work beautifully with your specific hair type and face shape.
Your wedding day celebrates you—not anyone else’s expectations or traditional rules. If short hair feels right for who you are, style it with intention and confidence, and you’ll look absolutely stunning in every photograph.