Waves have a magical way of transforming a bride’s entire look — they’re romantic without feeling overdone, elegant without requiring a rigid, sculpted appearance, and they work beautifully whether your hair is short, medium, or long. The right wavy wedding hairstyle doesn’t just sit on your head; it becomes part of the story you’re telling on your wedding day, adding dimension, movement, and a sense of effortless beauty that photographs gorgeously in natural light and looks even better in candlelight.
The challenge isn’t finding wavy hairstyles for weddings — it’s finding ones that genuinely complement your hair length, your dress neckline, your overall aesthetic, and the venue where you’re getting married. A style that photographs beautifully in a garden ceremony might feel too casual in a formal ballroom, just as a hairstyle that works perfectly for long, thick hair might overwhelm someone with fine, shoulder-length hair. This is where the real artistry comes in: understanding how wave patterns, placement, and styling techniques adapt across different lengths and face shapes.
What makes these twelve styles genuinely different — and why each one deserves a spot in your inspiration collection — comes down to how they treat the foundation of the waves themselves. Some styles amplify waves with strategic layering and texture, others tame them into a more controlled, polished direction, and still others use waves as the canvas for braids, twists, pins, or ornamental details that elevate them from simple to statement-making. Whether you’re working with naturally wavy hair that needs shaping, straight hair that requires tools and products to create and hold waves, or thick, textured hair that waves beautifully on its own, you’ll find tested styles here that understand the technical reality of creating waves that last through a full wedding day.
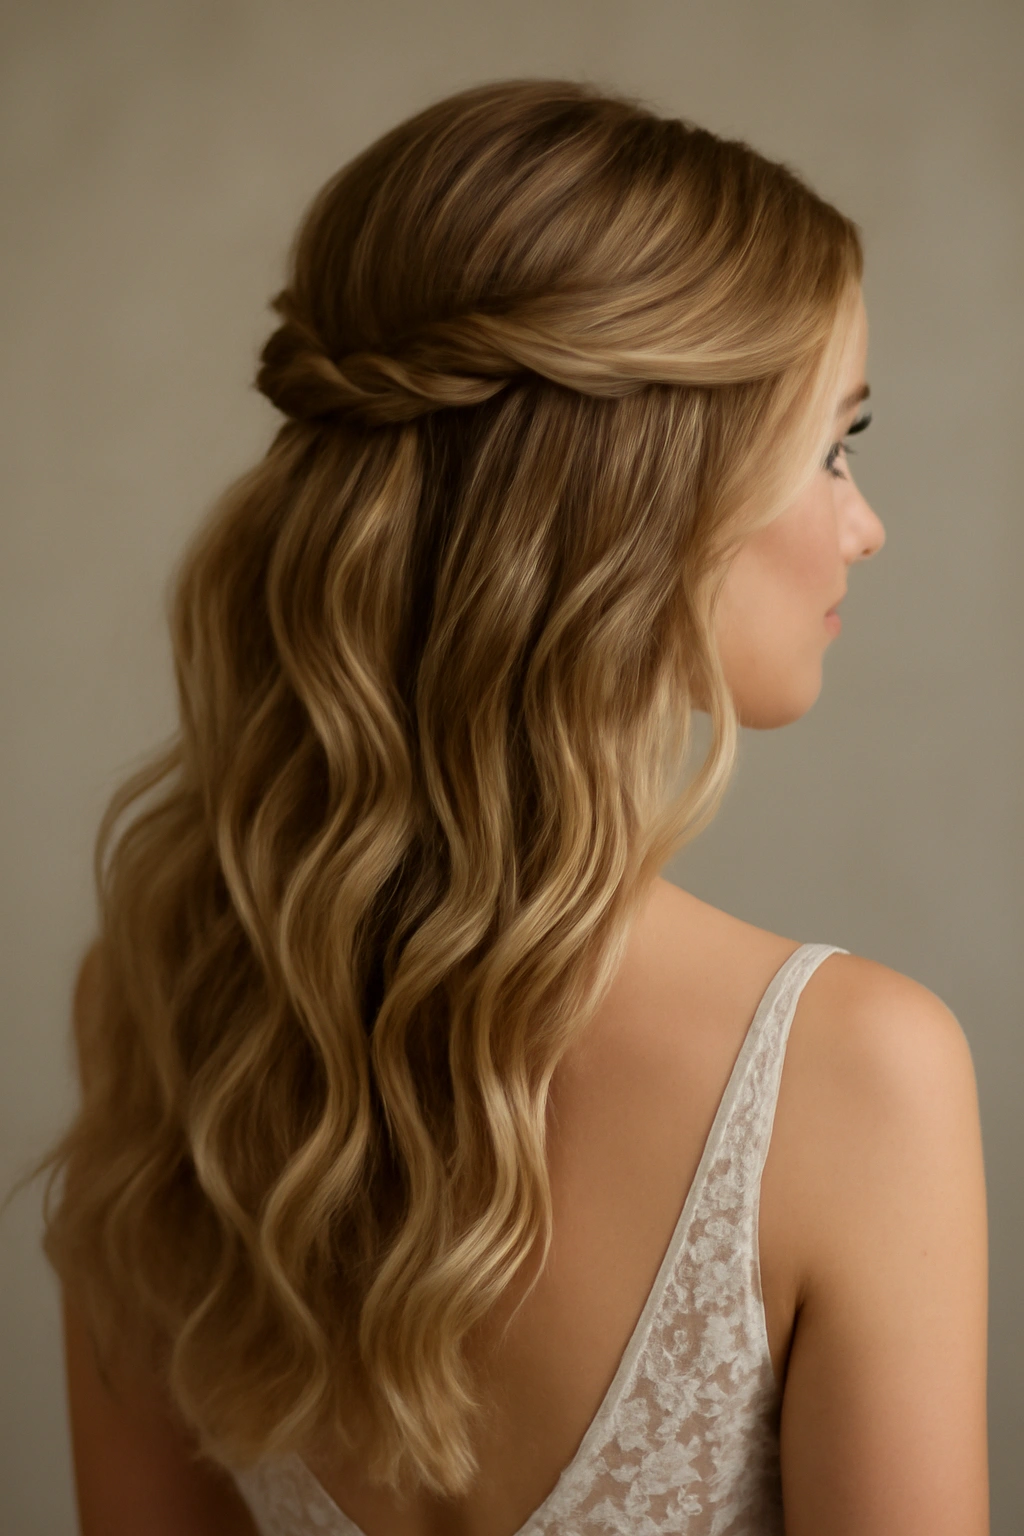
1. Soft Waves with Delicate Half-Up Style
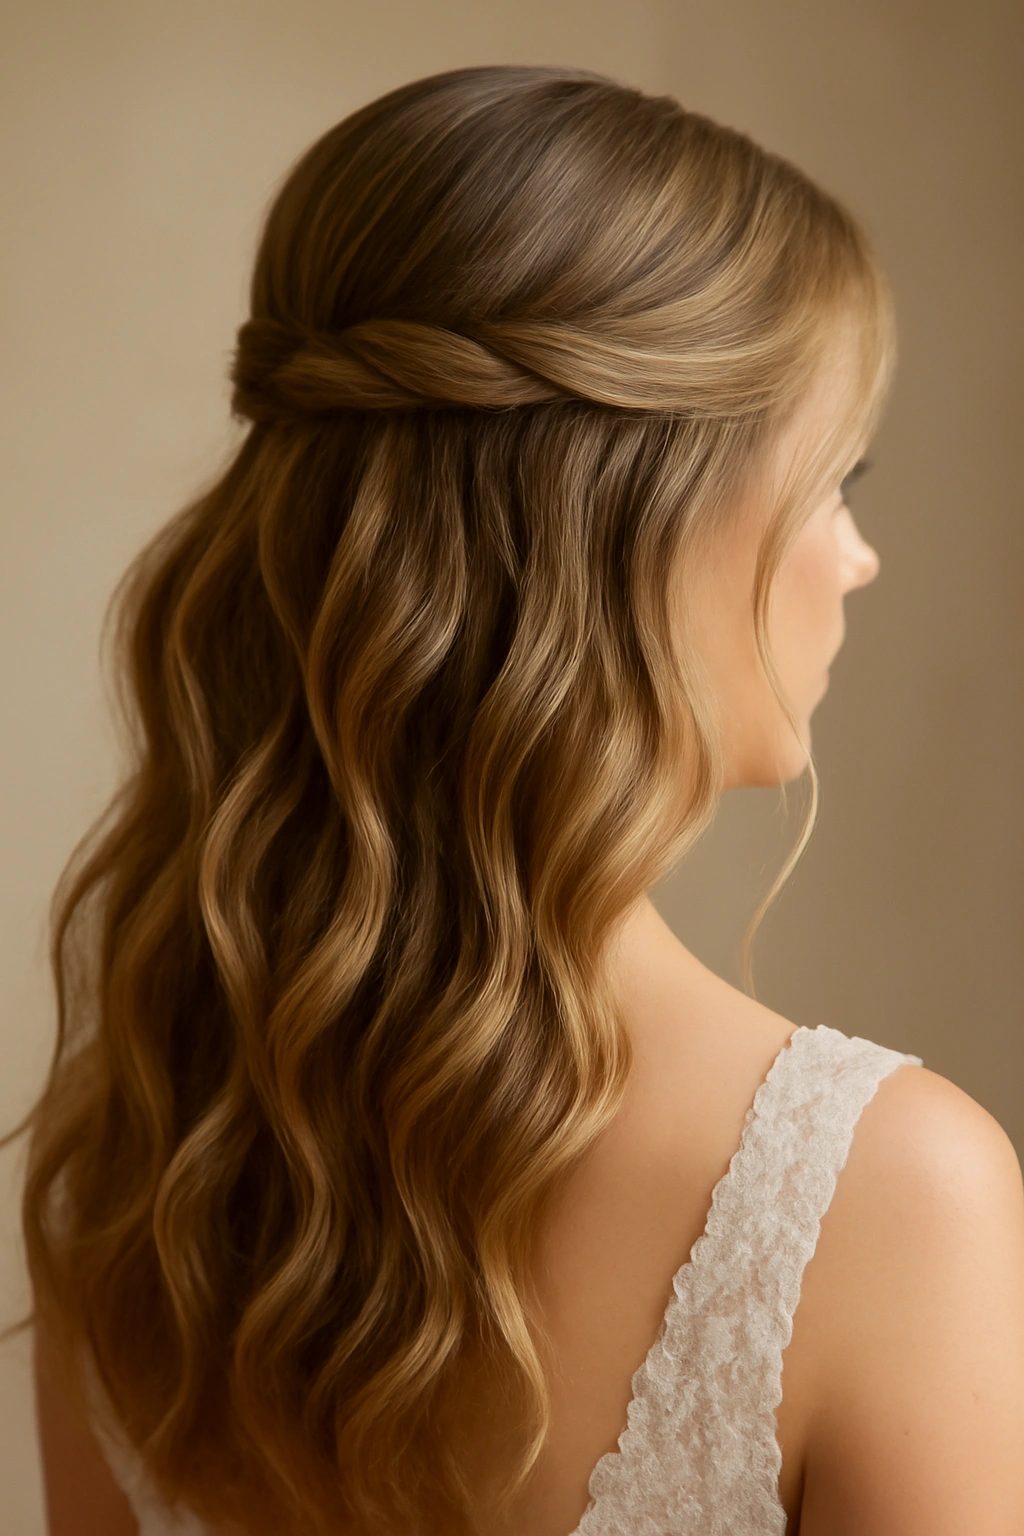
This is the hairstyle that feels like it could have taken you fifteen minutes but actually required strategic planning and precision. The beauty lies in the apparent effortlessness — waves that look natural and undone, paired with a half-up section that’s secure enough to stay in place for eight hours of dancing and celebration.
Start with waves that have genuine movement rather than tight, uniform curls. These waves should feel loose and pillowy, with the kind of dimension that comes from varying wave size throughout — some waves slightly larger, some tighter, creating an organic, lived-in texture. The upper half pulls back gently, secured with either a delicate bobby pin cluster (hidden underneath the back wave), a thin ribbon, or a jeweled clip that catches light without being obvious about doing so.
Why This Works for Weddings
The half-up silhouette keeps hair off your face and neck without committing to a full updo, which means you keep that romantic wave movement visible while appearing intentional and bride-ready. This style works beautifully for ceremonies in warm weather because it moves some hair away from your shoulders and neck, and it photograph exceptionally well from every angle — the pulled-back section creates visual interest in the back, while the wave movement frames your face in the front.
How to Create and Maintain This Look
- Create waves using a 1.25-inch curling iron or medium barrel wand, curling away from your face
- Let waves cool completely before running your fingers through them to break the curl slightly
- Use a texture spray or dry shampoo to add grip before pinning the half-up section
- Secure the pulled-back portion with bobby pins that match your hair color, tucking them underneath the top layer so they disappear
- Finish with a flexible hold hairspray that won’t create a stiff, helmet-like feeling
Pro tip: The key to this looking naturally undone rather than obviously styled is to resist the urge to make the half-up section perfectly smooth. Let a few waves escape around the face and blend the pulled-back section into the surrounding waves so there’s no harsh line between the two textures.
2. Loose Hollywood Waves with Low Chignon
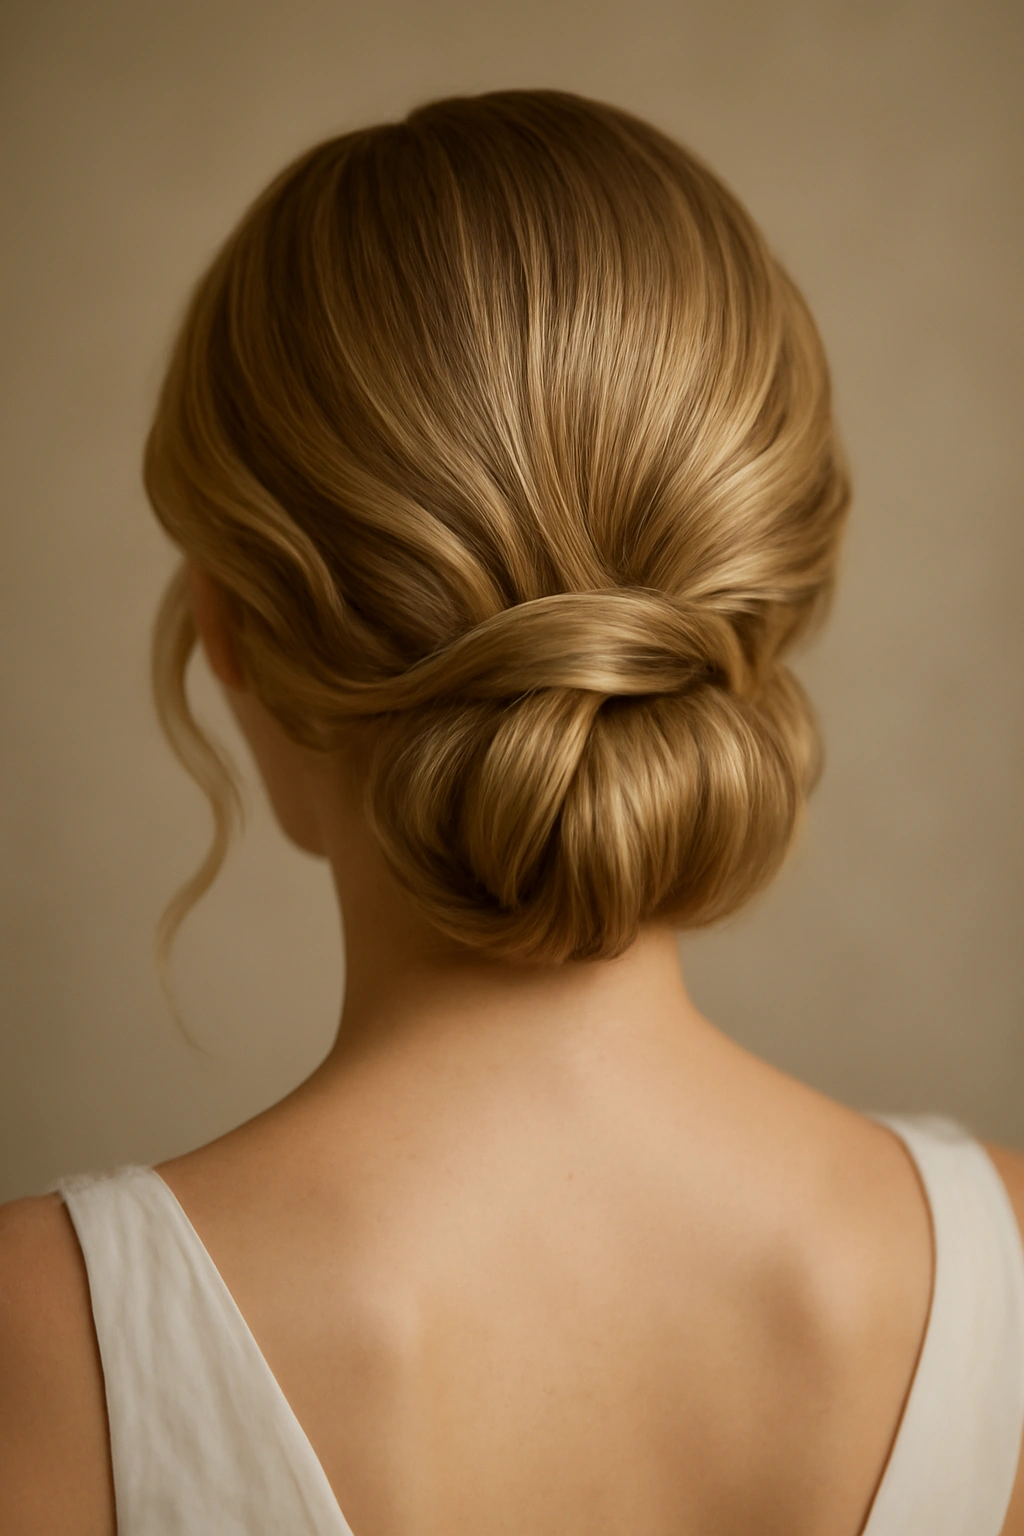
When people think of classic bridal elegance, this is often what comes to mind — the kind of waves that defined Old Hollywood glamour and have remained timelessly beautiful because they suit nearly every face shape and hair type. Loose Hollywood waves are larger, more sculptural waves that create a sophisticated, polished impression while maintaining enough softness to feel romantic rather than severe.
The addition of a low chignon transforms these waves from simply beautiful into genuinely structured. Rather than leaving waves loose and open, you gather them into a low, loose knot or twisted arrangement at the nape of the neck. The beauty of this approach is that it keeps your hair completely off your shoulders and neck — crucial if your wedding dress features an open back, delicate details, or if you’re getting married in warm weather.
The Technique Behind the Glamour
Creating true Hollywood waves requires patience and often some product support. Use a 1.5-inch curling iron or large barrel wand, taking thick sections and curling away from your face. The trick is to hold each curl in your hand for a few seconds as it cools, which helps the wave set rather than relaxing immediately. Brush through the waves gently with a soft paddle brush or wide-tooth comb to blend them into a cohesive wave pattern.
Securing the Low Chignon
- Gather the wavy hair at the nape and twist it gently, loosening the twist slightly to create a relaxed, undone knot
- Secure with bobby pins tucked underneath so they’re invisible from the front and sides
- Leave face-framing waves loose rather than pulling everything back completely
- Consider a delicate hair comb or small jeweled clip positioned at the base of the chignon for both hold and visual interest
Once the waves are in place and the chignon is secure, finish with a hairspray that holds without feeling crunchy — you want the waves to move subtly when you move, not to feel locked in place.
3. Romantic Beach Waves with Cascading Flowers
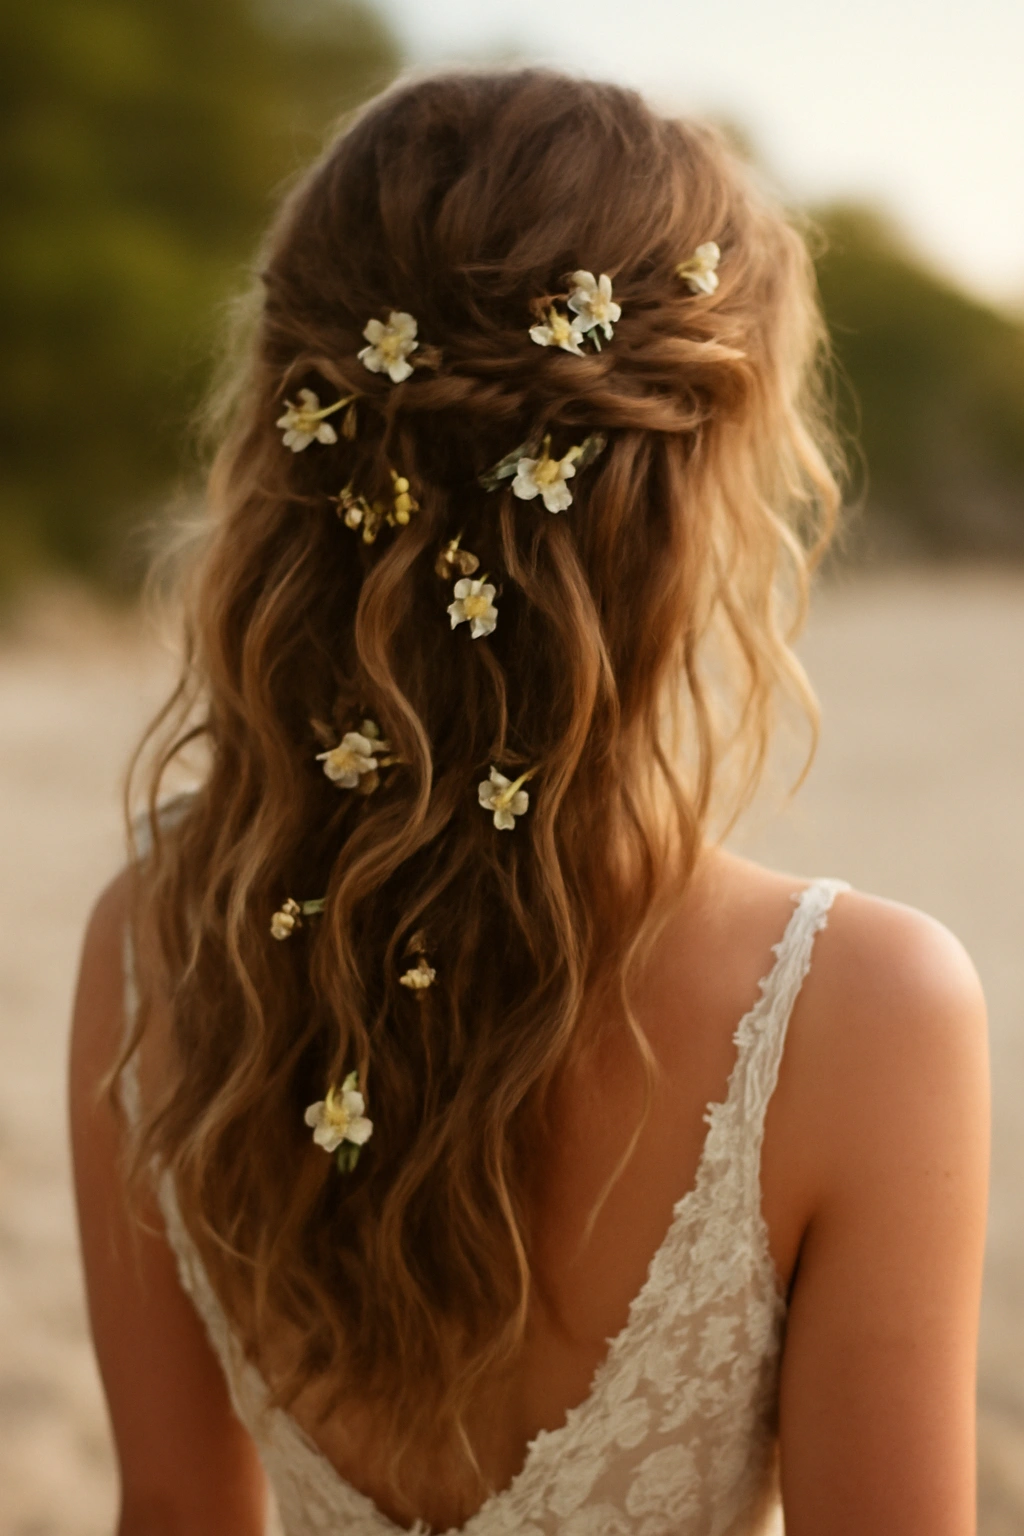
Beach waves have an inherent romanticism that photographs beautifully — they suggest movement, ease, and a certain carefree confidence. When you combine them with strategically placed flowers, you create a look that feels both bohemian and intentionally bridal, with the flowers serving as both decoration and the architectural element that keeps the waves arranged beautifully.
Beach waves are intentionally uneven and textured, lacking the perfect uniformity of Hollywood waves. You’re aiming for variation in wave size and pattern, with some areas wavier than others and some softer, straighter sections that create natural-looking breaks in the texture. This works particularly well for outdoor ceremonies, garden weddings, and beach weddings where the natural movement and slightly undone quality feels contextually perfect.
Creating Beach Waves That Last
The secret to beach waves that don’t fall flat by evening is adding enough texture and grip. Use a sea salt texture spray before styling — this changes the way your hair holds the wave and gives it a grittier, longer-lasting quality. Curl larger sections with a 1.5 to 2-inch wand, but don’t be perfectly methodical about it. Some hairstylists intentionally miss sections or vary the direction of the curl to create that organic, unplanned look.
Placing Flowers for Maximum Impact
- Tuck smaller flowers (spray roses, waxflowers, baby’s breath) directly into the waves, anchoring them with a bobby pin underneath
- Create a partial flower crown along the back of the head, letting it curve gently rather than sitting as a rigid band
- Cluster flowers on one side (usually the side with slightly more wave movement) for an asymmetrical, bohemian feeling
- Use flowers that complement your bouquet or the wedding color palette so the hairstyle feels intentional rather than random
The flowers should feel like they’re nested in the waves rather than perched on top of them. This requires tucking bobby pins underneath the flowers and anchoring them directly to your hair rather than placing them on top.
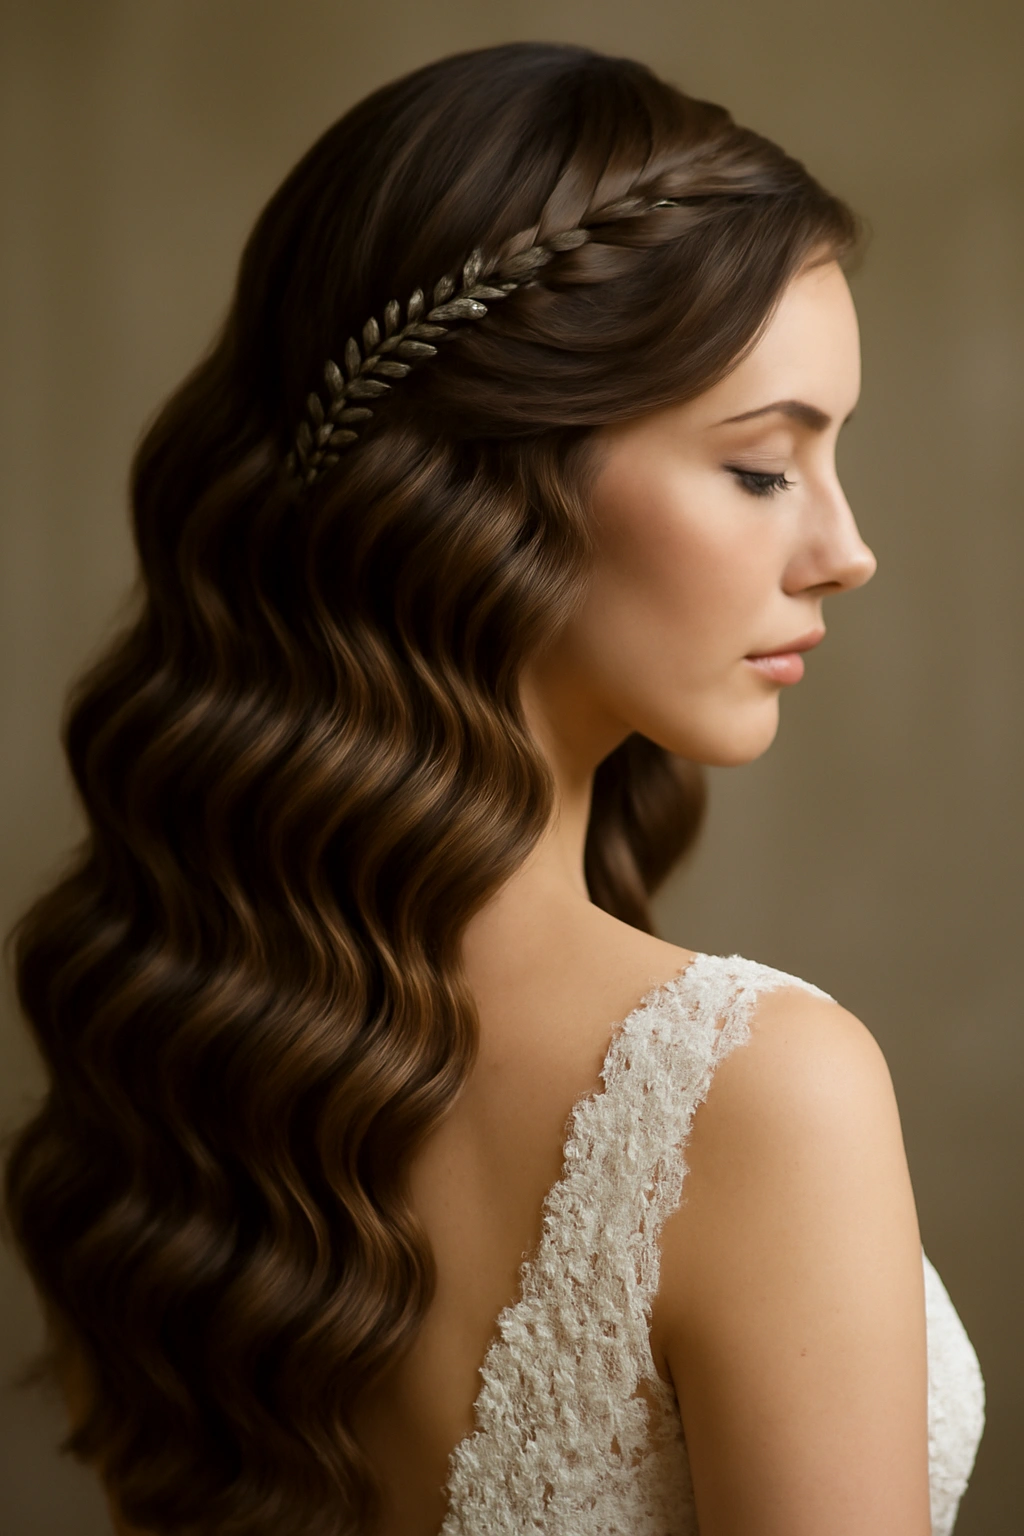
4. Braided Crown with Soft Waves
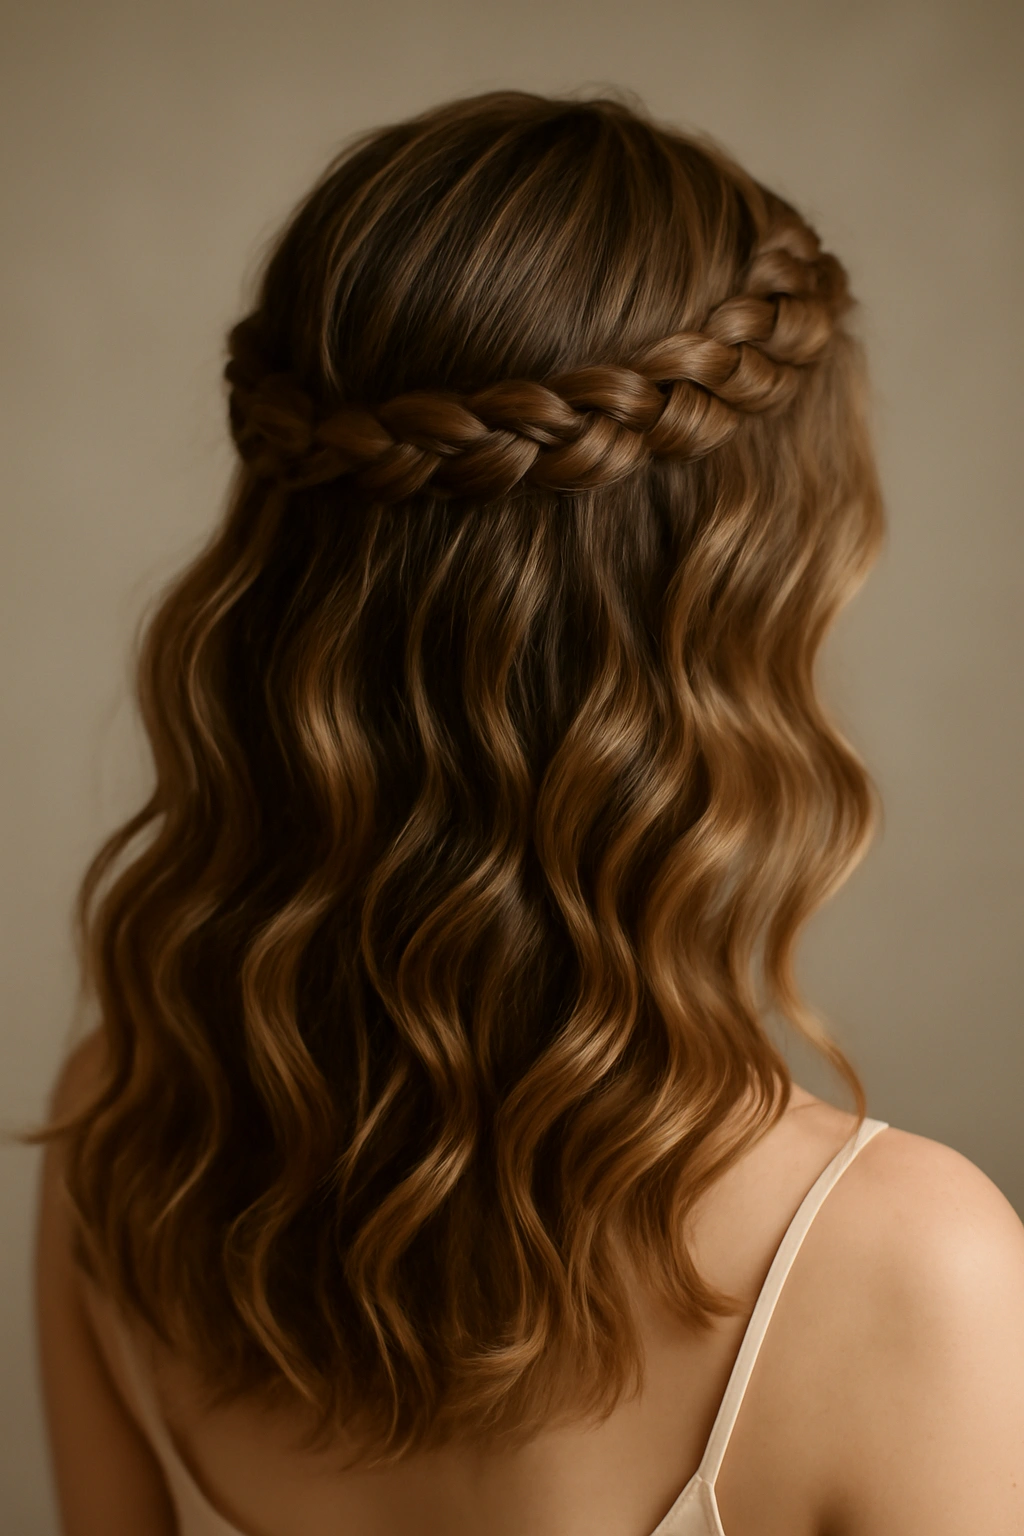
A braided crown takes the structural elegance of a braid and combines it with the romantic softness of waves, creating a look that’s intricate enough to feel special but soft enough to feel wearable. This works beautifully for virtually any hair length that’s at least shoulder-length, and it’s particularly stunning for brides with thicker hair or naturally wavy texture.
The braid serves a dual purpose: it’s both visually interesting and functionally strategic, as it anchors the overall style and keeps longer pieces in place without requiring a full updo. The waves below and around the braid create movement and romantic dimension, while the braid itself provides a polished, intentional element that says “this was thoughtfully planned.”
The Braiding Strategy
A Dutch braid (braided on top of the head rather than underneath) creates a bolder, more visible statement, while a standard three-strand braid feels slightly softer. The crown braid typically starts at one ear, travels around the back of the head, and ends at the opposite ear. Some brides prefer the braid to be perfectly neat and tight, while others choose to gently pull and loosen the braid sections after completing it, creating a softer, more relaxed version that blends better with surrounding waves.
How to Combine Braid and Waves Beautifully
- Create loose waves throughout your hair first using a wand or curling iron
- Allow the waves to cool completely, then gently break them up with your fingers
- Create the crown braid, working it loosely rather than tightly
- Gently pull sections of the completed braid to loosen it and make it blend with the surrounding waves
- Secure the braid end with a bobby pin hidden underneath, allowing waves to flow freely below
- Use a flexible hairspray that holds the overall style without making individual sections stiff
Worth knowing: The combination of a tight, detailed braid with loose, flowing waves creates better visual balance than a perfectly neat braid. The softness of the waves prevents the style from feeling too structured or severe.
5. Textured Waves with Side-Swept Look

The side-swept hairstyle has an inherent asymmetrical elegance that’s deeply flattering, particularly for brides who want to show off their profile (important if your photographer captures side angles or if you have a spectacular profile view that deserves featuring). Combining this with textured waves creates a look with dimension, movement, and visual sophistication.
Rather than dividing your hair equally down the middle, you’re deliberately sweeping more hair to one side, creating an off-center parting and allowing longer pieces to fall across one side of your face. This isn’t the same as a typical side-part — with this style, the sweep is more dramatic and intentional, and the textured waves add visual weight and interest to the side that’s receiving more hair.
Building Texture Into the Waves
Textured waves aren’t smooth, uniform waves — they have irregular sizes and stacked dimension, almost like crimped waves blended with larger waves. Create waves using multiple curling iron sizes (a 1.25-inch and a 1.5-inch barrel), varying which size you use in different sections. This creates natural-looking variation rather than perfect uniformity.
Executing the Dramatic Sweep
- Create an off-center part, positioning it closer to one side of your head
- Create waves throughout your hair, emphasizing slightly tighter, more textured waves on the side that will be swept across
- Brush waves through gently to blend them, then use a texture spray to maintain the pattern
- Sweep hair from the back and side toward the dominant side of your face
- Secure the sweep with bobby pins hidden underneath the back or side, allowing the movement to look natural rather than pinned
- Consider securing a portion on the opposite side with a small, decorative clip to keep hair from falling directly in your face
The beauty of this style is that it works whether your hair is straight, wavy, or curly — the textured waves adapt to your natural hair type while creating a polished, intentional appearance.
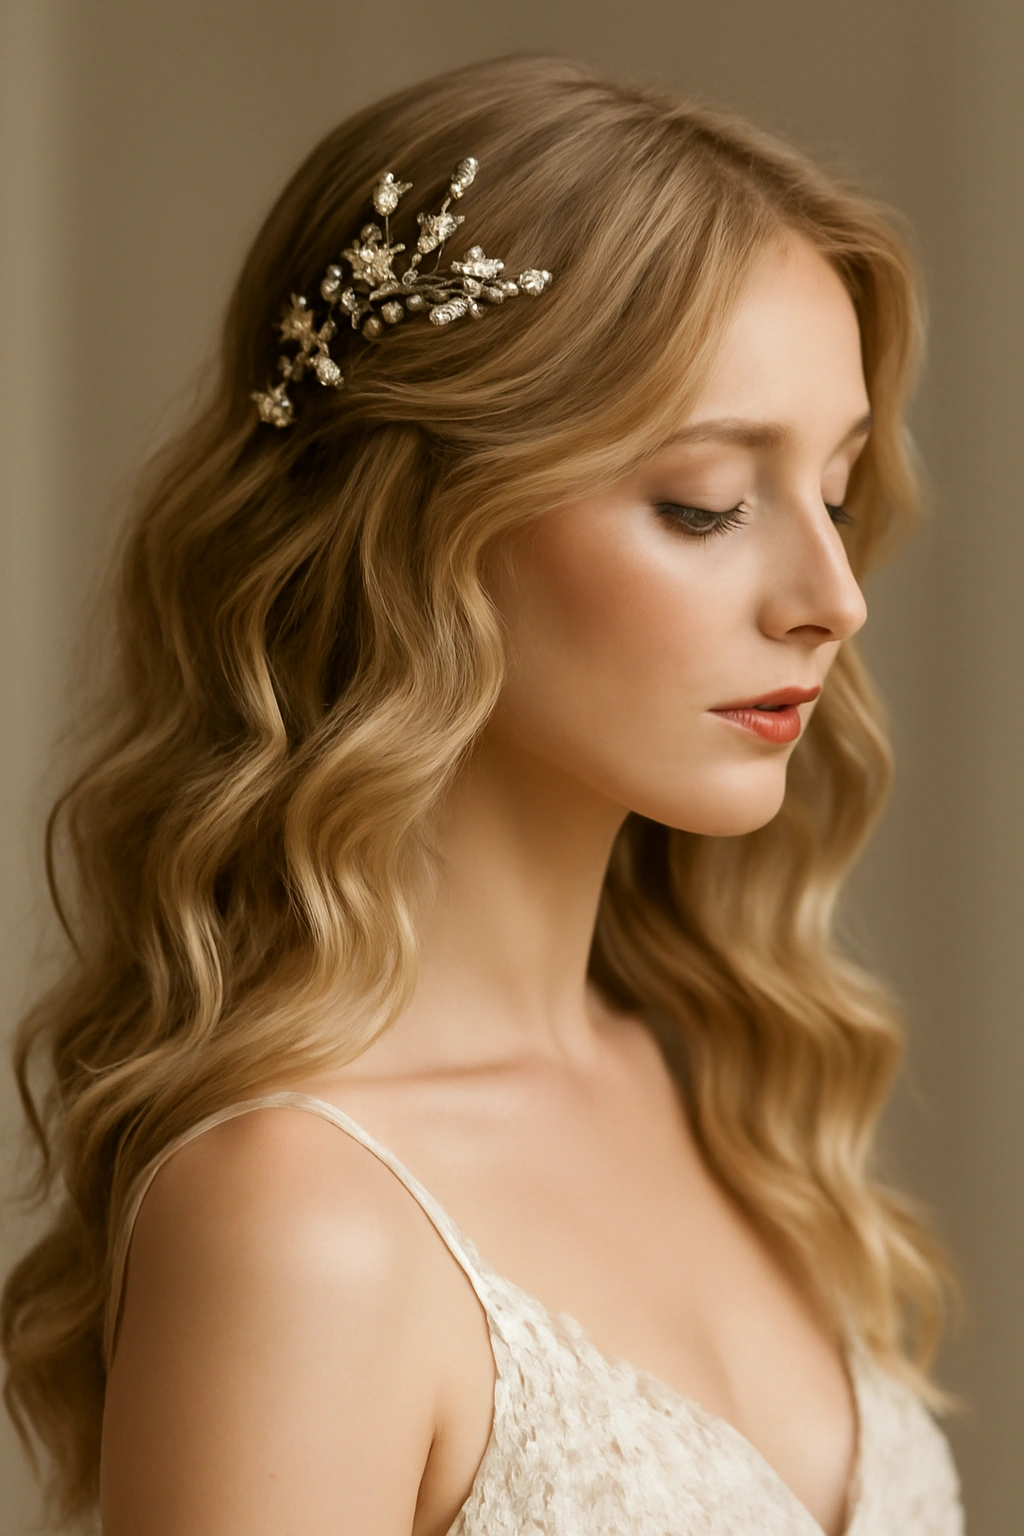
6. Boho Waves with Pearl Hair Pins
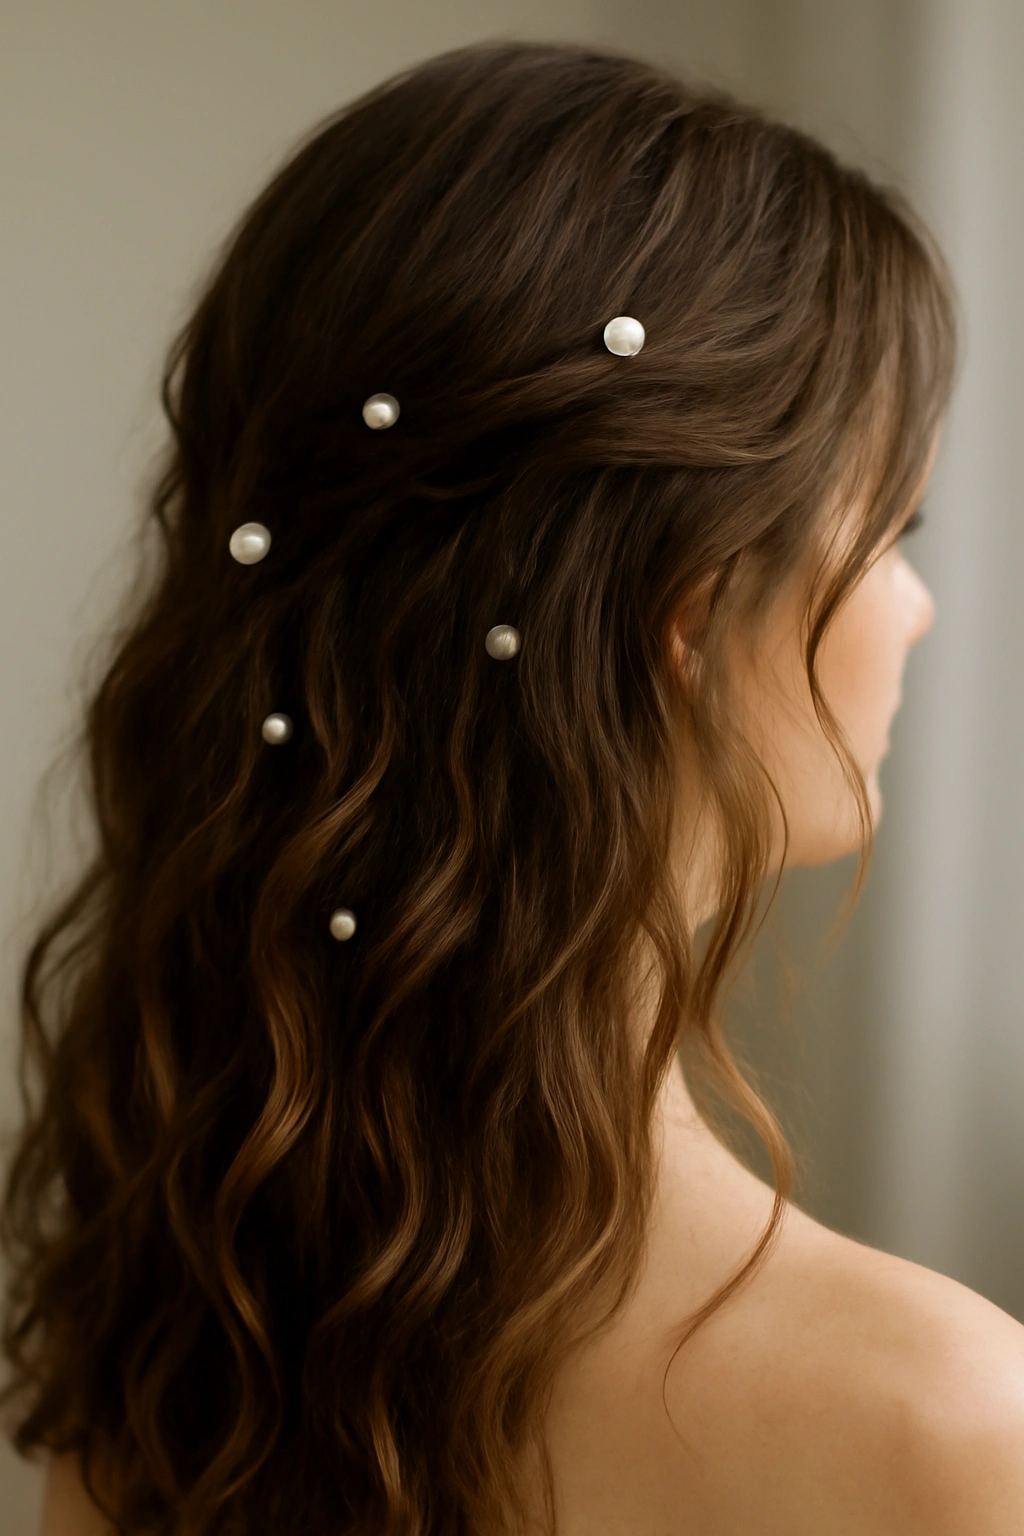
Bohemian aesthetics in bridal hair celebrate natural texture, organic placement, and delicate ornamentation. This style layers soft waves with strategically placed pearl hair pins that catch light and add luxury without the structure of a tiara or comb. It’s perfect for destination weddings, outdoor celebrations, and any bride drawn to a relaxed elegance rather than formal structure.
Boho waves are similar to beach waves — loose, natural-looking, with variation in texture and size. The difference is the intentionality with which you place delicate accessories throughout. Rather than one dramatic statement piece, you’re dotting small pearl pins throughout the hairstyle, creating visual interest and a sense of whimsy without overwhelming the waves.
Creating Natural, Undone Waves
Achieve this look by curling hair with a 1.5 to 2-inch wand, focusing more on creating texture than perfect waves. Braid your hair loosely while still damp, let it air-dry or blow-dry, then release the braid and you’ll have soft, natural-looking waves that feel organic rather than obviously styled.
Placing Pearl Pins Strategically
- Scatter 5-8 small pearl pins throughout your hair rather than clustering them
- Position them along the sides of your face, at the back near your neck, and throughout the crown area
- Tuck pins directly into waves, securing them with bobby pins that match your hair color
- Vary the depth and angle of placement so they look naturally scattered rather than rigidly planned
- Consider mixing pearl pins with a delicate hair vine or soft floral arrangement for a more elaborate boho aesthetic
Pro tip: Pearl pins work beautifully when they’re partially hidden within the waves rather than obviously perched on top. This creates an heirloom quality — like someone might discover these treasures woven throughout your hair if they looked closely.
7. Voluminous Waves with Full Updo
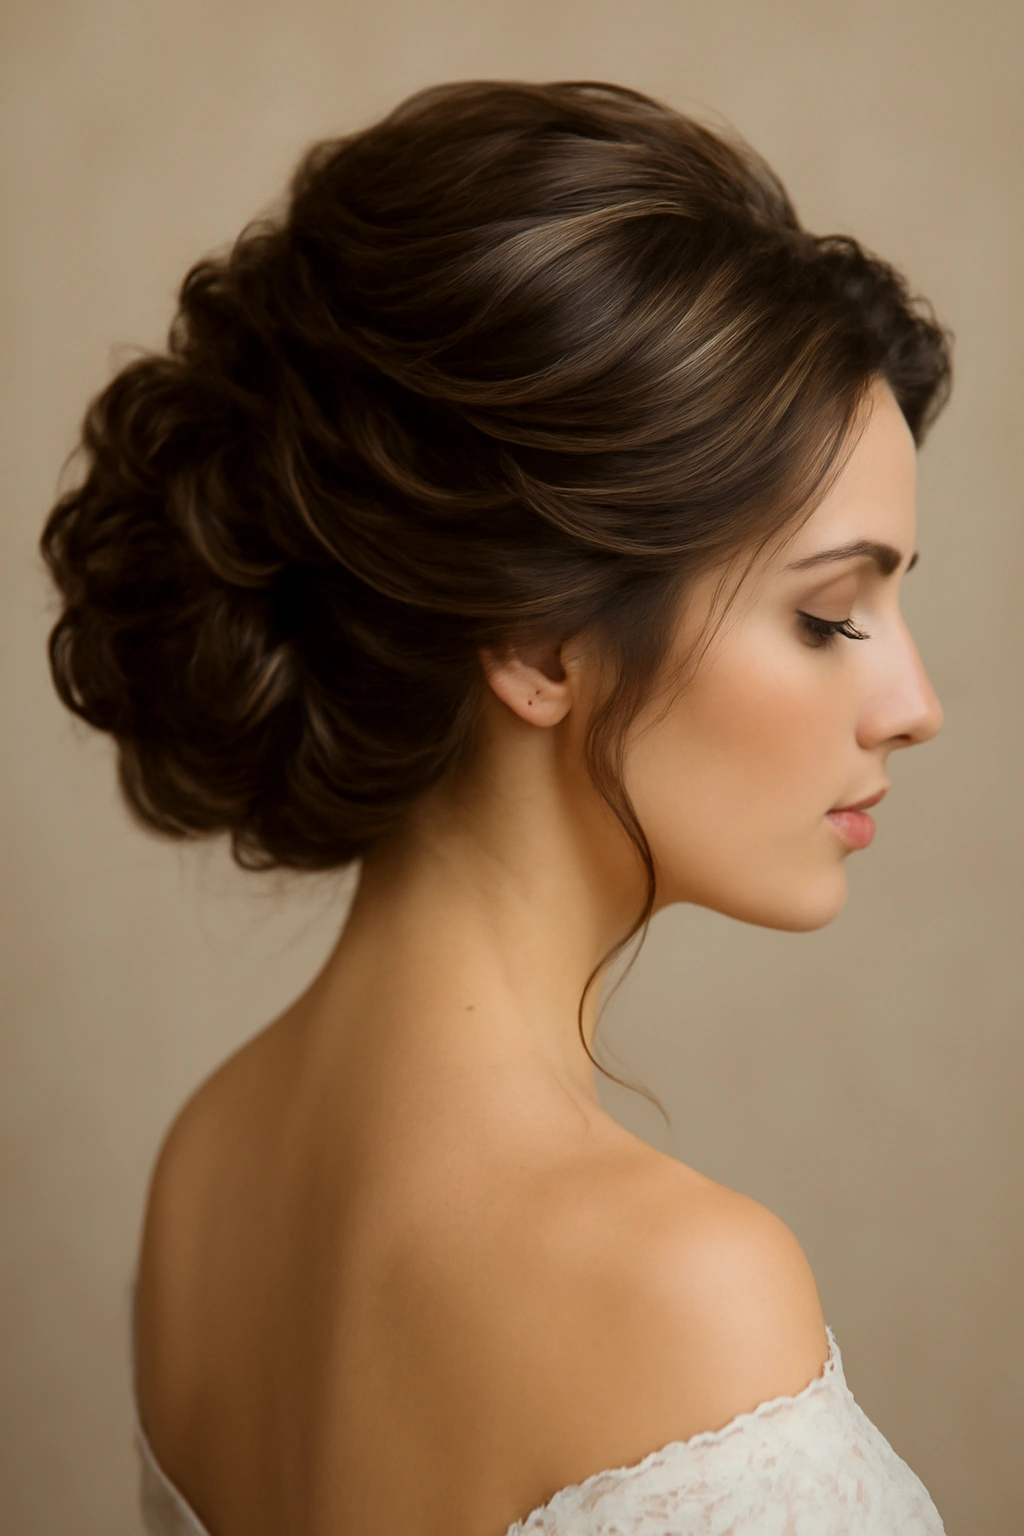
For brides who want maximum elegance and a completely polished appearance, this style delivers the romance of waves while committing to a full, structured updo. This works beautifully for formal weddings, indoor ceremonies, ballroom receptions, and any bride who feels most confident with her hair fully styled and secured.
The technique requires creating waves first, then gathering them into an updo arrangement that maintains visible wave texture throughout. This isn’t the sleek, smooth updo of decades past — it’s a modern updo that celebrates hair texture and volume while maintaining the formality of an off-the-neck style.
Creating Waves With Staying Power
Voluminous waves require more product and heat than casual beach waves. Use a volumizing mousse or texture spray on damp hair before blow-drying, which creates a foundation that holds waves longer. Curl in smaller sections (1-inch barrel) than you would for loose waves, which creates more compact, controlled waves that translate to updo-appropriate texture.
Building the Full Updo Structure
- Create waves throughout the entire head, focusing on volume at the crown and around the sides
- Blow-dry hair fully and allow waves to cool and set completely
- Gather hair into a low or mid-height ponytail at the nape of the neck or slightly to one side
- Twist the ponytail loosely, then wrap it into a relaxed bun shape, tucking and securing with bobby pins as you go
- Pull sections of the bun gently to loosen it and expose the wave texture within
- Tuck any face-framing waves around your face so they’re visible and softening
The finished style should look voluminous, not flat or slicked back, with visible wave texture that confirms you didn’t sacrifice romanticism for formality.
8. Soft Waves with Low Side Ponytail
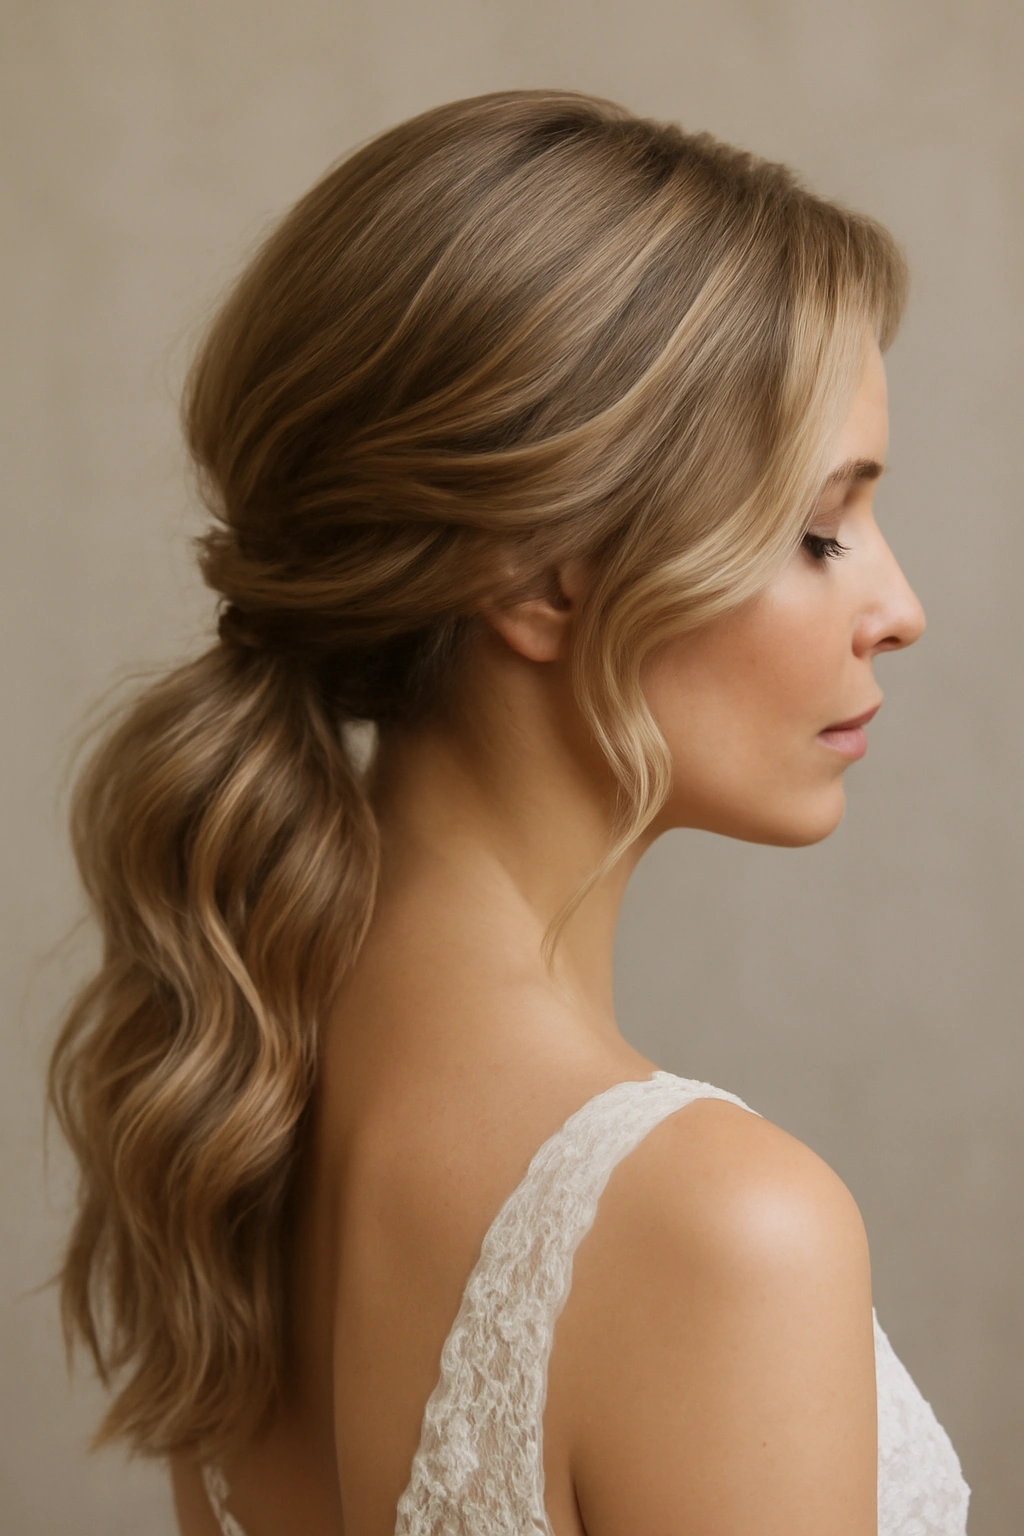
The low side ponytail occupies a perfect middle ground — it’s more casually elegant than a centered ponytail, more structured than completely loose waves, and it works beautifully for almost every hair length and texture. Combining it with soft waves creates a look that’s romantic, youthful, and infinitely wearable without requiring extreme styling or the skill level of an elaborate updo.
This hairstyle particularly suits brides with shoulder-length to mid-back length hair, though it adapts beautifully to longer lengths as well. The side placement feels more interesting visually than a centered ponytail, and it’s easier to incorporate hair accessories and details when the ponytail is positioned to the side.
Creating Soft, Romantic Waves
Use a 1.25 to 1.5-inch wand to create waves with genuine movement. Curl away from your face and down the hair shaft, taking time to create waves throughout the entire head, not just the front sections. Allow waves to cool completely before brushing through them gently to create a softer, more blended wave pattern.
Positioning and Securing the Side Ponytail
- Create a deep side part, significantly off-center
- Gather hair at the low side (near the nape but shifted to one side of the neck)
- Secure the ponytail loosely with an elastic band covered in hair or a silk scrunchie
- Leave face-framing waves loose rather than pulling them back into the ponytail
- Gently pull sections of the ponytail to create texture and prevent it from looking too neat
- Consider wrapping a thin strand of hair around the elastic band to hide it, securing the strand with a bobby pin
Styling variation: If you want more visual interest, consider loosely twisting sections of the ponytail and wrapping them around the base, securing with bobby pins to create a twisted, textured version rather than a simple ponytail.
9. Mermaid Waves with Intricate Styling
Mermaid waves are deeper, more defined waves with a sculptural quality that creates the appearance of smooth, flowing water. When combined with intricate styling elements — whether that’s braids, twists, or detailed pinning — you create a look that feels both glamorous and meticulously planned. This works beautifully for beach weddings, destination celebrations, and any bride drawn to a more dramatic, statement-making aesthetic.
Mermaid waves differ from beach or Hollywood waves in their uniformity and definition. These are intentionally formed, carefully placed waves that maintain their shape throughout the day, rather than loose, broken-up waves. They photograph magnificently because they show clear definition and movement, and they work beautifully with the kind of detailed styling that makes a hairstyle feel truly special.
Creating Defined Mermaid Waves
The foundation requires a 1-inch or smaller curling iron, working methodically through sections and curling in consistent directions. For symmetrical waves, curl sections alternating directions (away from the face on one side, toward the face on the other), creating a balanced wave pattern. For more dramatic effect, curl all sections in one direction.
Hold each curl in the iron longer than you would for loose waves — up to ten seconds — before releasing. This creates more defined, longer-lasting waves. After curling, clip each curl away from your face while it cools, which sets the wave pattern more permanently.
Adding Intricate Styling Elements
- Create a detailed braid or Dutch braid along one side after your mermaid waves are set
- Pin sections strategically at the back with decorative hair pins or clips
- Create a twisted crown or half-crown arrangement that incorporates some wave sections
- Use small, delicate bobby pins clustered strategically to create intentional visual interest
- Consider incorporating a hair comb or decorative piece positioned at the back or side
The intricate styling should enhance the waves rather than compete with them — let the defined wave pattern be the star, with accessories and details playing a supporting role.
10. Romantic Waves with Half-Up Twists
If the half-up style appeals to you but you want something with more visual sophistication than a simple pulled-back section, the half-up twist version offers that extra layer of detail and intentionality. Rather than simply gathering hair back, you’re creating twisted sections that pull hair away from the face while maintaining the romantic wave movement below.
This style works particularly well for brides with medium to long hair and adds a sense of movement and dimension that makes it feel more complex than the execution actually requires. The twists create visual interest while keeping hair off your face and neck — practical for warm weather while remaining undeniably elegant.
Creating the Foundational Waves
Start with soft, loose waves created with a 1.25 to 1.5-inch wand. These should be natural-looking and organic rather than perfectly uniform. Break up the waves gently by running your fingers through them once they’ve cooled, creating a softer, more blended texture that works beautifully with twists.
Building the Half-Up Twist Structure
- Part your hair gently, slightly off-center
- Take a section from one side near your ear and twist it loosely
- Secure the twist at the back with a bobby pin, allowing it to blend with the surrounding waves
- Repeat from the other side, creating a second twist that mirrors the first
- Allow both twists to meet and secure at the back with a single bobby pin or hair elastic
- Leave longer waves flowing freely below and face-framing pieces loose around your face
The twists should feel relaxed rather than tight — this prevents them from looking too controlled or updo-like. The beauty comes from the balance between the intentional twists and the casual flow of the waves below.
11. Sleek Waves with Slicked-Back Style
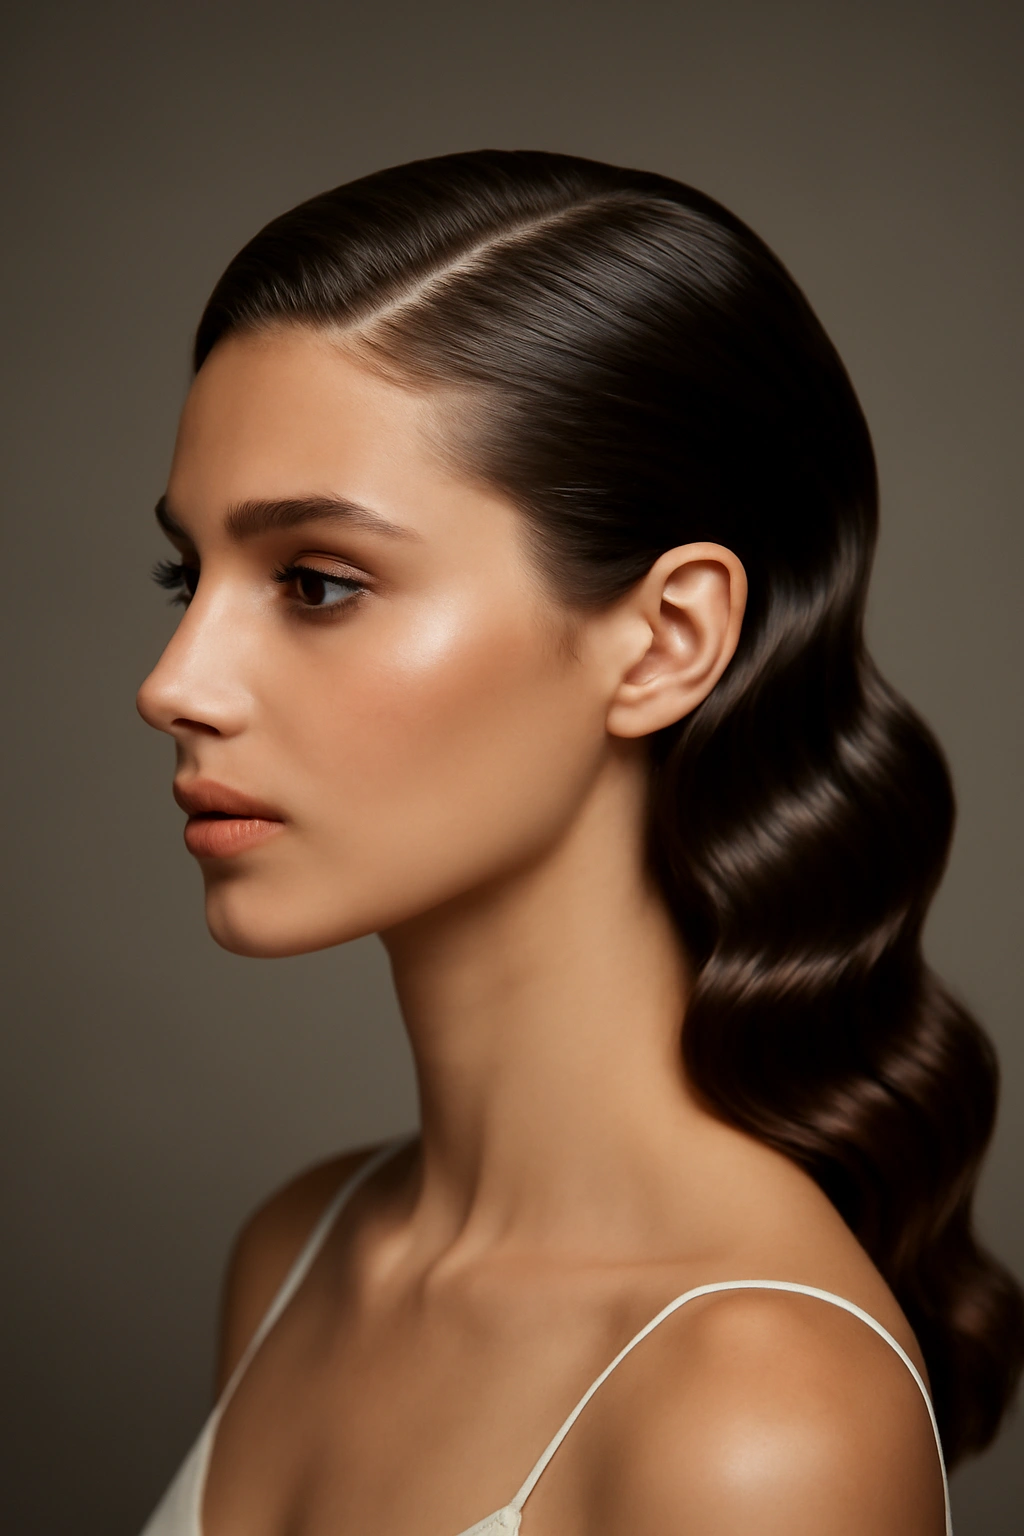
For brides who want maximum face exposure and a distinctly modern aesthetic, slicked-back waves offer drama and sophistication with an unexpected edge. This style pulls hair completely away from the face, emphasizing your facial features and the neckline and shoulders of your dress. It’s bold, contemporary, and works beautifully for minimalist-styled ceremonies and modern wedding aesthetics.
Creating slicked-back waves requires a different approach than typical wavy hairstyles. You’re working to make waves look intentional and artistic rather than accidental, and the sleek, controlled styling surrounding them is actually what makes the contrast work visually.
Creating Waves Within a Slicked-Back Framework
- Create defined waves using a 1-inch curling iron or smaller, focusing on clear, visible wave patterns
- Blow-dry hair with a smoothing serum or lightweight styling cream for a sleek foundation
- Use a gel or strong-hold styling product to pull hair back severely and smoothly, securing at the back with bobby pins
- Once secured, the waves below become the focal point, creating visual interest against the slicked-back top
Styling Details for Maximum Impact
- Consider creating a detailed, intricate wave pattern at the back where you’ve secured the slicked-back section
- Use decorative bobby pins or hair clips positioned visibly at the back to anchor the sleek portion
- Keep face-framing completely clear — this style only works when absolutely nothing breaks the line from your face to the back
- Finish with a strong-hold hairspray that keeps the slicked-back portion smooth but allows the waves to maintain their definition
Worth noting: This style is particularly striking paired with bold makeup, minimalist jewelry, and clean dress lines. It’s a statement style that works best when the overall bride aesthetic is intentionally modern and artistic rather than traditionally romantic.
12. Ethereal Waves with Accessory Integration
For brides seeking pure romance and magical beauty, ethereal waves combined with thoughtfully integrated accessories create a fairy-tale quality that feels both timeless and entirely intentional. This style is less about achieving a specific shape and more about creating an overall feeling of softness, movement, and enchantment.
Ethereal waves are characterized by their softness and apparent lack of structure — they look like they occurred naturally, with perfect coincidence creating exactly the right amount of texture and movement. When paired with accessories integrated directly into the waves (rather than worn on top of them), you create a cohesive, dreamy aesthetic that photographs beautifully and feels magical in person.
Achieving Ethereal Wave Quality
The key is starting with the right foundation. Use lightweight products that don’t weigh hair down — a texture spray or sea salt spray rather than heavy mousses. Curl with a large barrel (1.5 to 2 inches), taking generous sections and holding the iron loosely so waves aren’t too tight or controlled.
Blow-dry while scrunching hair gently with your hands rather than brushing, which maintains softness rather than creating defined, styled-looking waves. The result should look almost effortless — like you could have waves this beautiful just by virtue of having good hair, rather than through obvious effort.
Integrating Accessories Into the Softness
- Tuck small sprays of baby’s breath, waxflower, or delicate greenery directly into waves, securing with hidden bobby pins
- Thread a thin, delicate hair vine or pearl string through the waves, letting it curve and weave naturally
- Position a delicate jeweled hair clip at the back, allowing waves to flow around and partially conceal it
- Consider a thin, wispy veil positioned at the crown with waves flowing around it rather than over it
- Use metallic or pearl bobby pins placed slightly visibly as intentional styling details rather than hidden anchors
The accessories should feel like they’re part of the waves rather than additions to them. This requires tucking and positioning rather than simply placing them on top of your finished hairstyle.
Final Thoughts
Choosing your wedding hairstyle is ultimately about finding the style that makes you feel like the best, most confident version of yourself — not necessarily the style that photographs best or trends most prominently in bridal magazines. Each of these twelve styles adapts beautifully to different hair lengths, face shapes, and personal aesthetics, which means your job is identifying which approach resonates with how you envision yourself on your wedding day.
The technical execution matters, absolutely — you’ll want to practice these styles multiple times or work with a professional stylist who understands the specific approach you’re drawn to. But equally important is choosing a direction that feels authentically you, whether that’s the polished glamour of Hollywood waves, the bohemian ease of flower-scattered beach waves, or the dramatic statement of a slicked-back style.
Remember that your hairstyle will function for eight-plus hours of celebration, dancing, and emotion. The best wedding hairstyle is one that not only looks beautiful in your pre-ceremony photos but also holds up beautifully through first dances, cake cutting, and late-night celebration. Consider factors like the weather on your wedding date, the physical activities you’ll be doing, and how much time you’re willing to invest in touch-ups throughout the day. A style that requires constant adjustment might feel beautiful at first but frustrating by evening, while a style engineered to last creates freedom to enjoy your day.
Your hair is the frame for your face and the backdrop for your dress — give yourself permission to invest in a style that genuinely delights you, whether that means booking a trial appointment with a stylist or spending extra time practicing at home. The hairstyle you choose should feel like an extension of your wedding day joy, not an added source of stress.