Your wedding day is one of the most photographed moments of your life, and your hairstyle sets the entire tone for how you feel and look in those images. But here’s what many brides discover too late: the hairstyle that looks stunning on your best friend with thick, straight hair might actually overwhelm your fine, naturally curly texture—or worse, refuse to hold a curl at all. The secret to a wedding hairstyle that genuinely works isn’t following trends blindly. It’s choosing a style that celebrates your actual hair type, works with your hair’s natural texture rather than against it, and holds beautifully through the ceremony, the dancing, and the midnight slice of cake.
The good news is that you have far more options than you might think. Whether your hair is naturally straight, wavy, curly, coily, fine, thick, or somewhere beautifully in between, there’s a wedding hairstyle that will make you feel like the best version of yourself. The trick is knowing which styles actually work for your specific hair type, what preparation makes them last all day, and how to communicate your vision to your stylist. This guide walks you through 20 real, tested wedding hairstyle options—each matched to the hair types and textures where they truly shine.
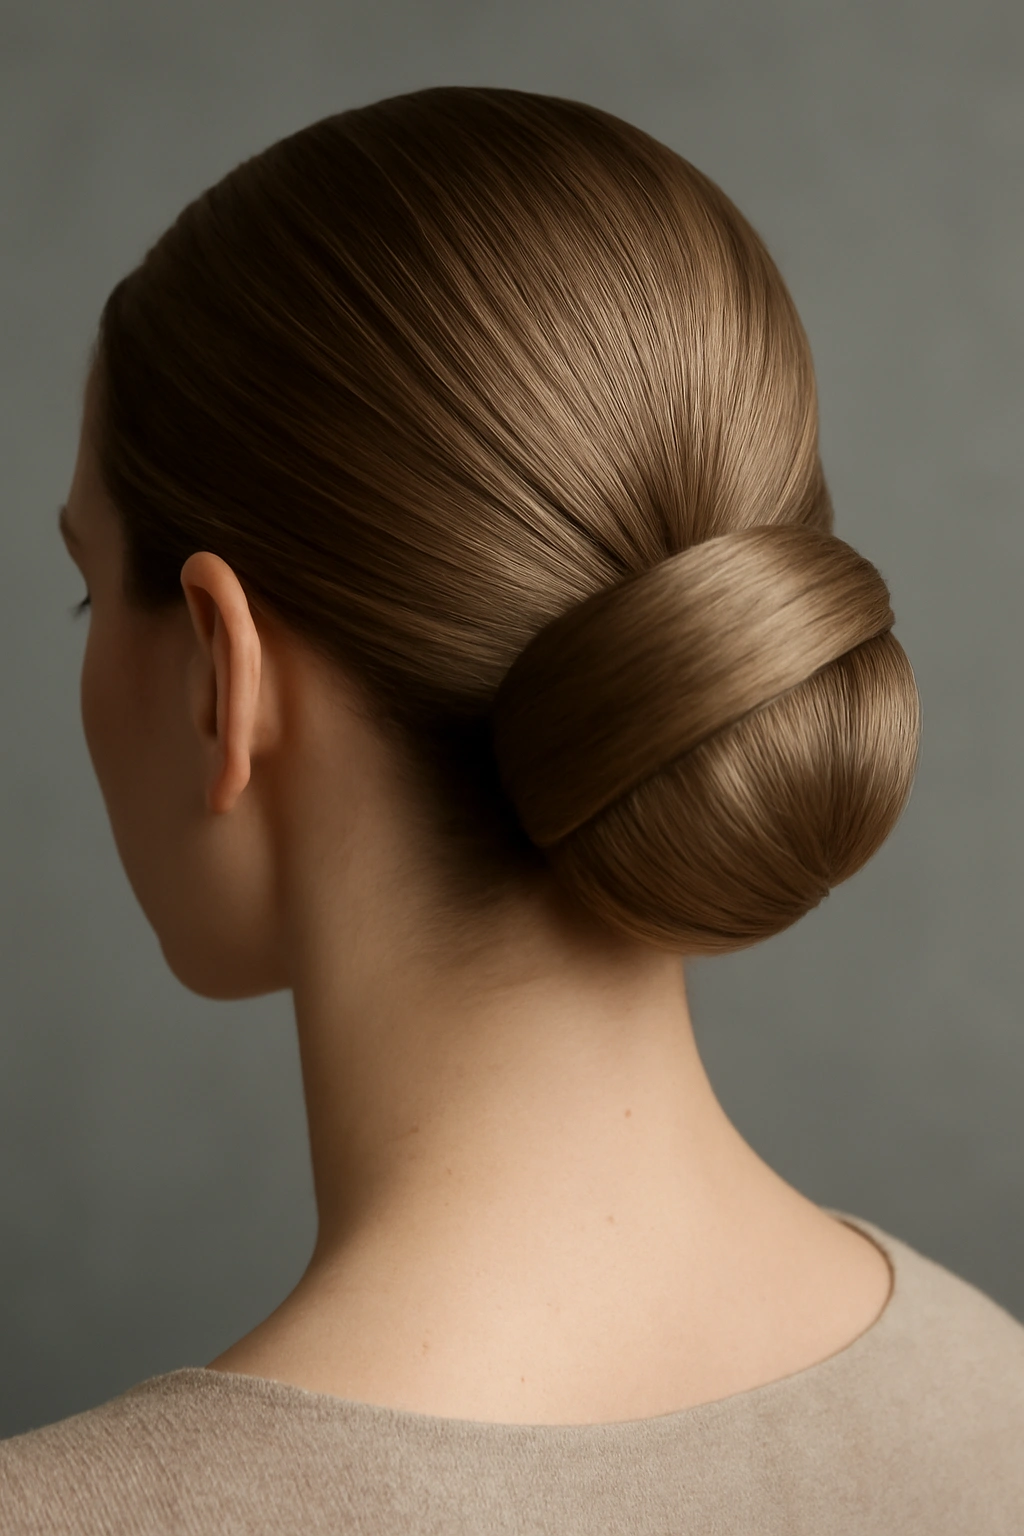
1. Sleek Low Bun for Fine, Straight Hair
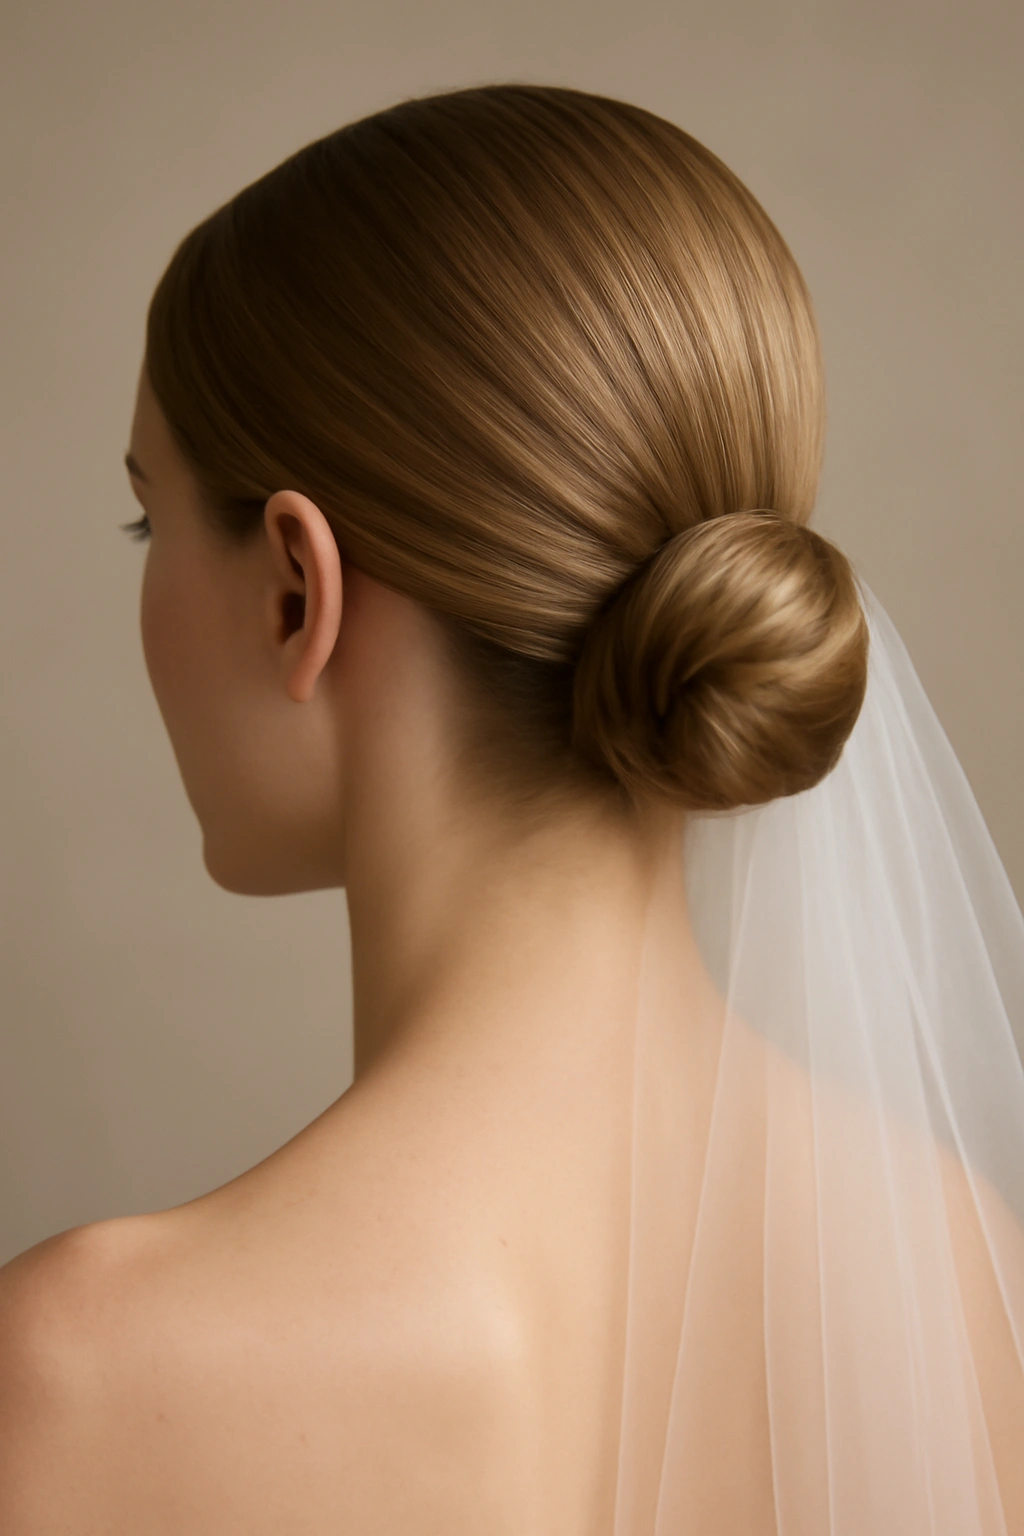
A low bun is the ultimate solution if your hair is fine or thin because it creates the illusion of thickness and density without requiring backcombing or teasing that would damage delicate strands. The key is positioning it slightly off-center at the nape of the neck, which makes it look intentional and sophisticated rather than like you’re trying to hide sparse hair. This style works beautifully with a sheer veil pinned into the hair, and it photographs elegantly from every angle.
Why It’s a Smart Choice for Fine Hair
Fine hair often lacks the volume and grip that elaborate updos require, but a sleek bun works with your hair’s natural behavior instead of against it. The smoothness actually looks intentional and chic, and there’s nowhere for loose flyaways to hide—which means a lightweight hairspray applied strategically keeps everything in place without weighing down delicate strands.
What You Need to Know
- Use a velvet hair tie or a silk scrunchie instead of elastic, which causes less breakage and slipping throughout the day
- Apply volumizing mousse to damp roots before blow-drying to create subtle lift at the crown
- Tease gently at the base of the bun and smooth the outer layer for a polished finish that doesn’t look harsh
- A few wispy face-framing pieces curled softly around the face add dimension and softness
Pro tip: Have your stylist create a small faux hawk or shallow crown braid underneath the top layer of hair—this hidden structure keeps the bun anchored all day without visible bobby pins.
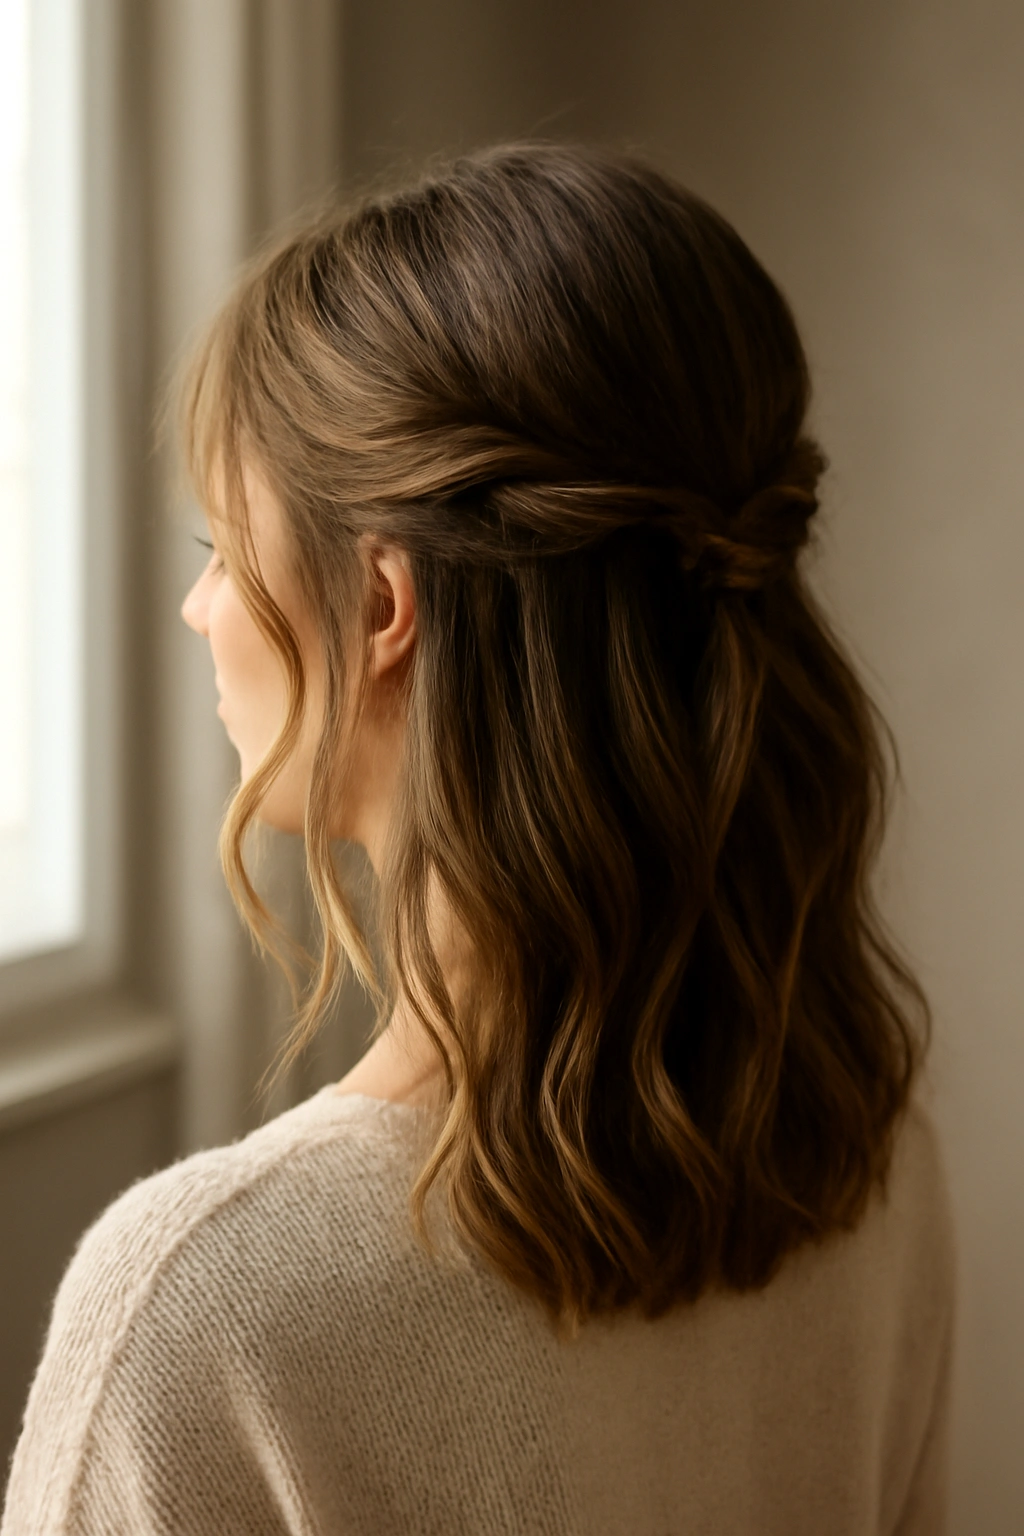
2. Textured Half-Up for Wavy Hair
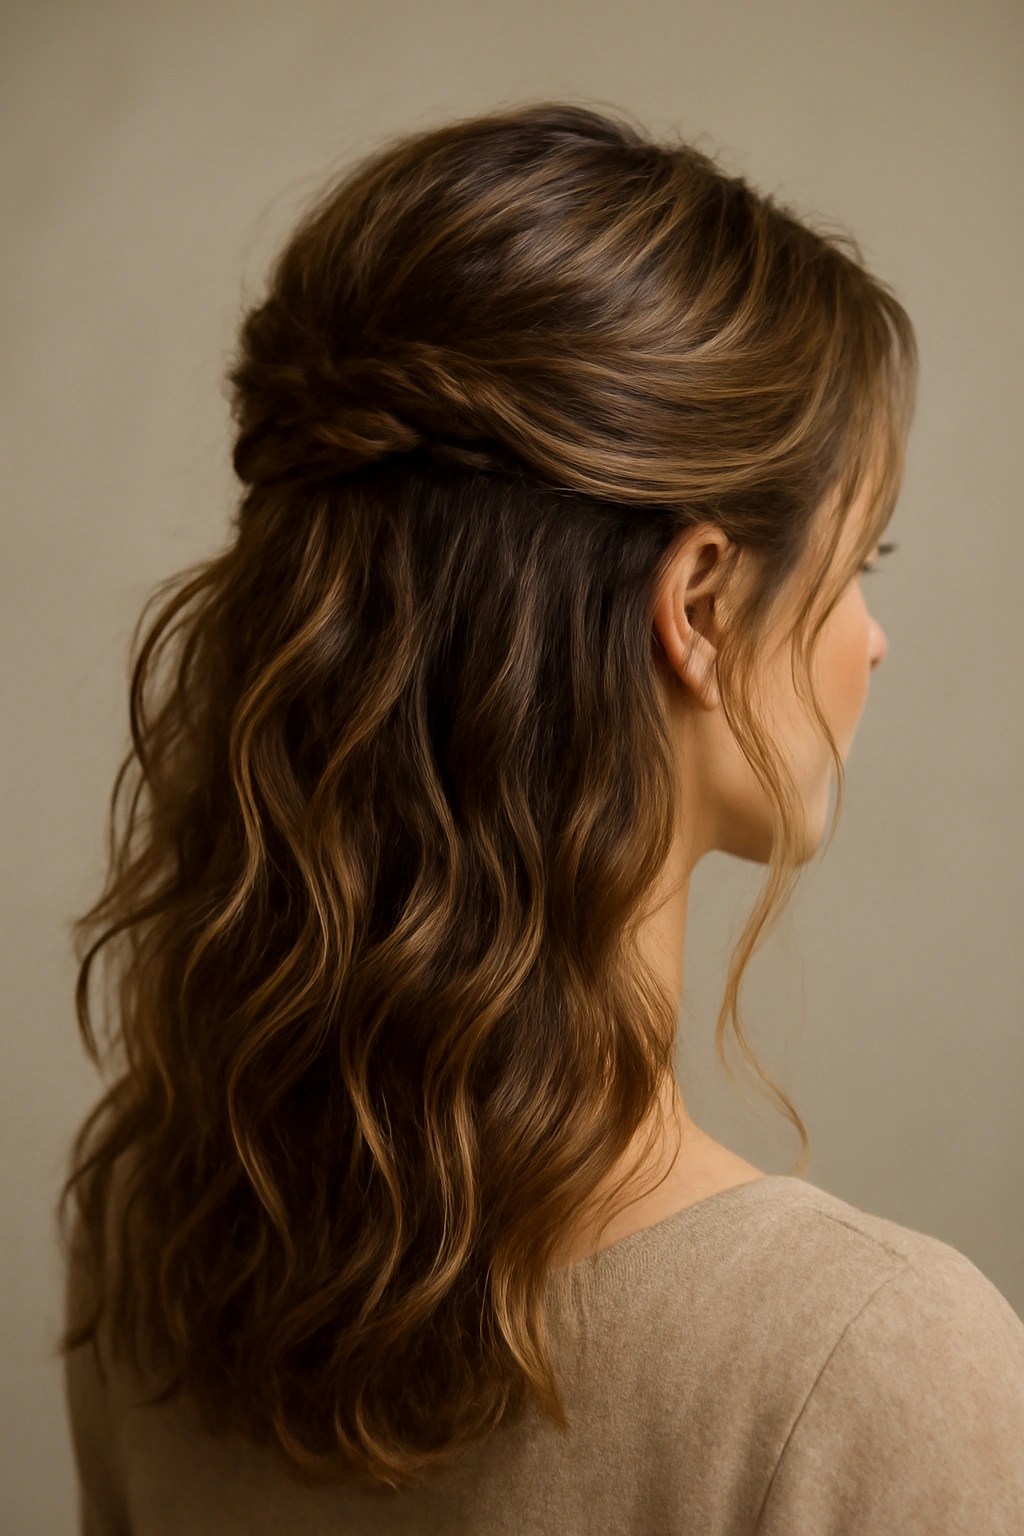
Wavy hair has natural movement and body that upstyle options take advantage of beautifully. A half-up style that leaves the bottom waves loose maximizes that movement while pulling hair away from your face and neck. The key is creating texture throughout the entire style—not sleek and straight, but deliberately undone, romantic, and lived-in.
What Makes This Style Shine for Waves
Wavy hair is the Goldilocks texture: it has enough body to hold waves without looking over-processed, but it’s loose enough to feel soft and romantic. A half-up style celebrates this by keeping some hair down to cascade over your shoulders while securing the top portion. You’re not fighting your hair’s natural texture; you’re amplifying it.
How to Build This Look
- Curl the lower half of your hair in soft, loose waves using a 1.5-inch barrel curling iron
- Create additional texture in the upper half using the same curling iron, then smooth those curls slightly for a more refined top section
- Pull the upper section back and secure with bobby pins hidden beneath a small clip, ribbon, or hair comb
- Leave a few face-framing pieces unclipped to soften the line and add movement
Worth knowing: Wavy hair can sometimes flatten under its own weight as the day goes on. Ask your stylist to use a lightweight texturizing spray rather than heavy hairspray, and consider pinning a light fascinator or headpiece that supports the style without pulling it down.
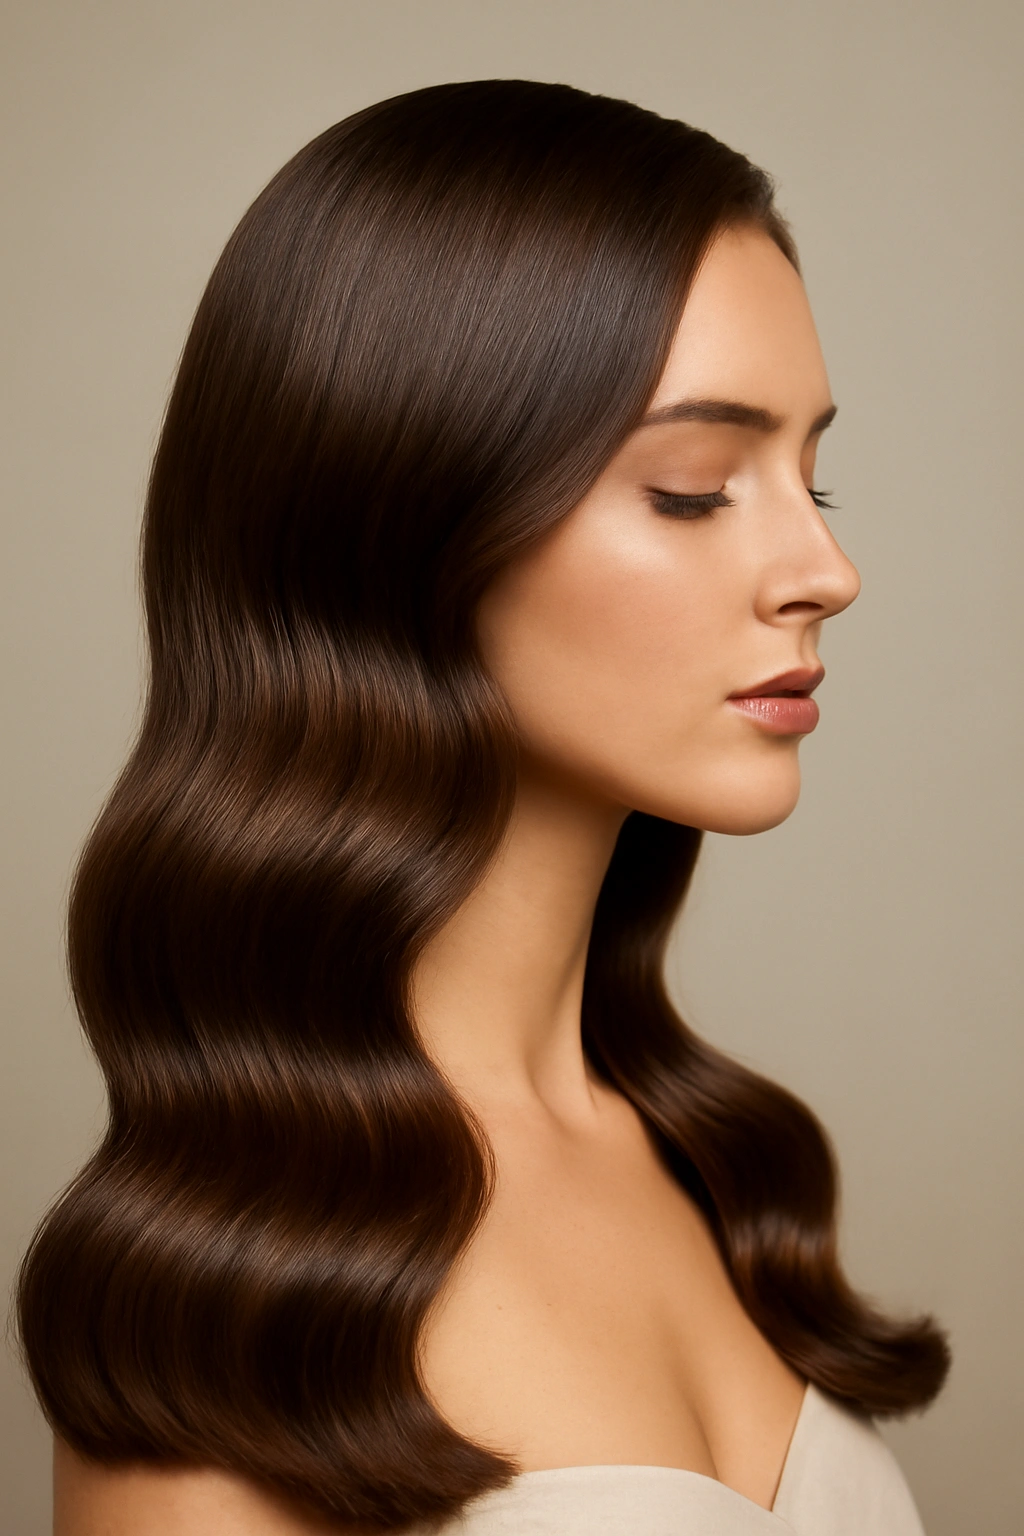
3. Soft Waves for Medium, Straight Hair
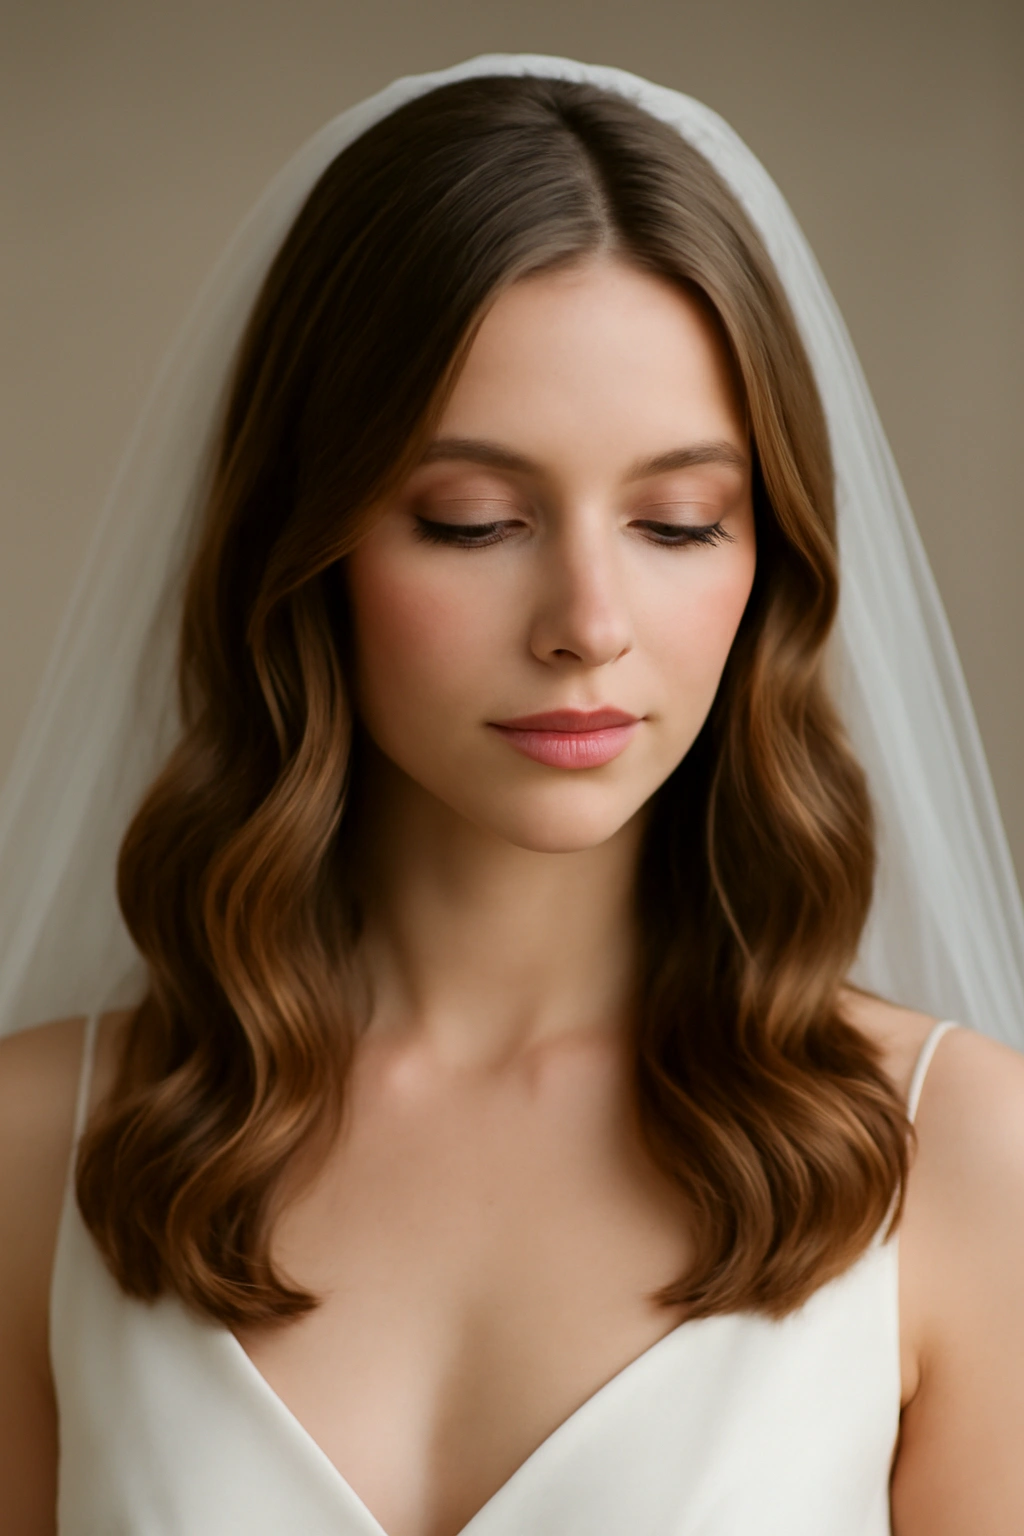
If your hair is naturally straight but medium in thickness, soft waves are your sweet spot: they’re romantic, forgiving, and actually easier to maintain all day than you’d expect. The waves add dimension and softness without looking overly styled or artificial. This style works wonderfully with a cathedral veil, a simple headpiece, or even no hair accessory at all—the waves are the statement.
Why Waves Work Beautifully for Straight Hair
Straight hair holds waves excellently because there’s no natural curl pattern fighting against them. Once you set waves in straight hair with the right technique and product, they stay. The benefit is that you get the romantic, soft aesthetic without the frizz or texture concerns that wavy or curly hair sometimes faces.
The Formula for Long-Lasting Waves
- Blow-dry your hair smooth first to create a sleek base, then apply a heat protectant spray
- Use a 1.25-inch curling iron to create vertical waves, curling away from the face on both sides
- After curling each section, pin it to your head and let it cool before releasing—this sets the wave shape
- Once all curls are set and cooled, brush through very gently with a paddle brush to blend the waves into a soft, undone look
- Lock everything with a flexible-hold hairspray that won’t feel stiff or crunchy
Insider note: Schedule your hair trial for the exact time of day your wedding is happening. Hair often photographs differently in different lighting, and waves behave differently depending on time of day and humidity.
4. Romantic Curls for Thick, Wavy Hair
Thick, wavy hair is a gift—it naturally has body, volume, and texture that curly or twisted styles absolutely thrive on. Romantic curls celebrate this gift by amplifying what’s already there. The curls look effortless and organic because they’re working with your hair’s natural tendencies rather than imposing structure that your hair will fight.
What Makes This Perfect for Thick Waves
Your hair already has the density to hold intricate styles without looking thin or wispy. The volume is there naturally, so you’re not adding artificial fullness. What you’re doing is enhancing and defining the natural curl pattern so it reads as intentional rather than just “I didn’t do my hair.”
Building Romantic Curls in Thick Wavy Hair
- Don’t add too much heat—your hair is already primed to curl. A light curl with a larger barrel iron is often enough
- Consider getting your hair in the day before the wedding so your natural curl pattern can settle and combine with the styled curls
- Use a curling cream or texture paste to define individual curls without making them look separate or frizzy
- Leave the curls loose and somewhat tousled; don’t brush them out into a uniform, structured wave
Pro tip: Thick wavy hair can sometimes look bulky if you add too many products or tools. Your stylist should work with texture rather than against it. If your hair naturally tends to frizz, use an anti-frizz cream, but skip the serum—it can make thick hair look greasy.
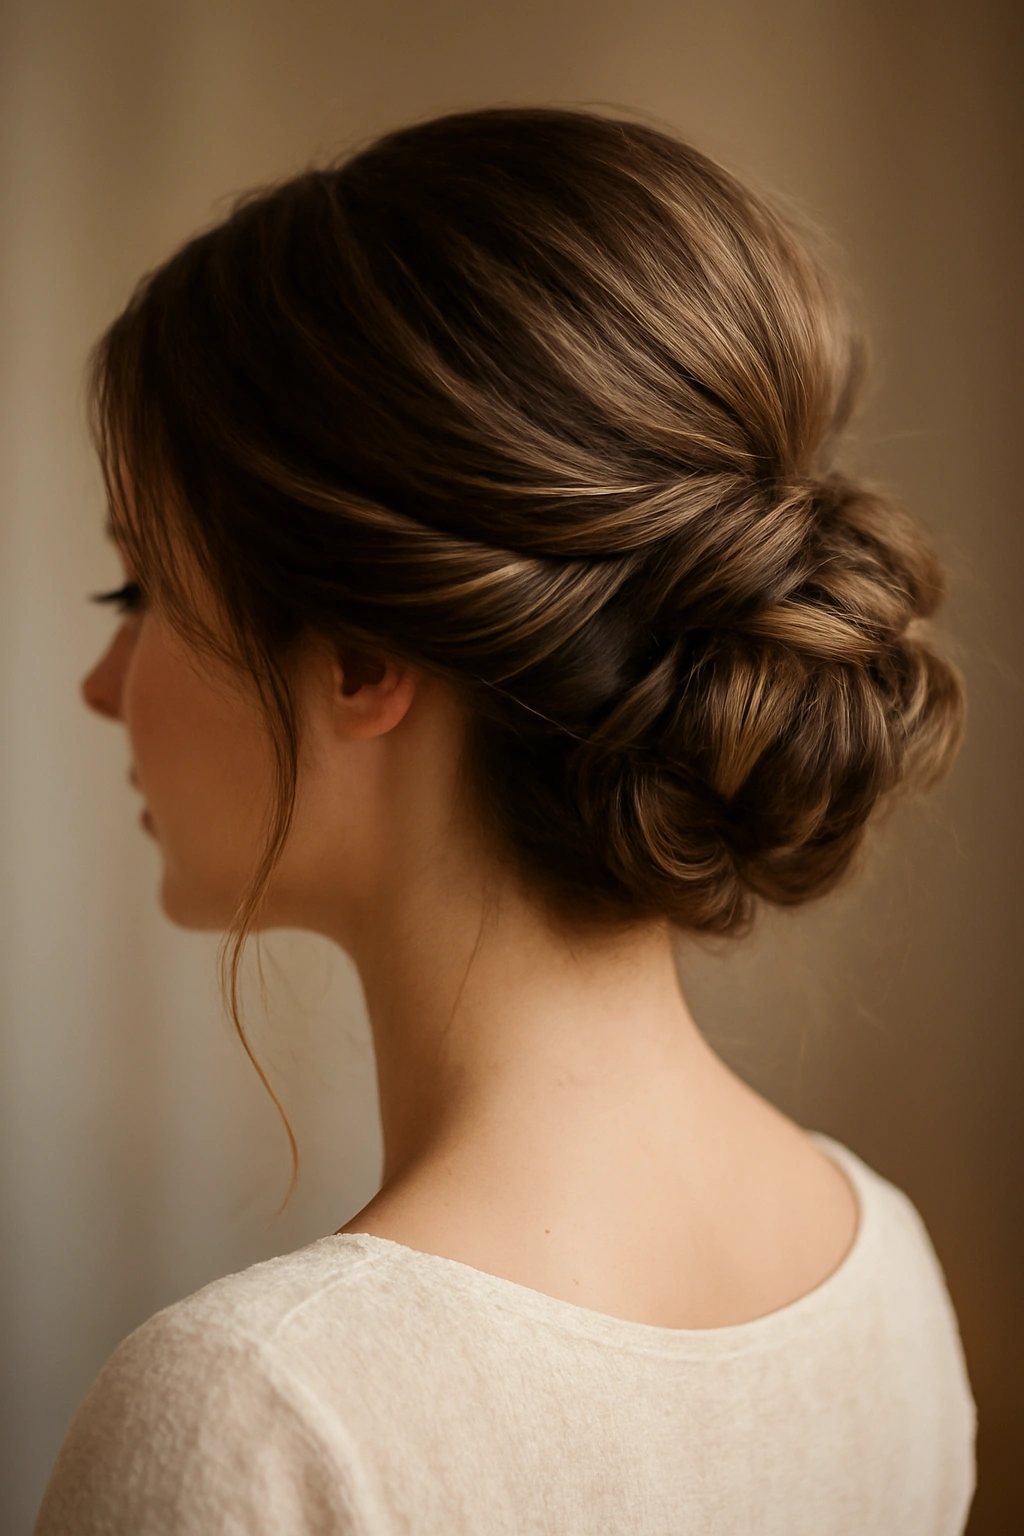
5. Elegant Balayage Updo for Thick, Straight Hair
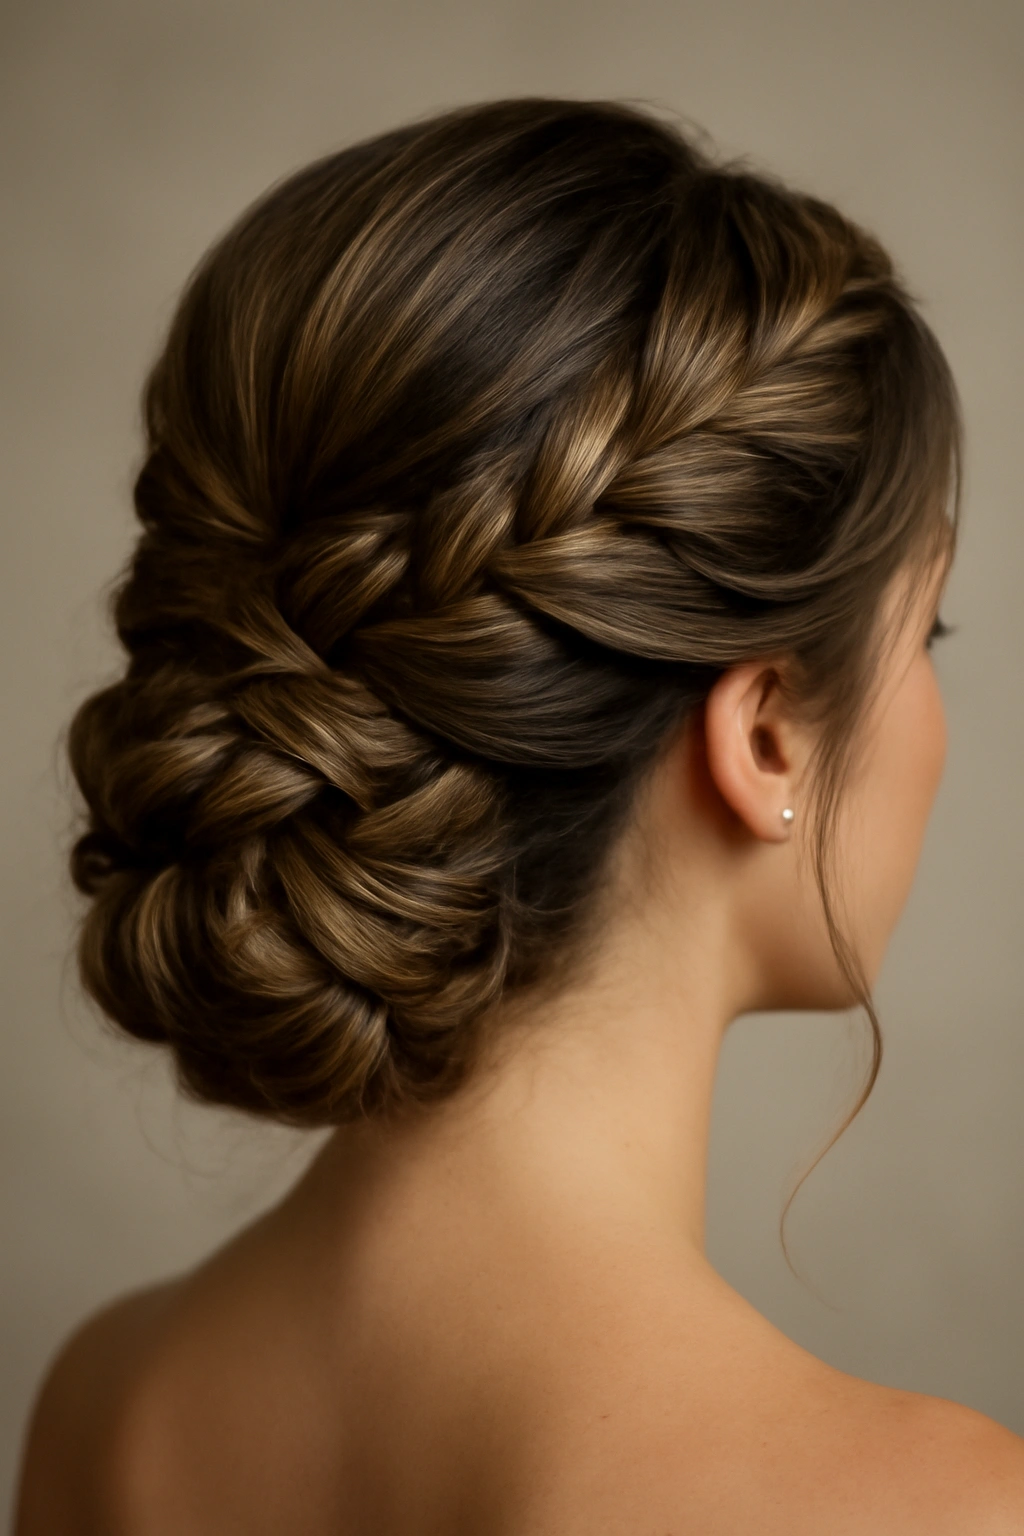
An updo in thick, straight hair needs visual interest built into the style itself because the hair texture won’t provide it. An elegant updo that plays with braids, twists, and soft undulations throughout works beautifully. The thickness means your stylist can create intricate detail without it disappearing or looking sparse.
Why Updos Suit Thick Straight Hair
Thick hair is strong enough to hold complex braids and shapes without slipping, pinching, or breaking bobby pins. Straight hair means that whatever shape and line your stylist creates will hold cleanly and be visible in photos. The combination is ideal for showcase updos that feature texture and dimension.
Creating an Updo That Shows Detail
- Incorporate a Dutch braid, a fishtail braid, or a twisted rope element into the updo rather than keeping it as a simple bun
- Use bobby pins strategically to create definition: some pins should be hidden, but others can be intentionally placed to show structure
- Tease the base of the bun very slightly to add texture and make the finished updo look less severe
- Leave one or two small pieces down at the temples to frame the face
Worth knowing: Thick straight hair can sometimes look heavy if piled entirely on top of the head. Consider a low side updo that uses the length of your hair to elongate your silhouette rather than shortening it with a high updo.
6. Braided Crown for Fine or Textured Hair

A braided crown works beautifully for fine hair because the braid itself creates the visual illusion of thickness and density. For textured hair, the crown braid celebrates the natural texture without requiring it to hold a curl. This style works for almost any hair type, but it’s especially flattering for anyone who feels self-conscious about hair volume or density.
What Makes a Crown Braid So Flattering
A crown braid draws the eye upward and creates a halo effect that’s inherently romantic and bridal. The braid also provides structure and anchor points for a veil or headpiece. Because the braid wraps around the head, it creates the impression of fullness even if your hair is actually quite fine.
Executing a Crown Braid Correctly
- Start with dry or slightly textured hair (not freshly washed and slippery, which makes braiding difficult)
- Create a Dutch braid or a regular three-strand braid that begins at one temple and wraps around the back of the head to the other temple
- Use bobby pins to secure the end of the braid into the hair at the opposite side, creating a continuous crown effect
- Gently tease the braid slightly by pushing the woven sections outward—this adds fullness and texture
- Pin a veil or hair comb into the back of the braid for security and visual interest
Pro tip: If you have very fine hair, your stylist can create a faux crown braid using only the top sections of hair while leaving the underneath hair down. This creates the visual impression of a full braided crown without actually braiding all your hair, which can look stringy if your strands are delicate.
7. High Ponytail for Straight, Thick Hair
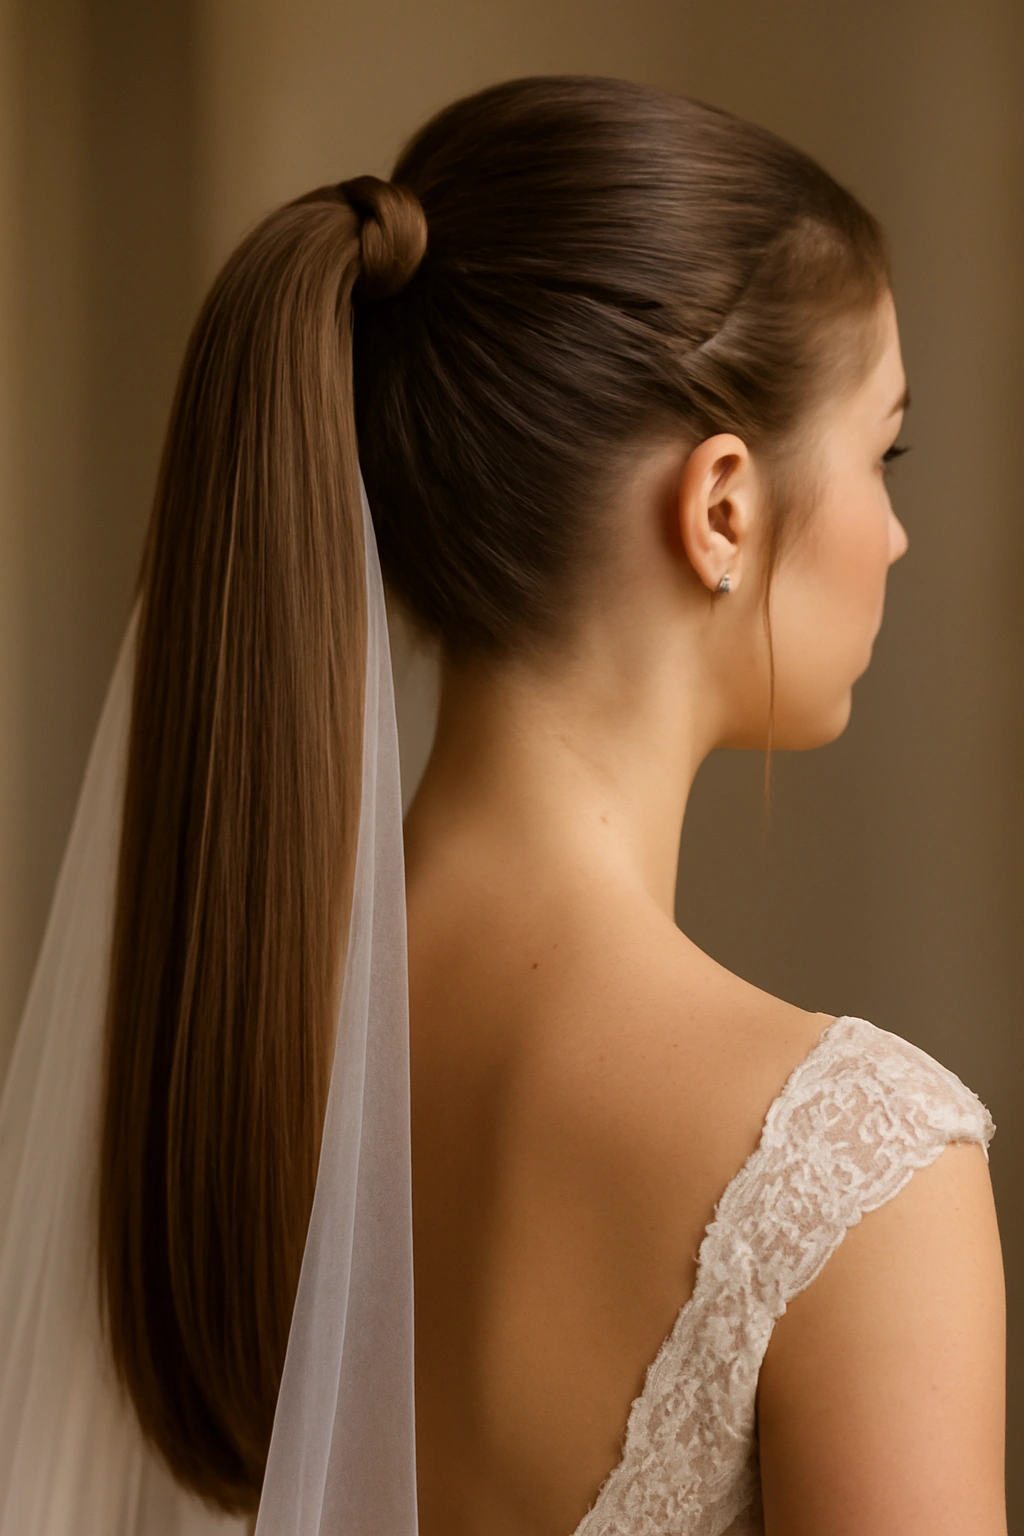
A high ponytail is an underrated bridal style that works beautifully for thick, straight hair. It’s modern, it’s clean, and it puts your face front and center for photos and the ceremony. The key is making it look intentional and polished rather than like a casual gym ponytail.
Why High Ponytails Shine for Thick Hair
A high ponytail in thick hair actually looks full and luxurious rather than thin or wispy. The density means the ponytail itself is a visual statement. You’re not trying to create volume; you’re showcasing the volume that’s already there.
Styling a Bridal High Ponytail
- Blow-dry your hair smooth and straight as a base, then apply a heat protectant
- Create a small face-framing braid or two on each side, bringing them back to where your ponytail will be
- Gather your hair into a high, tight ponytail at the crown, using the face-framing braids as a guide for where it sits
- Wrap a small section of hair around the base of the ponytail to hide the elastic
- Curl the tail of the ponytail in loose waves or leave it straight, depending on the formality you want
- Secure a veil or hair comb at the base of the ponytail
Insider note: A high ponytail photographs beautifully from behind, which matters if you have a dramatic backdrop or if your photographer will capture you walking down the aisle from the back. It’s also one of the easiest styles to maintain throughout a full day of celebrations.
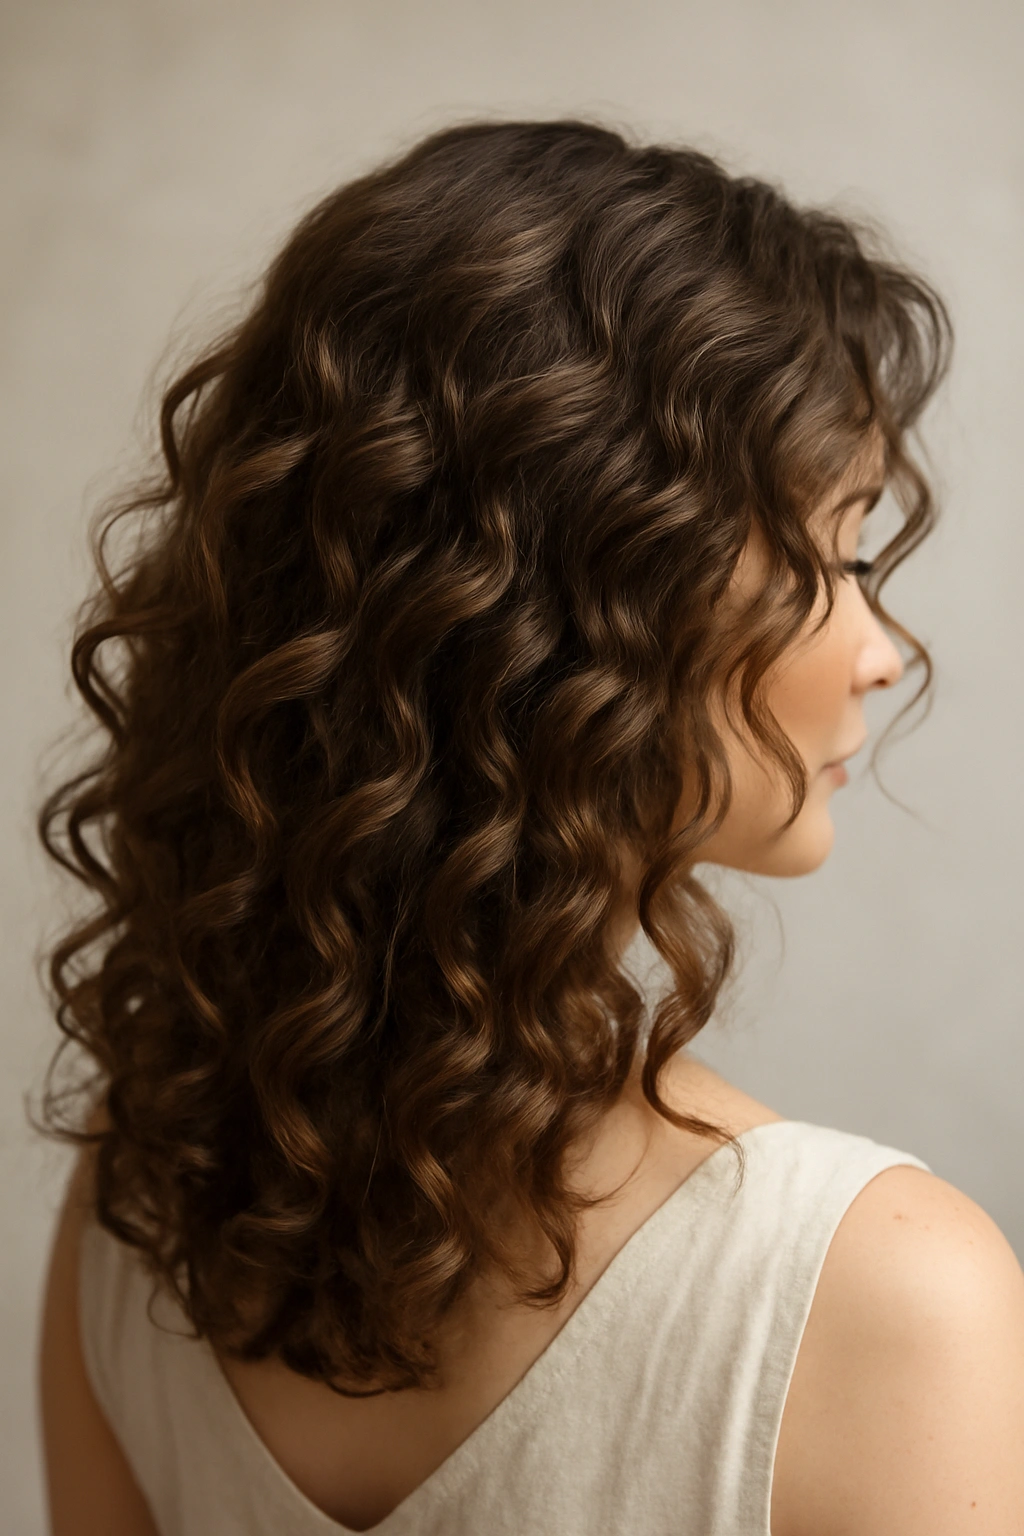
8. Tousled Waves for Naturally Curly Hair
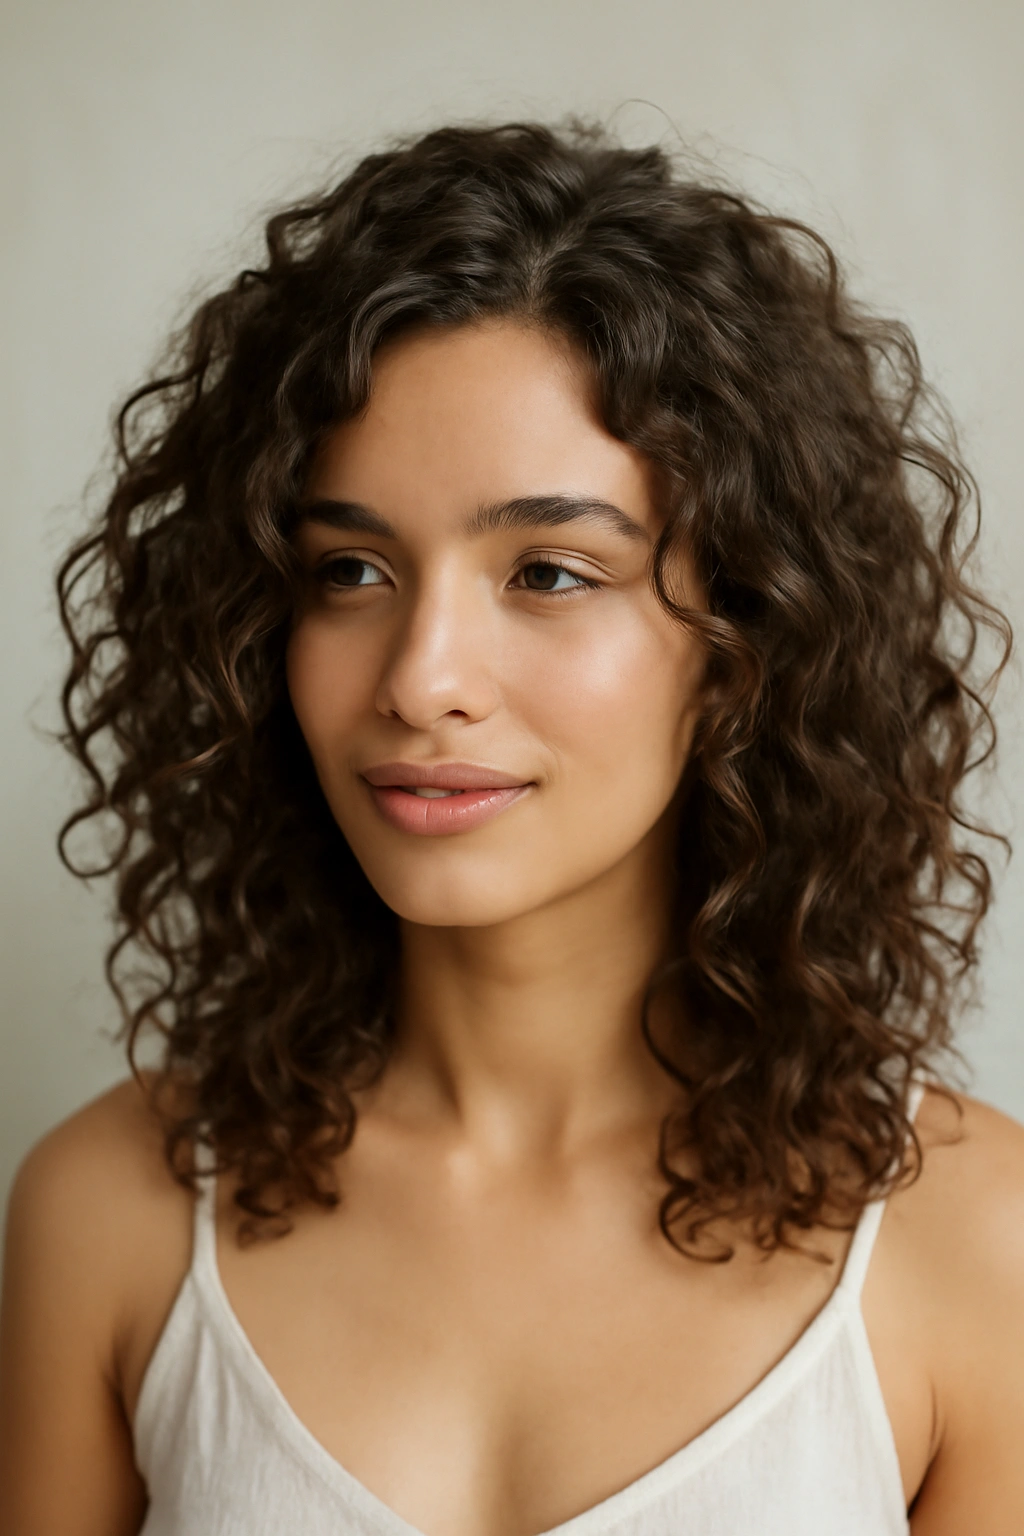
Naturally curly hair often gets pressed or straightened for formal events, but you don’t have to do that. Instead, lean into your texture with tousled waves that celebrate your curls while looking polished and intentional. This style is easier to execute and maintain than trying to fight your hair’s natural pattern.
Why Embracing Your Curls Creates Magic
Your hair is already doing the hard work of creating texture and volume. Tousled waves are simply that natural texture enhanced, defined, and styled intentionally. The result is romantic, unique, and far more forgiving than a straight style that will frizz or flatten as the day goes on.
Creating Tousled Waves from Curly Hair
- Start with clean, product-rich hair that’s been scrunched dry or air-dried to activate your natural curl pattern
- Apply a curl-defining cream or mousse to enhance your natural curls without adding crunchiness
- If you want more definition, use a diffuser attachment on your blow dryer, scrunching sections as you dry
- Once dry, gently separate individual curl clumps with your fingers to create a softer, more tousled appearance
- Use a lightweight, humidity-resistant hairspray formulated for curly hair
Pro tip: Curly hair often photographs darker and more defined than it appears to your eye in the mirror. Get a friend to take photos of your hair trial in the same lighting as your ceremony will have—morning, afternoon, or evening—so you know exactly how your style will translate in photos.
9. Sleek Straight with Side Part for Fine Hair
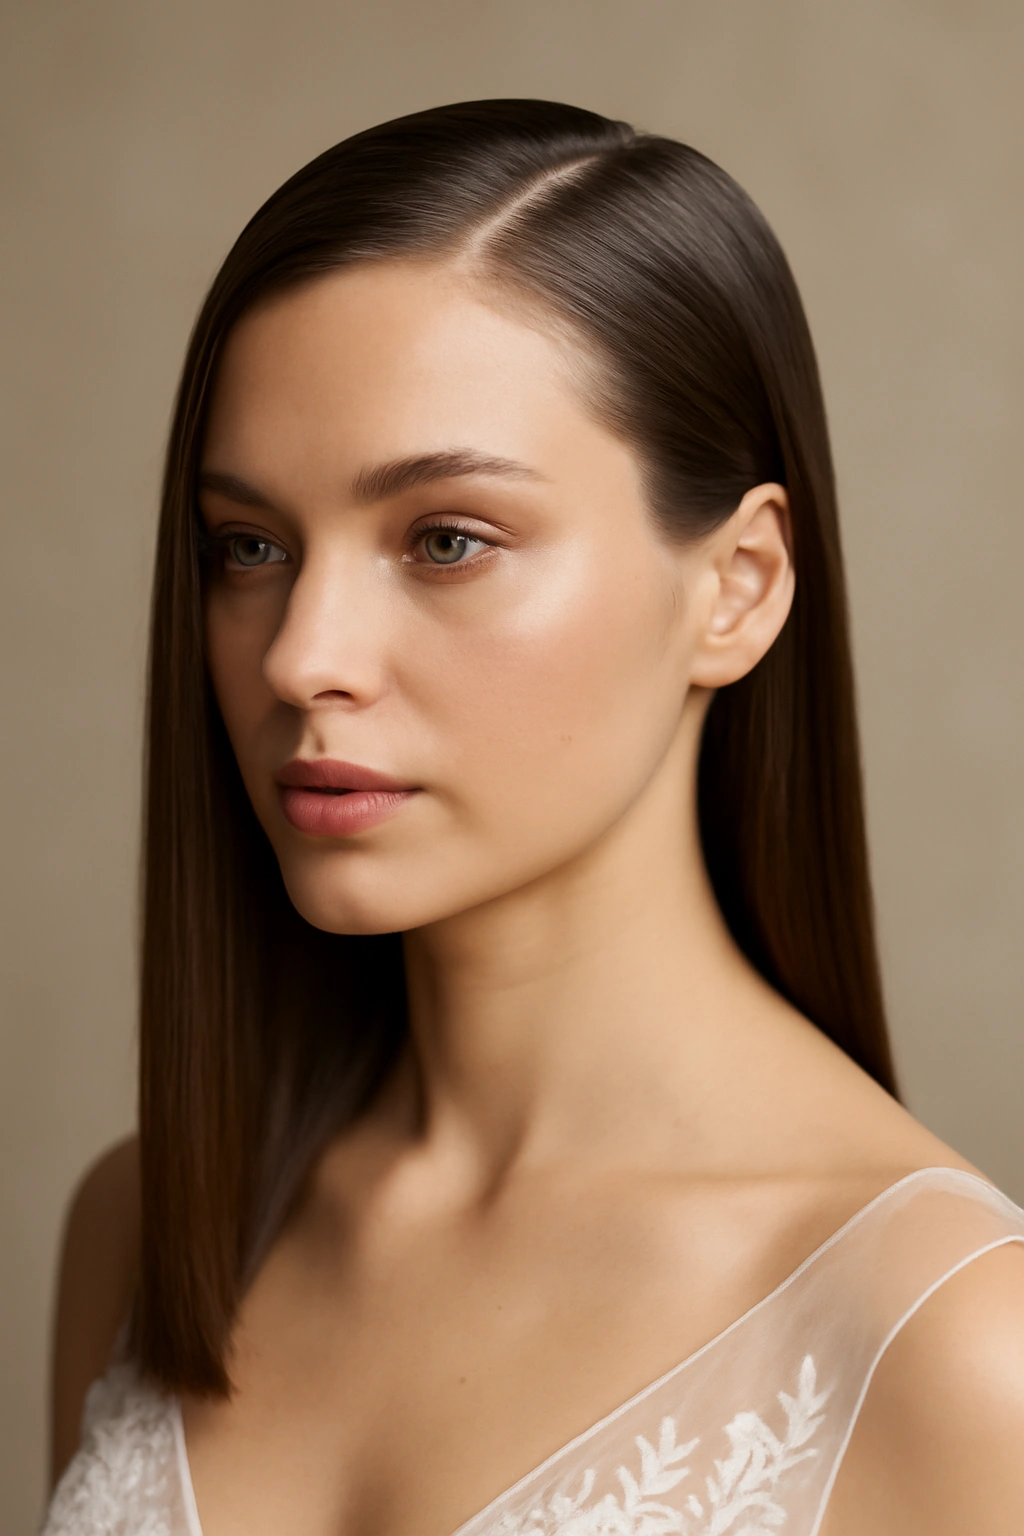
For those with fine hair who want a sleek, modern look, straight hair with a deep side part is elegant and timeless. The side part adds visual interest and asymmetry that makes the style feel intentional rather than just “I straightened my hair.” This works especially well for fine hair because there’s no volume to flatten or manage.
What Works About Straight Hair for Fine Textures
Fine hair actually looks its best when it’s sleek and smooth rather than curled or textured. Curls and waves can make fine hair look stringy or sparse, but straight, shiny hair looks thick and healthy. A side part adds dimension to what might otherwise feel one-dimensional.
Executing Sleek Straight with Impact
- Use a smoothing shampoo and conditioner designed for fine hair to prevent weighing it down while adding shine
- Blow-dry using a paddle brush to smooth the hair as you go, directing it toward the side where your part will be
- Use a flat iron to create perfectly smooth, shiny strands—no frizz, no texture, just clean shine
- Create a deep side part by combing hair strongly to one side from the crown
- Pin the smaller side gently behind your ear with a delicate hair comb or clip
- Use an ultra-light hairspray that adds hold without creating weight or greasiness
Worth knowing: Very fine hair can sometimes look sparse when completely straight and slicked back. Ask your stylist to add a subtle tease at the crown or to use a texturizing spray on the roots to create the appearance of fullness while keeping the rest sleek.
10. Voluminous Updo for Thick Curly Hair
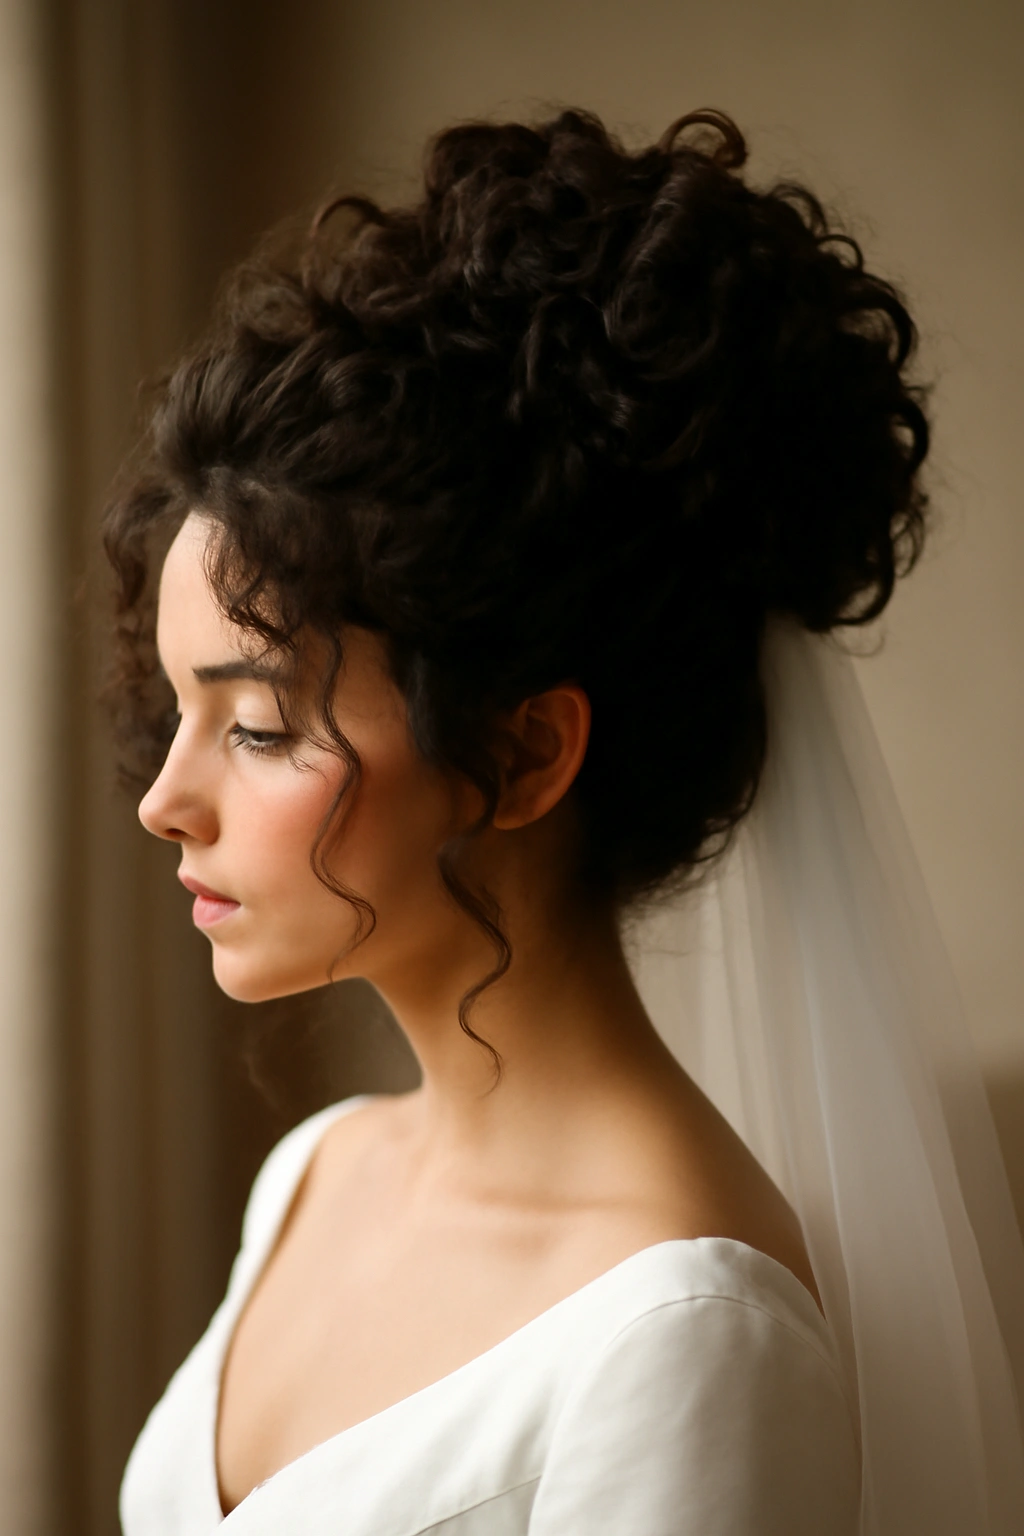
Thick, curly hair can create the most stunning updos because the texture itself provides volume and holds elaborate styles beautifully. A voluminous updo in thick curly hair is a showstopper—it’s romantic, it’s dramatic, and it uses your hair’s natural properties to maximum effect.
Why Thick Curly Hair is Ideal for Updos
Your hair already has all the texture, volume, and grip that a structured updo needs. You’re not adding artificial fullness or struggling to create texture. You’re simply gathering and sculpting what’s already there into an intentional shape.
Building a Voluminous Curly Updo
- Start with your natural curl pattern, scrunching with a curl-cream to define and enhance your curls
- Gather your hair into a ponytail at the crown or slightly lower, depending on the look you want
- Rather than smoothing the ponytail, loosely twist or braid it, then wrap it into a bun or circular shape
- Strategically pull out small sections of the bun to create a deliberately undone, romantic appearance
- Use bobby pins to anchor everything, but let some curls escape to frame your face
- Set with a medium-to-strong hold hairspray formulated for curly hair
Insider note: Thick, curly hair sometimes benefits from a consultation with your stylist a week before the wedding to discuss how your curls will feel at their best. Some curly-haired brides find their curls are bounciest right after a wash, while others prefer curls that have settled for a day or two. Plan your wedding-day wash timing accordingly.
11. Twisted Half-Up for Medium Hair
Medium hair—thick enough to hold style but not so thick that updos feel heavy—is perfect for twisted half-up styles that sit somewhere between casual and formal. Twists are elegant, they hold beautifully throughout the day, and they add a layer of sophistication without looking overly complicated.
Why Twists Work for Medium Hair
Twists have all the holding power of braids but they look more refined and modern. They work on any hair texture and they hold for hours without slipping. For medium hair, twists are the Goldilocks solution: they provide enough structure and interest without overwhelming your face or looking too casual.
Creating Twisted Half-Up Elegance
- Start with slightly textured or waved hair (not freshly washed, which is too slippery) for better grip
- Take a section of hair from one side of your part, approximately 2 inches wide, and divide it into two strands
- Twist the two strands together, wrapping one over the other in a smooth, continuous motion down toward the back of your head
- Secure the twisted section at the back of your head with a bobby pin
- Repeat on the other side, bringing both twisted sections together at the back
- You can secure them with a single clip or comb, or weave them together for additional interest
- Leave the bottom half of your hair down in waves, curls, or straight style depending on your preference
Pro tip: Twisted styles hold better if you apply a light texturizing spray or dry shampoo to the hair before twisting. This increases grip and prevents slipping throughout the day.
12. Faux Bob Wrap for Long, Thick Hair
If you love the idea of a bob but you’re not ready to cut your hair, a faux bob wrap creates the illusion of a blunt bob while keeping your length intact. It’s especially stunning on thick, straight hair where the wrap looks polished and intentional. This style is modern, it photographs beautifully, and it’s easier to maintain than you’d expect.
What Makes a Faux Bob So Clever
A faux bob wrap works by pinning the lower half of your hair up and under, creating the visual line of a blunt bob while your actual long hair is tucked away. It’s a trick, but it’s an elegant one that creates a completely different silhouette than your normal long hair.
Executing a Convincing Faux Bob
- Blow-dry your hair smooth and straight as a base
- Divide your hair horizontally at about ear level—everything below that line will be wrapped up
- Gently twist or curl the lower section and pin it securely to the crown area, hidden underneath the upper layer of hair
- The upper layer should fall smoothly over the wrapped section, creating the illusion of a blunt bob hitting at approximately ear level
- Smooth with a flat iron for a polished finish
- Pin a veil or fascinator at the crown to add bridal elegance
Worth knowing: This style is most convincing on hair that’s naturally straight or only slightly wavy. Very curly hair will show the difference between the wrapped and unwrapped sections more obviously.
13. Loose Braid for Wavy or Curly Hair
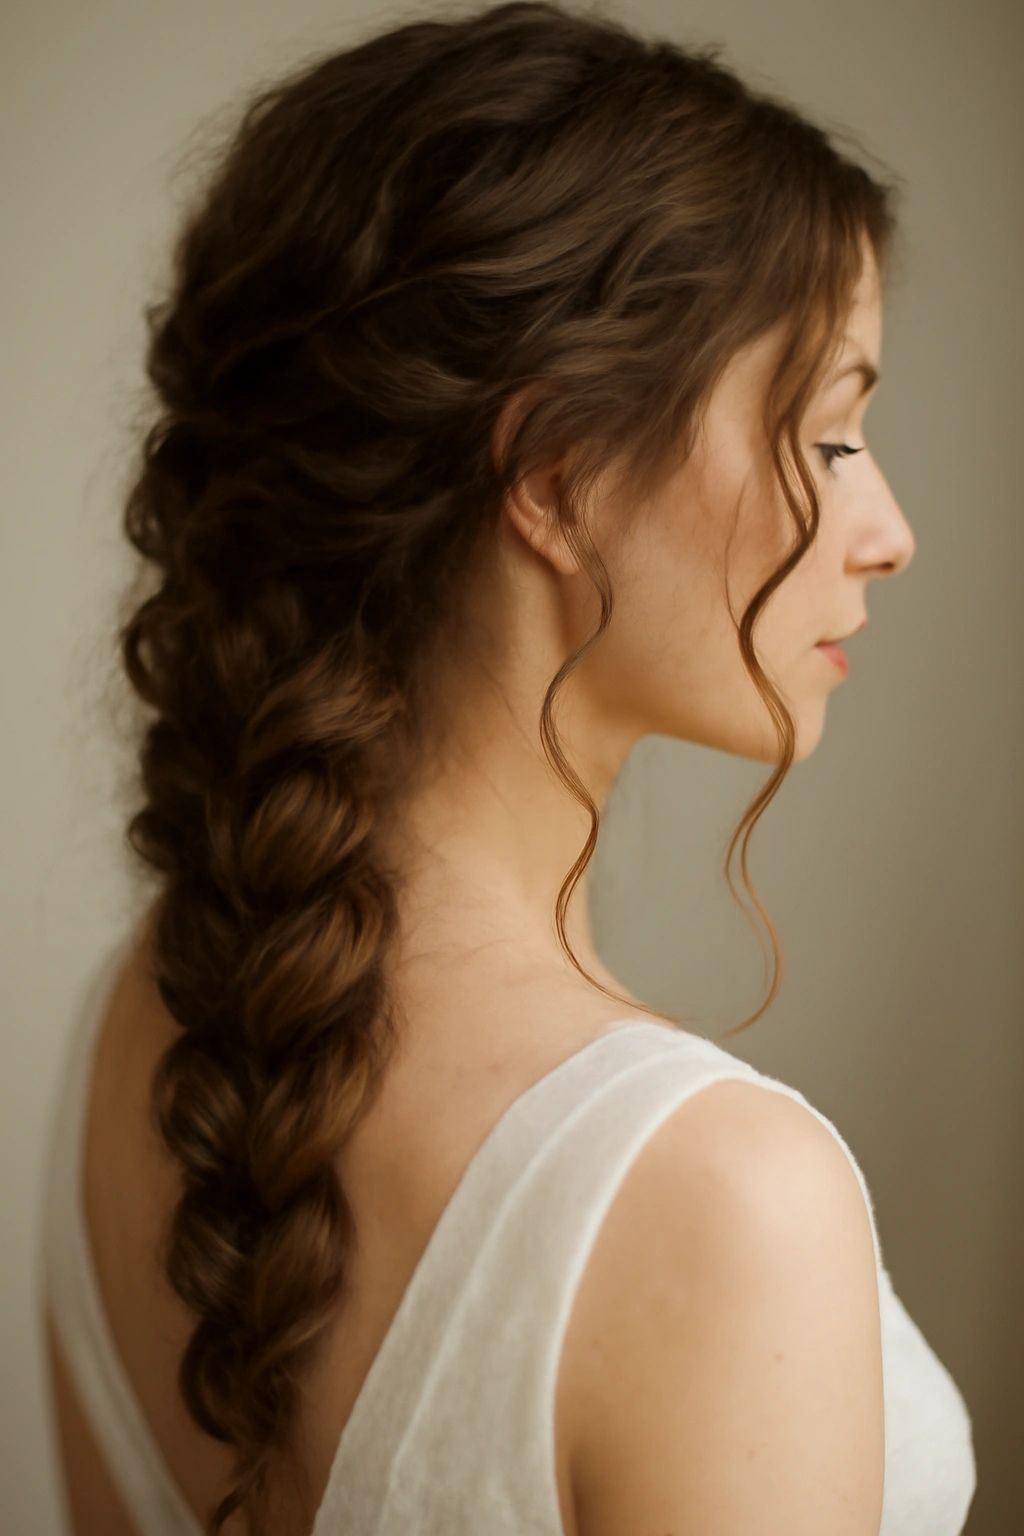
A loose, romantic braid is perfect for wavy or curly hair because the texture of your hair makes the braid look soft and effortless rather than rigid or structured. A single braid down the back or over the shoulder is simple, romantic, and timeless—a bridal classic that works beautifully with any dress style.
Why Braids Celebrate Wavy and Curly Texture
Wavy and curly hair naturally create visual interest within a braid. The strands catch light differently, the braid looks dimensional and organic rather than uniform. You’re not fighting your hair’s texture; you’re showcasing it in a way that looks intentional and romantic.
Creating a Romantic Loose Braid
- Start with slightly textured, undone hair rather than freshly washed and smooth hair
- Divide your hair into three equal sections and begin a basic three-strand braid at the crown
- As you braid, gently pull the outer sections of each loop outward, loosening the braid considerably
- The finished braid should look undone and romantic, not tight and structured
- Secure the end with a clear elastic or a silk hair tie
- Tuck in a few baby’s breath flowers or small sprigs of greenery into the braid for a romantic touch
- If you want a side braid, simply begin the braid at one temple rather than the crown and bring it over the shoulder
Pro tip: Wavy and curly hair holds a braid better if you braid it on the day of the wedding rather than braiding it the night before. Hair that’s been in a braid overnight can develop a permanent kink, and then when you unbraid it for styling, the kink remains.
14. Side-Swept Style for Fine, Wavy Hair
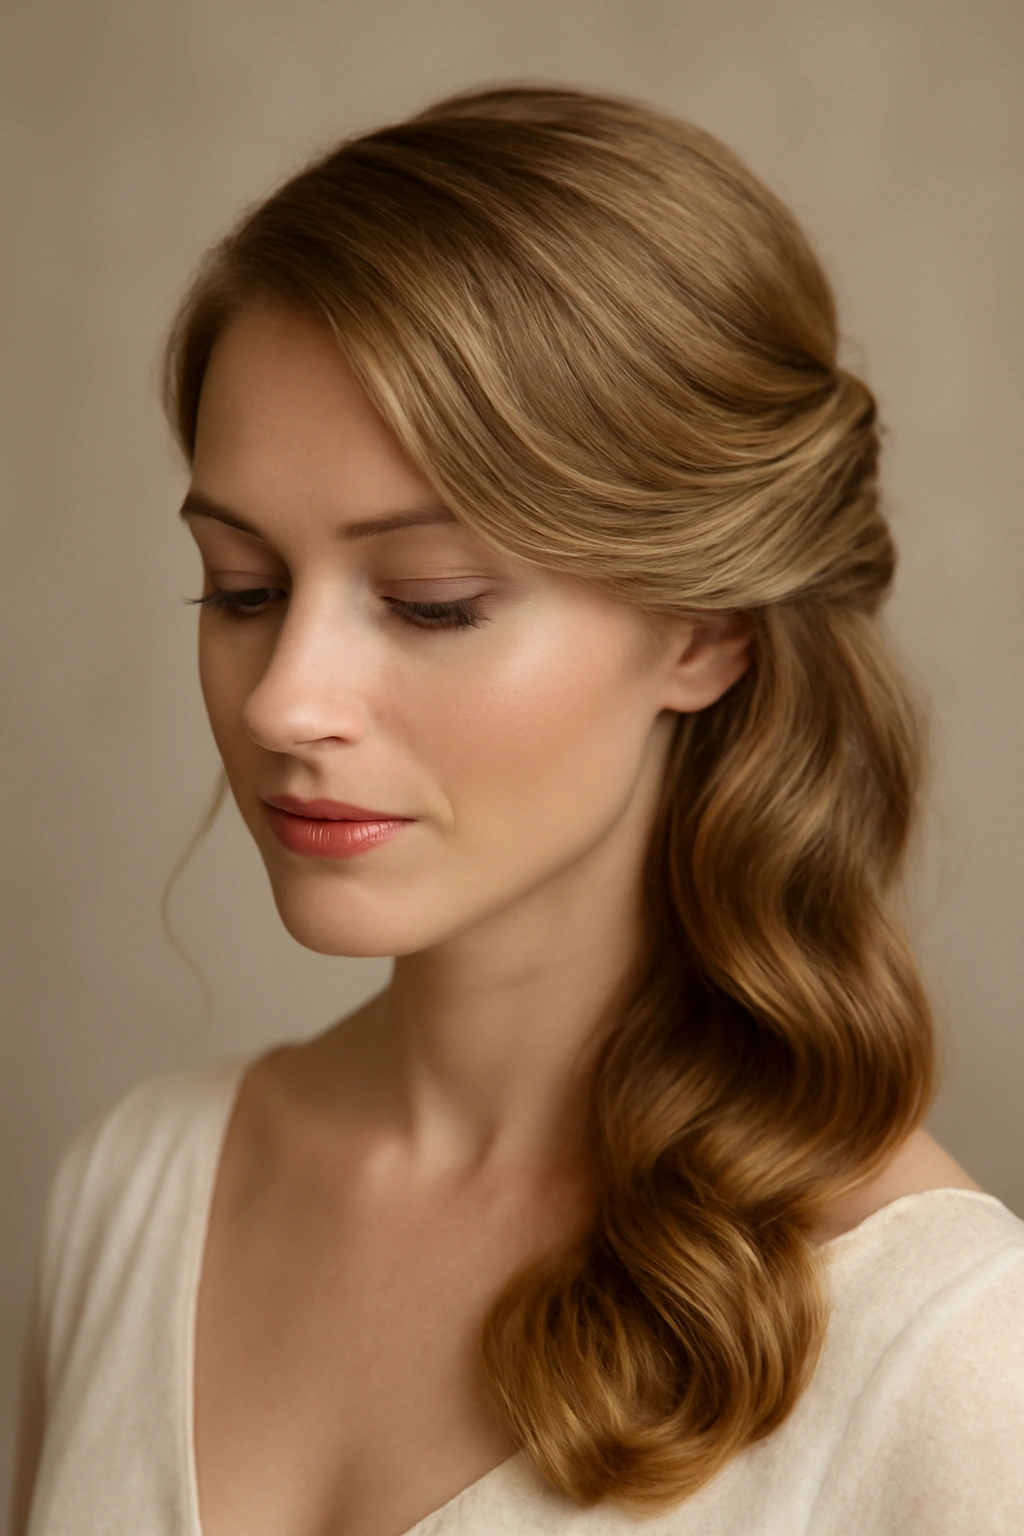
For fine hair with natural wave or texture, a side-swept style that pulls most of the hair to one side creates the illusion of fullness while being honest about your hair texture. The sweeping motion elongates your face, and the asymmetry is more visually interesting than centering all your hair.
What Makes Side-Swept Styles Work for Fine Hair
A side-swept style gathers the hair to one side, which creates the appearance of density at that collection point. It’s also deeply romantic and flattering to most face shapes. The asymmetry is modern without looking trendy or dated.
Building a Side-Swept Look
- Blow-dry your hair with a side part, directing volume toward the side where the sweep will be
- Create loose waves or curls throughout your hair using a 1.25-inch barrel iron
- Use a texturizing spray to add grip and make your fine hair hold the wave better
- Gather a large section of hair from the opposite side of your head and sweep it across the back toward the fuller side
- Secure with bobby pins hidden underneath the swept hair
- Leave a few face-framing pieces loose on the smaller side of your head to add softness
- Finish with a flexible-hold hairspray that won’t weigh down fine strands
Insider note: Side-swept styles photograph beautifully from the side angle, so make sure your photographer knows to capture you from the side as well as straight-on. This style really shines when you can see the full sweep of hair across the back.
15. Geometric Modern Bun for Straight Hair
For brides who want something contemporary rather than traditionally romantic, a geometric or architectural bun in straight hair makes a bold statement. This style is clean, modern, and it photographs as editorial and artistic rather than conventional bridal.
Why Modern Buns Work for Straight Hair
Straight hair creates clean lines and geometric shapes far more effectively than textured hair. A modern bun in straight hair can look graphic and intentional, almost like wearable art. It’s perfect for minimalist wedding aesthetics or non-traditional ceremonies.
Creating a Geometric Modern Bun
- Blow-dry your hair completely smooth and straight as a base
- Create a super-tight, high or low ponytail depending on where you want your bun to sit
- Rather than wrapping the ponytail loosely into a romantic bun, twist it tightly and wrap it into a compact, almost architectural shape
- Use multiple bobby pins to hold the bun in a specific geometric form: some buns are perfectly round, others are more angular and slightly flattened
- Smooth any flyaways with a smoothing serum and secure with a strong-hold hairspray
- Consider adding a small, modern hair comb or minimalist headpiece that echoes the geometric aesthetic
Pro tip: Modern buns look especially striking when paired with a sleek, minimalist veil or no veil at all. They’re also ideal if you’re wearing your hair down or in an unconventional wedding dress style.
16. Cascading Curls for Naturally Curly Hair
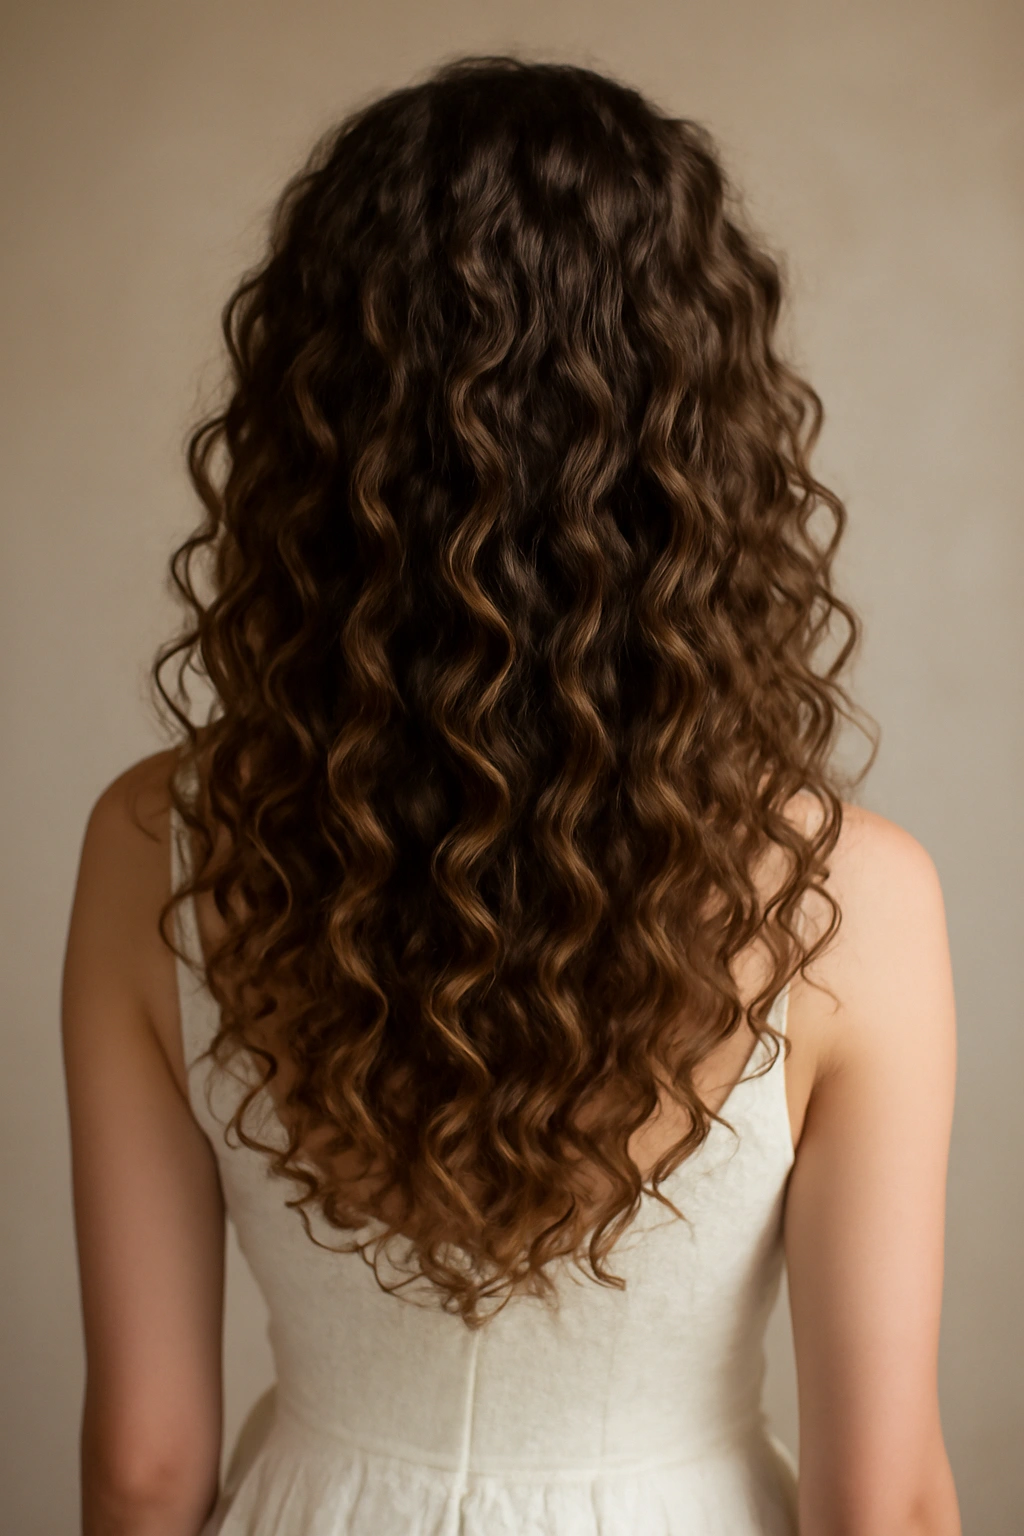
Naturally curly hair deserves to be celebrated, and cascading curls that flow down your back and over your shoulders are the ultimate way to do that. This style is unapologetically feminine, it’s unique to your hair, and it photographs beautifully with movement and dimension.
What Makes Cascading Curls So Striking
Your hair’s natural curl pattern creates movement and texture that no amount of curling iron work can replicate. Cascading curls lean into that authentic texture, enhanced and defined but not altered. The result is romantic, it’s distinctly you, and it’s far easier to maintain than styles that fight your natural hair.
Building Cascading Curls
- Start with clean hair and apply a curl-defining cream or gel to damp hair
- Dry your hair using a diffuser attachment, scrunching as you dry to encourage curl formation
- Once fully dry, gently separate curl clumps with your fingers to create defined but not frizzy-looking curls
- If you want some curls to cascade forward over your shoulders more dramatically, pin them in a specific direction as you style
- Use a humidity-resistant hairspray formulated for curly hair to combat frizz as the day goes on
- Consider pinning back just one small section on each side to keep some hair off your face while letting the bulk cascade down
Worth knowing: Humidity is both a friend and an enemy of cascading curls. On a humid wedding day, your curls will be bouncier and fuller, which is usually an advantage. But bring a humidity-fighting product and a tiny spray bottle of water mixed with hairspray for touch-ups if needed.
17. Dutch Braid Updo for Thick Hair
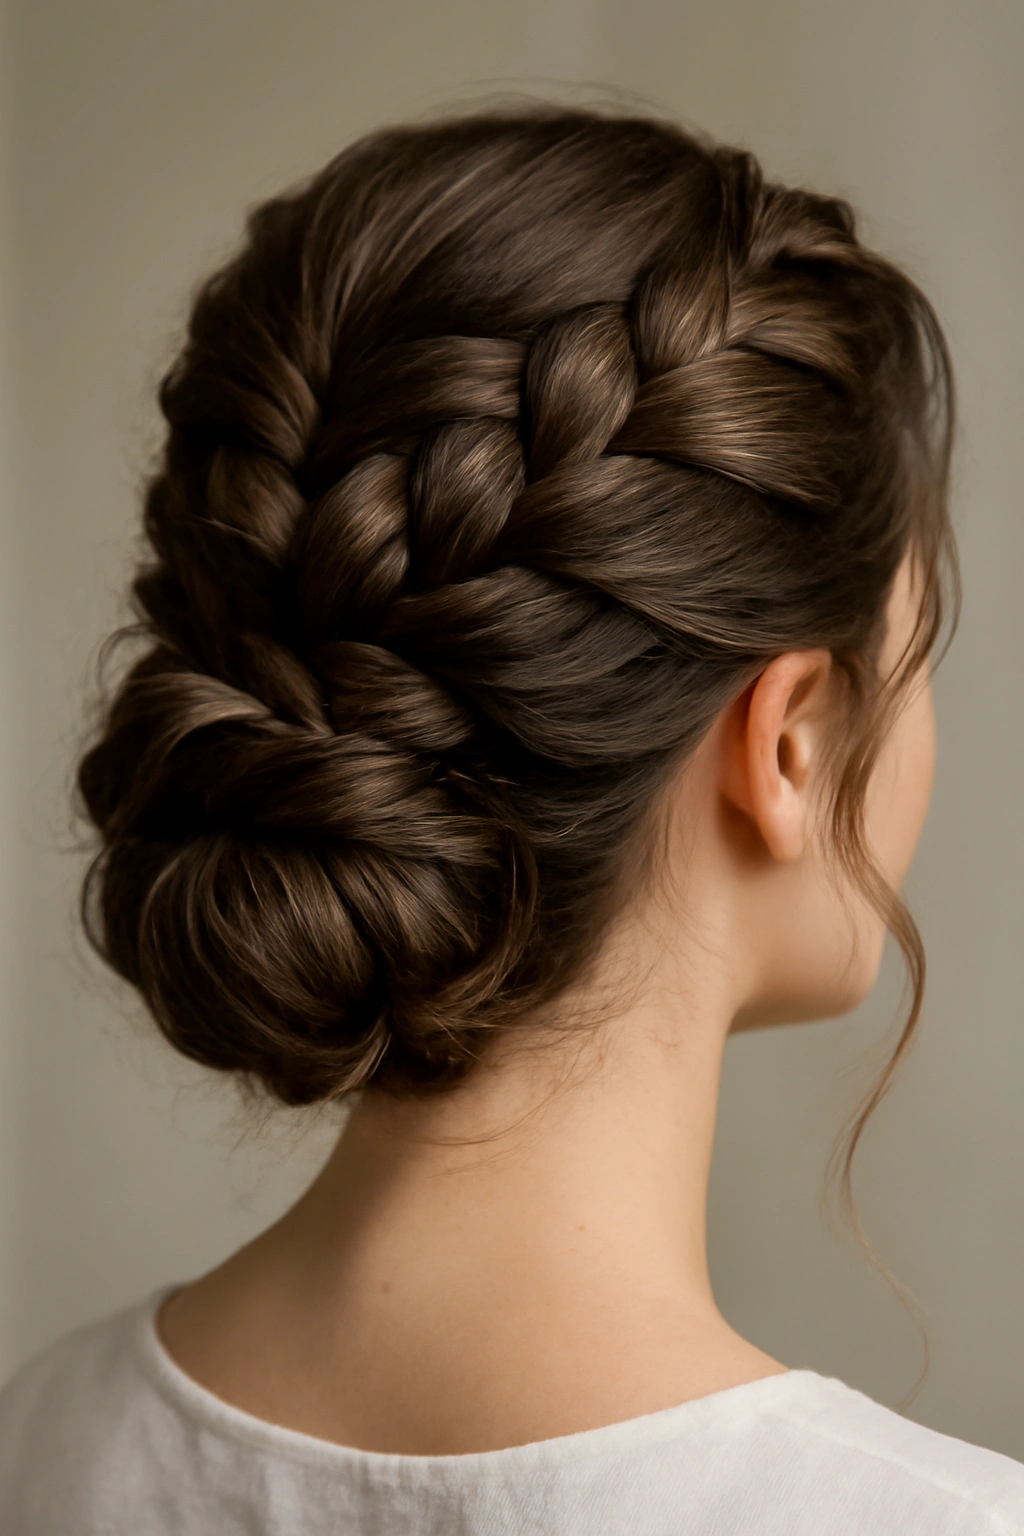
A Dutch braid (which is an inside-out braid, creating a raised, three-dimensional effect) incorporated into an updo is a showstopper for anyone with thick hair. The braid adds visual interest and dimension to the updo, and the Dutch braid technique creates that impressive raised effect that photographs beautifully.
Why Dutch Braids Suit Thick Hair
Dutch braids are more visually dramatic than regular braids, and they need thick hair to look their best. Thick hair gives the braid dimension and makes each loop of the braid visible and impressive. On fine hair, Dutch braids can look stringy, but on thick hair, they’re stunning.
Creating a Dutch Braid Updo
- Blow-dry your hair with volume at the crown
- Begin a Dutch braid at the crown, weaving strands under rather than over to create that raised effect
- As you braid down the back of your head toward your neck, let some hair remain loose rather than incorporating every strand
- Once you’ve braided as far as you want to go (typically to the nape of the neck), gather all your hair—braided and loose—into a low bun
- Wrap the bun in sections and secure with bobby pins
- Gently pull sections of the bun outward to create a slightly undone, romantic appearance
- The Dutch braid should be visible running through the top of the bun, creating a stunning visual effect
Pro tip: This style is best executed by a professional stylist who has experience with Dutch braids. It’s more complex than a basic braid, and the technique matters significantly for how impressive it looks.
18. Soft Romantic Updo for Medium, Straight Hair
Medium, straight hair is ideal for soft, romantic updos that feel timeless and effortlessly elegant. This style is what most people envision when they picture a classic bridal hairstyle—soft, romantic, and intentionally styled but not overdone.
What Makes Romantic Updos Work for Medium Straight Hair
Medium straight hair has enough length to create an updo that reads as substantial without being heavy, and enough body to hold the style without slipping. Straight hair means any texture you add through curling or teasing is intentional and visible.
Creating a Soft Romantic Updo
- Blow-dry your hair smooth as a base, then add waves or curls throughout using a 1.5-inch barrel iron
- Gather your hair into a loose, low ponytail at the nape of your neck
- Divide the ponytail into 2-3 sections and loosely twist each section
- Wrap the twisted sections around each other and into a soft, undone bun shape
- Pull small sections out of the bun to create that deliberately romantic, slightly messy appearance
- Use bobby pins to secure everything, but try to minimize visible pins by placing them strategically
- Tease slightly at the crown to add lift and make the style feel less severe
Insider note: Soft romantic updos hold better if you apply a texturizing spray or dry shampoo before styling. This increases grip and prevents the style from slipping or loosening throughout the day.
19. Textured Low Ponytail for Curly Hair
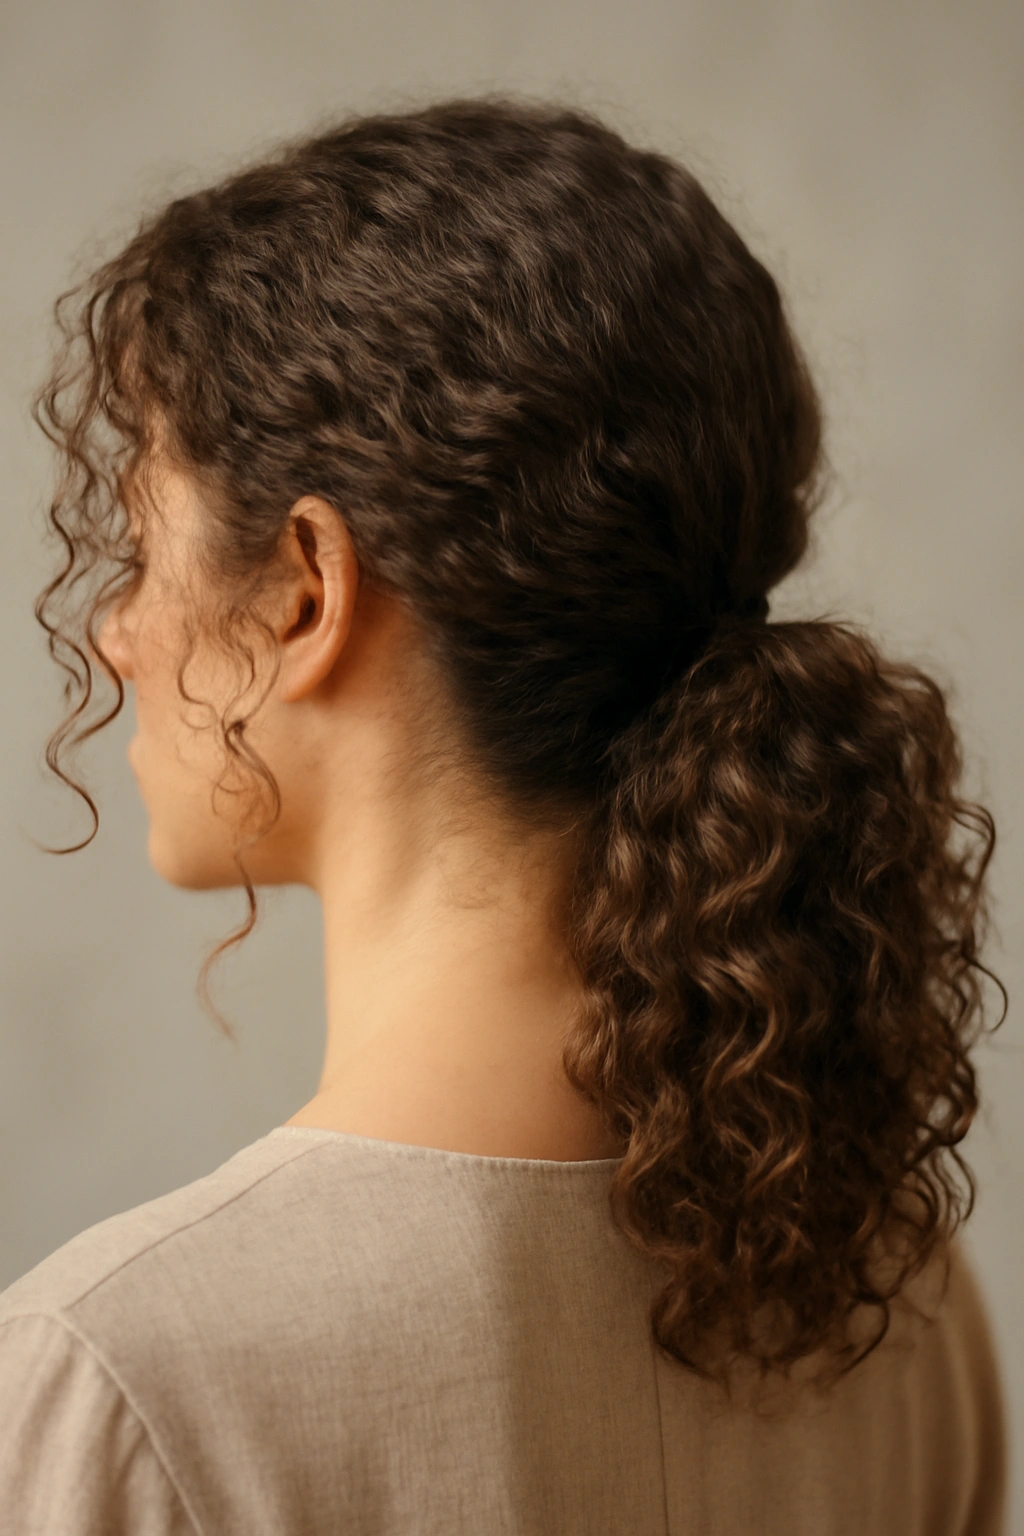
A low ponytail in curly hair is the perfect compromise between “my hair is down” and “my hair is up.” Your curls remain visible and celebrated, but you’ve got them contained and controlled enough that you can see your face and neck clearly. This style is practical, beautiful, and makes sense for curly-haired brides.
Why Low Ponytails Are Ideal for Curls
Curly hair in a low ponytail remains dimensional and textured. The curls at the bottom of the ponytail can flow freely, creating movement and length. The style feels romantic without requiring you to fight your natural texture or commit to an updo.
Building a Textured Low Ponytail
- Style your curls as you normally would: applying curl cream, diffuser-drying, and scrunching to define your curl pattern
- Gather your hair into a low ponytail at the nape of your neck, but keep it fairly loose rather than super-tight
- Use a clip, comb, or elastic that won’t create a visible line of demarcation between curly and straight hair (since you’re keeping it low, you want the entire ponytail to remain curly)
- Gently separate the curls in the ponytail to create more visual interest and volume
- Leave a few small face-framing pieces down on each side to soften the look
- Use a humidity-resistant hairspray formulated for curly hair
Pro tip: This style is one of the easiest to touch up throughout the day. If a curl relaxes or flattens, you can easily scrunch it back into shape with your fingers and a spritz of water or product.
20. Sleek Smooth Waves for All Hair Types
If you’ve spent this entire list trying to figure out which style works for your hair, here’s the universal option: sleek smooth waves work beautifully on almost every hair type. This style is forgiving, it photographs well, it’s romantic without being overly styled, and it’s one of the easiest to maintain throughout a full day of celebrating.
Why Waves Work for Everyone
Waves are romantic and intentional without being complicated. They work on straight hair because they’re easy to create and hold. They work on wavy hair because they enhance natural texture. They work on fine hair because they add the illusion of fullness. They work on thick hair because waves are flattering regardless of hair volume.
Creating Universal Sleek Smooth Waves
- Blow-dry your hair smooth and straight as a base, whether your hair is naturally straight or wavy
- Apply a heat protectant spray all over
- Using a 1.5-inch barrel curling iron, curl vertical sections of hair, curling away from your face on both sides
- After curling each section, pin it to your head and let it cool before releasing—this sets the wave
- Once all sections are cooled, brush through very gently with a paddle brush to blend waves into a soft, undone appearance
- Use a flexible-hold hairspray that creates definition without crunchiness
- Pin waves to one side of your head with bobby pins, or leave them loose and flowing depending on your preference
Worth knowing: This is the hairstyle most brides request, which means most stylists are excellent at creating it. If you’re nervous about your wedding-day hair, choosing sleek smooth waves is a safe, beautiful choice that virtually guarantees you’ll feel confident and look stunning in photos.
Final Thoughts
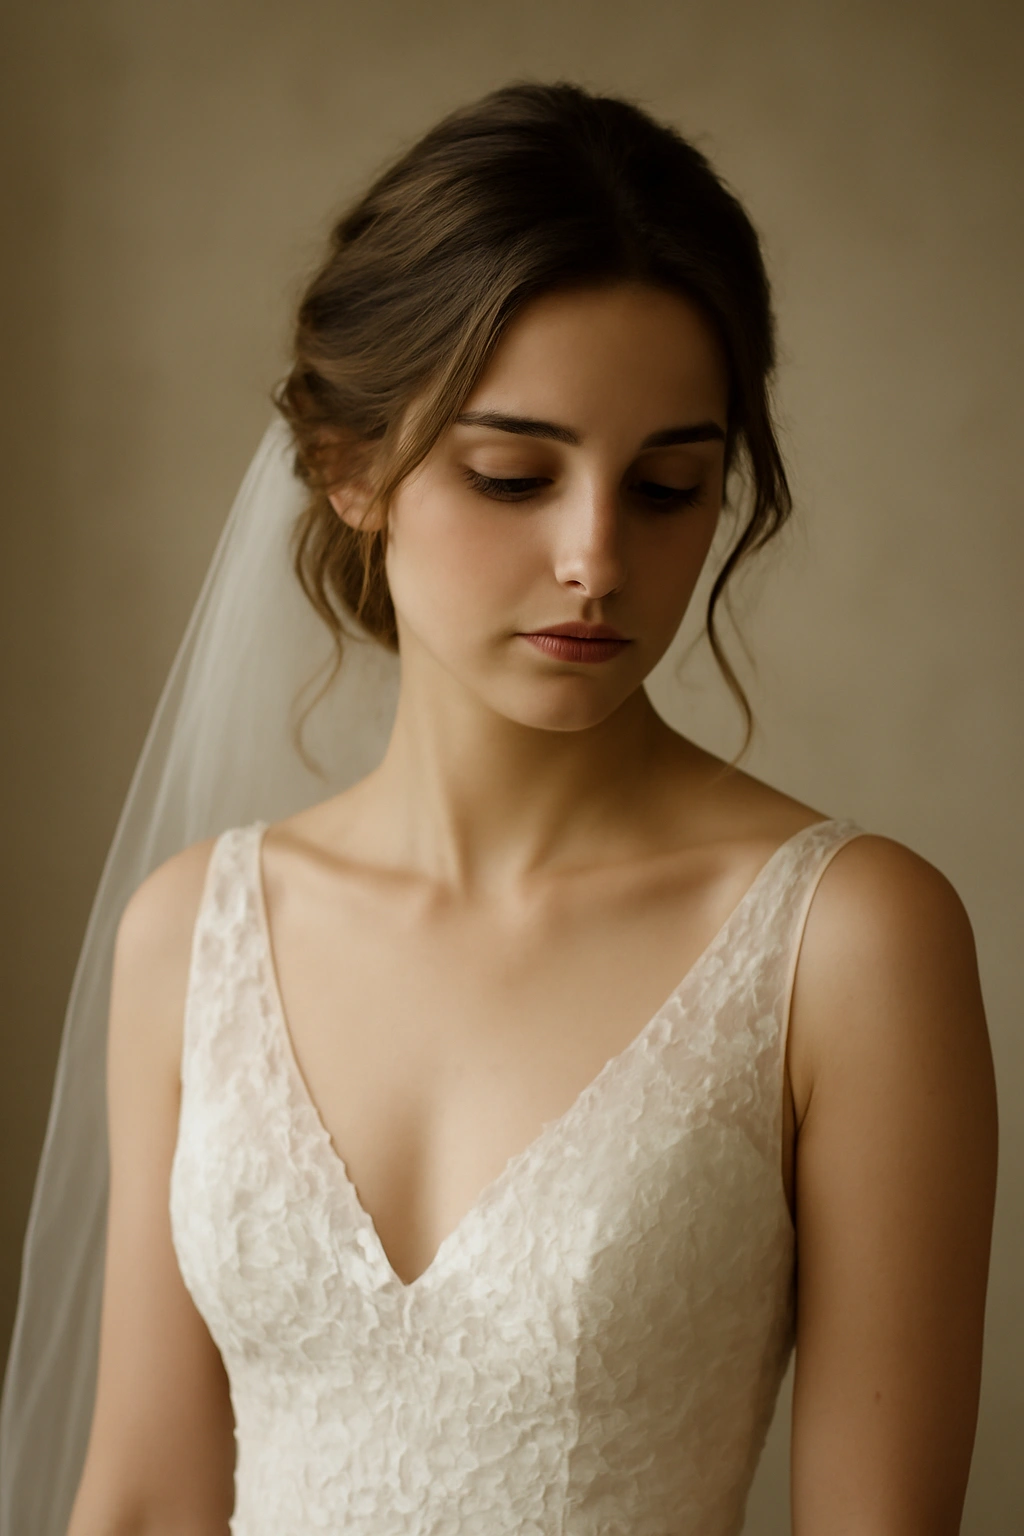
Your wedding hairstyle should make you feel like the most beautiful, most confident version of yourself—not like you’re fighting your hair or trying to be someone you’re not. The best bridal hairstyle isn’t the one that’s most trendy or the one your mother-in-law loved on her daughter. It’s the one that works with your hair’s natural texture and behavior, that suits your face and your dress, and that you can actually wear comfortably all day without worrying about it falling apart.
The truth is that hair type matters far more than most brides realize when choosing a wedding style. Fine hair has different needs than thick hair; straight hair behaves completely differently from curly hair. When you choose a style that’s matched to your actual hair rather than fighting against it, you gain hours of holding power, you reduce the amount of product and styling you need, and you end up with a style that actually looks like you on your wedding day.
Start your search by being brutally honest about your hair type and what your hair actually does, not what you wish it would do. Find a stylist who specializes in your hair type and who gets genuinely excited about creating a style for you—not someone who’s just going through the motions. Do a full trial run before the wedding, and ask your stylist tough questions about how the style will hold up, what products you’ll need, and what touchups might be required. Your hair will thank you, and so will your photos.