Your wedding day is the one time you get to invest heavily in your hair without second-guessing yourself. The hairstyle you choose becomes part of your entire wedding day narrative — it sets the tone for photos, supports your dress and flowers, and makes you feel like the best version of yourself. The challenge isn’t finding a wedding hair idea; it’s finding the one that feels authentically you while working with your hair type, face shape, dress style, and the kind of celebration you’re having.
Wedding hair has moved far beyond the “updo-or-nothing” mentality that dominated decades ago. Modern brides wear pixie cuts with delicate jewelry, sleek bobs with dramatic accessories, braided half-ups with wild texture, and flowing waves with statement pieces — all with complete confidence. The diversity of options means that whether you have fine, straight hair or thick curls, whether you’re drawn to romantic or architectural styles, whether you’re planning an intimate garden ceremony or a formal black-tie reception, there’s a hairstyle that will make you feel incredible.
What makes a great wedding hairstyle isn’t just how stunning it looks in that moment — it’s how it holds up throughout the entire day. You’ll be hugging people, dancing, possibly crying happy tears, moving from venue to venue. Your hair needs to be as practical as it is beautiful, secure enough to last from first dance to final photos without falling apart, but not so heavily pinned that it gives you a headache. The ideas below span from the boldest short cuts to the most romantic long waves, with thoughtful details about what makes each one work, how to customize it for your features, and the real-world durability factors that matter when you’re wearing this style for 12+ hours.
1. Modern Pixie Cut With Soft Texture

A pixie cut as a wedding hairstyle signals confidence, and when done well, it’s nothing short of stunning. The key to a wedding-appropriate pixie isn’t just the cut itself — it’s adding softness and femininity that complements your dress and overall aesthetic without compromising the clean, modern lines that make a pixie so striking.
Why This Works for Weddings
A pixie cut completely changes the focus to your face, your jewelry, and your expression. Without hair framing or covering your features, your bone structure, your smile, and your eyes become the centerpiece. This is especially powerful if you have beautiful skin, defined cheekbones, or striking eye makeup. The simplicity of a pixie also means you’re not fighting with length all day — there’s nothing to tangle, flatten, or shift as you move.
Making It Feel Bridal
- Add subtle waves or texture throughout using a curling iron or texture spray for movement and dimension
- Incorporate a delicate hair comb, thin jeweled headpiece, or small fascinator clipped into the side
- Style the back and sides slightly longer than typical pixie proportions for softer edges
- Consider a side-swept bang or slightly tousled top for a less severe silhouette
- Pair with bold, defined makeup since there’s nothing to soften or balance your features
This works exceptionally well with modern, minimalist dresses, sharp tailored suiting, or any style where you want the focus on your face and upper body rather than an elaborate updo.
2. Sleek Low Bun With Tendrils

A sleek low bun is the workhorse of wedding hairstyles — polished enough for formal celebrations, practical enough to actually survive a full day of events, and flattering across virtually every face shape and dress style when styled with intention.
The Sophistication Factor
What separates a “regular everyday bun” from a wedding bun is obsessive attention to smoothness, placement, and the strategic release of a few softening tendrils. The bun should sit low on the back of your head, just above the nape of your neck, positioned to elongate your neck and balance your proportions. The front hairline should be absolutely smooth — this requires a good smoothing serum or gel and a fine-tooth comb, plus strategic bobby pins that are genuinely invisible against your hair color.
Finishing Touches That Matter
- Release 2-3 thin face-framing pieces that curve softly around your face
- Create one or two delicate tendrils from the underside of the bun that frame the nape of your neck
- Weave a thin silk ribbon, pearl strand, or delicate hairpiece through the bun itself
- Use a high-quality matte finish hairspray to keep everything locked in place without shine
- Ensure the base of the bun has enough bobby pins (usually 8-10) that it won’t shift or rotate throughout the day
A low bun pairs beautifully with statement earrings, an exposed back dress, or any style where you want an elegant, timeless silhouette.
3. Half-Up, Half-Down With Braided Crown

The half-up style is the romantic middle ground between leaving your hair down and fully pinning it up. When done with a braided crown element, it creates a look that feels ethereal and intentional — like you woke up looking this good rather than spending three hours getting ready.
Building the Braided Crown
Start with a thin Dutch braid or three-strand braid along your hairline from one ear to the other, sitting just above your temples. This crown braid doesn’t need to be perfectly tight; in fact, slightly loose and textured braids feel more romantic and modern. Once you’ve braided across the crown, gather the remaining hair from roughly ear level upward into a low ponytail at the back of your head and secure it with a clear elastic or a small claw clip.
Texture and Release
- Gently tug the braids to create softness and width
- Leave the bottom half of your hair down and curled or waved for movement
- Release 2-3 thin tendrils around your face to frame your features softly
- Incorporate baby’s breath, small white flowers, or delicate greenery into the braided section
- Use a texturizing spray before styling to give your hair grip and prevent the braid from sliding
This style works gorgeously with bohemian dresses, garden ceremonies, and any aesthetic that embraces romance and movement over rigid formality.
4. Sleek Straight Bob With Deep Side Part

A polished bob — sharp, symmetrical, and styled with a deep side part — is pure modern elegance. This is the wedding hairstyle for someone who doesn’t want to look like anyone else’s version of “bridal hair.” It’s architecture and attitude combined.
The Technical Requirements
This style demands either professionally straightened hair or hair that’s naturally straight and cooperative. You’ll need a ceramic flat iron, a smoothing serum that actually works, and the kind of hairspray that holds without leaving residue. The side part should be deep enough to create real visual interest — not a middle part slightly off-center, but a genuine deep side that has weight and intention.
Elevating It Beyond Everyday
- Style the back shorter than the front for extra modern lines and movement
- Tuck the shorter back section behind your ears with an invisible bobby pin for a slightly exposed-ear look
- Add a thin metal hair cuff, jeweled barrette, or sculptural clip at ear level
- Consider a high-shine serum that catches light without looking wet
- Pair with strong, graphic eye makeup since your hair is minimal
A sharp bob pairs spectacularly with modern wedding dresses, tailored separates, or any bride who wants to look sharp and architectural rather than soft and romantic.
5. Romantic Curls With Flower Crown

If you’re envisioning yourself in soft, tumbling curls with flowers woven throughout, this is the style that delivers that fantasy. It requires commitment to setting curls properly, but the payoff is the quintessential romantic bride aesthetic that photographs gorgeously.
Creating Long-Lasting Curls
Start with damp hair and apply a curl-enhancing cream or mousse to your roots and mid-lengths. Section your hair into 6-8 larger sections and use a large-barrel curling iron (1.5 to 2 inches in diameter) to create loose, bouncy curls. The key is wrapping the hair around the barrel, holding for 8-10 seconds, then gently releasing the curl downward rather than unwrapping it upward. Let the curls cool completely before touching them — this sets the shape and increases longevity.
Adding the Flowers
- Choose flowers that won’t wilt under the heat of your scalp — roses, ranunculus, spray roses, and baby’s breath are reliable choices
- Create a loose flower crown using floral wire and tape, or have your florist create a custom piece
- Secure the crown with bobby pins hidden underneath the curls
- Intersperse individual stems or sprigs throughout your curls if a full crown feels overwhelming
- Consider a soft hairspray that holds curls without creating crunchiness
This style is the dream for garden weddings, summer celebrations, outdoor ceremonies, and any bride who wants to feel romantic and feminine.
6. Twisted Low Ponytail

A twisted ponytail is a bridge between polished and playful — it looks intentional and styled without feeling stiff or overdone. The twists add visual interest and texture, elevating a simple ponytail into something that feels special and wedding-appropriate.
Building the Twisted Base
Rather than gathering hair straight back into a ponytail, create two or three twists along one or both sides of your head, each one twisted gently and secured with bobby pins. Bring these twisted sections together at the base of your neck and combine them with the remaining hair into a low ponytail. The key is that the twists should be slightly loose and textured, not tight and rope-like.
Styling and Securing
- Wrap a thin section of hair from the ponytail around the elastic to hide it and create a finished look
- Curl or wave the ponytail section for movement and romance
- Tuck a delicate hairpiece or pearl strand into the twist for subtle sparkle
- Use U-shaped bobby pins to anchor the twists without visible metal clips
- Apply a light hairspray that allows for movement rather than concrete hold
A twisted ponytail is perfect for outdoor venues, semi-formal celebrations, and any bride who wants polished hair that doesn’t feel overly formal or stationary.
7. Textured Updo With Loose Curls

A textured updo is that magical sweet spot where your hair looks like it was casually gathered rather than architecturally constructed, but every curl is in exactly the right place. It’s romantic without being precious, and it photographs beautifully from every angle.
Creating the Texture Foundation
Begin with slightly second-day hair or use a texturizing spray on freshly washed hair — completely clean, smooth hair is actually harder to work with for this style. Create loose, romantic curls throughout your entire head, larger curls on the top and slightly tighter texture through the underneath layers. Let these curls cool and sit for at least 15 minutes before you begin pinning.
Pinning the Updo
- Gather the curls loosely at the back of your head, allowing some to fall around your face and neck
- Use multiple bobby pins (at least 20-25) to anchor curls in place, threading pins through sections of curl rather than pulling everything tight
- Leave face-framing pieces down intentionally, curving softly around your cheekbones
- Allow some curls to escape around your nape for a deliberately undone feel
- Finish with a flexible hairspray that holds without creating a shellacked appearance
This style works beautifully for almost any dress and any wedding aesthetic — it’s formal enough for elegant celebrations but romantic enough for garden and outdoor events.
8. Sleek High Ponytail With Statement Piece

A high ponytail is confident, modern, and surprisingly flattering — it draws the eye upward, elongates your face, and shows off your bone structure. When paired with a statement hair accessory, it becomes a strong, memorable style that photographs beautifully.
Executing the Perfect High Ponytail
Smooth your hair back firmly with a smoothing serum and fine-tooth comb, gathering it as high on your head as you want without it pulling uncomfortably. The elastic should sit 2-3 inches above your natural crown. Use a clear elastic or one that matches your hair color. Wrap a thin section of hair around the base of the ponytail to hide the elastic and secure it with a bobby pin tucked underneath.
Choosing Your Statement
- A decorative cuff, jeweled clip, or sculptural barrette at the base of the ponytail
- A silk ribbon or pearl strand woven through the ponytail itself
- Delicate hair jewelry that hooks onto sections of the ponytail
- A combination approach: smooth base with an ornate piece anchoring the style
- Consider how this piece will be visible in photos from behind and above
A high ponytail is excellent for modern dresses, destination weddings where ease of styling is practical, and any bride who wants a youthful, energetic vibe.
9. Soft Waves With Jeweled Hairpiece

Soft waves are the traditional romance of wedding hair — they’re flattering, forgiving, and beautifully photograph. The key to making this style feel special rather than like your everyday waves is choosing a meaningful hairpiece and placing it with intention.
Creating Waves That Last
Apply a curl cream or heat protectant to damp hair and blow dry with a round brush to establish a smooth base. Using a 1.25-inch curling iron, create waves by wrapping hair around the barrel away from your face, holding for 8 seconds, and releasing. Work through your entire head in this direction, then flip the iron and work through again in the opposite direction to create multidirectional movement.
The Hairpiece
- A delicate crystal or pearl comb positioned on one side where it catches light in photos
- A thin metal headpiece that sits just above your forehead
- A jeweled clip securing a small section of hair to one side
- Multiple small hair pins scattered throughout for understated sparkle
- Ensure whatever piece you choose doesn’t feel heavy or pull on your hair during the day
Soft waves work with nearly every wedding dress style and aesthetic, making this the most universally flattering option.
10. Dutch Braid to Side Ponytail

A Dutch braid that flows into a side ponytail is romantic, practical, and distinctly bridal when done with soft texture and gentle execution. It combines the intricacy of braiding with the softness of waves.
Braiding the Foundation
Start at your hairline on one side and create a Dutch braid (braid that sits on top of the hair rather than weaving through it) that travels down the side of your head. The braid should be loose and slightly textured — gently tug the edges of the braid as you go to create softness and fullness. Once you’ve braided to approximately ear level, release the braided section and gather it along with your remaining hair into a low side ponytail.
Final Styling
- Curl the ponytail section for romantic movement
- Leave 2-3 thin pieces out around your face to soften the overall look
- Tuck delicate flowers or baby’s breath into the braid as you’re braiding or after it’s pinned
- Use U-shaped bobby pins to secure everything without visible metal
- Apply a light texture spray before braiding for grip without crunchiness
This style is perfect for outdoor ceremonies, bohemian celebrations, and any wedding where you want to feel romantic and thoughtfully put-together.
11. Slicked-Back Bun With Graphic Liner

A slicked-back bun paired with bold graphic eye makeup is chic, modern, and unexpectedly striking. This is the hairstyle for a bride who wants every bit of her face visible and doesn’t want to hide behind softening layers.
The Slicked Technique
Apply a smoothing serum and strong-hold gel to damp hair, combing it straight back with absolute precision. The goal is a polished, almost wet-looking finish without actual moisture. Gather the hair as high on your head as you prefer and secure with multiple bobby pins. Smooth any flyaways with additional gel and a fine-tooth comb. Create a geometric bun by wrapping the ponytail around itself, pinning as you go, and tucking the tail end underneath for a clean finish.
Making It Bridal
- Keep the bun tight and architectural rather than loose and romantic
- Consider a sculptural metal cuff or headpiece that sits above the bun
- Make sure your makeup is flawless and bold — graphic liner, strong brows, bold lip
- Expose your ears with delicate, statement earrings
- Pair with a modern, minimalist dress or one with interesting back details
This look works beautifully for urban weddings, modern celebrations, and any bride with a strong personal style who wants her wedding hair to reflect that.
12. Looped Braid Updo

A looped braid creates an updo that looks far more intricate than it actually is to create. The result is a hairstyle that feels special and intentional, with romantic texture and movement.
Creating the Loops
Start with curled or textured hair. Beginning at the base of your neck, create a three-strand braid using sections of hair, but instead of braiding tightly against your head, create loose loops by allowing the braided sections to dip and curve. This creates a looped, almost sculptural appearance. Continue this looped braid up the back of your head, pinning as you go and allowing some curls to escape throughout.
Finishing Details
- Gently tug and loosen the loops to add softness and volume
- Allow face-framing pieces to curve naturally around your face
- Tuck flowers or greenery into the loops as you create them
- Use multiple bobby pins hidden underneath to ensure the structure holds all day
- Apply a flexible hairspray that allows for movement
This style photographs beautifully and works for any wedding aesthetic that embraces romance and intentional detail.
13. Half-Up With Waterfall Braid

A waterfall braid is a specific braiding technique where hair is woven through in a way that creates a cascading effect. Combined with a half-up style, it’s romantic, unique, and surprisingly manageable to execute.
The Waterfall Technique
Start by taking a thin section of hair from your front hairline and create a basic three-strand braid. As you braid, instead of adding all your hair to the braid as you would in a traditional Dutch braid, you’re going to allow thin sections to fall and cascade down as you work. This creates the “waterfall” effect. Continue this across one side of your head toward the back, then gather the braided section along with the upper portion of your hair into a half-up ponytail or clip.
Styling Elements
- Leave the cascading pieces slightly wavy or curled for movement
- Curl the bottom half of your hair in loose waves
- Add delicate flowers to the waterfall braid or the gathered portion
- Use a light texture spray before braiding to give yourself grip
- This style especially suits hair that’s at least shoulder-length
A waterfall braid works for outdoor weddings, bohemian celebrations, and any bride who wants a style that feels special and artistic.
14. Sleek Wet-Look Updo

A sleek wet-look updo is modern, edgy, and absolutely striking in photographs. It’s the opposite of the soft, romantic updo — this is about architecture, shine, and precision.
Creating the Wet Look
Use a wet-look gel or smoothing serum applied generously to damp hair. The goal is for your hair to look polished and shiny as though it’s damp, but it should actually be dry. Blow dry while applying the product to set the shine. Gather your hair into a high or low updo, depending on your preference, and pin carefully. Smooth any flyaways with additional gel, and consider a fine-tooth comb and edge control to create perfectly defined hairlines.
Style Pairings
- Bold, graphic makeup that complements the modern aesthetic
- A modern, sleek wedding dress or architectural separates
- Minimal jewelry unless you want a statement piece
- A sculptural hair accessory that complements the clean lines
- Consider this look for urban venues or minimalist celebrations
This style is powerful and memorable, perfect for a bride who wants to look striking and confident.
15. Soft Curls With Delicate Fascinator

A fascinator is a lightweight, decorative headpiece that sits at an angle on your head — often featuring feathers, netting, or beading. Combined with soft waves, it creates a polished, put-together look that feels refined without being heavy.
Building the Curl Base
Create soft, romantic curls throughout your hair using a large-barrel curling iron. Work in sections, wrapping hair around the barrel and releasing the curl downward. Let all curls cool completely before touching them. When the curls have cooled, very gently brush through them with a paddle brush to combine individual curls into soft waves rather than distinct ringlets.
Positioning the Fascinator
- A fascinator should be secured with a comb or clip woven into your hair at approximately temple height
- Angle it to catch light and create visual interest in photographs
- Choose a color that complements your dress and overall aesthetic
- A fascinator works especially well for formal daytime weddings or more traditional celebrations
- Ensure it’s secure enough that it won’t shift during dancing or movement
Soft curls with a fascinator create a classic, polished look that works for nearly any wedding style.
16. Textured Crown Braid

A crown braid is one of the most flattering and special-looking hairstyles you can achieve, especially when executed with soft, romantic texture rather than tight precision.
Braiding the Crown
Start at one ear and create a loose three-strand braid that travels along your hairline toward the opposite ear. The braid should sit just above your temples, not tight against your scalp but rather floating slightly above it. As you braid, gradually incorporate new sections of hair from beneath the braid, similar to a Dutch braid. Continue until you reach your opposite ear, then secure the braid with bobby pins tucked underneath.
Softening the Style
- Gently tug the edges of the braid to create fullness and softness
- Leave the back section of your hair down and curled or waved
- Release 2-3 thin face-framing pieces from the front
- Tuck delicate flowers into the braid as you work or after it’s pinned
- Keep texture spray handy to refresh the braid throughout the day
A crown braid is romantic, photogenic, and works beautifully with almost any wedding aesthetic.
17. Side-Swept Bob With Volume

A side-swept bob is modern and flattering, especially when styled with volume at the crown and a gentle curve that frames your face beautifully.
Creating Volume and Movement
Start with damp hair and blow dry with a round brush, directing the hair upward and back at the crown to create height. Once dry, use a 1.25-inch curling iron to create a wave in the longer side of the bob, curling away from your face to enhance the swept shape. Curl the shorter side loosely as well, allowing it to curve slightly inward toward your face.
Finishing Touches
- Use a light texture spray to maintain softness and movement
- A delicate hair clip or jeweled barrette can anchor the longer side
- Minimal jewelry works well since the hairstyle itself is the statement
- This style pairs beautifully with modern, asymmetrical dresses
- The side-swept cut should have real dimension and movement, not just length
A side-swept bob is perfect for a bride who wants a modern style that’s still polished and intentional.
18. Low Twisted Updo With Tendrils

A low twisted updo combines the sophistication of an updo with the romance of loose tendrils and soft waves. It’s forgiving, beautiful from all angles, and practical for a long day.
Creating the Twisted Base
Section your hair into 2-3 portions and loosely twist each section, pinning them at the nape of your neck. Rather than creating a rigid updo, allow these twisted sections to wrap around each other organically, creating a soft, sculptural appearance. Pin as you go, using at least 15-20 bobby pins to ensure stability, but hide them completely within the twisted sections.
Releasing Softness
- Leave 2-3 thin pieces completely loose around your face to frame your features
- Release a few thin tendrils from underneath the updo to frame your nape and neck
- Curl the face-framing pieces and tendrils gently to enhance the romantic effect
- Use a flexible hairspray that allows hair to move throughout the day
- This style works beautifully for any wedding aesthetic
A twisted updo is elegant, romantic, and surprisingly practical for an active day of celebrations.
19. Sleek Ponytail With Pearl Strand

A sleek ponytail elevated with a pearl strand or delicate hair jewelry is simple, modern, and unexpectedly elegant. The pearl strand transforms a basic style into something special and intentional.
Perfecting the Ponytail
Smooth your hair back with a smoothing serum and fine-tooth comb, creating a high or low ponytail depending on your preference and dress style. Use a clear elastic and wrap a thin section of hair around the base to hide it. This section should be smooth and polished, not flyaway or textured.
Adding the Pearl Strand
- A pearl strand is woven through the ponytail, creating visual interest and delicate sparkle
- Alternatively, a thin metal hair jewelry piece can be hooked through sections of the ponytail
- A delicate comb or clip at the base of the ponytail adds another touch of refinement
- Keep the ponytail itself smooth and sleek rather than textured
- This style is perfect for minimalist, modern, or classic elegant weddings
A pearl strand transforms a simple ponytail into a refined, special-occasion style.
20. Romantic Half-Up With Curls

A half-up style is romantic without being overly formal, allowing you to show off length while keeping hair away from your face. When paired with soft curls, it’s the quintessential romantic bride aesthetic.
Building the Style
Create soft, loose curls throughout your entire head using a large-barrel curling iron. Work in sections, curling away from your face. Once all curls are complete and have cooled, gently brush through them with a paddle brush to combine individual curls into soft waves. Gather the top half of your hair (from roughly temple height) into a low ponytail or clip at the back of your head, leaving the bottom half down and waved.
Romantic Details
- Release 2-3 thin face-framing pieces to curve softly around your face
- Consider hair flowers, delicate greenery, or a small comb woven into the gathered section
- Use a light texture spray to maintain curls without crunchiness
- A delicate ribbon or pearl strand can be woven into the gathered portion
- This style works beautifully for garden weddings and romantic celebrations
This is one of the most universally flattering and romantic wedding hairstyles available.
21. Braided Low Bun

A braided low bun combines the practicality of a low bun with the intricate beauty of braiding. It’s polished and romantic while still being secure enough to last all day.
Creating the Braided Structure
Start with soft, curled or textured hair. Create one or two loose three-strand braids, then wrap and pin these braids together at the nape of your neck to form a low bun. The braids should be loose and gently tugged to create softness and fullness. Ensure the braids are pinned firmly enough that they won’t shift throughout the day.
Finishing the Look
- Gently tug the edges of the braids to add texture and softness
- Allow face-framing pieces to curve naturally around your face
- Tuck delicate flowers or greenery into the braids or between the wrapped braids of the bun
- Use multiple bobby pins hidden within the braids to ensure security
- This style works beautifully for both formal and outdoor celebrations
A braided bun is beautiful, practical, and photograph-worthy from every angle.
22. Hollywood Waves

Hollywood waves are the epitome of glamour and timeless bridal beauty. They’re soft waves that begin at approximately ear level, creating a cascading effect of movement and shine.
Creating the Waves
Blow dry your hair smooth with a round brush. Using a 1.25-inch to 1.5-inch curling iron, create waves by wrapping hair around the barrel and releasing downward. Work through your entire head, and importantly, alternate the direction of your waves — curl some away from your face, some toward your face — to create multidirectional movement. Once all waves are complete and cool, very gently brush through them with a paddle brush to blend the individual curls into soft waves.
The Glamour Factor
- A deep side part adds to the Old Hollywood glamour
- Minimal hair accessories (or none) so the waves themselves are the statement
- Pair with classic makeup and a timeless wedding dress
- Use a smoothing serum and light hairspray for shine and hold
- This style photographs beautifully in natural light and flash photography
Hollywood waves are timelessly elegant and work for any wedding aesthetic that embraces classic beauty.
23. Wrapped Ponytail With Sparkle

A wrapped ponytail is essentially a ponytail where the base is wrapped with hair and then decorated with a sparkly comb, clip, or hair jewelry. It’s simple but elevated and surprisingly eye-catching in photographs.
Building the Wrapped Base
Create a high or low ponytail depending on your preference, using a clear elastic. Take a thin 1-inch section of hair from the ponytail and wrap it around the elastic multiple times, tucking the end underneath and securing it with a bobby pin. This creates a finished, polished look that completely hides the elastic.
Adding Sparkle
- A sparkly comb or decorative clip inserted at the wrapped section
- Delicate hair jewelry hooked through the ponytail itself
- A thin metal or crystal strand woven through the ponytail
- Consider a wrap that itself has subtle sparkle or texture
- Ensure any sparkly elements catch light in photographs but don’t feel costume-y
A wrapped ponytail is a simple style elevated with intention and a thoughtful finishing touch.
24. Textured Waves With Delicate Clips

Textured waves with delicate hair clips scattered throughout create a styled-but-effortless aesthetic that photographs beautifully and feels comfortable to wear.
Creating Texture and Waves
Apply a texture or curl spray to damp hair, then blow dry with a round brush. Use a curling iron to create soft, loose waves throughout. Rather than creating distinct, individual curls, aim for soft, blended waves that have movement but not defined ringlets.
Placing the Clips
- Use 3-4 small, delicate claw clips or barrettes scattered throughout your hair
- Clips should be placed to secure hair gently without creating visible dents or damage
- Placement should look intentional but not overly styled — hair should still appear to move and flow
- Choose clips that complement your dress color or aesthetic
- This style works beautifully for outdoor weddings and bohemian celebrations
Textured waves with delicate clips create a romantic, intentional look without feeling stiff or overly formal.
25. Long, Thick Waves With Subtle Accessories
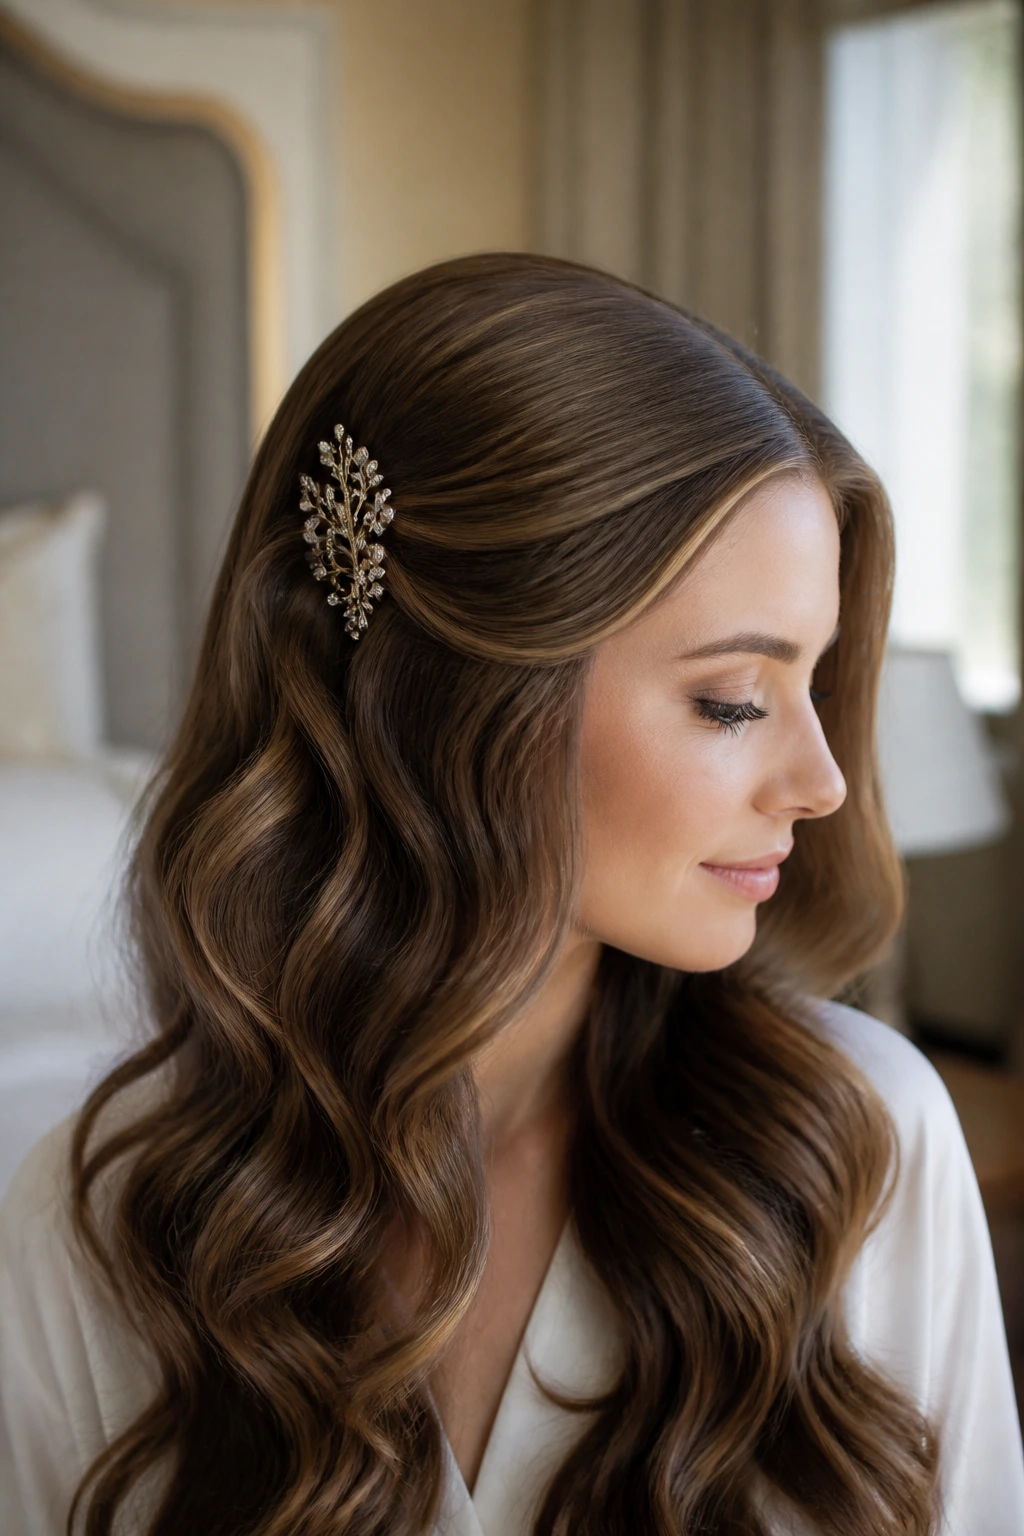
If you’re leaving your hair down, long waves are the way to go. Full, thick waves that cascade down your back are stunning in photographs, romantic, and require less pinning than updos.
Building Voluminous Waves
Start with volumizing mousse or texture spray applied to damp roots. Blow dry with a round brush, directing the brush upward and back to create volume at the crown. Once your hair is dry, use a 1.5-inch curling iron to create soft waves throughout your entire length. Work in sections and curl away from your face on the front sections. Allow curls to cool completely before touching them.
The Subtle Accessory Approach
- A delicate comb or small clip placed to one side
- A thin hair jewelry strand that hooks into a few sections of hair
- Face-framing pieces left slightly looser than the rest for dimension
- A light texture or shine spray to enhance the waves without creating crunchiness
- Consider your dress neckline and back — a low back looks beautiful with waves, as does a high neckline with the hair pulled slightly away from the face
Long waves work beautifully for any wedding aesthetic and are surprisingly practical since there’s minimal pinning involved.
Final Thoughts
Your wedding hair should feel like an extension of your personality and style, not a costume you’re wearing for the day. The best style isn’t necessarily the most elaborate or the trendiest — it’s the one that makes you feel like the most confident, beautiful version of yourself. Whether you choose a bold pixie cut, romantic waves, an intricate braid, or a sleek updo, the real magic comes from a style that aligns with how you want to feel and look on your wedding day.
Consider your hair type, your face shape, your dress style, and the venue when making your decision. A trial run with your stylist is invaluable — this is how you’ll discover if a style photographs well, holds up throughout a full day, and genuinely makes you feel beautiful. Pay attention to how secure the style feels, whether it gives you a headache after several hours, and how it looks from all angles, not just straight-on.
Remember that your wedding hair doesn’t exist in isolation. It’s part of a complete picture that includes your dress, makeup, flowers, and overall celebration. The best wedding hairstyles are the ones that support and complement these elements while still feeling authentically you. With 25 distinct styles to choose from, spanning from short cuts to long waves and everything in between, you’ll absolutely find a hairstyle that makes you feel ready to walk down the aisle.