Hair has a superpower that most people take for granted—it can instantly elevate your entire look, regardless of what you’re wearing or where you’re headed. The right hairstyle doesn’t just frame your face; it broadcasts competence, intentionality, and polish. Whether you’re walking into a job interview, attending a wedding, meeting with clients, or going out for dinner with friends, your hair sets the tone before you even open your mouth. The challenge, though, is finding hairstyles that actually work across multiple contexts without requiring an entirely different look each time.
The most versatile hairstyles share a common thread—they’re undeniably classy, they suit a broad range of face shapes and hair types, and crucially, they’re adaptable. A style that looks polished at 8 a.m. in the boardroom can shift into something more relaxed by evening simply through the addition of a few face-framing pieces or a change in texture. These aren’t trendy looks that’ll feel dated in six months. These are the hairstyles that work whether you’re attending a formal gala, running errands on a Saturday, or heading into a professional meeting. They’re the ones that say “I put thought into this” without screaming “I spent two hours getting ready.”
What makes a hairstyle truly versatile is that it balances structure with flexibility. Too rigid and it only works for one occasion; too loose and it reads as undone rather than intentional. The twelve styles below navigate that balance perfectly. Each one can be dressed up or down with minimal effort, suits most hair types and lengths (with slight adaptations), and projects an air of sophistication that transcends trends or temporary fashion moments. These are the hairstyles that belong in every person’s repertoire.
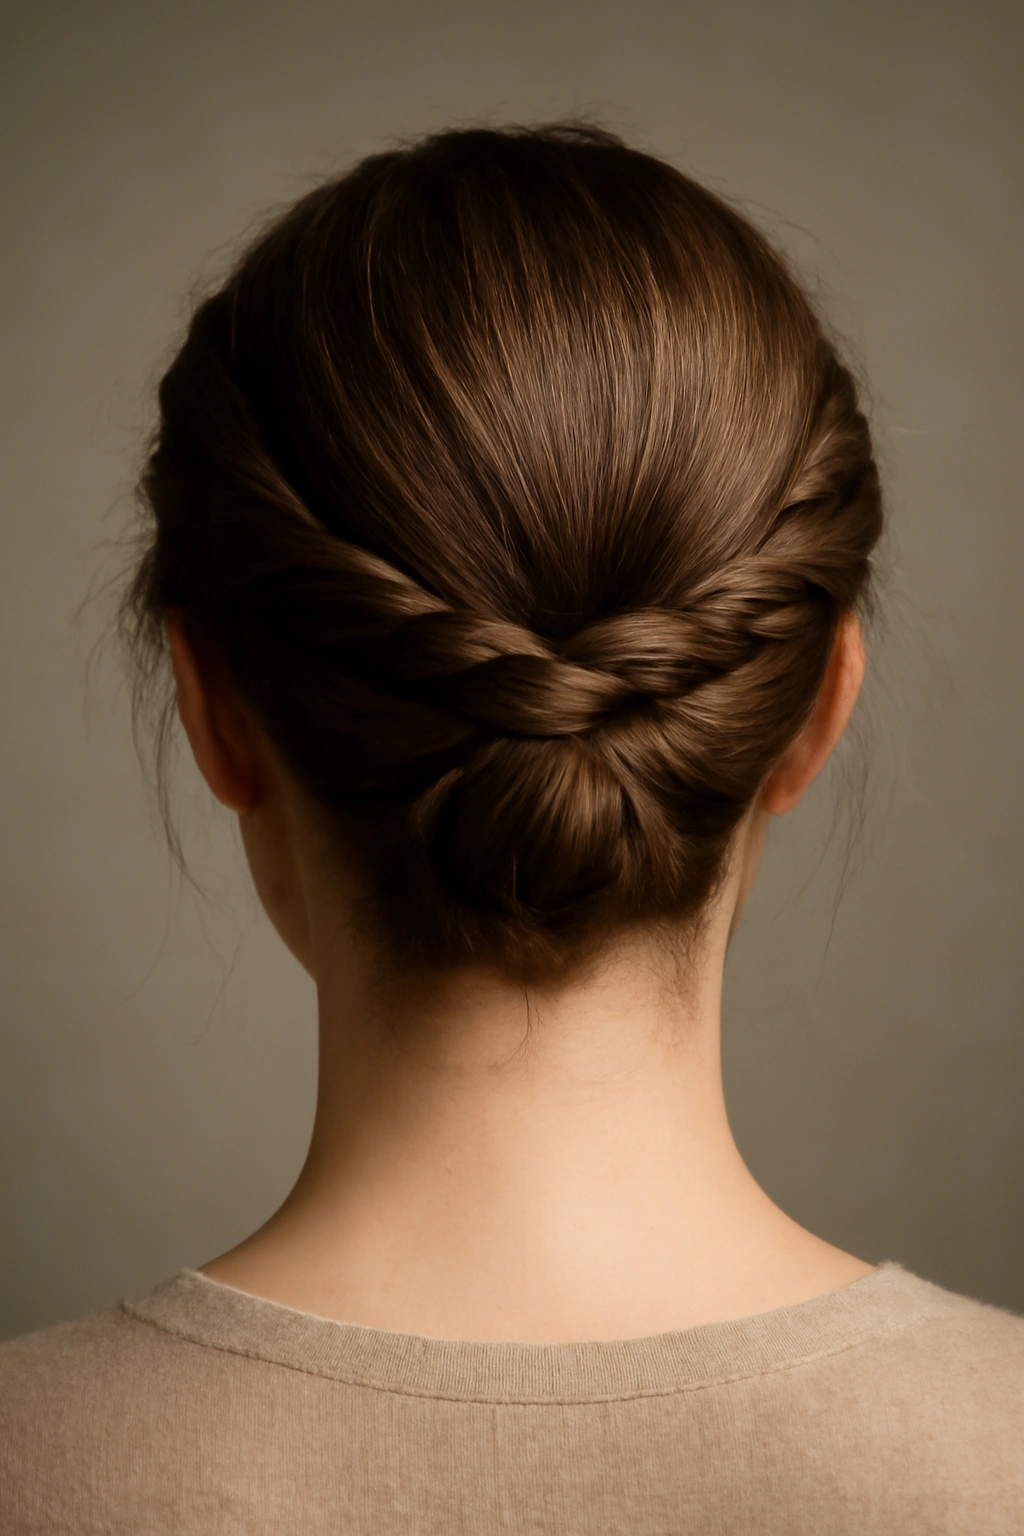
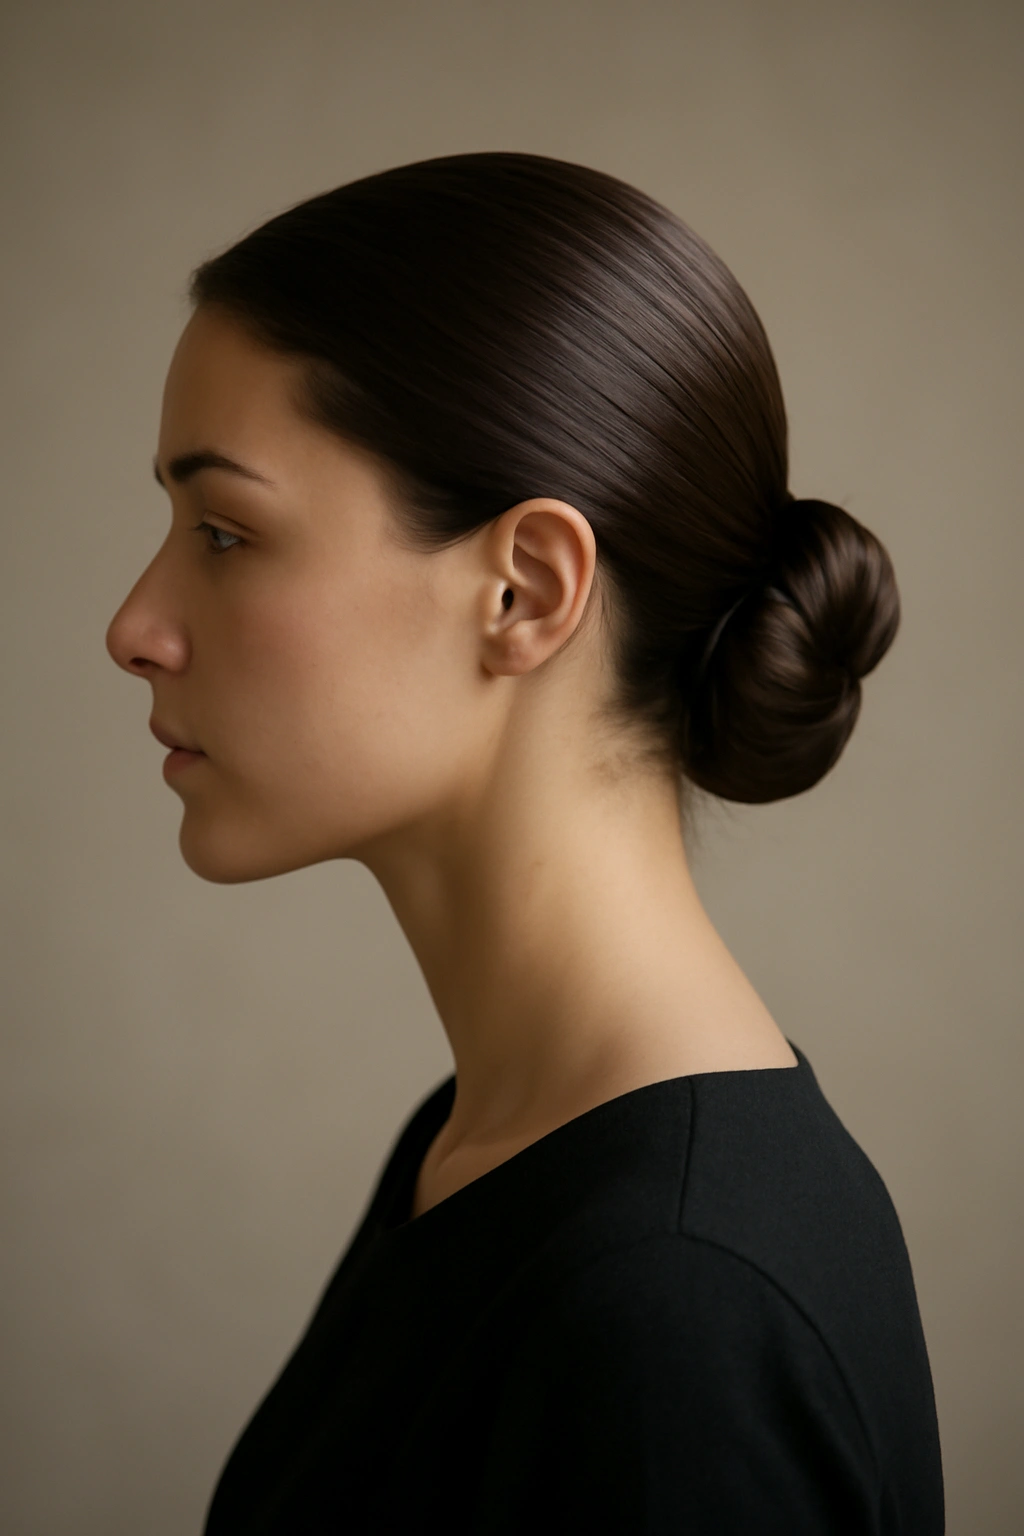
1. Classic Low Bun
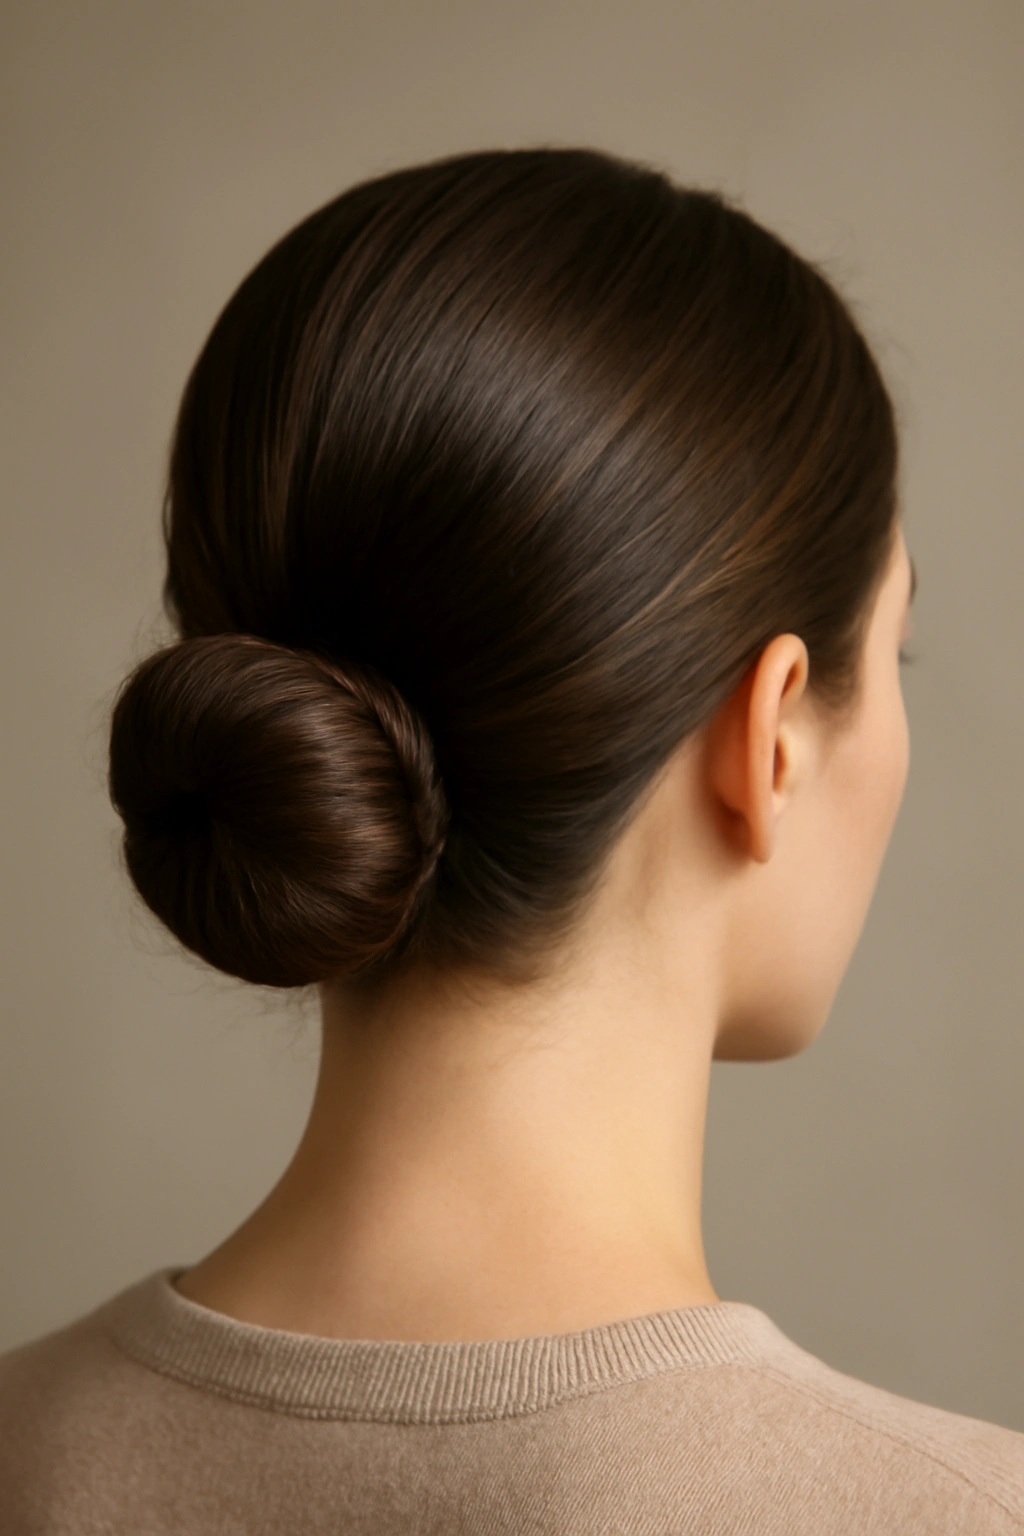
A low bun is the ultimate chameleon hairstyle—depending on how you construct it and what you pair it with, it works for a black-tie event, a casual Friday at the office, or a relaxed brunch. The key to making it look intentionally polished rather than hastily pulled together is starting with the right foundation. Your hair needs to be clean and have just enough grip to hold the shape without feeling stiff. Some people find that day-old hair or hair that’s been lightly spritzed with texturizing spray holds much better than freshly washed hair.
How to Build a Polished Low Bun
Start by smoothing your hair back into a low ponytail at the nape of your neck—not quite at the base of your skull, but lower, roughly where your ear aligns with the back of your head. Use a fine-tooth comb to eliminate any flyaways as you gather the hair. Secure the ponytail with a elastic band that matches your hair color, or use a clear elastic that’s barely visible. Once your ponytail is secure, twist it gently and wrap it around the base to form the bun shape. Secure it with bobby pins angled in different directions so they lock against each other rather than working against the twist. Smooth the outer surface with a small amount of lightweight styling cream or wax—just enough to tame flyaways without creating a greasy appearance.
Why It’s So Versatile
- Works with every face shape—the low placement is particularly flattering for long faces because it creates visual width at the jawline
- Suits straight, wavy, and curly hair; curly hair naturally creates more volume, which looks intentional and textured rather than sparse
- Adapts easily: add a silk ribbon woven through the bun for a formal event, or leave it minimal for workdays
- Stays secure for hours, making it practical for anyone with an active day ahead
- Reads as polished during business hours but still appropriate for evening events when paired with statement earrings or an updo clip
Pro tip: Use a donut-shaped bun former (a cushioned ring that slides onto your ponytail before wrapping) to create a fuller, rounder bun shape with less effort—this is especially helpful if your hair is fine or straight.
2. Half-Up Half-Down
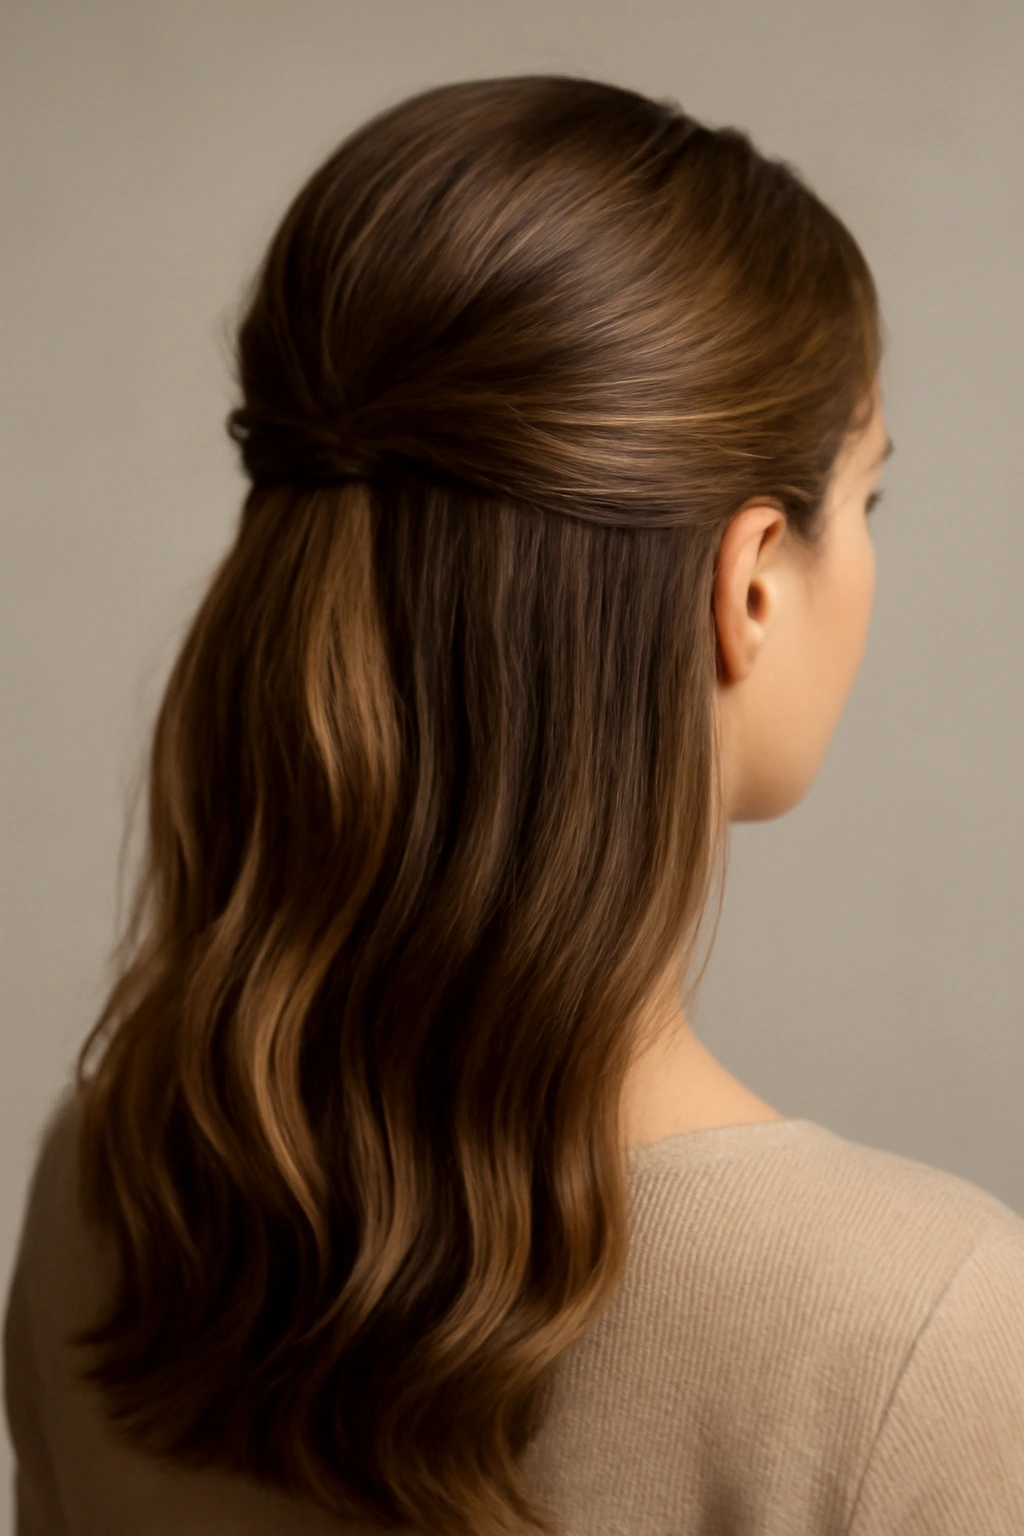
The half-up half-down style hits a specific sweet spot: it’s casual enough for weekend wear but structured enough for professional settings. This hairstyle works because it shows your hair length while still pulling enough back to frame your face and appear intentional. It’s also one of the most forgiving styles if you’re having an off-hair day—texture, slight waves, or even a bit of frizz actually enhances the look rather than detracting from it.
Constructing the Perfect Half-Up Section
Take a horizontal section of hair from one temple, across the crown, to the other temple—roughly the amount you’d use if you were going to create a half-ponytail. The exact width depends on your hair thickness and personal preference, but this section should represent about one-third of your total hair volume. Smooth this section back gently toward the crown, then secure it with a small elastic or clip at the back of your head, leaving the bottom half of your hair completely down. The magic happens in the finishing details: gently tease the secured section with a fine-tooth comb to create subtle volume at the crown, then smooth the outer layer back into place so it looks intentional rather than chaotic.
Styling Options Across Different Occasions
- For work: Keep it sleek and precise, with smooth texturing in the back section and a minimalist clip (tortoiseshell or metal)
- For evening: Add loose waves to the bottom half and swap the clip for something more decorative—a pearl barrette, a statement hair clip, or even a delicate hair stick
- For casual wear: Embrace texture; crimped waves, beachy texture, or even deliberately undone sections all work beautifully
- For added polish: Create a small twisted section within the half-up portion before securing—this adds visual interest and looks more deliberate than a straight section
Worth knowing: The half-up style works beautifully with bangs or face-framing pieces; these elements help soften the face and add dimension to the overall look.
3. Sleek Ponytail
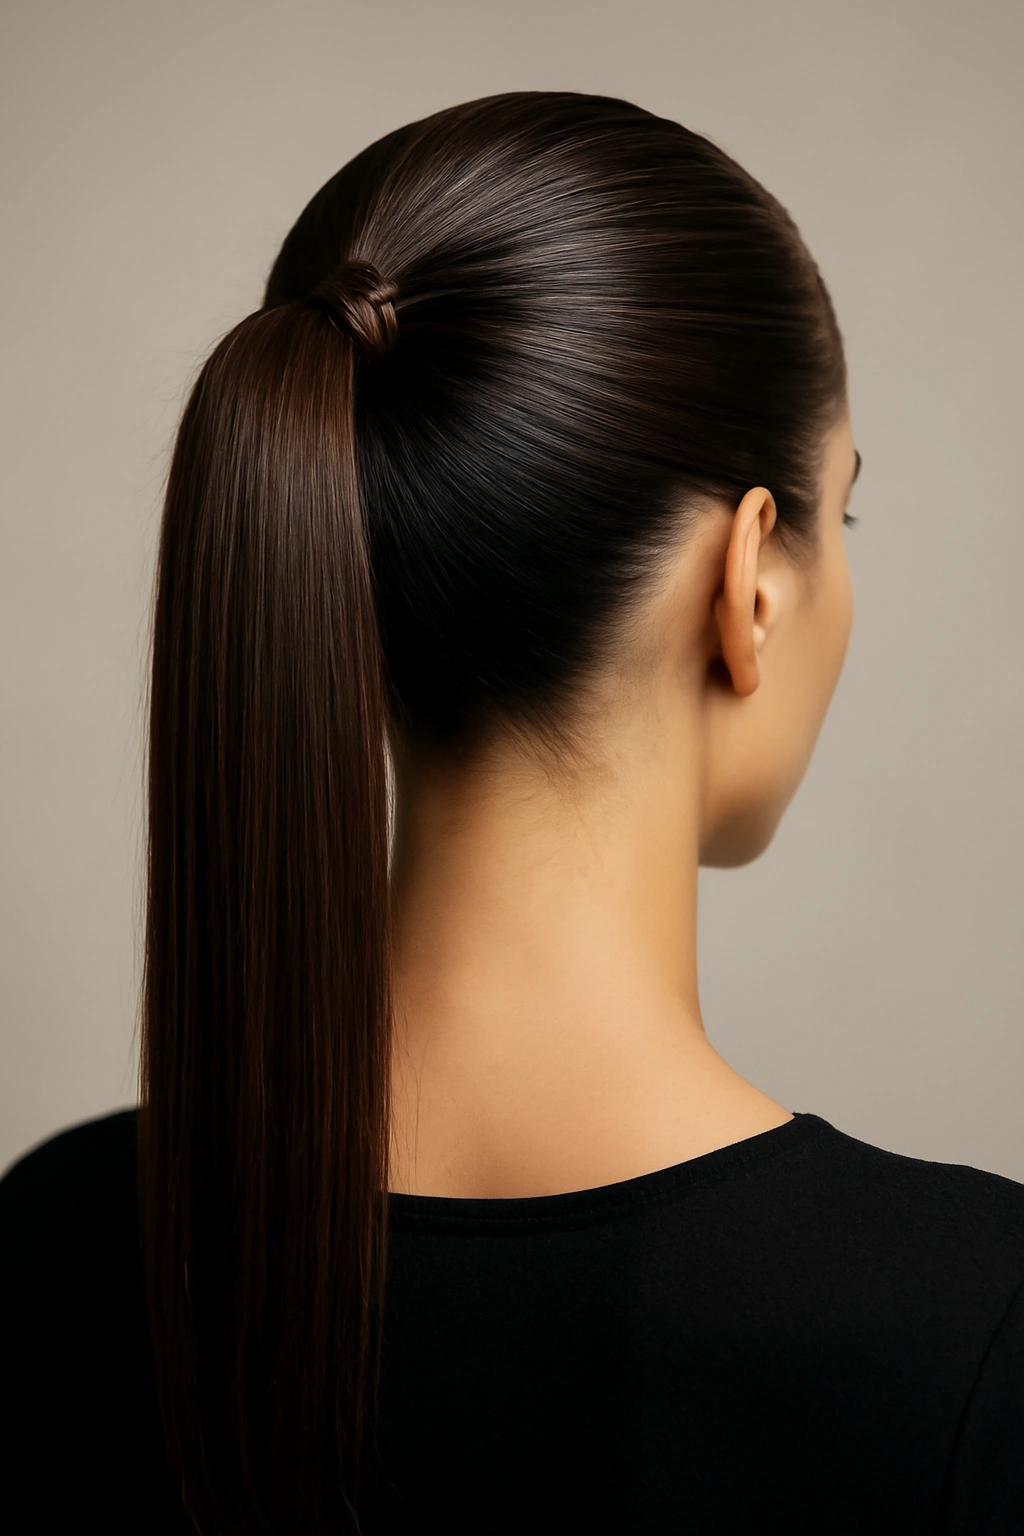
Don’t mistake the sleek ponytail for a casual everyday look—when executed properly, it’s one of the most professionally commanding hairstyles available. A truly sleek ponytail requires attention to detail: smooth hair that’s been carefully gathered and secured at a precise height. The sleekness is what elevates it; any flyaways or irregular texture immediately reads as sloppy rather than intentional. This style broadcasts confidence and polish, which is why you see it so frequently in high-level professional environments.
Achieving Genuine Sleekness
Start with hair that’s been treated with a smoothing product—this could be a light serum, a smoothing cream, or even a touch of gel. Brush your hair back firmly and gather it at your chosen height, typically at the crown for a high ponytail (very professional and youthful-looking) or at the base of the skull for a mid-height ponytail (excellent for most face shapes and body types). Use a fine-tooth comb to eliminate every single flyaway as you gather the hair. Secure with an elastic that’s thick enough to hold without slipping but not so thick that it creates a bulge—many people prefer to use two thin elastics stacked together rather than one thick one, as this creates a smoother final appearance.
Elevating It Beyond the Basics
- For professional contexts: Wrap a small section of hair from the ponytail around the base to conceal the elastic entirely—this creates a finished, polished appearance that reads as high-effort
- For formal occasions: Add a decorative hair cuff or barrette at the base, or even a small silk scarf tied through the ponytail for visual interest
- For a softer version: Create the sleek base, but then gently backcomb the ponytail itself to add subtle texture and volume—this maintains the polished front while adding dimension
- Face-framing option: Before securing the ponytail, leave small sections of hair at each temple and curl them loosely; this softens the overall effect without compromising the sleekness
Insider note: A high sleek ponytail can make your face appear slimmer and more angular, while a lower ponytail is more universally flattering and approachable-looking.
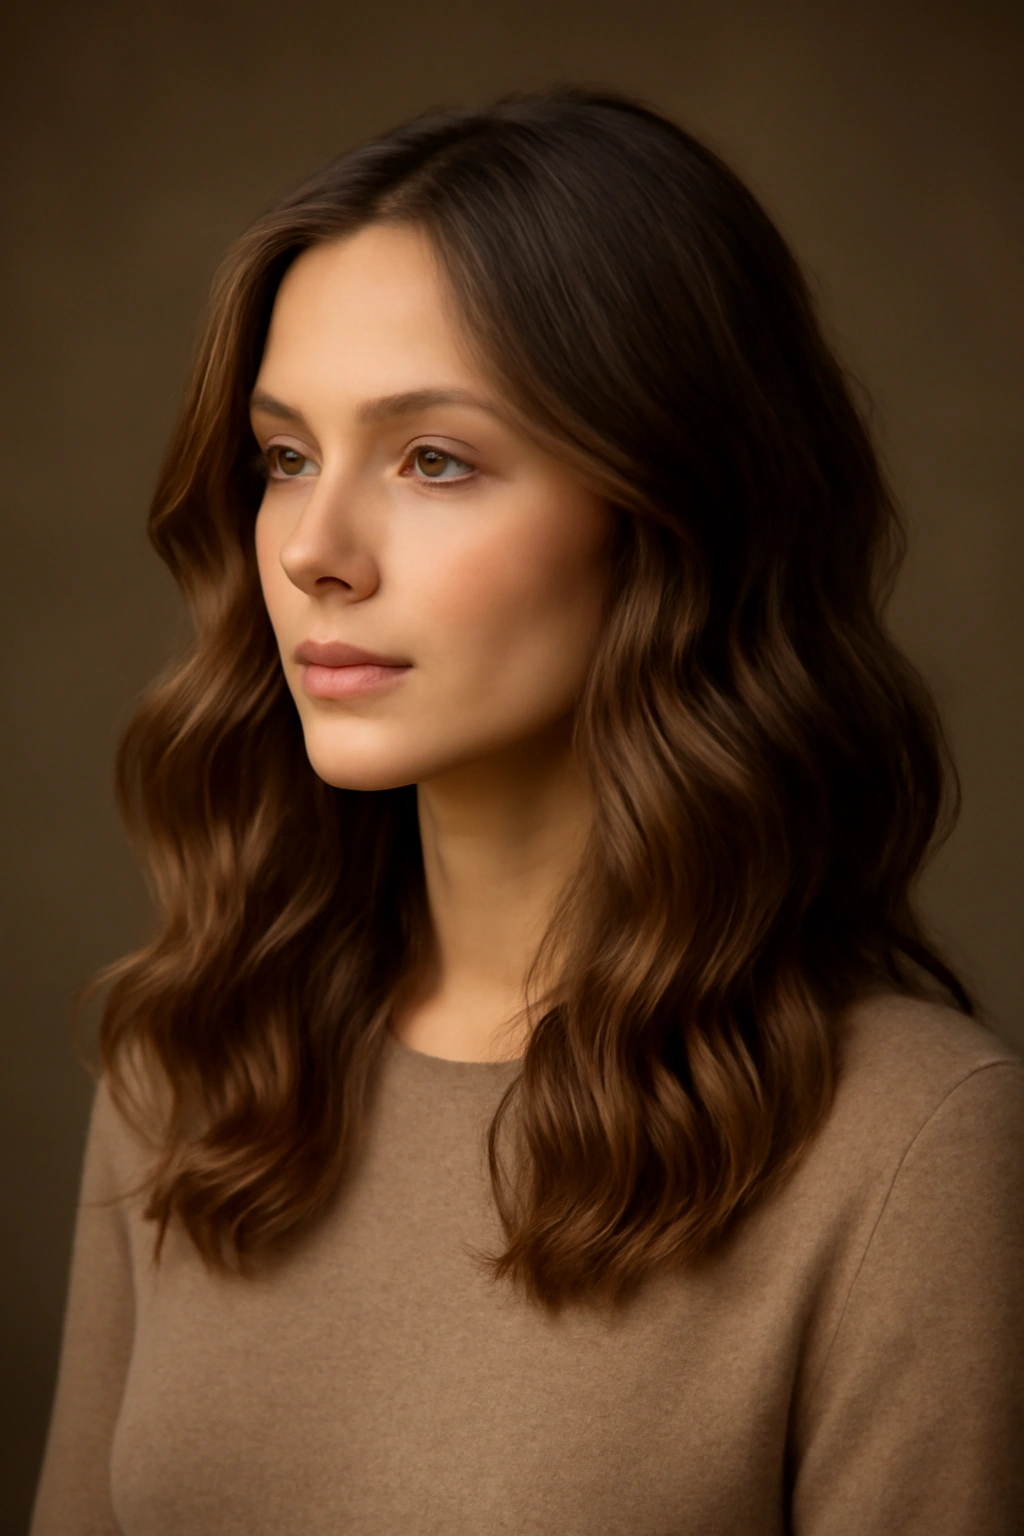
4. Loose Waves
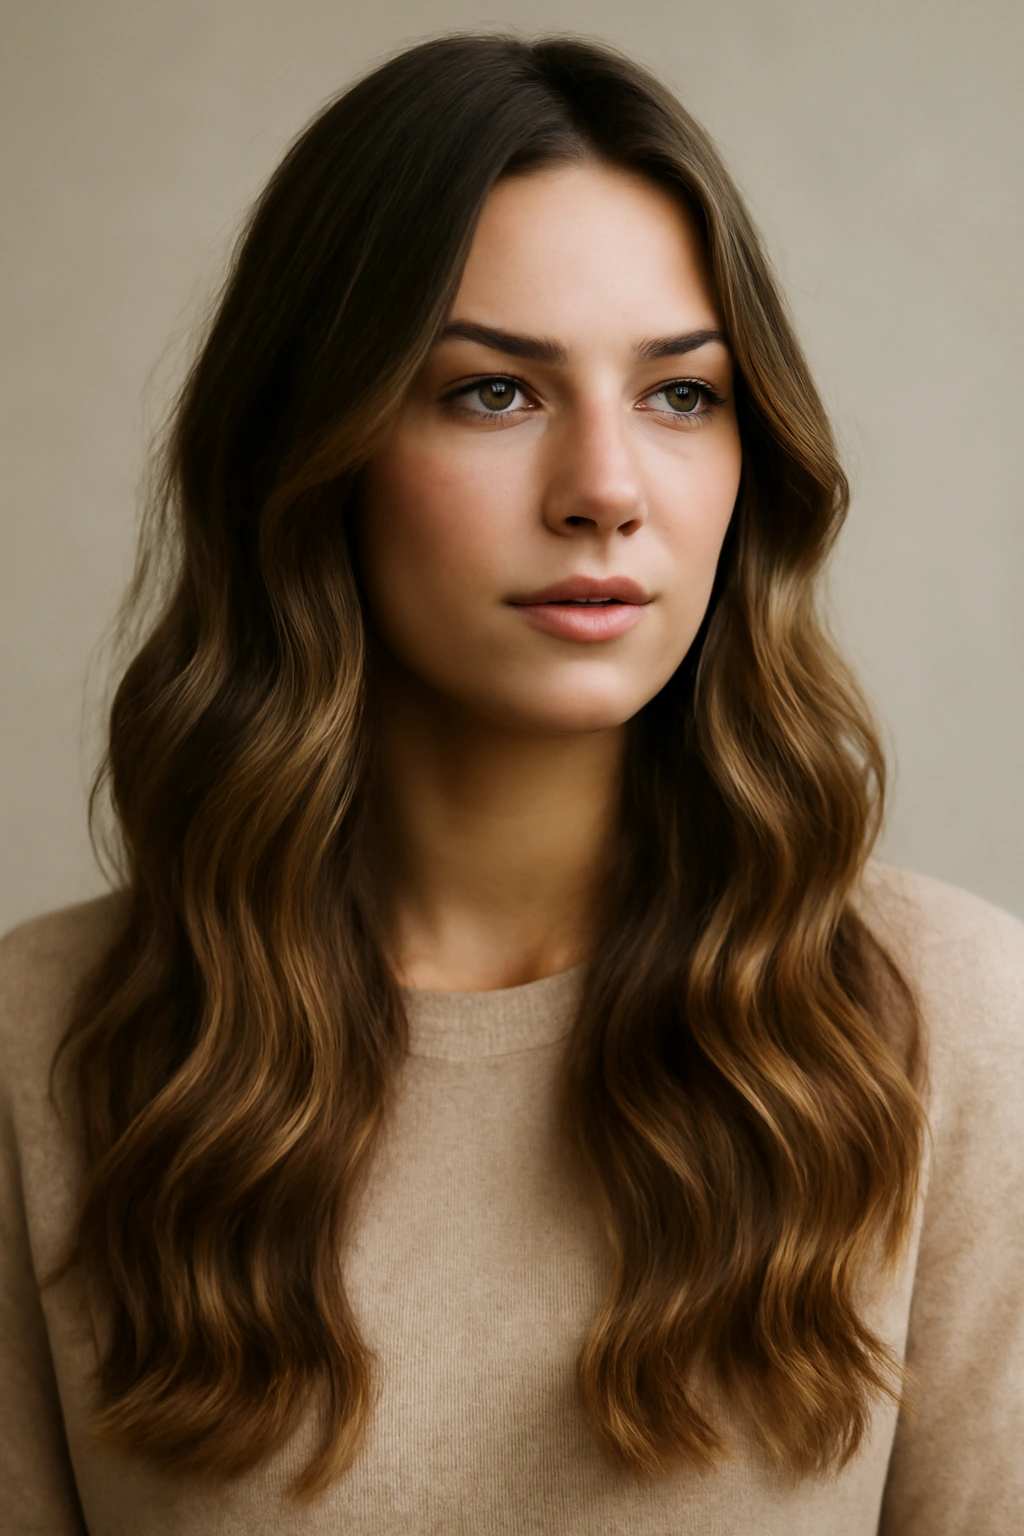
Loose waves occupy the magical middle ground between casual and intentional. They’re effortless-looking while still reading as polished, and they work for nearly every occasion simply through styling choices and accessories. Loose waves suit every hair type—straight hair holds waves best when styled with the right products, wavy hair naturally tends toward this texture, and curly hair can be encouraged into looser wave patterns. The key to making loose waves look intentional rather than accidentally bed-head is consistency in the wave pattern and deliberate texture rather than frizz.
Creating Waves That Actually Hold
If you’re starting with straight hair, the easiest method is using a large-barrel curling iron or waving iron. Take sections no thicker than two inches, wrap them around the barrel loosely, and release. The larger the barrel, the looser and more relaxed the wave. Work in sections from bottom to top, alternating the direction you wrap each section—this creates more natural-looking waves that flow rather than ringlets. Once you’ve waved all your hair, let it cool completely before touching it; the waves set as they cool, so patience here makes a real difference.
Versatile Styling for Any Setting
- For professional settings: Create tighter, more controlled waves, keep them smooth and well-defined, and add a structured headpiece or hair clip to signal intentionality
- For casual wear: Embrace looser, more relaxed waves with slightly messier texture; add a hair ribbon, bandana, or loose clip for decoration
- For evening events: Create deep, luxurious waves with plenty of shine and volume; the looser the better, as long as there’s clear wave definition rather than frizz
- For a softer look: Waves in front of the face and looser texture in back creates a romantic, approachable appearance that works for dates or social events
Pro tip: Use a heat-protectant spray before styling and a light hairspray while the waves are cooling to help them hold all day without feeling stiff or crunchy.
5. Twisted Crown
A twisted crown is a braided updo’s more elegant, sophisticated cousin. Instead of intricate braiding, you’re creating two or more twists that wrap around the crown of the head and secure in the back. This style reads as intentional and put-together without requiring the precision that braiding demands. It suits both shorter and longer hair, works beautifully with various hair textures, and can be styled in under five minutes once you understand the technique. The twisted crown is particularly flattering because it lifts hair away from the face while still allowing some face-framing movement.
Constructing the Twisted Crown
Part your hair slightly off-center, then take a small section from one side near your temple. Divide this section into two strands and gently twist them together, moving upward and slightly backward across the crown of your head. As you twist, you can incorporate small sections of loose hair from the crown, similar to a Dutch braid but with a twist rather than an interlace. Secure the twist at the back of your head with bobby pins. Repeat on the opposite side, creating a matching twist. Where the two twists meet at the back, secure them together with a decorative clip or another round of bobby pins. Gently pull the twists slightly to create a fuller, more relaxed appearance.
Adapting It for Different Occasions
- For professional events: Keep twists tight and polished with minimal texture; use minimalist bobby pins or a sleek clip
- For casual wear: Pull the twists slightly looser and allow small pieces to escape for a softer, more romantic appearance
- For formal occasions: Add a decorative clip, pearl bobby pins, or even a small fresh flower at the point where the twists meet
- For hair with texture or waves: The twists look even more intentional with naturally textured hair, as the texture adds visual interest to the twist itself
Worth knowing: This style works especially well if you have bangs or long face-framing pieces, as these elements break up the pulled-back feeling and soften the overall look.
6. Braided Updo
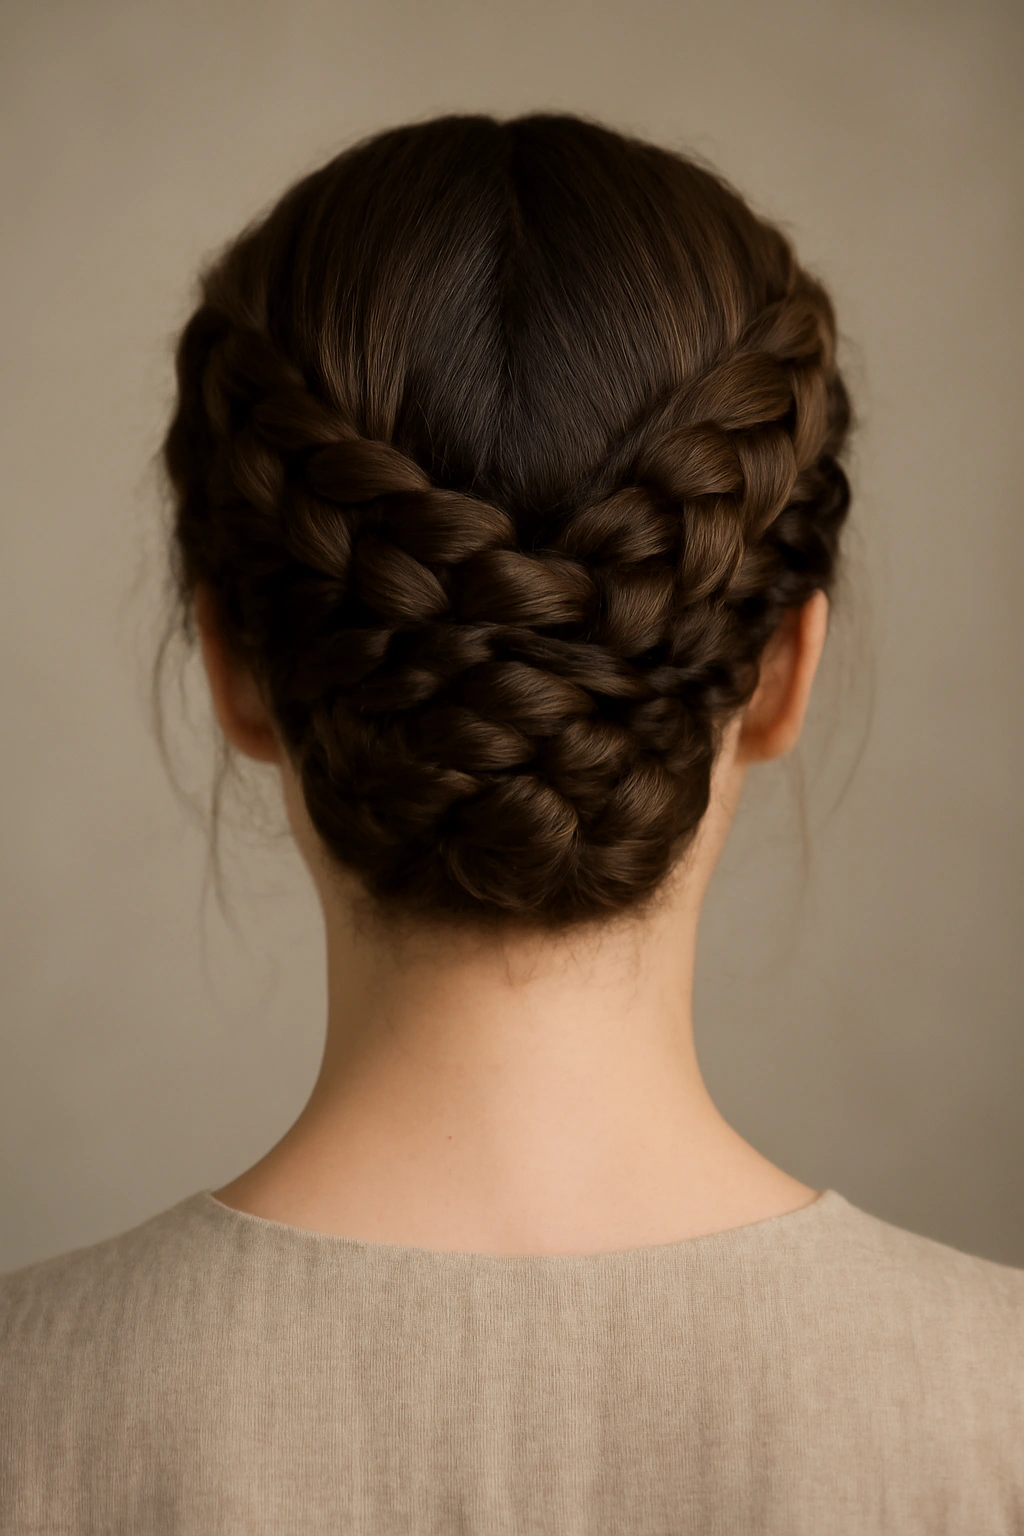
A braided updo projects sophistication and intentionality. Whether it’s a single braid wrapped into a bun, multiple braids intertwined, or a more intricate pattern, braided updos read as high-effort and polished. The beauty of this style is that it works for nearly any hair length (even medium-length hair can accommodate a braided updo with creative technique), and the structural nature of braiding means the style holds securely all day. Braided updos are particularly flattering for people with round or angular face shapes, as the structure and detail draw the eye upward.
Basic Braided Updo Construction
Start by deciding what type of braid suits your skills and hair type. A simple three-strand braid is timeless and accessible; a Dutch braid (braiding under instead of over for an inverted appearance) reads as slightly more elaborate; and French braids offer endless variation. Braid a section of hair from the back of your crown downward, incorporating more hair as you go if you’re doing a French braid. Once your braid reaches the nape of your neck, secure the end loosely with a small elastic. Coil the braid around the base to form a bun shape, tucking the end underneath and securing with bobby pins. Smooth any flyaways with a fine-tooth comb and a touch of lightweight styling cream.
Varying the Style for Different Contexts
- Single braid wrapped into a bun: Clean, modern, and works for both professional and casual settings; the detail of the braid adds visual interest without being overly ornate
- Two French braids wrapped into a low bun: More textured and romantic; particularly flattering for long, straight, or wavy hair
- Crown braids: Create two braids that start at the temples and meet at the back, then secure the meeting point with clips—this is exceptionally feminine and works beautifully for formal events
- Loose, textured braided bun: Pull the braid slightly after securing to create volume and a relaxed appearance; this works for less formal occasions
Pro tip: If your hair struggles to hold braids without slipping, lightly mist the braid with texturizing spray as you braid or allow the braid to sit for a few minutes before coiling it into an updo; this gives the hair grip.
7. High Bun
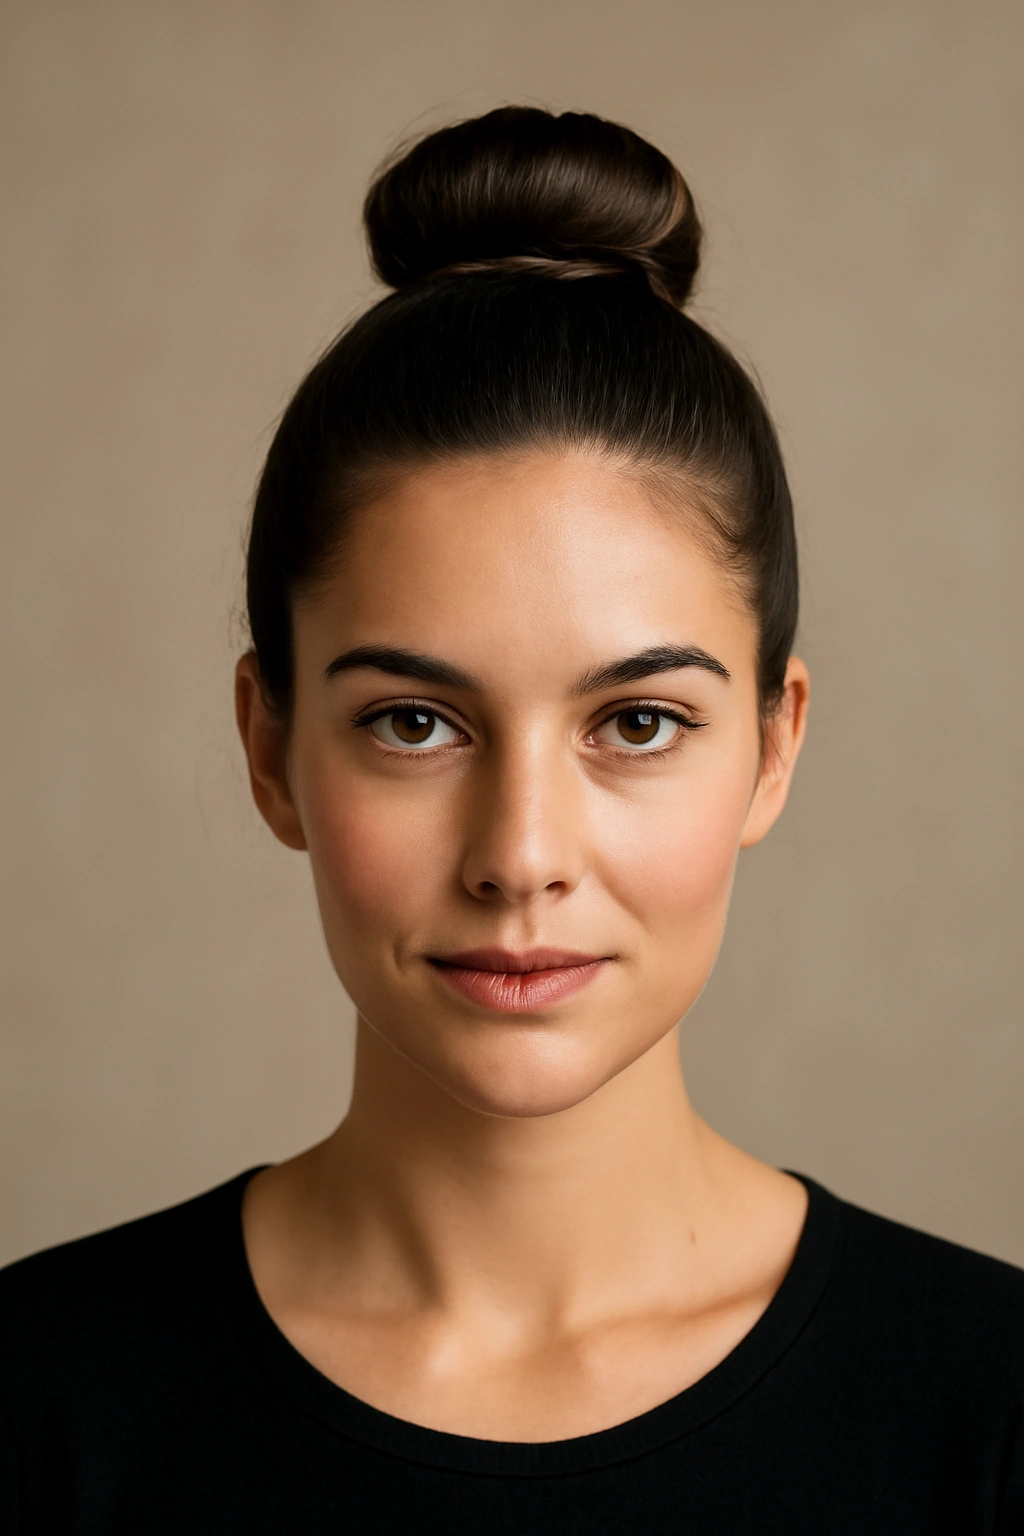
A high bun is a statement style—it’s youthful, energetic, and reads as confidently put-together. Placed at the crown of the head, a high bun flatters most face shapes and can be styled anywhere from sleek and severe for professional contexts to soft and textured for casual wear. This style works beautifully for active days because it keeps hair completely off the face and neck, making it practical as well as aesthetically appealing. High buns pair especially well with stronger facial features or angular face shapes, as the lifted placement and visible face draw attention upward.
Creating a High Bun With Staying Power
Gather your hair into a high ponytail at the very crown of your head—imagine a point directly above where your ears meet your head. Secure tightly with an elastic band. Take the ponytail and twist it gently, then wrap it around the base of the ponytail to form a bun. Secure with bobby pins inserted at different angles so they lock against each other. The tighter you twist initially, the more secure the bun will be throughout the day. If you want a fuller bun shape, use a bun former or create a looser twist; if you prefer a sleeker appearance, keep the twist tight and smooth the outer surface carefully.
Styling Versatility
- For fitness and active days: Keep it sleek and tight with no pieces escaping; use strong-hold hairspray to ensure nothing shifts during movement
- For professional settings: A smooth, polished high bun signals confidence and polish; pair with minimalist jewelry for a modern look
- For casual wear: Soften the look by gently pulling small face-framing pieces down or by creating the bun with slightly looser twists
- For evening events: Add decorative bobby pins, small pearl clips, or even a decorative hair stick through the center of the bun
Worth knowing: Hair texture plays a role here—straight hair creates a sleeker high bun, while naturally wavy or curly hair creates a fuller, rounder shape that can look more romantic even when constructed tightly.
8. Straight and Sleek Bob
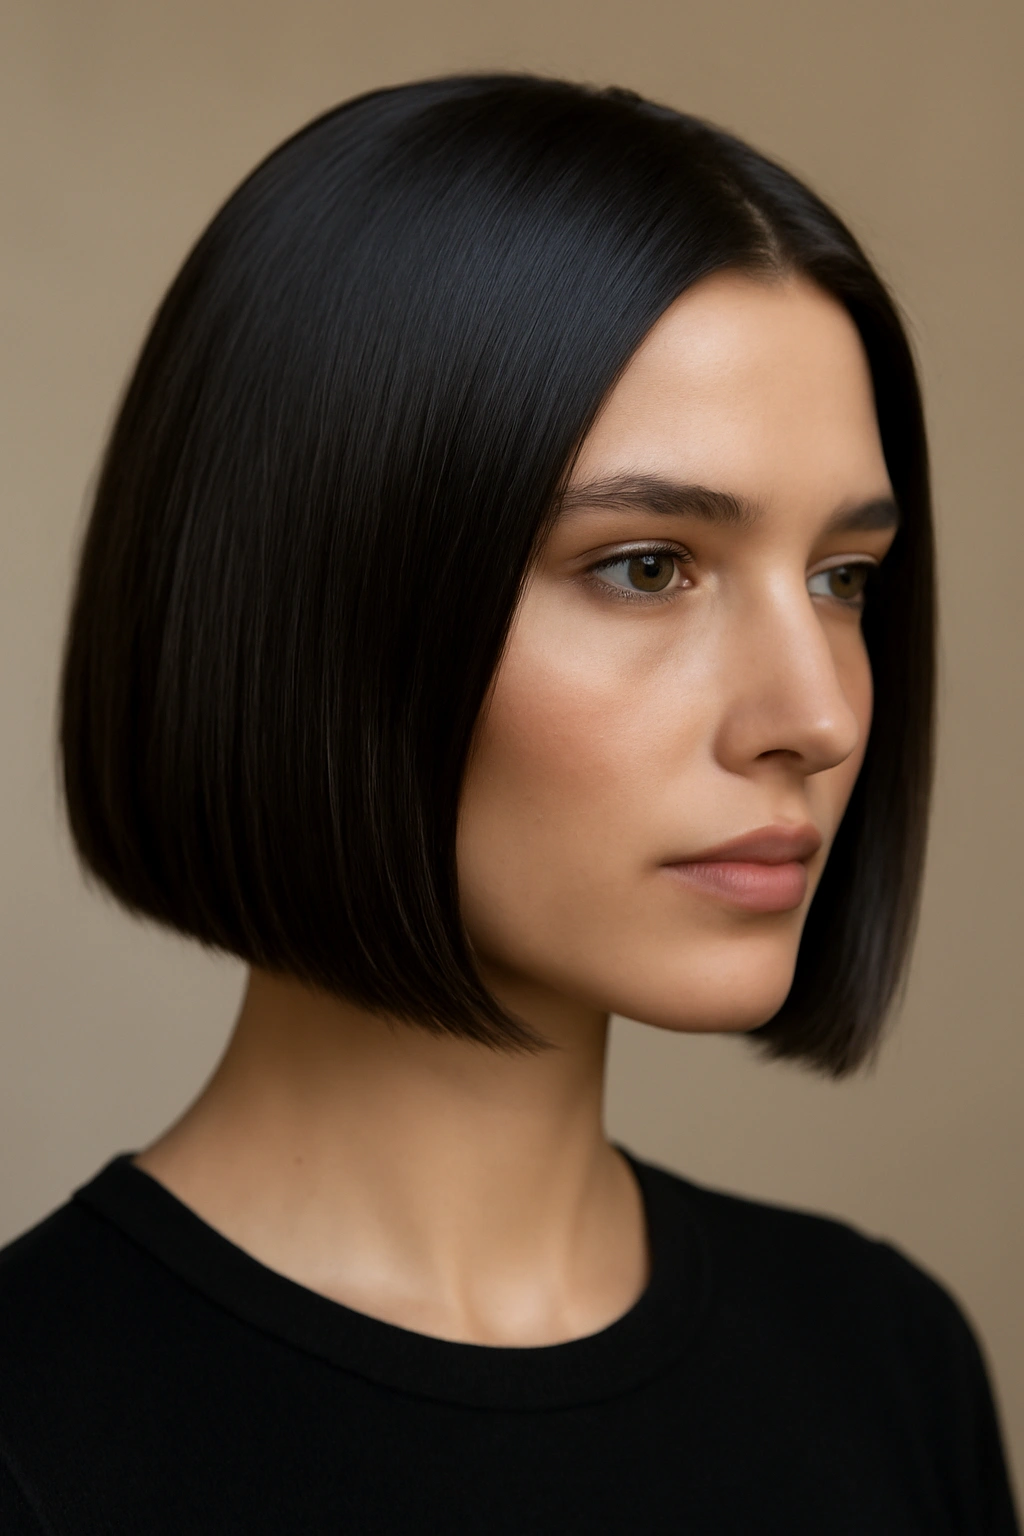
A well-executed straight bob isn’t just a haircut; it’s a polished, professional statement. A sleek bob reads as intentional, modern, and effortlessly put-together, whether it hits at your chin, your jaw, or your shoulders. The beauty of the bob is that it requires minimal styling beyond straightening and smoothing products, yet it projects sophistication and careful grooming. This length flatters most face shapes, suits multiple hair types, and reads as appropriate for any professional or social context. The key to making a bob look polished rather than flat is creating movement through subtle layering or texture rather than assuming completely straight equals polished.
Achieving the Sleek Bob Look
Wash your hair and apply a smoothing product to damp hair—a serum or smoothing cream works beautifully. Blow-dry your hair straight using a paddle brush to smooth it as you dry. Once your hair is dry, use a flat iron to create ultra-sleekness and to refine the shape. The flat iron pass is crucial; it transforms hair from “dried straight” to “intentionally smoothed.” Work through sections methodically, ensuring you’re catching all the ends. A light hairspray applied after straightening helps maintain the sleekness throughout the day without creating that stiff, overproduct feeling.
Versatile Bob Styling
- Chin-length bob: Very modern and youthful; works beautifully for square or round face shapes
- Jaw-length bob: Incredibly flattering universally; elongates round faces and softens angular features
- Shoulder-length bob (lob): More versatile for styling; can be straightened, waved, or textured depending on occasion
- Textured bob: Subtle layers and texture add dimension; this version reads as deliberately modern rather than basic
- With side-swept bangs: Adds sophistication and face-framing dimension; particularly flattering for long faces
Insider note: The quality of your cut matters significantly here—a blunt, well-maintained bob always looks more polished than a shaggy, overgrown one, so regular trims (every 4-6 weeks) are non-negotiable for this style.
9. Romantic Waves
Romantic waves represent the intersection of effortless-looking and intentionally polished. This is the hairstyle that suggests you spent time on your appearance without looking like you’re trying too hard. Romantic waves read as soft, approachable, and feminine without being costume-y or overdone. This style suits nearly every hair length and type, and it’s particularly forgiving because slight imperfections in the wave pattern actually add to the romantic, intentional imperfection aesthetic.
Creating Romantic Wave Texture
Start with clean, dry hair (or slightly damp hair if your hair holds texture better with a bit of moisture). Section your hair into manageable pieces, approximately two to three inches wide. Using a large-barrel curling iron or waving iron, curl each section loosely away from the face, holding the iron for five to ten seconds before releasing. The longer you hold the iron, the tighter the curl; for romantic waves, you want loose curls rather than ringlets. Work through all sections, then allow the curls to cool completely—this is essential for hold. Once cool, gently run your fingers through the curls to break them up slightly and create soft waves rather than defined curls. A light hairspray finishes the look without creating stiffness.
Occasion-Based Styling Variations
- For formal events: Create deep, luxurious waves with plenty of dimension; add soft curls in front of the face and looser waves in back; pair with an elegant updo clip or hair stick
- For casual wear: Embrace looser, messier waves; add a hair ribbon or bandana for visual interest without looking overly polished
- For romantic occasions: Soft waves with side-parted placement; add a delicate hair clip or flowers for a truly romantic aesthetic
- For work: Tighter waves with more definition; keep the style smooth and well-groomed; minimal accessories for a professional edge
Pro tip: Apply hairspray section by section as you curl, not all at once at the end; this helps each wave hold individually rather than relying on one final application that can make hair feel stiff.
10. French Twist
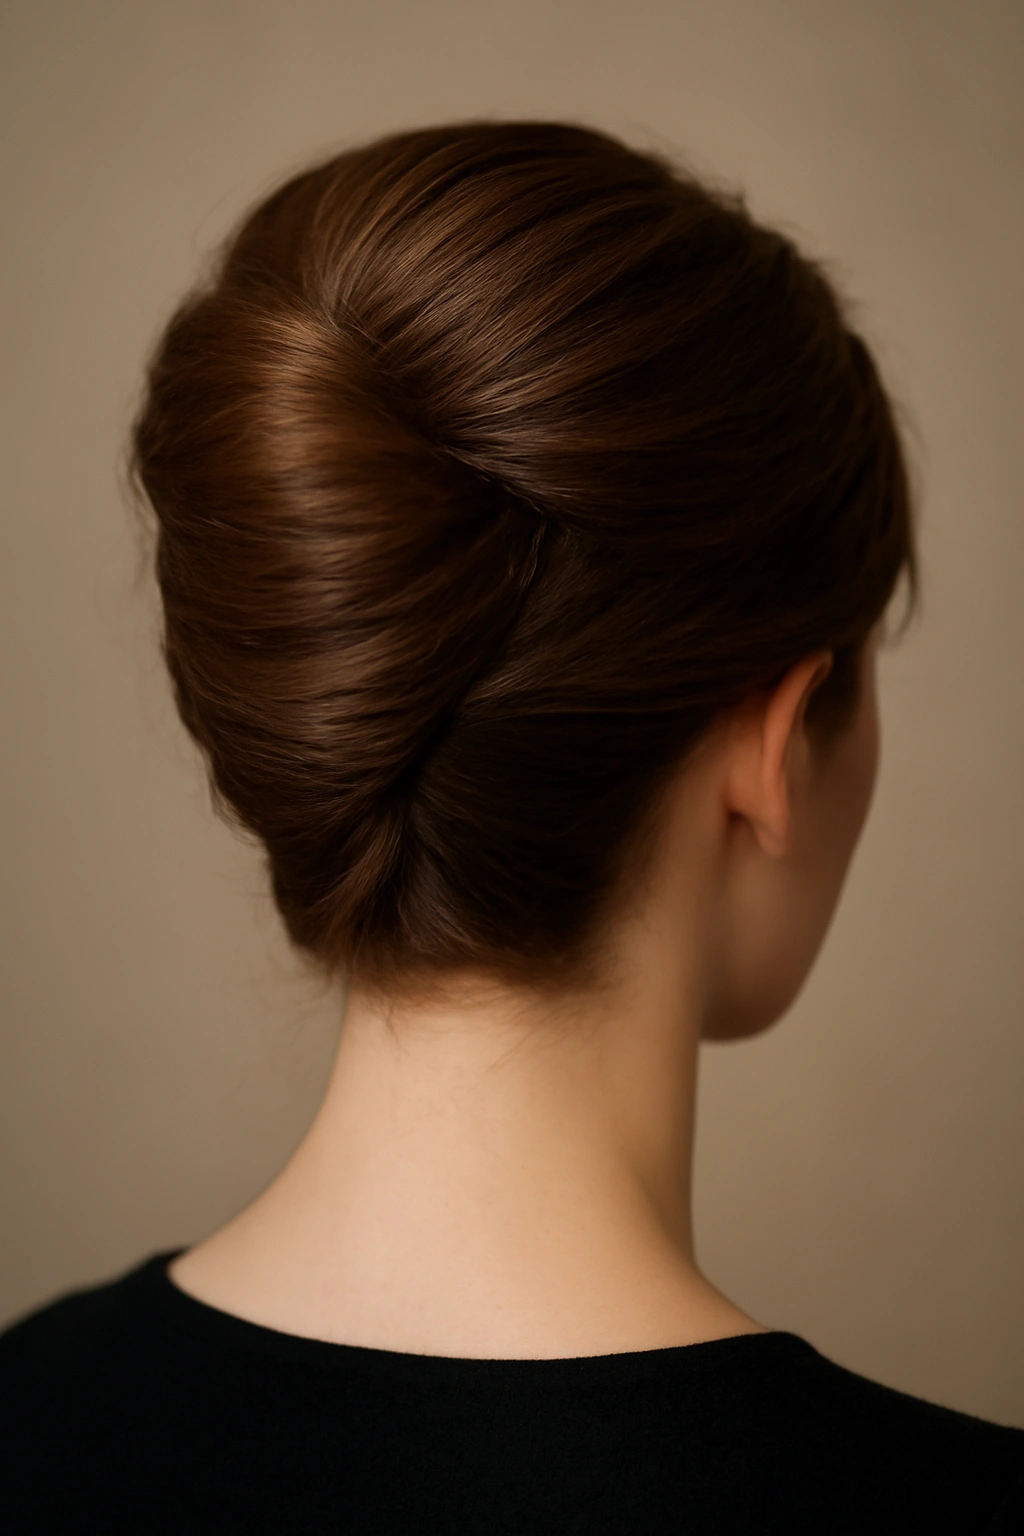
A French twist is pure elegance—it’s the hairstyle that instantly looks more expensive and refined than the effort required to create it. This style works beautifully for professional settings, formal events, and any occasion where you want to read as polished and put-together. The French twist suits most hair lengths and textures, and it’s particularly flattering because it elongates the neck and focuses attention on the face. Unlike elaborate braids or complex updos, a French twist reads as effortlessly chic rather than high-maintenance.
Step-by-Step French Twist Construction
Brush your hair smoothly toward one side—this is important, as the asymmetry is part of the twist’s appeal. Take all your hair and hold it in one hand, gathered loosely behind your head, slightly to one side. Using your other hand, begin tucking and twisting the gathered hair upward and inward, creating a vertical roll that runs from the nape of your neck toward the crown. As you twist, tuck the ends of your hair into the roll itself, securing everything with bobby pins placed horizontally into the twist. The pins should be invisible, hidden within the twist. Gently smooth the outer surface with a fine-tooth comb and a touch of lightweight styling cream to eliminate flyaways.
Adapting the French Twist
- Classic French twist: Sleek and smooth, constructed tightly—this is the most professional version and works beautifully in corporate settings
- Softer, more textured twist: Create the twist using slightly wavy or textured hair; gently pull the twist to add volume; this reads as more romantic and works for social events
- Low twisted version: Position the twist lower on the back of the head for a softer, more approachable appearance
- With face-framing pieces: Leave small sections of hair at the temples and curl them loosely; these pieces soften the face and add dimension
- With decorative details: Add a pearl clip, a small silk scarf, or delicate bobby pins visible in the twist for formal occasions
Worth knowing: A French twist works beautifully on hair that’s one to two days old; freshly washed hair can be slippery and difficult to hold, while slightly textured hair grips more naturally.
11. Textured Lob
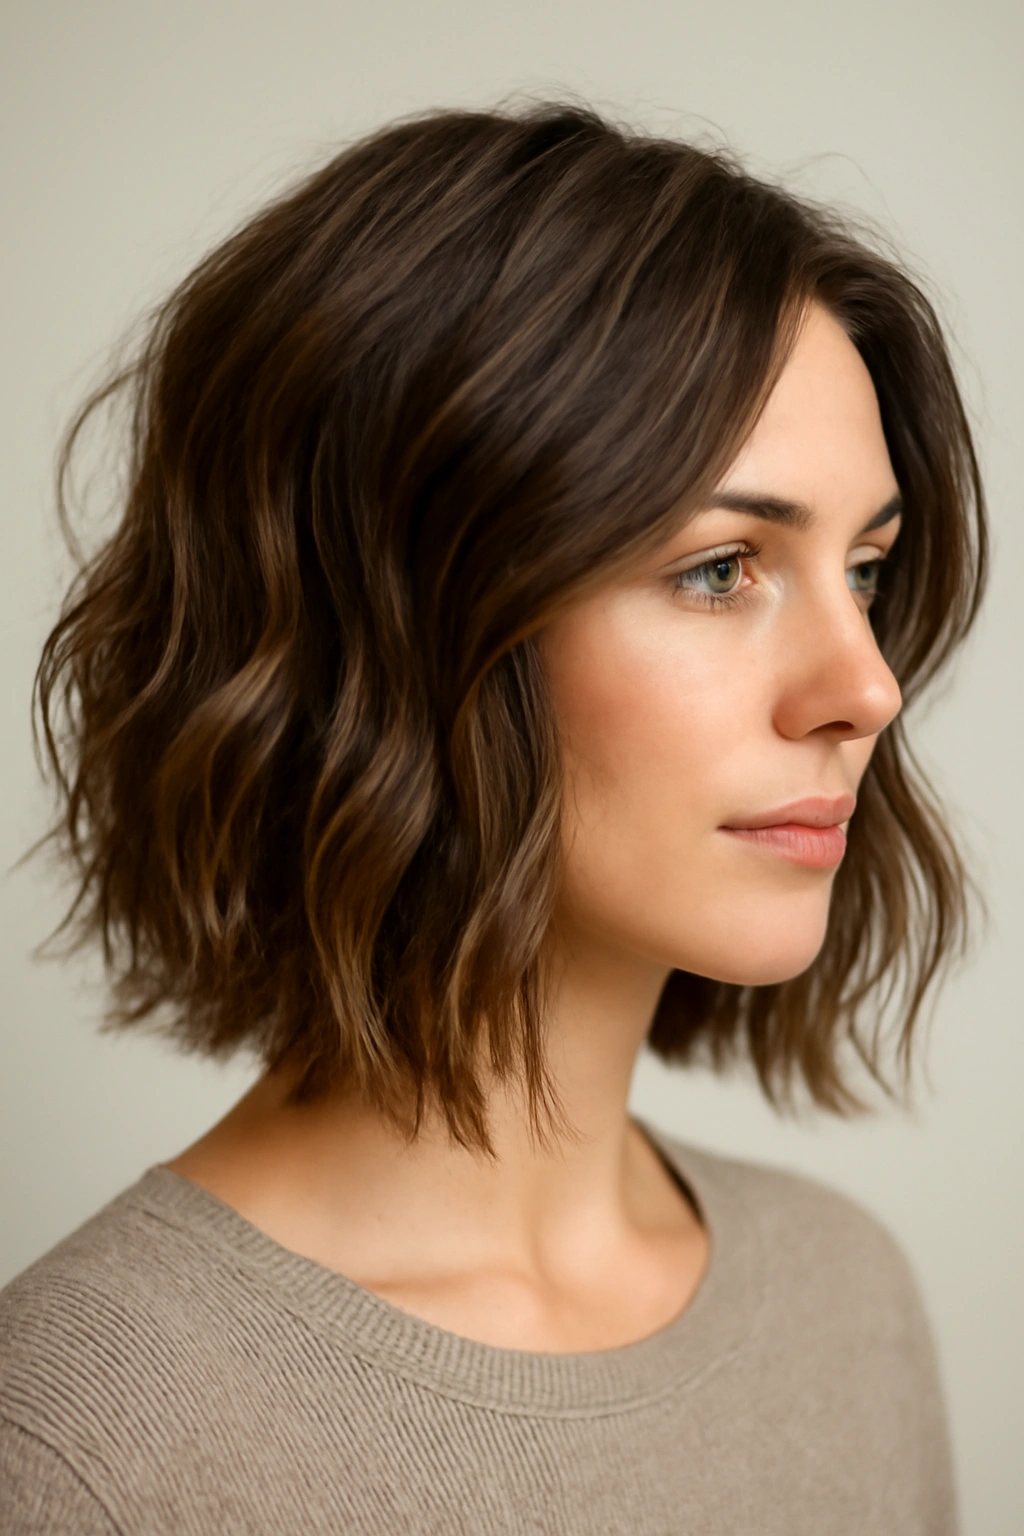
A textured lob (long bob) strikes an excellent balance between length and manageability while offering significant styling versatility. The shoulder-length positioning means your hair catches light and moves beautifully, and the texture—whether created through layers, waves, or natural curl pattern—adds dimension and visual interest. A textured lob reads as intentional and modern without requiring the daily styling commitment of longer hair. This length suits most face shapes, works with various hair types, and adapts easily from professional to casual to formal contexts simply through how you style it.
Building the Textured Lob Look
A textured lob benefits from layers cut throughout the length, which creates movement and dimension. If your hair is straight, add waves or texture through styling; if your hair is naturally wavy or curly, let the texture shine by emphasizing those waves rather than fighting them. For styling, rough-dry your hair with a blow dryer, using a diffuser attachment if your hair is wavy or curly. This creates natural texture and volume. If your hair is straight, blow-dry smoothly, then add waves using a curling iron or waving iron. Apply texturizing spray or sea salt spray to enhance movement and create a piece-y appearance rather than one solid mass.
Versatile Lob Styling
- Sleek and straight: Blow-dry smooth with a paddle brush, then flat-iron for polish; works beautifully for professional settings with a structured side part
- Wavy and textured: Embrace natural waves or create them through styling; add a loose, tousled appearance that reads as casual yet intentional
- Tousled with texture: Use texturizing spray to create that deliberately undone look; piece out individual sections for visual interest
- Half-up, half-down styling: Pull the top section back and secure with a clip, leaving the textured bottom portion down; this works for both casual and professional contexts
- With face-framing layers: Shorter layers in front soften the face and create flattering movement; longer layers in back maintain the length
Pro tip: A textured lob photographs beautifully and photographs are often how people judge your hair’s health and style—keep your lob well-maintained with trims every 6-8 weeks to preserve the shape and ensure ends look intentional rather than scraggly.
12. Polished Side Part
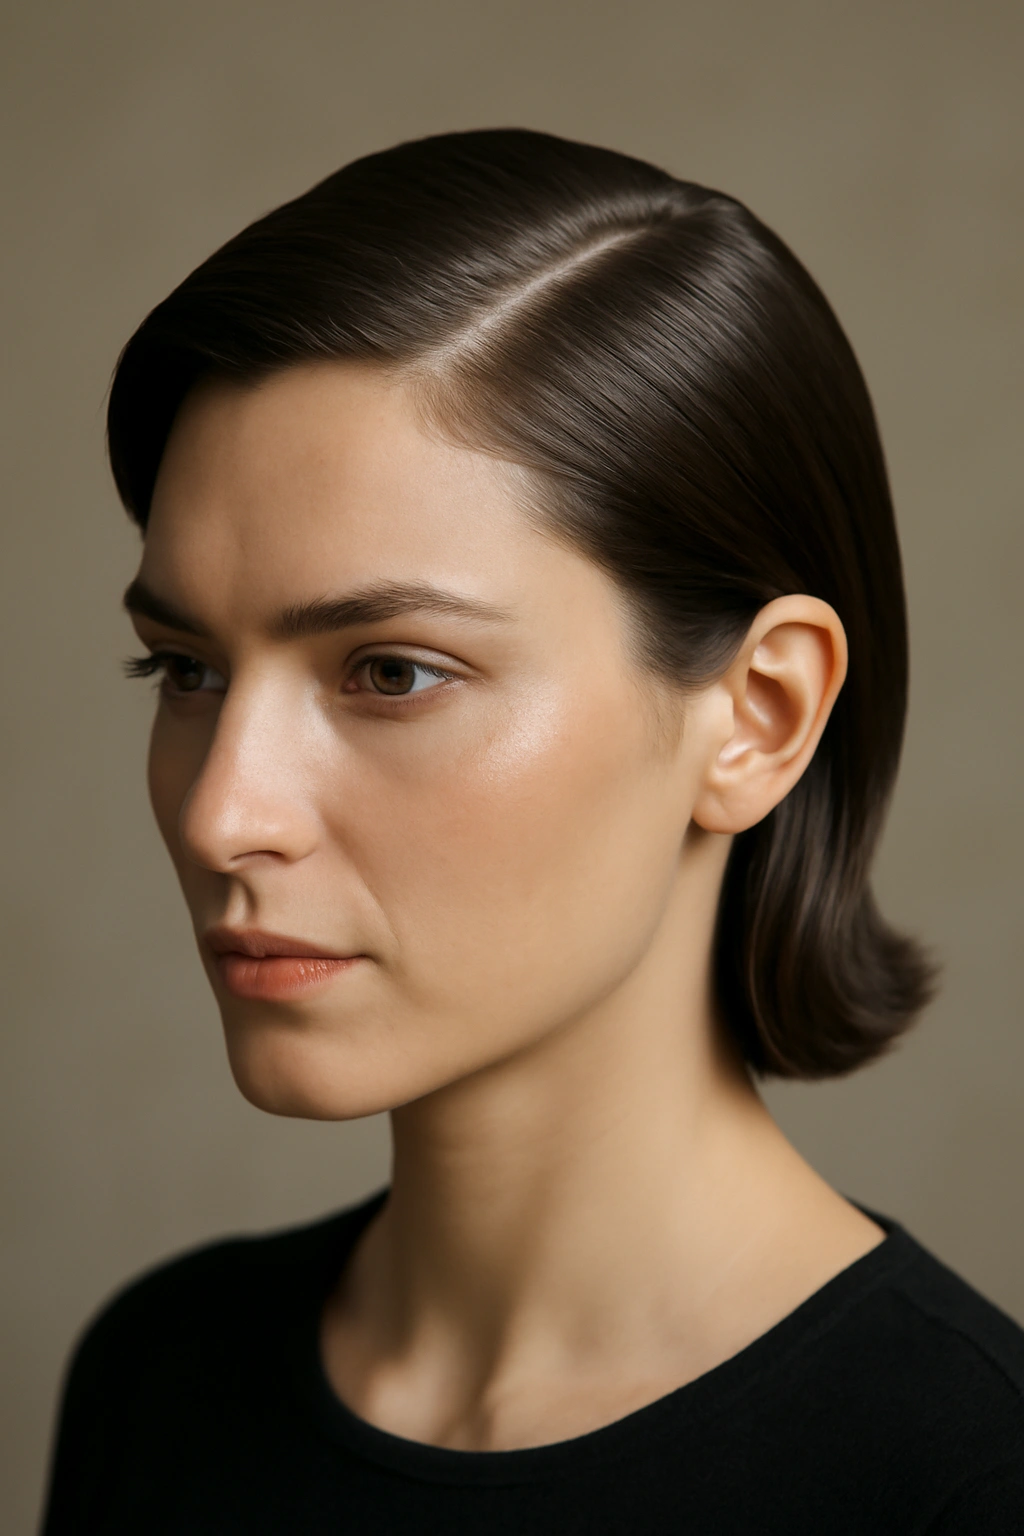
The polished side part is a classic that never goes out of style. This isn’t about a casual side part where you simply brush hair to the side; it’s about a deliberate, structured side part that creates an asymmetrical, elegant frame for the face. This style works for nearly every face shape, suits most hair types, and reads as intentionally groomed and professional. The beauty of a side part is that it works with virtually any hair length and can be combined with waves, straightness, or texture depending on occasion and preference.
Creating a Truly Polished Side Part
Start by identifying where your natural part falls or where you’d like it to fall—typically somewhere between the center and the outer edge of one eyebrow. Using a fine-tooth comb, create a clean, precise line from your hairline toward the back of your head. The key to a polished appearance is the precision of this line; fuzzy or imprecise partings read as careless. Once your part is clean, style your hair according to your preference—straight, wavy, or textured. The part creates structure regardless of your styling choice, but the style you choose determines whether the overall look reads as professional, casual, or formal.
Styling the Side Part for Any Occasion
- For professional settings: Pair your side part with straight, smooth hair and a sleek low bun or ponytail; keep the part clean and precise
- For formal events: Create soft waves or curls on the side that has more hair; the asymmetry created by the side part adds elegance
- For casual wear: The side part still creates polish; pair it with looser waves or textured hair for an approachable yet intentional look
- For everyday wear: This is your low-maintenance option; a side part reads as put-together even if your styling is minimal
- With styling products: A light pomade or gel applied to smooth the part makes it look intentional and refined
Insider note: The side part naturally creates face-framing dimension; use this to your advantage by allowing some soft waves or curls to frame your face, especially if you have a longer face that benefits from horizontal dimension.
Final Thoughts
These twelve hairstyles earned their place in this list because they deliver genuine versatility without requiring you to reinvent your look for every occasion. Each one starts with a solid foundation—whether that’s a gathered section of hair, a twist, a braid, or a carefully crafted wave—and then adapts upward or downward depending on context. A low bun that’s polished and smooth for Monday morning at work becomes something different entirely by evening when paired with statement earrings and slightly looser twists. That half-up section that reads as professional during the workweek shifts into weekend-casual simply through the addition of texture and a different styling product.
The real secret to these hairstyles’ longevity isn’t that they’re trend-proof—though they largely are. It’s that they’re fundamentally flattering because they consider the basic principles of face-framing, proportions, and polish. They account for the fact that your hair isn’t static; it reflects light differently depending on time of day, moves differently depending on environment, and reads differently depending on what you pair it with. A style that feels too polished for Friday night drinks becomes perfect for Saturday brunch. A hairstyle that looks professional at 9 a.m. reads as intentionally elegant at an evening event.
The most important part of making any of these styles work for your life is understanding that the hairstyle is a foundation, not a final product. Your personality, your confidence in the style, and the small adjustments you make throughout the day are what transform a technically correct hairstyle into something that feels genuinely you. These twelve options are here whenever you need them.