When you’re standing in front of the mirror on the night of a formal event, your hair deserves to feel as polished and intentional as the rest of your appearance. There’s something about a well-executed updo that communicates elegance instantly — it says you’ve taken care with the details, you understand the occasion, and you know how to present yourself. But here’s what most people don’t realize: the best formal updos aren’t necessarily complicated. They’re classic. They work because they’ve been refined over decades, they suit almost every face shape and hair type, and they hold their own through hours of dancing, talking, and moving around.
The challenge isn’t complexity — it’s choosing the right style for your hair texture, your face, and the specific vibe of the event. A style that looks stunning on someone with thick, straight hair might pull uncomfortably on fine, delicate waves. A chignon that photographs beautifully might feel too formal for a daytime garden wedding. That’s where this guide comes in. We’re going to walk through eight proven updos, each with specific techniques to make them work for you, real tips about what can go wrong and how to prevent it, and honest guidance about which occasions each style suits best.
You don’t need hours at a salon to achieve any of these looks — though that’s certainly one option if you want to guarantee flawless execution. With practice and the right approach, most of these styles are completely achievable at home. The key is understanding the structure of each look, preparing your hair properly, and knowing exactly which pins and products will keep everything exactly where you put it until the end of the night.
1. The Timeless French Twist
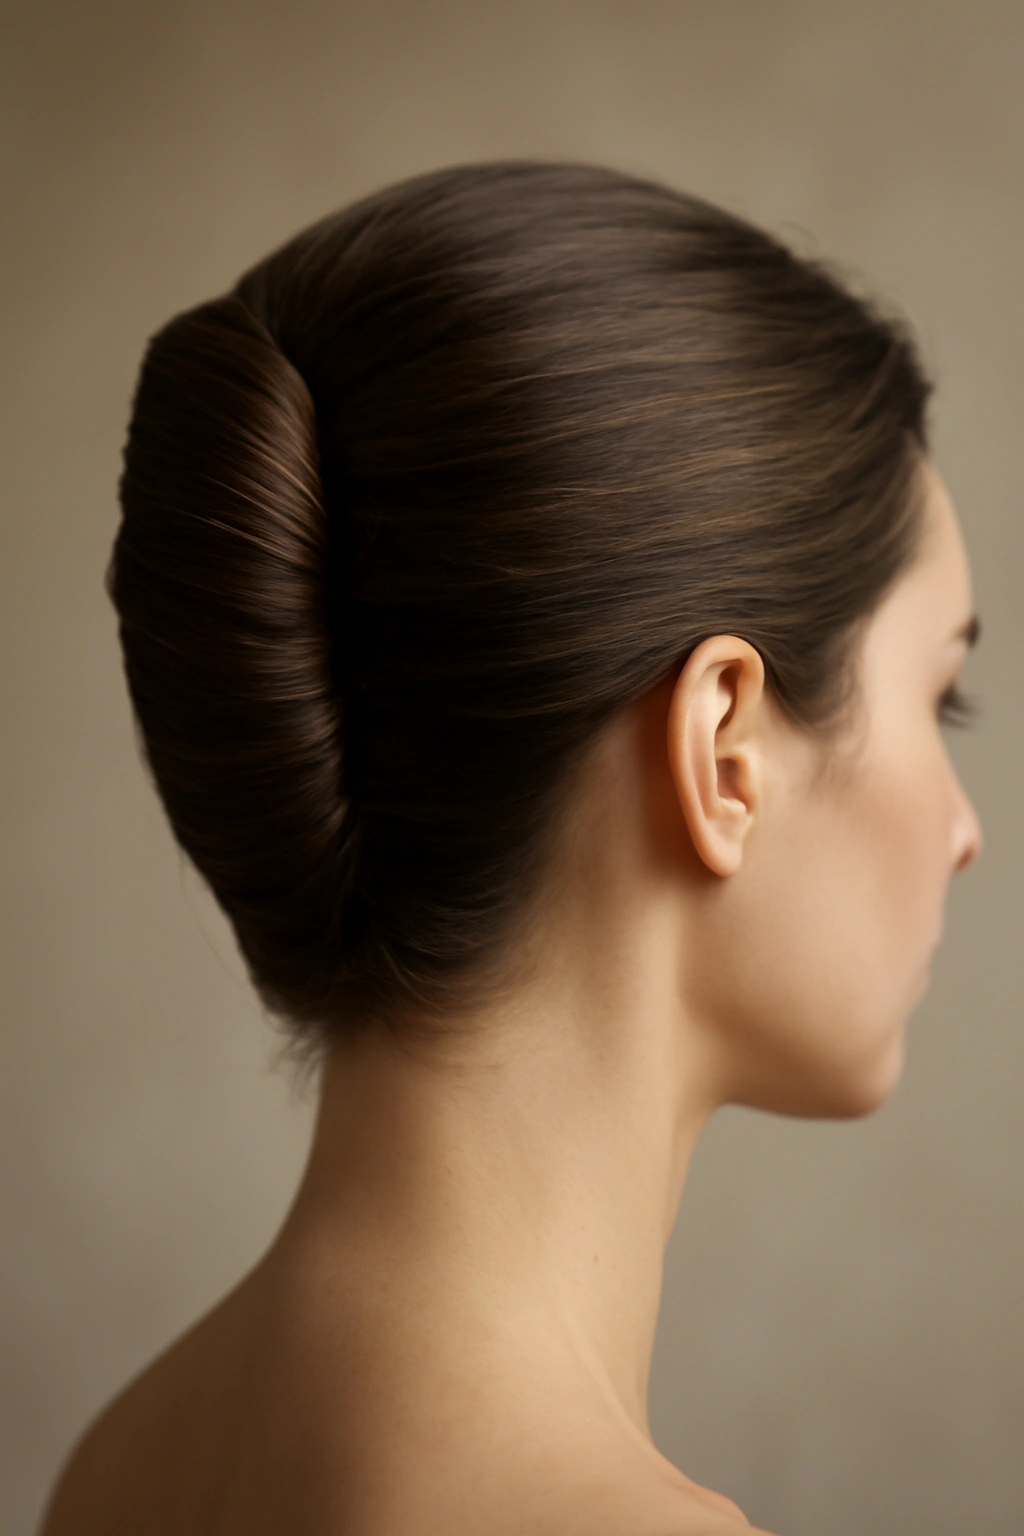
The French twist is the gold standard of formal updos. It’s sleek, it’s sophisticated, and honestly, it never looks casual or poorly executed if you get the technique right. What makes it so effective is that it’s just structured enough to feel intentional, but flexible enough to work on nearly every hair type and length — as long as you have enough hair to twist and tuck, you can make this work.
The beauty of the French twist lies in its simplicity. Unlike updos that require multiple sections, braids, or complex pinning patterns, this style is essentially one continuous twist that you fold into itself. The finished look is clean and elongated, which makes it particularly flattering for formal occasions because it draws attention upward and creates a graceful line from your neck through the crown of your head.
Why It’s Perfect for Formal Events
The French twist reads as effortlessly polished, which is exactly the message you want to send at a formal occasion. It works for black-tie events, galas, weddings, and upscale dinners equally well. The style is timeless enough that it never looks dated, but it’s executed by people at every level of formality — from casual brunches to presidential events. What really sets it apart is that it photographs beautifully from multiple angles. The back of your head looks structured and intentional, the side profile is clean and flattering, and from the front, you get the benefit of a smooth, uncluttered face frame.
How to Create the Perfect French Twist
Start with hair that has texture — second-day hair is actually ideal for this, or blow-dry your clean hair and let it cool completely. If your hair is very slippery or fine, apply a texturizing spray or dry shampoo to give the twist something to grip.
- Flip your head forward and brush all your hair back and slightly to one side, then flip back upright. This distributes product evenly and creates volume at the crown.
- Gather a section from the nape of your neck up to the crown, roughly at the center-back of your head. You want the twist to sit vertically, not angled.
- Twist this section firmly between your fingers as you move upward. The tighter you twist, the more structured the final look will be.
- Once you reach the crown, fold the twisted section into itself, creating a loop. Pin the base of this loop with bobby pins, working in an X pattern for security.
- Tuck the ends of the twisted section into the loop and pin down any escaping pieces.
- Smooth the exterior with a fine-tooth comb and finish with light hairspray to control flyaways.
Pro tip: If your twist feels loose or your hair is particularly slippery, hold the twisted section in place with one hand while pinning with the other. The tension you create with your hand prevents the twist from unwinding while you’re securing it.
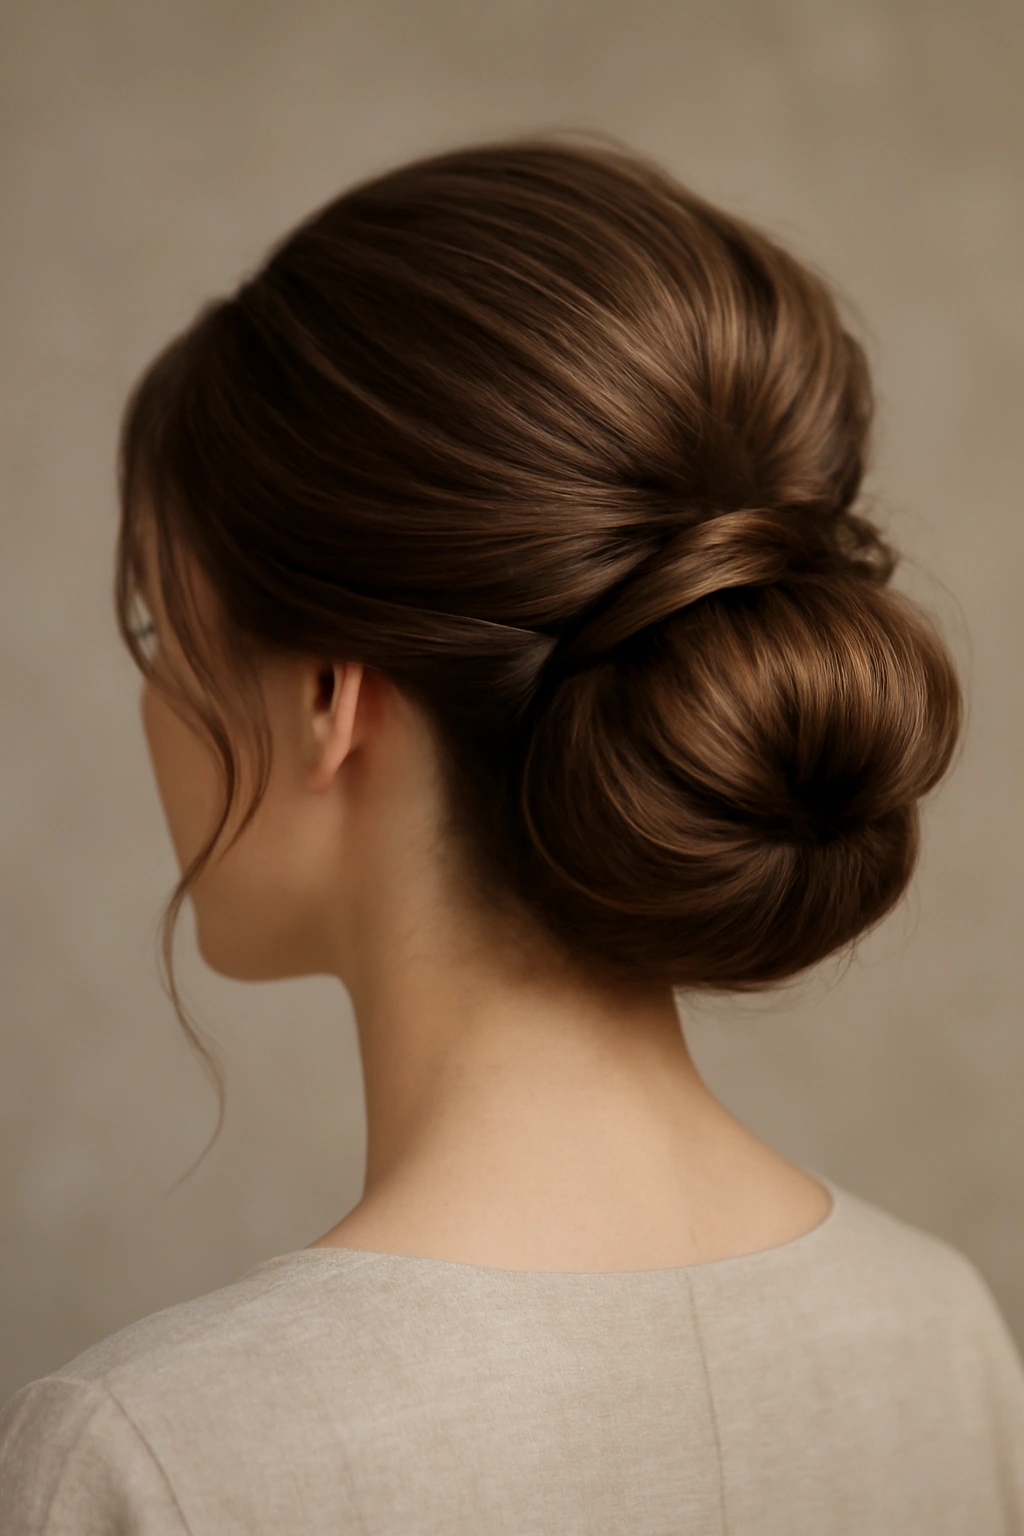
2. The Low Bun — Effortless Sophistication
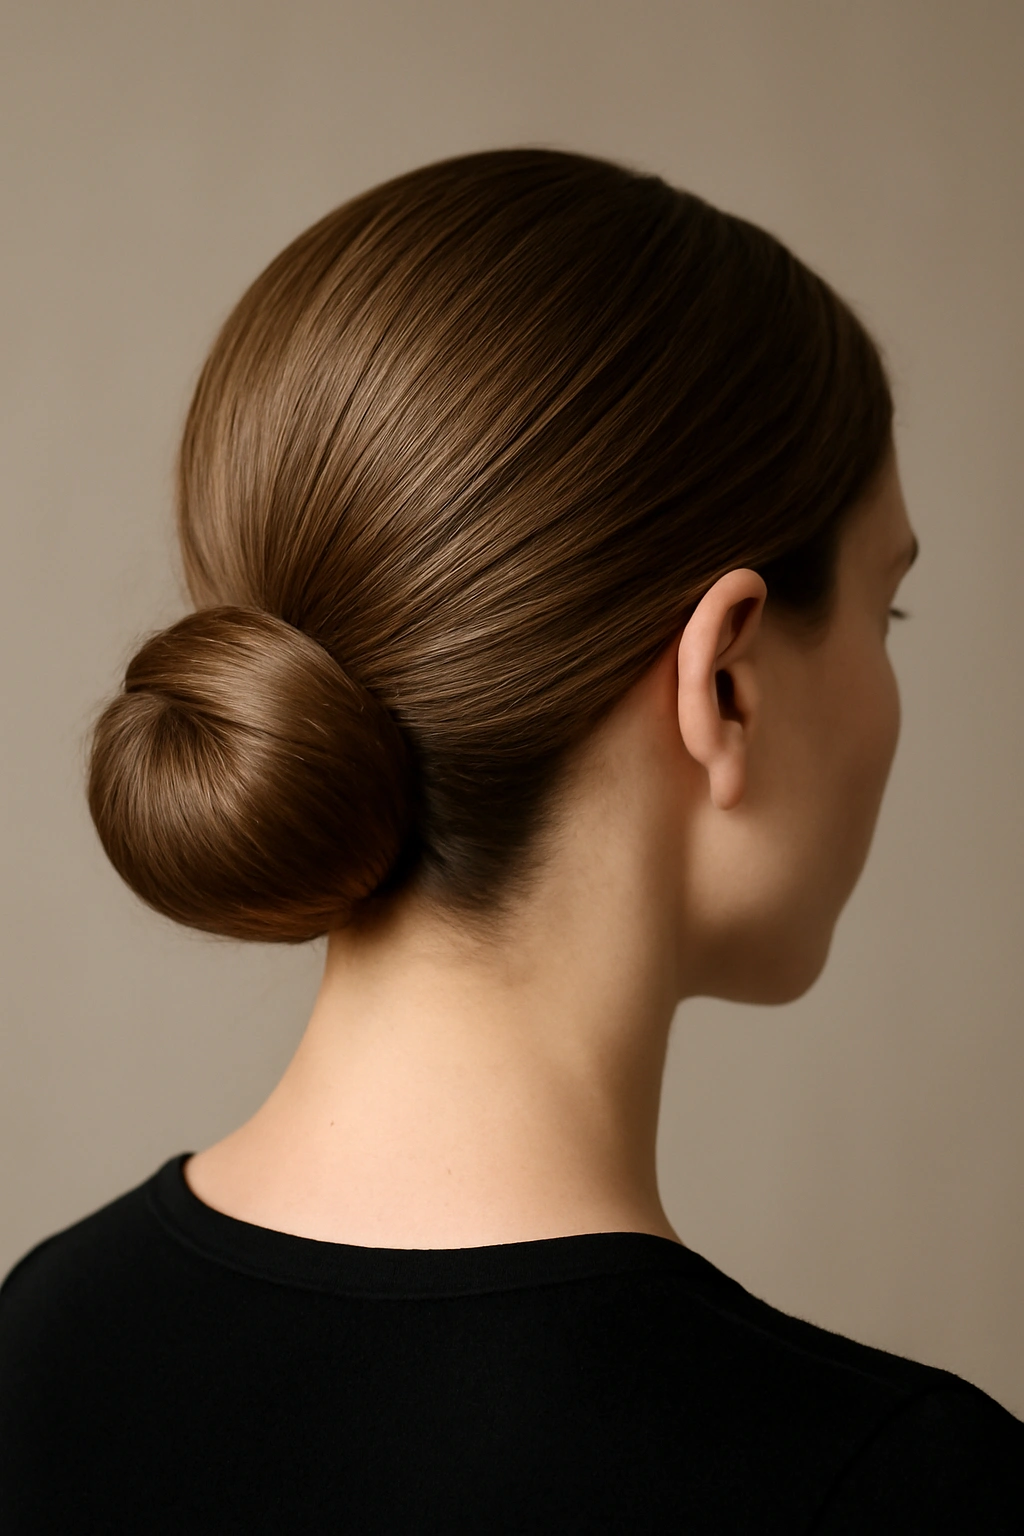
The low bun sits at the base of your neck, just above your shoulders, and it’s one of the most universally flattering updos in existence. What makes it different from other bun styles is that placement — low and centered — creates an elegant frame for your face and an elongated line down your back.
This style works for absolutely every hair type and texture. Straight hair? It’ll look sleek and architectural. Curly hair? The texture creates dimension and interest even when it’s pulled back. Fine hair? A low bun actually looks fuller because all your hair is gathered in one spot rather than spread across your head. Thick hair? The lower placement keeps weight from pulling at your scalp.
Why It’s Perfect for Formal Events
A low bun communicates understated elegance. It’s not trying too hard, which is exactly what you want at a formal event. You look polished without looking overly done, and that balance is incredibly sophisticated. The low placement also means it works with any neckline — strapless, halter, v-neck, high neck — your updo won’t compete with whatever you’re wearing. And practically speaking, a low bun is stable. Once it’s secured, it stays put through hours of movement.
How to Create a Polished Low Bun
This is where the foundation matters. You want smooth hair without texture for a sleek bun, or intentionally textured hair for a romantic version.
- Brush your hair smoothly into a low ponytail at the base of your neck. Use a comb to smooth any flyaways as you work.
- Secure the ponytail with an elastic. This is your anchor — make sure it’s tight enough that nothing will slip.
- Twist the entire ponytail or create two smaller twists and wrap them around the base of the ponytail to form a bun shape.
- Pin the bun with bobby pins inserted horizontally through the bun and into the base. Use at least 4-6 pins arranged in different directions for security.
- Smooth the surface with a fine-tooth comb and edge control product if you need to tame baby hairs.
- Finish with hairspray to lock everything in place.
Worth knowing: The size of your bun should be proportional to your face and head size. If you have a smaller face, a compact bun looks more balanced than a very large, loose one. If you have a larger frame, a fuller bun looks proportional.
3. The High Bun — Dramatic and Modern
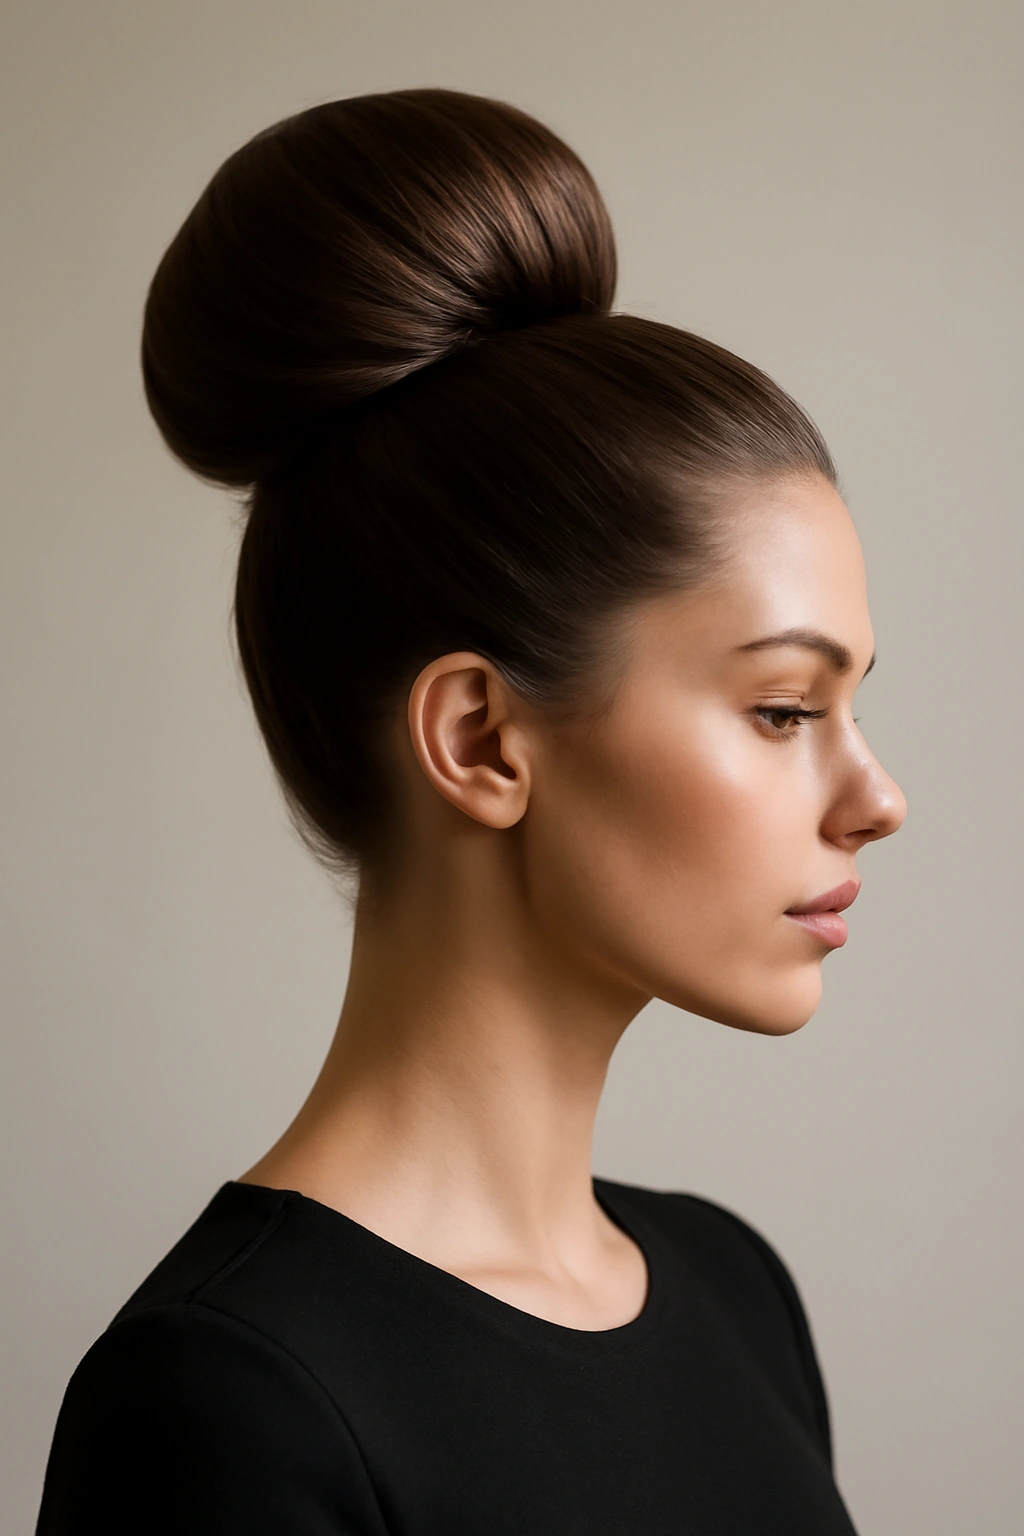
A high bun sits at the crown of your head, and while it’s slightly trendier than some of the other classics on this list, it’s absolutely appropriate for formal occasions when executed with precision and elegance. The high placement creates volume, draws attention to your face, and elongates your neck — which is why it photographs so well.
The trick to making a high bun feel formal rather than casual is keeping the execution very clean. This isn’t a tousled, undone bun — it’s a structured, intentional one. Every piece should be deliberately placed, and flyaways should be controlled rather than embraced.
Why It’s Perfect for Formal Events
A high bun works particularly well for occasions where you want to show off your face, your shoulders, and your neckline without any obstruction. It’s ideal for black-tie events, galas, and formal dinners. The height also creates a visual lift to the entire face, which is why many people find it more flattering than lower styles. You also get the benefit of movement — a high bun can gently swing as you move, which adds graceful motion to your overall presentation.
How to Create a Structured High Bun
A high bun requires more precision than a low bun, but the payoff is worth it.
- Blow-dry your hair with a round brush to create volume at the roots. This volume is what makes a high bun look full rather than tight.
- Create a high ponytail at the crown of your head. Use a fine-tooth comb to smooth the sides and back as you gather hair upward.
- Tease the ponytail gently at the base to create grip and volume. This gives the bun shape and prevents it from looking flat.
- Wrap the ponytail around the base to form a bun, or twist it and wrap it around itself. Pin with bobby pins inserted at multiple angles.
- Wrap a small section of hair around the elastic base to hide it — this makes the bun look polished rather than obviously secured with an elastic.
- Use edge control on your hairline and smooth any bumps with a fine-tooth comb.
- Finish with strong-hold hairspray because gravity will work against this style throughout the night.
Pro tip: If your bun feels too small or tight, backcomb the bun itself gently to add volume and texture to the finished shape. This makes it look fuller without looking messy.
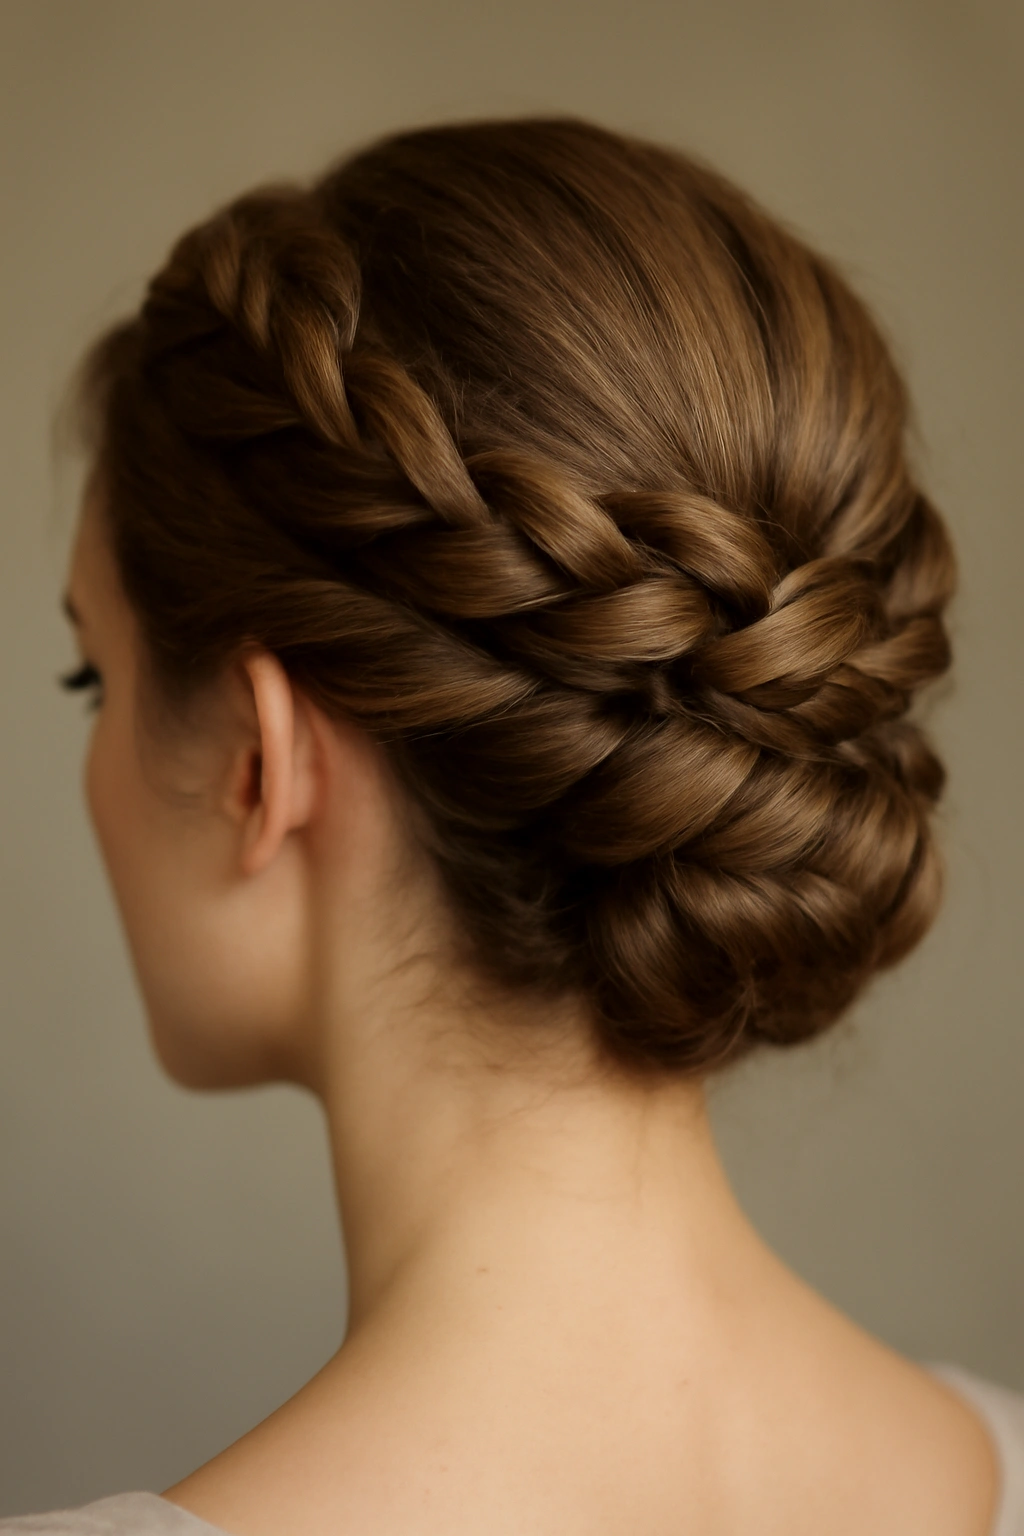
4. The Elegant Braided Updo
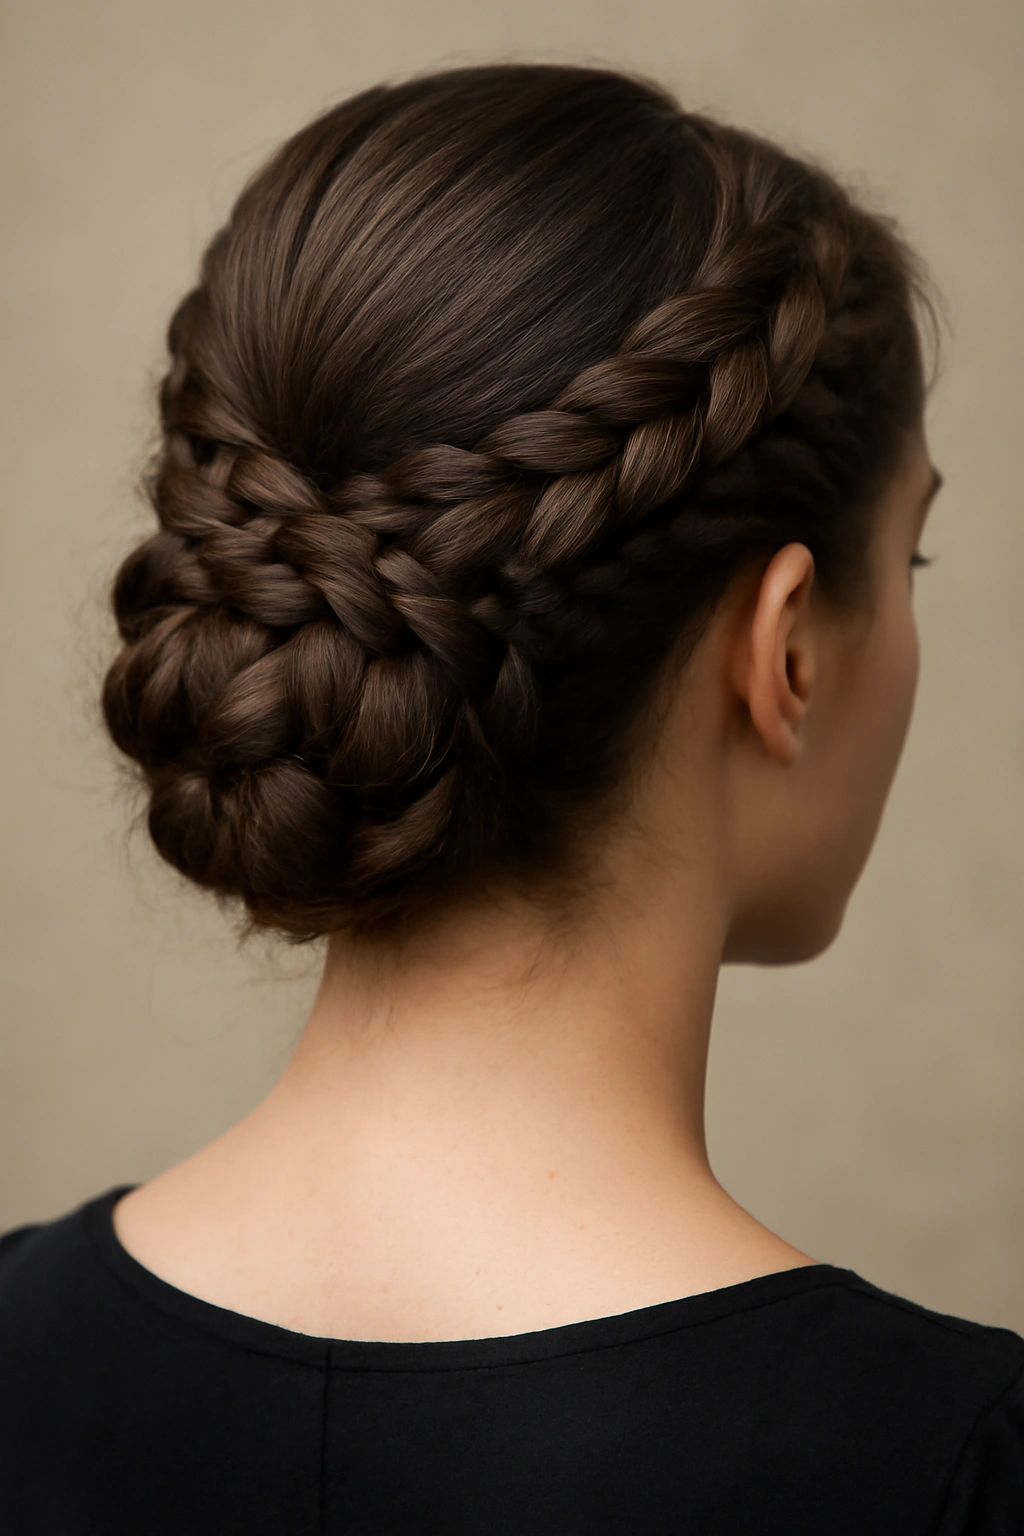
A braided updo is where formal elegance meets interesting texture. There are countless ways to execute this — you can do a single braid, multiple braids, a crown braid, or braids wrapped around a bun. What they all have in common is that braids add visual interest and sophistication while also being incredibly secure.
Braids hold remarkably well throughout a long event. The interlocking structure means that even if a few loose pieces escape, the overall style remains intact. This makes braided updos perfect for events where you’ll be active — dancing, mingling, or moving around extensively.
Why It’s Perfect for Formal Events
Braids elevate an updo from simple to special without looking overly complicated or trendy. They add texture and dimension, which photographs beautifully and looks elegant from every angle. A braided updo also works across different hair types — straight hair shows off the clean lines of the braid, wavy hair adds dimension to the braid structure, and curly hair creates a romantic, textured appearance.
How to Create a Braided Updo
The most versatile braided updo combines a braid with a low bun. Start by creating volume and texture in your hair.
- Create a side part or center part, depending on your preference and face shape.
- Begin a braid at one side, starting at the temple and working toward the back of your head. A Dutch braid (braiding under rather than over) creates more dimension.
- Braid all the way down the back of your head, gathering hair as you go. This creates a thicker, more interesting braid than starting with a small section.
- Once you reach the nape, gather the braid and any remaining hair into a low ponytail.
- Wrap the braid around the base of the ponytail to form a bun, or create a second braid and wrap both around the ponytail base.
- Pin everything securely with bobby pins inserted in multiple directions.
- Smooth flyaways with edge control and finish with hairspray.
Worth knowing: French braids are more formal and structured, while Dutch braids create more texture and dimension. Choose based on your hair type and the vibe you’re going for. Fine hair often looks better with a French braid, which sits flatter against the head. Thick or textured hair looks wonderful with a Dutch braid.
5. The Sleek Low Ponytail
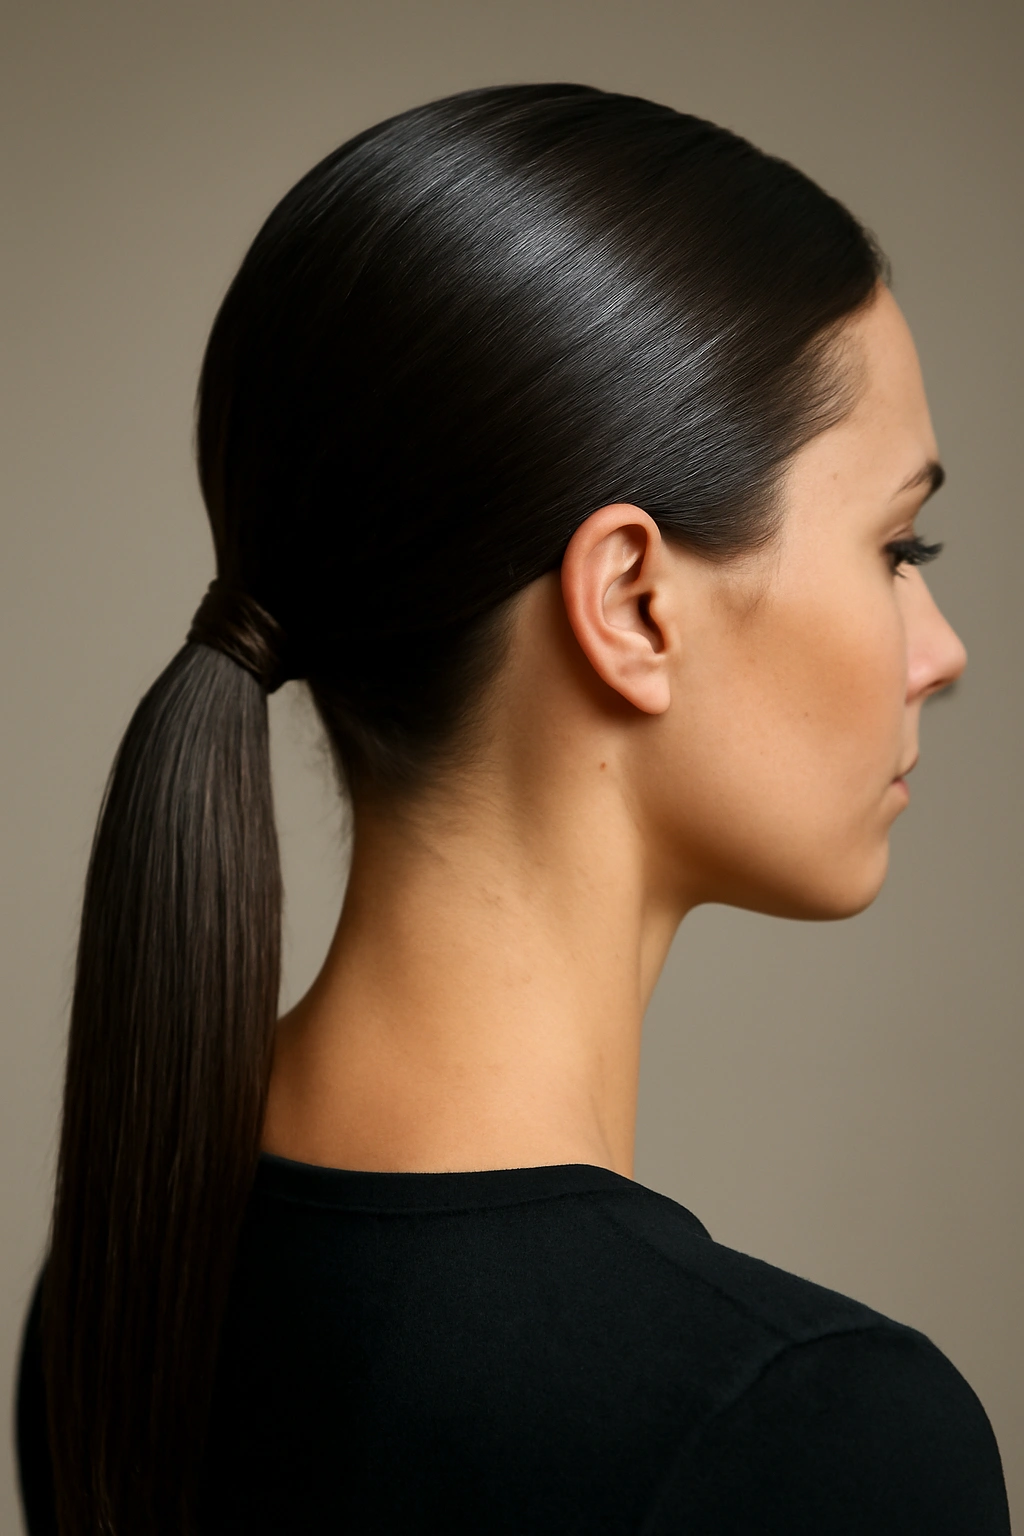
A low ponytail is perhaps the most minimalist of formal updos, but don’t let its simplicity fool you — a truly polished low ponytail is the mark of someone who understands understated elegance. The key is making it look intentionally sleek rather than casually thrown together.
The low ponytail works for every hair type and every formal occasion. It’s modern enough for contemporary events, classic enough for traditional weddings, and polished enough for black-tie galas. What makes it feel formal rather than casual is the execution — every hair needs to be smooth and in place, the elastic needs to be hidden, and the ponytail itself should have shape and movement.
Why It’s Perfect for Formal Events
A sleek low ponytail draws attention to your face, your shoulders, and your neckline without any visual obstruction. It works beautifully with any outfit because it doesn’t compete for visual attention. The style is also practical — it keeps hair off your face without being as sculptural as a structured bun, so it feels slightly more relaxed while remaining completely formal.
How to Create an Impeccable Low Ponytail
The difference between a casual ponytail and a formal one comes down to preparation and finishing details.
- Start with smooth hair — use a smoothing serum or anti-frizz product if you have any texture that needs taming.
- Create a low ponytail at the nape of your neck, roughly centered. Use a fine-tooth comb to smooth all hair backward as you gather it.
- Secure with a thin elastic — not a thick hair tie, but a thin clear or matching elastic that will be barely visible.
- Wrap a small section of hair around the base of the ponytail to cover the elastic. Secure this wrapped section with a bobby pin hidden underneath.
- Consider adding subtle waves to the ponytail itself using a curling iron. Waves add movement and softness without making the style look casual.
- Use edge control around your hairline to create smooth, defined edges.
- Finish with light hairspray that holds without making hair look stiff.
Pro tip: A low ponytail with subtle waves is more interesting to look at than a completely straight one, but make sure the waves are intentional and smooth, not textured or curly. One pass with a large curling iron through each section of the ponytail creates elegant movement.
6. The Sophisticated Chignon
A chignon (pronounced “shin-yon”) is a low bun, but the term specifically refers to a fuller, less structured version than a tight formal bun. It sits at the base of your neck and has volume and softness, which makes it feel romantic and elegant rather than severe.
The chignon is particularly flattering because it creates a soft frame for your face while still keeping hair completely off your shoulders. It works beautifully for weddings, galas, formal dinners, and any event where you want to look polished but not overly structured.
Why It’s Perfect for Formal Events
A chignon communicates refinement with a touch of romance. It’s formal enough for any occasion but soft enough to feel modern and approachable. The style also works beautifully with delicate jewelry, updos with face-framing pieces, and any neckline. Because it has volume and isn’t pulled extremely tight, it’s also more comfortable for long events than a very structured bun.
How to Create a Soft Chignon
The key to a good chignon is creating volume and texture while keeping everything polished.
- Create a low ponytail at the nape of your neck, but don’t pull it too tightly — there should be slight softness at the sides.
- Tease the ponytail gently to create texture and volume. This is what gives a chignon its distinctive fuller appearance.
- Wrap the ponytail around the base to form a bun, allowing some texture to show rather than smoothing it completely.
- Pin the bun securely but allow some gentle waves and texture to remain visible on the surface.
- Gently pull a few very small pieces near your face to soften the look further — but keep this subtle. You want softness, not looseness.
- Use light hairspray to hold the texture without making it look stiff.
Worth knowing: A chignon works best on hair with natural texture or waves. If your hair is very straight, creating intentional waves before forming the bun will make the final style look more romantic and polished. The texture gives the chignon its characteristic softness.
7. The Twisted Crown Updo
A twisted updo works by creating a series of small twists that wrap around the crown of your head, either meeting at a bun, a ponytail, or gathering at the back of your head. This style is visually interesting, surprisingly easy to execute, and works beautifully for formal occasions because twists always look intentional and sculptural.
What makes the twisted crown updo special is that it shows off the detail of your hair texture. The twists create beautiful definition, and the overall effect is more dynamic than a simple bun while still being completely appropriate for formal wear.
Why It’s Perfect for Formal Events
Twisted updos work for events ranging from garden parties to black-tie galas. The style is elegant without being overly complicated, and it photographs beautifully from every angle. The twisted detail adds visual interest that makes you look like you’ve put real thought into your appearance — which, of course, you have. The style also works well for showcasing jewelry, particularly if you’re wearing a statement necklace or earrings, because the clean lines of the twists don’t compete for attention.
How to Create a Twisted Crown Updo
This style requires a bit of patience, but the payoff is a sophisticated updo that looks more complicated than it actually is.
- Section your hair into 3-4 pieces — one from each side of your head and one or two from the back.
- Starting on one side, create a twist by taking two sections of hair and wrapping one around the other repeatedly. The tension should be firm so the twist holds.
- Pin the twist down as you go, adding bobby pins every few inches to secure it against your head.
- Repeat on the other side, creating a matching twist that goes toward the back of your head.
- Gather the back sections and the ends of your side twists into a low ponytail or bun.
- Secure the gathered section with bobby pins inserted at multiple angles.
- Tuck any loose ends into the bun or wrap small pieces around the base to hide the elastic.
- Smooth the surface and finish with hairspray.
Pro tip: Practice this style before the event. It requires more hands-on time than some other updos, and having done it once makes the second time much faster and smoother.
8. The Half-Up, Half-Down Updo
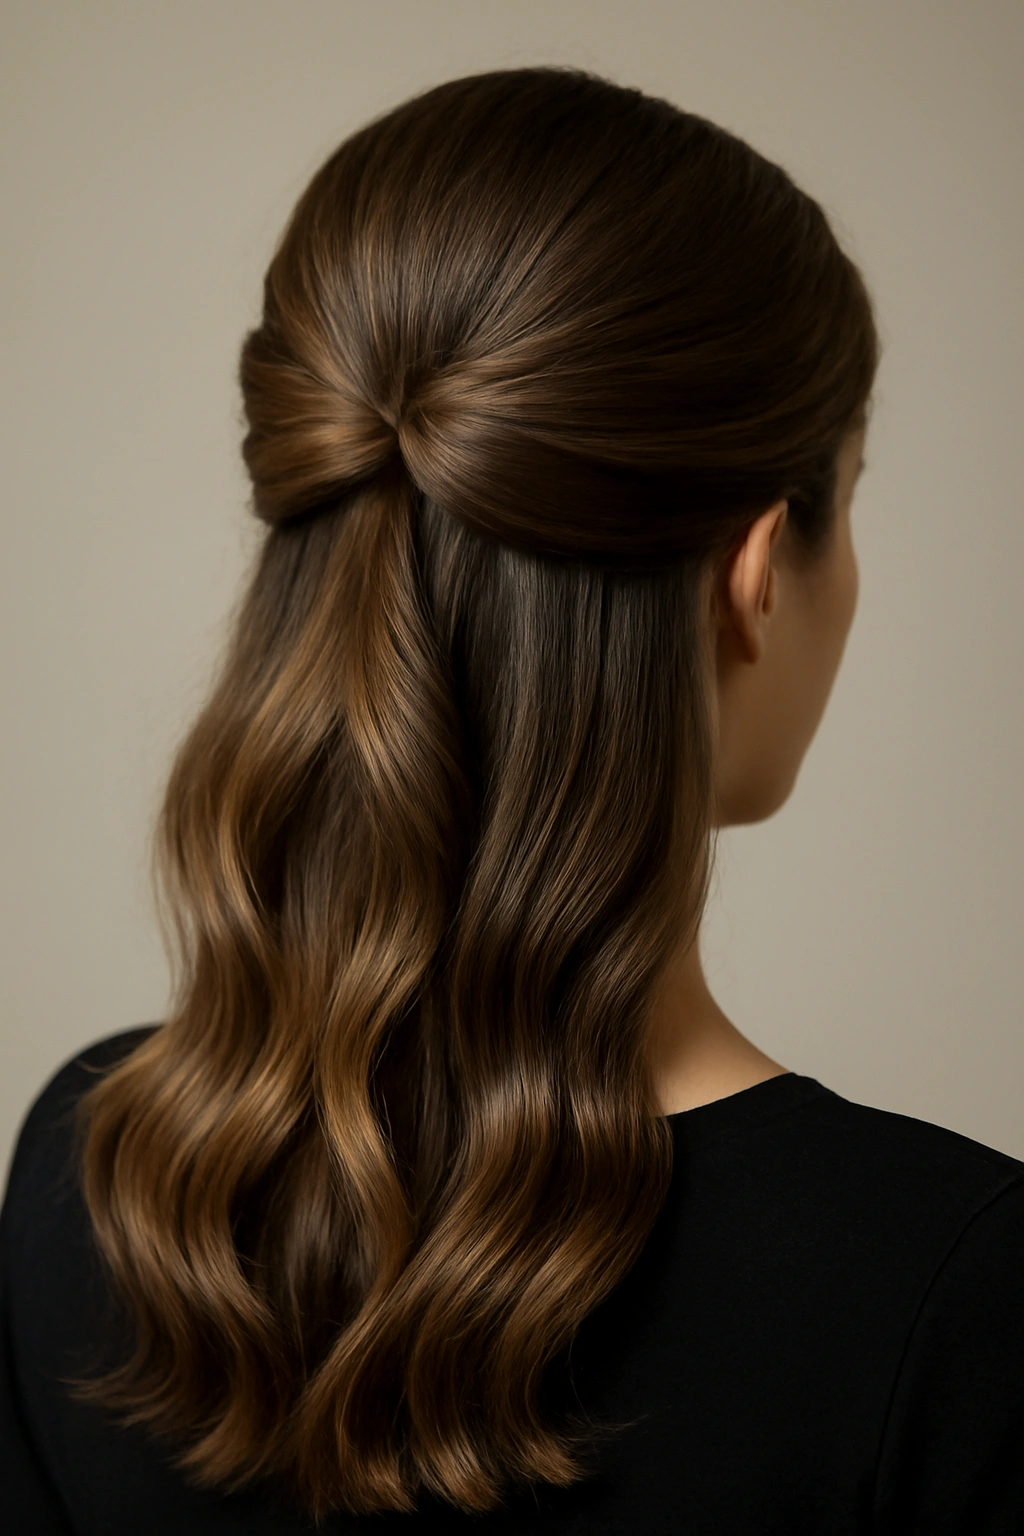
The half-up, half-down style occupies a beautiful middle ground between letting your hair down and putting it fully up. Half of your hair is secured into an updo at the crown while the rest flows freely down your back. This style works for slightly less formal occasions — perhaps a semi-formal dinner, a cocktail event, or a daytime wedding — where you want polish without appearing too heavily styled.
What makes this style work as a “formal” updo is the execution. The secured portion needs to be clean and intentional, and the down portion should be styled with waves or curls rather than left completely straight. The overall effect should be that you’ve put significant thought into your appearance, even though the style feels lighter and more relaxed than a full updo.
Why It’s Perfect for Formal Events
The half-up style shows your hair and demonstrates volume and styling while still having the polish of an updo. It works beautifully for events where you want to look elegant without looking overly formal. The style is also incredibly flattering because you get the face-framing benefits of down hair with the polish of an up style. If you have beautiful long hair or have invested in hair extensions, this style shows off that length while keeping things off your face.
How to Create a Half-Up, Half-Down Updo
The key is creating intentional styling in both the up and down portions.
- Blow-dry your hair with a round brush to create volume throughout.
- Create waves or curls in the lower half of your hair using a curling iron or wand. Let these cool completely before moving to the next step.
- Section off the top half of your hair, from temple to temple across the crown. Secure this section with a clip to keep it out of the way while you work.
- Create the updo from the secured top section — this can be a twisted knot, a small bun, a braid, or a combination. Pin it securely.
- Release the clipped section and smooth any bumps or creases where it was pinned.
- Gently tease the base of the updo to create a fuller appearance where the two sections meet.
- Wrap a small section of hair around the base of the updo to hide any visible elastic or clips.
- Finish with hairspray that holds without making the down portion stiff.
Worth knowing: The transition where the up and down portions meet is crucial. Make sure there are no visible clips or awkward gaps. A small wrapped section of hair that ties everything together makes the style look polished and intentional rather than like you couldn’t decide whether to wear your hair up or down.
Final Thoughts

The truth about formal updos is that they don’t need to be complicated to be beautiful. Each of these eight styles works because it’s been refined over decades, tested on countless people with different hair types, and proven to hold up through long events while still looking fresh and elegant.
What matters most is choosing the style that suits your hair, your face, and your level of comfort with styling. If you’ve never done a French twist, don’t attempt it for the first time at a black-tie event — practice it several times beforehand so your hands know exactly what to do. If your hair is fine and fragile, skip the tight high bun in favor of a chignon that’s gentler on your hair and scalp. If you love the look of braids but worry about them holding, pair a braid with a bun so the braid adds visual interest while the bun provides security.
Every one of these updos can be executed at home with practice, or you can book a professional stylist for flawless results. Either way, you now know exactly what to ask for, how to describe the style you want, and what details matter in the execution. That knowledge is what turns a formal occasion from something you’re anxious about into something you can look forward to — when you feel confident in your appearance, everything else becomes easier.