Your birthday’s the perfect excuse to try a hairstyle that feels special but doesn’t require you to spend three hours at the salon or wrestle with your hair for half the day. The sweet spot is finding a look that feels effortlessly polished — something that turns heads, photographs beautifully, and makes you feel genuinely confident without feeling fragile or overdone. These are the kinds of hairstyles that work whether you’re celebrating with an intimate dinner, heading to a party with friends, or just treating yourself to something that feels a little more put-together than your usual routine.
The best birthday hairstyles share one crucial quality: they look intentional and refined while still feeling like you. They don’t require a team of people to maintain, they won’t fall apart the moment you move your head, and they actually work with your hair texture instead of fighting against it. This is where technique matters way more than having perfect hair to begin with.
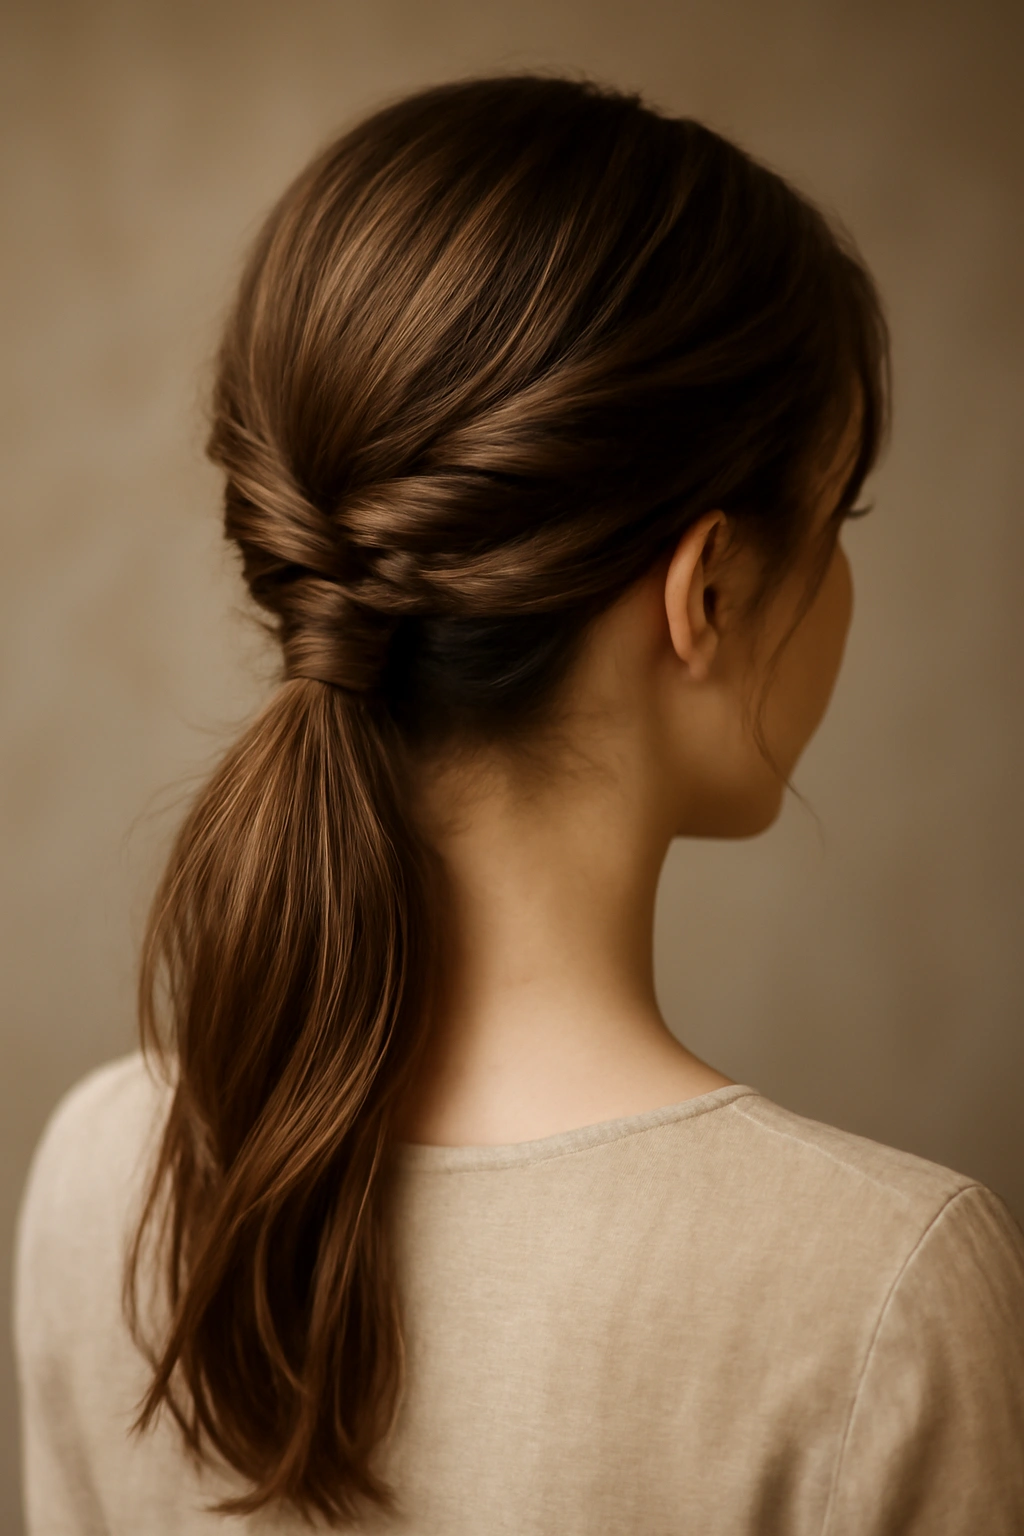
1. Sleek Low Bun
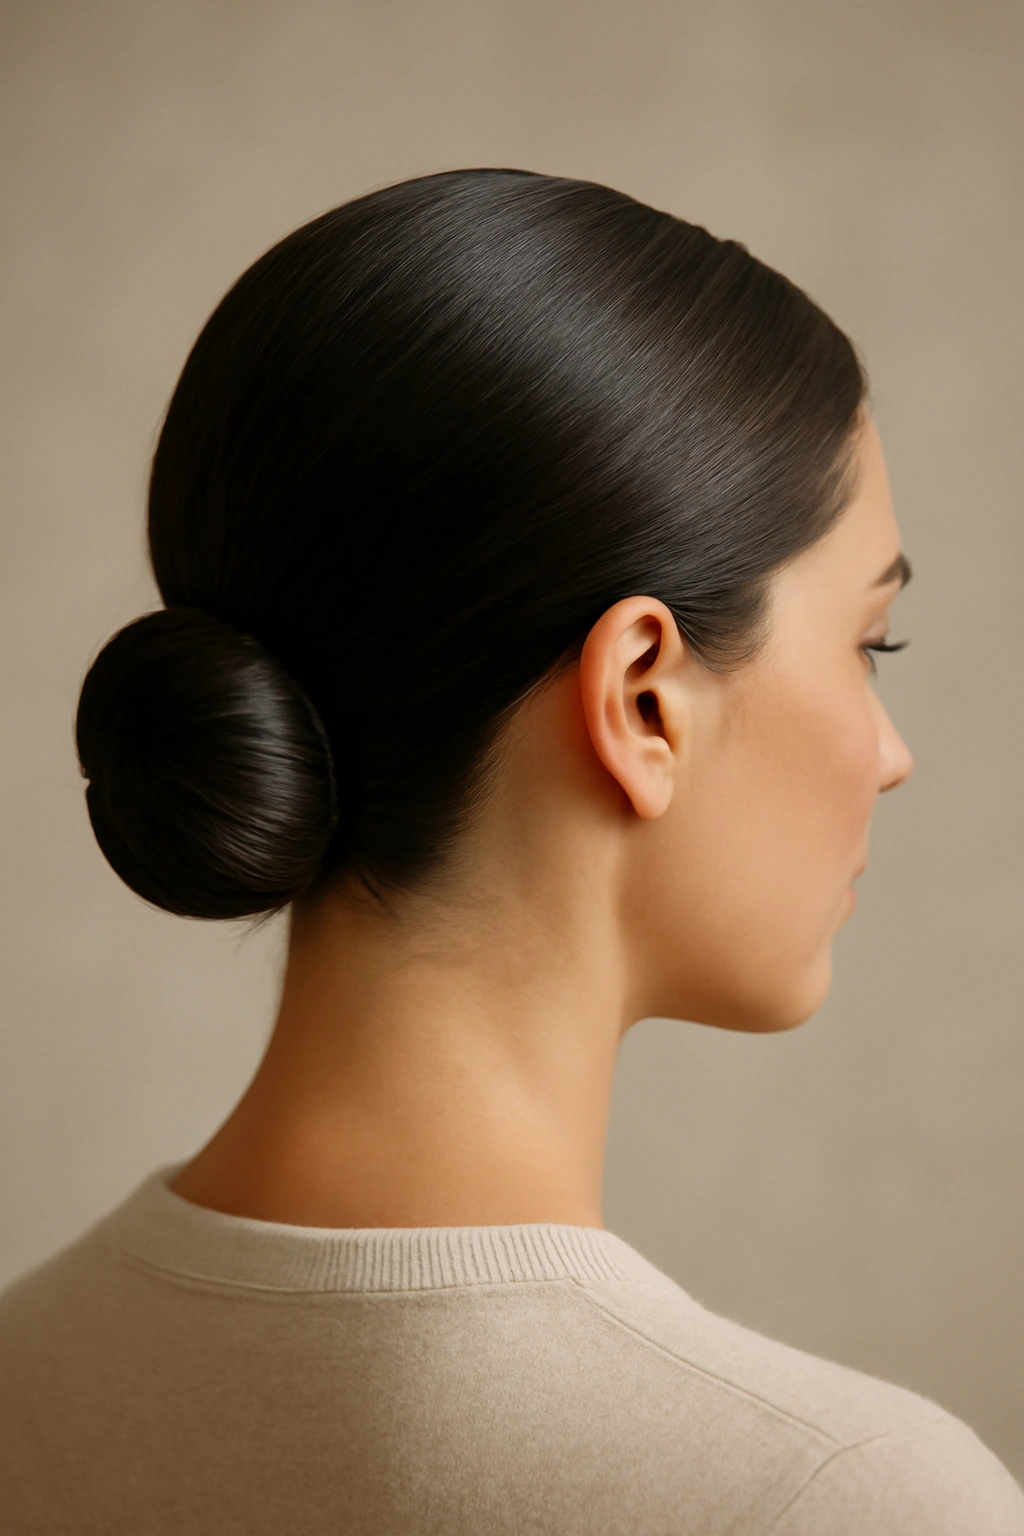
A low bun is the Swiss Army knife of birthday hairstyles — it works for almost every hair type, every face shape, and every dress code imaginable. What makes it feel polished rather than casual is the sleekness and the way you position it. The key is pulling your hair back firmly enough that it looks intentional, but not so tight that you spend the evening with a headache.
How to Create This Polished Low Bun
Start with hair that’s been lightly blow-dried and smoothed down with a paddle brush. If your hair tends toward texture, a smoothing serum or anti-frizz cream applied to damp hair before blow-drying will save you hours of struggling. Brush your hair straight back into a low ponytail at the nape of your neck — the exact placement matters here. You want it low enough to feel elegant, but high enough that it doesn’t sit directly on your collar (unless that’s the intentional vibe). Use a small elasticated hair tie to secure the ponytail first.
Twist the ponytail loosely around itself, then wrap it into a compact coil. Secure it with bobby pins inserted horizontally into the bun, making sure they’re hidden inside the coil. The trick that elevates this from “casual bun” to “polished bun” is using a smoothing cream or light hairspray on a fine-tooth comb to gently smooth away any flyaways, then wrapping a small section of hair (or a faux hair wrap piece) around the base of the bun to conceal the elastic band.
Why This Works for Birthdays
The low bun shows off your face, your neck, your earrings, and the back of your outfit — it’s maximum elegance for minimum effort. You can dress it up with delicate bobby pins or leave it ultra-clean. It stays put all evening without feeling restrictive, and it works equally well whether you’re wearing a dress or a blazer.
Quick Styling Tips
- Use volumizing products at the crown before you pull the hair back if you want more dimension and height rather than a sleek, flat look.
- A spritz of light hairspray before you form the bun keeps everything locked in place without the sticky, stiff feeling of heavy-hold products.
- If you have fine or thin hair, create the bun slightly higher and slightly looser — it’ll look fuller and more intentional.
2. Soft Waves with Movement
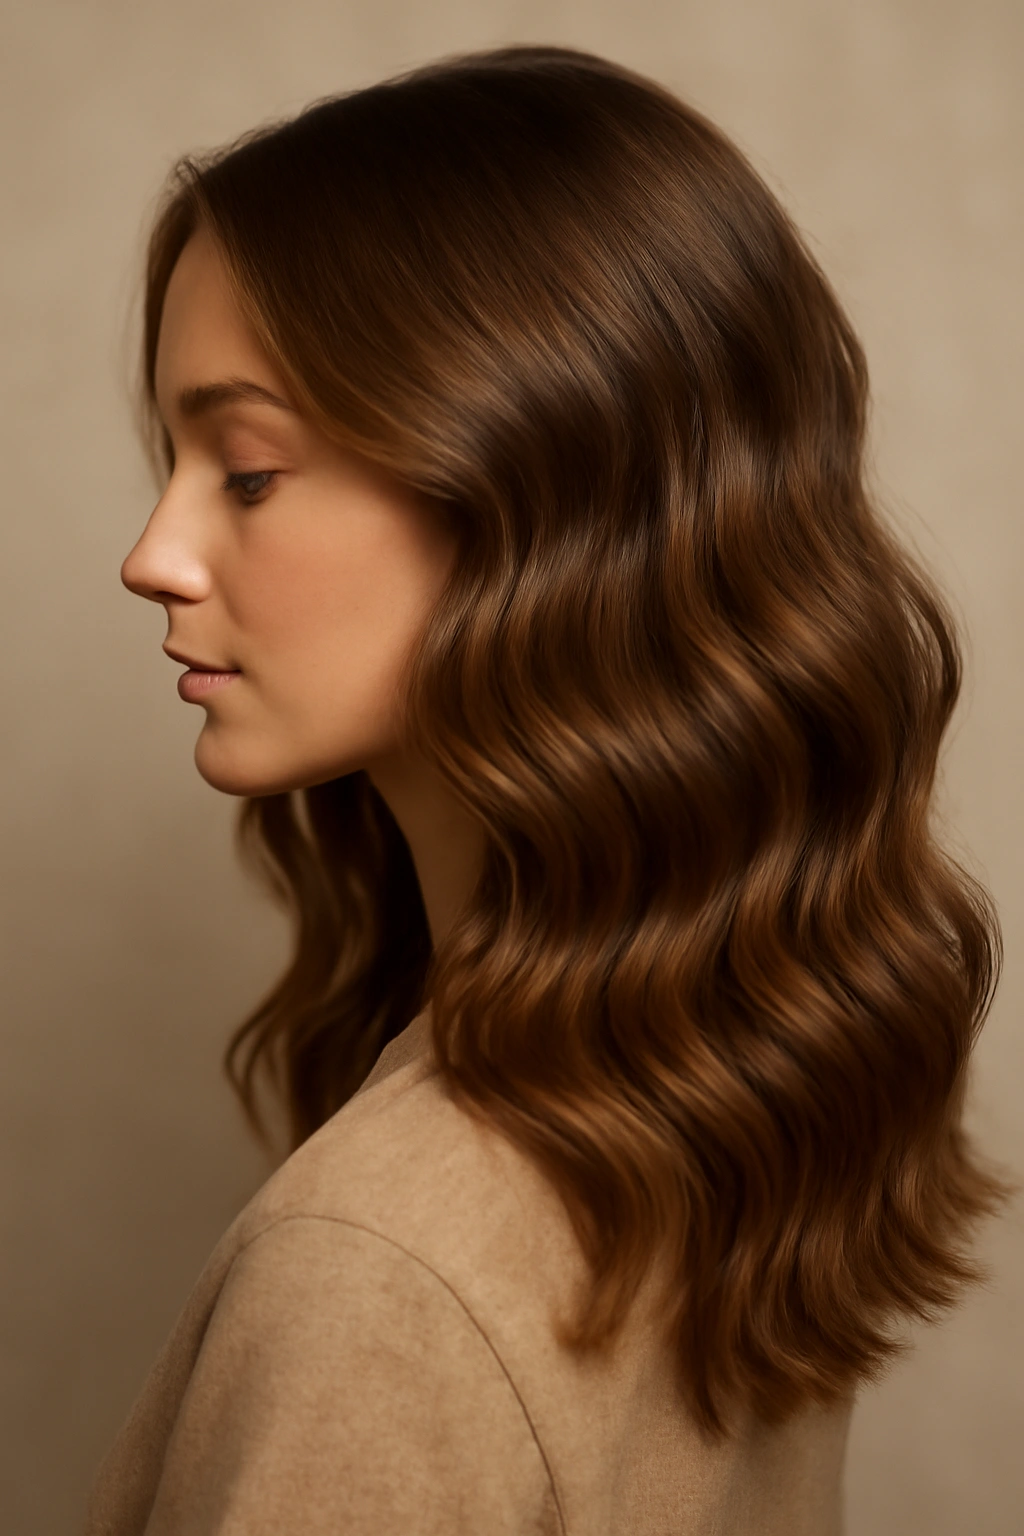
Soft waves are the opposite of the slicked-back look, and they strike a balance between feeling special and feeling like yourself. The goal isn’t perfect, uniform waves — it’s texture and movement that catches light and adds dimension to your face.
Building Waves That Last All Night
The longevity of your waves depends entirely on your starting point. If you have naturally textured hair, you’re already halfway there — you just need to enhance what you’ve got. Blow-dry your hair with a round brush, directing the brush in the direction you want the wave to go. This creates a smooth base without straightening the texture out completely.
For smoother hair types, waves last longer when you create them on slightly damp (not soaking wet, not fully dry) hair. Use a 1.5-inch curling iron or a wand, taking sections and wrapping them loosely around the barrel. Don’t clamp the barrel down — let the hair wrap around it naturally. Hold for 8-10 seconds, then slowly pull the iron out. The slower you release, the better the wave holds. Work in sections, alternating the direction of the waves for a natural, undone look.
Finish with a light-hold hairspray applied from a distance — too close and you’ll flatten the waves. You want to coat everything lightly rather than drenching it. A texturizing spray applied before you curl helps grip the hair and makes waves last significantly longer.
The Secret to “Effortless” Waves
The irony is that effortless-looking waves require a deliberate technique, but the payoff is real. Waves that you’ve shaped and set individually will last through eating, laughing, dancing, and humidity far better than waves you created by twisting your hair or using a generic straightening iron technique. The key is patience — spend the time curling properly, and you’ll spend zero time worrying about your hair for the rest of the night.
Customizing Waves to Your Face
Looser, more relaxed waves suit oval and heart-shaped faces and work beautifully when you want a romantic, soft vibe. Tighter, more defined waves can add fullness to narrower face shapes and work perfectly for a more polished, intentional look.
3. Half-Up Half-Down with Texture
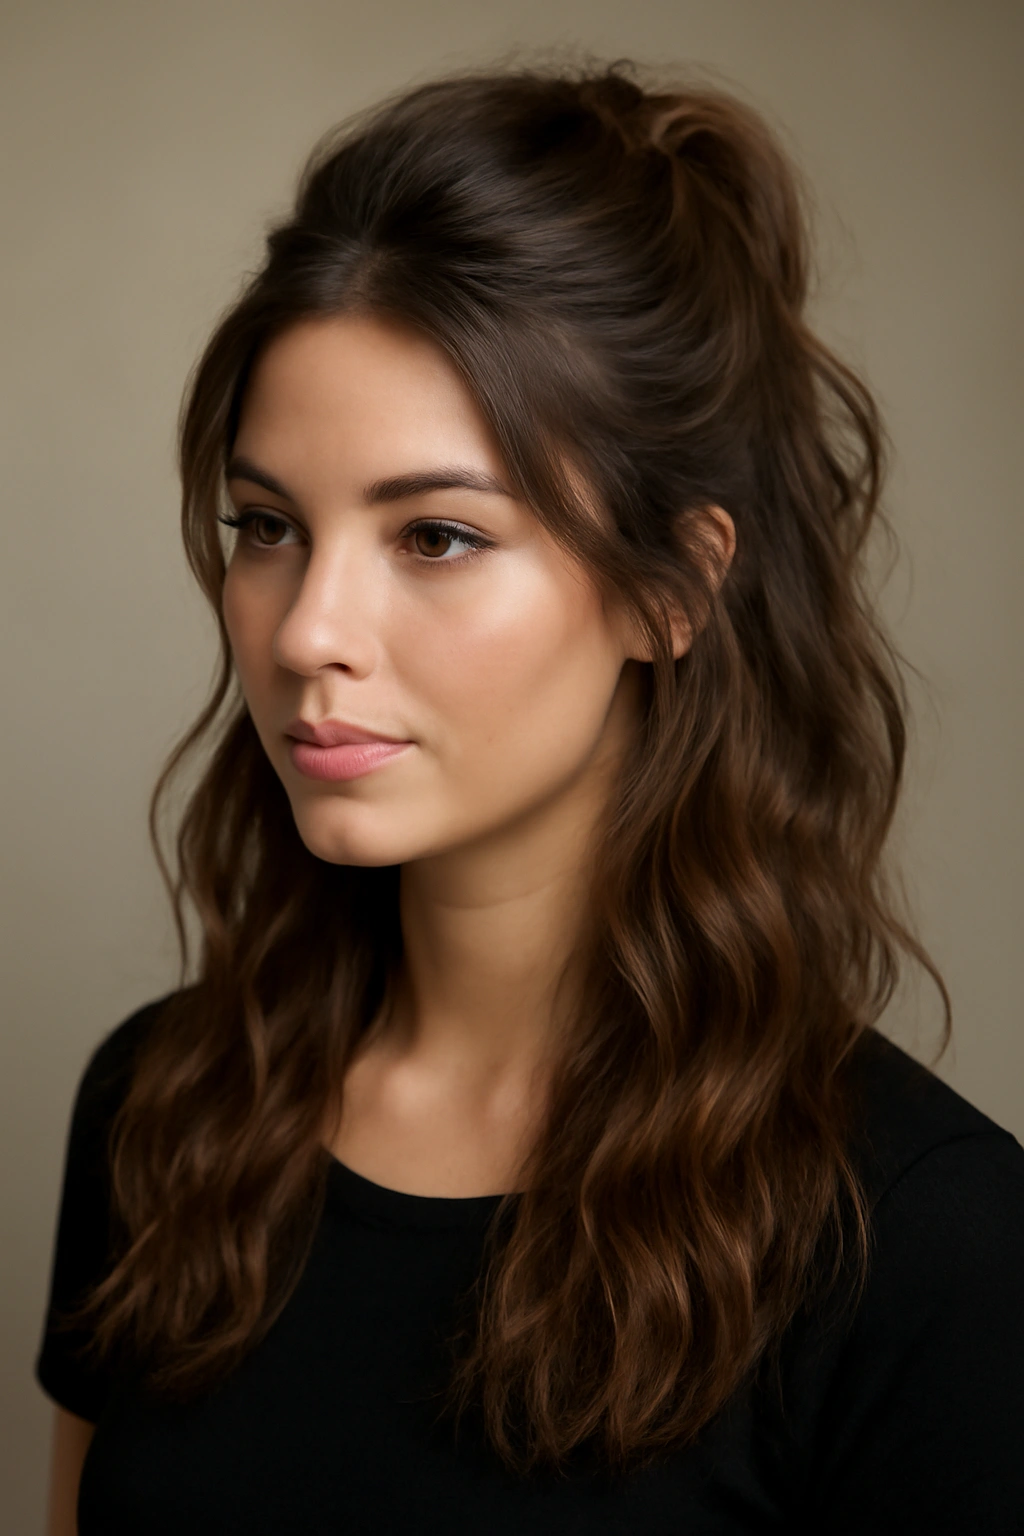
This is the hairstyle that lets you have it both ways — some of your hair is off your face (which means you can move and eat and live without worrying about hair in your mouth), and the rest flows down your back for a youthful, celebratory vibe.
Creating the Perfect Half-Up Section
The half-up style only works if the top section is secured firmly enough that it won’t slowly slip down throughout the evening. Start by taking a section of hair from each temple — roughly the width of your thumb — and brush these sections straight back toward the crown. Combine them into a small ponytail at the crown, using a clear elastic or a matching-color tie. This alone is functional, but not particularly polished.
To make it feel intentional, take a small 1-inch section of hair from underneath the secured ponytail (hidden underneath, not from the top), and wrap it around the elastic band to conceal it completely. Secure the wrap with a bobby pin inserted into the main ponytail where it won’t be visible. This hidden technique is what separates “I just threw my hair up” from “I have a intentional, polished hairstyle.”
The bottom half should have texture and movement, so waves, curls, or a deliberate bend work beautifully. If your hair tends toward limp, a volumizing spray at the roots of the down portion before you start styling adds lift that lasts all evening.
Why Birthdays Call for Half-Up Half-Down
This style says “I made an effort” without saying “I’ve spent all day on my hair.” It’s dressy enough for a party, practical enough for eating and celebrating, and flattering enough for photos. It works on every hair length from shoulder-length and down, and it photographs beautifully from every angle.
Elevating the Basic Half-Up
Consider adding a decorative clip, a delicate hair comb, or even a small braid twisted into the secured section at the crown. A thin layer of sparkling hairspray or hair glitter applied just to the top section adds subtle shine that catches light without feeling costume-y.
4. Textured High Ponytail

A high ponytail can read as either casual or polished depending entirely on the texture you build into it and the way you finish the base. A sleek, flat high ponytail reads sporty. A high ponytail with intentional texture, volume, and a finished base reads polished and celebratory.
Building the Textured High Ponytail
Start with your hair blown dry, but don’t smooth it too much — you want some texture to work with. If your hair is naturally straight, create some movement with a curling iron or by twisting sections while blow-drying. Flip your head upside down and brush the hair at the crown backward to create volume at the top. This gives you height and fullness that makes the entire look feel more intentional.
Gather your hair into a high ponytail — so high that your hand sits at the very crown when you hold it. Secure it with an elasticated tie. Now, take a small section of hair from the bottom of the ponytail and wrap it around the base of the ponytail to conceal the elastic. This wrapped base instantly elevates the whole look and is the detail that transforms a casual ponytail into a polished one.
Creating Texture in the Ponytail Itself
Rather than leaving the ponytail smooth, create intentional texture by taking thin sections and twisting them loosely, then wrapping those twists around the base of the ponytail in a spiral. Secure the ends with bobby pins. This technique creates a braided or twisted look without actually braiding — it’s faster and creates a more organic, undone vibe.
Alternatively, create waves throughout the ponytail using a curling wand or iron, wrapping sections loosely and releasing them to create movement. The waves catch light, add visual interest, and make the whole style feel intentional rather than just “hair pulled up.”
Finishing Touches That Make the Difference
Smooth down any flyaways with a fine-tooth comb and a tiny amount of smoothing serum. A light hairspray applied from a distance (not sprayed directly on) keeps texture in place without stiffness. If your face tends to look too severe with hair pulled back, soften it by pulling out a few delicate pieces at the temples — just an inch or two of softness on either side of your face changes the whole effect.
5. Side-Swept Layers
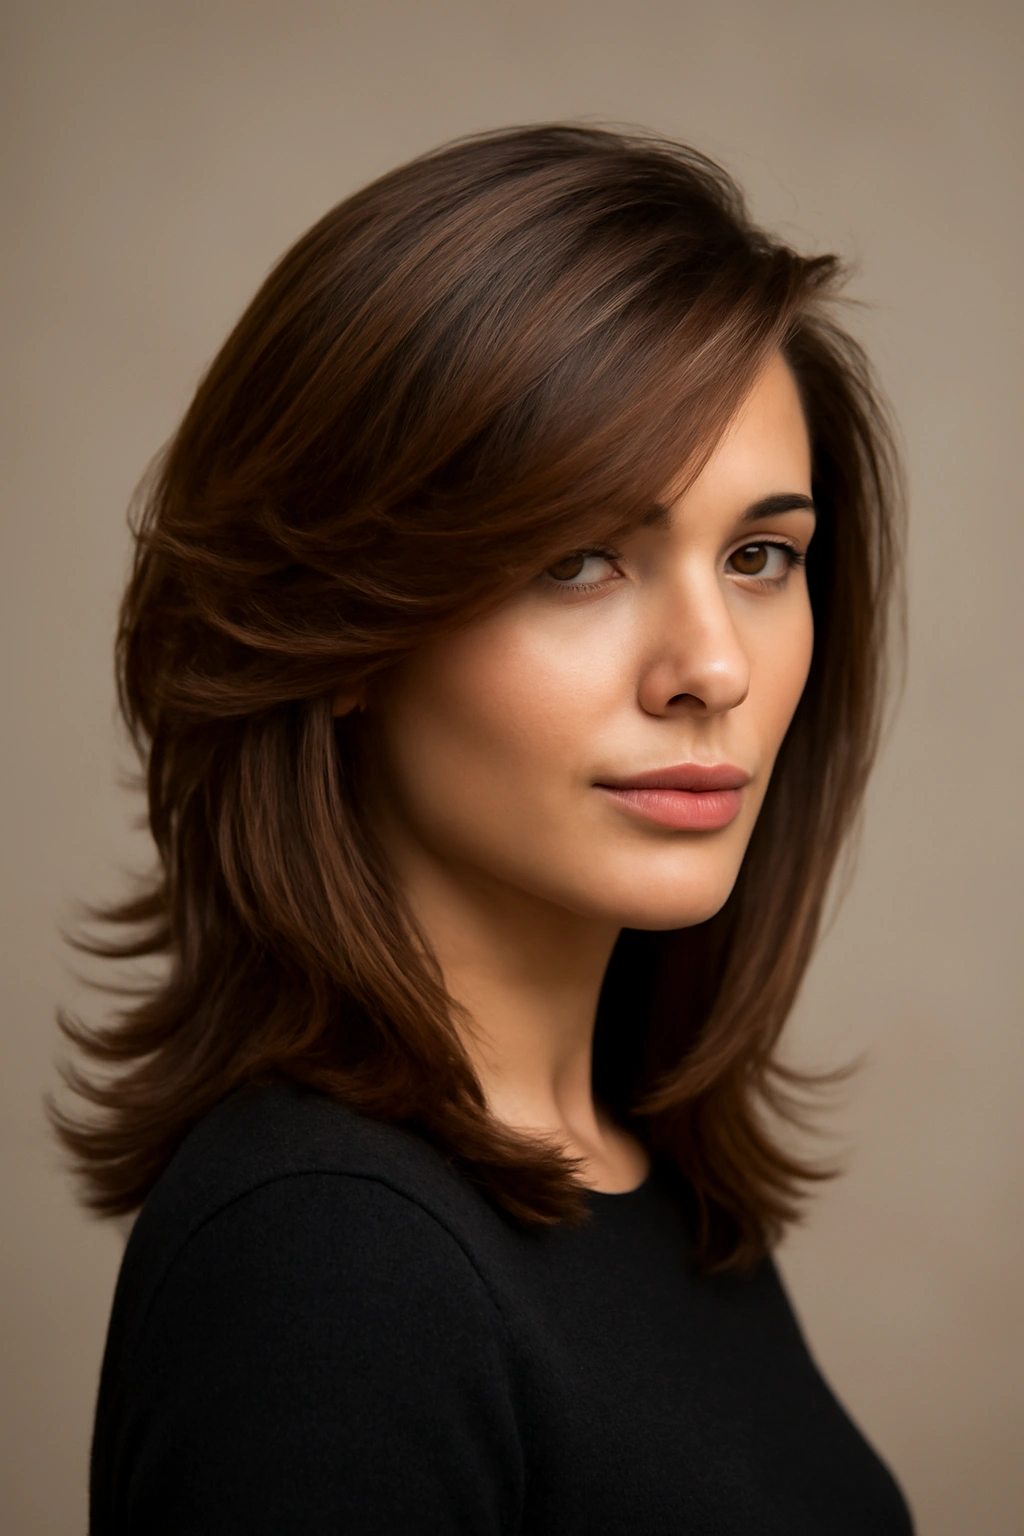
This style is pure sophistication — your hair sweeps across one side of your face, and the layered texture creates movement and dimension. It’s the kind of hairstyle that photographs beautifully and feels genuinely special without being precious or overdone.
Creating the Swept Dimension
This style works best on hair with some length (at least shoulder-length) and benefits significantly from texture or waves. Start by blow-drying your hair with movement — you want natural-looking texture, not a flat result. If your hair is straight, use a round brush to create gentle curves while blow-drying, or add waves with a curling iron afterward.
Create a deep side part on the opposite side of where you want the sweep to go. Brush the longer section toward the dominant side, creating a dramatic sweep across one side of your face and down your shoulder. Secure the smaller section (the one behind the part) with bobby pins clipped into the back of your head — you want these pins hidden underneath the swept section.
The Texture That Makes This Work
Layers are essential to this style — without them, the sweep can look heavy and flat. If you have layers, enhance them by curling or waving them with a curling iron. Work in sections, curling away from your face on both sides, which creates movement that flows with the sweep rather than fighting against it.
If you have blunt-cut hair without layers, you can still create this look by curling the bottom two-thirds of your hair with a wand, holding the wand vertically and wrapping sections loosely around it. This creates texture and movement that mimics the effect of layers.
Making It Polished
The difference between a side-swept style that looks intentional and one that looks like your hair just fell that way is the finishing. Use a smoothing cream or serum on a fine-tooth comb to smooth the swept section against your head. Spray lightly with hairspray to set the shape. The smaller, pinned section should feel secure and invisible — secure enough that no amount of movement dislodges it, but hidden enough that no one sees the pins.
6. Braided Crown
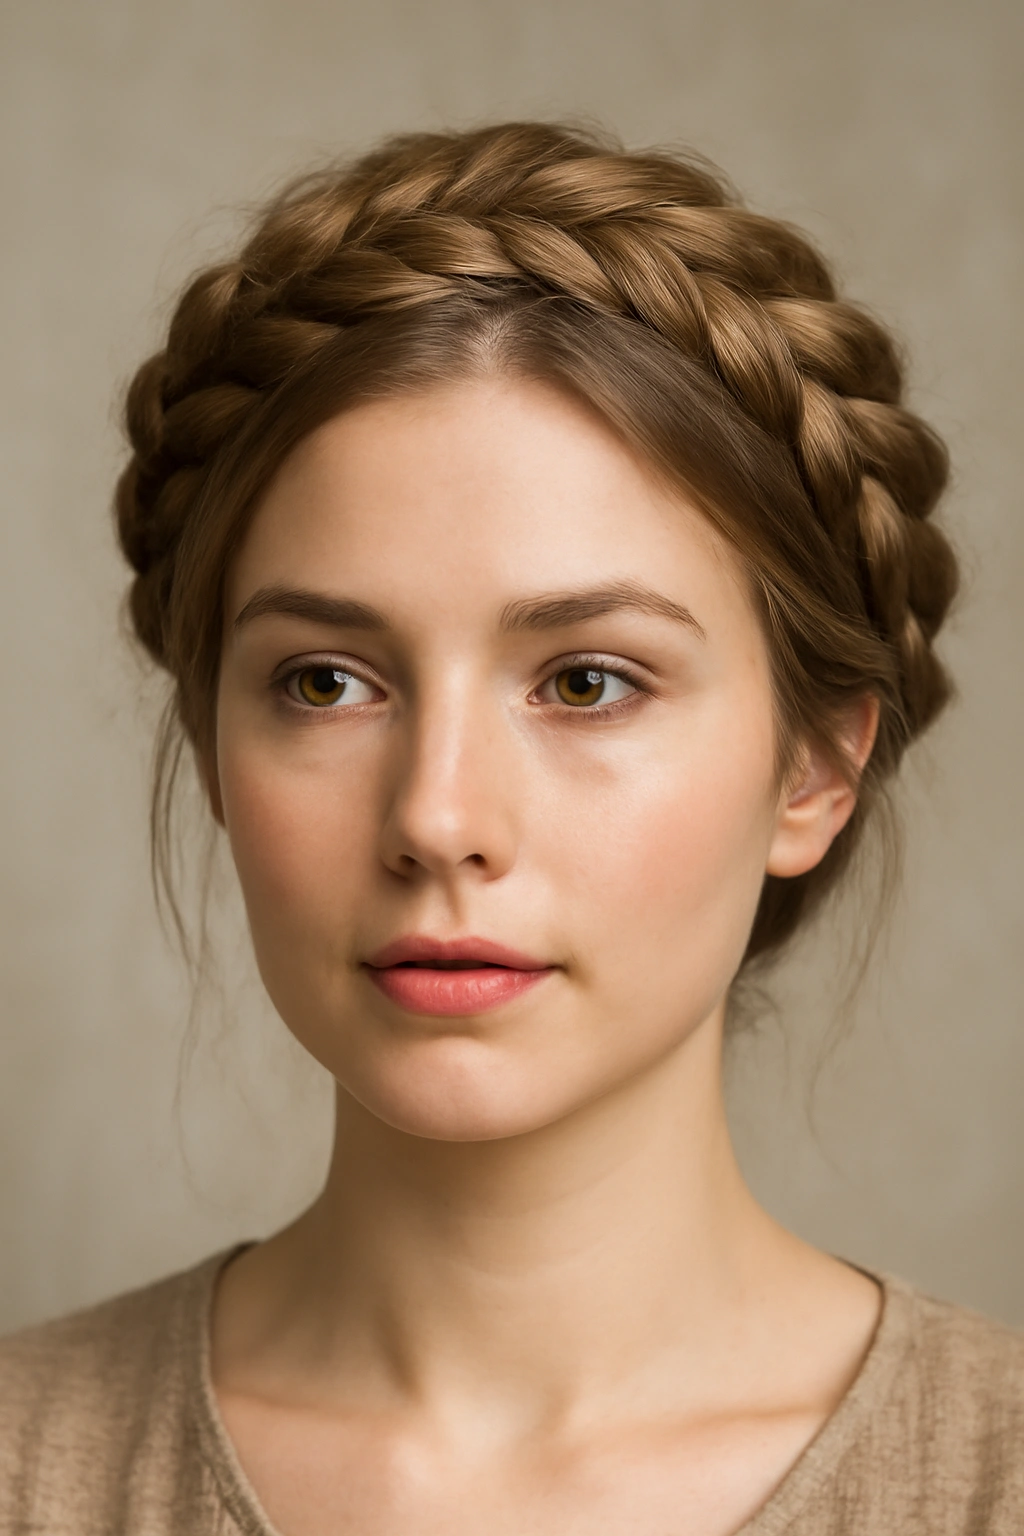
A crown braid (also called a halo braid) wraps around your head like a crown, and it’s one of the most elegant and celebratory hairstyles you can create. It sounds intricate, but once you understand the technique, it’s actually quite manageable, and it holds beautifully all evening.
Mastering the Crown Braid Technique
Start with hair that has some texture or waves — a crown braid on completely smooth hair tends to slip and loosen throughout the evening. Blow-dry your hair with a round brush, creating gentle movement. If you have naturally textured hair, you’re already set.
Section off a one-inch piece of hair at one temple, right at your hairline. Divide this into three strands and begin a normal three-strand braid. As you braid, you’re going to add new hair into each strand as you braid toward the back of your head — this is exactly like a Dutch or French braid, but you’re working horizontally across the back of your head instead of straight back.
Work slowly and deliberately. Each time you cross a strand over, add a small section of new hair into that strand before the next cross. Work from one temple, around the back of your head, to the opposite temple. You want the braid to sit right at the occipital bone (the back bump of your head), creating a crown-like effect.
Once you’ve incorporated all the hair you’re going to braid, finish the braid with the remaining three strands and tuck the end under, securing it with bobby pins. The completed braid should wrap around the back of your head, with the top section remaining loose and flowing.
Making It Look Effortless
The key to a beautiful crown braid is loosening it slightly after you’ve completed it. Gently pull on the outer edge of the braid to create a wider, more romantic, less tight appearance. This takes the style from “tight and precise” to “soft and intentional.” Tug on the braid very gently — you’re not unraveling it, just creating a softer silhouette.
Secure any loose strands or the end of the braid with bobby pins placed underneath where they won’t be visible. A light hairspray helps keep the braid intact without making it feel stiff.
Why This Works for Birthday Celebration
A crown braid says “I made an effort” in the most elegant, intentional way possible. It’s special enough for a dressy occasion, romantic enough for any vibe you’re going for, and practically bulletproof — once it’s in, it stays in. You can eat, dance, celebrate, and the braid remains exactly where it is.
7. Voluminous Curls
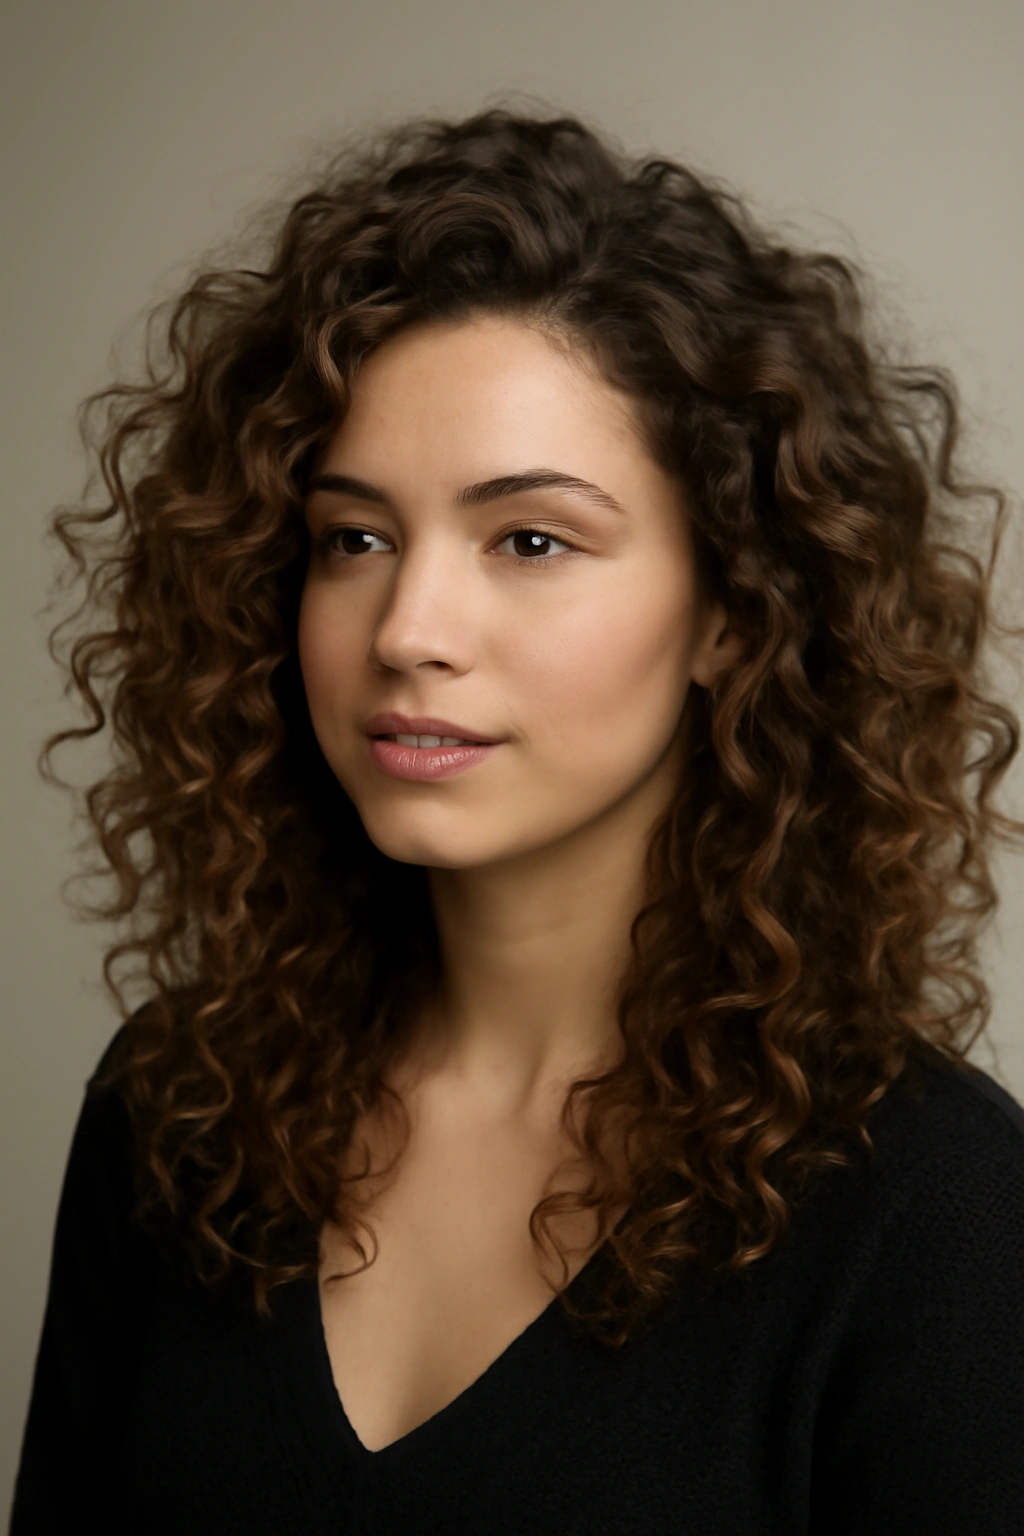
Voluminous curls are the ultimate birthday hair — they’re celebratory, they photograph beautifully, and they create an instant sense of occasion. The trick to curls that feel polished rather than costume-y is avoiding uniform ringlets and instead creating a mix of curl sizes and a slightly undone finish.
Building Curls With Dimension
The best curls start with the right base. Blow-dry your hair completely dry — damp curls eventually fall out. A volumizing mousse applied to damp roots before blow-drying creates lift that makes curls look fuller and healthier.
Use a 1.25-inch or 1.5-inch curling iron depending on the size of curls you want. Smaller barrels create tighter curls; larger barrels create looser waves. To create dimension, use multiple barrel sizes — curl some sections with a smaller iron and others with a larger one. This prevents the uniform ringlet look that reads less polished and more costume-y.
Take a one-inch section of hair, wrap it loosely around the barrel (don’t clamp down — let gravity do the work), hold for 8-12 seconds, then slowly release. Work methodically through your entire head, alternating the direction you curl the barrel (sometimes rotating toward your face, sometimes away) for a natural, multidirectional look.
Setting Curls to Last
Once you’ve curled your entire head, do not immediately brush through the curls. Let them cool completely — this sets the curl shape into your hair. Once they’re cool, run your fingers gently through the curls to separate them and create softness, or brush gently with a soft paddle brush if you want more volume and a softer look.
Finish with a flexible-hold hairspray applied at a distance. Heavy hairspray makes curls feel stiff and brittle. Light hairspray allows the curls to move while keeping them in place.
Adding Intentional Polish
Voluminous curls are inherently celebratory, but you can add polish by keeping the roots smooth and the curls concentrated on the mid-lengths and ends. Pull back a small section at the crown and secure it with a bobby pin or clip — this shows intentionality rather than “my entire head is curly” and adds a touch of sophistication.
Alternatively, keep curls in the front sections loose and soft while curling the back section more tightly, creating a style that’s soft and flattering around your face while still feeling intentionally curled.
8. Sleek Middle Part with Dimension
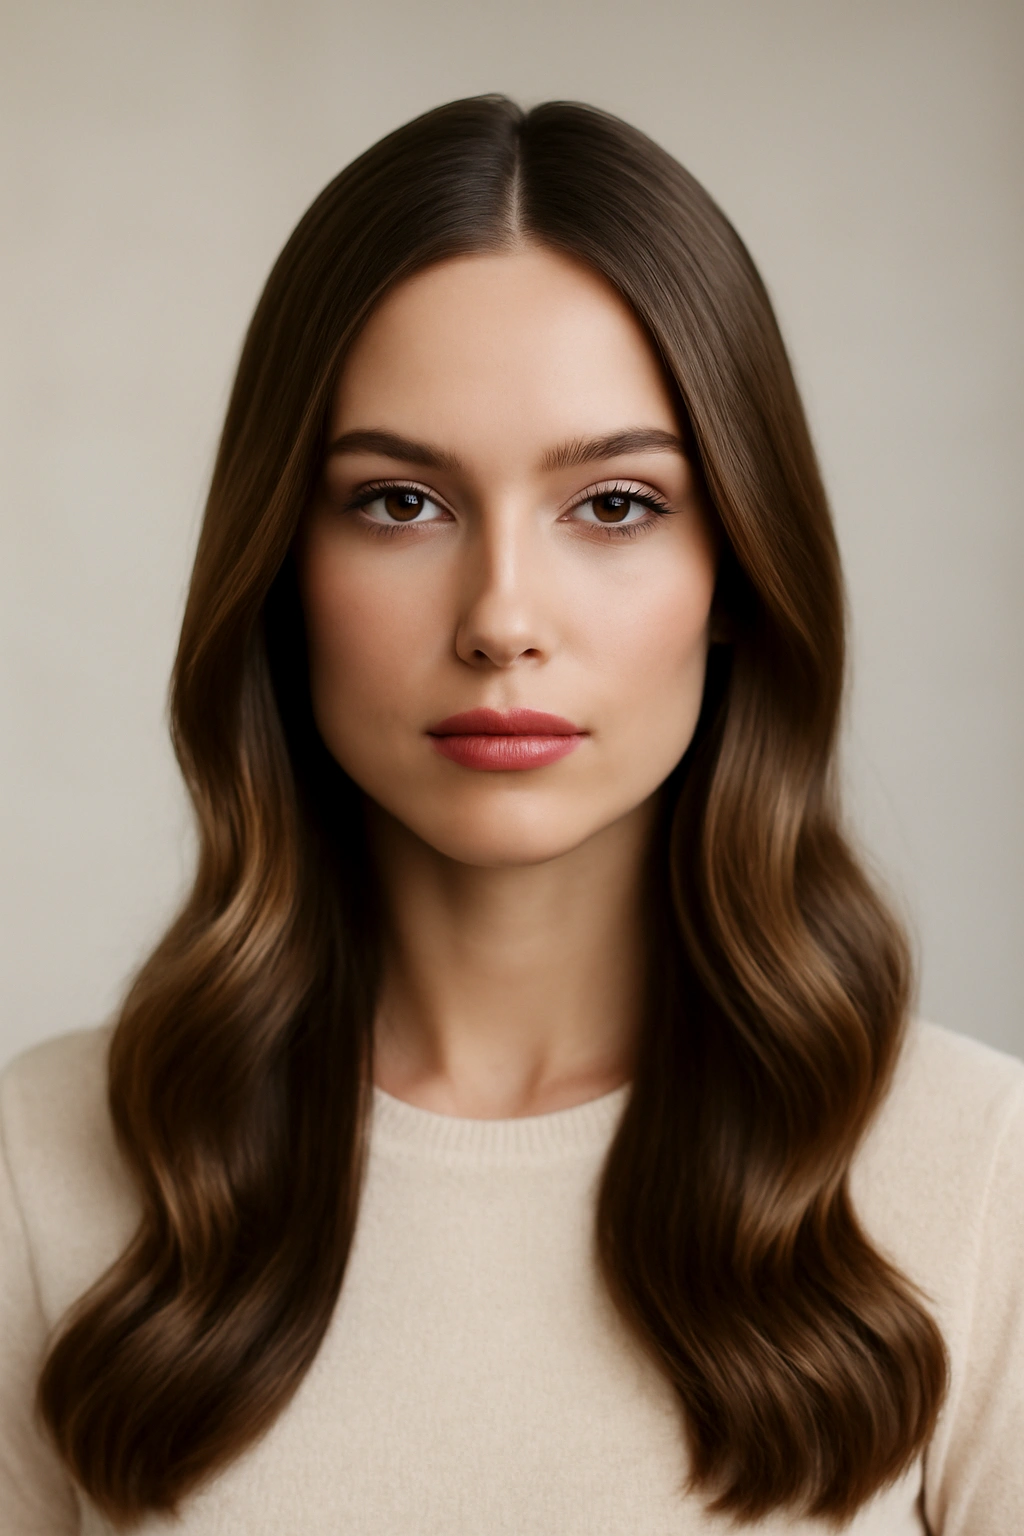
This style is effortlessly chic — a clean middle part feels modern and intentional, and when you pair it with subtle texture or waves, it reads as polished without feeling overdone or costume-y.
Creating the Perfect Middle Part
A true middle part requires your hair to be smooth and your part to be razor-straight. Blow-dry your hair with a paddle brush, directing it straight back. Once it’s dry, take a rattail comb (the fine-tooth side) and create a part right down the center of your head. Use the comb to ensure the part is perfectly straight — crooked or wavy parts read as careless, while straight ones read as intentional.
Smooth each side down with a smoothing serum and paddle brush, directing the hair straight down on each side of your face. The key is symmetry — each side should mirror the other exactly. If your face tends to look round, you might slightly angle the hair at the temples away from your face, but the part itself should be dead-center.
Adding Texture to Avoid a Flat Look
A middle part with completely smooth, straight hair can read as flat or severe depending on your face shape. Add subtle movement by creating gentle waves throughout the length of your hair. Use a curling iron to add a bend every three to four inches, releasing the curl gently so it becomes more of a wave than a ringlet.
Alternatively, curl the hair at the ends only — the bottom two inches — to create a subtle flip. This adds movement without creating waves throughout.
Finalizing the Polished Look
Smooth any flyaways with a fine-tooth comb and the tiniest amount of smoothing serum. A light hairspray applied evenly keeps the part crisp and the texture in place without stiffness.
9. Twisted Back with Soft Front
This style pulls some hair back while keeping the front section soft and flattering around your face. It’s like a half-up style but executed with twists instead of a simple ponytail, which reads as more intentional and polished.
Executing the Twisted Technique
Start with your hair styled with gentle waves or texture. Section off a one-inch piece from one side of your head near your temple. Twist this section loosely — not a tight, rope-like twist, but a soft, undone one — and secure it with a bobby pin at the back of your head, hidden underneath other hair.
Repeat on the opposite side. You now have two soft twists anchoring the back, while the front of your hair remains loose and falls naturally around your face. The effect is romantic, soft, and intentional without being precious.
Creating More Dimension
Rather than just a single twist on each side, create two twists per side — one closer to your temple and another closer to your ear. This creates more visual interest and holds better than a single twist. Each successive twist can be slightly tighter (but still soft) than the last, creating a gradient of softness from front to back.
If you want even more dimension, add a third twist right down the center back of your head — this creates a crown-like effect while keeping the entire front and sides soft and loose.
Finishing Details
Secure all twisted sections with bobby pins inserted underneath where they won’t be visible. Smooth the front sections with a fine-tooth comb and a tiny amount of smoothing serum so they lie beautifully but still feel soft. The back twists should have a slightly undone, romantic quality — they’re intentional but not perfect.
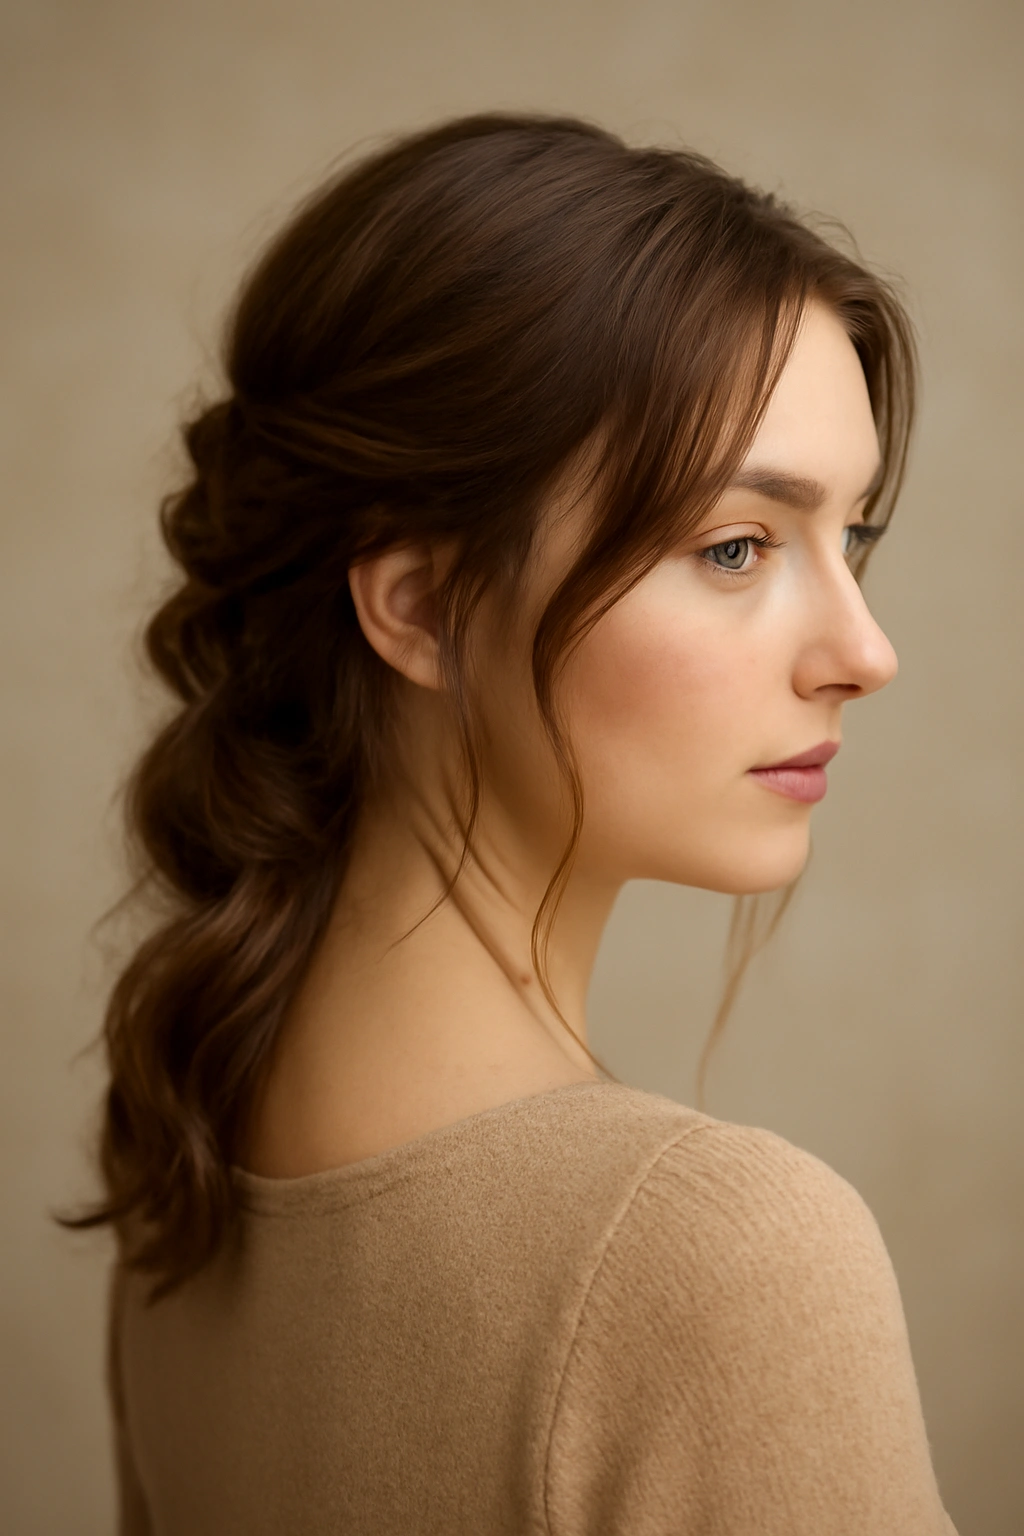
10. Romantic Low Ponytail
This is the style that balances polish with romance — your hair is pulled back in a low ponytail, but the execution is so refined that it feels celebratory and special rather than casual.
Building the Romantic Ponytail
Start with your hair blow-dried with movement and texture. You want waves or curls throughout, not completely smooth hair — texture is what makes this feel romantic and intentional. Create gentle waves using a curling iron or by blow-drying with a round brush angled to create movement.
Gather your hair into a low ponytail at the nape of your neck — lower than a typical ponytail, almost at your collar. The lower placement is what creates the romantic, elegant vibe. Secure with an elasticated hair tie.
The Refined Details
Wrap a small section of hair around the base of the ponytail to conceal the elastic — this is the detail that transforms a casual ponytail into a polished one. Secure the wrapped section with a bobby pin hidden inside the wrapping.
Create texture within the ponytail itself by taking small sections and twisting them loosely, wrapping those twists around the base in a spiral, and securing with bobby pins. This creates visual interest and prevents the ponytail from looking flat or one-dimensional.
Making It Romantic
Leave a few delicate pieces loose at the temples and around your face — just one-inch sections on each side. These soft pieces frame your face and add a romantic, soft quality. Use a fine-tooth comb with a tiny amount of smoothing serum to make these pieces lie gently against your skin.
Smooth the ponytail itself with a smoothing serum and fine-tooth comb. You want it sleek enough to look intentional, but textured enough to feel romantic. A light hairspray keeps everything in place without stiffness.
Final Thoughts
The best birthday hairstyle is the one that makes you feel genuinely like yourself — just a more polished, celebratory version. Every single one of these styles can be executed well or executed carelessly, and the difference comes down to the finishing details. Concealing elastics with wrapped hair sections, smoothing flyaways, creating intentional texture rather than flat straightness, and using light hairspray rather than heavy hold — these are the techniques that separate a casual hairstyle from a polished one.
None of these styles requires you to spend hours at the salon or learn complex techniques that take months to master. Each one is entirely achievable with a few basic tools — a blow dryer, a curling iron or wand, a paddle brush, a fine-tooth comb, and good bobby pins. The investment is genuinely in technique and intention rather than in complicated skills or expensive treatments.
Your birthday is exactly the right occasion to try something that feels special and intentional. You deserve to feel like the best version of yourself, and the right hairstyle is one of the easiest ways to get there. Choose the style that speaks to you, take your time with the finishing details, and trust that the effort you put in will absolutely show in how the style looks and how it makes you feel.