Your graduation day is one of those moments where everything needs to feel just right — your gown is pressed, your diploma awaits, and your hair absolutely has to work with your vision, not against it. If you’re rocking short hair, you might feel like your styling options are limited compared to your long-haired classmates, but that’s where the real magic happens. Short hair offers incredible versatility on graduation day: it can look polished and sophisticated, bold and contemporary, romantic and textured, or sleek and powerful — often all within the same styling session.
The key to nailing short-hair graduation styling is understanding that texture, direction, and strategic accessorizing are your superpowers. You’re not fighting against length; you’re leveraging structure, movement, and shine to create something memorable. Whether you’re going for an elegant updo, a tousled modern look, or something unexpected, these ten hairstyles prove that short hair doesn’t just look good on graduation day — it can genuinely steal the show.
The beauty of short hair is also practical: these styles hold throughout a long ceremony and photo session without wilting, they work beautifully under your mortarboard without creating awkward bumps, and many can be achieved without professional help if you’re comfortable styling your own hair. Each of these looks works for different face shapes, hair textures, and personal styles, so you’ll find something that feels authentically you while still capturing the polish that the occasion deserves.
1. Sleek High Ponytail with Volume at the Crown
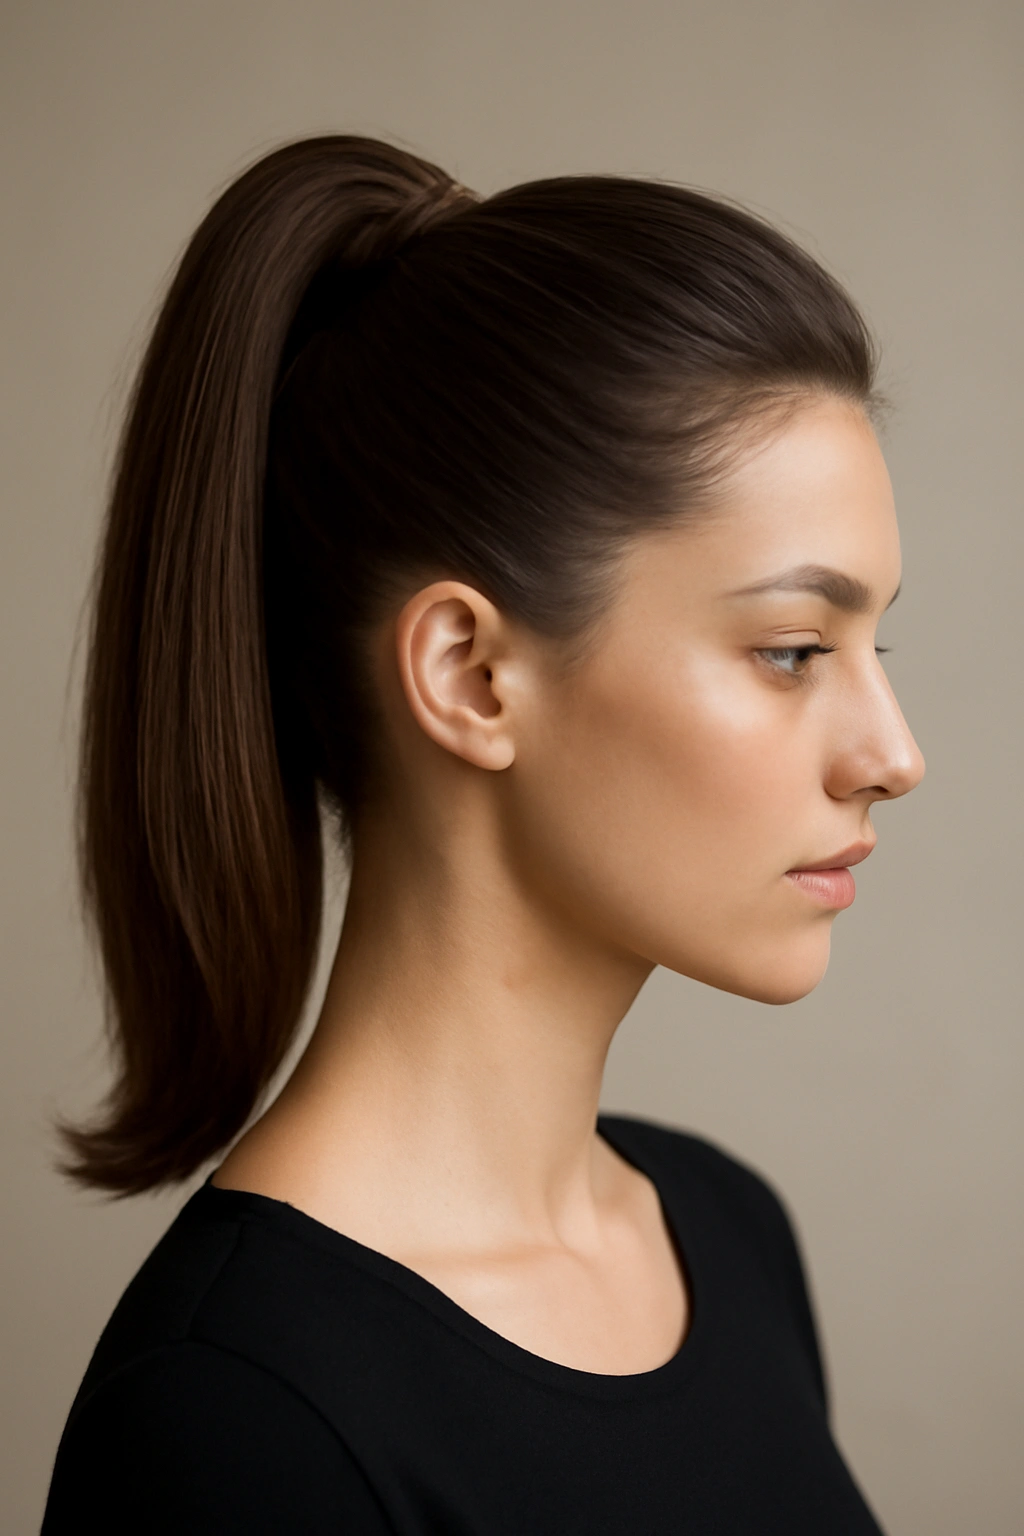
This is the short-hair answer to the timeless graduation ponytail — modern, sophisticated, and surprisingly elegant even with limited length. A sleek high ponytail works beautifully if your hair is at least 3-4 inches long, and it creates an instantly polished appearance that photographs beautifully from every angle.
How to Build the Perfect Sleek Ponytail
The foundation is creating volume at the crown before you pull everything back. Blow-dry your hair with a volumizing mousse applied to damp roots, using a round brush to lift hair straight up at the crown. This creates dimension and prevents the style from looking flat. Once your hair is dry, apply a lightweight smoothing serum from mid-length to ends — this creates shine without weighing things down.
Step-by-Step Styling Guide
- Use a fine-tooth comb or a teasing brush to gently backcomb the crown area, creating texture that holds a ponytail elastically without slipping
- Gather hair into a high ponytail at the very top of your head, positioned toward the back of your crown (not directly at the center top, which can look harsh)
- Secure with a quality elastic — silk-lined elastics prevent breakage and create a smoother finish than standard rubber bands
- Take a small section of hair from the ponytail itself and wrap it around the elastic base to hide it completely, pinning the wrapped section underneath with a bobby pin
- Smooth flyaways with a smoothing serum or clear gel, paying special attention to the hairline and temples
- Optional: curl the ponytail ends slightly with a curling iron for texture and movement, or leave them straight for an extra-sleek finish
Pro tip: If your short hair doesn’t quite gather into a traditional ponytail, this style also works beautifully as a sleek half-ponytail — pull just the top layer back and secure it, letting the underneath layers fall free.
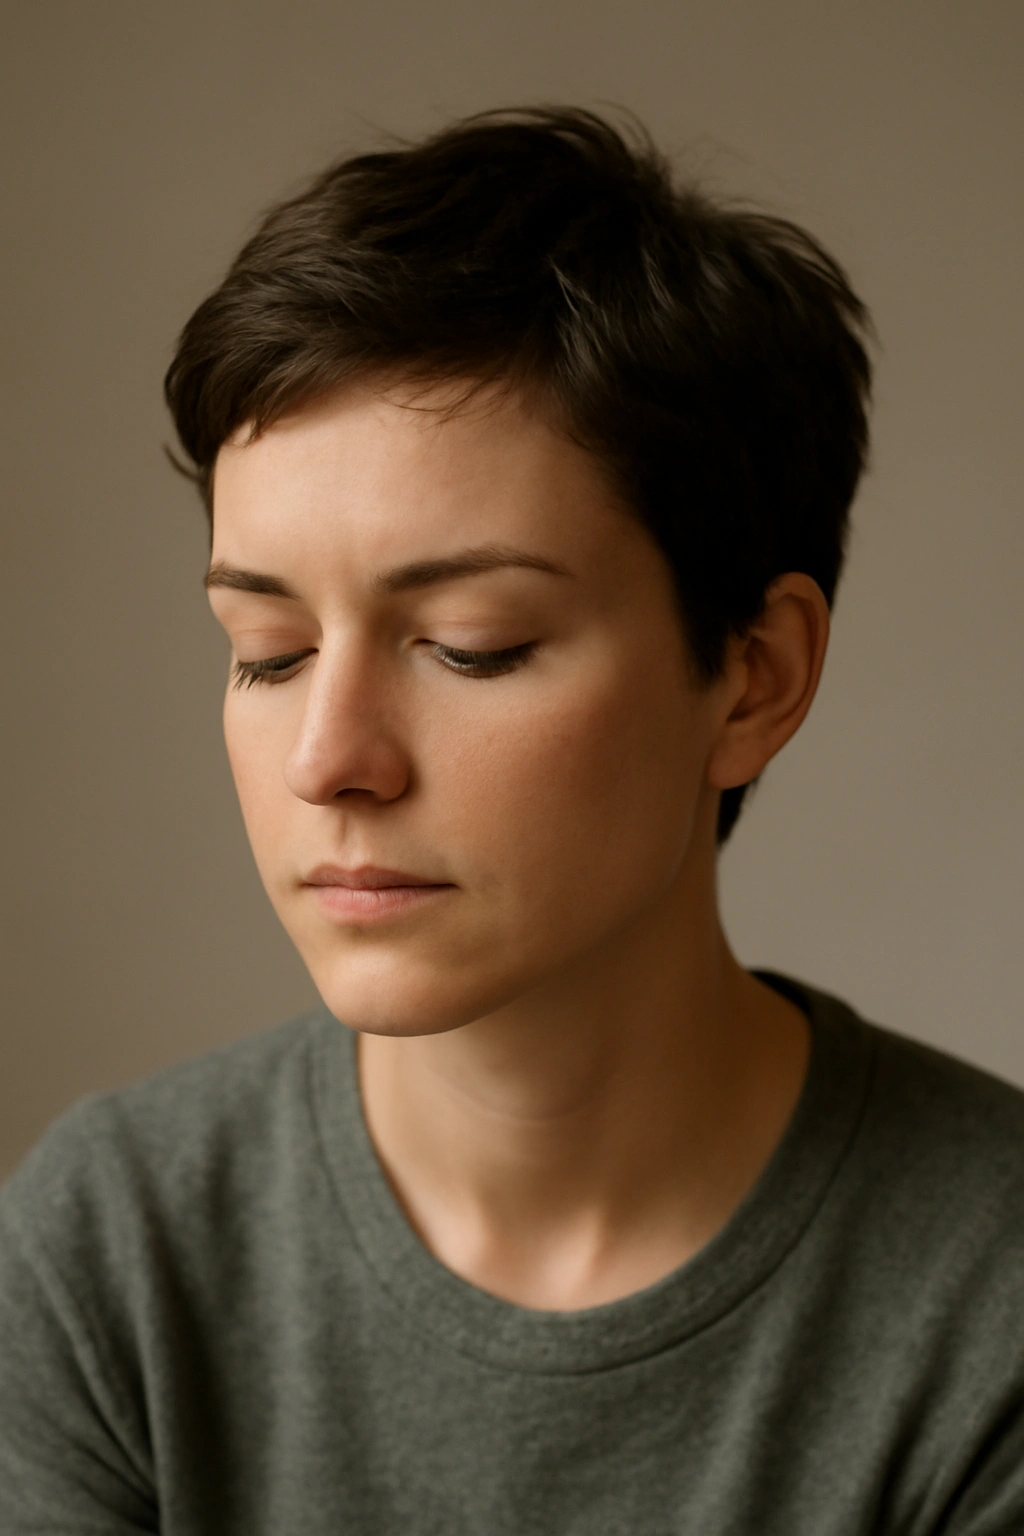
2. Textured Pixie with Strategic Hair Accessories
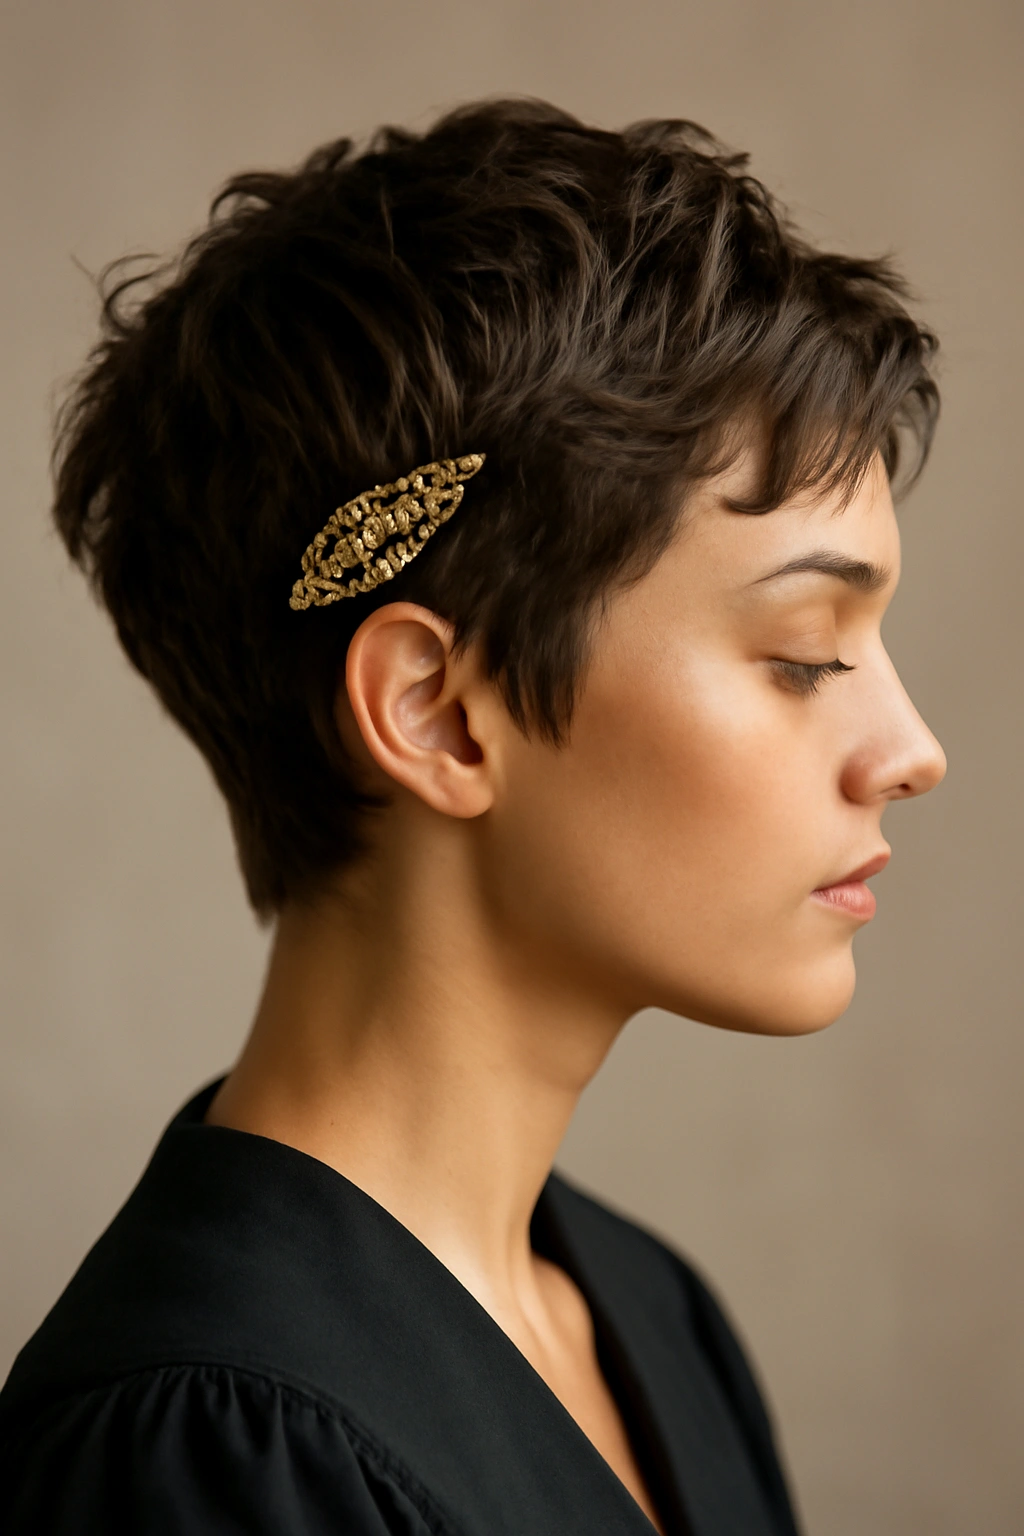
A pixie cut on graduation day doesn’t have to mean minimal styling — in fact, this is your chance to show off the cut with intentional texture and a show-stopping accessory. The right combination of movement, shine, and a well-placed comb, clip, or headpiece transforms a everyday pixie into a graduation-worthy look.
Creating Movement in a Short Cut
Start with textured product applied to damp hair. A sea-salt spray creates piecey, dimensional texture, while a lightweight mousse builds shape and hold from the roots. Blow-dry with your fingers or a wide-tooth comb, working in the direction you want the hair to fall — this might be sleek against the head on one side and lifted and tousled on top.
Accessory Placement for Maximum Impact
- A vintage metal comb worn to the side creates both elegance and a subtle ’40s vibe that reads as intentional
- A delicate jeweled hair clip positioned just above one ear adds sparkle without looking costume-y
- A thin metallic headband worn across the crown works beautifully with pixies, especially if you style hair swept to one side
- Pearl or crystal bobby pins scattered throughout add dimension and catch light in photographs
- A silk scarf worn as a thin headwrap adds color and texture while keeping edges smooth
Worth knowing: If your pixie has some length on top (the classic pixie-plus), consider a light texturizing spray that creates separation and movement — this prevents the style from looking flat against your head during photos.
3. Half-Up, Half-Down Style with Twisted Details
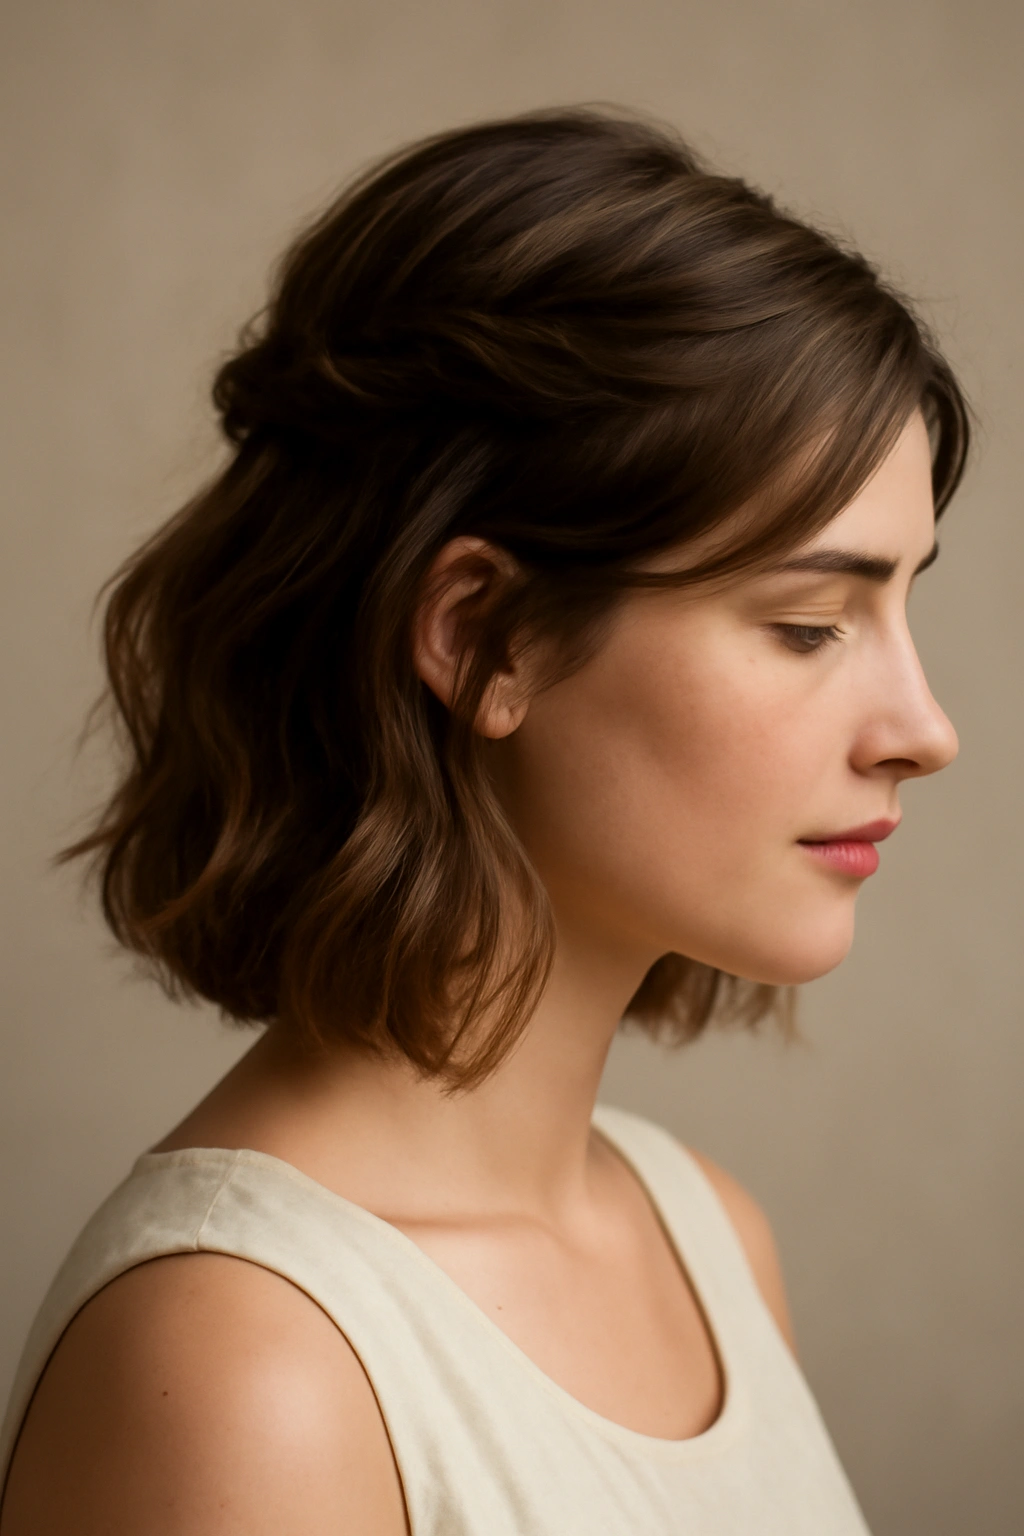
This is the sweet spot between “I have short hair” and “I want my hair down and romantic.” A half-up, half-down keeps hair off your face for photos while maintaining the softness of loose hair, and with short hair, it looks modern and intentional rather than like you couldn’t decide.
Building the Half-Up Foundation
Begin by creating soft waves or curls throughout your entire head. Use a 1-inch curling iron or curling wand to create loose waves, curling away from your face on the front sections and alternating direction throughout the back. Once your waves are set and cooled, gently finger-comb through them to soften the curl into a tousled wave pattern.
Securing the Half-Up Section
- Divide your hair by creating an invisible line from ear to ear across the top of your head
- Gather the top section between your fingers, creating the volume and texture by not pulling too tightly
- Add a subtle twist or two by wrapping a small section around your fingers before securing — this creates sophistication and visual interest
- Secure with a decorative clip, a pearl-studded bobby pin, or a small elastic hidden behind a twisted section of hair
- Leave the underneath layers completely loose, falling naturally around your shoulders and framing your face
- Use a curling iron or straightener to refine the direction of the loose bottom layer, ensuring waves flow in a flattering direction
Insider note: This style works even better if you use a volumizing root spray at your crown before creating waves — it prevents the half-up section from drooping as the day goes on.
4. Voluminous Textured Waves with a Metallic Grip
Short hair absolutely can have glorious volume and movement on graduation day. This look focuses on texture, shine, and a strategic hair grip that adds both function and glamour while your waves do all the visual work.
Creating Voluminous Texture From Roots to Ends
Apply a volumizing mousse to damp hair, concentrating on the roots and mid-lengths. Blow-dry your hair completely with a round brush, using upward motions at the crown to build height and direction. Once dry, use a large-barrel curling iron (1.5 to 2 inches) to create loose waves, leaving the curls in for the full recommended time so they hold beautifully through your ceremony.
Adding a Metallic Hair Grip for Impact
- A thin metallic claw clip positioned at the back of your head adds visual interest and keeps volume in place without slicking anything down
- A pearl or crystal hair comb worn to the side combines functionality with elegance
- A delicate chain-style hair barrette adds a contemporary luxury feel
- A silk hair scarf worn as a thin accent band adds color while keeping everything cohesive
Pro tip: After curling, use a lightweight hairspray (not heavy-hold) and flip your head upside down for 30 seconds, then flip back right-side up — this redistribute volume throughout your hair and prevents it from sitting flat at the roots by end-of-day.
5. Twisted Crown Updo for Short Hair
If you want an updo that works with shorter hair, a twisted crown style creates an elegant, ethereal look that reads as intentionally sophisticated rather than like you’re trying to work with what you have. This style works beautifully if your hair is at least 4-5 inches long with some texture or wave.
Building the Twisted Crown Base
Create waves or curls throughout your hair first — this is essential for a textured updo that doesn’t look too severe. Use a curling iron to wave your hair, then gently finger-comb for softness. Start with a small section of hair at one temple, and twist it gently, pinning as you go and gradually incorporating more hair as you move around the back of your head.
Completing the Crown Effect
- Twist a section from one side, pinning horizontally across the back
- Take a second section from the opposite side, also twisting and pinning to meet the first section
- Leave a few shorter pieces loose at the crown to maintain softness and prevent the look from feeling too severe
- Use bobby pins that match your hair color, inserting them at angles so they disappear into the twisted sections
- Gently pull and loosen the twisted sections slightly to add volume and dimension — this prevents the style from looking tight or uncomfortable
- Finish with a light hairspray that won’t make everything stiff
Worth knowing: This style works best if you have some natural wave or if you’ve set waves with a curling iron beforehand — trying to twist straight hair into an updo often creates an overly slicked appearance that doesn’t photograph as well.
6. Asymmetrical Bob with Sharp Definition and Shine
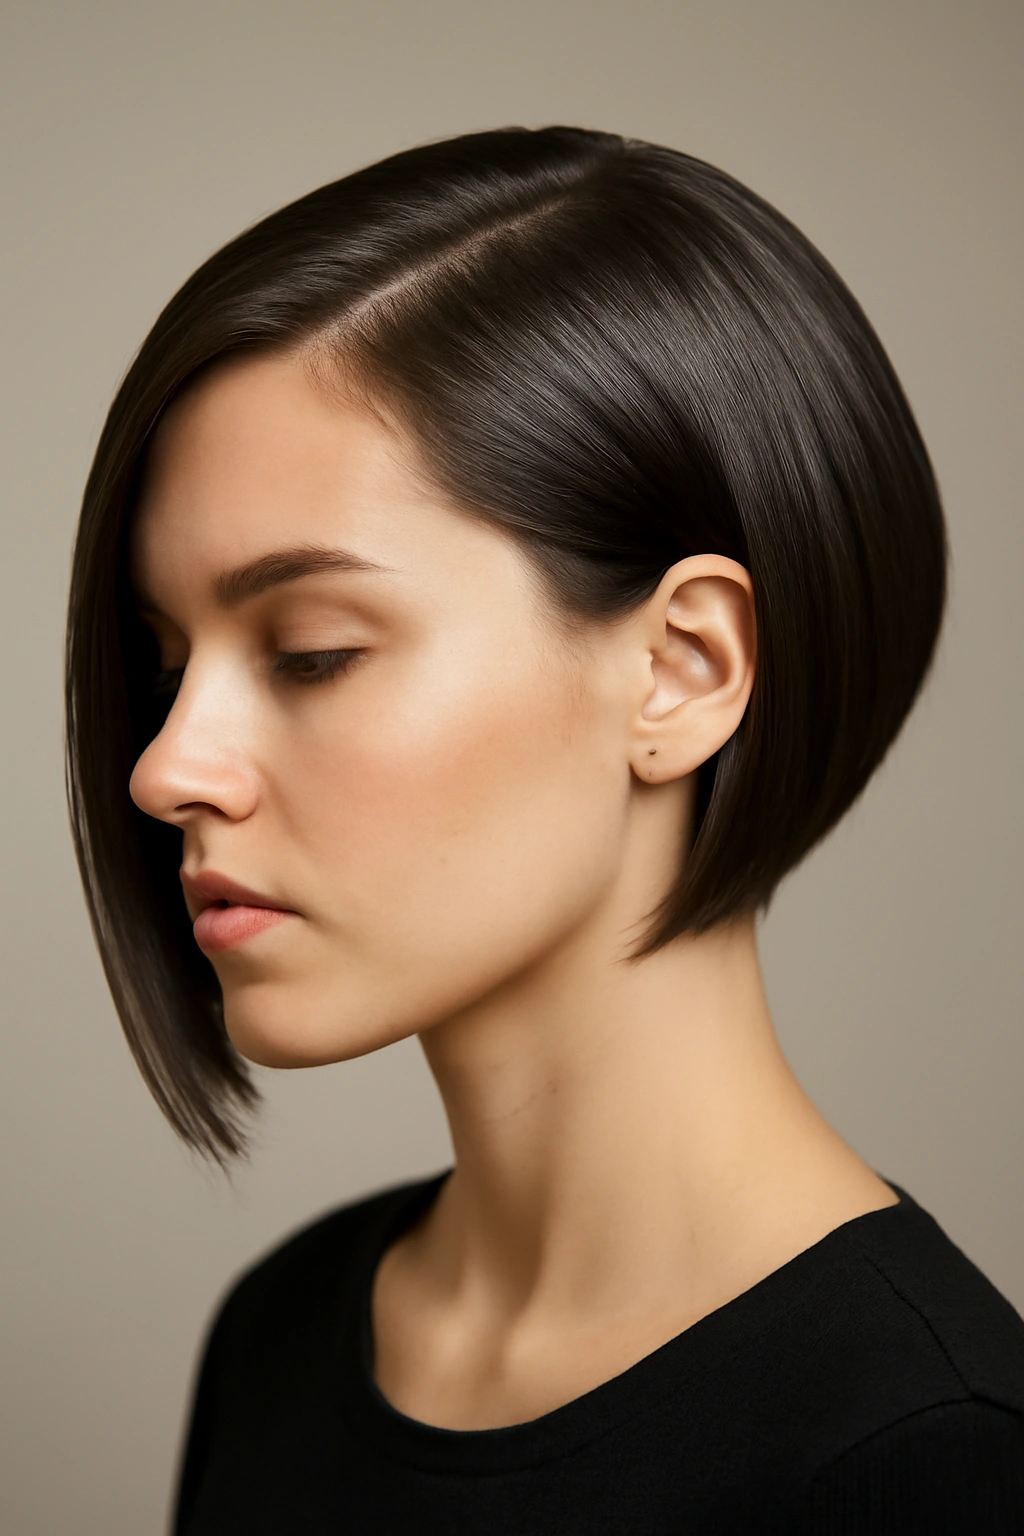
A well-cut asymmetrical bob is a statement on its own, but for graduation day, you can elevate it with intentional styling that emphasizes the cut’s angles and creates movement. This look works for bobs that are shorter in back and longer in front, or with any angled bob structure.
Styling for Maximum Cut Definition
Blow-dry your bob paying careful attention to direction and shape. Use a round brush to curl the longer front sections slightly inward, creating a subtle frame around your face. The shorter back sections should be directed to fall naturally, following the cut’s angles. Apply a smoothing serum to the ends to emphasize shine and definition.
Creating Dimensional Depth
- Side-part your bob dramatically, sweeping one side completely behind your ear — this emphasizes the asymmetrical cut
- Use a straightening iron to refine the line of your bob, creating crisp definition especially at the ends
- Apply a volumizing powder to the roots on the underside of the bob to create lift without visible texture
- Add a thin hair comb or sleek barrette to the side that’s swept back, anchoring the style while adding elegance
- Finish with a shine spray or light oil on the ends to emphasize the cut’s beautiful lines
Pro tip: The night before your graduation, sleep on your styled bob with a silk pillowcase or bonnet — this preserves your blow-dry and prevents frizz that would dull the sharp definition you’ve created.
7. Spiky Faux Hawk with Subtle Edge
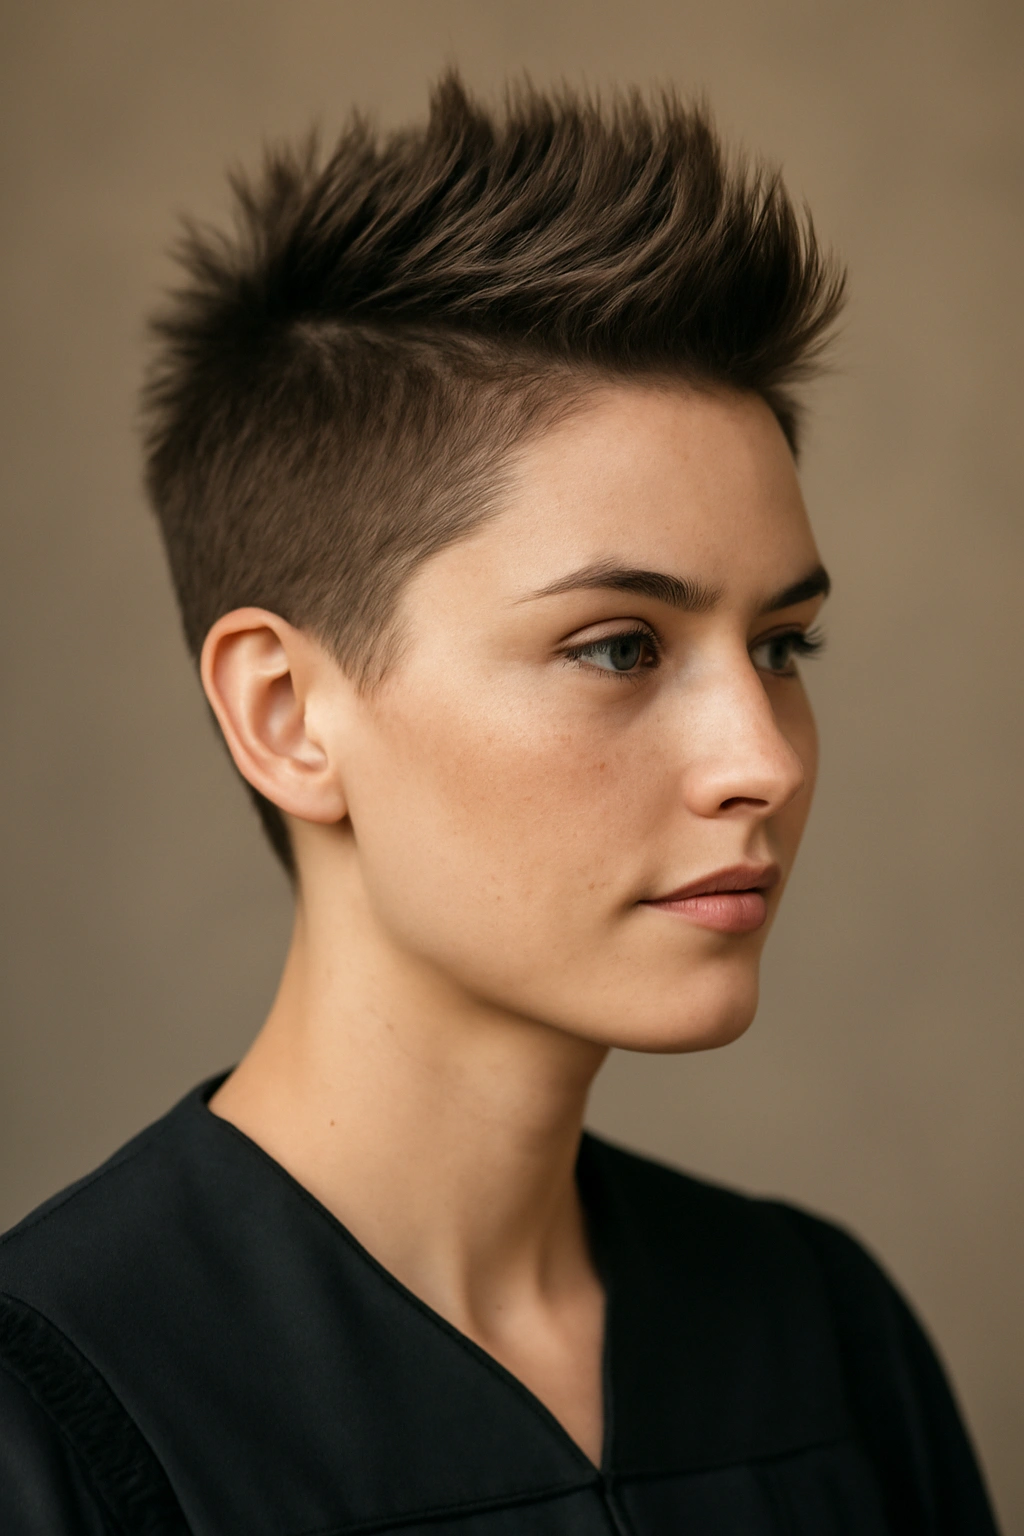
If you want to break the mold and show personality on graduation day, a subtle faux hawk on short hair is bold without being costume-y. This look uses texture and directional styling to create movement and edge while remaining graduation-appropriate.
Building Texture and Lift for the Hawk
Apply a texturizing spray or sea-salt spray to damp hair to create grip and separation. Blow-dry your hair with your fingers, working upward at the crown to build maximum height. Once dry, apply a lightweight gel or texture paste to the crown and top sections, working it through from roots to ends with your fingertips, encouraging hair to stand slightly on end.
Directing the Spiky Movement
- Create a faux hawk by brushing the crown area upward and slightly forward, using product to encourage the spiky texture
- Keep the sides sleek and close to the head by smoothing with a light gel and your fingertips or a small comb
- Avoid making the hawk too extreme — aim for a subtle lift rather than a literal standing-up effect
- Use pearl or metallic bobby pins on the crown to add glamour and emphasize the texture
- Finish with a medium-hold hairspray that allows texture to move naturally
Insider note: This style works best if you have naturally textured hair or if you use a permanent or semi-permanent texturizing treatment beforehand — trying to create a faux hawk with extremely fine, straight hair requires a lot of product and may not hold through a full graduation ceremony.
8. Side-Swept Vintage Wave
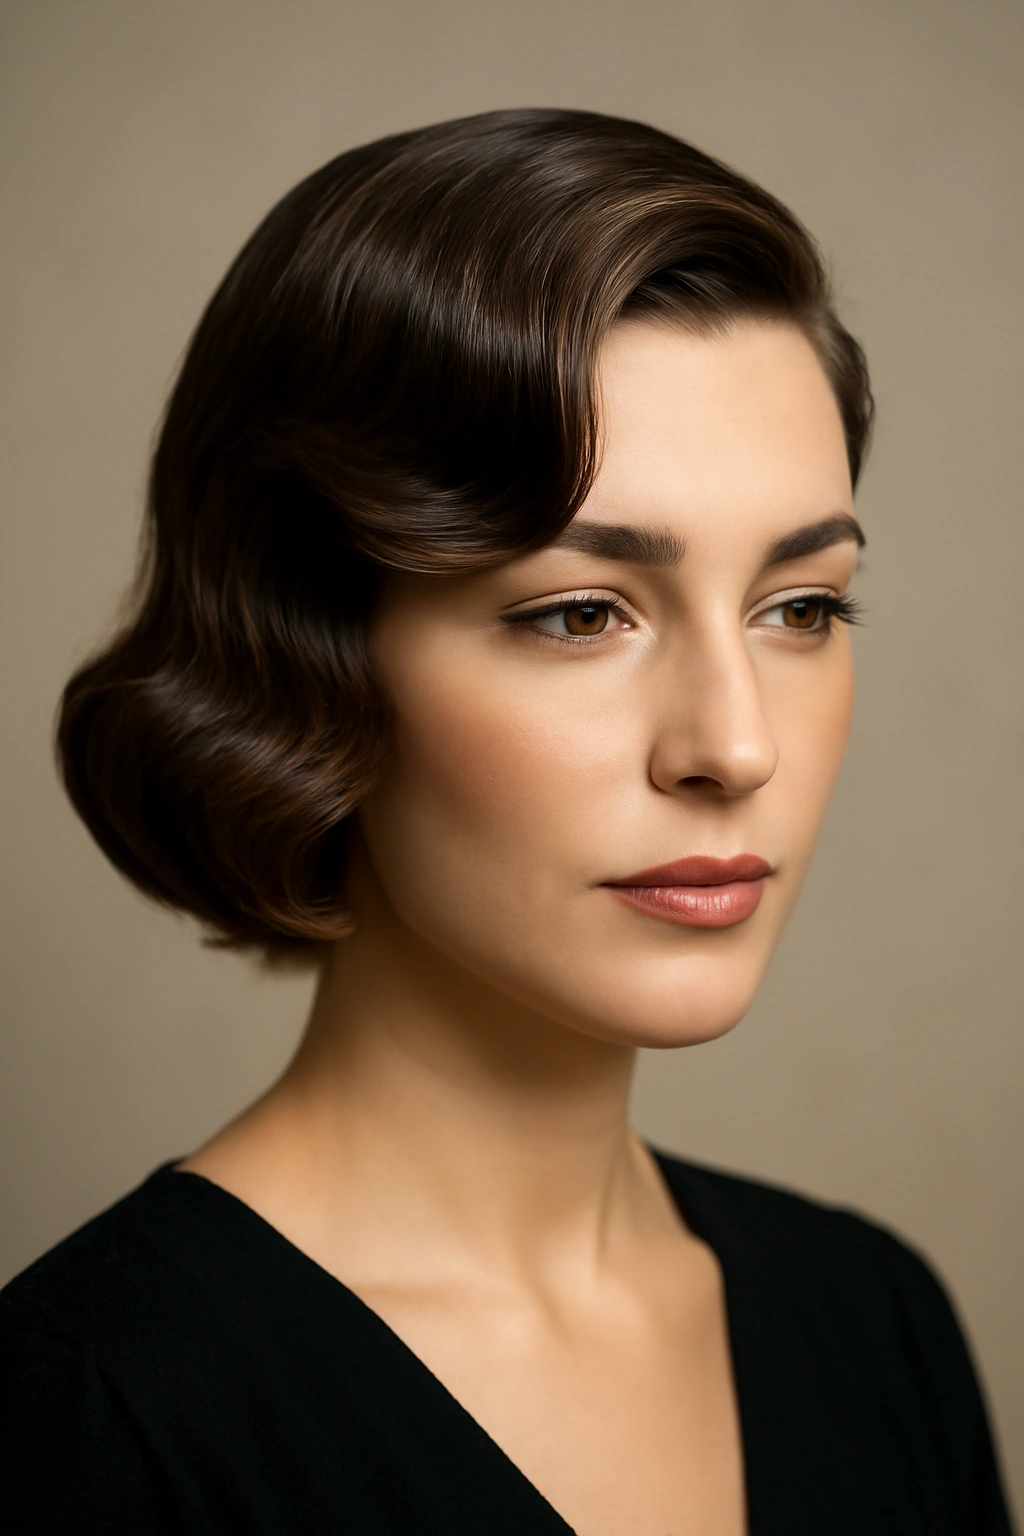
A vintage-inspired side-swept wave is pure elegance on short hair — it creates romance and polish while keeping hair completely off one side of your face for photography. This style evokes Old Hollywood glamour without feeling costume-y.
Creating Polished Waves
Blow-dry your hair smooth and sleek as a base. Section off the hair on one side of your head, and use a 1-inch curling iron to create vertical waves, curling each section away from your face. Make sure to leave the curl in the iron for the full recommended time — this creates defined waves rather than loose curl. Repeat throughout your entire head.
Sweeping to One Side
- Use a fine-tooth comb to gently comb your waves in one direction, creating a side part
- Direct all your hair to sweep toward one side of your head, allowing it to flow naturally from your crown across
- Pin the swept section behind your ear with decorative bobby pins or a sleek metal comb, securing it while maintaining the swept appearance
- Use a light smoothing serum on the waves to emphasize shine and smooth any flyaways
- Finish with a flexible hold hairspray that allows your waves to move gracefully
Pro tip: Create this style on slightly damp hair, then allow your waves to set for 30 minutes before pinning — this ensures they hold their shape throughout the entire day and photographs beautifully.
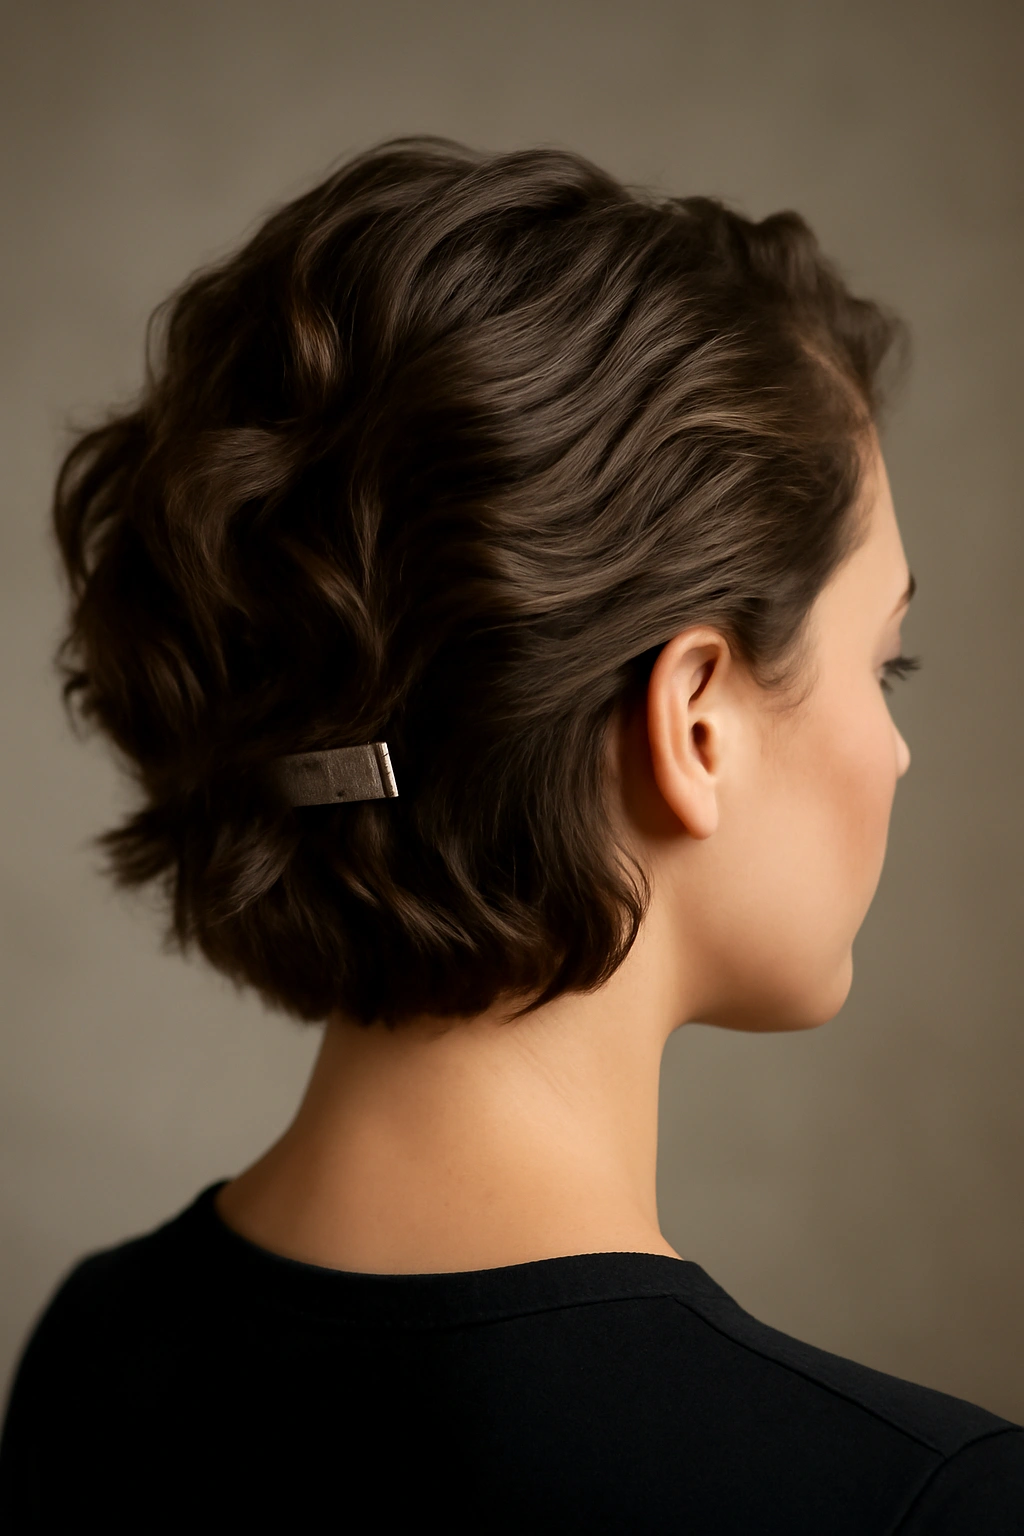
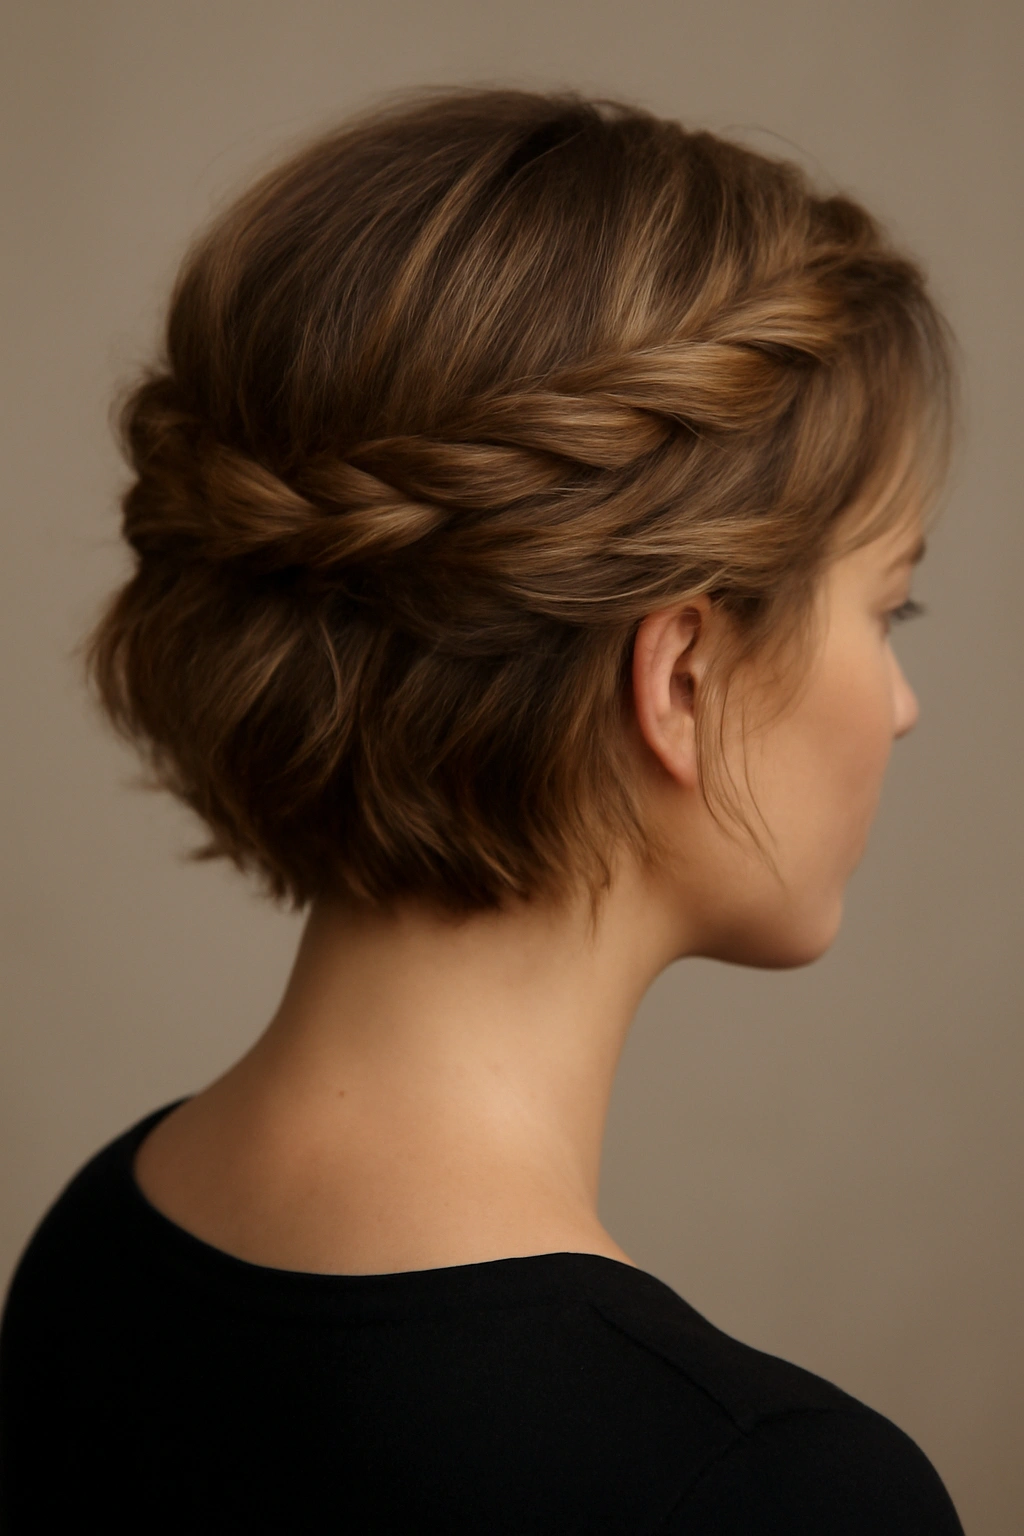
9. Braid-Accented Short Cut with Textured Ends
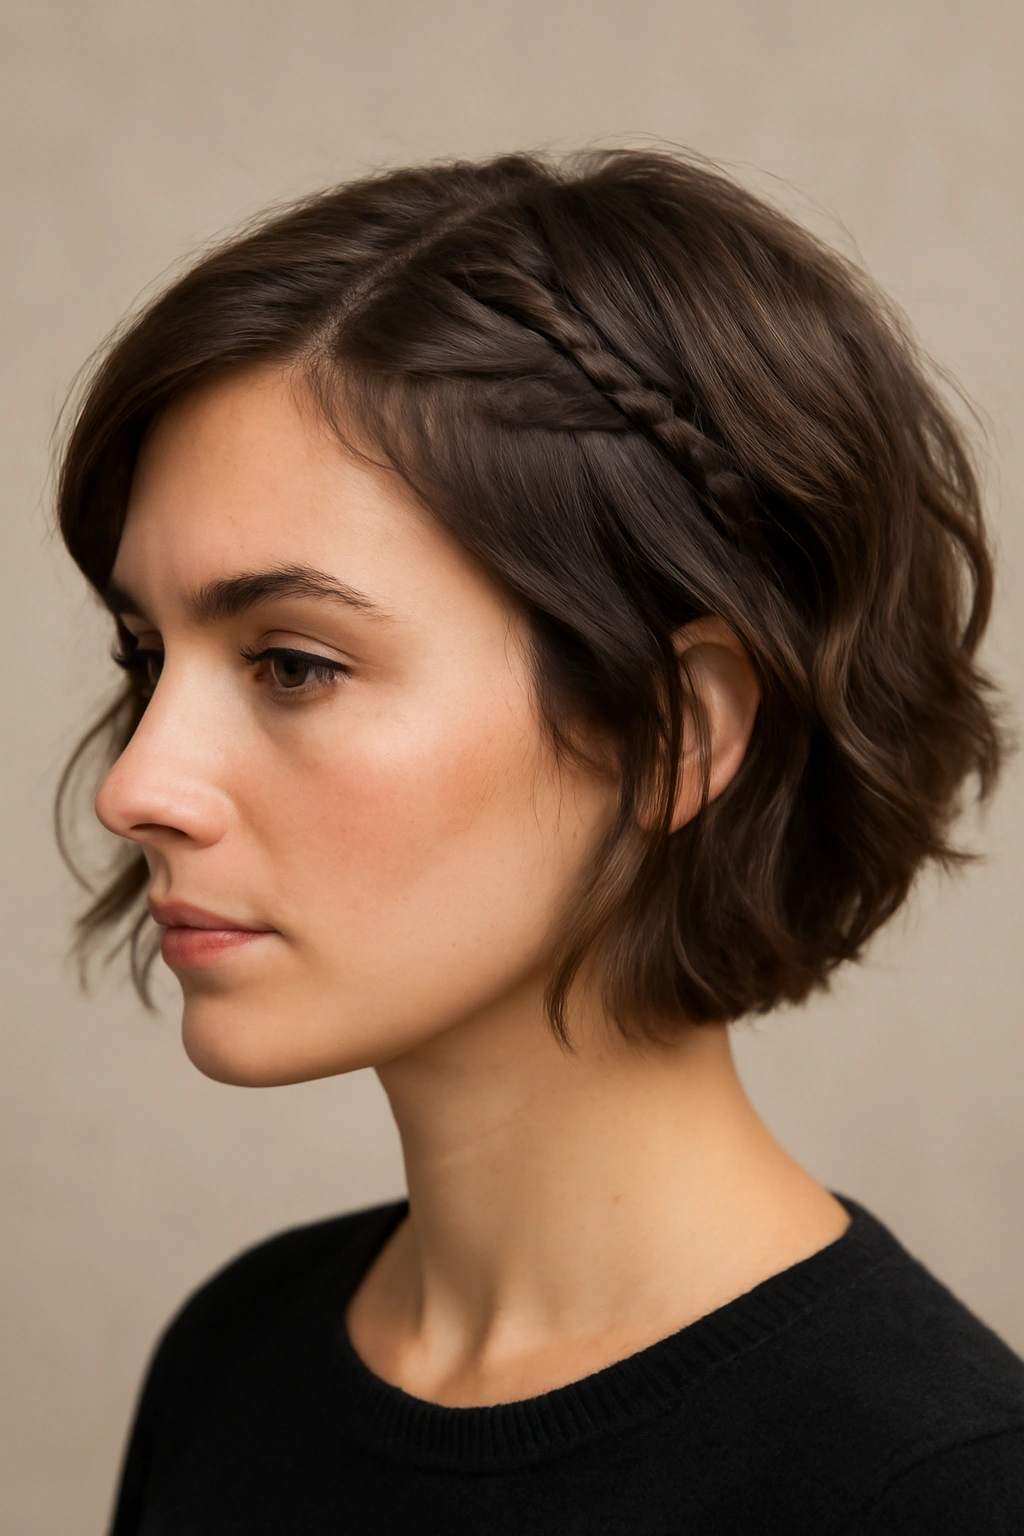
Short hair and braids might seem contradictory, but a subtle braid woven into textured short hair creates visual interest and an intentionally polished look. This works best if you have at least 3-4 inches of hair with some texture or wave.
Creating the Base Texture
Wave your hair with a curling iron or allow your natural texture to show. Finger-comb gently to create separation and dimension. Use a texturizing spray to enhance grip and prevent the style from looking too smooth or flat.
Incorporating a Subtle Braid
- Start a thin three-strand braid at one temple, incorporating hair as you move toward the back
- Keep the braid loose and slightly disheveled — a tight, perfect braid looks out of place with short textured hair
- Secure the braid’s end with a tiny clear elastic or bobby pin, allowing it to blend into the waves around it
- Pull and loosen the braid slightly so it blends seamlessly with the surrounding textured hair
- Optional: weave a thin metallic thread or ribbon through the braid for added glamour
- Finish with a light hairspray that maintains texture without stiffness
Worth knowing: Practice this style ahead of time — braiding short hair requires a different technique than longer hair, and you’ll want to feel comfortable with the process before your graduation day.
10. Slicked-Back Sleek Look with Statement Jewelry
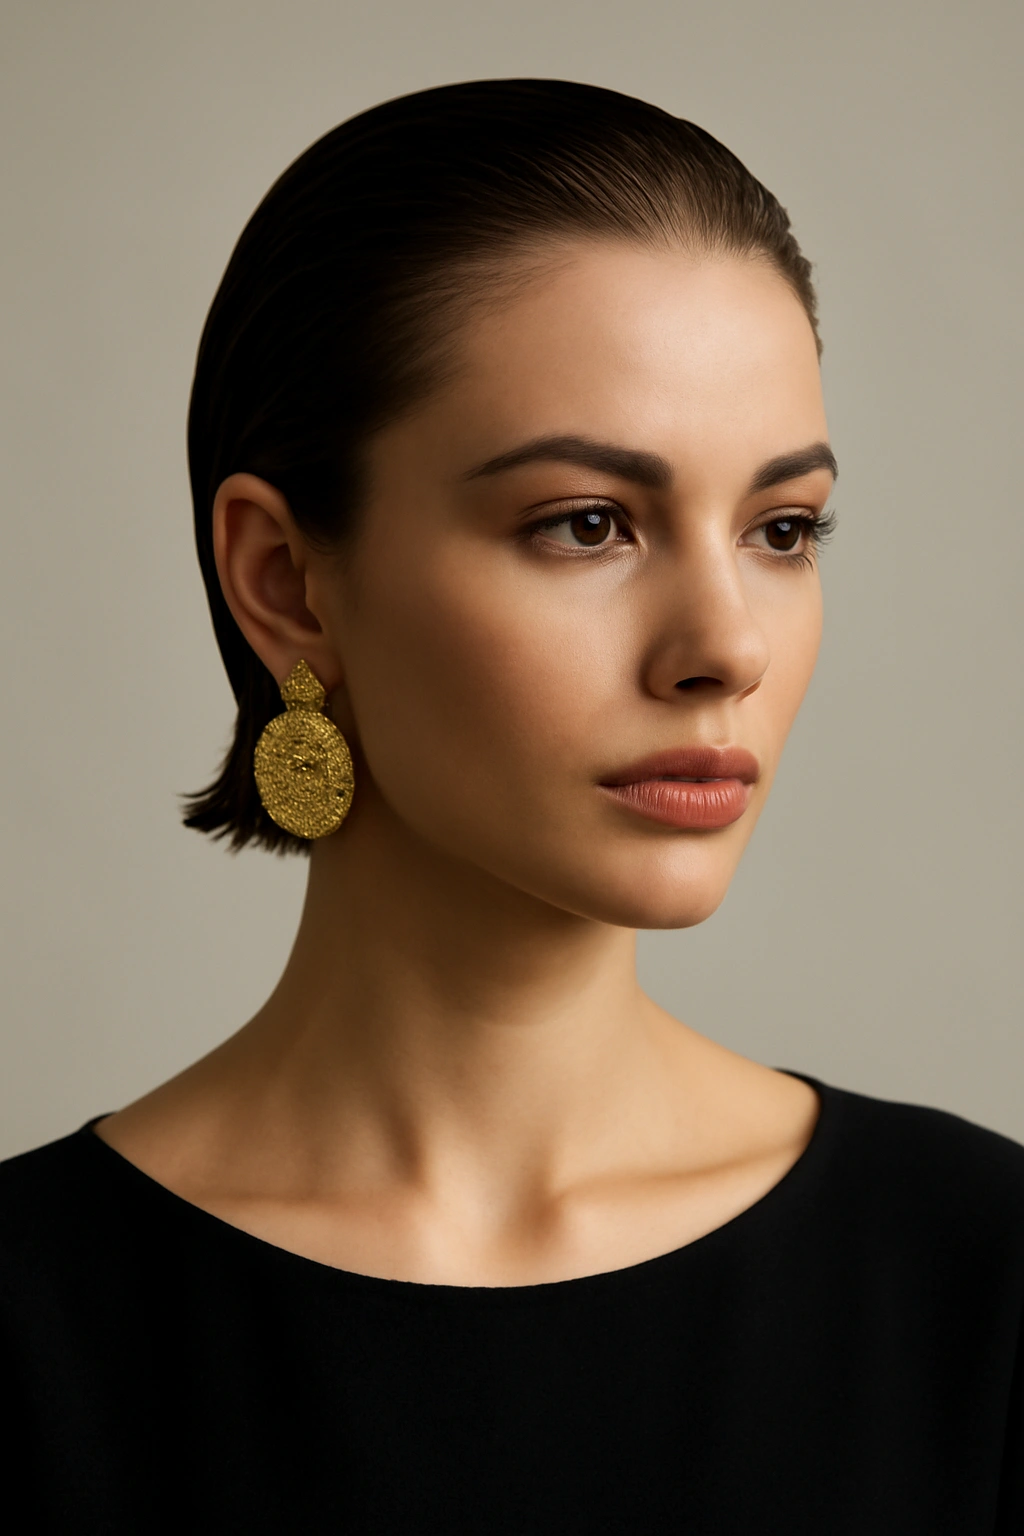
When you want maximum impact with minimum fuss, a completely slicked-back style on short hair is architectural and modern. This look highlights your face, your features, and allows statement earrings or a decorative headpiece to become the focus.
Creating the Sleek Base
Apply a strong-hold gel or pomade to damp hair, working it through from roots to ends. Blow-dry completely, using a fine-tooth comb or brush to direct hair smoothly against your head. The goal is a polished, aerodynamic finish with no texture or flyaways.
Perfecting the Slicked Appearance
- Use a smoothing serum or a light oil on the very ends to create shine and definition
- Comb your hair repeatedly with a fine-tooth comb, smoothing in one direction
- Apply an edge control product to your hairline and temples, smoothing everything against your head
- Consider using a satin or silk bonnet for 30 minutes after styling to allow the product to set completely
- Pair this sleek base with statement earrings, a delicate headband, or a jeweled hair comb to prevent the look from feeling stark
- Finish with a flexible hold hairspray — strong enough to keep everything in place, light enough to allow some natural movement
Pro tip: If you have a short, textured cut, you might not be able to achieve a completely slick look — and that’s fine. Instead, aim for a sleek, controlled look where texture is visible but directed, creating a modern interpretation rather than a literal slicked style.
Final Thoughts
Graduation day with short hair isn’t about making do with what you have — it’s about choosing a style that makes you feel confident and beautiful in your own way. Every single one of these looks proves that short hair has incredible range: you can go classic and elegant, textured and modern, romantic and soft, bold and statement-making, or anywhere in between. The key is understanding your hair’s natural texture, what styling techniques work best for your specific cut, and what look genuinely reflects who you are on this significant day.
Start practicing your chosen style at least a week before graduation. Test your products, timing, and techniques so nothing surprises you on the actual day. Take photos in natural light to see how your style translates through a camera lens, since that’s how your graduation will truly be remembered. If you’re working with a professional stylist, bring photos of your chosen look and show them exactly what you’re envisioning — communication prevents disappointment.
Remember that hair is forgiving: even if something shifts during the ceremony or photo session, you have the knowledge now to touch it up confidently. You’re graduating, your short hair looks fantastic, and you should absolutely own that moment.