Short curly natural hair is bold, beautiful, and undeniably versatile—but only if you know which cuts and styles actually work with your texture rather than against it. Many women with natural curls struggle to find hairstyles that celebrate their curl pattern while working with the reality of short length, and that’s where this guide comes in. The styles below aren’t just trends; they’re cuts and styling methods that enhance curl definition, reduce styling time, and look sharp from day one. Whether you’re transitioning to natural hair, chopping off damaged ends, or simply ready for a major change, you’ll find options that work with different curl patterns, face shapes, and lifestyle commitments.
The key to pulling off short curly hair is understanding how your specific curl pattern behaves and choosing a cut that works with that texture, not against it. A skilled stylist who understands natural hair is essential—they’ll know how to cut your curls in a way that enhances bounce and definition rather than creating awkward shrinkage or an uneven shape. These styles range from super low-maintenance wash-and-go looks to styles that take a bit of intentional styling but reward you with head-turning definition and movement. Your hair is not a problem to solve; it’s a beautiful foundation for genuinely stunning hairstyles that deserve to be celebrated.
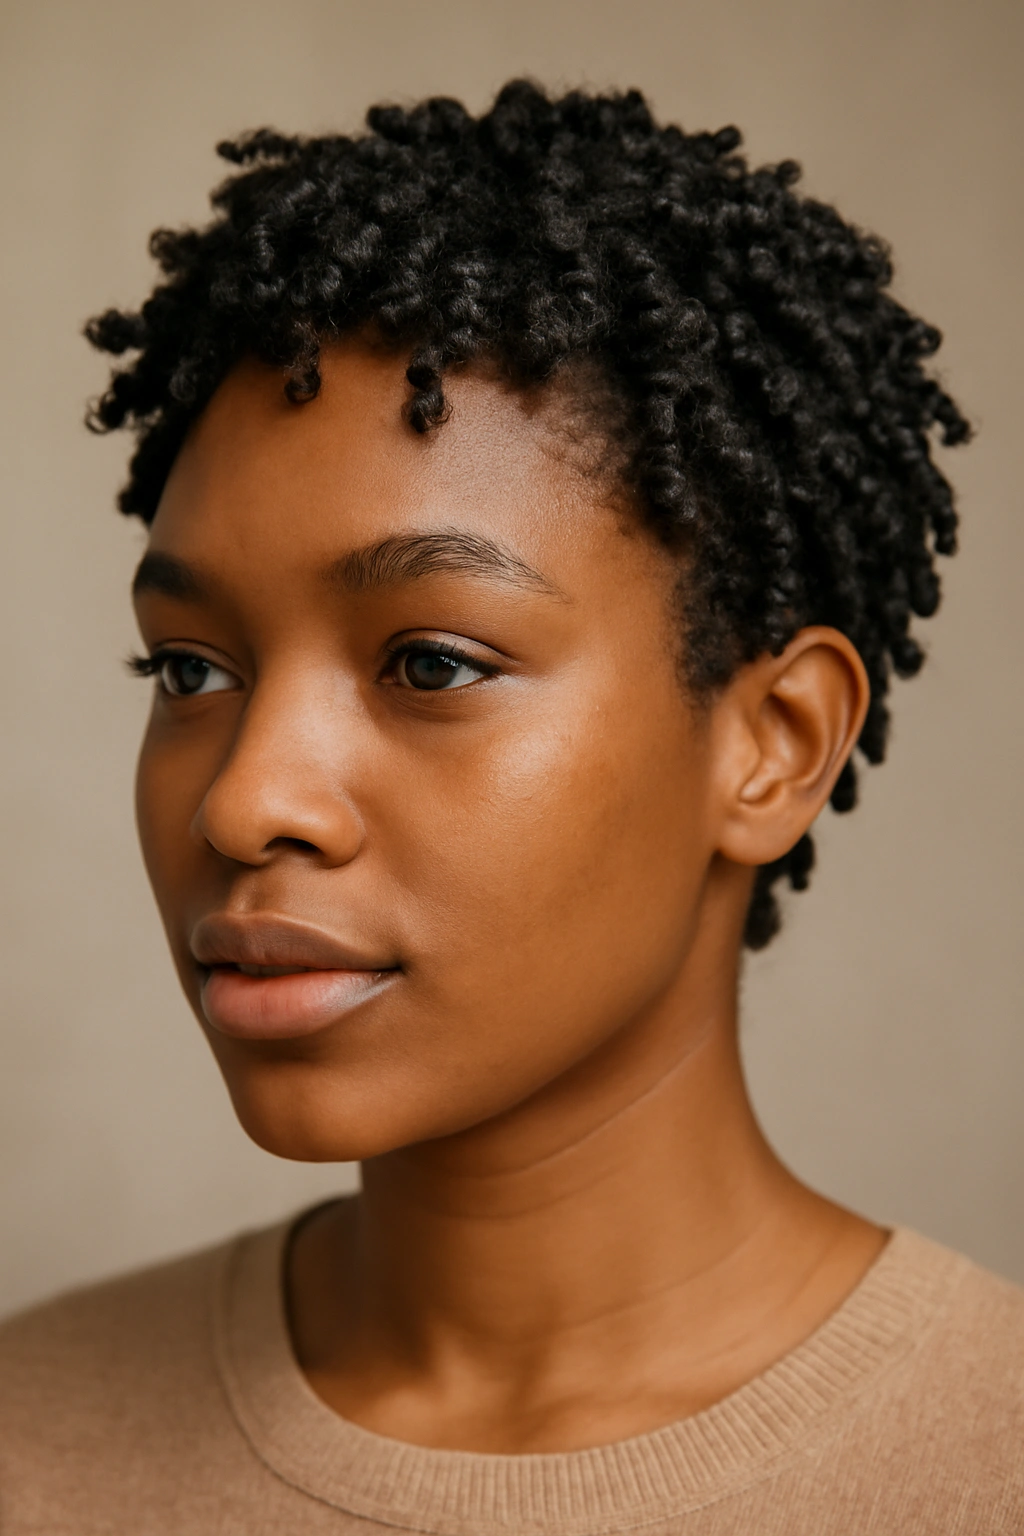
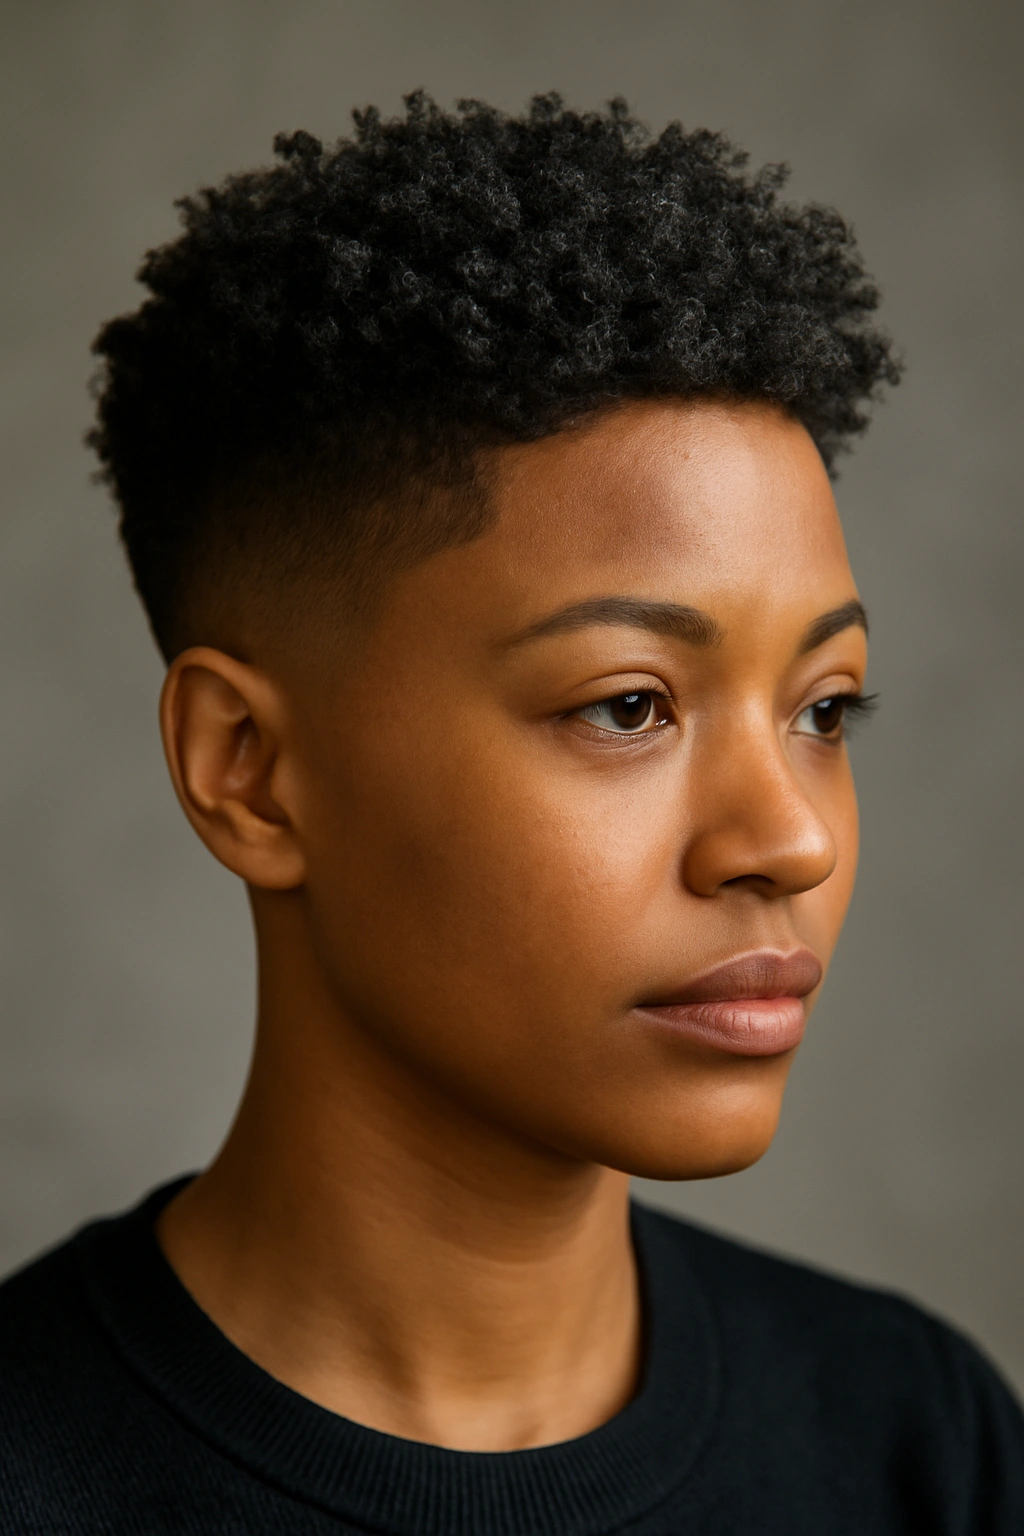
1. Tapered Natural Cut with Textured Crown
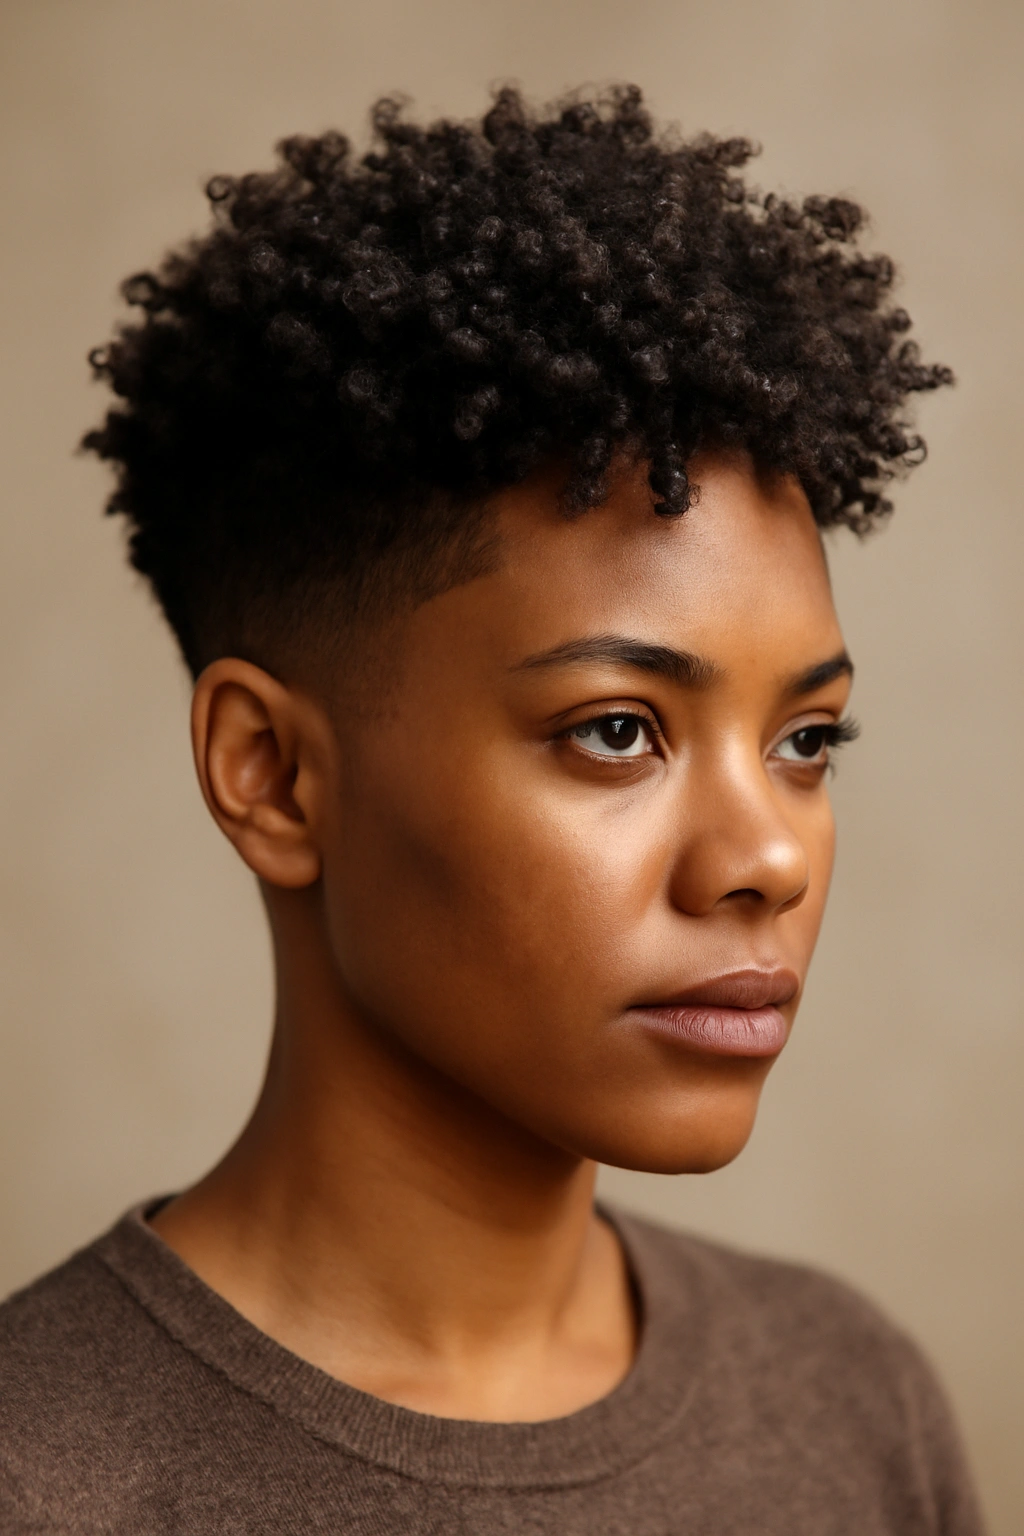
A tapered cut is the foundation of many successful short curly hairstyles—it combines short, faded or closely-cropped sides with more length concentrated at the crown and front. This silhouette instantly frames the face, draws attention upward, and creates a flattering shape for almost every face structure. The sides taper gradually from tight at the nape to slightly longer near the ears, while the top has enough length for your curls to spring up and show off their natural texture and dimension.
Why This Works For Natural Curls
The genius of a tapered cut is that it removes weight from the sides, allowing curls on top to sit higher and bounce more freely. When you have volume concentrated at the crown rather than weighing down the entire head, your curls look more defined and intentional instead of matted or shapeless. The fade also creates a clean, polished look that contrasts beautifully with the textured fullness on top—this contrast is what makes the style feel modern and intentional rather than just “short hair.”
How to Style and Maintain
Wash your curls, apply a curl-defining cream or gel to damp hair, and let them air dry for a wash-and-go that requires minimal effort. You can also use a diffuser on low heat to speed up drying time while maintaining your curl definition. Every 4-6 weeks, visit your stylist for an edge-up or full retape to keep the sides crisp and prevent overgrowth from blurring your silhouette. The taper requires maintenance, but the payoff is a hairstyle that looks intentional and shaped rather than just “short.”
Pro tip: Ask your stylist to cut your curls while they’re dry so they can see exactly how your hair will sit after shrinkage—this prevents over-cutting and ensures the crown has enough length for curl definition.
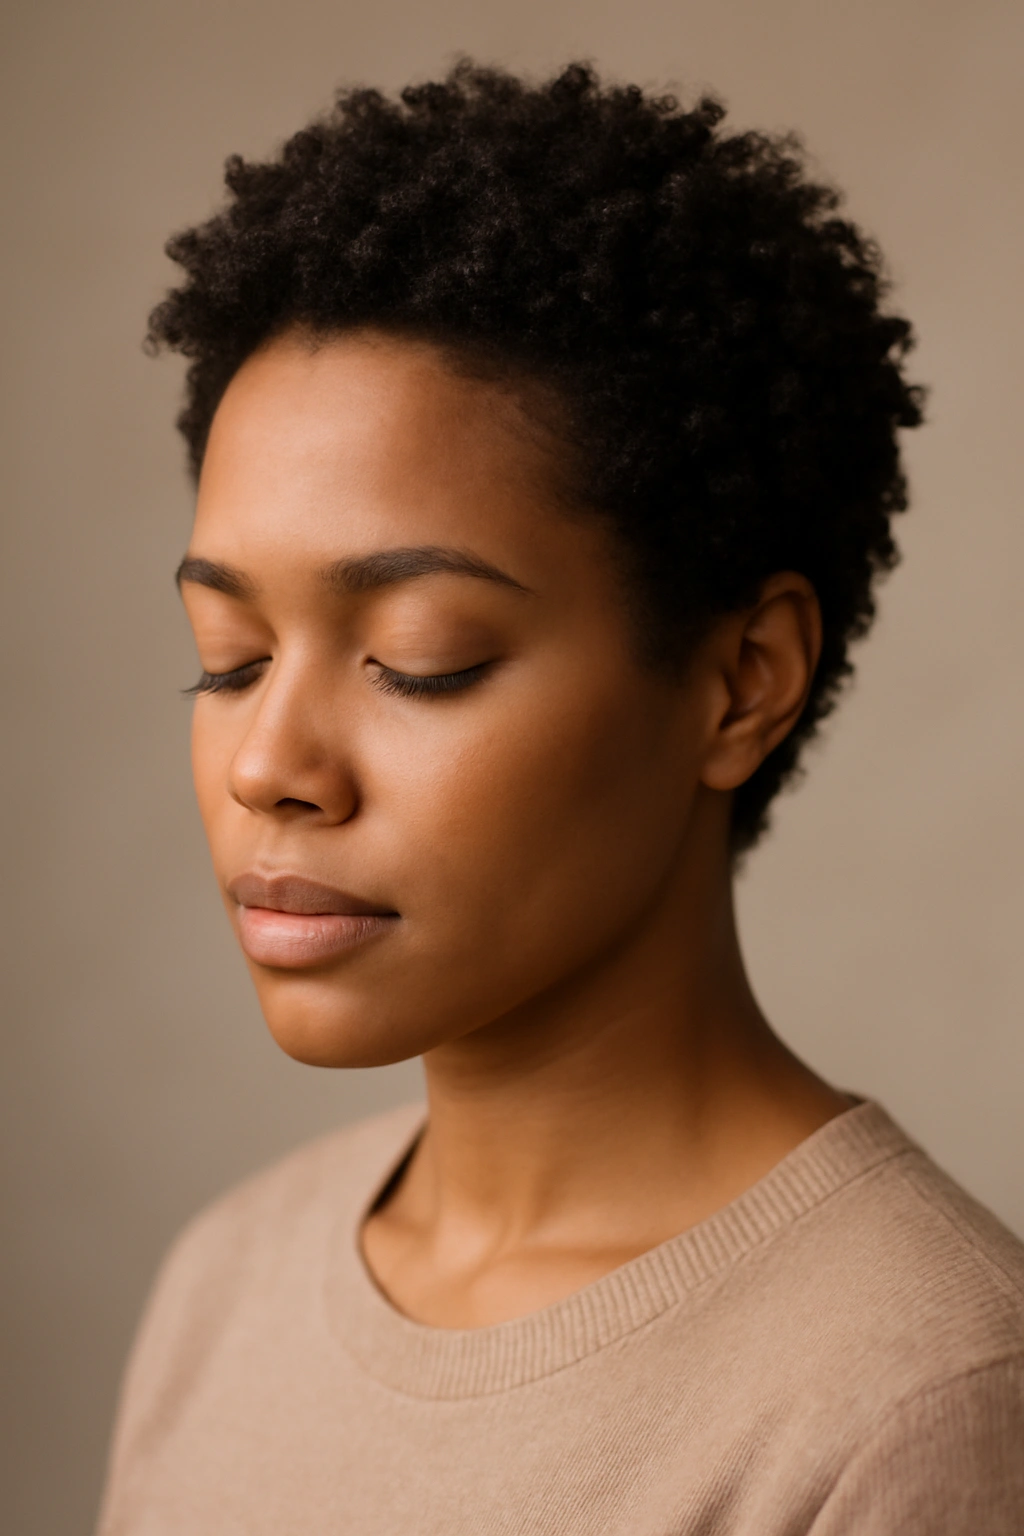
2. Textured Pixie Cut with Defined Curls
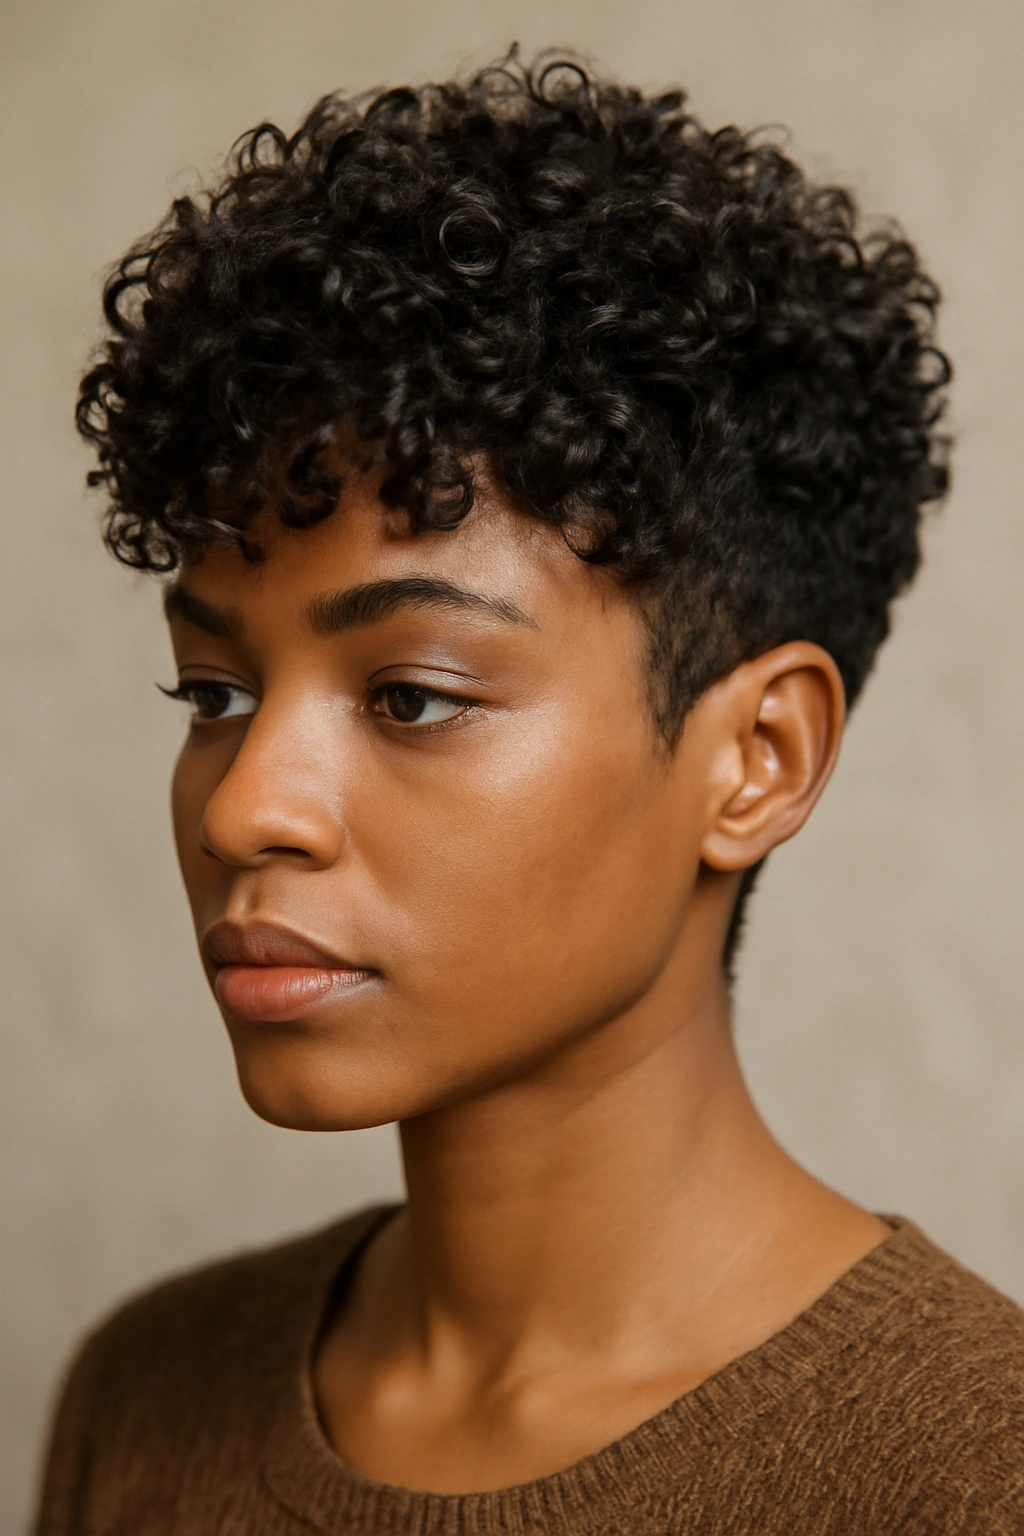
A textured pixie takes the classic short cut and reimagines it for curl texture—instead of sleek and smooth, this version celebrates the curl pattern by keeping length throughout the cut so that curls stack on top of each other, creating dimension and movement. The cut is typically shorter in back and slightly longer in front, with enough texture throughout that your curls read as an intentional style rather than just “grown-out hair.”
Why Pixie Cuts Work With Natural Curls
Curly pixie cuts work because they play with the natural height and shrinkage of curls. When your curls shrink up, they create volume automatically—the cut works with that physics rather than fighting it. A skilled stylist will angle the cut to enhance your curl pattern, removing bulk where it’s not needed and keeping length where curls can really show their personality. The result is a style that looks fuller, more defined, and more intentionally shaped than a traditional blunt pixie.
Styling and Care for a Curly Pixie
Wash with a hydrating shampoo and condition generously—short curls dry out faster than longer hair because there’s less conditioner clinging to the strands. Apply a leave-in conditioner and curl-defining product to damp hair, then either air dry for a soft, tousled look or use a diffuser to enhance curl definition and increase volume at the roots. Style with your fingers to encourage curl formation rather than using a comb, which can disrupt the natural curl pattern. Refresh curls between washes using a spray bottle filled with water and a lightweight styling cream.
Worth knowing: Textured pixies need a trim every 4-5 weeks to maintain shape and prevent hair from looking shaggy or overgrown, so factor that into your maintenance routine before committing to this cut.
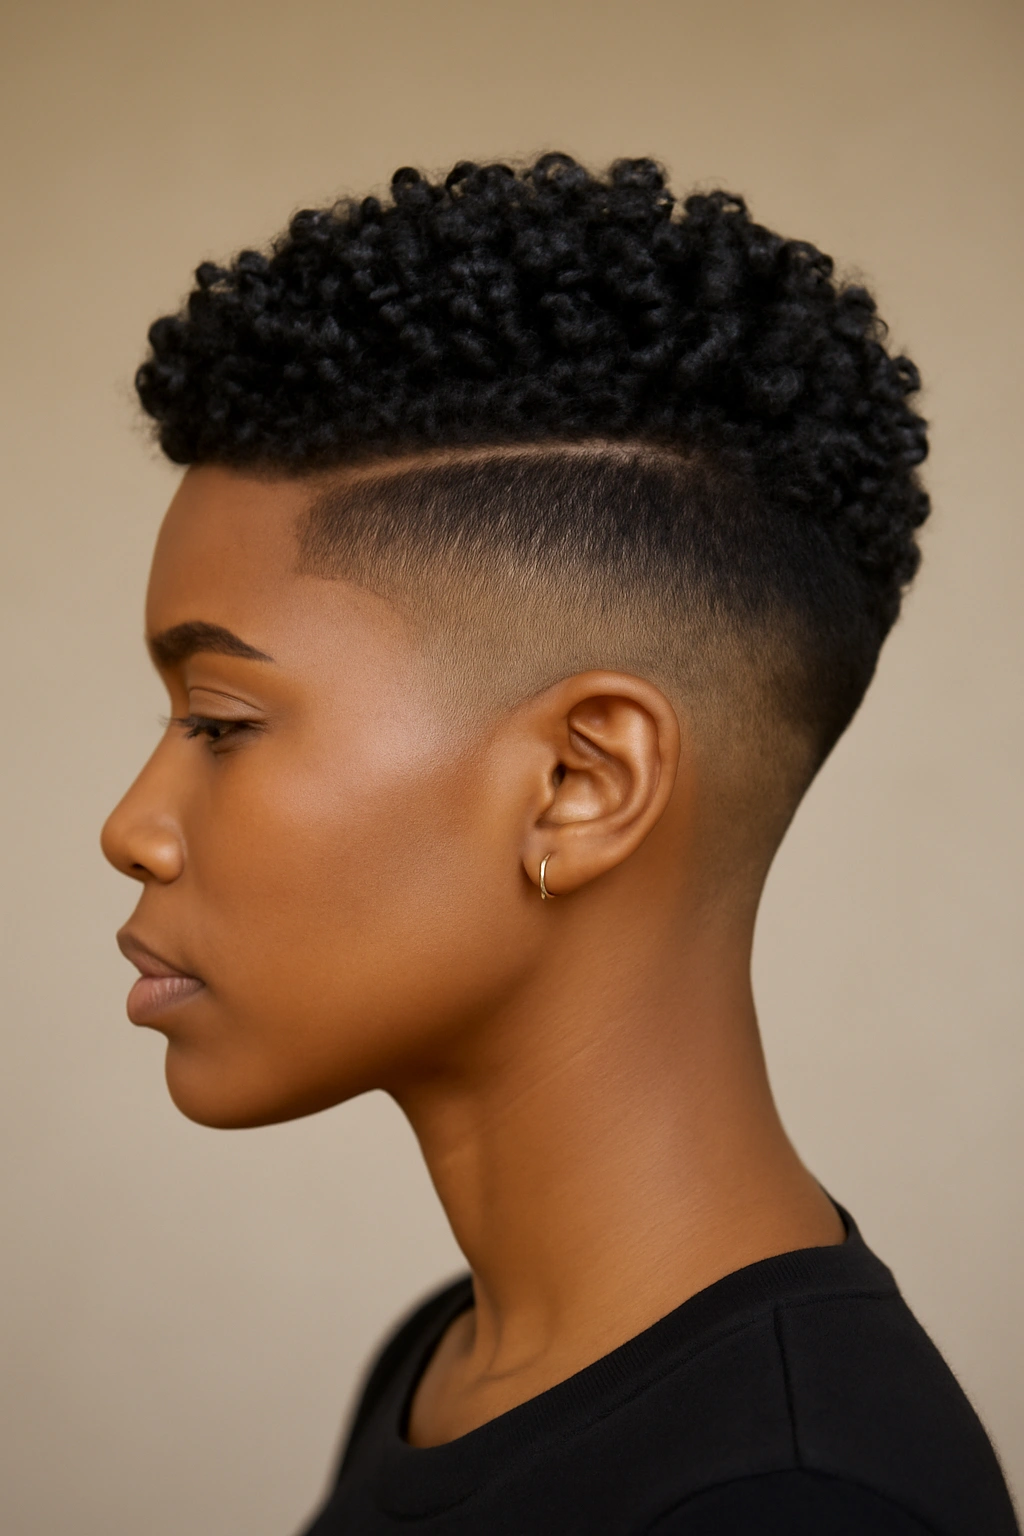
3. Undercut with Extended Crown Length
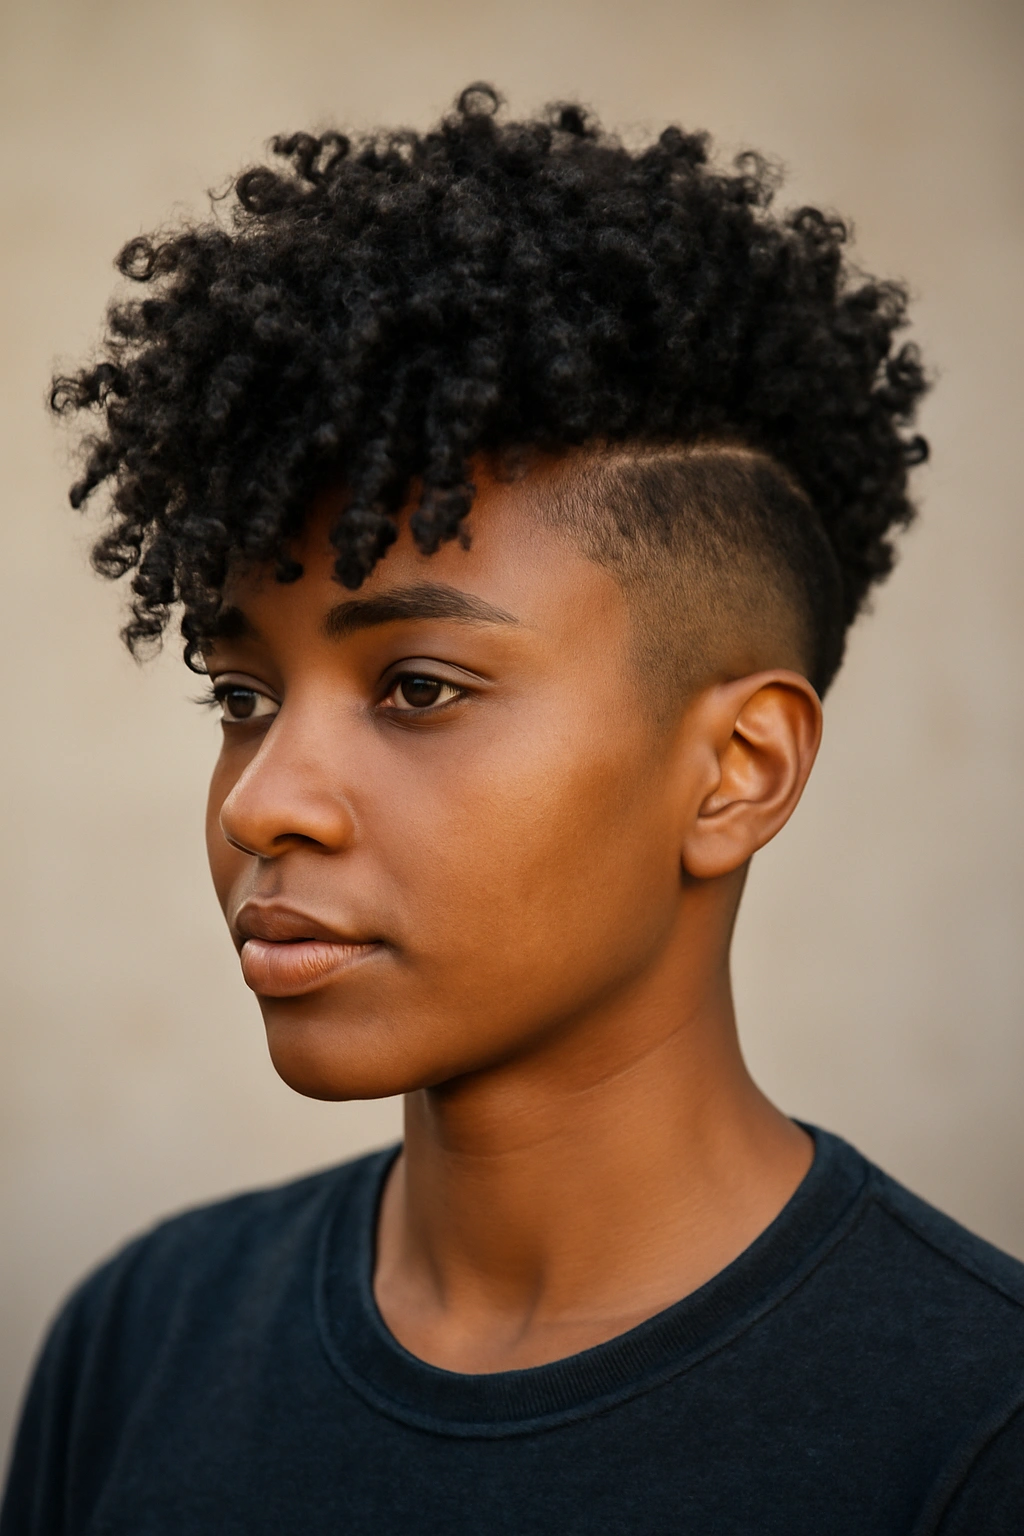
An undercut is a dramatic style that features very short or even shaved sides (usually a fade to skin or close-cropped length) paired with significantly longer hair on top—the contrast between the two lengths is what defines this look. On natural curly hair, the extended crown length allows your curls to fall forward and show off their full spiral pattern, while the exposed sides create a sleek, edgy frame. This style makes a bold statement and works beautifully on women who want to showcase their curl definition while keeping styling simple.
The Visual Impact and Curl Showcase
The undercut works because the length concentration at the top maximizes curl visibility and movement—your curls have room to spread out and express themselves without the weight of hair on the sides pulling them down. The contrast between the shaved or faded sides and the textured crown creates a striking visual that reads as intentional and fashion-forward. This style is particularly stunning on women with tight, springy curls that benefit from hanging forward without any competing texture on the sides.
Styling an Undercut
Shampoo and condition your curls, apply a curl cream or gel to damp hair, and let them air dry for a natural, bouncy finish. You can also finger-coil each section as it dries to enhance curl definition. The sides require attention—plan on visiting your stylist every 2-3 weeks to maintain the fade or keep the sides shaved clean, depending on how sharp you want to keep the look. The maintenance commitment is real, but the payoff is a style that genuinely turns heads.
Pro tip: Work with a stylist experienced in undercuts on natural hair—they’ll understand how to shape the crown in a way that makes your curls read as a cohesive style rather than just long hair left unstyled on top.
4. Coils Stacked on Top with Faded Sides
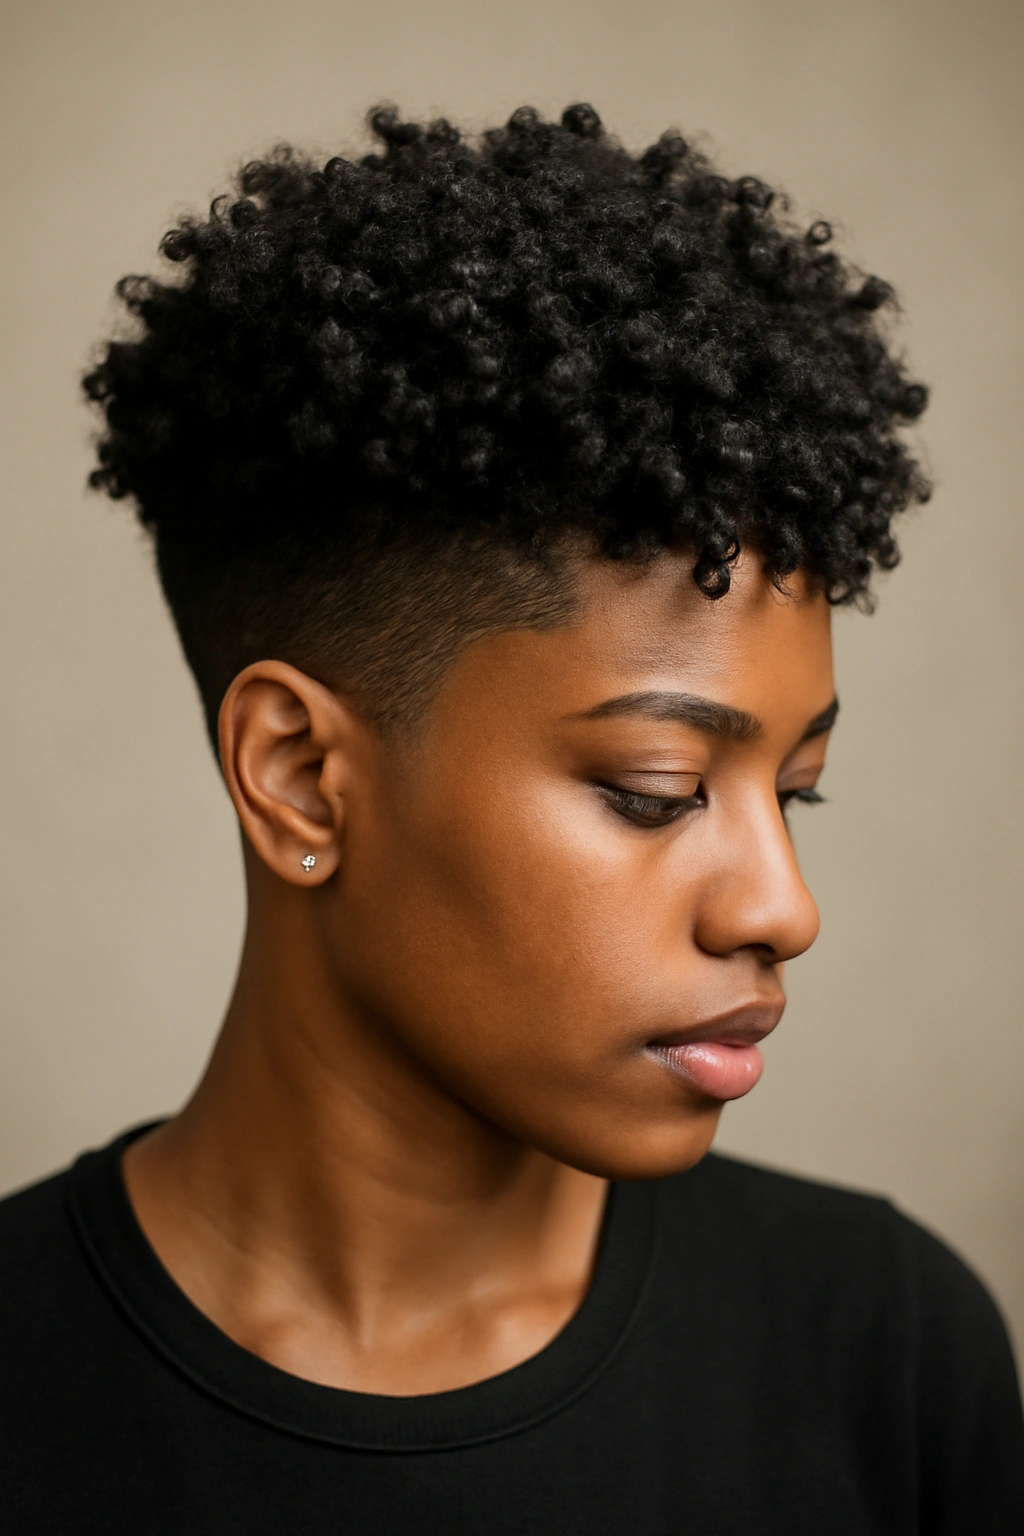
This style maximizes curl definition by keeping curls on top while fading the sides, then actually working with your curl shrinkage to create height and volume at the crown. The sides fade down gradually, while the top is shaped to encourage upward growth and stacking. The result is a style with impressive height and dimension that celebrates tight, well-defined curls while keeping the silhouette sharp and modern. This works especially well for women with tighter, springier curl patterns.
Why Stacked Coils Read as Intentional
When your curls shrink and stack vertically, they create natural height and dimension. A good stylist will cut in a way that encourages this stacking rather than fighting it—think of it like creating “rooms” for your curls to live in. The fade on the sides makes the crown coils look even more prominent and intentional. The overall effect is bold, confident, and deeply flattering on most face shapes because the height draws the eye upward.
Maintaining Curl Definition and Stacking
Wash with a hydrating shampoo and use a rich conditioner or deep conditioning treatment to keep curls bouncy and hydrated. Apply a styling product with hold—a curl cream, gel, or mousse—to soaking wet hair, then either air dry or use a diffuser to encourage upward growth and stacking. Avoid touching your hair while it dries to prevent disrupting curl formation. Refresh between washes by lightly spritzing with water and scrunching in a bit more product, then allowing air drying. A trim every 4-6 weeks keeps the stacking looking intentional rather than overgrown.
Insider note: The tighter and more defined your curls are, the more this style will impress—if you have looser, wavier curls, you might consider one of the other styles instead, as this one really shines with well-defined, springy coils.
5. Twist-Out Style with Short Length
A twist-out is a styling technique where you twist damp hair into sections, allow it to dry completely, then unravel the twists to reveal textured, defined curl clusters. On short hair, twists create impressive texture and definition without the weight and tangles that longer twist-outs can develop. The style delivers a thick, dimensional look with visible curl definition that reads as intentionally styled rather than just wash-and-go natural hair. This is perfect if you want something that looks polished and put-together without spending hours styling.
The Texture and Definition Benefits
Twists force your hair into a specific pattern as it dries, and when you unravel them, you get beautifully defined curl clusters instead of individual curls. On short hair, this technique creates a thick, voluminous texture that feels modern and intentional. The twist-out is also a way to encourage curl definition if you have a curl pattern that’s a bit undefined or frizzy—the twists teach your curls to form in specific shapes, and over time, your natural curl pattern becomes more pronounced and defined.
How to Create and Maintain a Twist-Out
Start with clean, damp hair and apply a hydrating product—a leave-in conditioner, curl cream, or styling gel, depending on your hair’s needs and what gives you the best definition. Divide your hair into sections (usually 4-8 sections depending on the density of your hair) and twist each section, smoothing the product through as you go. You want the twist tight enough to hold shape but not so tight that it’s uncomfortable. Allow your hair to air dry completely—this can take 6-12 hours depending on your curl pattern and room humidity. Once fully dry, gently unravel each twist, starting at the end and working toward the root. Use your fingers to separate and fluff the twists into the texture you want. Your twist-out will last 3-5 days before you’ll want to refresh it with water and product or wash and start fresh.
Pro tip: Do your twist-out in the evening and sleep on a satin or silk pillowcase to prevent frizzing overnight—you’ll wake up with perfectly defined texture that looks fresh and intentional.
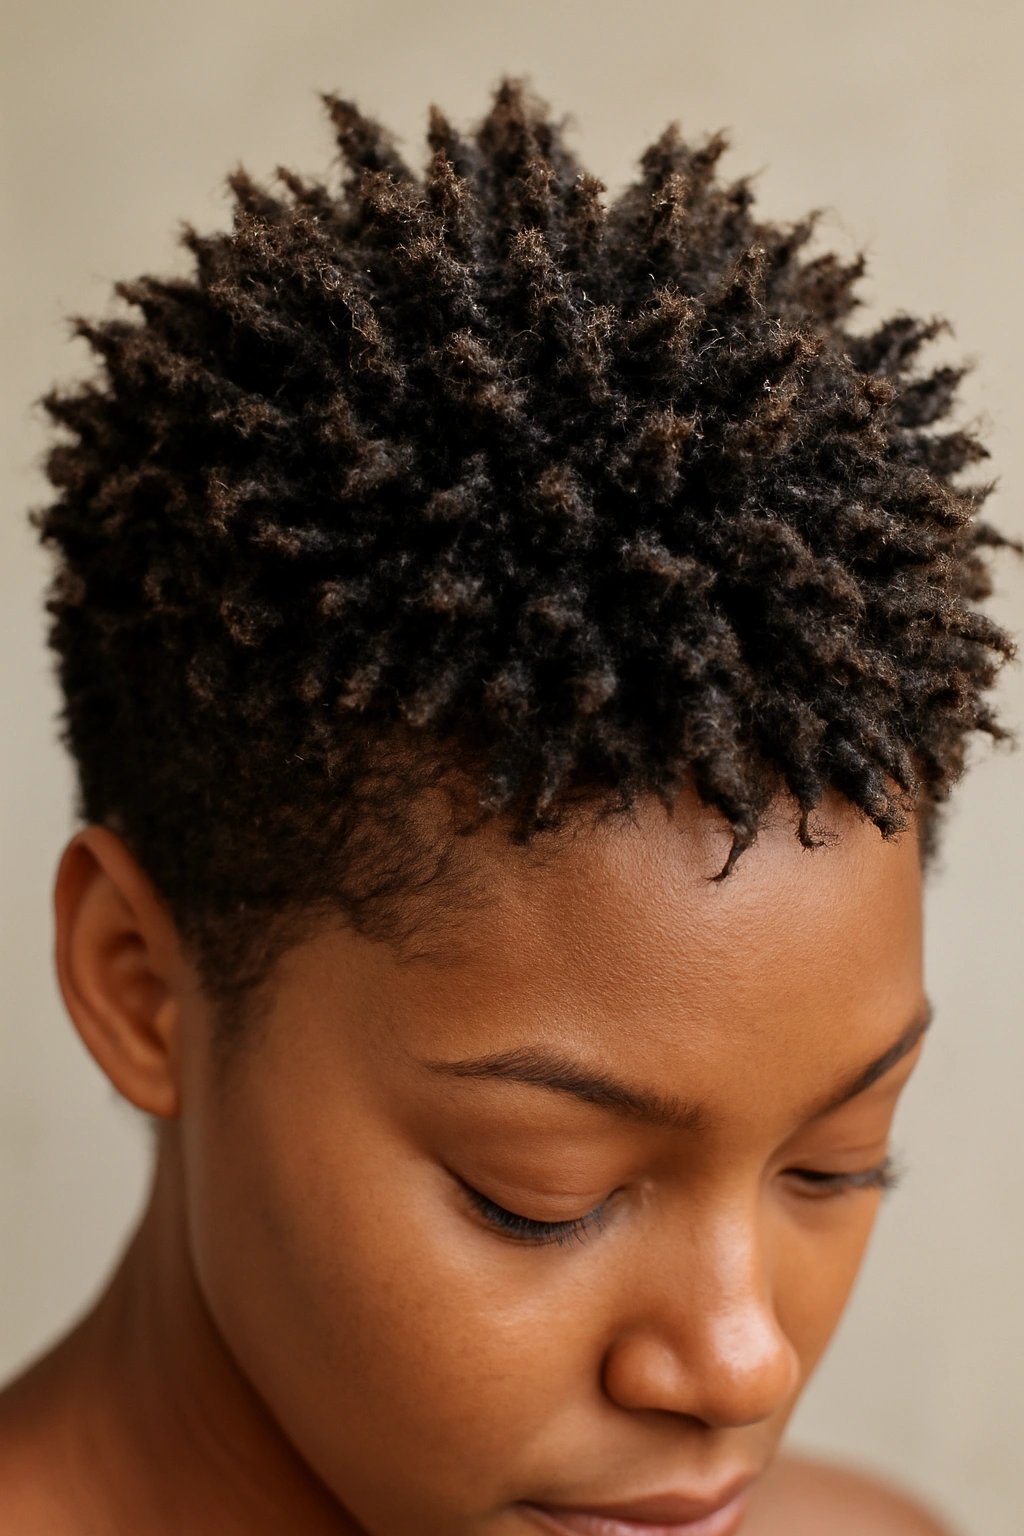
6. Teeny Weeny Afro (TWA) with Natural Shrinkage
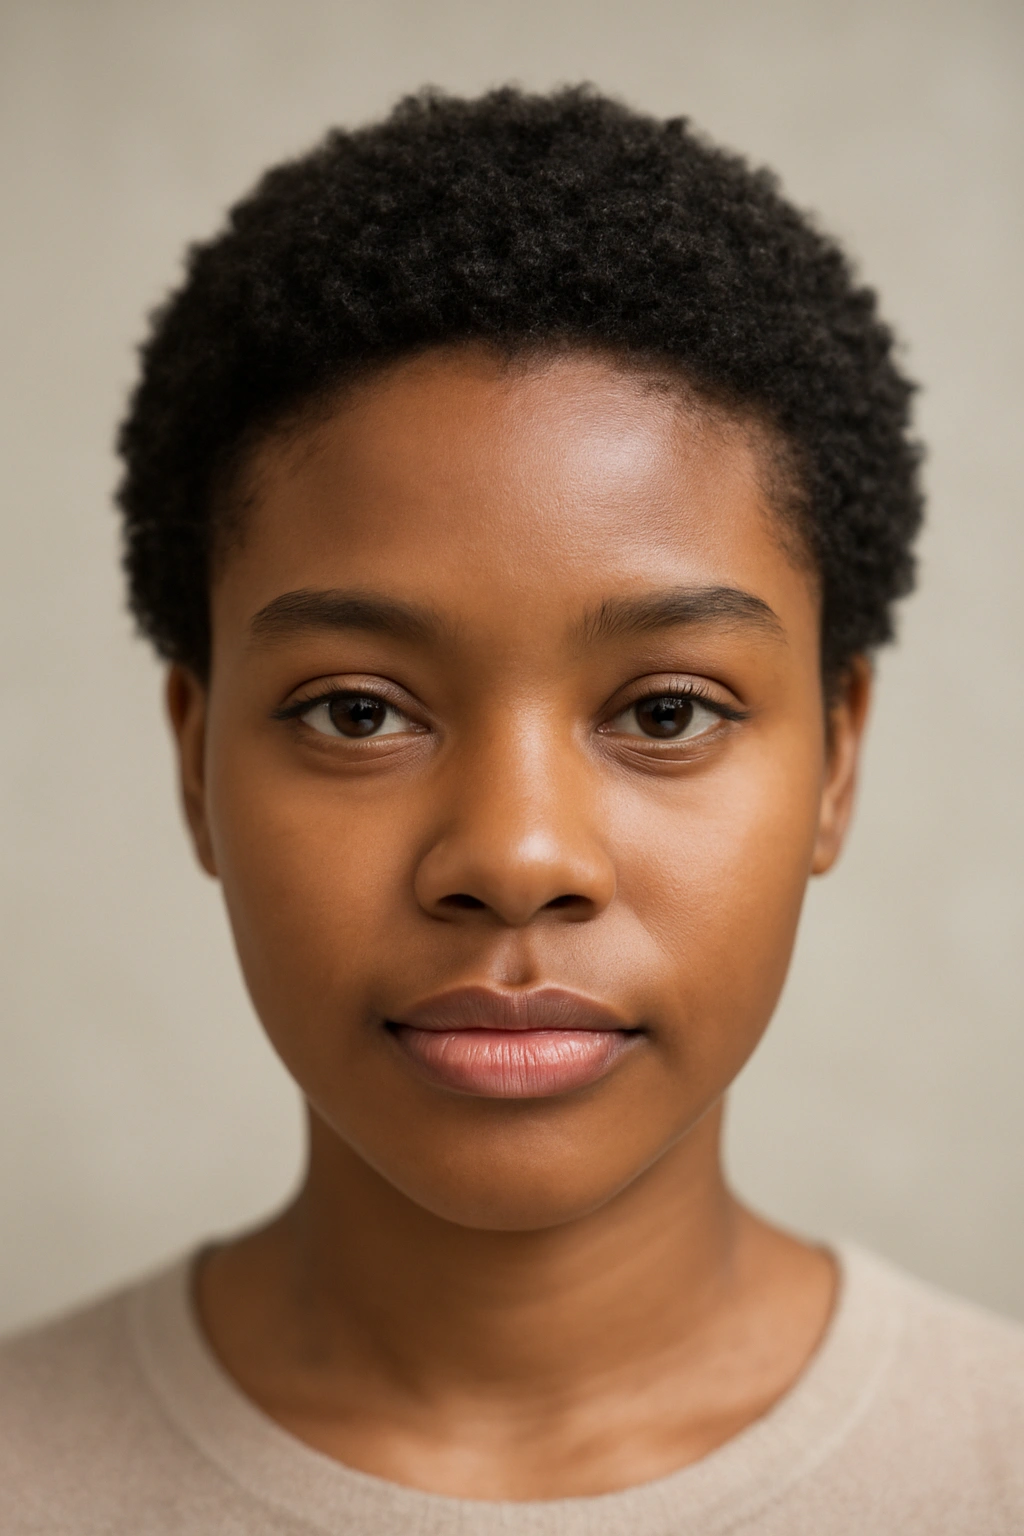
A TWA is exactly what the name suggests—a very short natural hairstyle where you cut your hair close to the scalp and let your natural curl pattern shine through without any length to weigh it down. The style celebrates pure curl texture; there’s no hiding or smoothing—just your hair in its most authentic form. The cut is usually clean and even all over, though some women add slight layering or a subtle fade to create dimension. This style is freeing, low-maintenance, and genuinely striking on anyone confident enough to rock it.
The Liberation and Beauty of a True TWA
There’s something powerful about a TWA—it’s a statement that you’re comfortable in your own skin and proud of your natural texture. The style works beautifully with every curl pattern because it celebrates texture itself rather than trying to create a specific shape or silhouette. A TWA requires zero styling products if you don’t want them (though a light oil or moisturizer keeps curls shiny), and you can literally wash and go every single day. For many women, a TWA is the gateway to falling in love with their natural texture because they finally see it without any interference.
Caring for and Styling a TWA
Wash your hair regularly with a gentle shampoo and condition generously—short hair dries out faster because there’s less natural oil traveling from your scalp down the hair shaft. A light leave-in conditioner keeps curls moisturized and shiny without weighing them down. You can style a TWA completely product-free for an ultra-natural look, or add a small amount of curl cream or gel for enhanced definition and hold. Maintenance is genuinely simple—just keep the edges clean with regular trims every 3-4 weeks if you want a sharp, intentional shape, or let it grow naturally for a fuller, rounder silhouette. A TWA is perfect if you want to minimize styling time and maximize celebration of your natural texture.
Worth knowing: A TWA shows every detail of your curl pattern, so if you have uneven curl definition or areas of hair loss, this style will highlight those—make sure you’re choosing a TWA for the right reasons and not because you feel like you have to.
7. Braided Fade with Cornrow Design
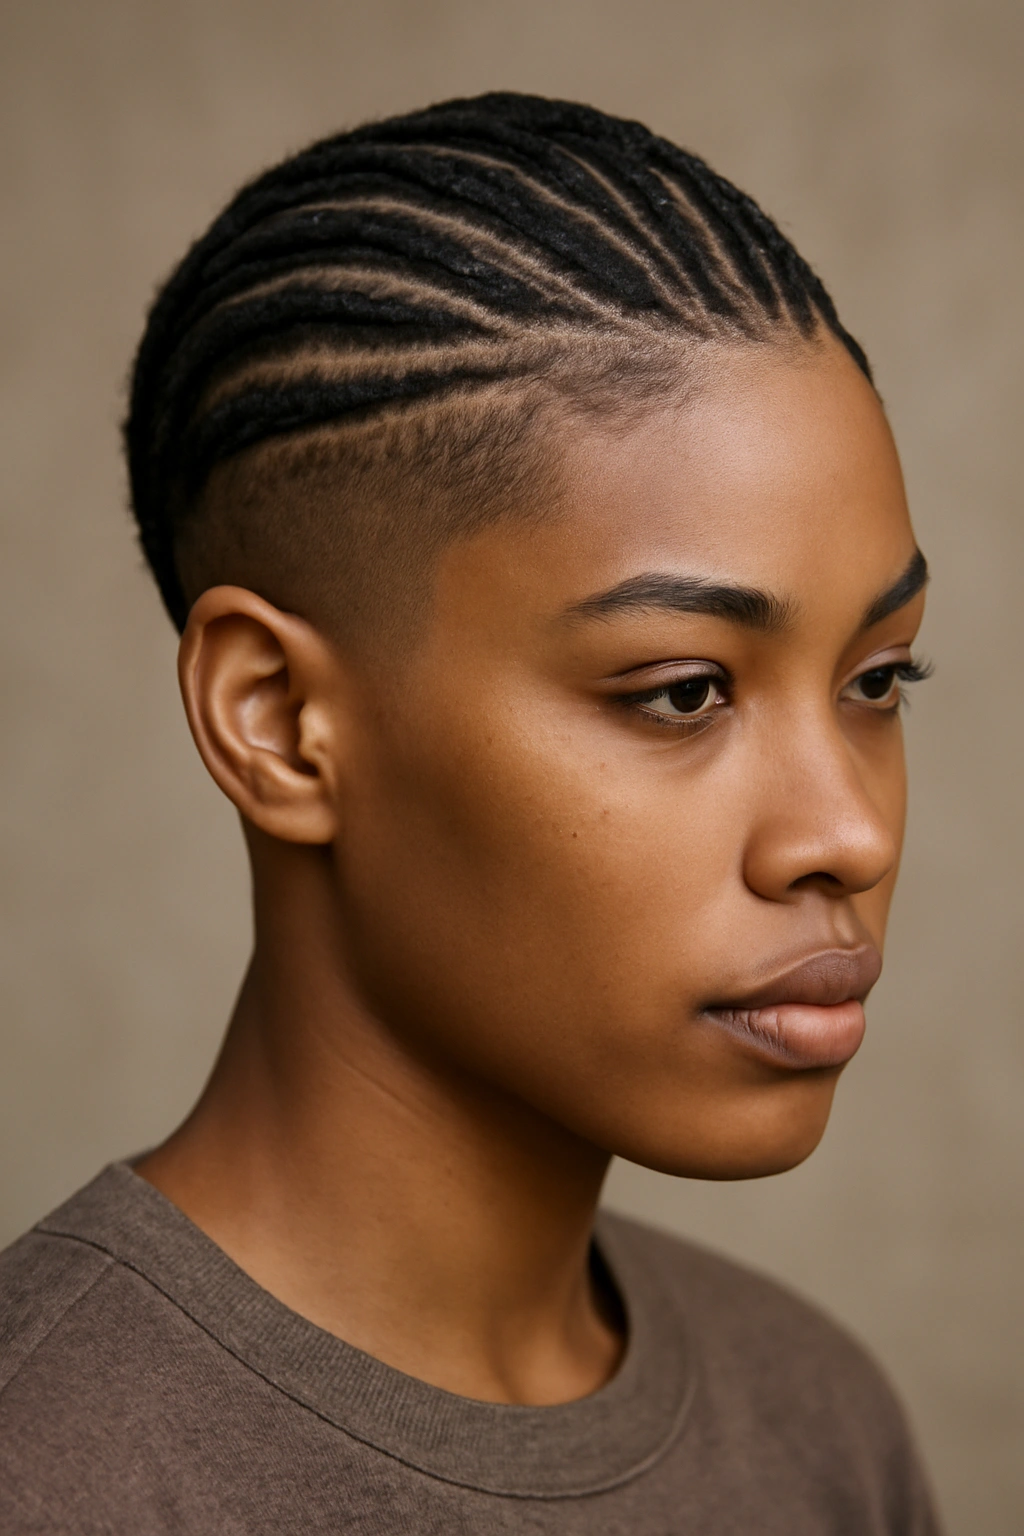
This style combines protective cornrow braids on top with a sharp fade on the sides, creating a modern look that protects your curls while looking intentionally styled and polished. The cornrows can follow any pattern you like—straight back, curved, diagonal, or a custom design—and the fade underneath makes the braided sections pop. This style is particularly genius because it protects your curls while they’re braided, reduces daily manipulation, and still looks completely intentional and beautiful.
Why Braids + Fades Work Together
The contrast between the neat, smooth lines of cornrows and the clean, faded sides creates a modern, high-fashion look that feels both protective and intentional. Cornrows keep your natural curls intact and protected from daily styling damage while the style remains polished and put-together. The fade frames the braids beautifully, and the overall effect is striking without being over-the-top. This style also works across multiple hair densities and curl patterns—tight curls, looser waves, or anywhere in between can rock a braided fade.
Maintaining Your Braided Fade
Have the braids installed by a professional braider who understands how to braid natural hair without causing tension or stress on your edges. Keep the braids clean by washing your scalp gently and allowing water and shampoo to run through the braids rather than scrubbing them. Refresh the fade every 2-3 weeks to keep the sides sharp and prevent overgrowth from blurring your design. The braids themselves typically last 3-5 weeks before they start to look fuzzy and need to be taken down. When you remove the braids, your curls will be beautifully protected and ready for styling.
Pro tip: Before getting braids installed, do a strand test or consult with your braider about tension to make sure the braids won’t cause breakage or traction alopecia—protective styling is only protective if it’s not causing damage.
8. Short Coil Set with Perm Rods
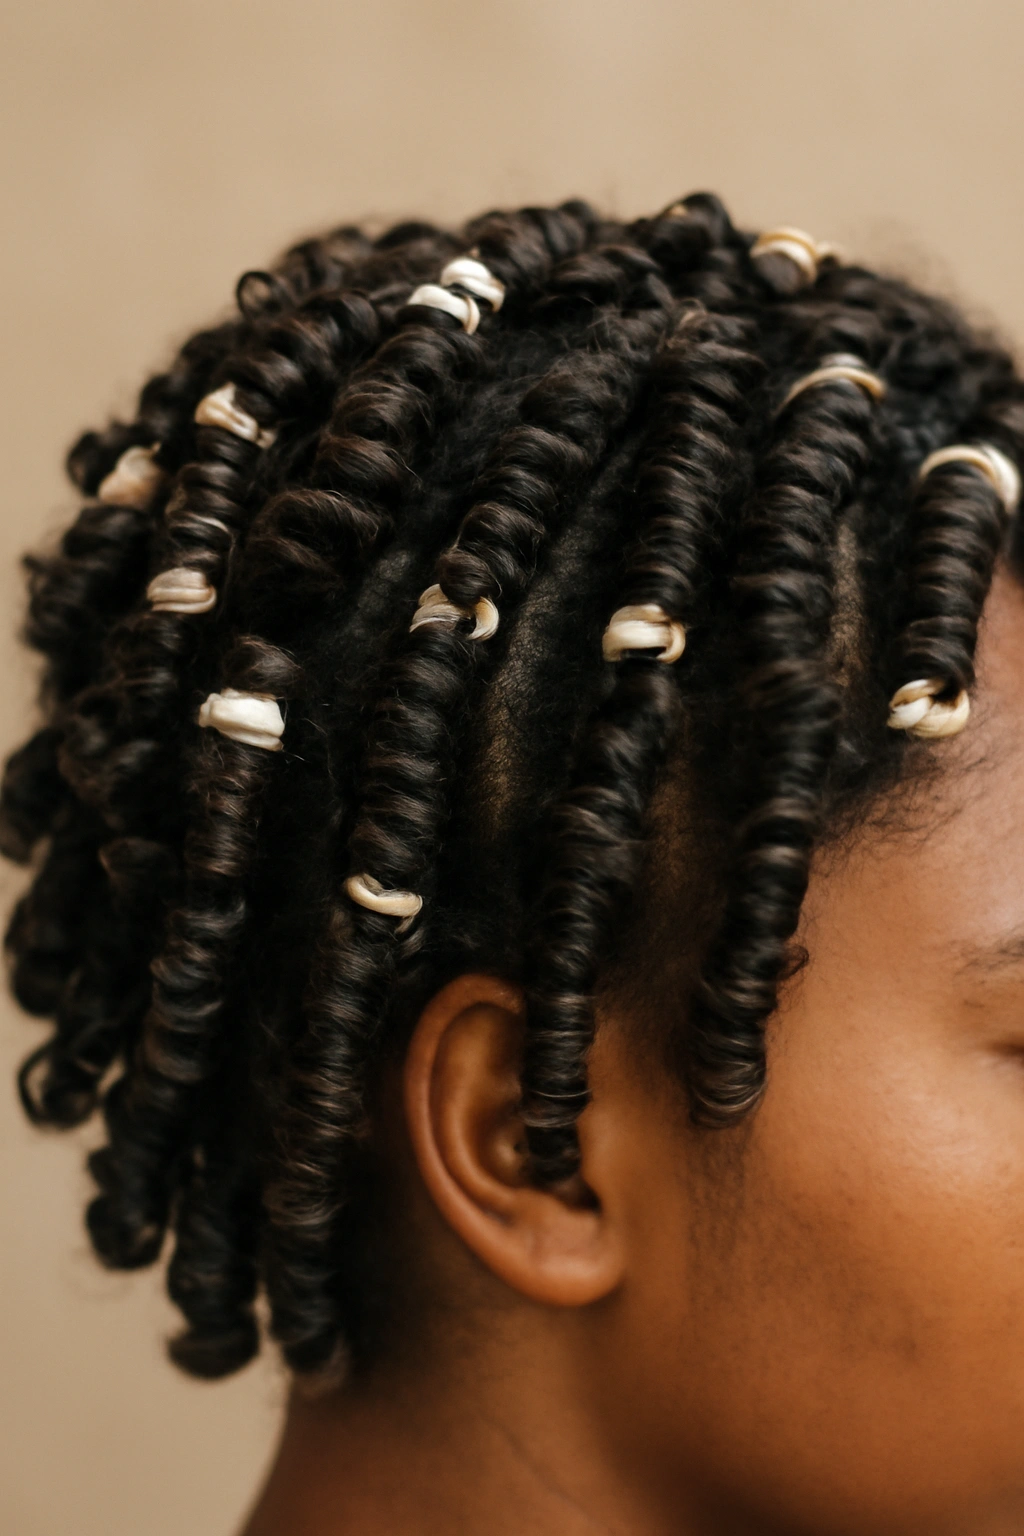
Using perm rods to set your short curls creates incredibly defined, uniform curls with impressive hold and bounce. You apply the perm rods to damp hair, allow the hair to dry completely (either air drying or using a hood dryer), then remove the rods to reveal beautifully spiraled coils. The result is intentional, polished, and lasts several days without reapplication. This styling method works beautifully on short hair because the rods have something to work with but aren’t so long that they become unwieldy or uncomfortable.
The Definition and Hold Perm Rods Deliver
Perm rods force your hair into a specific curl formation as it dries, creating uniform, beautiful spirals that last for days. Even if your natural curl pattern is a bit undefined or frizzy, perm rod sets deliver stunning definition and shape. The curls have impressive hold without feeling hard or crunchy if you use the right products—a lightweight gel or mousse that dries soft works better than heavy creams. The overall effect is polished, intentional, and definitely “dressed up” rather than casual.
How to Create a Perm Rod Set
Start with clean, damp hair and apply a lightweight styling product—a gel or mousse that will hold the curl without creating crunch. Section your hair into manageable pieces, then roll each section onto a perm rod, smoothing the product through as you go. For short hair, smaller rods create tighter curls, while larger rods create looser waves—choose based on the curl definition you want. Allow your hair to air dry completely (this takes 6-12 hours depending on density) or use a hood dryer to speed up the process. Once fully dry, gently remove the rods, unrolling from the end toward the root to prevent breaking your set curls. Use your fingers to separate and style the curls into your desired look. Your perm rod set will last 4-7 days depending on how you sleep and how much moisture you introduce.
Insider note: Perm rod sets look their best when you sleep on a satin or silk pillowcase and don’t touch your hair much—every time you manipulate the curls, you’re disrupting the shape, so minimal handling extends the life of your set.
9. Cut-Out Design with Shaved Patterns
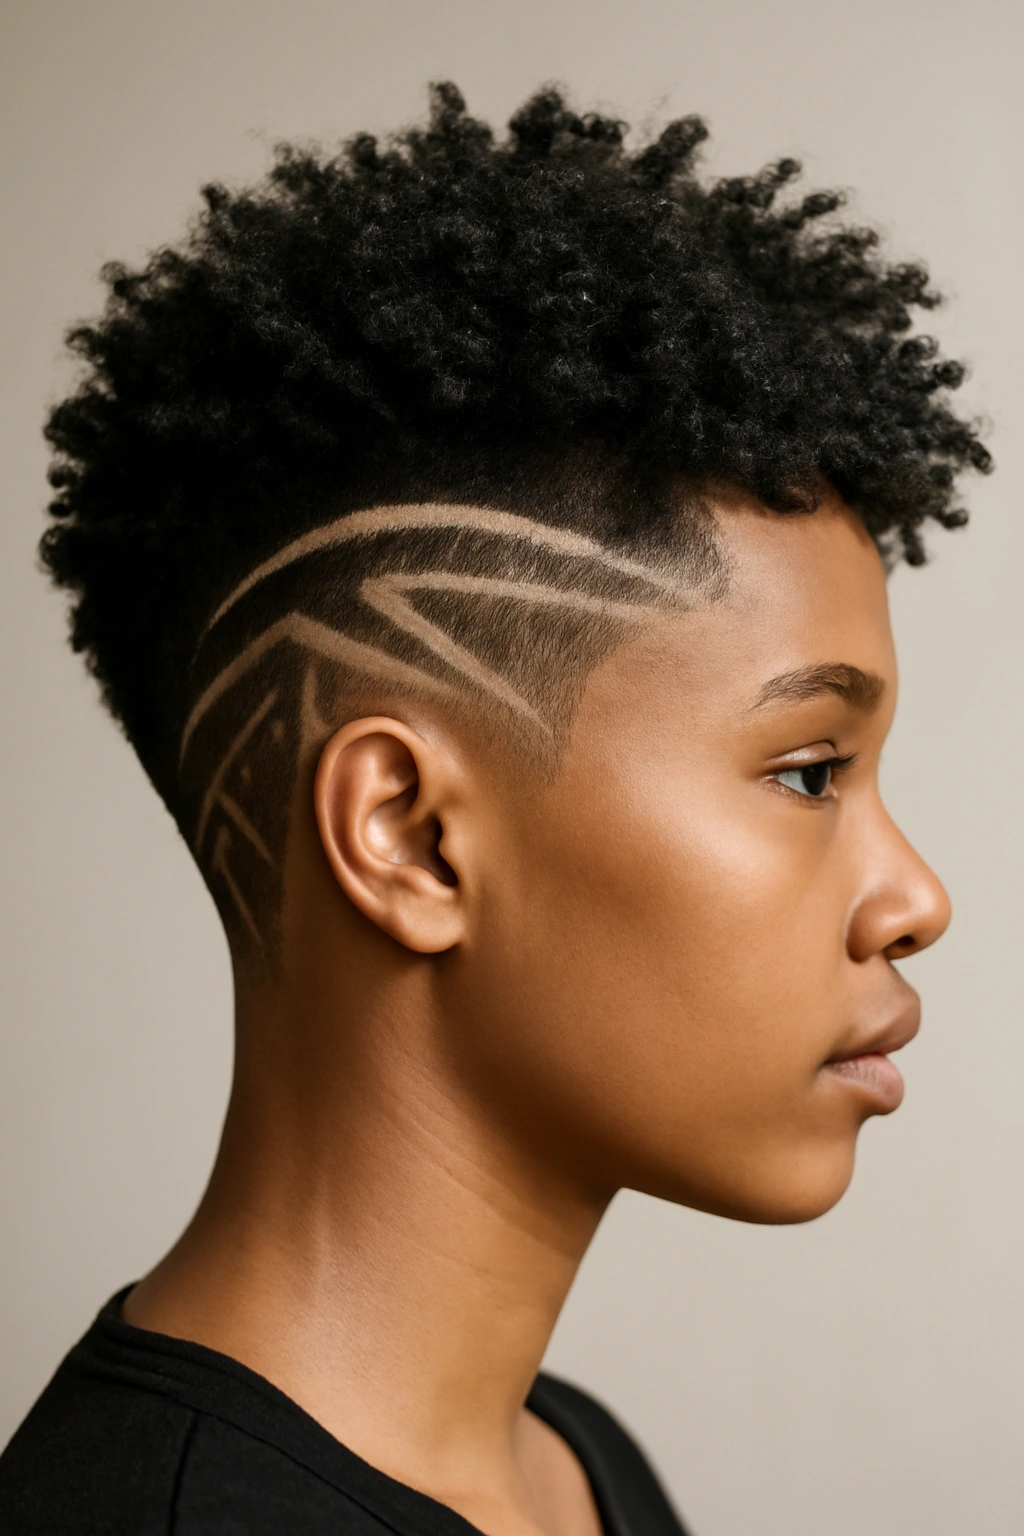
This artistic style features shaved or faded designs on the sides and back of your head—geometric patterns, lines, curves, or custom designs—while keeping length and curls on top. The shaved designs become a form of self-expression and art, and they create stunning contrast with the textured curls above. This is not a style for everyone (it requires confidence and regular maintenance), but for women who want something truly unique and eye-catching, a cut-out design is genuinely unforgettable.
The Artistic and Personal Expression Element
Shaved designs transform your hair into wearable art—you can choose traditional geometric patterns, custom designs that mean something to you, or abstract shapes that complement your style. The contrast between the shaved pattern and the textured curls on top is visually striking and immediately sets you apart. This style announces that you’re not following anyone else’s rules and you’re confident in expressing yourself creatively.
Creating and Maintaining Cut-Out Designs
Work with a barber or stylist experienced in detail work—they’ll use clippers and various guard sizes to create crisp, clean lines and shading. The design should be planned out before clippers touch your head, so bring reference images or work with your barber to design something that suits your head shape and style. The shaved sections require maintenance every 1-2 weeks to keep the lines crisp and the design looking fresh. The curls on top need regular moisturizing and occasional trimming to keep the style looking intentional.
Worth knowing: Cut-out designs are a significant commitment—they look amazing when freshly done but start to look overgrown and fuzzy within a week or two, so you’ll be visiting your barber frequently to keep the design sharp and intentional.
10. Curved Fade with Textured Top Styling
A curved fade features sides that fade down gradually while following the natural curve of your head, creating a soft, rounded silhouette that’s less stark than a straight fade. The top is kept longer, allowing your curls to express themselves fully. The curves and gradual fade create a modern, polished look that’s a bit softer and more feminine than a severe taper or undercut. This style works beautifully on most face shapes and curl patterns, making it one of the most universally flattering short curly styles.
Why Curved Fades Suit Curly Hair
The curved fade removes bulk from the sides while maintaining some length that allows your curls to sit naturally on your head. The gradual fade creates a smooth transition from short to longer rather than an abrupt line, which reads as more intentional and polished. On a round face, the curve of the fade can actually help elongate and flatter your features. On other face shapes, the softness of the curve prevents the look from feeling too harsh or severe.
Styling and Maintaining a Curved Fade
Wash your hair with a hydrating shampoo and condition generously, then apply a curl-defining product to damp hair—a curl cream, gel, or mousse depending on what gives you the definition you want. Air dry or use a diffuser for enhanced volume and curl definition. The curved fade requires maintenance every 3-4 weeks to keep the curves smooth and the fade from getting fuzzy as it grows out. Between cuts, keep your edges clean and moisturized to prevent dryness and breakage.
Pro tip: Ask your stylist to use a curved blade or technique when creating your fade—some stylists default to straight fades, so specify that you want the curve to follow your head shape naturally for the most flattering result.
11. Spiky Curl Definition Look with Point-Cut Texture
This edgy style features point-cutting or texturizing techniques that create individual curl definition and a spiky, dimensional texture throughout your hair. Rather than a blunt, even cut, point-cutting creates peaks and valleys that make each curl visible and defined. The result is a style with impressive texture, dimension, and movement—curls that genuinely stand out rather than blending together. This works best on women with well-defined, springy curls that benefit from individual curl separation.
How Point-Cutting Enhances Curl Definition
Point-cutting uses vertical scissors work to remove bulk and create separation between curl clusters, allowing each curl to stand on its own rather than matting together. This technique creates a textured, spiky appearance that looks intentional and styled without requiring heavy product or excessive manipulation. The varying lengths created by point-cutting also catch light differently, creating dimension and visual interest that a blunt cut can’t deliver.
Styling a Point-Cut for Maximum Definition
Apply a curl-defining product to damp hair—a lightweight gel or cream that enhances definition without weighing curls down. Scrunch the product into your curls, encouraging each curl to form and separate. Allow air drying or use a diffuser, scrunching occasionally as your hair dries to encourage curl formation. Once dry, use your fingers (never a brush) to separate individual curls and encourage the spiky, dimensional texture. A light hand with product and minimal touching creates the best results—you want the curls to look effortlessly defined rather than heavily styled.
Insider note: This style requires a stylist who truly understands point-cutting and curl texture—a stylist unfamiliar with these techniques can easily create a choppy, uneven mess instead of the beautiful dimension point-cutting should deliver, so ask for references or examples before committing.
12. Fade with Sleek, Defined Crown Styling
This polished style pairs a sharp fade on the sides with a sleek, intentionally styled crown where your curls are smoothed down and shaped into a defined silhouette. Rather than letting your curls spring up naturally, this approach uses product and technique to encourage a specific shape and direction. The result is a look that’s undeniably polished, intentional, and perfect for anyone who wants their short curls to look manicured and sophisticated.
The Polished, Intentional Aesthetic
By using product and styling technique to shape your curls into a specific silhouette—perhaps smoothed forward, curved to one side, or swept back—you create a look that reads as intentional and curated. This approach works beautifully on women who love the aesthetic of styled hair and don’t mind spending a few minutes each morning on definition and shaping. The fade underneath makes the shaped crown look even more intentional and polished.
How to Achieve and Maintain Sleek Crown Styling
After washing, apply a styling product with hold—a gel, pomade, or mousse depending on your hair type and the hold you need. While your hair is damp, use your fingers or a wide-tooth comb to shape your curls in the direction you want them to go. For a sleek look, smooth the product through using downward or directional strokes rather than scrunching upward. Allow air drying while maintaining the shape with occasional finger guidance, or use a diffuser on low speed if you need to speed up the process. Once dry, your curls will hold the shape you created. Refresh between washes by lightly spritzing with water and reapplying a small amount of product, then reshaping.
Worth knowing: Sleek crown styling requires daily attention if you want it to look intentional and polished—if you prefer truly wash-and-go styling, one of the other options in this guide might suit you better than this approach.
Final Thoughts
Your short curls deserve a hairstyle that celebrates them rather than fighting against them. The styles in this guide work because they acknowledge how natural curls actually behave—the shrinkage, the texture, the volume potential—and use those characteristics to create genuinely beautiful results. The best short curly hairstyle is the one that fits your daily routine, complements your face shape, and makes you feel confident and like yourself.
Finding a stylist who understands natural hair texture is genuinely one of the most important investments you can make. A skilled stylist trained in cutting natural hair can create cuts that work with your specific curl pattern and show you how to style your hair in ways that enhance rather than diminish your natural texture. It’s worth taking time to research stylists, ask for recommendations from friends with similar hair, and even travel if necessary to find someone who gets it.
Remember that short curly hair is versatile enough for you to change your style regularly without damage—you can wear your hair naturally textured one week, get cornrows the next, and try a completely different cut a month later. Your natural curls are strong, beautiful, and worth celebrating in whatever style makes you feel like your best self.