The side part has become a defining hairstyle choice that works beautifully across hair types, face shapes, and personal styling preferences. What makes it particularly appealing is its versatility — it can be dressed up for special occasions, worn casually for everyday life, or adapted to nearly any length or texture combination. Unlike centered parts that create symmetry and formality, the side part introduces an element of softness and movement that feels both polished and approachable.
The appeal of the side part goes deeper than simple aesthetics. When you shift the parting line to one side, you naturally create dimension and the illusion of added volume. The asymmetry flatters most face shapes because it draws the eye along curves rather than emphasizing width. Stylists have noticed that clients gravitating toward this look often describe feeling more confident and modern compared to their previous styling — which tells you something important about how a simple parting choice can shift your entire appearance.
What’s particularly interesting is how the side part works as a foundation for countless variations. You can keep it minimalist and clean, or layer it with texture, color, and styling techniques that completely transform the vibe. Whether you’re working with fine hair that needs strategic cutting, thick waves that need taming, or straight hair that needs personality, there’s a side part approach that’ll serve you. Let’s explore the specific styles that have become go-to choices for people seeking that perfect balance of modern and flattering.
1. Side Part Bob With Face-Framing Layers
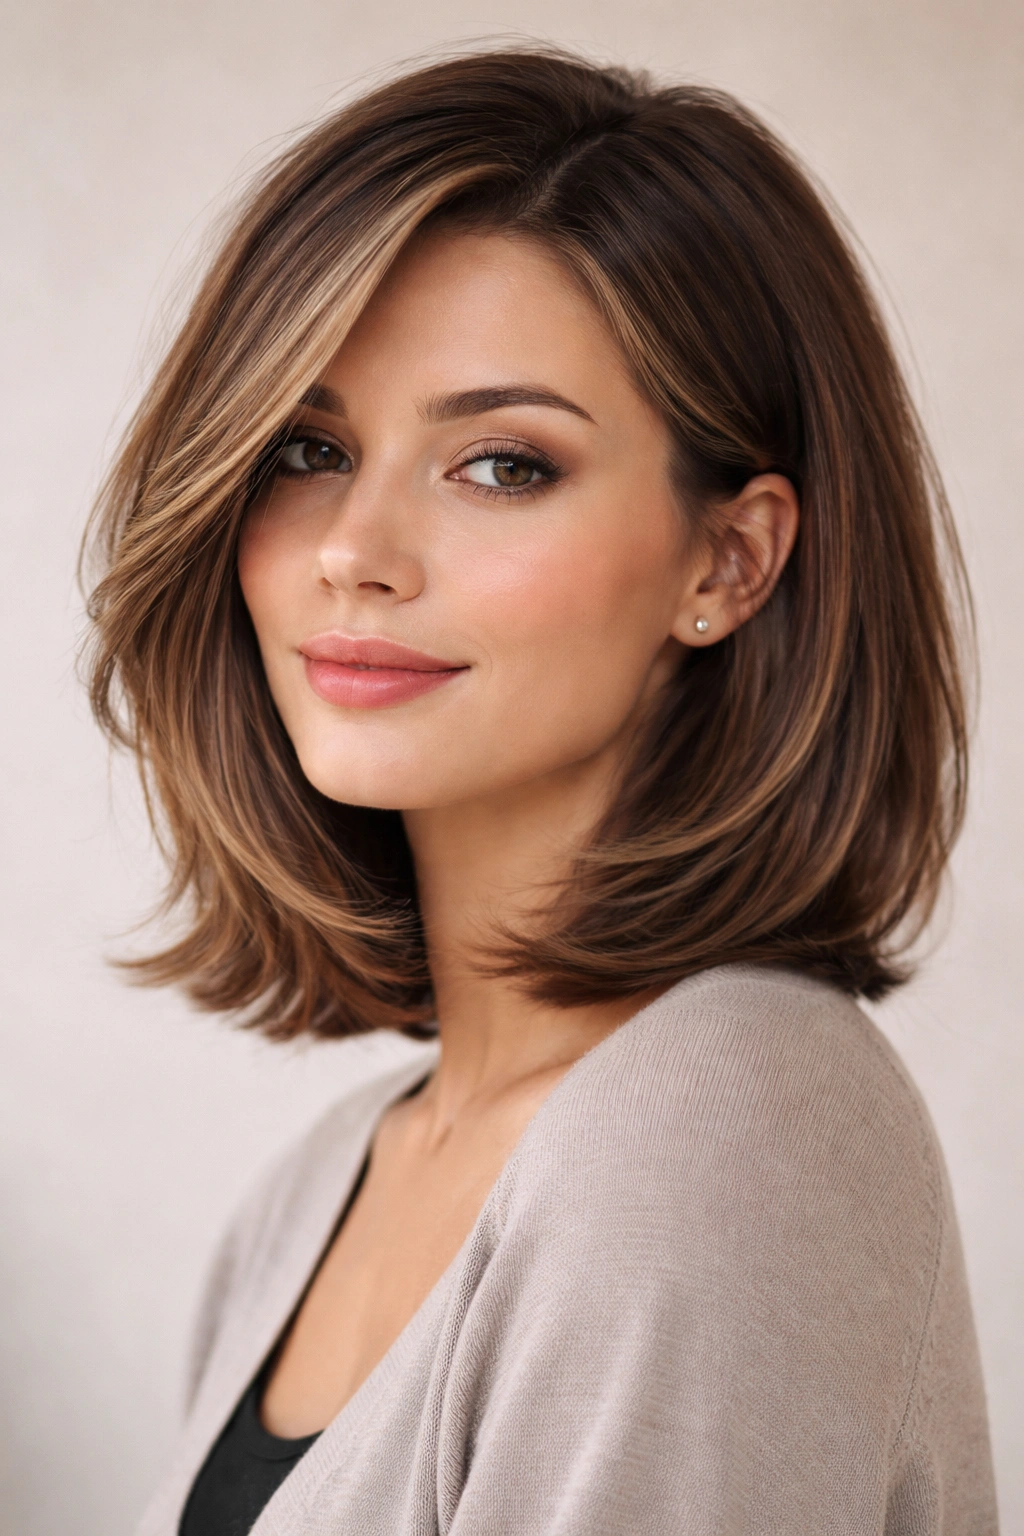
A side part bob with face-framing layers combines the clean simplicity of a bob with movement and dimension that soften the face. The layers around the front create a naturally flattering shape that works particularly well for round or square face shapes because the shorter pieces at the face draw the eye forward and downward rather than across. The bob itself typically lands somewhere between the chin and shoulders, giving you room to work with styling options without committing to extremely long hair.
Why This Cut Transforms Your Look
The face-framing layers are what elevate a standard bob from basic to intentional. These shorter pieces around the cheekbones and temples catch light differently than the main body of hair, creating the illusion of texture and movement even on naturally straight hair. The side part amplifies this effect by directing attention toward whichever side you part, making that frame even more prominent. You get the clean, polished aesthetic of a bob without it feeling too structured or severe.
How to Style It for Maximum Impact
- Blow-dry with a round brush, directing hair away from the side part and creating soft waves or curves throughout
- Use a texturizing spray or sea salt spray on damp hair before blow-drying to enhance natural wave patterns
- Tuck the longer side behind your ear for a completely different daytime look, or pull both sides back with a delicate clip for evening
- Apply smoothing serum to the ends to prevent flipping outward, which can happen with shorter layers
- Refresh waves on second-day hair with a curling wand or flat iron, working in 1-inch sections for consistency
Pro tip: Ask your stylist to cut the layers slightly shorter on the side you’re parting toward — this creates more movement and prevents that side from lying flat against your head.
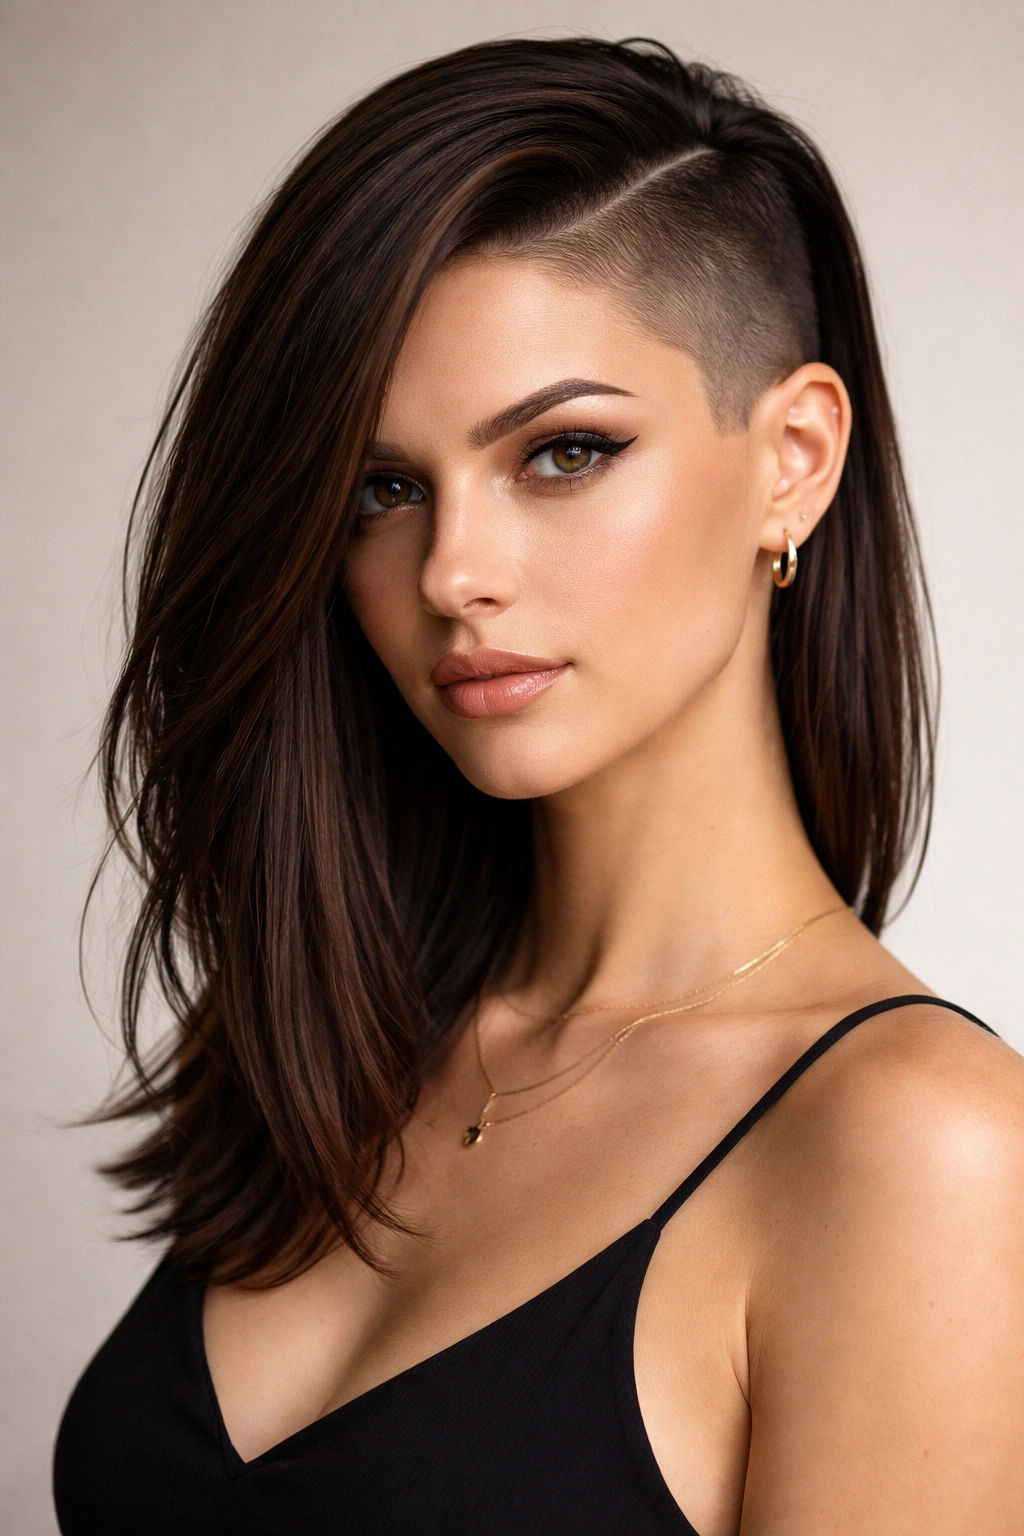
2. Side Part With Hidden Undercut Design
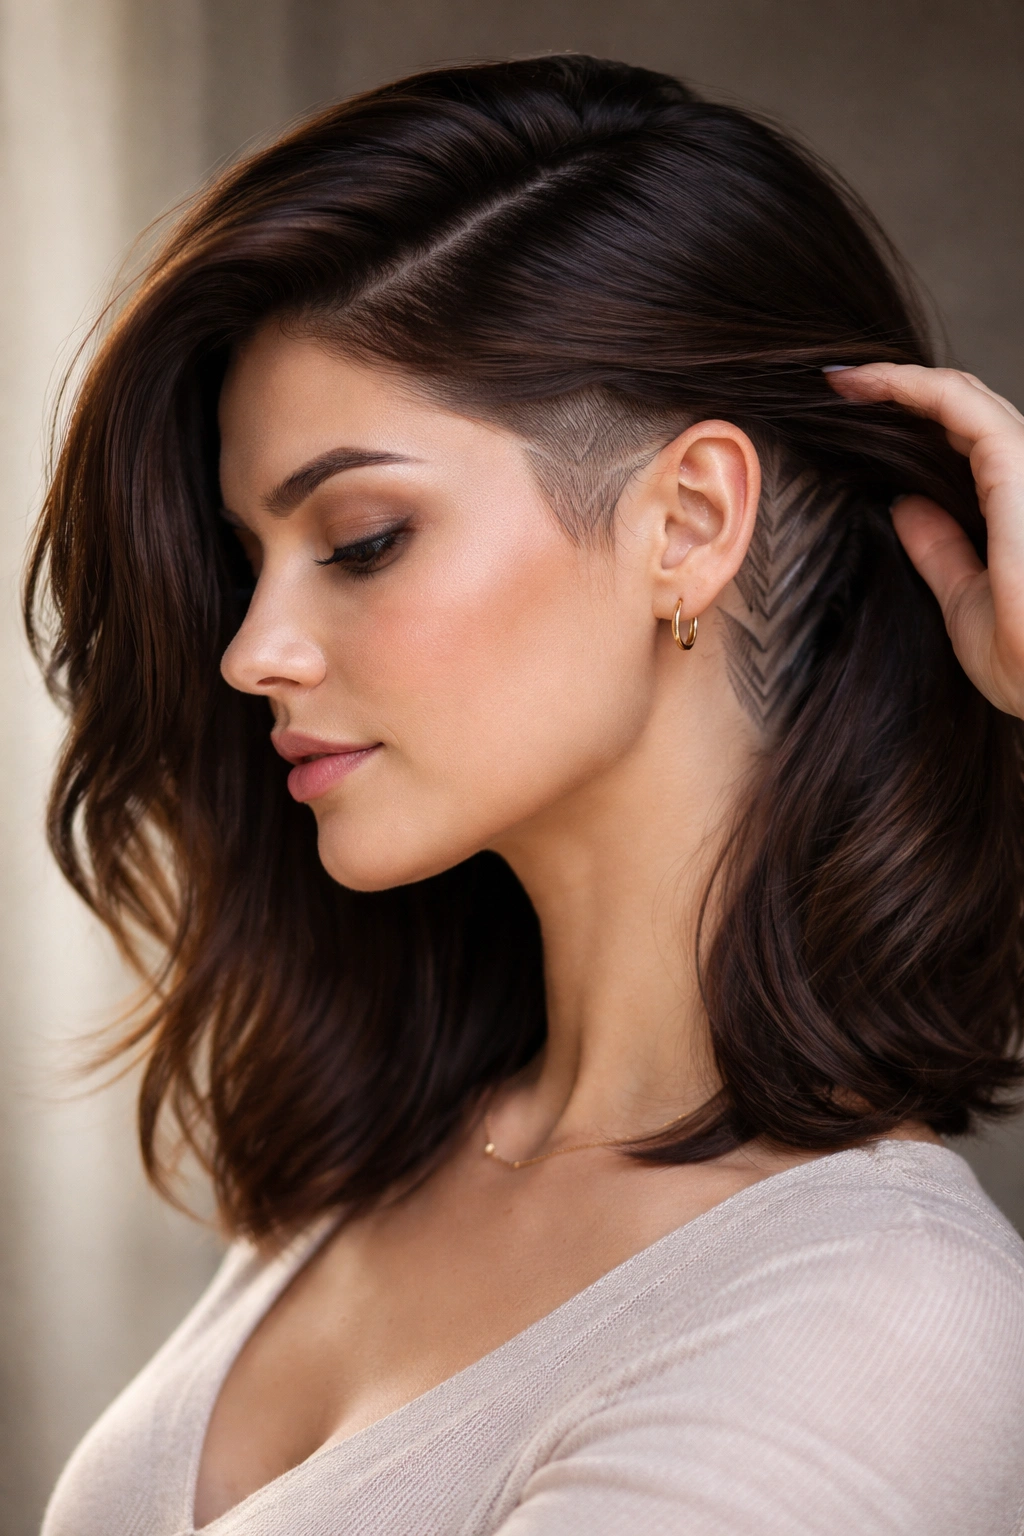
An undercut hidden beneath a side part gives you two completely different looks depending on how you style your hair. From the front and sides, you see a full, voluminous hairstyle that could be shoulder-length or longer. But when you pull your hair back, reveal the design, or wear it slicked to the opposite side, you expose a buzzed or closely-cropped undercut with optional pattern work. This is the ultimate style for people who want dramatic transformation options without committing to short hair full-time.
What Makes This Edgy Yet Wearable
The genius of a hidden undercut is that it feels daring and artistic without requiring you to maintain a bold look in professional or conservative environments. You control when it shows and when it stays hidden, which means you can wear it multiple ways depending on your mood, the occasion, or simply what works with your outfit that day. The side part naturally skims over the undercut side, keeping it completely concealed if you want. Many people who go this route report it feels like having a secret that only they and their stylist know about.
Design Options to Explore
- Subtle undercut with geometric lines or patterns that only show when hair is pulled back
- Faded undercut that gradually blends into longer hair, creating dimension even when hidden
- Textured crop on top combined with a clean undercut for tousled, piece-y styling
- Shaved designs like lightning bolts, stars, or minimalist line work for artistic expression
- Contrast color fade, where the undercut is dyed a different shade than your main length
Worth knowing: Undercuts require touch-ups every 2-4 weeks to maintain clean lines, so factor that into your styling commitment before you take the plunge.
3. Sleek Side Part With Blunt Bangs
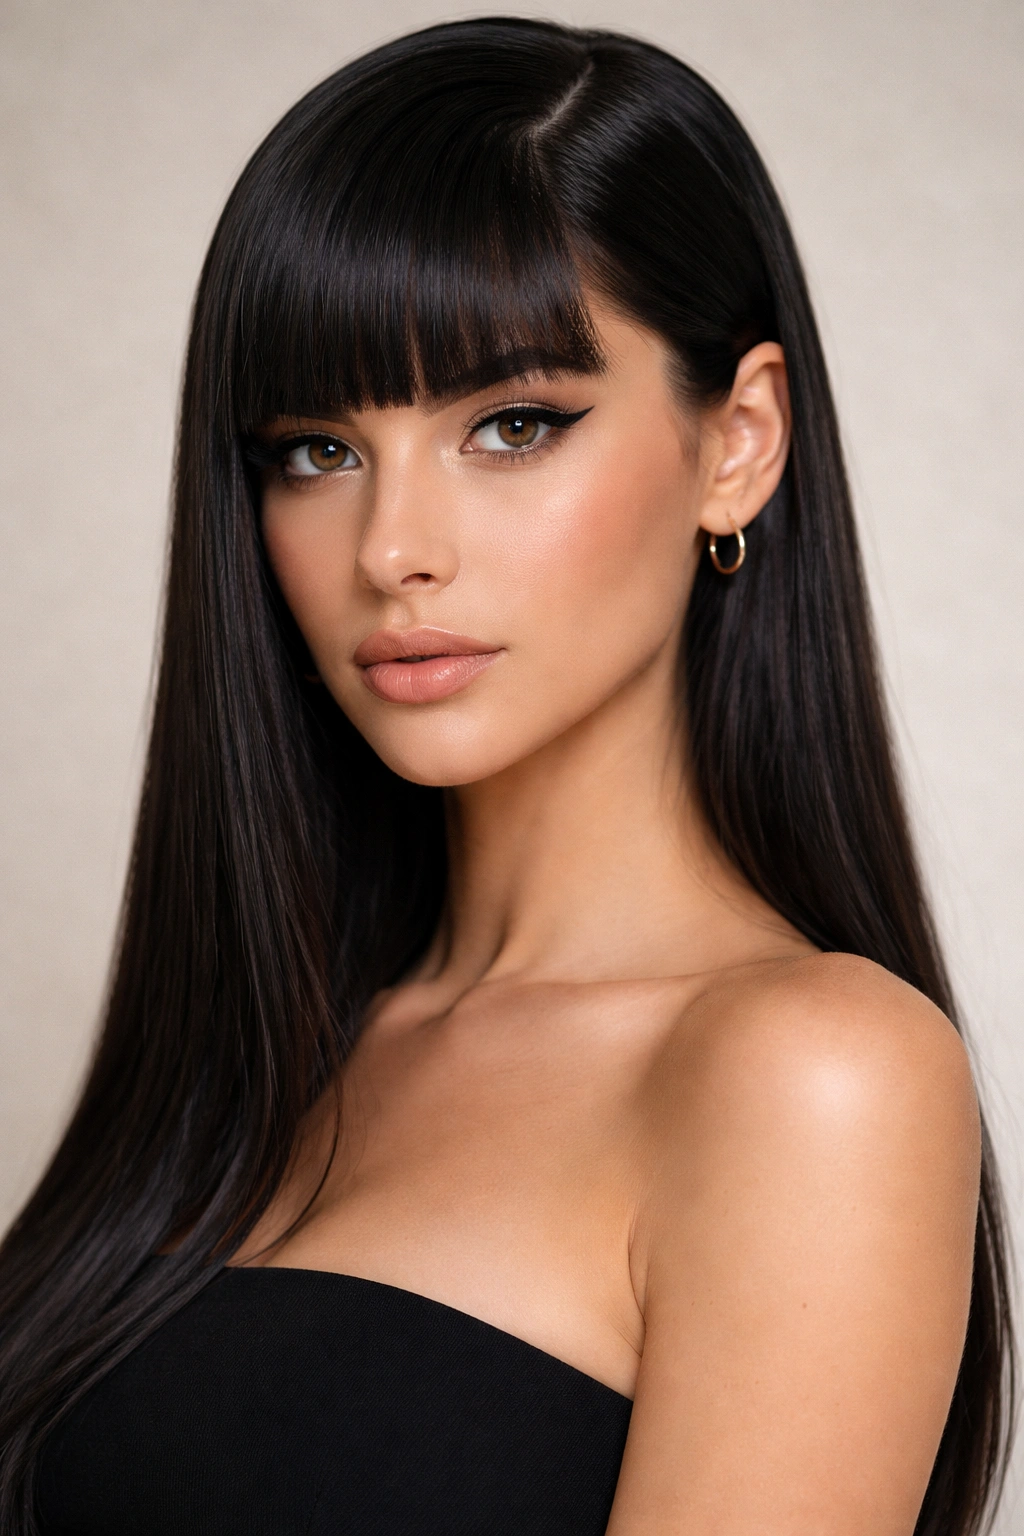
Pairing a side part with blunt bangs creates one of the most striking, fashion-forward looks available. The bangs — cut straight across at approximately eyebrow length — draw all focus to your eyes and face. The side part adds sophistication and prevents the whole look from feeling too severe. This combination has a distinctly editorial, cool-girl quality that photographs beautifully and works especially well for people with smaller or more delicate facial features.
The Science Behind Why This Works
Blunt bangs create a horizontal line that’s flattering to longer face shapes, while the side part introduces asymmetry that prevents the look from feeling rigid or costume-like. Together, they frame your face in a way that feels intentional and modern rather than dated. The key is that your side part and bangs need to work as a coordinated unit — the bangs should follow the direction of the side part slightly, creating a unified line across your forehead that leads toward your side-parted hair.
Styling Techniques for Flawless Results
- Blow-dry bangs straight down and smooth, using a flat brush or paddle brush to direct them forward
- For added polish, use a flat iron to create a subtle inward-turning curve at the ends of your bangs
- Keep bangs soft and separated rather than clumped together — use your fingers or a comb to create definition
- Style the rest of your hair with either sleek straightness (for a sharp look) or soft waves (for a balanced vibe)
- On second-day hair, use dry shampoo and a straightening iron to refresh bangs without full re-washing
Pro tip: Blunt bangs require regular trims — every 4-6 weeks — to maintain their clean edge as they grow out. Ask your stylist for frequent bang-only appointments rather than waiting for full haircut appointments.
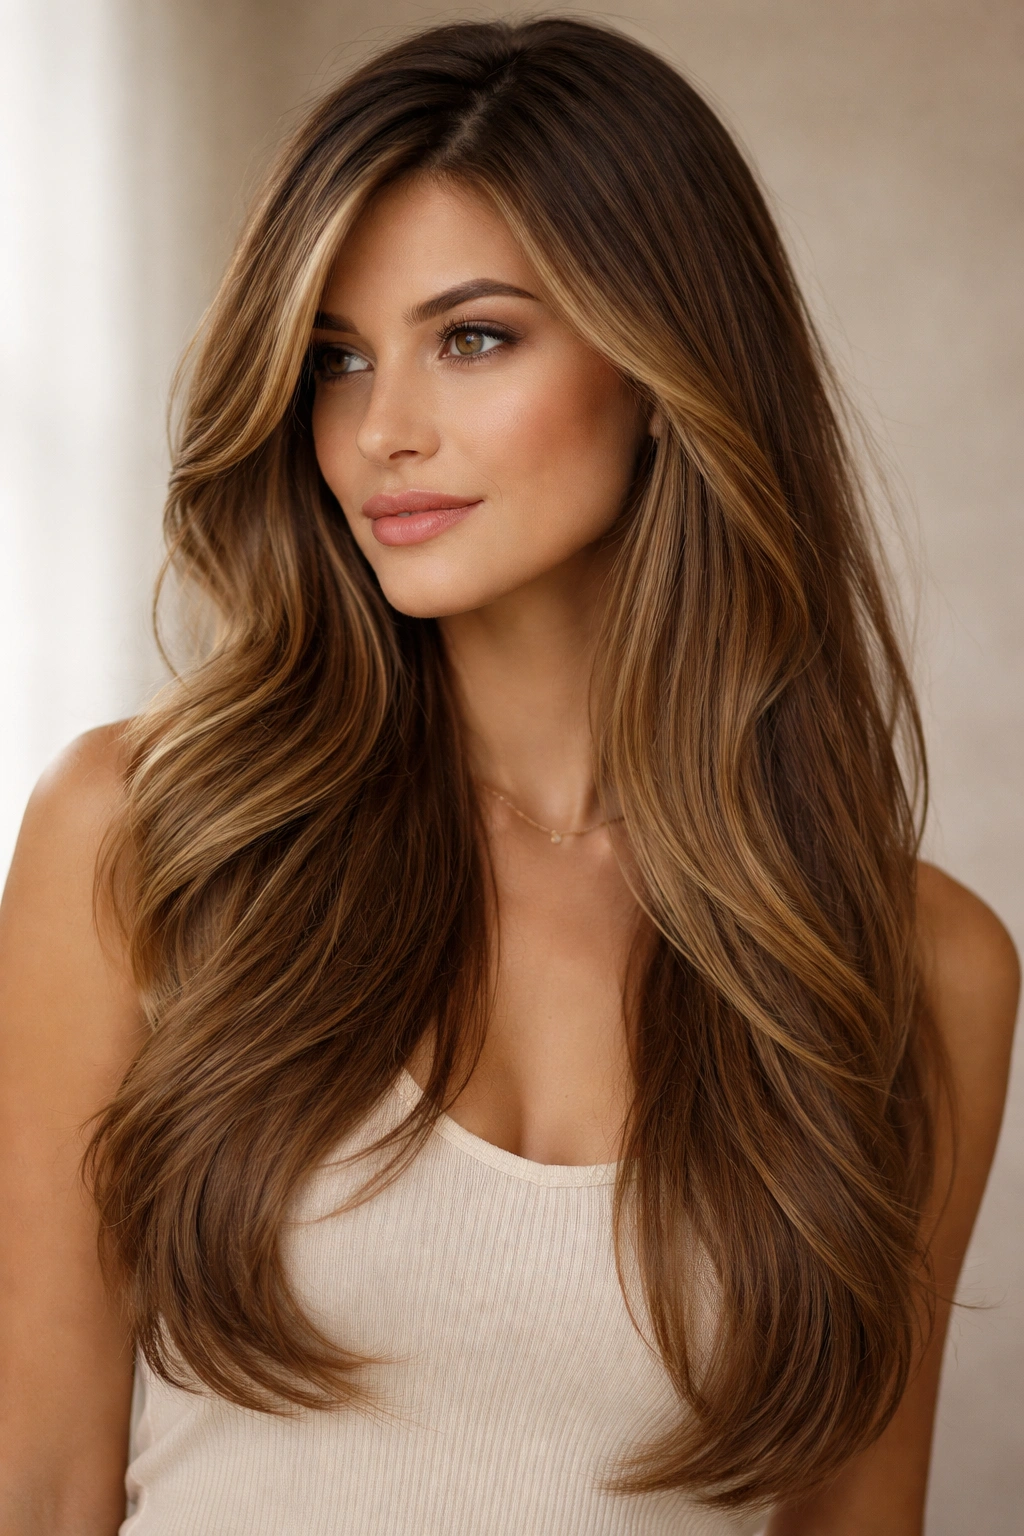
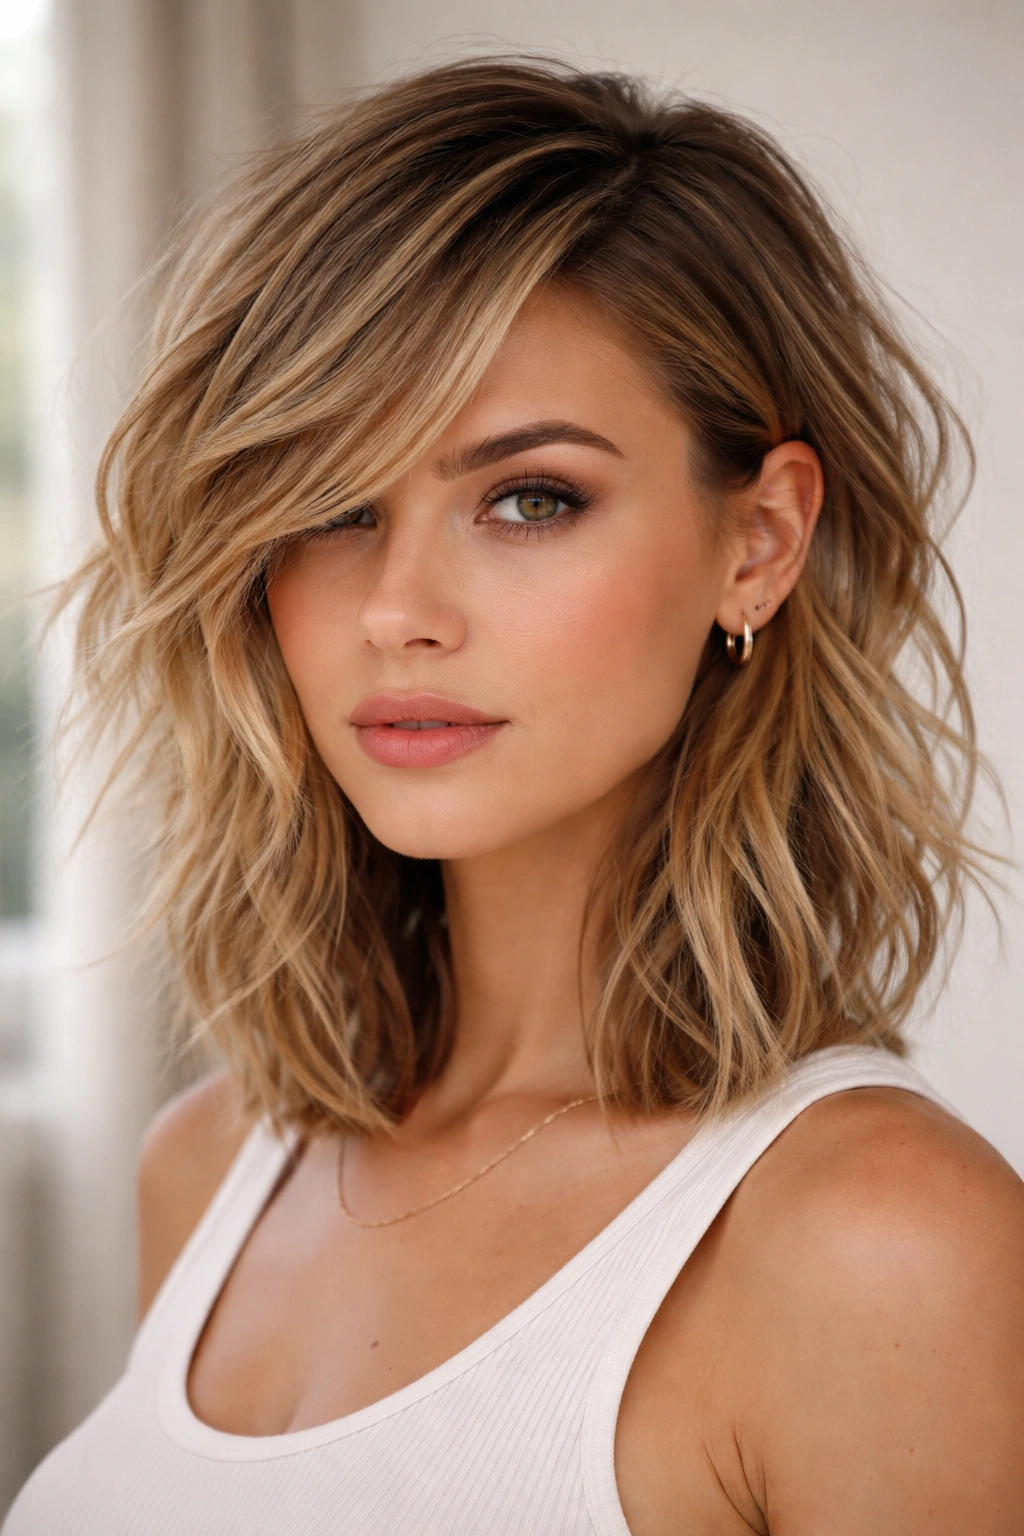
4. Textured Side Part With Waves
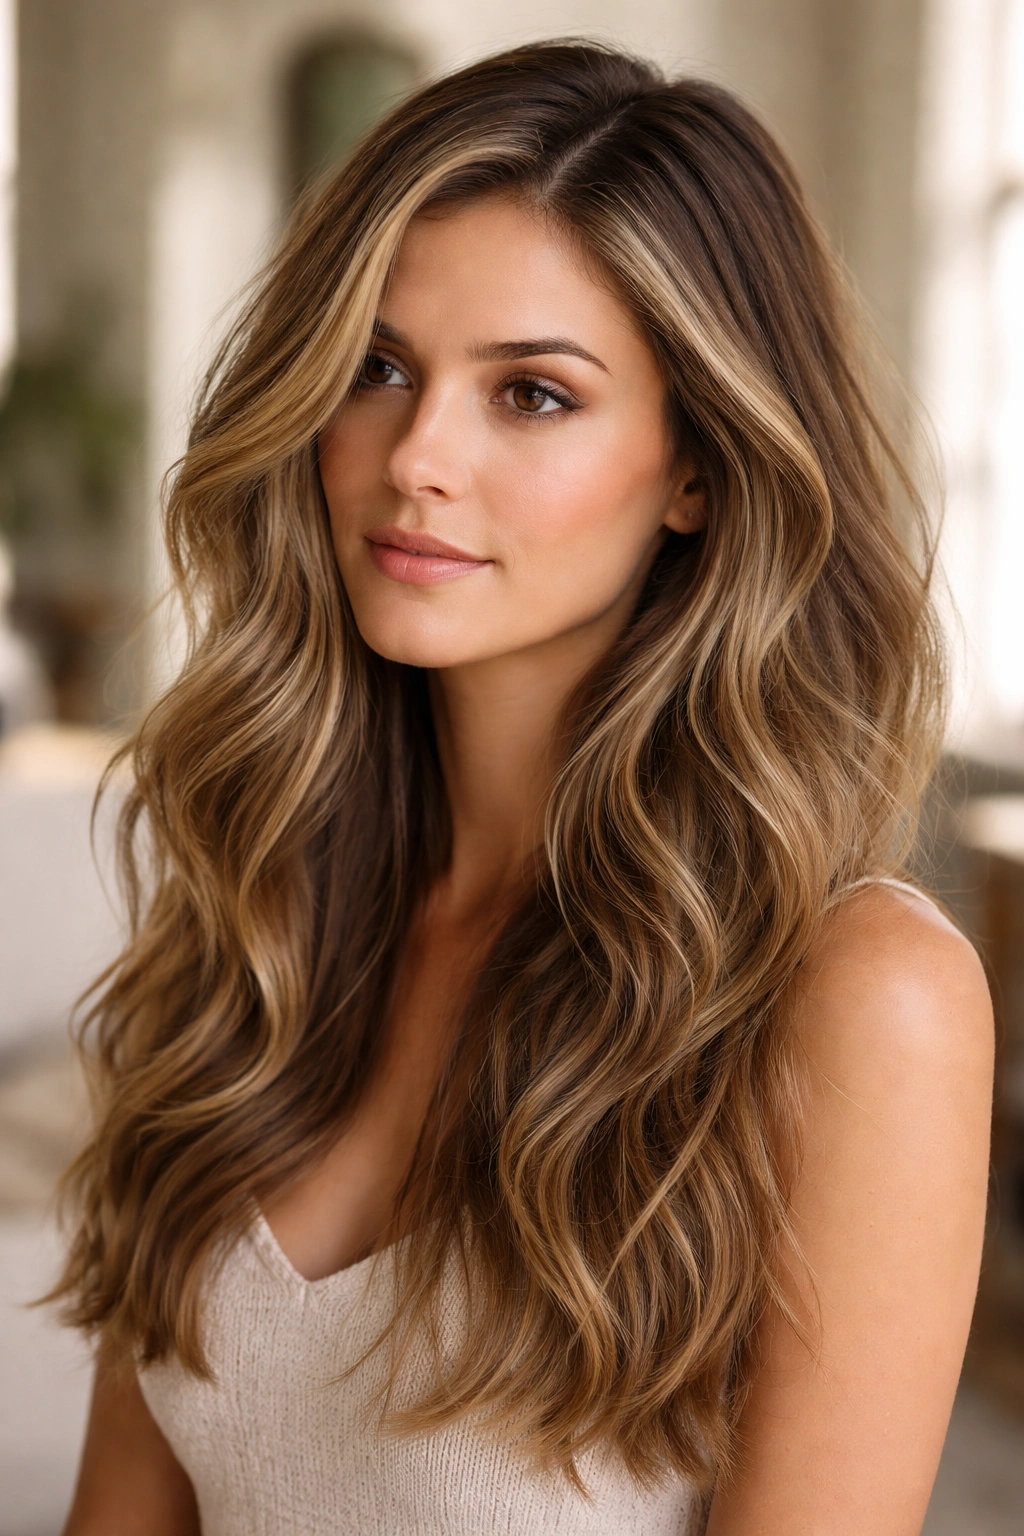
A side part layered with face-framing pieces and styled into soft, lived-in waves creates a romantically undone aesthetic that feels effortlessly put-together. The waves catch the side part, creating dimension and movement throughout your hair. This is one of the most forgiving styles to wear because imperfection actually enhances the look — the goal is tousled and relaxed, not smooth and perfect. It works beautifully on hair that’s at least shoulder-length and tends to suit people who prefer styling flexibility and natural-looking texture.
Why Texture Beats Smoothness Here
When your side part is combined with waves and texture rather than sleekness, the whole effect feels current and approachable rather than stuffy or overly formal. The side part creates structure while the waves add movement — you get the best of both worlds. The face-framing layers become even more interesting when they’re textured because light plays through them differently, creating shadows and highlights that add depth to your entire face. This is the style for people who want a put-together look without appearing to have tried too hard.
Creating and Maintaining Beach-Textured Waves
- Apply texturizing mousse or sea salt spray to damp hair before blow-drying
- Blow-dry roughly with your fingers, avoiding a brush (this creates less defined waves and more broken-up texture)
- Once dry, create waves with a curling iron or wand, working in sections and rotating the barrel to create alternating curves
- Use your fingers to separate and break up the waves, preventing them from looking too structured
- Lock in the texture with a light hairspray that won’t weigh waves down
- On second-day hair, refresh with a curling wand on select sections and re-apply texturizing spray
Insider note: The best waves for this style are the kind that look like they happened naturally — slightly imperfect, with some sections wavier than others. This actually requires more styling skill than creating perfectly uniform waves, so don’t underestimate the work involved.
5. Long Side Part With Curtain Layers
Curtain layers — shorter pieces that frame the face on both sides while maintaining longer length in the back — become particularly striking when paired with a side part. The shorter front sections create that coveted face-framing effect, while the longer back allows you to keep length and movement. When you style this cut, the front layers separate naturally, creating the appearance of curtains opening around your face. The side part intensifies this effect by directing one curtain layer toward your face and sweeping the other side back.
Understanding Curtain Layer Placement
Curtain layers aren’t just shorter random pieces — they’re strategically cut to follow your face shape and create balance. If you have a rounder face, the layers should be cut to approximately cheekbone length and angled slightly inward. For longer faces, longer layers (closer to jawline length) work better. The side part amplifies the framing effect because one side of your curtain layers moves in the direction of the part while the other side creates a fuller frame on the opposite side. This asymmetry is what makes the style feel contemporary and flattering.
Blow-Drying for Maximum Dimension
- Apply volumizing mousse to roots before blow-drying to give your layers lift and separation
- Blow-dry roots upward and away from your scalp using your fingers or a paddle brush
- Blow-dry the curtain layers forward and downward, directing them to fall on either side of your face
- Use a round brush to create soft waves or curves at the ends of your layers
- Finish with a light hairspray that maintains movement without stiffness
- On days when you want a different look, blow-dry your side part in the opposite direction for a completely refreshed appearance
Worth knowing: This style looks its absolute best with regular trims every 8-10 weeks. Curtain layers lose their shape quickly once they start growing out, so maintenance is essential for keeping that intentional, framing effect.
6. Side Part With Volume at the Crown
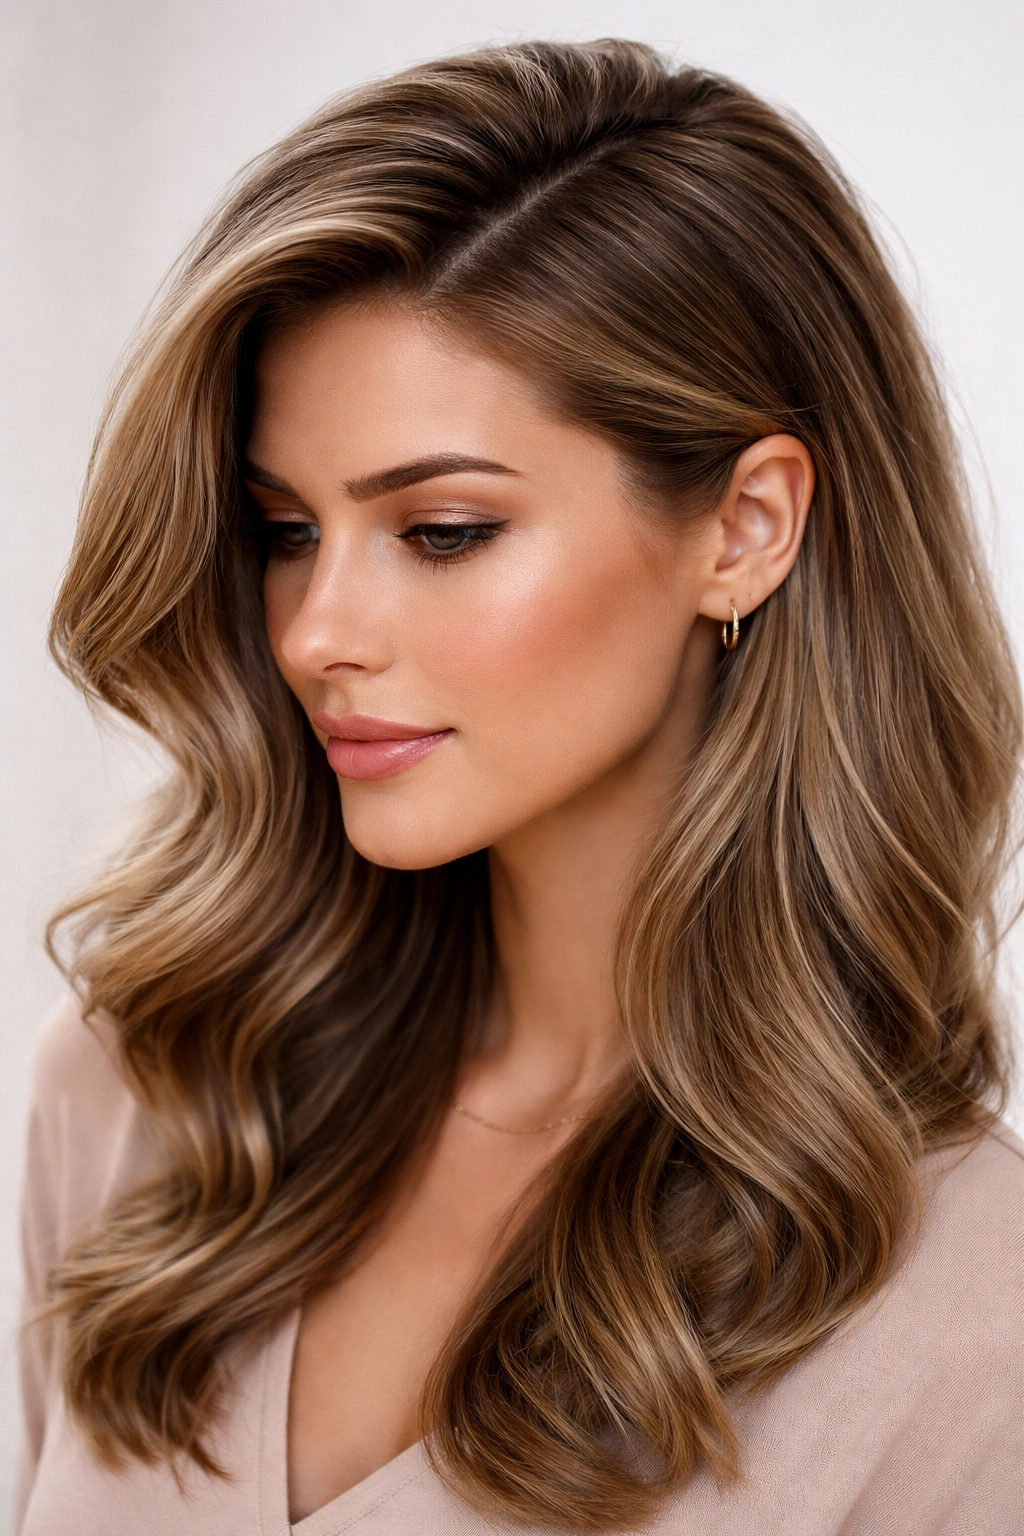
Creating strategic volume at the crown while maintaining a side part gives you height and dimension that’s flattering to nearly every face shape and head size. This approach involves either cutting shorter layers at the crown (which naturally create volume) or blow-drying specifically to boost roots. The side part works because it creates asymmetry that makes the volume feel intentional rather than accidental. This is an especially smart choice for people with fine hair, thin hair, or anyone who feels their hair lies flat no matter what they do.
Cutting Techniques for Crown Volume
Stylists create crown volume by cutting shorter layers specifically in the crown area, usually between 2-4 inches shorter than your main length. These shorter pieces lift naturally when you blow-dry, creating the illusion of much more hair than you actually have. The graduated length from crown to ends means that when you flip your head upside down during blow-drying, those shorter pieces rise up and stay lifted. When you flip back upright, that lift persists because the shorter pieces are literally lighter and have less weight pulling them down.
Blow-Drying for Lasting Crown Lift
- Apply volumizing mousse or root-lifting spray to damp hair, focusing on the crown area
- Blow-dry your roots using a concentrator nozzle, directing heat upward and slightly backward
- Use your fingers to gently lift roots away from your scalp while blow-drying (this trains hair to grow with more natural lift)
- Once your crown is mostly dry, flip your head over and continue blow-drying the underside of your roots
- Flip back upright and use a round brush to smooth the surface layer while maintaining the lifted roots
- Finish with a texturizing spray to add grip and prevent your hair from falling flat
Pro tip: Sleep on a silk pillowcase to preserve your blow-dried volume through the night. Cotton creates friction that breaks down your style, while silk allows your hair to slide without disruption.
7. Asymmetrical Side Part Cut
An asymmetrical cut taken to the extreme creates a dramatically shorter side paired with much longer hair on the other side, all unified by a bold side part. This isn’t subtle — it’s a statement style that says you’re confident and fashion-forward. One side might be buzzed or cut very short while the other side flows to shoulder-length or longer. The side part sits firmly on the short side, and as you move through the cut, it gradually becomes longer, creating a diagonal line of length across your head. This style requires a skilled stylist but creates an unforgettable look.
Who Should Consider This Bold Choice
Asymmetrical cuts work best for people who have strong features, don’t mind frequent maintenance, and genuinely love the aesthetic rather than viewing it as a trend to try. The style demands confidence because it’s intentionally unbalanced. It suits people with oval or oblong face shapes better than round shapes (because it creates height rather than width). This is also a style that photographs exceptionally well, so if you love taking photos or have a strong social media presence, the dramatic impact might appeal to you.
Styling and Maintenance Reality
- The short side requires regular trims (every 3-4 weeks) to maintain its precise length and shape
- The longer side can be styled in waves, straight, or textured depending on your mood and the occasion
- On formal occasions, you can slick both sides back to show off the cut’s structure, or leave the longer side down for softness
- During your grow-out phase (if you ever decide to move away from this style), styling becomes increasingly challenging, so factor that in
- This cut works better on straight to wavy hair — very curly hair can obscure the intentional length difference
Worth knowing: This is a commitment style. If you love it, great — but if you’re uncertain, start with a less extreme asymmetrical cut (maybe a 2-3 inch difference rather than a 6-8 inch difference) before going all-in.
8. Side Part With Braided Details
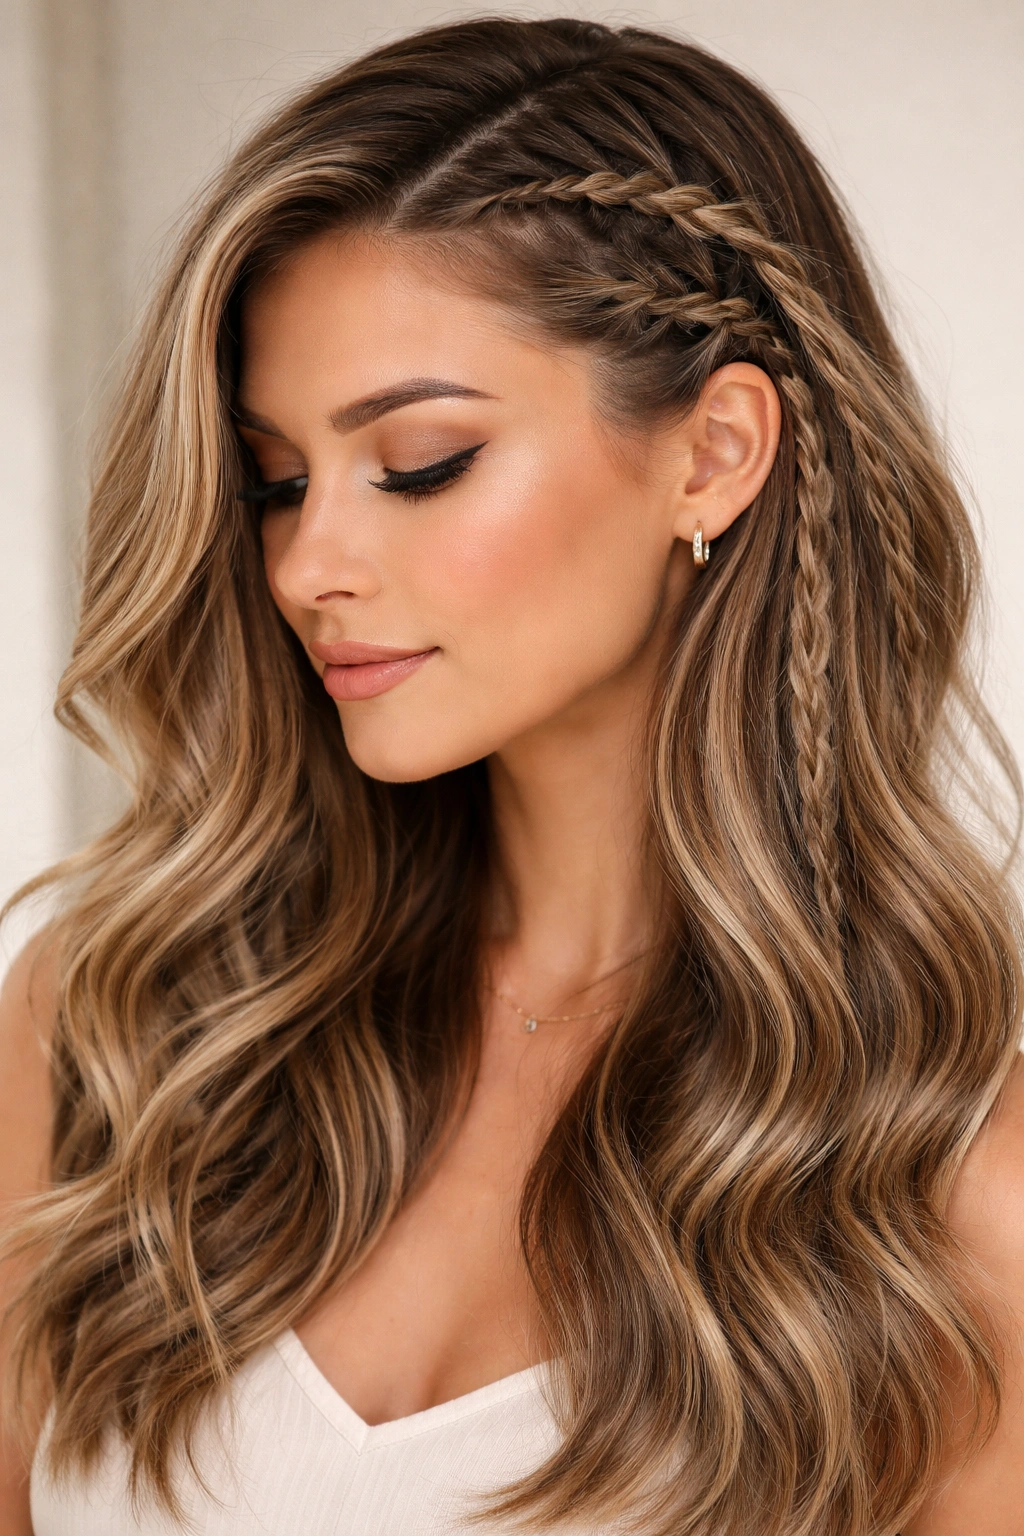
Incorporating braids into your side-parted hairstyle adds texture, visual interest, and a subtle romantic or bohemian element depending on how you execute it. You might braid a small section starting near your side part and integrate it into your overall style, or create multiple delicate braids woven throughout your layers. Braids add dimension that’s completely different from waves or curls — they create defined texture that catches light and adds complexity to your look. This approach works beautifully on medium to long hair and is especially striking when your hair has some natural color variation or dimension.
Different Braiding Techniques to Try
- Dutch braid near the part: Start a Dutch braid (reverse French braid) right at your side part and braid toward the back, securing with a bobby pin that blends with your hair color
- Multiple delicate braids: Create 2-3 thin braids woven throughout your side-parted sections, securing them subtly so they feel like part of your natural texture
- Fishtail braid accent: Incorporate a loose fishtail braid into one side of your style for an undone, artistic vibe
- Crown braid integration: Start a braid at one temple, follow it across the back of your head, and pin it down to create a subtle detail only visible from certain angles
- Loose, messy braids: Create intentionally imperfect braids that feel more textured and bohemian than polished
Making Braids Last Through Your Day
- Spray braids lightly with texture spray before creating them to give your hair grip and prevent slipping
- Use small, thin bobby pins in a color matching your hair rather than obvious black ones
- Gently tease the braid slightly with a fine-tooth comb to make it appear fuller and more intentional
- Secure the ends with clear elastic bands that disappear rather than obvious hair ties
- For a romantic, lived-in look, gently pull and loosen the braid slightly after creating it — this adds volume and softness
Pro tip: If you’re new to braiding, practice on damp hair first. Damp hair has more grip and is more forgiving as you’re learning the technique than fully dry or freshly blow-dried hair.
9. Side Part Pixie Cut
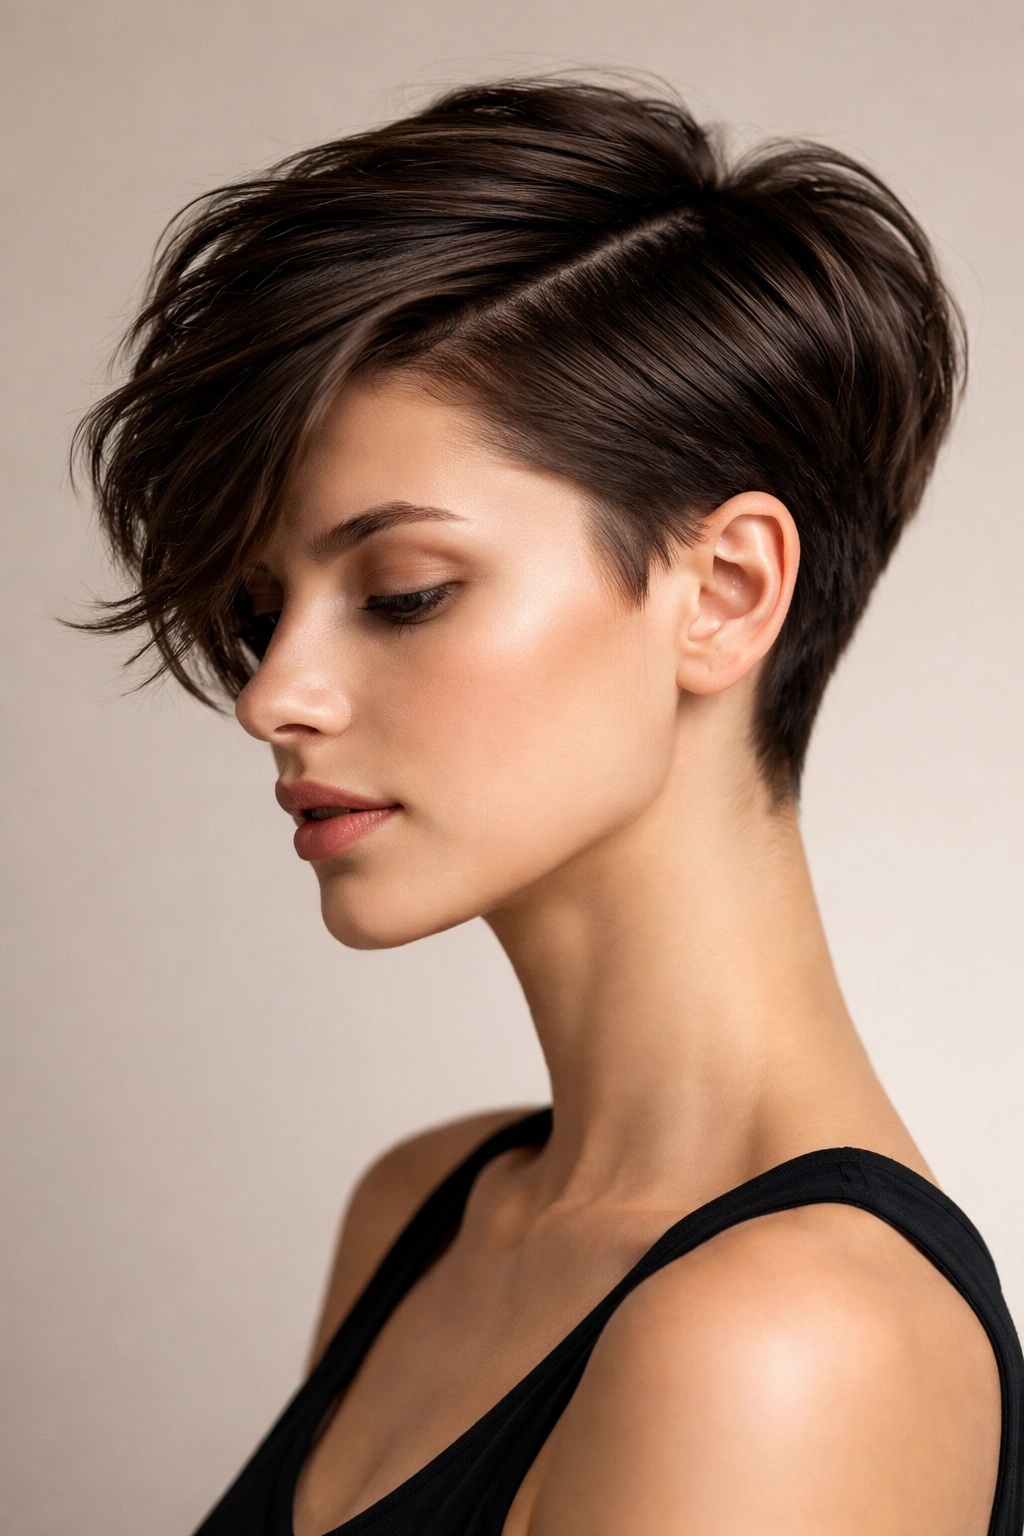
A side part pixie — where short cropped hair is parted dramatically to one side — creates an edgy, androgynous look that’s undeniably cool and modern. The pixie itself is cut very short on the sides and back (usually 1-2 inches or shorter) with slightly longer length on top (2-4 inches), creating room for the side part and directional styling. When you part this short hair to one side, you create visual interest and prevent the cut from looking too uniform or flat against your head. This is a style that requires confidence and the right face shape, but it’s absolutely transformative.
Face Shapes That Suit This Cut
Pixie cuts with side parts work best on people with angular or oval face shapes because the short length shows off bone structure. If you have a rounder face, you can still do this style — your stylist will keep slightly more length on top and style the side part to create height rather than width, which balances roundness. The cut requires sharp, well-defined facial features to really shine, which is partly why it feels so editorial and fashion-forward. If you’re unsure whether you’d suit this cut, consulting with an experienced pixie specialist is worth the investment.
Styling Your Pixie With Intentional Side Part
- Blow-dry your pixie with your fingers, directing hair in the direction of your side part
- Use a texturizing mousse or paste to add grip and piece-y definition to short hair
- Create your side part while hair is still damp, then blow-dry to set the direction
- On formal occasions, you can slick your pixie back with gel for a sleek, sophisticated look
- For everyday wear, keep it touchably soft and textured rather than stiff
- Use a strong-hold texturizing product (wax or clay) to maintain your part direction throughout the day
Insider note: A pixie with a side part requires styling commitment. Unlike longer hair where you can go days without washing, pixie cuts look their best when freshly styled. If you want a true wash-and-go hairstyle, this isn’t it — but if you love the daily styling ritual, this cut is incredibly rewarding.
10. Choppy Side Part With Texture
Choppy layers throughout your side-parted hair create movement and texture that feels edgy and current. Unlike face-framing layers that are strategic and placed, choppy layers are cut throughout your entire head in varying lengths, creating tons of separation and piece-y texture. The side part sits amid all this texture, becoming part of a cohesive whole rather than a separate styling choice. This is the perfect style for people who want movement, personality, and a modern, undone vibe without looking like they’ve just rolled out of bed.
The Difference Between Choppy and Other Layered Cuts
Choppy cutting is more aggressive and less formulaic than traditional layering. Your stylist uses point-cutting techniques (cutting into the hair rather than across it) to create shorter pieces throughout rather than graduated layers. This means you get more texture, more movement, and more styling options. The randomness of choppy layers makes the style feel artful and intentional. A side part with choppy layers looks modern precisely because it’s not perfectly symmetrical or polished — it’s edgy in the best way.
Blow-Drying Choppy Texture for Impact
- Apply sea salt spray or texturizing mousse to damp hair before blow-drying
- Blow-dry roughly with your fingers rather than a brush, encouraging hair to separate and piece up
- Use a diffuser attachment on your blow-dryer to encourage texture without creating defined curls
- Once mostly dry, use a curling iron or wand on select pieces to create more defined texture and separation
- Break up waves with your fingers rather than leaving them smooth and uniform
- Finish with a light texturizing spray that maintains movement without stiffness
Worth knowing: Choppy hair can tangle more easily than smoother styles because of all the texture and separation. Invest in a good detangling spray and use it before brushing to prevent breakage.
11. Side Part With Color Blocking
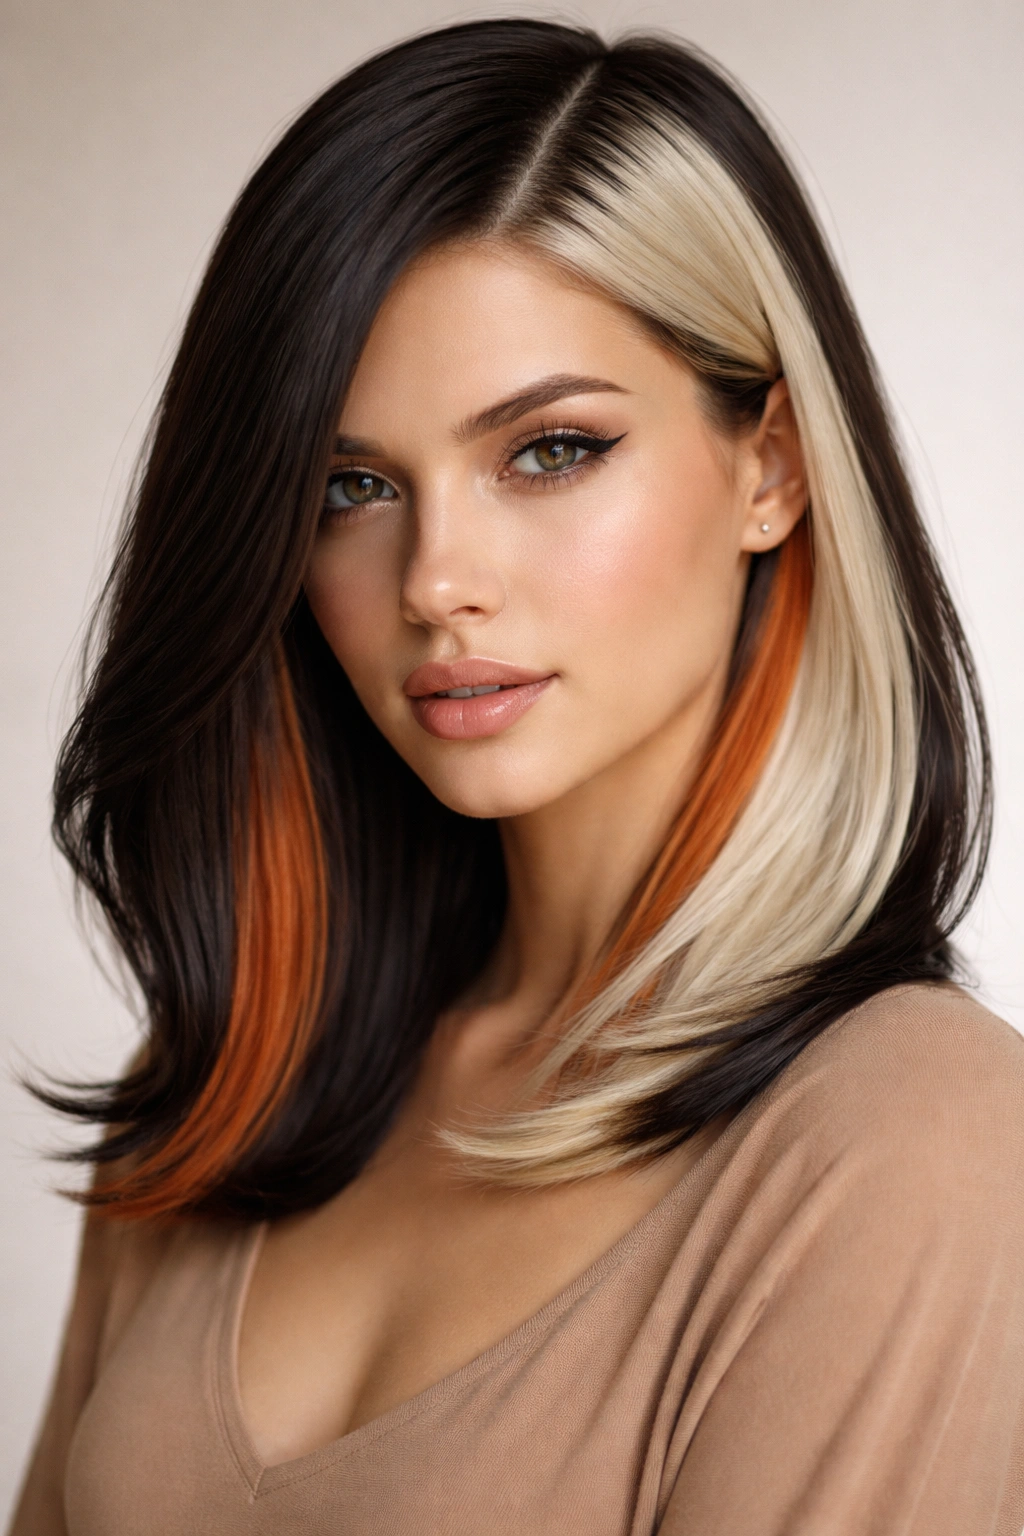
Adding color blocking to a side-parted style creates visual impact and dimension that’s completely different from a single-color approach. Color blocking typically involves placing contrasting colors in specific sections — maybe a different shade along one side, a contrasting color on your underneath layers, or a bold accent color in your curtain layers. The side part becomes a design element because it naturally separates where different colors sit. This approach works beautifully if you want to experiment with color without committing to an all-over change.
Smart Color-Blocking Approaches for Side Parts
- Subtle root shadow: Keep your natural color or a similar shade at the roots while lightening the mid-lengths and ends, creating dimension that follows your side part
- Underneath pop: Keep the top color darker while making underneath layers a contrasting shade (blonde underneath dark hair, for example) — this shows when you move
- Face-framing accent: Color your curtain layers around your face in a contrasting shade while keeping the bulk of your hair your natural color
- Babylights throughout: Weave strategic lighter pieces throughout darker hair, creating dimension without block color — softer than obvious color blocking
- Temporary color in layers: Use temporary or semi-permanent color in specific layers so you can change it up frequently without damaging your hair
Maintenance and Longevity
- Color-blocked styles require toning or glossing every 4-6 weeks to keep colors vibrant and prevent brassiness
- If you’re blocking cool and warm tones, expect the cooler tones to fade faster and may need more frequent touch-ups
- Semi-permanent color fades more gently than permanent color, which can be an advantage for experimental color blocking
- Invest in sulfate-free shampoo and conditioner specifically formulated for color-treated hair to extend color life
- Purple shampoo or color-depositing conditioner helps maintain blonde or silver tones if that’s part of your color blocking
Pro tip: Start with semi-permanent color for your first color-blocking experiment. If you don’t love it, it fades out in 6-8 weeks, and you can try a different approach next time.
12. Romantic Side Part With Soft Waves
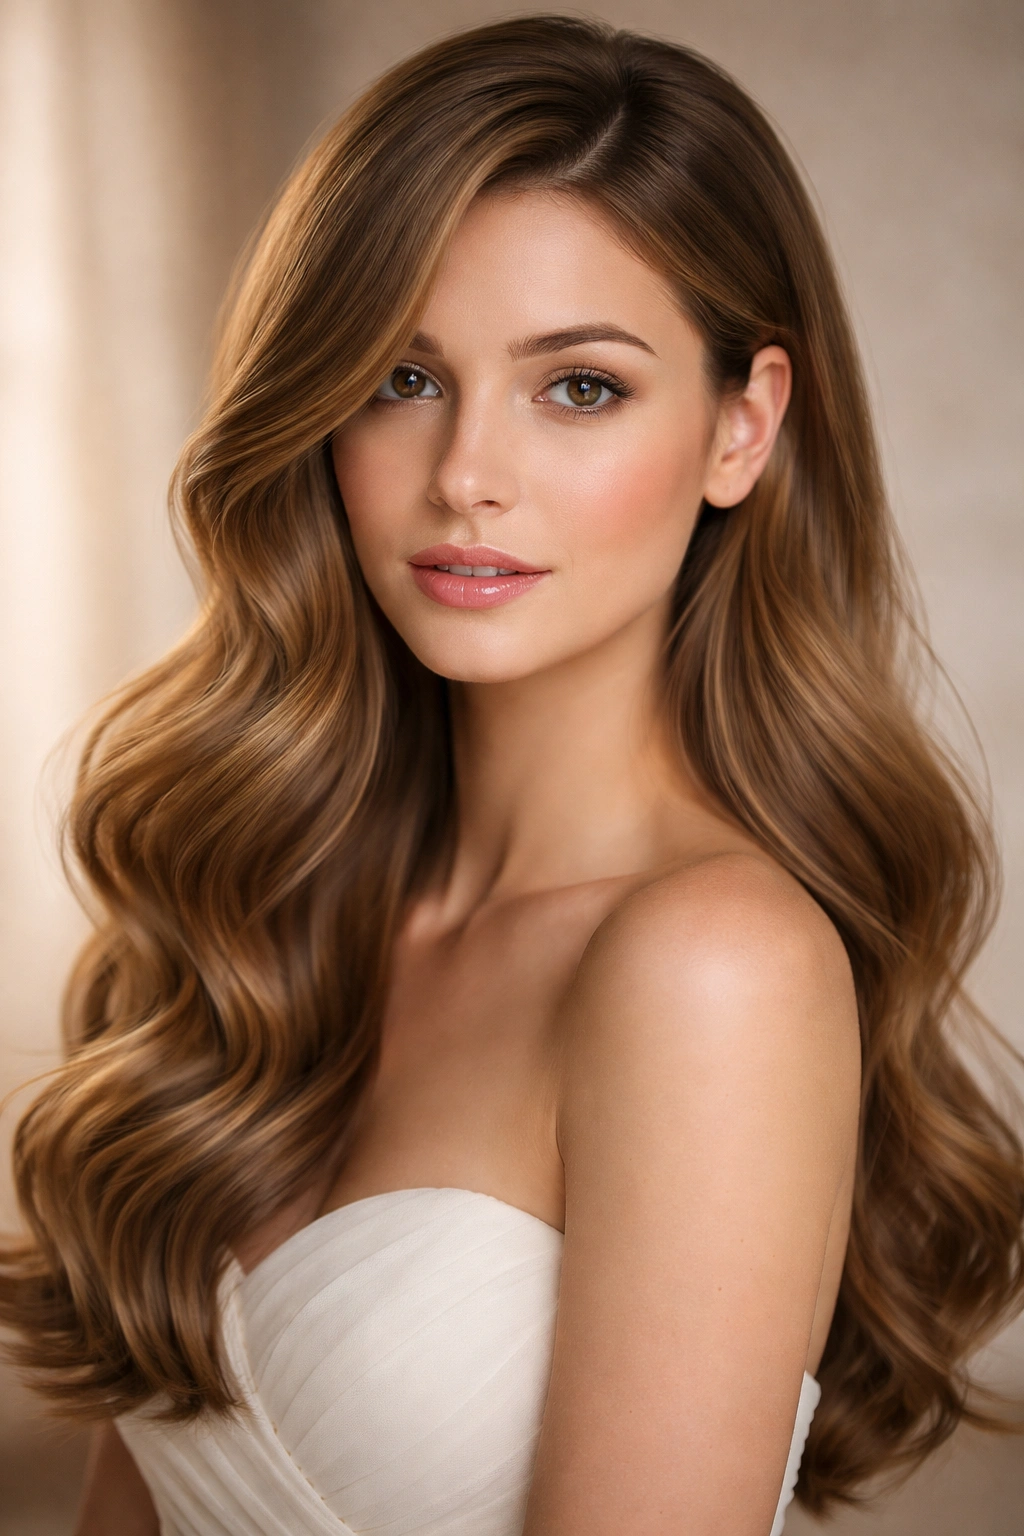
A romantic side part with soft, loose waves creates an ethereal, timeless aesthetic that works for nearly any occasion. The waves are intentionally loose and flowing — not tight curls or defined waves, but gentle curves that create movement and softness. The side part adds an asymmetrical element that prevents the overall look from feeling too formal or bridal. This is the style you see in romantic editorials, engagement photo shoots, and anywhere people want to look effortlessly beautiful without appearing overly done. It works on hair of almost any length, though it’s particularly stunning on longer styles.
Creating Waves That Look Naturally Romantic
The key to romantic waves is that they should look effortless and slightly imperfect. You’re aiming for waves that could plausibly happen naturally, not obviously blow-dried or curled. The best approach is usually a combination of texturizing products and a curling iron used selectively. You don’t want every inch of your hair waved — instead, you want some straight pieces, some gently waved pieces, and some more defined curves, creating variation that feels organic. The side part sits naturally amid these waves, creating asymmetrical softness.
Products and Techniques for Effortless Waves
- Start with texturizing spray or sea salt spray applied to damp hair to give your hair grip
- Blow-dry with your fingers roughly, not using a brush, to create piece-y texture rather than smooth blowout
- Use a 1.5-inch curling iron on select sections, rotating the barrel to create natural-looking curves
- Leave some pieces uncurled for a more undone feel
- Break up waves with your fingers once they’ve cooled, separating them rather than leaving them clumped
- Finish with a very light hairspray that maintains movement — nothing heavy or stiff
- Sleep on a silk pillowcase to preserve waves overnight
Insider note: The most romantic waves actually take longer to style than they appear to. The effortlessness is an illusion created by careful product choice and selective curling. Don’t underestimate the time involved, but the payoff is absolutely worth it.
Final Thoughts
The side part has proven itself as one of the most versatile and flattering parting choices available, offering countless styling directions depending on your hair texture, face shape, and personal aesthetic. What makes these styles so compelling is their adaptability — the same side part can feel edgy with an undercut, romantic with soft waves, modern with choppy layers, or cool with color blocking. The foundation is simple, but the possibilities are genuinely endless.
The best side part style for you depends on your hair type, your styling commitment level, and honestly, how you want to feel when you look in the mirror. If you have fine or thin hair, focus on styles with crown volume or strategic layering. If you love styling and have time for daily blow-drying or curling, texturized waves or choppy cuts reward that effort. If you prefer minimal maintenance, a sleek side part or a pixie with side part suits you better. The beautiful thing about exploring these options is that they all share that flattering, asymmetrical foundation — you’re really just choosing which direction to take your specific version of the side part.