When you want your hair to look genuinely romantic rather than just polished, the right updo makes all the difference. The best updos for special occasions walk a delicate line — they need enough structure and polish to feel intentional and elegant, but enough softness and movement to keep that touchable, approachable quality that reads as romantic rather than stiff or formal. Whether you’re heading down the aisle, enjoying an intimate dinner, or attending a celebration where you want to feel truly beautiful, the updo you choose sets the entire tone for how you carry yourself.
The challenge most people face is that romantic updos can feel intimidating to create. You might assume they require professional skills or complicated techniques, but the truth is that many of the most stunning updos are surprisingly achievable once you understand the core principles: texture matters more than perfection, strategically placed layers and wisps create softness, and the right hairpins and accessories are half the battle. The eight updos I’m breaking down here range from surprisingly simple to moderately involved, but each one delivers that romantic impact that photographs beautifully and holds strong throughout a full evening of wear.
What makes these updos genuinely romantic is their versatility. You can adapt each one to your hair type, hair length, and personal style. Whether your hair is fine and delicate, thick and voluminous, naturally wavy, or perfectly straight, you’ll find at least a few of these that work beautifully for you. The confidence you’ll feel wearing one of these styles — knowing it looks intentional, elegant, and effortlessly beautiful — is what truly makes any occasion feel special.
1. The Twisted Crown Updo
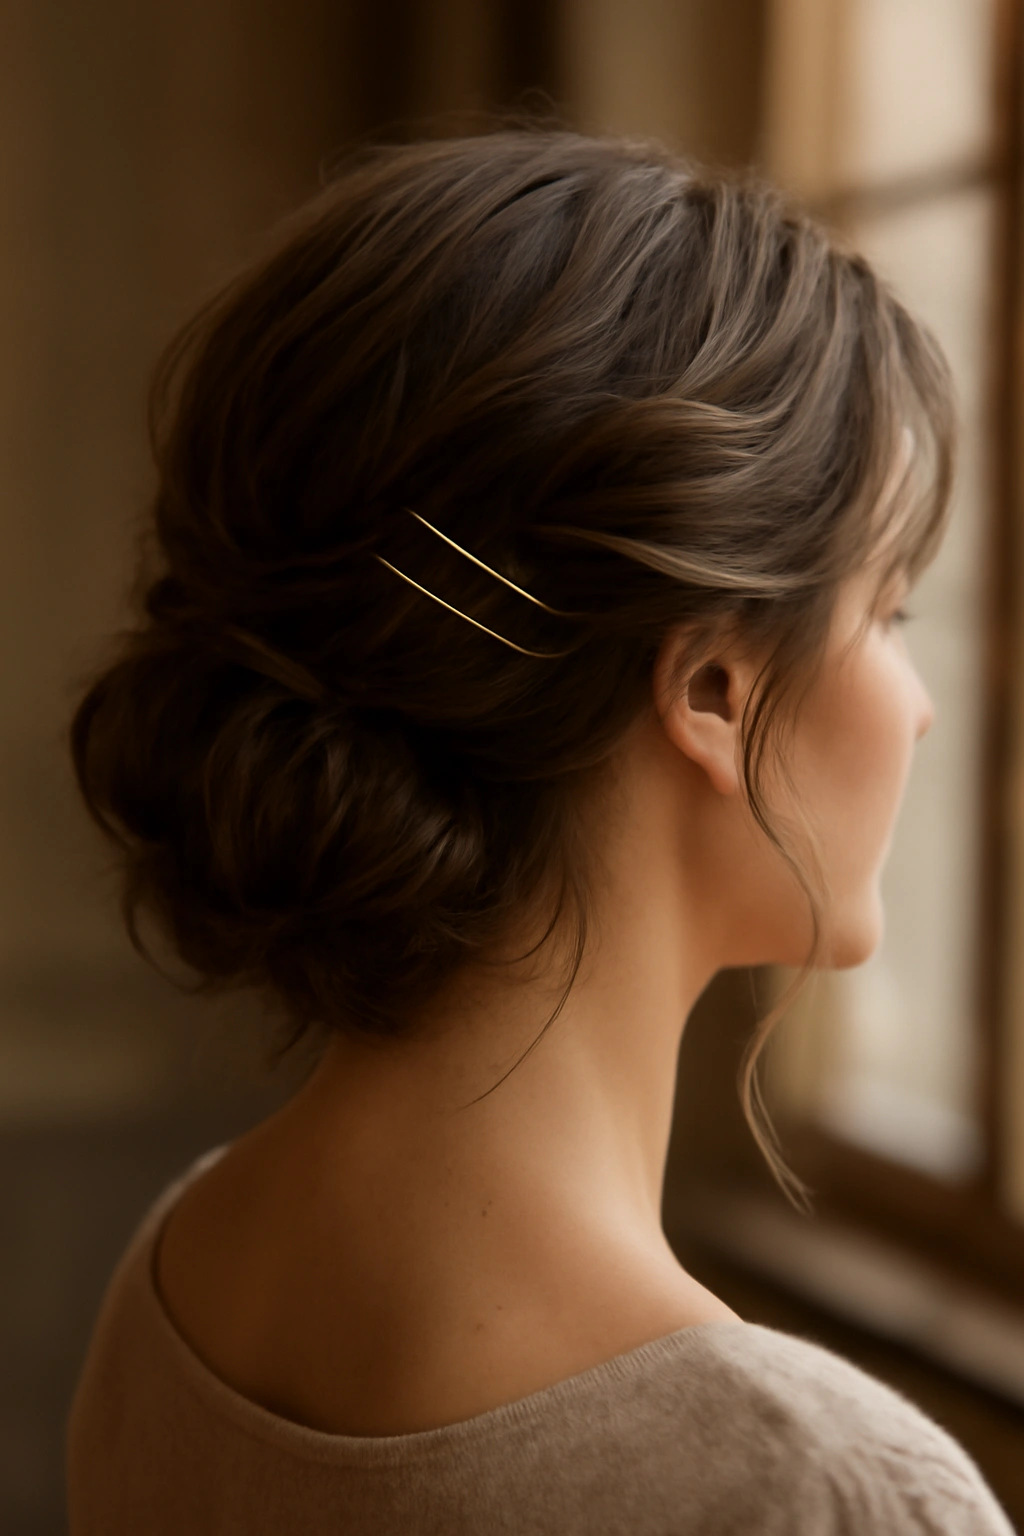
This updo sits somewhere between a crown braid and a twisted sculpture, with sections of hair twisted around the back of your head to create a romantic, almost ethereal effect. Rather than a single tight twist, this technique uses multiple looser twists that wrap around the crown area, leaving the rest of your hair down or in soft waves. It’s the kind of updo that photographs brilliantly because it has natural dimension and movement, not the stiff, overly sculpted look of some formal styles.
Why This Style Works for Romance
The twisted crown updo succeeds because it balances structure with softness in exactly the right way. The twists create clear, defined lines that photograph sharply and hold beautifully throughout the evening, but they’re loosely enough constructed that they don’t feel severe or severe. The twists actually frame your face and collarbones, which is inherently flattering and romantic. Because most of your hair remains down or only partially pinned, this style feels modern and approachable rather than stuffy or overly formal.
How to Create This Look
- Start with hair that has some texture — if you have very straight hair, create gentle waves throughout using a curling iron or overnight braids, which gives you something to grip and twist
- Take a section of hair from one side of your head, starting near your temple, and twist it loosely back toward the crown area, pinning with bobby pins as you go
- Repeat with 2-3 more sections from different areas of the crown (back, other side, center), each time twisting loosely and pinning in place
- Use bobby pins in a color that matches your hair, inserted horizontally into the twist and hidden within the twist itself
- Leave face-framing layers loose if you want a softer effect, or twist them in for a more complete look
- Set with a light hairspray once complete — this style should move slightly, not be frozen in place
Styling Tips and Tricks
Pull gently on the twisted sections after pinning to create a slightly fuller, airier look rather than letting them sit too smooth and tight. If any sections feel loose or unstable, add a second bobby pin parallel to the first — two pins always hold better than one in an updo. Use texturizing spray or dry shampoo on the morning of your event to give your hair more grip and make the twists stay in place longer. This updo actually improves as the evening goes on — the twists relax slightly and become even softer and more romantic as you wear it.
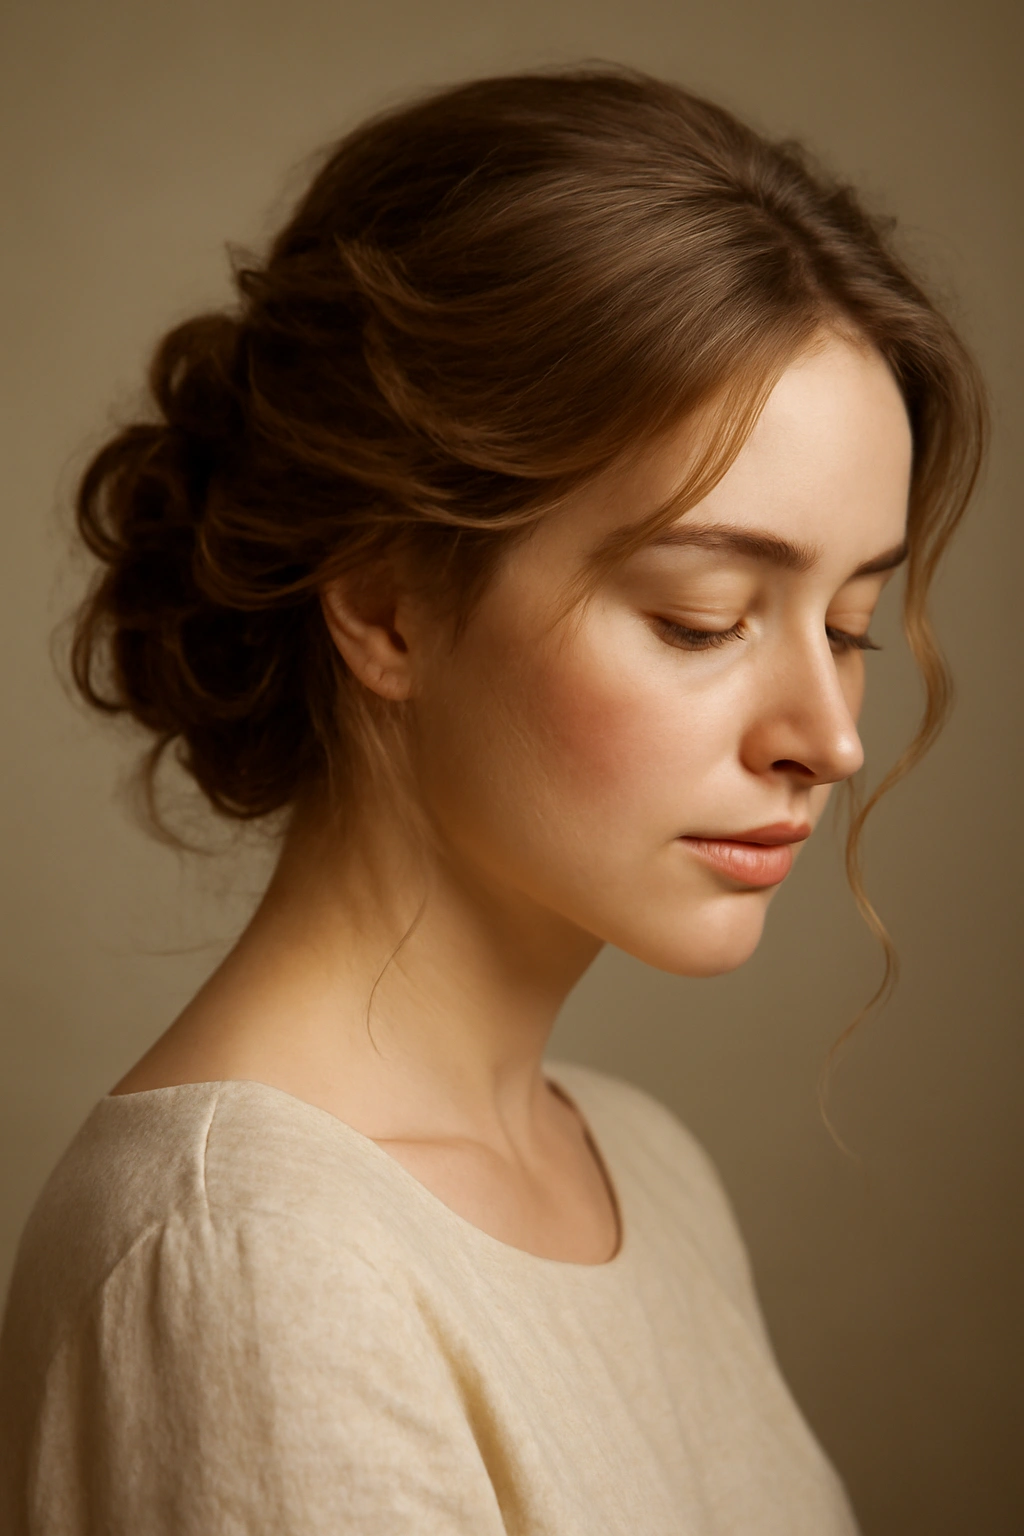
2. The Romantic Low Bun
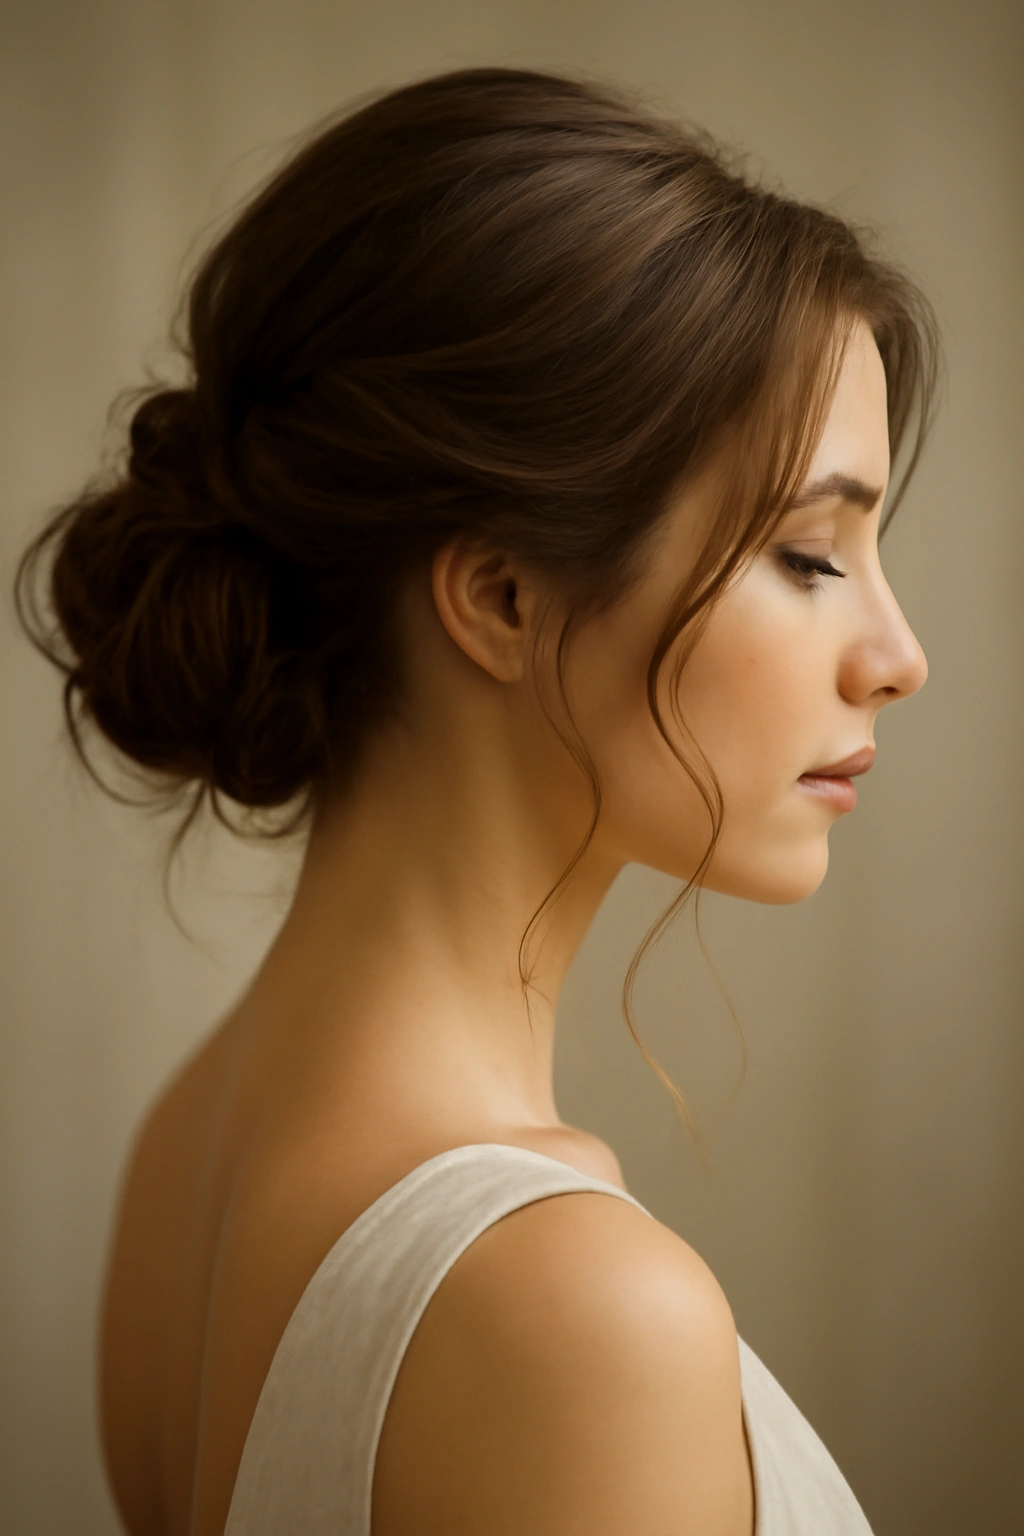
The low bun is the workhorse of romantic updos because it’s endlessly adaptable to your hair type, incredibly stable, and photographs beautifully in both candlelit intimate settings and bright daytime venues. Unlike a tight, sleek bun that can feel corporate or severe, a romantic low bun is intentionally soft and slightly undone-looking, with pieces pulled loose around the face and a slightly messy, relaxed construction at the base.
Why This Style Works for Romance
A soft, loose low bun reads as effortlessly elegant — the exact quality that defines romance in hair. It keeps your face and neck completely visible, which is flattering and draws attention to your features, skin, and any jewelry you’re wearing. The loose pieces around the face create softness and movement, especially if you have any waves or texture to play with. Because the bun sits low on the head, it elongates your neck and creates a graceful silhouette, which is deeply romantic. This style works for almost any hair length, thickness, and texture, and it remains stable even with vigorous dancing or movement.
How to Create This Look
- Start with textured, wavy hair created either the night before with braids or sea salt spray, or with a curling iron on the day of your event
- Flip your head forward and gather all your hair at the nape of your neck, pulling it loosely back — aim for a low position, not centered on your crown
- Twist the gathered hair loosely, then wrap it around itself to form a loose, messy bun at the base of your neck
- Secure with 3-4 bobby pins inserted into different sections of the bun, using pins that match your hair color
- Gently pull apart the bun slightly to create a fuller, airier appearance — it should look relaxed, not tight
- Pull 2-3 small sections of hair loose around your face and temples, allowing them to frame your face naturally
- Smooth any flyaways with hairspray, but aim for a “soft hold” rather than heavily sprayed
Styling Tips and Tricks
The key to this style is embracing slight imperfection. If it looks too neat and structured, use your fingers to gently tousle and separate the bun strands. Use a texturizing product like sea salt spray or dry shampoo before building your bun to increase grip and longevity. If you have very fine hair, create more volume at the crown before pulling back into the bun — you can tease gently at the crown area to give yourself more to work with. This style actually holds better if you don’t use much hairspray at the construction stage; instead, spray after you’ve loosened it to set the intentionally undone look.
3. The Ethereal Half-Up, Half-Down
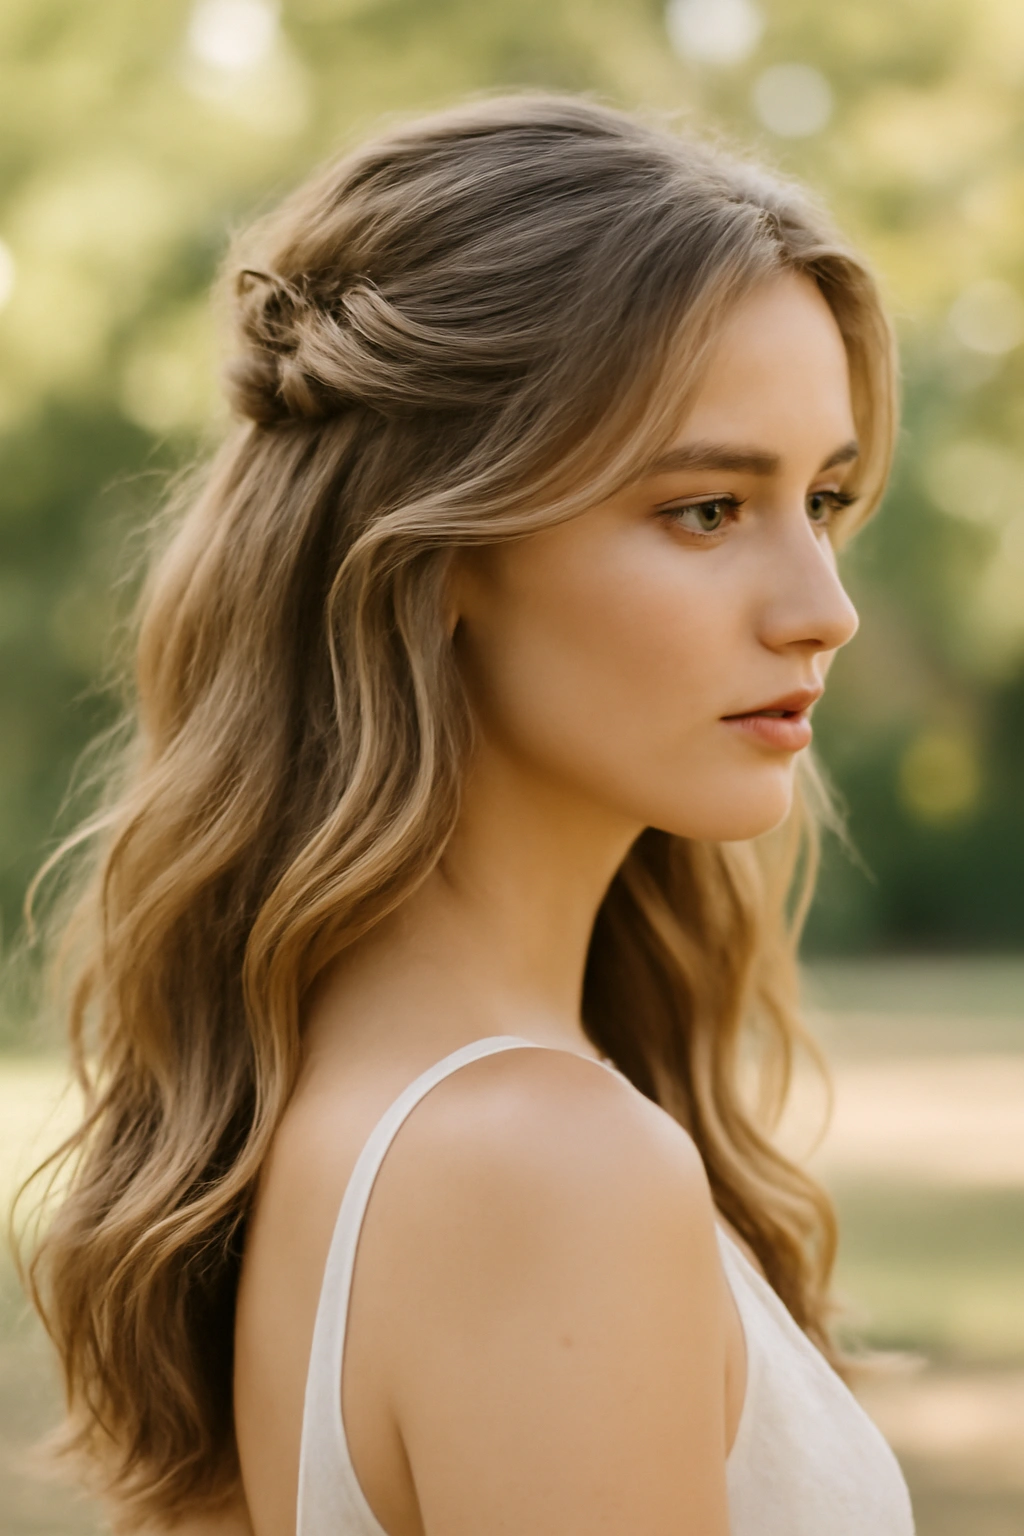
This is perhaps the most universally flattering updo variation because it gives you the polish of an updo while maintaining the romantic freedom of down hair. The half-up, half-down style takes the top and sides of your hair and pulls them up and back into a soft knot, twist, or braid, while the bottom half of your hair remains down, often in waves or curls. It’s the updo for people who aren’t quite ready to commit to a full updo but want something more styled than completely down hair.
Why This Style Works for Romance
The half-up, half-down creates a beautiful frame around your face while keeping your hair’s length and movement visible. It shows off curl or wave texture in your down hair while still controlling the framing sections around your face. This style is romantic because it’s not overdone — it feels sophisticated but still approachable and effortlessly put-together. It works across almost any venue, hair type, and formality level, from casual date nights to black-tie weddings. The style is also incredibly stable because you’re only managing half your hair in the updo, meaning less weight and less likelihood of falling or shifting throughout the night.
How to Create This Look
- Begin with full waves or curls throughout your entire hair — create these with a curling iron, hot rollers, or by braiding hair while damp and letting it dry
- Gather hair from the front and sides of your head, pulling back from your temples and around your ears, stopping at about mid-head
- Twist or braid this gathered section loosely, or simply smooth it back and secure into a small, soft knot
- Pin your chosen updo style at the back of your head using bobby pins, making sure it’s completely secure before moving forward
- Leave the bottom half of your hair completely down, allowing your curls or waves to fall freely
- Pull 2-3 small face-framing pieces loose from the updo section to soften the line and create additional frame
- Finish with a flexible hairspray that holds without stiffness, allowing your down hair to maintain its natural movement
Styling Tips and Tricks
The more texture you create in your down hair, the better this style looks and the longer it holds. Don’t aim for perfect, bouncy curls throughout the entire length — slightly relaxed, tousled waves are more romantic and forgiving as they soften during the evening. Use a texturizing spray or lightweight dry shampoo in your down hair to increase grip and prevent the front sections from becoming too smooth and slipping out of their updo. Consider adding a decorative element like a delicate hairpin, small comb, or subtle hair accessory to the updo portion to draw the eye and add intentionality to the style.
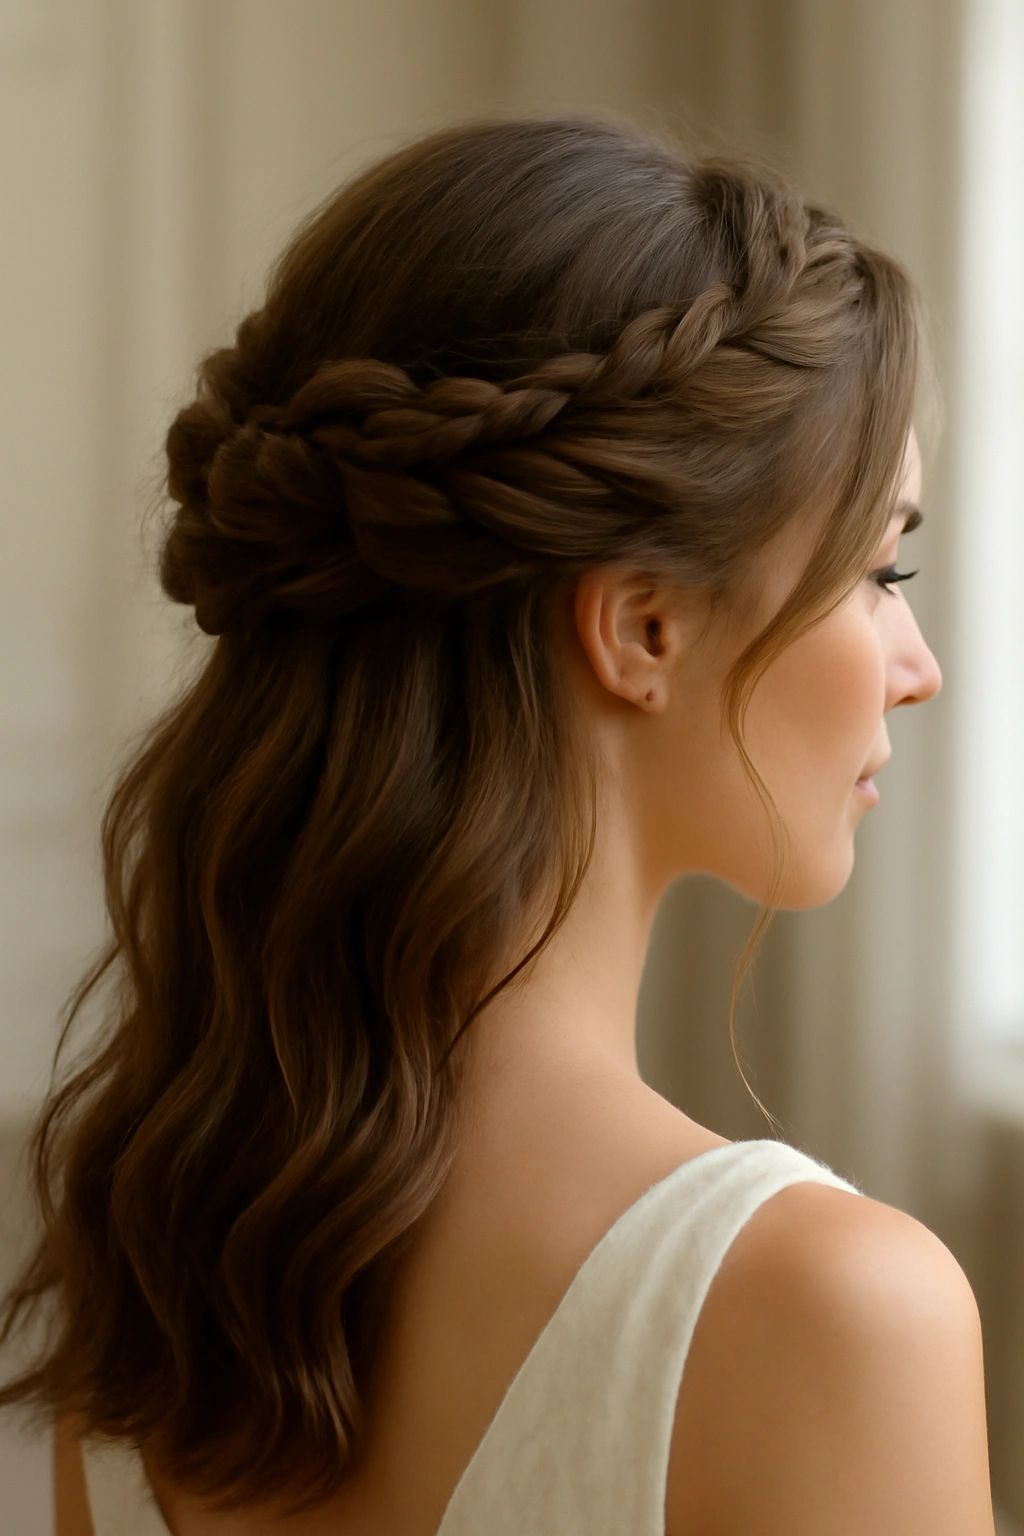
4. The Braided Halo Updo
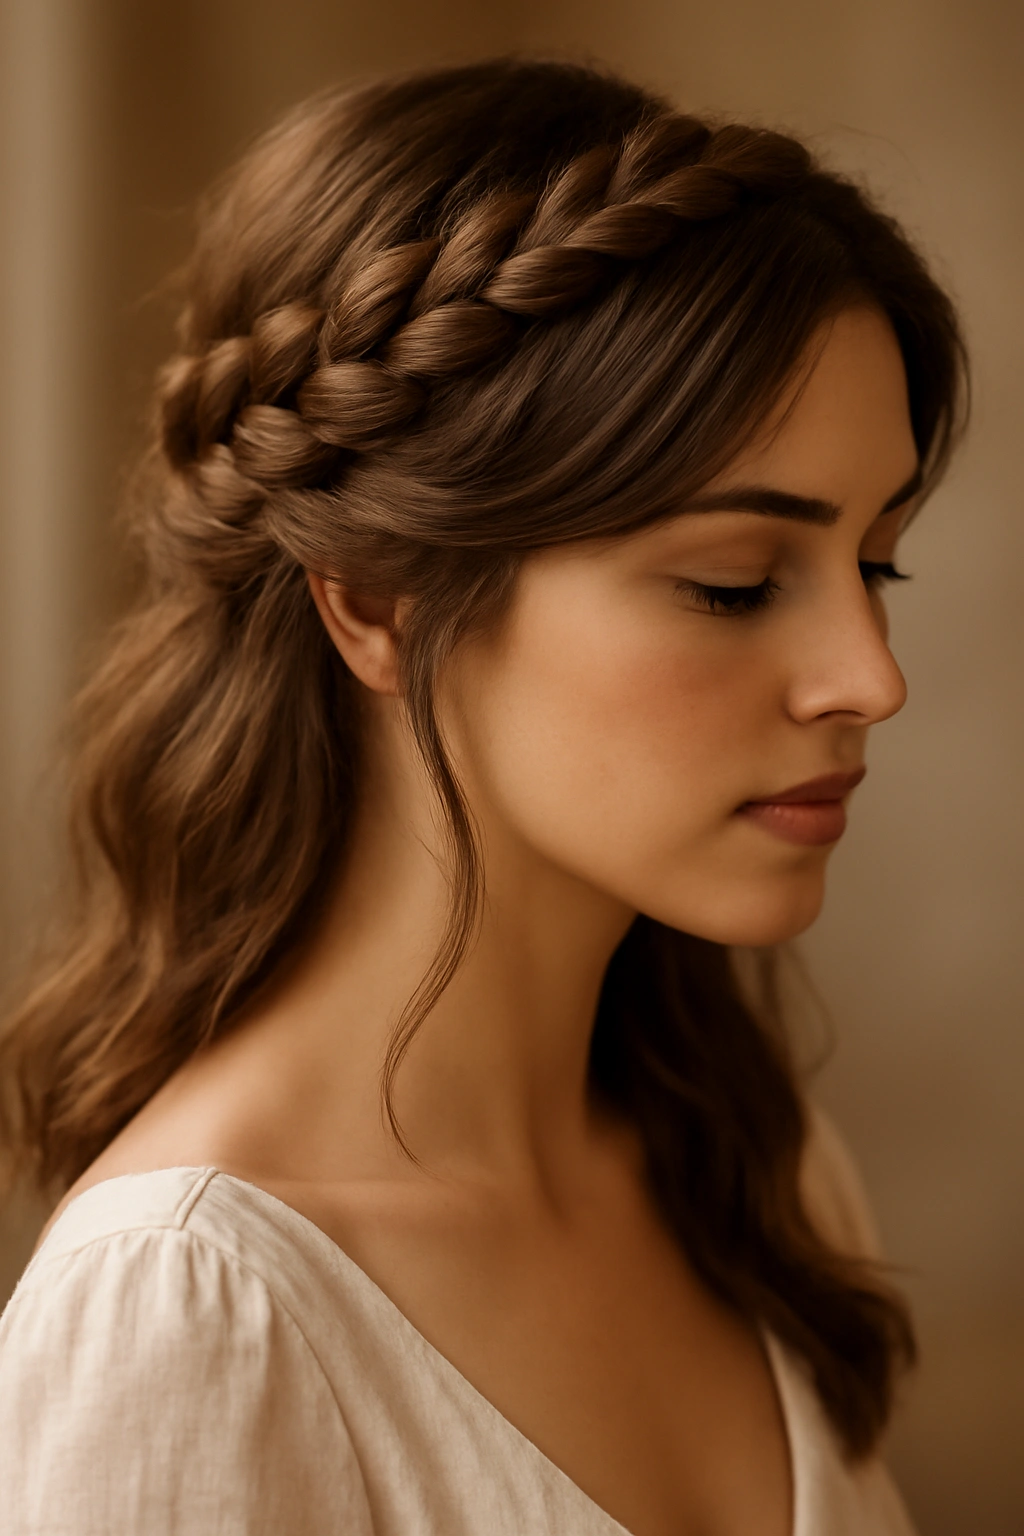
A braided halo wraps one or more braids around the crown of your head, creating an almost ceremonial, romantic quality that reads as elevated and special without feeling overly costume-y. The braid (or braids) forms a crown around your head, and the remaining hair can be left down in waves, gathered into a half-up twist, or pulled into a low bun — giving you multiple finishing options depending on the formality of your event. This style is a go-to for weddings specifically because it has an inherently bridal quality without being obviously a wedding style.
Why This Style Works for Romance
The braided halo is romantic because it’s genuinely special and intentional — it’s clearly not an everyday style, but it doesn’t feel cartoonish or overly elaborate. The halo shape frames the face beautifully and draws the eye upward, which is inherently flattering. The braid itself adds texture and visual interest, and it’s incredibly stable, meaning this style can handle hours of wear, movement, and even photographing from many different angles. It works beautifully with accessories — fresh flowers woven into the braid, delicate gold pins, pearl-adorned clips — making it endlessly customizable to your personal aesthetic.
How to Create This Look
- Start with hair that has some texture to grip — either waves, braids from the previous night, or texture spray applied to straight hair
- Begin your braid on one side of your head, starting near your temple and braiding toward the back of your head — use a three-strand or Dutch braid depending on the thickness and fullness you want
- Continue the braid all the way around your head to the opposite ear, creating a crown effect
- Pin the end of the braid at the nape or tuck it into itself to hide the tail
- For a fuller effect, gently pull on each section of the braid to slightly loosen and widen it — this makes the braid look more romantic and airier
- If using a two-braid halo, create matching braids along both sides of the crown and meet them at the back or center
- Leave remaining hair down and wavy, or gather into a half-up twist, or pull into a low bun depending on the style you’re creating
Styling Tips and Tricks
Dutch braids (which braid under rather than over, creating an undercut look) appear fuller and more dimensional than traditional three-strand braids, so use those if you want extra visual impact. Loosening your braid slightly after constructing it is crucial — a tight, neat braid looks more formal and less romantic, while a gently loosened braid with slightly separated sections looks softer and more ethereal. If you’re adding flowers to the braid, tuck them into the loosened sections as you go rather than trying to thread them through a tight braid. Set this style with a very light hairspray so the braid maintains movement and doesn’t become stiff or overly controlled.
5. The Sleek High Ponytail Twist

This updo takes the humble ponytail and elevates it into something genuinely romantic and sophisticated by combining a high, sleek base with a twisted or knotted finish. Rather than a tight, sporty high ponytail, this version starts with a very smooth, polished ponytail at the crown, then twists or loops the tail before securing it into a romantic knot or partial bun. It’s modern, sleek, and incredibly photogenic while still maintaining softness through the twisted or looped finish.
Why This Style Works for Romance
The sleek high ponytail twist works because it combines the graphic elegance of a high ponytail with the romance of a twisted or bunned finish. Your face, neck, and shoulders are completely visible and framed by the smooth lines of the updo, which is inherently flattering. The height creates a graceful silhouette and the twist or knot adds visual interest and dimension. This style is incredibly versatile depending on formality — it can feel casual and modern with loose waves hanging down from the twist, or completely sophisticated and bridal with everything smooth and controlled. It’s also one of the easiest updos to execute once you understand the basic construction.
How to Create This Look
- Apply a smoothing serum or gel to your hair to create a sleek finish — this is crucial for achieving the polished look this style requires
- Gather all your hair at the crown of your head into a high ponytail, using a clear elastic that won’t show or a thin hair elastic wrapped tightly
- Smooth the ponytail base with a fine-tooth comb and additional smoothing product to eliminate flyaways
- Twist the ponytail loosely or divide it into 2-3 sections and twist each section separately
- Wrap the twisted tail around the elastic base to create a knot or partial bun
- Secure the twist with bobby pins inserted into the twist itself, using pins that match your hair color
- If you want additional romance, leave the very ends of the twist slightly loose or separate a few strands to create wispy movement
Styling Tips and Tricks
The contrast between the sleek, smooth ponytail base and the twisted finish is what makes this style work, so don’t skip the smoothing step. Use a gel or serum rather than spray at the ponytail construction stage — spray can make hair feel sticky and difficult to work with when trying to achieve sleekness. If you have flyaways around your hairline, tame them with a soft-bristled toothbrush and a tiny amount of gel before securing the ponytail. This style holds exceptionally well and won’t need retouching throughout the evening because the tight, smooth base keeps everything in place.
6. The Soft Romantic Waves with Pins
This is the minimalist updo for people who love the idea of up hair but aren’t ready for true structure. Rather than pinning hair into a defined bun or twist, this technique uses carefully placed pins throughout loosely waved hair to create the illusion of an updo while maintaining that touchable, romantic wave texture. It’s essentially styled down hair that’s been strategically pinned to sit slightly higher and create a more intentional look than completely loose waves.
Why This Style Works for Romance
This approach works because it delivers the polish of an updo while maintaining the softness and movement of down hair. Romantic waves have inherent beauty and elegance, and by using pins to create height and intentionality, you’re amplifying that beauty rather than covering it up. This style is romantic because it feels effortless and natural — not overdone or artificial. It also works beautifully with the natural aging and softening of hairstyles throughout an evening; as the waves relax and shift, it only adds to the romantic, lived-in effect rather than feeling like the style is falling apart. This option is perfect for people with naturally wavy hair or those who create beautiful waves but struggle with traditional updo techniques.
How to Create This Look
- Create soft, romantic waves throughout your entire head of hair — either with a 1.25-inch curling iron winding sections loosely, or by braiding damp hair and leaving braids in until completely dry
- Allow waves to relax and soften slightly rather than using waves immediately after creating them — this creates a more romantic, less structured look
- Take small sections of hair from around the crown and sides and pin them to the back of the head using bobby pins in a color that matches your hair
- Don’t aim for a defined updo shape — instead, use pins strategically to create the sense of movement and intentionality while leaving most of your waves loose
- Add 2-3 pins along the back of the head, pulling hair slightly backward and upward to create subtle height
- You can also add small twists in front sections if desired, pinning them to the back to create additional dimension
- Finish with a flexible hairspray that allows waves to maintain their natural movement and beauty
Styling Tips and Tricks
The key to this style is restraint — you want just enough pinning to create an intentional look without actually pulling hair up into a traditional updo. Use bobby pins spaced out rather than clustered together, which creates a more organic effect. Slightly mussed, tousled waves are more romantic than perfect, tight curls, so don’t stress if your waves aren’t immaculate. This style actually benefits from a slightly undone quality throughout the evening as waves relax and shift; the style becomes more romantic rather than looking like it’s falling. Consider adding a delicate hair comb or decorative pin as a design element that justifies your use of pins and adds intentional elegance.
7. The Vintage-Inspired Gibson Girl Updo
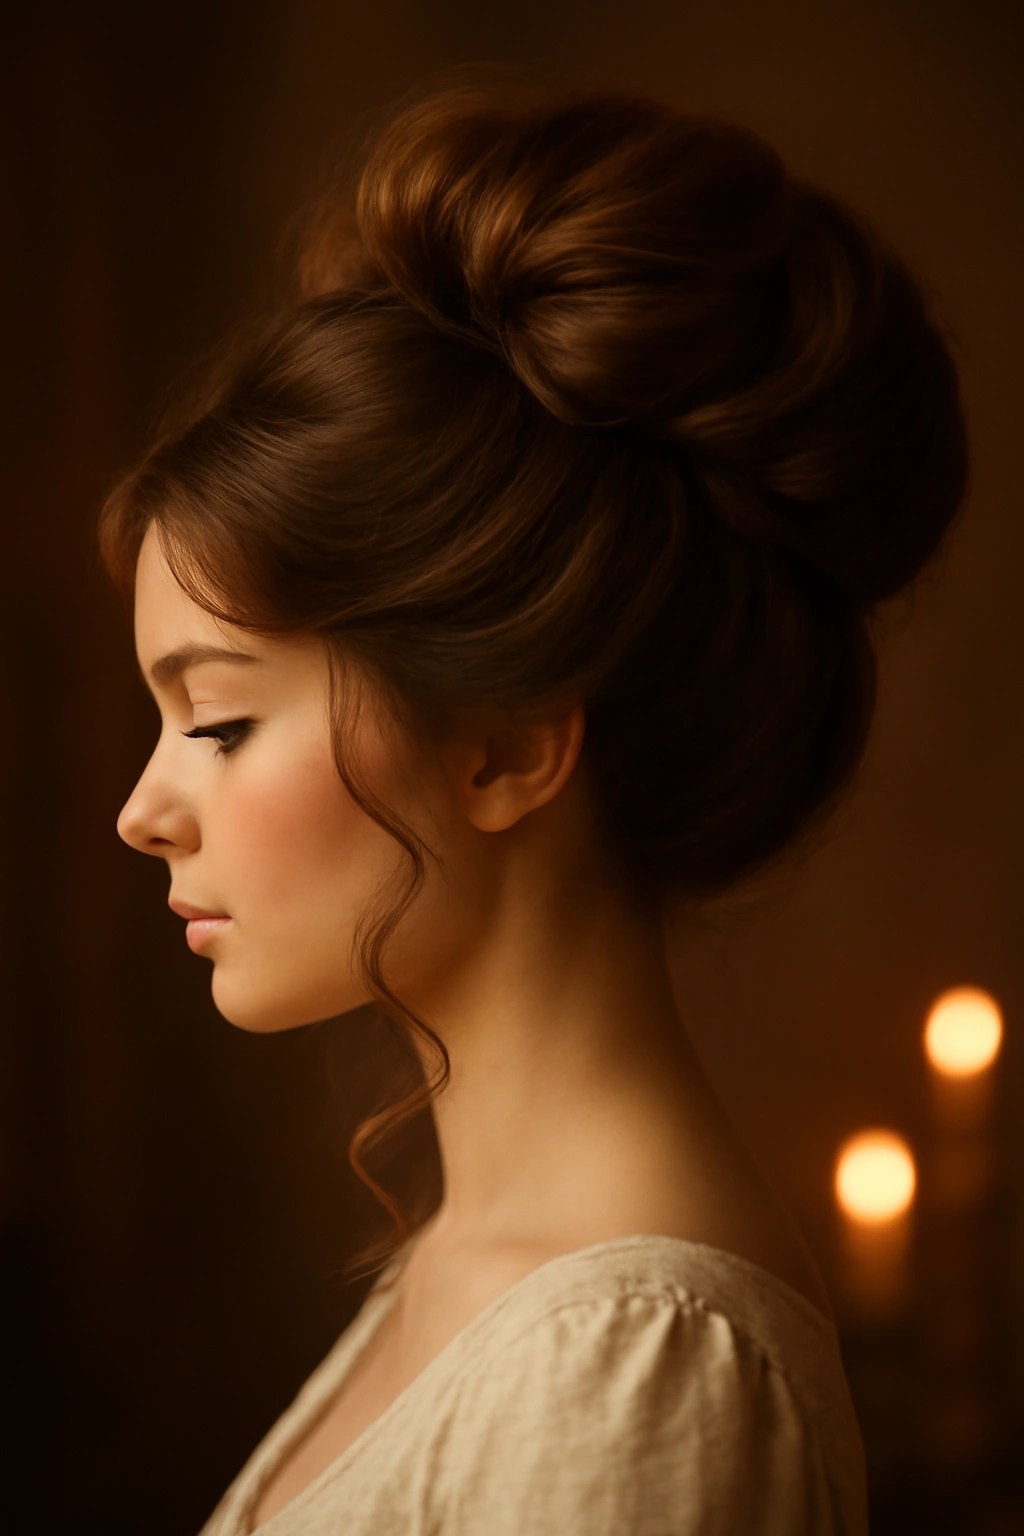
The Gibson Girl updo is a full, voluminous updo that sits on top of the crown and has an almost architectural quality — think romantic Victorian elegance merged with Art Deco glamour. This style requires you to create considerable volume and height at the crown, then sweep hair back and around to create a soft, romantic silhouette. It’s distinctly romantic because of its vintage, timeless quality and the way it photographs beautifully from almost any angle.
Why This Style Works for Romance
The Gibson Girl updo is inherently romantic because it’s visibly intentional and elegant — this isn’t a style you accidentally stumble into. The volume and height create a beautiful silhouette and draw attention to your face and features. The style references a romantic historical period while still feeling modern and wearable. Because the volume sits at the crown and the back is relatively smooth and controlled, this style is incredibly flattering across different face shapes — it doesn’t pull tight to the head but rather creates a full, rounded frame. It photographs beautifully in both candlelit and daytime settings, making it perfect for any special occasion.
How to Create This Look
- Start with very textured hair — you’ll need significant wave or curl throughout to create the volume this style requires
- Apply a texturizing product or dry shampoo before styling to maximize grip and volume
- Create volume at the crown by backcombing or teasing the hair gently at the roots — tease enough to create a noticeable cushion of height
- Smooth the top layer of teased hair to create a polished surface while maintaining the volume underneath
- Gather hair from the sides and back of your head, sweeping it up and around the teased crown section
- Arrange the swept-back hair in soft loops and waves around the crown rather than pulling it flat
- Secure with multiple bobby pins inserted into the teased section, using pins that match your hair
- Leave face-framing pieces loose and gently curl them to enhance the romantic quality
- Use a flexible hairspray to set the style while maintaining movement and softness
Styling Tips and Tricks
This is a style where backcombing or teasing is genuinely necessary — you cannot create this volume without it. Don’t be timid about the teasing; you need enough volume at the crown to support the updo structure throughout the evening. Use a fine-tooth teasing brush and work in small sections, teasing from the base upward. Once teased, smooth only the surface layer, leaving the teased texture underneath to provide the grip needed for pins. This style actually holds better if you don’t use heavy hairspray during construction; instead, spray after the entire style is complete to set the intentionally soft, romantic loops and waves.
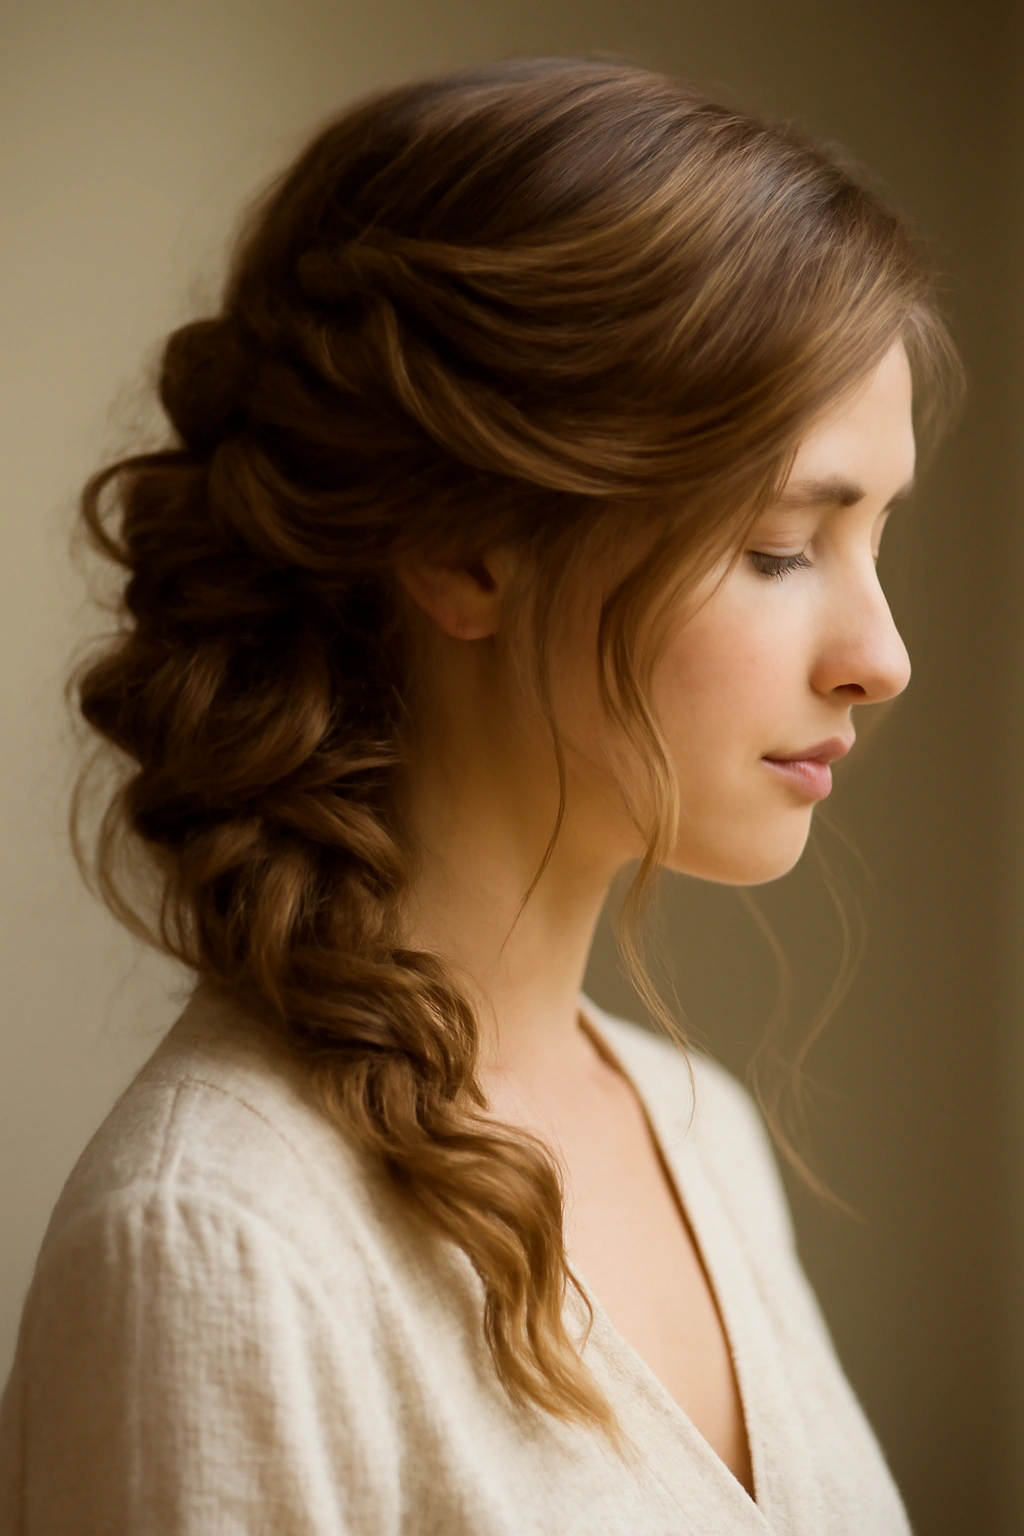
8. The Cascading Side Updo
This updo gathers most of your hair to one side of your head — typically the back or side — creating an asymmetrical, romantic look that’s both elegant and playful. The hair is twisted, braided, or otherwise gathered to one side, while some sections are left to cascade down or frame the opposite side of your face. This style is distinctly romantic because the asymmetry and off-center styling has an inherently softer, less formal quality than centered updos.
Why This Style Works for Romance
The cascading side updo is romantic because it feels whimsical and intentional without being overly formal or severe. The asymmetry immediately reads as elegant and modern, while the cascading strands maintain that touchable, approachable quality. One side of your face and neck remain beautifully visible and unframed, while the other side is romantic and gathered — this contrast is deeply flattering. The style works beautifully with movement; as you move through the evening, the cascading sections sway and shift, adding to the romantic, dynamic quality. This updo is also forgiving because slight imperfection and looseness only add to its charm.
How to Create This Look
- Start with textured, wavy hair created either the night before or with hot tools on the day of your event
- Decide which side you’ll gather your updo toward — typically toward the back or side of that same shoulder
- Gather hair from the crown and pull it toward your chosen side, keeping sections loosely textured rather than smooth and tight
- Create a twisted or braided section using the gathered hair, then wrap it around itself to form a loose knot at the gathering point
- Pin securely using multiple bobby pins inserted into the twisted or braided section
- Allow some sections to cascade down from the updo — either along the back of your head or down the opposite side of your face — depending on how dramatic you want the effect
- Leave face-framing pieces loose on the unupdo’d side of your head to enhance the romantic, cascading quality
- Use a light hairspray to set the style while maintaining movement and the intentionally soft appearance
Styling Tips and Tricks
Embrace looseness and imperfection in this style — a too-tight, too-neat side updo loses the romantic cascading quality. Let the gathered sections look slightly tousled and undone. You can add delicate cascading curls by curling the tail of your twist or braid before securing it, then allowing it to hang down. This style photographs beautifully from the side, so if you’re having professional photos taken, make sure the photographer captures this angle. The asymmetry means this style looks intentional and sophisticated even if it’s slightly less than perfect, so don’t stress about achieving absolute polish.
Final Thoughts
The romantic updo that feels right for you depends entirely on your hair type, the venue, and your personal style, but the most important principle is choosing a style that makes you feel genuinely beautiful and confident. The updos that last longest and photograph best are the ones that feel authentic to who you are — whether that’s the soft, undone aesthetic of loosely pinned waves or the elegant structure of a Gibson Girl updo. The difference between an updo that feels stiff and uncomfortable and one that feels effortlessly romantic comes down to intentional softness: loose twists instead of tight ones, strategic strands left loose around the face, flexible product that moves instead of freezing your hair in place.
The technical skills behind these updos are entirely learnable with a little practice and patience. Spend time experimenting before your actual event, perhaps creating the style 2-3 times to understand the specific movements and pinning patterns that work best for your hair. Most importantly, remember that romantic doesn’t mean perfect. Some of the most beautiful updos have slightly imperfect elements — loose strands, slightly separated braids, tousled waves — that make them genuinely romantic rather than looking like they came from a salon with military precision.
Whatever updo you choose, own it with confidence. The way you carry yourself in a style matters just as much as the style itself. An updo combined with the self-assurance that comes from knowing you look beautiful and intentional is what truly makes any special occasion feel romantic and memorable.