A flower girl’s hairstyle deserves as much attention as her dress. Nothing captures that perfect blend of elegance, innocence, and whimsy quite like a braided crown—and when you get it right, the photographs speak for themselves. These aren’t just pretty arrangements of hair; they’re architectural styles that need to hold up through a ceremony, outdoor heat, excited children, and the inevitable head-turning moments when everyone’s eyes are on your little one.
The magic of braided crowns is that they work across nearly every hair type, from fine and straight to thick and curly. They’re appropriate for formal weddings, casual garden celebrations, and everything in between. The best part? Most of these styles can be prepped ahead, adjusted on the day, and reinforced with strategic bobby pins and a good-quality hairspray so they survive the entire event without falling apart.
Whether you’re a parent learning to braid for the first time, a hairstylist who specializes in children’s events, or someone searching for fresh inspiration, these ten styles offer proven solutions that little ones actually feel comfortable wearing. Each one can be customized with ribbon, flowers, pearl pins, or delicate clips to match the wedding’s aesthetic—and each one comes with the specific tricks that prevent the most common styling disasters.
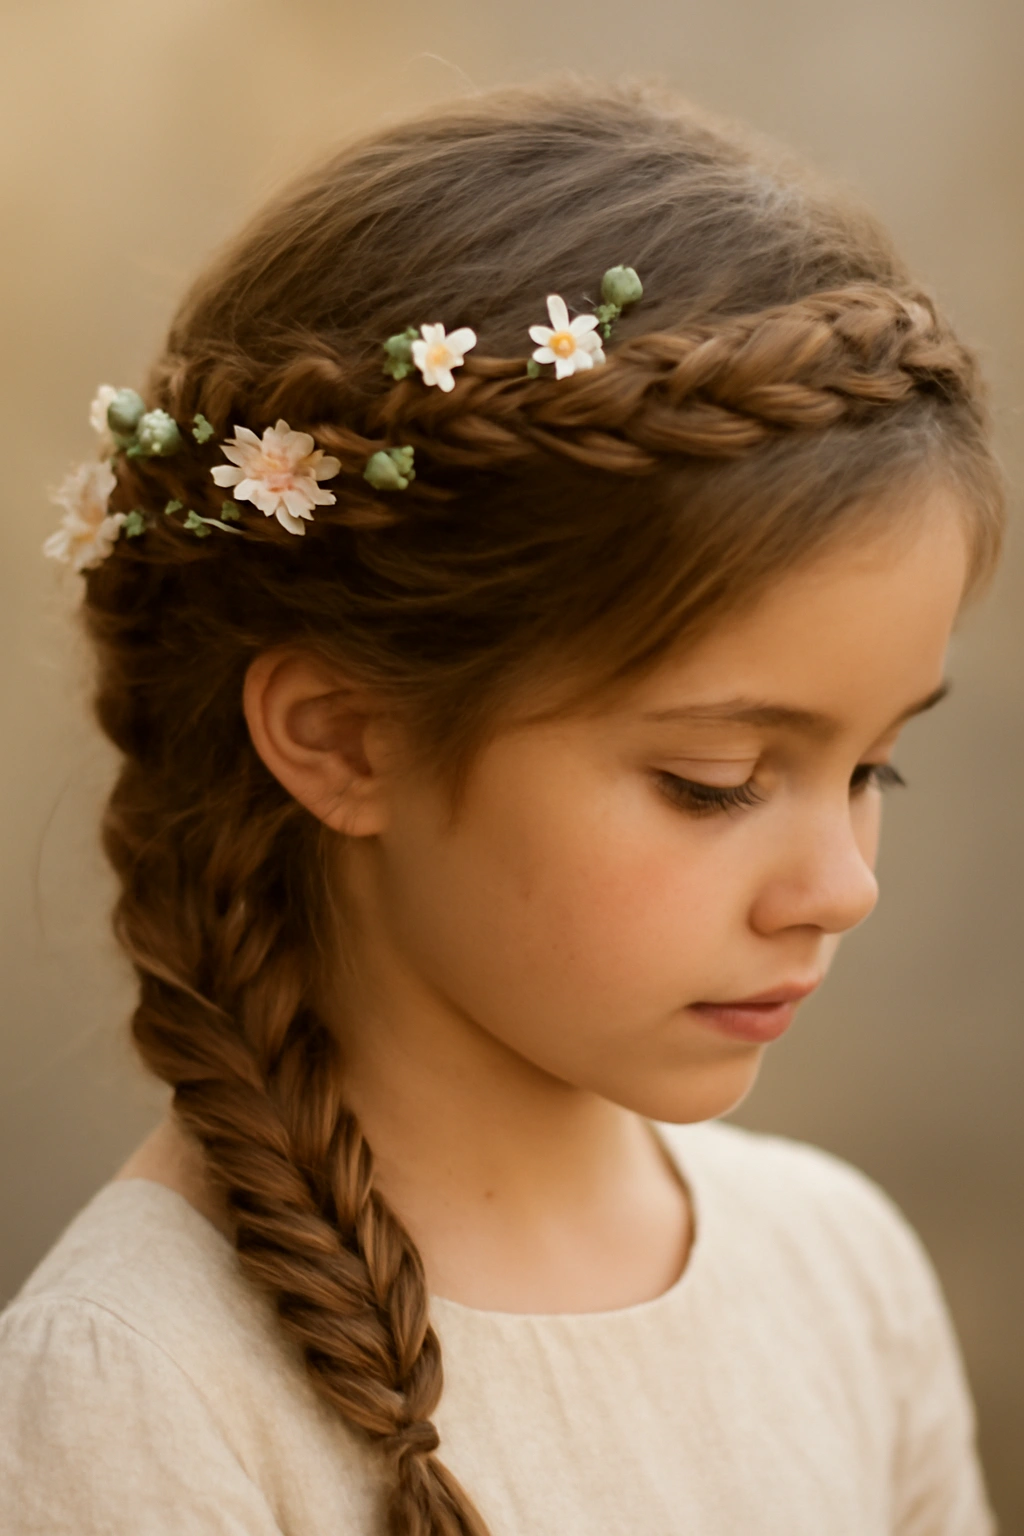
1. The Classic Daisy Chain Braid Crown

This is the foundation style that every flower girl should have in her repertoire—simple enough that it works on the first try, but polished enough that it looks intentional and beautiful in photographs. The daisy chain braid crown works by creating a single Dutch braid that wraps around the head like a crown, starting from behind one ear and finishing behind the other.
How to Build the Foundation
Start by brushing the hair thoroughly and applying a light texturizing spray or light hairspray—this gives even slippery, fine hair enough grip to hold the braid securely. Section off hair from the temple on one side, creating a horizontal line that will serve as your starting point. Begin a Dutch braid (braiding under instead of over, which creates that inverted, raised appearance) at this starting point, working the braid in a gentle curve that follows the natural shape of the head.
As you braid around, incorporate small sections of hair from underneath, gradually moving toward the back of the head. The braid should sit about an inch above the ear, creating a frame that’s flattering and secure. When you reach the back of the head, continue braiding down the nape area toward the opposite ear, maintaining even tension throughout so the braid looks intentional rather than accidental.
Finishing Touches That Make It Last
Secure the end of the braid with a small clear elastic or a hair-colored band tucked behind the opposite ear. The real secret to longevity is pinning—use 2-3 bobby pins along the braid to anchor it to the base of the hair, especially near the starting and ending points where the most stress occurs. A light mist of flexible-hold hairspray (not the stiff kind) seals everything in place without making the braid feel stiff or uncomfortable.
For flower girl events, twist a delicate ribbon or silk floss through the braid as you work, or weave in baby’s breath after the braid is complete. The visual effect is the same, but weaving flowers in afterward gives you more control over placement and doesn’t add weight that might pull the braid loose during the ceremony.
Pro tip: Braid this style the night before if possible—overnight, the braid will set and become even more secure and sculptural. Simply pin any loose pieces down in the morning, refresh with a light hairspray, and you’re ready to add fresh flowers right before the event.
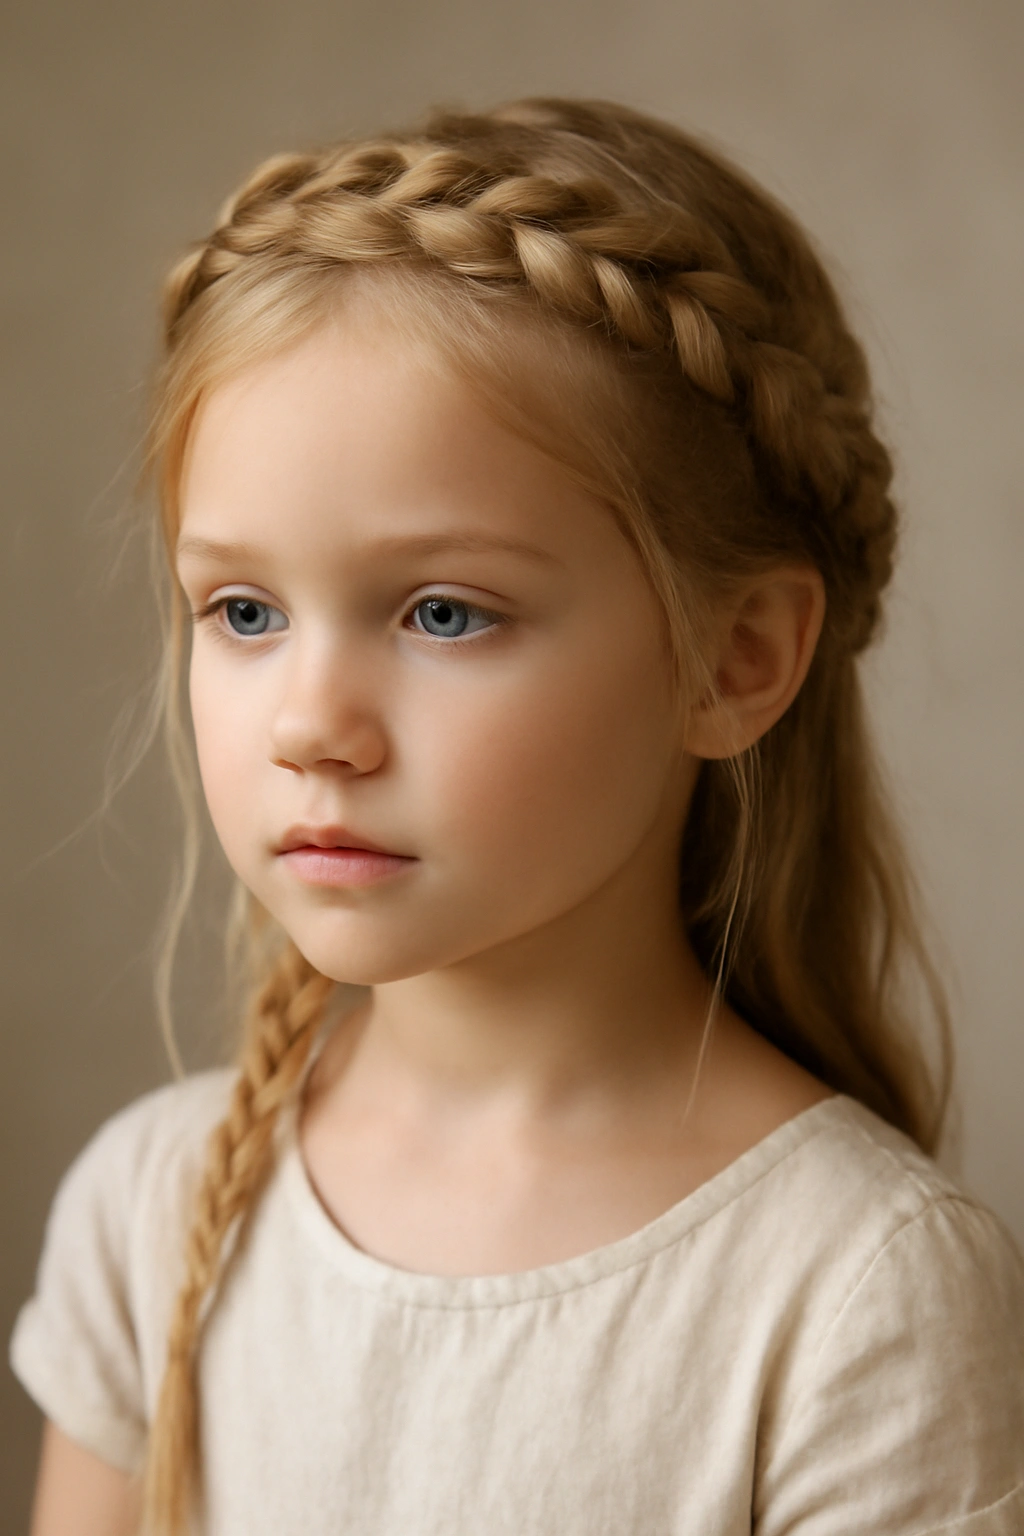
2. The Double Halo Braided Crown
For flower girls with longer, thicker hair, a double braid crown offers visual impact and architectural interest that photographs beautifully from every angle. This style uses two parallel Dutch braids positioned one above the other, creating the effect of a layered, floating crown around the head.
Setting Up Two Parallel Braids
Begin by creating a clean part down the middle of the head from the forehead to the nape. Take one side and section the hair into two distinct halves—the top portion (from the part to about mid-ear height) and the bottom portion. Start your first Dutch braid in the top section, beginning at the temple and moving backward, braiding in a gentle curve that hugs the side of the head.
Once the upper braid reaches the back of the head, secure it loosely (you’ll anchor it fully later). Repeat the exact same process with the lower section, positioning the second braid just below and parallel to the first. The spacing creates a crown effect that’s both visually interesting and structurally sound—each braid supports the other, making the whole arrangement more stable.
Bringing Both Braids Together at the Back
The key to this style is how you finish the back. Allow both braids to meet at the nape of the neck, then gently roll them together and pin them as a unified unit. This creates a full, romantic back view—especially stunning if the flower girl will be photographed from behind as she walks down the aisle.
Alternatively, if you prefer a more delicate look, leave both braids visible as separate elements and pin each one to its side of the head independently. Use a curved bobby pin or a U-shaped hair stick designed for this purpose—they’re far more effective than standard bobby pins for securing thick braids without creating visible lumps.
Adding Dimension Without Overwhelm
This style pairs beautifully with white flowers, baby’s breath, or ribbons woven through each braid separately. The double-braid construction means you can place flowers at two different heights, creating depth that’s visible in photographs. Keep the flowers light and dispersed rather than clustered—a young child shouldn’t feel like they’re wearing a heavy crown of foliage.
Worth knowing: This style works best on children ages 5 and up with hair long enough to reach at least mid-back. Very young children or those with shorter hair will be more comfortable with simpler styles that don’t require as much precision or as many pins.
3. The Twisted Vine Crown with Woven Ribbons
If braiding feels intimidating or the flower girl’s hair is too fine or short for traditional braids, a twisted vine crown offers the same elegant effect with much simpler technique. Twists are inherently forgiving—imperfect twists actually look more romantic and natural than mechanically perfect ones.
Creating Graceful Two-Strand Twists
Divide damp or slightly damp hair (dampness is crucial for this technique) into two thick sections starting from one temple. Twist section one clockwise and section two counterclockwise, then wrap them around each other in the opposite direction, creating a spiral effect that naturally hugs the head.
The beauty of twists is their flexibility—you can make them tighter or looser depending on the hair texture and the look you’re going for. Fine hair benefits from looser, more relaxed twists that create a romantic, undone feel. Thicker or curlier hair can handle tighter twists that read as more polished and intentional.
Incorporating Ribbon for Extra Elegance
Before you begin twisting, fold a narrow silk ribbon in half and pin the midpoint at your starting location. As you twist, weave the ribbon through the twist—one strand going over, one going under—so the ribbon becomes an integral part of the style rather than something added on top.
Silk ribbons work better than grosgrain or satin because they’re thinner, lighter, and drape more naturally. Pearl-colored ribbons complement blonde or light brown hair; ivory works with all hair colors. The ribbon catches light differently than hair, creating visual interest even in candid photographs taken during the ceremony.
Securing Without Visible Pins
Bring the completed twist around the back of the head and secure it by wrapping the loose ends around the twist’s base, tucking them underneath where they won’t be visible. A light hairspray mist makes the twist slightly sticky and much more stable—you can then use thin bobby pins to anchor the twist in place, tucking them between the twist strands where they won’t show.
If the flower girl has a shorter hairstyle and you can’t create a continuous twist all the way around, create a shorter twisted crown that anchors from side to side rather than completing a full circle. This still reads as intentional and beautiful without requiring as much hair length.
Insider note: Practice this style on a mannequin head or yourself a few days before the event. Twists have a learning curve, but once your hands understand the rhythm, you’ll be able to create them consistently and quickly on the day of the event.
4. The Loose Waterfall Braid Crown
A waterfall braid crown is the epitome of romantic, and it’s surprisingly easier to execute than it looks. This style creates the visual effect of water (or flowers, or ribbons) cascading down from a braid, while the braid itself anchors securely around the head.
Understanding the Waterfall Mechanism
A waterfall braid works by continuously dropping strands of hair as you braid—instead of incorporating new hair, you intentionally let pieces drop and fall freely. Start with a French braid at the temple, picking up a small section from the hairline and braiding normally for the first few passes.
Once you’ve established the braid, pick up a new section from below, braid it in, then drop the bottom strand of your braid—let it fall freely. The falling strand creates that cascading effect. Immediately pick up a new piece of hair to replace it, and repeat the process as you work around the head toward the back.
Positioning for Maximum Impact
The beauty of a waterfall braid is that it looks gorgeous from the side and back—perfect for a flower girl who’ll be visible from multiple angles. Position the braid to start at the temple, travel across the back of the head, and finish behind the opposite ear.
For a fuller waterfall effect that photos beautifully, create a loose waterfall braid (don’t pull too tight) and gently pull the strands to create a slightly undone, airy appearance. This actually strengthens the style by distributing tension more evenly, and it photographs as intentionally romantic rather than simply loose.
What to Cascade Through the Waterfall
The falling strands are your canvas for decoration. Weave baby’s breath through the fallen pieces, tuck in small flower sprigs, or let the hair fall freely and add flowers or pearl pins afterward. The advantage of adding flowers after styling is that you can adjust them on the day and replace any that wilt.
For extra security in a long ceremony or outdoor event, mist the falling strands with flexible hairspray before tucking flowers in. This prevents individual hairs from escaping and keeps the waterfall intact.
Pro tip: This style pairs beautifully with a half-up half-down look—leave some hair down in the back, pin the braid crown, and curl the remaining hair for added romanticism and volume.
5. The French Braided Flower Crown
A full French braid crown that starts at the forehead and travels around the entire head is a classic for good reason—it’s secure, photogenic, and works across a wide range of ages and hair types. The key is starting at the right spot and maintaining consistent tension.
Mapping Your Braid Path
Begin with clean, brushed hair and apply a light texturizing spray. Start the braid at the center of the forehead where the hairline meets the hair growth, with three roughly equal-sized strands. French braid (over, not under) as you normally would, but instead of braiding straight back, angle your braid slightly toward one side.
As you pick up new strands, work around the head in a gentle curve, always incorporating hair from above and outside the existing braid. This creates a crown that follows the natural shape of the skull. When you reach the side of the head behind the ear, continue around toward the back.
The Crucial Nape Section
Most French braid crowns loosen as they travel around the head, especially through the back. To prevent this, slightly increase tension as you work through the back and nape sections—not uncomfortably tight, but definitely firm. This is where most flower girls experience slippage during a long ceremony, so don’t skimp on this step.
When the braid reaches the opposite side of the head, continue braiding all the way to the ends of the hair (rather than stopping at the nape). Wrap the finished braid around and pin it to the starting point at the front of the head, creating a complete circle. This distributes the weight of the braid and prevents any single anchor point from bearing too much tension.
Anchoring with Purpose
Use at least 4-5 bobby pins spaced evenly along the braid, especially in the back and at the nape where gravity works hardest. Crisscross pins (one pointing left, the next pointing right) rather than all pointing the same direction—this gives superior holding power. Push pins all the way to the scalp, not just into the braid itself.
A light coat of flexible hairspray applied during the braiding process (while you’re working through the middle and back sections) will help the braid set in place as you work. This is far more effective than waiting and spraying afterward.
Decorating the Braid
Fresh flowers look stunning threaded through a French braid crown, but they’re heavy and can wilt during a long event. Artificial flowers, silk flowers, or baby’s breath are more practical choices that will look fresh throughout the entire ceremony and photographs.
Weave flowers into the braid as you work, or add them after the braid is complete by tucking stems and blooms into the braid’s grooves. The braid itself creates natural pockets where flowers rest securely without additional pins.
Worth knowing: This style works best on flower girls age 6 and up with shoulder-length or longer hair. The longer the hair, the more secure the crown will be. For younger children or shorter hair, consider a half-crown that starts at one temple, travels around the back, and ends at the opposite temple—equally beautiful and easier to execute.
6. The Fishtail Braid Crown with Floral Accents
A fishtail braid creates an entirely different visual texture than a classic three-strand braid—instead of thick, defined braid lines, a fishtail braid looks intricate, delicate, and slightly undone in the most intentional way. It’s the preferred style for flower girls whose parents want a modern, less formal aesthetic.
Learning the Fishtail Technique
A fishtail braid starts like a regular braid but uses only two thick sections of hair instead of three. Divide your hair into two halves. Take a thin slice from the outer edge of the right section and cross it over to the left section. Then take a thin slice from the outer edge of the left section and cross it over to the right section.
Continue alternating, always pulling thin slices from the outer edges and crossing them over to the opposite side. The key to a beautiful fishtail is keeping those outer slices small and consistent—this creates the intricate, woven appearance. Thick slices create a sloppy look; thin slices create the delicate visual that makes this style worth the extra effort.
Positioning for a Crown Effect
Start a fishtail braid at the temple on one side and work it around the back of the head toward the opposite temple, using the same technique as a French crown but with the fishtail method. The braid should sit about an inch above the ear, creating a frame that doesn’t obscure the face.
The relaxed appearance of a fishtail braid pairs beautifully with a slightly loose crown—don’t pull it super tight. In fact, after you’ve completed the braid, gently pull on sections of the outer strands to loosen and widen the braid. This creates a softer, more romantic look that photographs as intentionally undone rather than sloppy.
Why Flower Girls Love This Style
Fishtail braids feel thinner and lighter than thick three-strand braids, making them far more comfortable for children who have sensitive scalps or who get headaches from the weight of heavier styles. The intricate appearance means it looks beautiful even if a few strands escape—perfection isn’t the goal; romantic intricacy is.
Flowers work wonderfully with fishtail braids. Tuck individual blooms or sprigs of baby’s breath into the fishtail sections as you complete the braid, or add them afterward by sliding stems into the braid’s grooves.
Pro tip: A fishtail braid crown is easier to create if you first lightly braid the hair in a loose three-strand braid, let it sit for an hour, then undo the three-strand braid. This gives the hair a gentle wave pattern that makes the fishtail sections easier to separate and control.
7. The Spiral Crown with Delicate Side Braids
For a flower girl with fine, delicate hair or someone who simply prefers a lighter, more feminine aesthetic, a spiral crown combines curved braids with twisted sections that spiral around the head. This style offers visual interest without the weight of a thick, continuous braid.
Creating the Spiral Foundation
Begin on one side of the head, roughly where your temple and hairline meet. Create a thin Dutch braid (about the width of your pinky finger), working it in a gentle spiral curve around the head. The spiral shouldn’t be perfect—it should follow the natural contours and curves of the skull, almost like water flowing around rocks.
As you spiral around, occasionally switch from braiding to twisting for a few inches, then back to braiding. This variation in technique prevents the monotony of a single braid all the way around and creates visual texture that’s interesting to look at and photograph.
Adding Delicate Side Details
Once your main spiral crown is in place and pinned, add thin three-strand braids on each side of the head (from the temple area toward the back). These smaller braids don’t need to connect to the crown; they’re decorative elements that frame the face and add dimension.
Secure these side braids with tiny, clear elastics or bobby pins tucked behind the ear. The beauty of this style is its apparent delicacy—even though it’s very secure, it looks light and ethereal, perfect for a young flower girl who wants to feel special without feeling weighed down.
Flowers, Ribbons, and Pearl Pins
The multiple braids and twists in this style give you numerous opportunities for decoration. Weave a ribbon through the main crown spiral, tuck flowers into the side braids, and use delicate pearl pins to highlight specific sections. The complexity of the style actually makes decoration easier—there are so many places for flowers to naturally nest.
For a cohesive look, keep decorations consistently light and dispersed rather than clustering all the flowers in one area. This creates a balanced appearance that photographs beautifully from multiple angles.
Worth knowing: This style works beautifully on curly or wavy hair, where the variations in texture naturally enhance the spiral effect. On very straight hair, you might want to slightly wave or curl the hair first to create dimension that makes the spirals more visually interesting.
8. The Four-Strand Braided Crown
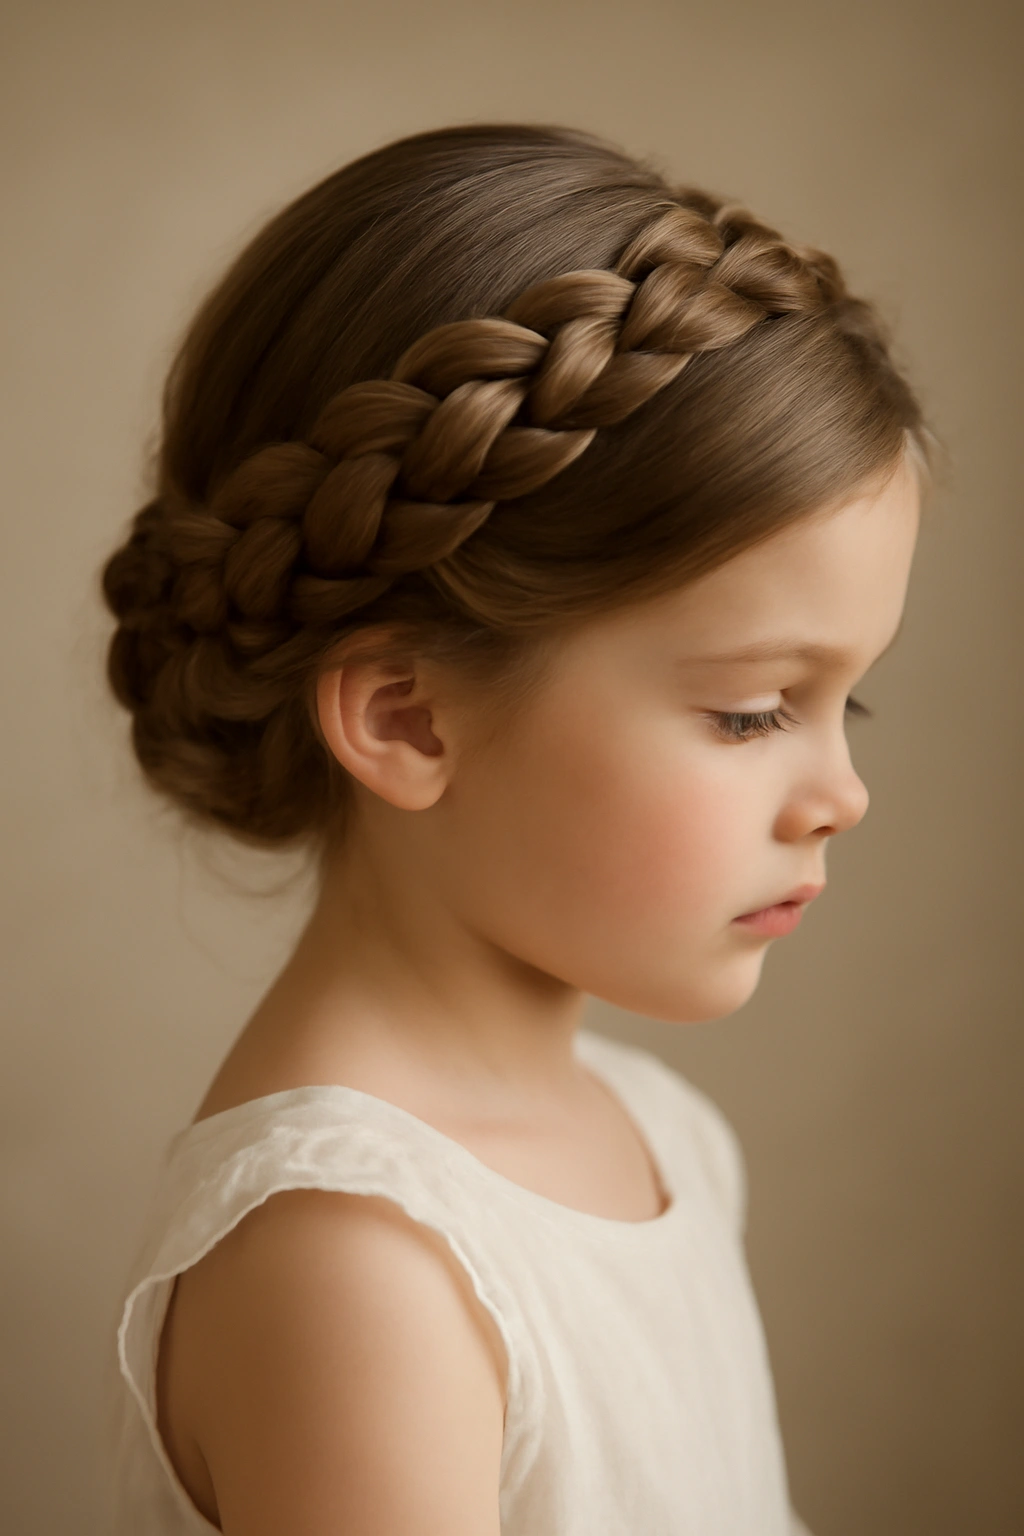
A four-strand braid is a step up in complexity from the classic three-strand braid, but the visual result—an intricate, thick crown with beautiful linear patterns—is worth the practice. This style reads as more sophisticated and intentional, perfect for formal weddings or older flower girls.
Dividing Hair into Four Strands
Begin with four roughly equal-sized strands. The rhythm of a four-strand braid is: braid the right strand over two (it’s now on the left), braid the left strand over two (it’s now on the right), repeat. It takes a few repetitions to get into the rhythm, but once your hands understand the pattern, it becomes surprisingly automatic.
The braid itself is thicker and more sculptural than a three-strand braid because there’s more hair involved, which means it’s inherently more secure. Position the braid to start at one temple and curve around the back of the head, following the same path as a French crown would take.
Why This Style Is More Secure
The extra strand and the way the strands interweave means there’s simply more structural integrity. If a three-strand braid starts to loosen, hair can slip free relatively easily. With a four-strand braid, even if one section loosens slightly, the overall structure remains intact because of how densely the strands are interwoven.
This makes it an excellent choice for active flower girls, outdoor ceremonies, or longer events where a simpler braid might begin to unravel by the time you reach the reception.
Making It More Accessible
If a four-strand braid feels overwhelming, you can simplify the technique by creating a three-strand braid crown first, then weaving a thin ribbon through the braid to create the visual effect of a four-strand braid. The effect is similar, but the execution is far simpler and appropriate for children’s events where speed and reliability matter.
Pro tip: Practice this braid on yourself or a friend several times before attempting it on the flower girl. The braiding pattern is less automatic than three-strand braiding, and you’ll be more confident in executing it smoothly if you’ve already done it correctly several times.
9. The Dutch Braid Crown with Pearl Pins
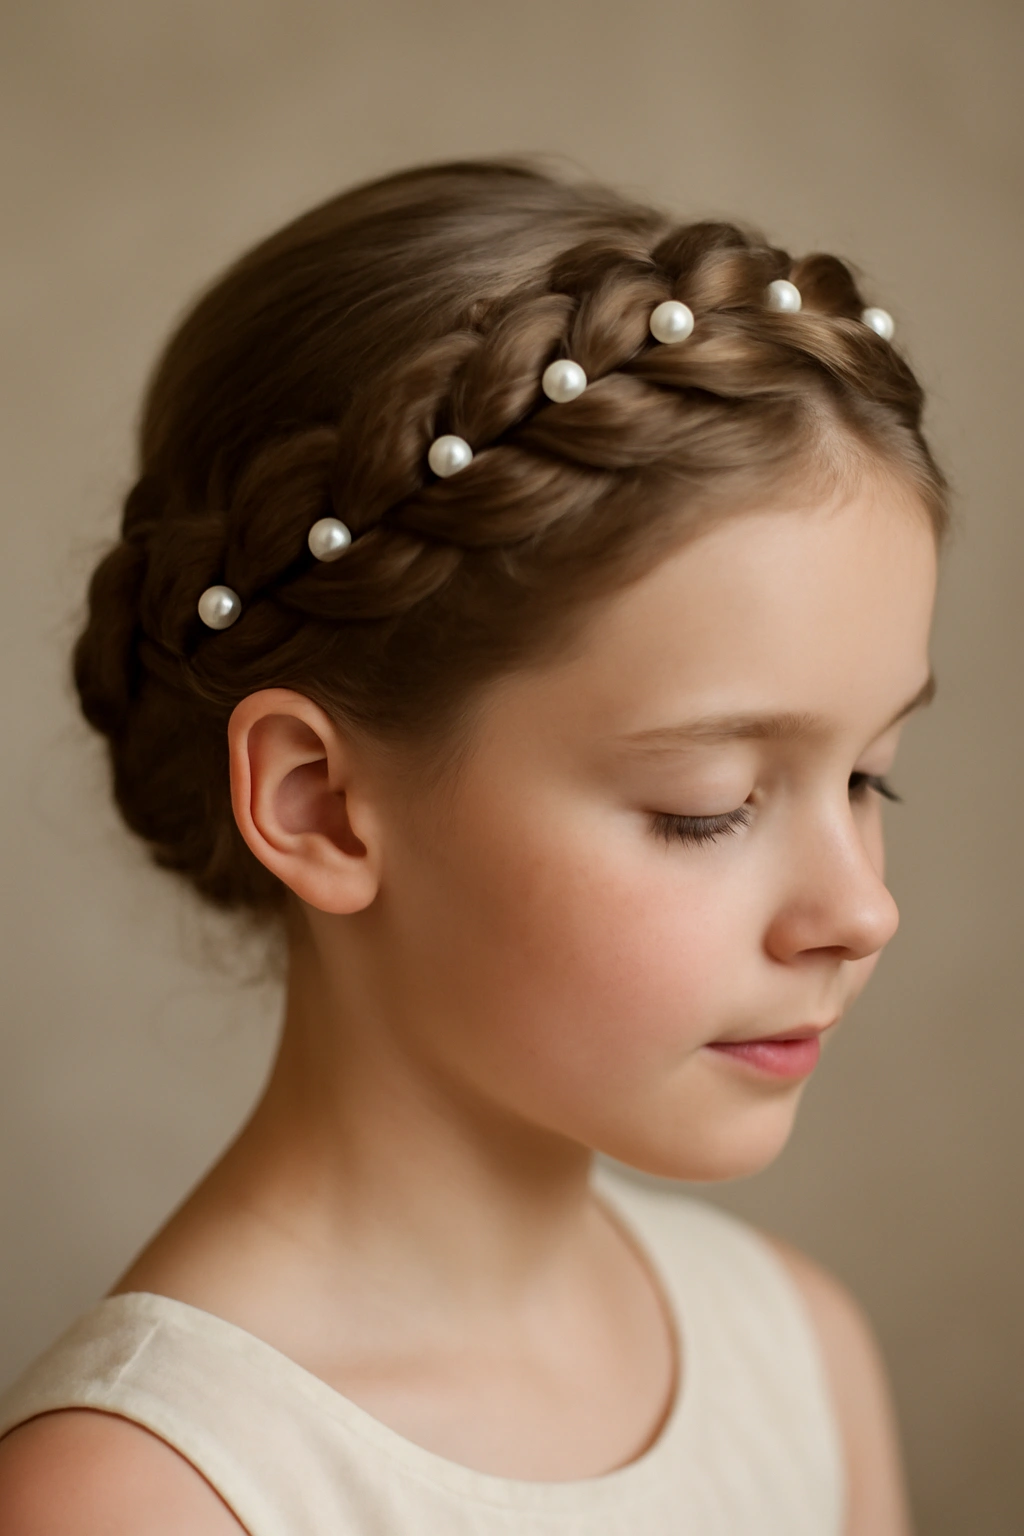
A Dutch braid crown creates that inverted, raised appearance that photographs beautifully and feels modern while still being utterly appropriate for formal events. Paired with delicate pearl pins positioned strategically along the braid, this style elevates a simple technique into something that looks custom-designed.
Mastering the Dutch Braid Technique
A Dutch braid is essentially the opposite of a French braid—instead of crossing strands over the top of the braid, you cross them under, beneath the main structure. This creates a braid that appears to sit on top of the hair rather than embedded in it, making the braid itself the visible focal point.
Begin at one temple and Dutch braid around the head following the same curved path as a French crown would take. Work the braid around to the opposite temple, then bring the loose ends to the back of the head and secure them with bobby pins at the nape.
The Dutch braid naturally sits raised and prominent, which is why it photographs so beautifully—the dimension is visible from every angle, and the braid itself becomes the design element rather than just a means of pulling hair back.
Strategic Pearl Pin Placement
Once the braid is complete and secured, add delicate pearl pins at strategic intervals along the braid—roughly every 2-3 inches. Slide each pin through the braid structure and into the hair beneath to anchor it securely. Pearl pins catch light beautifully in photographs and add just enough extra detail to make the style feel special and intentional.
Use pins that match the flower girl’s skin tone and hair color for a subtle effect, or choose gold or silver pins for a bit more sparkle. The scale matters—choose small pins appropriate for a child, not large statement pins that would overwhelm her.
Adding Flowers Selectively
With the pearl pins already providing visual interest, flowers can be added more sparingly than with other styles. Place one or two clusters of baby’s breath or small flowers in the braid, perhaps near the end or where two pins create a frame. This restraint makes the design feel elegant rather than overwrought.
Alternatively, skip additional flowers entirely and let the braid and pearl pins speak for themselves. The beauty of Dutch braids is that they’re visually interesting enough on their own.
Worth knowing: Dutch braids are actually easier to learn than French braids because the under-crossing motion feels more natural to most people. If you’ve never tried Dutch braiding, this style is an excellent place to start—it will likely be easier to execute than you expect.
10. The Boho Lace Braid Crown
The boho lace braid crown combines the delicate, intricate appearance of multiple thin braids with the romantic aesthetic of flowers, creating a style that feels fashion-forward while remaining appropriate for young flower girls. This is the style that stands out in photographs because it looks hand-crafted and intentional.
The Boho Lace Braiding Pattern
Rather than one thick braid, the boho lace crown consists of three to five thin braids positioned close together, creating a lace-like pattern around the head. Begin with one thin braid at the temple, then create additional thin braids that run parallel to it or that weave around it.
The braids don’t need to connect perfectly or create a mathematically precise pattern—in fact, the beauty of the boho aesthetic is that it’s intentionally relaxed and organic. Each braid can be slightly different thickness or tightness; the overall effect should be romantic and undone, not mechanical.
Building Dimension with Variation
Alternate between three-strand braids and two-strand twists, or use a mix of Dutch and French braiding techniques in different sections. This variation creates visual texture that photographs beautifully and feels more modern than a single unified braid.
Consider the flow of hair around the head. Does it curve? Does it spiral? Does it straighten out in the back? Let the hair’s natural patterns guide your braiding decisions rather than forcing a rigid, pre-planned design.
Flowers as the Star
With multiple thin braids as the foundation, flowers become the main decorative element. Weave baby’s breath through every braid, tuck small flower sprigs into the spaces between braids, and use delicate pins to anchor additional flowers strategically. The boho aesthetic celebrates flowers, so don’t be shy about abundance here—the overall effect should be romantic and garden-like.
Pair this style with a slightly loose, flowing hairstyle below the crown for the full boho effect. Or keep the rest of the hair neatly styled up in a bun, which creates an interesting contrast between the structured crown and the rest of the style.
Why Flower Girls Love This Style
The boho lace braid feels light and romantic—not heavy, not overly formal, not babyish. For a flower girl who’s reached that age where she has opinions about her appearance, this style feels grown-up and beautiful without being inappropriate for her age.
The multiple thin braids are also more forgiving than a single thick braid—if one section loosens slightly, the overall design is barely affected because there are other braids holding the structure together. This is genuinely less stressful for a child who might move around, play with her hair, or experience a long day of photographs.
Pro tip: Create a mood board or Pinterest collection of boho braid styles and show them to the flower girl ahead of time. When a child feels invested in her own styling decisions, she’s much more likely to be happy with the final result and take care of the style throughout the day.
Final Thoughts
The right braided crown hairstyle can make a flower girl feel like the special person she is on the wedding day—confident, beautiful, and excited about her role. The styles above work across different hair types, ages, and comfort levels, which means there’s genuinely a perfect crown braid for every flower girl.
The most important technical truth to remember is that security matters far more than perfection. A slightly imperfect braid that stays in place throughout the ceremony looks beautiful in photographs; a perfect braid that loosens halfway through causes stress and requires fixes. Invest in good bobby pins, use flexible hairspray, and don’t skip the step of securing your work with multiple pins positioned strategically.
Practice your chosen style at least once before the event, ideally twice. This gives you confidence, shows you exactly how long it takes, and allows you to troubleshoot any issues while you’re not under time pressure. A flower girl can sense when the person styling her hair is nervous or uncertain—but when you approach the task with calm confidence, even young children relax and cooperate.
Finally, remember that the most beautiful hairstyle is the one the flower girl feels comfortable wearing. If she’s tugging at her hair, complaining about tightness, or clearly unhappy about the style, no amount of aesthetic perfection makes up for her discomfort. The best crown braid is the one that makes her feel special, leaves her feeling like herself, and stays in place so she can enjoy the day without thinking about her hair at all.