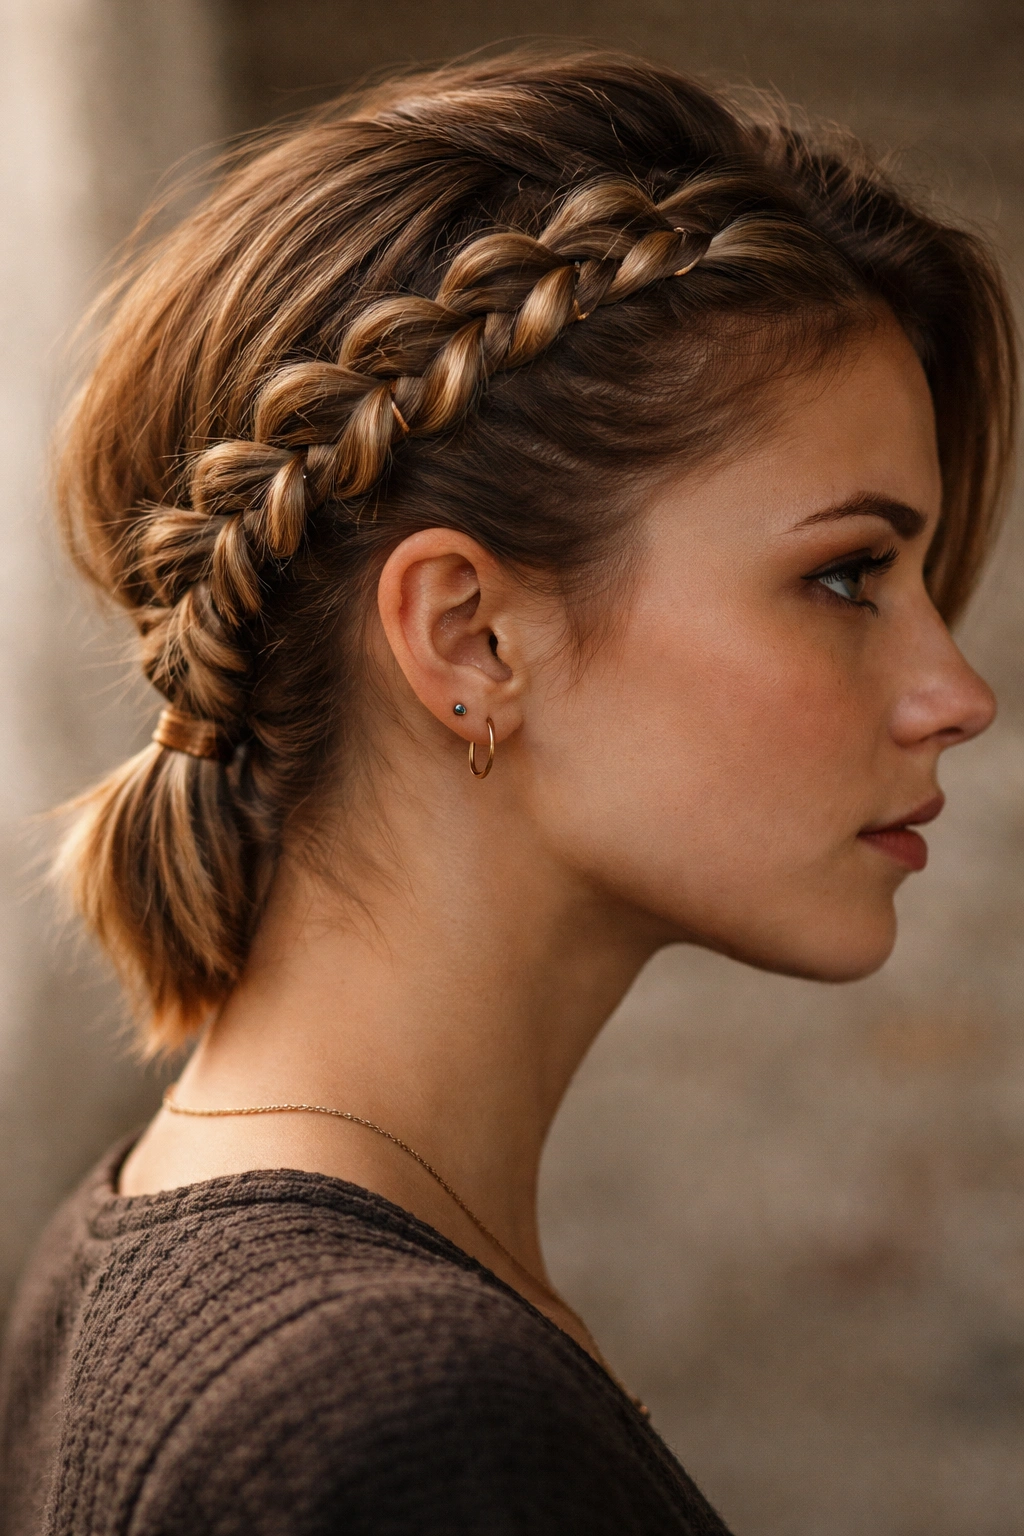
Short hair doesn’t mean you have to skip Viking braiding altogether—in fact, some of the most striking Norse-inspired styles actually shine when your hair is cropped close to the head. The misconception that you need long, flowing locks to pull off warrior-worthy braids is exactly that: a misconception. What Viking braids actually demand is texture, intentional placement, and a willingness to lean into the aesthetic rather than fight it. If you’ve got short hair and you’re drawn to that fierce, historically-grounded look, you’re in the right place.
The beauty of adapting Viking braiding techniques for shorter lengths is that they become more architectural and intentional, not less. A braid that might get lost in waist-length hair becomes a focal point when it’s positioned on a shorter cut. You’re working with what’s called the “canvas principle”—your head itself becomes the primary visual element, and every braid, wrap, and texture choice reads immediately. This is actually closer to how these styles would have functioned historically; Vikings weren’t braiding purely for decoration, but as a practical method of keeping hair out of the face during work and combat. Short-haired Viking braids honor that functional origin while feeling completely contemporary.
The styles that follow work beautifully on cuts ranging from pixie-length to chin-length bobs, and many adapt seamlessly across different hair types and textures. Whether you have naturally straight hair, waves, coils, or curls, you’ll find techniques in here that complement your specific texture rather than fighting it. The key is understanding why each braid works at shorter lengths, how to position it for maximum impact, and what styling tricks make the difference between a braid that falls apart and one that feels intentional and structured.
1. The Classic Shieldmaiden Side Braid
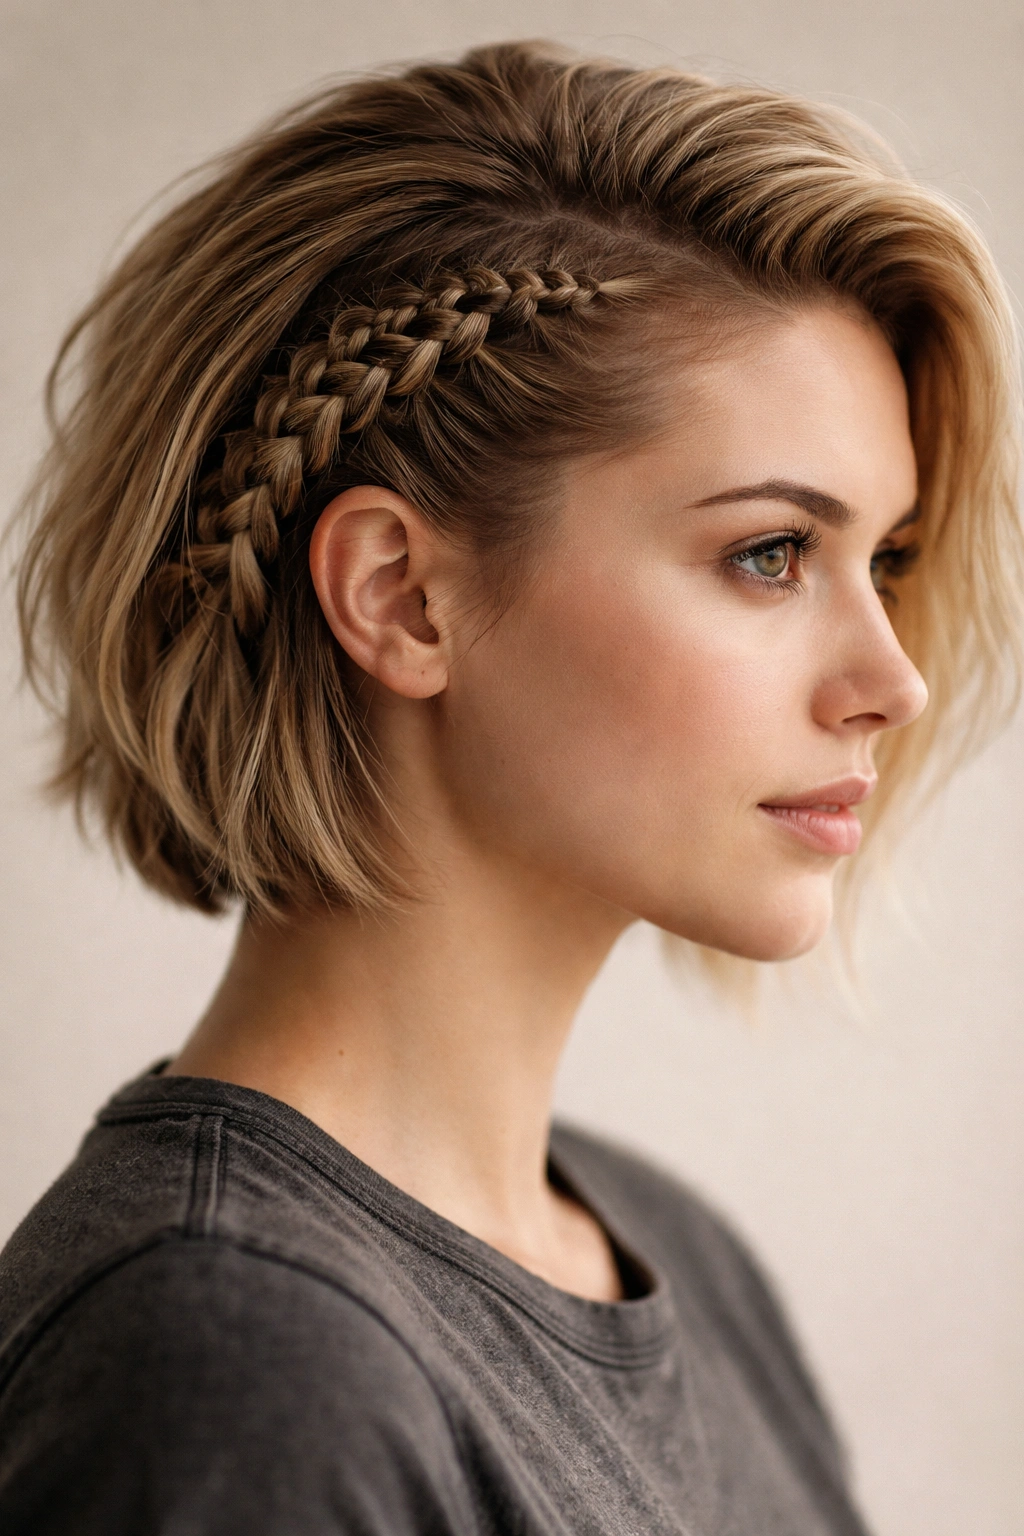
This is the entry point for anyone new to Viking braiding on short hair—it’s recognizable, forgiving, and absolutely stunning when executed with confidence. The shieldmaiden side braid sits against the skull on one side of the head, typically beginning near the temple and traveling toward the back or sometimes wrapping toward the opposite ear. What makes it specifically work for shorter hair is that you’re not trying to braid the entire length down the back; instead, you’re creating a visual statement that reads as intentional rather than incomplete.
Why It Works For Short Hair
A side braid on short hair immediately draws attention to your facial features and bone structure. The braided line creates a frame that actually enhances rather than competes with a shorter cut. Because the braid sits against the scalp rather than hanging away from it, you have better control over the tension and placement, which matters enormously when you don’t have the weight of long hair to anchor the braid naturally. The braid can be as small or as substantial as your hair length allows—even a three-strand braid that’s only two or three inches long reads as intentional and fierce.
How to Execute It
Start by sectioning off hair at your temple, just at the hairline or slightly above. Take three even sections and begin your basic three-strand braid, keeping tension consistent and pulling slightly toward your scalp rather than away from it. This creates what braiders call a “tight hold” that prevents the braid from sliding or loosening as you move through your day. As you continue the braid, angle it gently back and slightly downward—you’re not aiming for a specific endpoint as much as creating a visual line that complements your head shape. If your hair is very short (pixie-length), you might only get four or five complete braiding sequences before you run out of length; that’s perfectly acceptable and still looks intentional.
- Braid tightly for better hold and visual definition
- Use a tiny elastic or even a piece of contrasting thread to secure the end
- Gently backbrush the three sections before you begin for extra grip
- Keep your sections even-sized so the braid has symmetry and visual weight
Pro tip: If your braid keeps slipping as you’re making it, mist the sections lightly with a texturizing spray before you start—the grit helps your fingers grip the sections more securely.
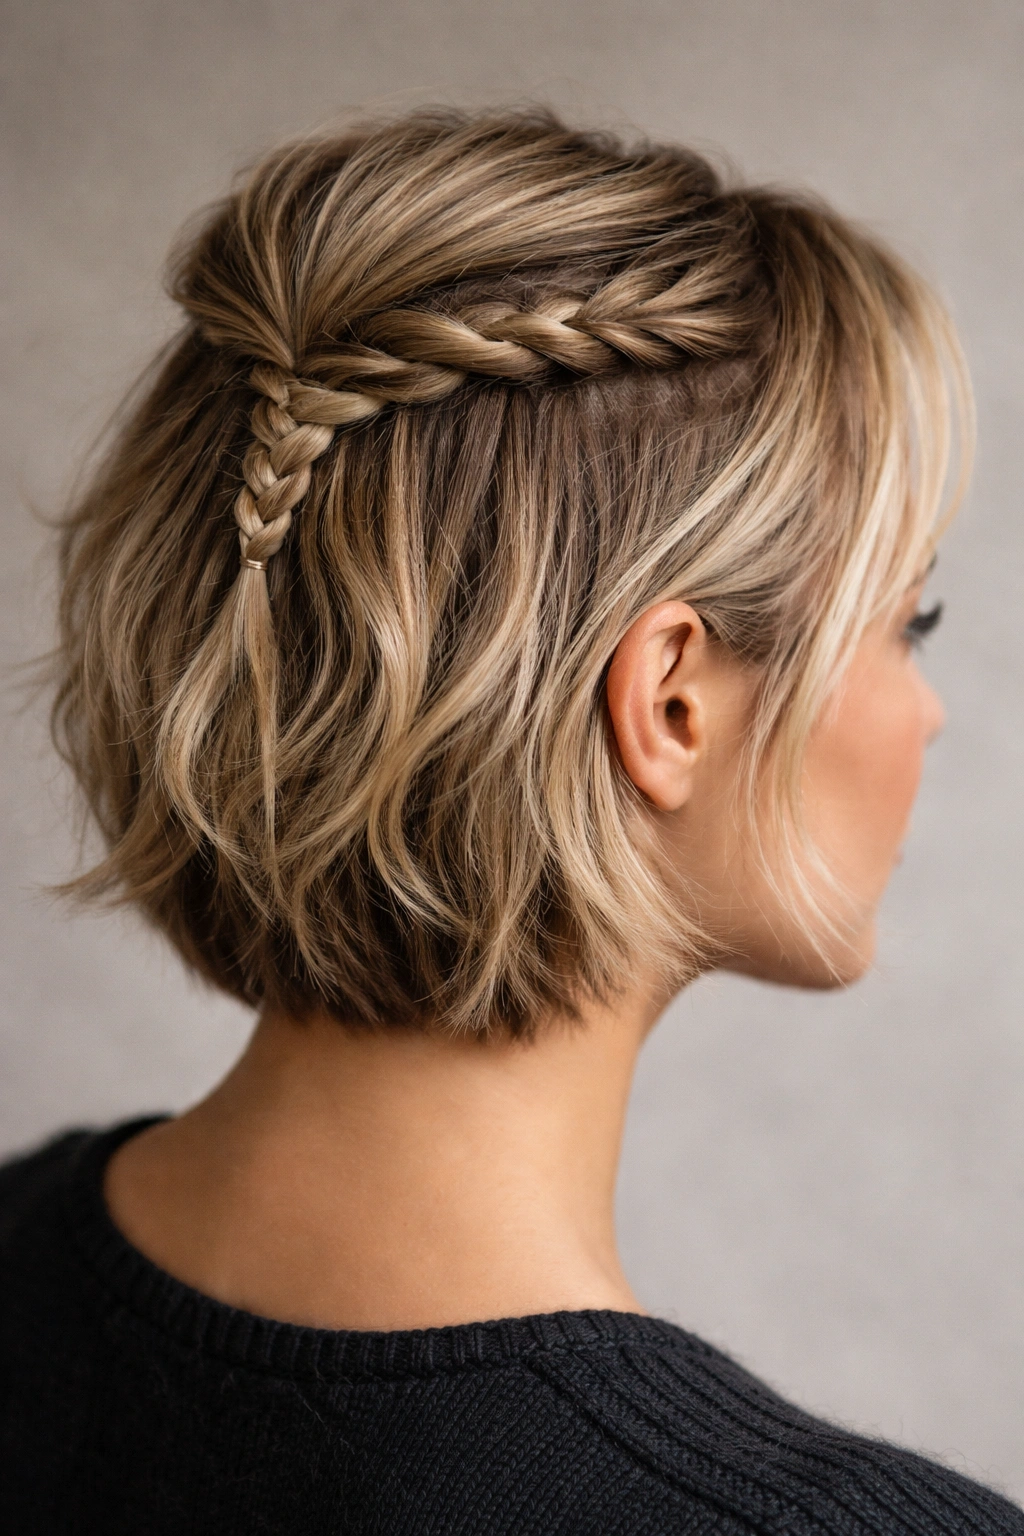
2. The Feathered Crown Braid
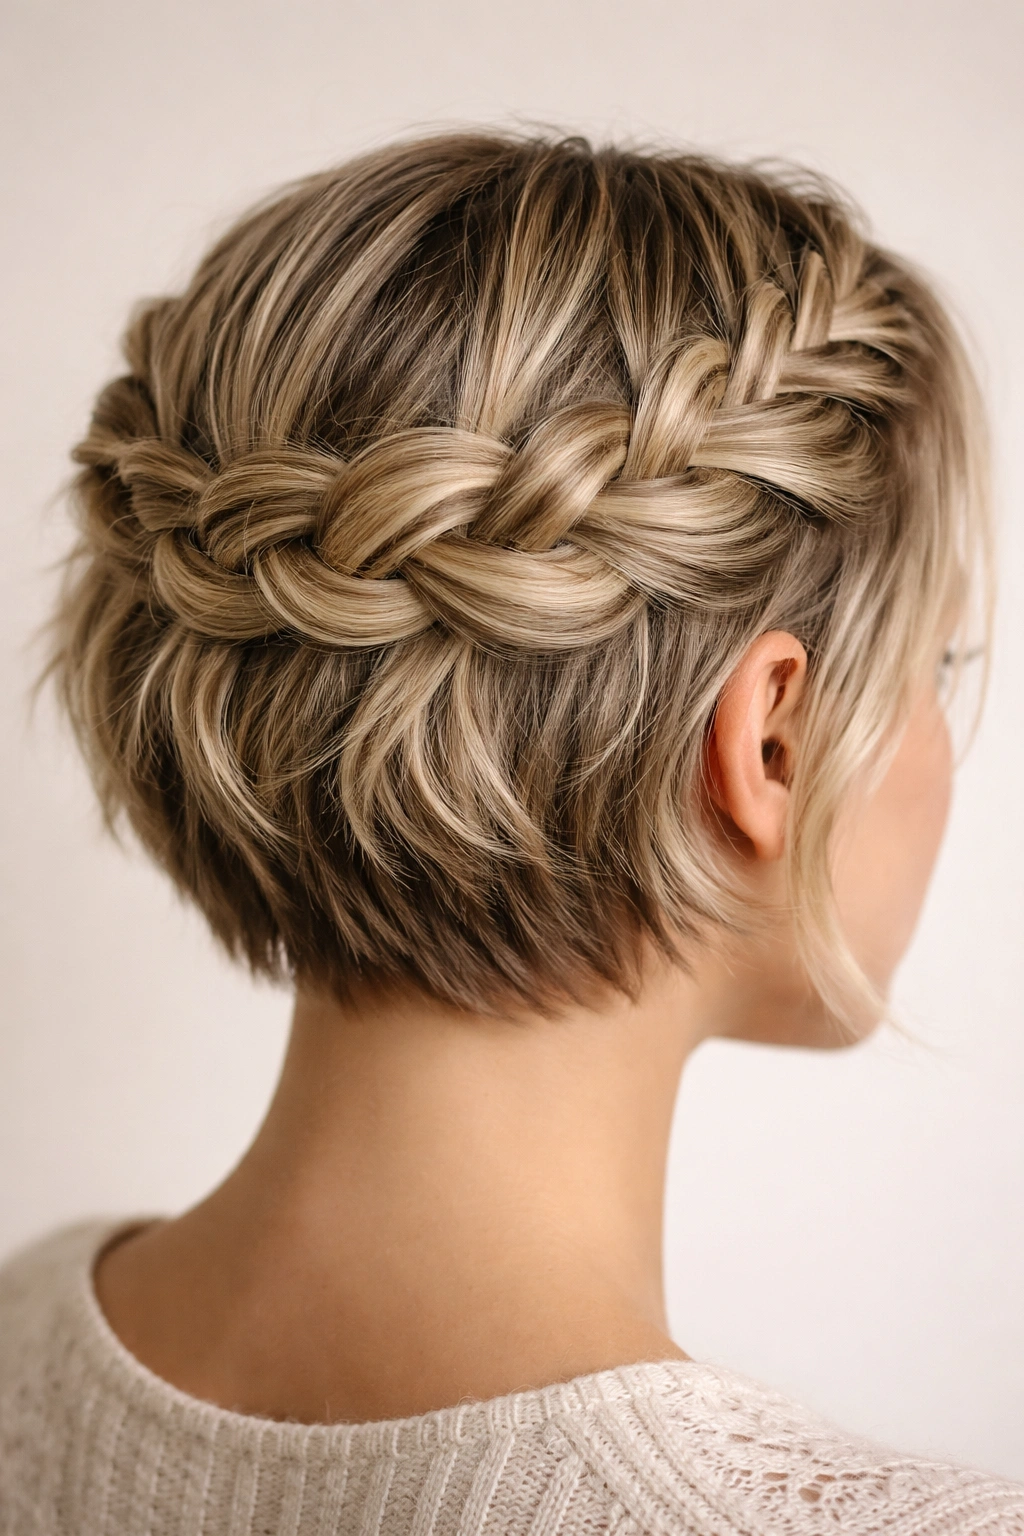
This style wraps around the back of the head like a crown and works particularly beautifully on shorter cuts because it creates a halo effect that frames your entire face. The “feathering” refers to strategically pulling out small sections of the braid after you’ve completed it, creating a softer, more organic texture. This technique transforms a simple braid into something that feels ethereal and intentional simultaneously—very Viking aesthetics, since that culture definitely understood the power of combining hard and soft elements.
Why It Works For Short Hair
Crown braids on short hair feel royalty-inspired rather than diminished. The circular placement means the braid is visible from every angle, which actually works better when you don’t have long hair competing for attention. The feathering process also helps disguise any areas where your shorter hair might feel thin or less substantial—each pulled section adds dimension and visual weight. On short hair, this style reads as a choice rather than a compromise, which is the difference between a style feeling authentic and feeling like it’s trying too hard.
How to Execute It
Begin by creating a horizontal parting across the back of your head, roughly where a crown would sit. Start your braid on one side, using three sections from just behind your ear. Braid across the back of the head, angling slightly upward, until you reach the opposite side. Secure the end as you work around, and then come back through and gently pull out small sections of the braid using the tip of a rattail comb or even a bobby pin. Pull each section just enough that it creates a feathered, softer texture without completely dismantling the braid structure. The goal is controlled looseness, not dishevelment.
- Pull feather sections from alternating sides of the braid for balanced dimension
- Start feathering from the center and work outward for a more organic look
- Use bobby pins to secure any sections that feel too loose after feathering
- If you have very short hair, you might only get 4-5 feathered sections before you run out of braid—that’s enough
Worth knowing: This style actually works better on second-day or third-day hair because it has a bit more texture and grip. If your hair is freshly washed, add texture spray beforehand.
3. The Double Dutch Warrior Braids
Double braids sit symmetrically on either side of the head, mimicking the look of warrior braids in historical depictions. When executed on short hair, they create a bold, balanced aesthetic that feels neither whimsical nor overly warrior-like—it’s just genuinely striking. This style is particularly forgiving on hair that’s textured or slightly resistant, because the double structure means you’re not asking any single braid to carry the entire visual weight.
Why It Works For Short Hair
Two braids automatically read as intentional and bold. Because you’re distributing the braided sections across both sides of the head, the overall effect feels balanced and architectural rather than lopsided. On shorter hair, this means you’re creating a focal point that’s impossible to miss—you’re not relying on length to communicate the style, you’re relying on placement and symmetry. The double structure also means the braids can be quite small and still feel substantial; a thin braid on each side looks deliberate where a single thin braid might look accidental.
How to Execute It
Create a vertical center part down the middle of your head from forehead to nape. Starting on one side, take a three-strand section from just behind your ear and braid downward and slightly inward—you’re aiming to angle the braid roughly toward the center back of your head rather than straight down. Repeat on the opposite side, mirroring the angle and tension. Both braids should feel like they’re “meeting” somewhere in the back, even if they don’t actually touch. Secure each braid individually, and then you can connect them at the back with a small decorative clip or elastic if you want them to read as a unified style.
- Keep both braids at exactly the same tension so they look intentional and matched
- Angle them slightly inward rather than straight down the sides for a warrior-like effect
- Consider backcombing your sections before braiding for extra hold and visual texture
- If your hair is very short, these braids might only be a few inches long—and that’s perfect
Real talk: If you have a lot of hair with density, this style will read as fuller and more substantial. If you have finer hair, use texturizing spray beforehand to increase grip and make each braid feel more defined.
4. The Norse Knot Braid with Wraps
This style combines traditional braiding with decorative wraps—using thread, thin ribbon, or even faux leather strips around the base or along the length of the braid. The “Norse knot” refers to the historical practice of braiding and wrapping hair as both a functional and aesthetic choice. On short hair, the wrapping technique becomes even more visible and impactful because you’re not trying to create drama through length; you’re creating it through texture and embellishment.
Why It Works For Short Hair
Wraps add visual dimension and texture to even very small braids. A two-inch braid suddenly feels intentional and thought-through when you’ve wrapped the base with contrasting thread or a thin strip of material. This technique is especially effective on short hair because the wrap is so visible—it’s not hidden by layers of longer hair, it’s on full display. The wrapping also creates a kind of visual “marker” that reads as very specifically Viking-inspired, which helps short hair braids feel like a deliberate aesthetic choice rather than an afterthought.
How to Execute It
Create a basic three-strand braid starting from your temple or from the back of your head, depending on where you want the braid to sit. Once you’ve braided as far as your hair length allows, secure the end loosely. Now, take your wrapping material—this could be embroidery thread, a thin strip of linen, leather cord, or even a ribbon—and begin wrapping it tightly around the base of the braid, just above the elastic. Wrap about half an inch to an inch, depending on how bold you want the effect to be. Tie off the wrapping material securely behind the braid, or tuck the ends underneath the wraps so they’re not visible.
- Use contrasting colors or materials for maximum visual impact
- Wrap tightly so the wrapping feels intentional rather than loose or accidental
- You can wrap just the base, or spiral the wrapping material down the entire braid length
- Experiment with materials—thread, yarn, leather, ribbon all read differently and create different moods
Pro tip: If you’re using leather or a material that might be stiff, slightly dampen it before wrapping to make it more pliable and easier to work with.
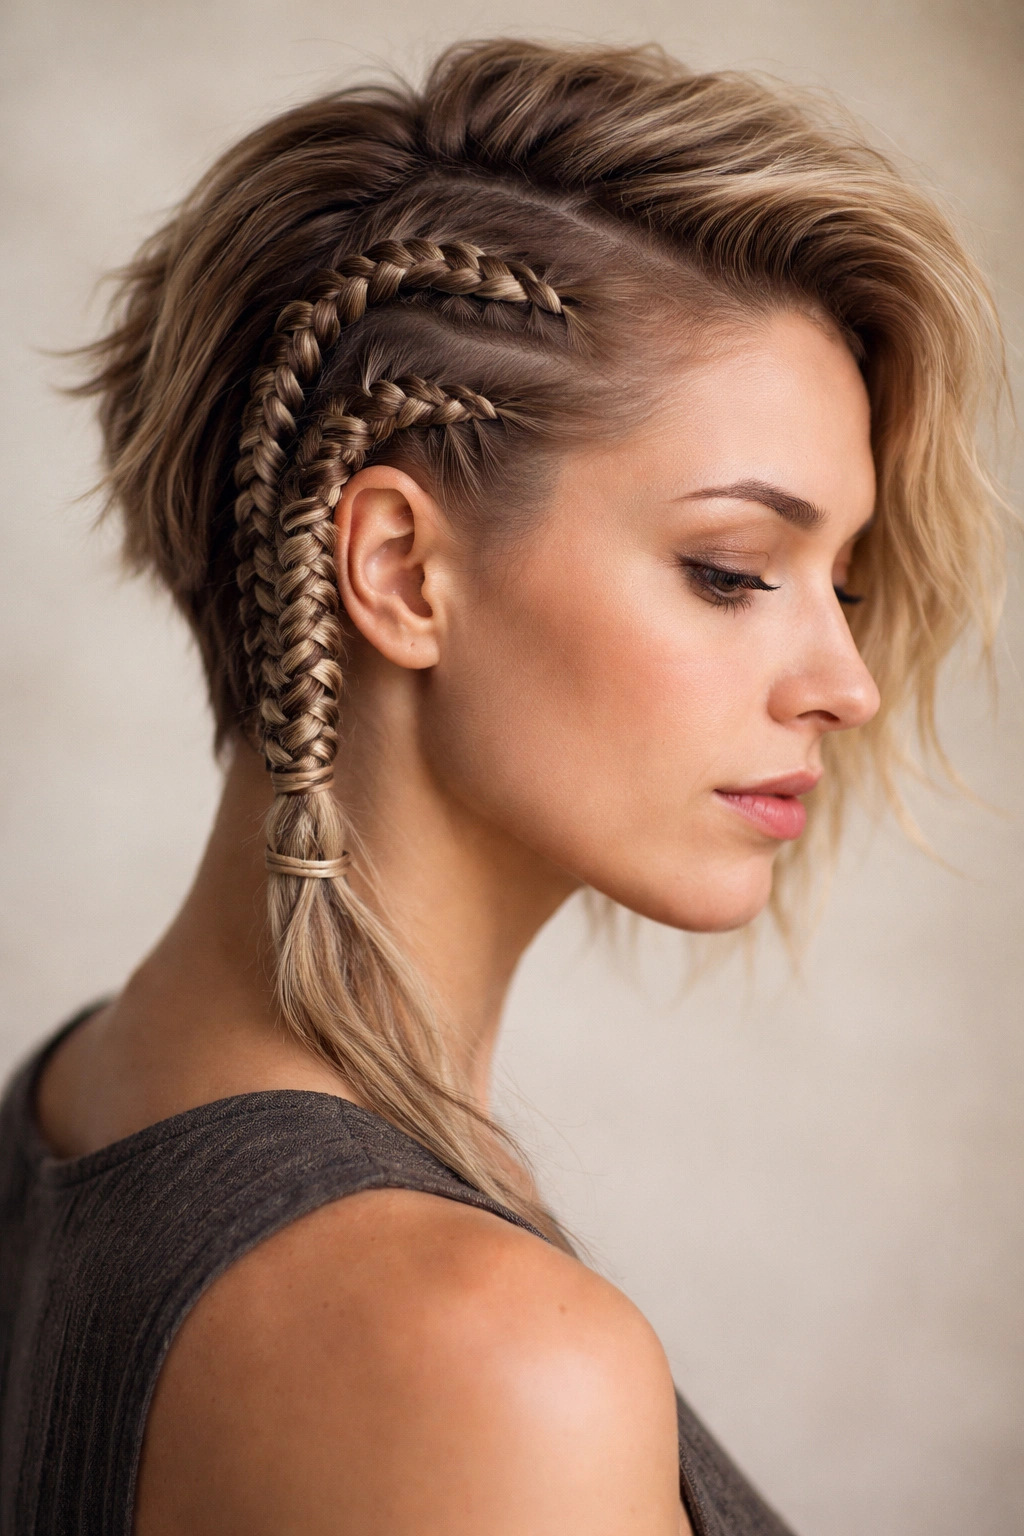
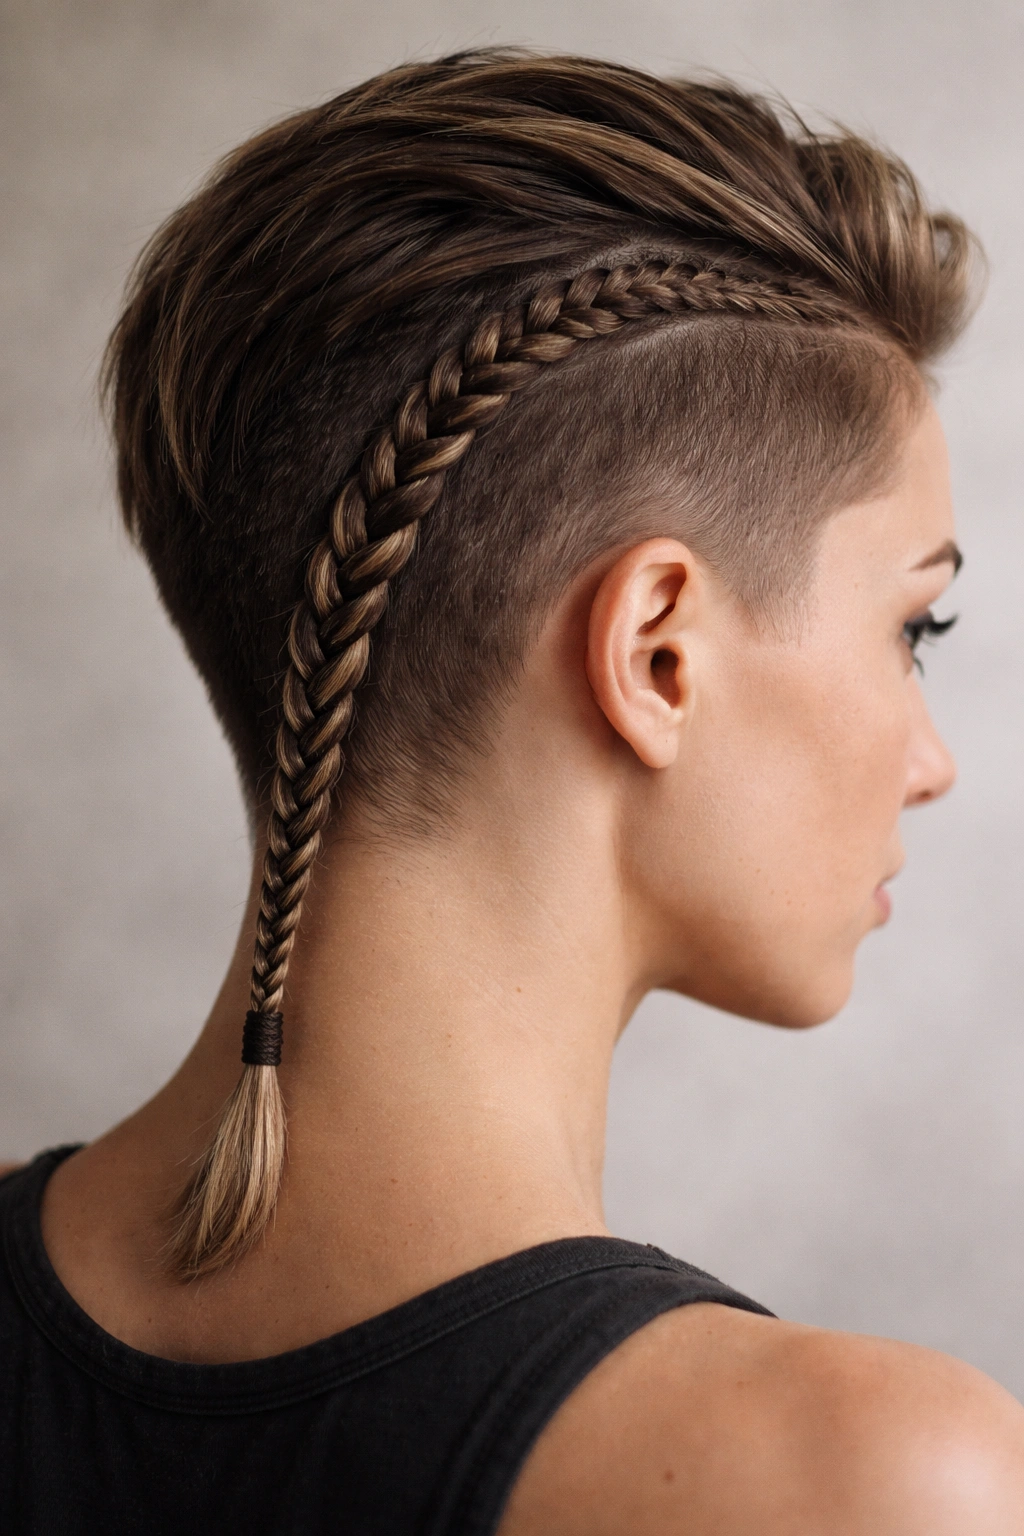
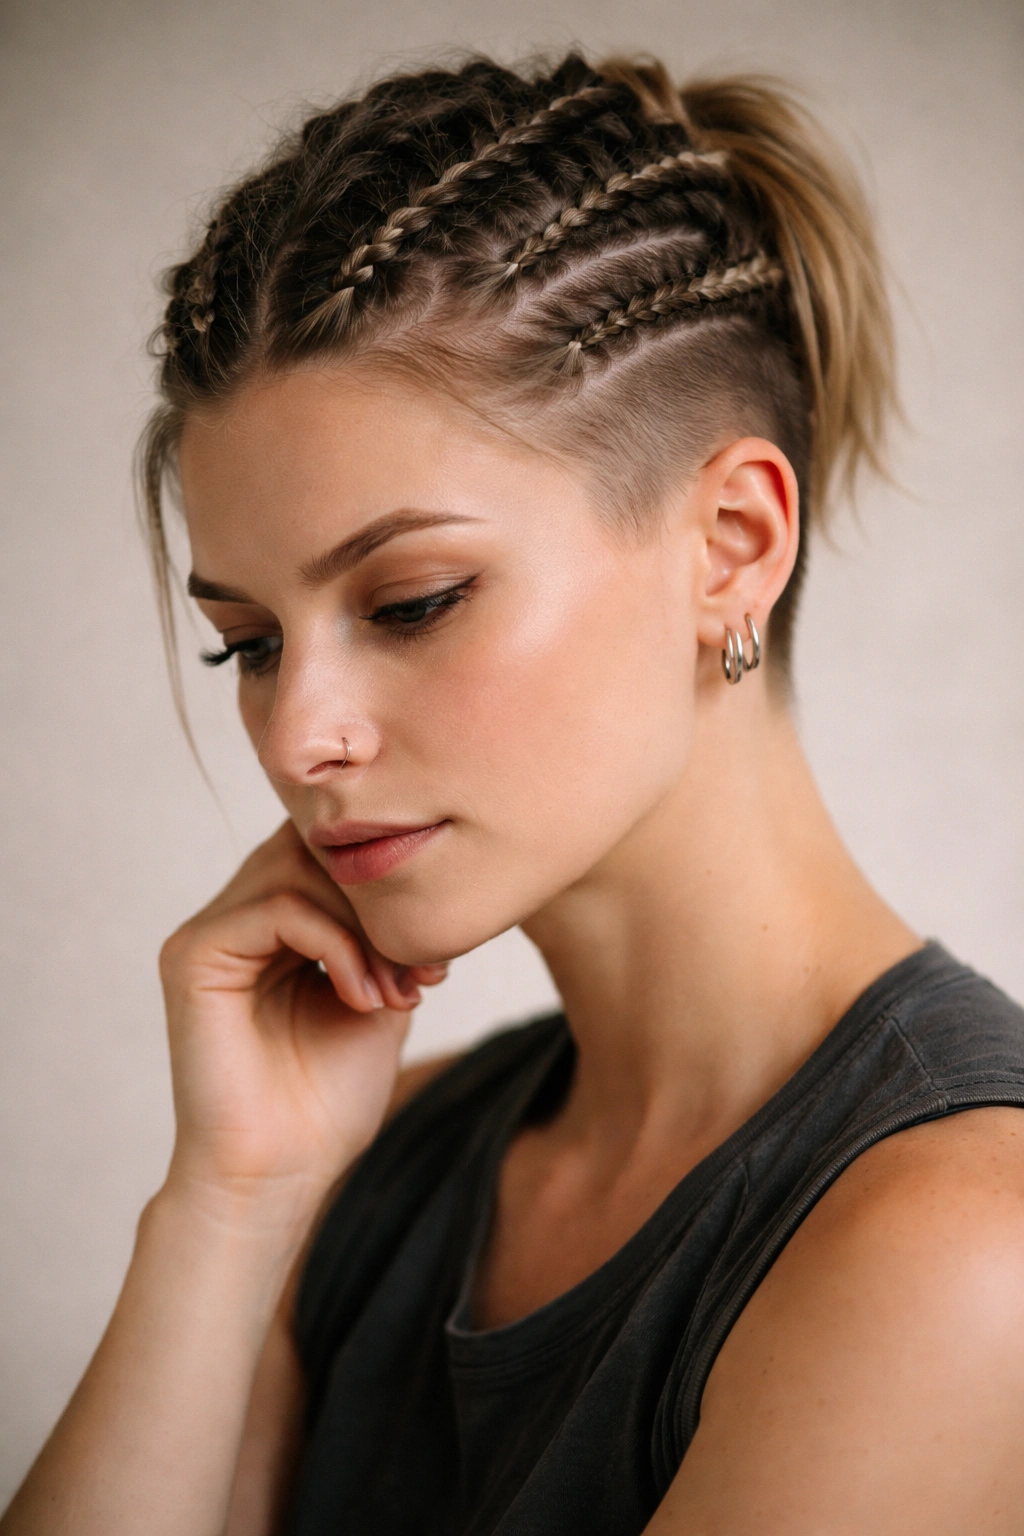
5. The Textured Undercut Braid
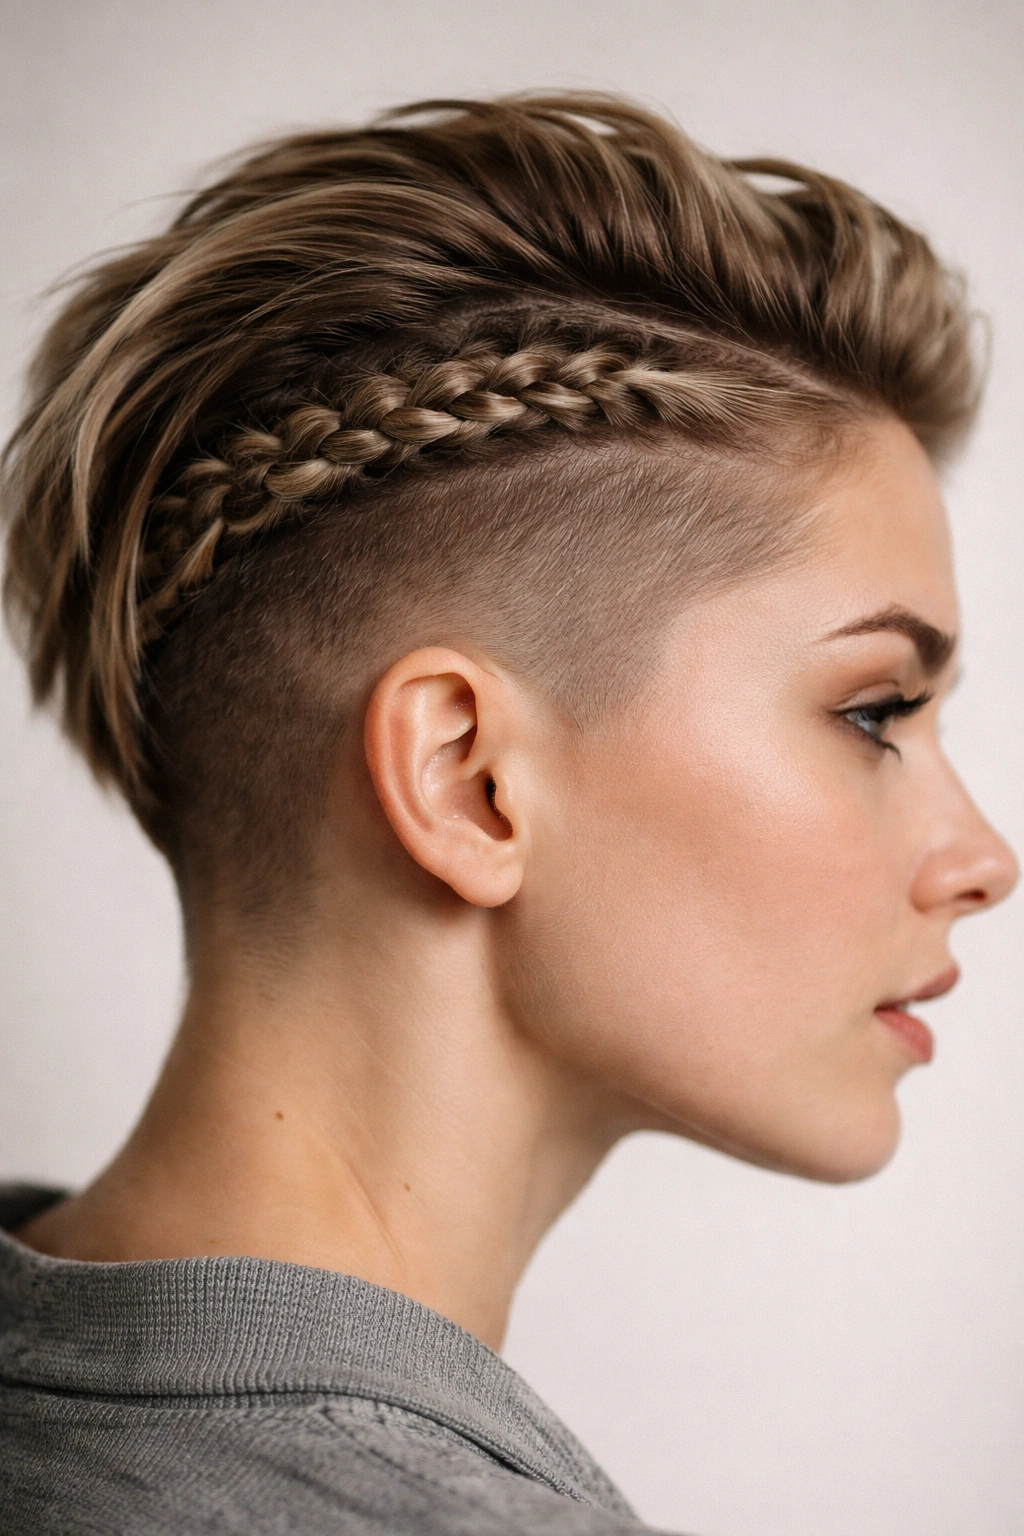
This style assumes you have an undercut or shaved/very short sections on part of your head, and positions a braid to sit above that undercut area, creating strong contrast. The braid itself might be quite small and tight, but the contrast between the braided section and the bare or ultra-short scalp makes it read as bold and contemporary. This is a genuinely Viking-inspired approach because it emphasizes structure and intentional positioning rather than relying on length alone.
Why It Works For Short Hair
An undercut braid actually requires short hair to work visually. The contrast between braided and unbraided—or braided and bare—is what makes the style land. On longer hair, you lose that contrast and the style becomes much less striking. With an undercut, a small braid reads as powerful and architectural. It’s also eminently practical; you’re not fighting to hold a braid in place at a specific angle, you’re working with the natural structure of your cut.
How to Execute It
Position your braid along the natural line where your undercut begins, or create a braid that sits just above the shaved or ultra-short area. A three-strand braid works beautifully here, kept tight and close to the scalp. You can position it diagonally, horizontally, or even create a small series of braids that echo the shape of your undercut. Because the contrast is doing the heavy lifting visually, you don’t need a particularly complex or long braid—small and intentional is actually better than long and loose.
- Keep the braid tight against the scalp to emphasize the line of contrast
- Consider positioning multiple small braids rather than one large one
- You can tie the braid ends into a knot or even braid them into the undercut hair if you want them secured longer-term
- This style photographs beautifully because of the strong visual contrast
Worth knowing: This style actually looks better after a day or two when you have a bit of texture growth, because the contrast between styled and natural becomes softer and more intentional.
6. The Viking Fishtail Hybrid

A fishtail braid uses a different technique than a traditional three-strand braid—you’re working with two large sections and repeatedly pulling smaller sections from each side, creating an intricate, woven appearance. Hybrid means you’re combining elements of traditional Viking braiding with fishtail technique. The result is a braid that looks extraordinarily complex despite being surprisingly manageable, even on very short hair.
Why It Works For Short Hair
Fishtail braids appear more intricate than they actually are, which is perfect for short hair where you’re trying to create maximum visual impact from minimal length. A four-inch fishtail braid reads as more detailed and substantial than a four-inch three-strand braid. The interwoven appearance also catches light differently, which means the braid reads beautifully from different angles and in different lighting. On short hair, this technique is genuinely practical because you don’t need much length to create something that looks intentional.
How to Execute It
Take two large sections of hair and hold them in each hand. From the outside of the left section, pull a small subsection (about the width of a pencil) and cross it over to the right section. From the outside of the right section, pull a small subsection and cross it over to the left section. Continue this alternating pattern, pulling small sections from the outside of each side. The fishtail braid naturally creates a tighter, more intricate appearance than a three-strand braid, and it holds together surprisingly well even at shorter lengths. Once you’ve braided as far as your hair allows, secure the end with an elastic.
- Make your subsections consistent in size so the braid reads as intentional and balanced
- Pull the subsections tightly so the fishtail pattern is clearly visible
- You can tighten the overall braid after you’ve finished by gently pulling the sides for more texture
- A fishtail braid hides texture and imperfections beautifully
Pro tip: If you find the two-section fishtail confusing, start with a regular three-strand braid and progress to the fishtail technique once you’re comfortable with basic braiding.
7. The Maiden’s Loop Braid
This is a decorative braiding style that incorporates loops or “bows” as you’re braiding, creating a scalloped, rope-like effect. Instead of completing the braiding sequence and finishing with a tight knot, you’re deliberately creating loops at intervals along the braid. It’s less aggressive than warrior braids and reads slightly more decorative and feminine while still maintaining that structured, intentional Viking aesthetic.
Why It Works For Short Hair
Loop braids create visual interest through their three-dimensional structure. From the side, they catch light and create shadow; from behind, they’re clearly defined. On short hair, this three-dimensional quality means the braid reads as substantial even if the length is minimal. A six-inch loop braid feels considerably more dimensional than a six-inch straight braid. This style also works brilliantly if you have naturally textured or curly hair, because the texture enhances the dimensional effect of the loops.
How to Execute It
Begin your three-strand braid at your temple or behind your ear. After you’ve completed one or two braiding sequences, stop and create a loop by lifting one of the three strands and creating a small loop shape, securing it temporarily with a bobby pin or holding it with your opposite hand. Continue braiding for another inch or so, then create another loop. Repeat this process until you’ve reached the end of your hair or achieved the look you want. Once you’ve finished, go back through and secure each loop with a bobby pin that matches your hair color, anchoring it to the braid or to the hair beneath it.
- Space your loops evenly for a balanced, intentional appearance
- Make loops roughly the same size so they read as a pattern rather than accidental
- Secure loops tightly so they hold their shape through the day
- Gently tease the braided sections between loops for extra texture and dimension
Worth knowing: This style works best on slightly damp or textured hair because it holds its shape better. If your hair is freshly washed and slippery, use a light texturizing spray beforehand.
8. The Minimalist Single Wrap Braid
Sometimes the most effective Viking-inspired style on short hair is the simplest: a single, tight three-strand braid with perhaps one minimalist wrap. There’s something genuinely powerful about an intentional, well-executed braid that asks nothing of your hair except that it behave. This style reads as incredibly confident and is surprisingly difficult to pull off perfectly, which is exactly why it works so well.
Why It Works For Short Hair
Minimalism is powerful, especially on short hair. A single perfect braid reads as a deliberate choice, not a workaround for lack of length. The tight structure and clean finish communicate control and intention. On shorter cuts, this style can actually feel more warrior-like than complex braids with multiple components, because it’s so purely functional and focused. There’s also something aesthetically satisfying about a style that makes a statement through execution rather than ornamentation.
How to Execute It
Take a section of hair roughly two inches wide and divide it into three equal strands. Keeping consistent tension throughout, braid tightly against your scalp, angling your braid according to where you want it to sit—behind one ear, at an angle across the back, or positioned to frame one side of your face. Braid until you’ve used all available hair length, then secure with a small, clear elastic. If you want to add a single wrap, choose a material and wrap just the base of the braid where it meets the elastic. That’s it—no loops, no additional braids, no decorative elements. Just precision and intention.
- Keep your three sections absolutely even for visual balance
- Maintain consistent tension throughout the entire braid
- A clear elastic keeps attention on the braid itself rather than the tie
- This style reads best with slightly textured hair; freshly washed hair can look too soft and may not hold as well
Real talk: This style is harder to execute perfectly than more elaborate braids because there’s nowhere to hide imperfections. If your section sizes aren’t perfectly matched or your tension is uneven, it will be visible. Practice on days when your hair has some texture and grip.
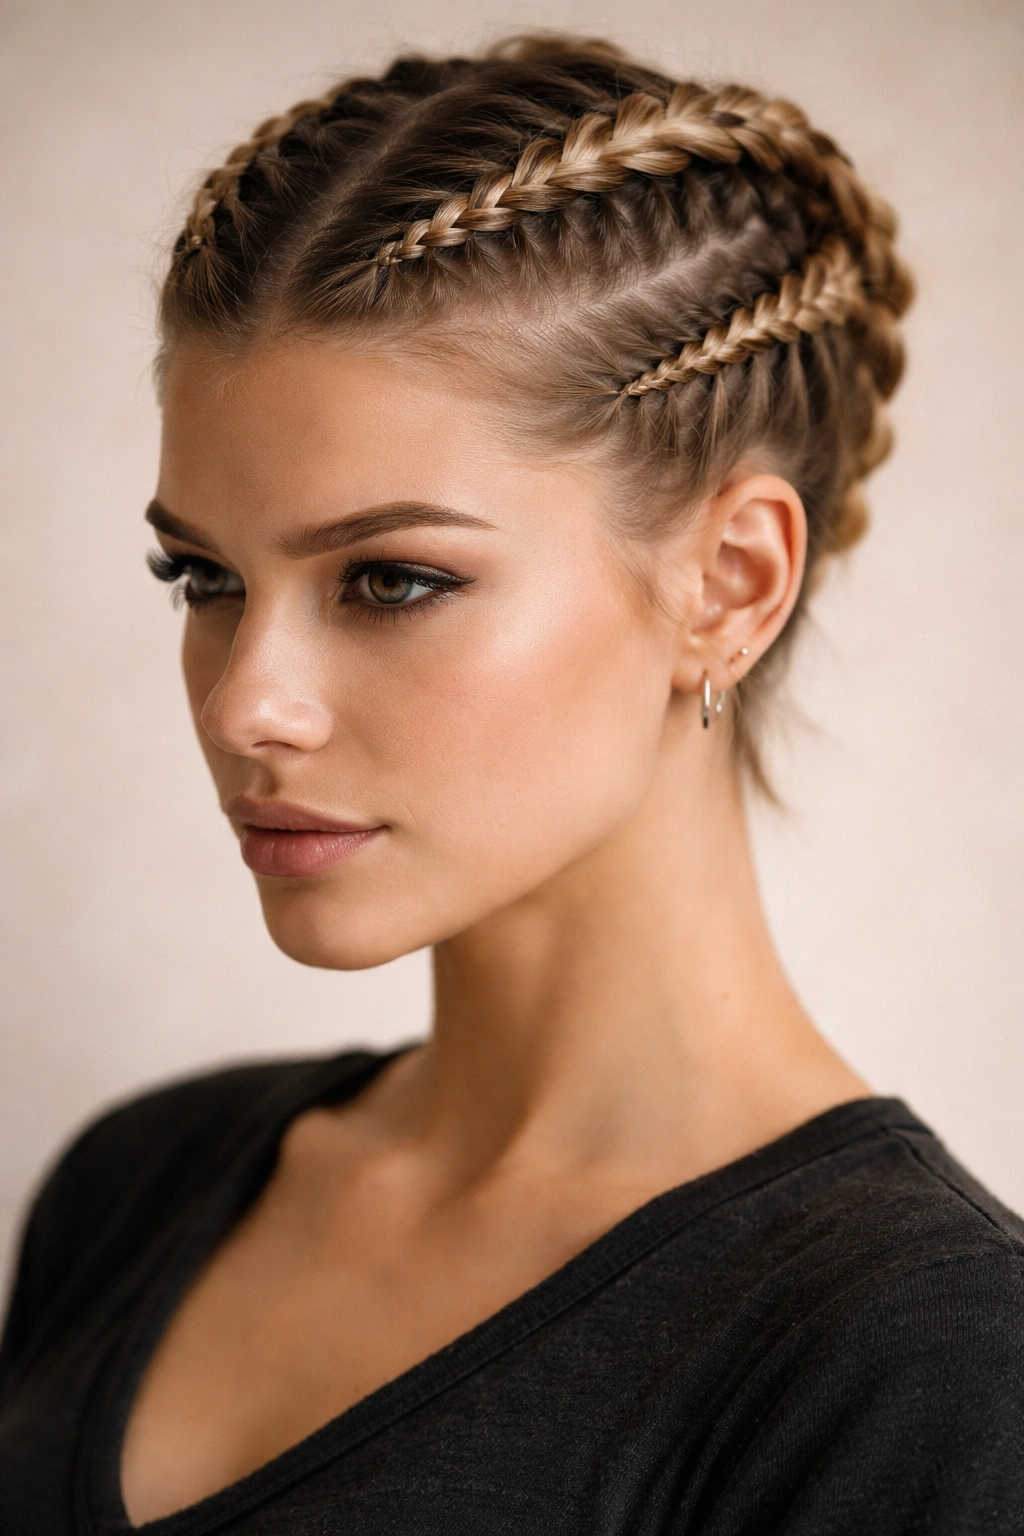
9. The Intricate Scalp Braid

Also called a cornrow or Dutch braid, this style travels along the scalp using a three-strand technique where you’re incorporating new hair into the braid as you move. On short hair, this creates an incredibly striking effect because the braid is sculpted directly to your head shape. You can create cornrows that follow the natural contours of your skull, making the style feel archaeological and intentional.
Why It Works For Short Hair
Scalp braids actually require shorter hair to look their best. When your hair is long, scalp braids can look unfinished or incomplete because you’re not braiding the entire length. On short hair, the scalp braid is the complete style—there’s no additional hair hanging below it, so it reads as fully realized. The braid hugs your head, emphasizing your skull shape and bone structure in a way that longer hair doesn’t. This style is also incredibly functional; the braid is locked in place by its own structure and rarely needs adjusting throughout the day.
How to Execute It
Start at your hairline and take three small sections of hair. Begin your basic three-strand braid, but as you continue, you’re not just using those original three sections—you’re adding small amounts of new hair to each section as you go. So your left strand incorporates a small bit of new hair as you braid, then your middle strand incorporates new hair, then your right strand. This creates a thicker braid that follows your scalp. You can create one scalp braid running down the center, or multiple braids following different patterns across your head.
- Start with thick sections and gradually incorporate new hair so the braid thickens as it progresses
- Practice the motion of incorporating new hair—it’s different from traditional braiding and takes a few attempts to feel natural
- Create your braid direction based on your hair’s natural growth patterns for the most comfortable hold
- Scalp braids hold better on day-two or day-three hair; avoid doing them right after washing
Pro tip: If you’re nervous about scalp braiding, practice on a friend or a wig head before attempting it on yourself. Once you understand the motion of incorporating new hair, it becomes much easier.
10. The Viking Half-Up Twisted Braid
This final style combines a half-up structure with a twisted braid element, creating something that feels both contemporary and historical. You’re taking the top section of your hair, twisting it and incorporating it into a partial braid, then securing it at the crown or slightly off to one side. It’s more forgiving than some other styles because the twisting creates volume and texture that helps disguise imperfections.
Why It Works For Short Hair
A half-up style on short hair reads as intentionally styled rather than incomplete. The twist-and-braid combination creates dimension and texture that makes even very short hair feel styled and intentional. This style also works beautifully across a range of hair textures—if your hair is very fine, the twist and braid combination creates visual thickness; if you have thick or textured hair, it creates a gorgeous dimensional effect. The security of the half-up also means you’re not relying on a tiny elastic to hold a full braid in place; you’re using the crown of your head as your anchor point.
How to Execute It
Take a section of hair from one side of your head, roughly two to three inches wide, starting at your temple. Twist this section loosely as you move back toward the crown, then begin incorporating it into a basic three-strand braid using the twisted section as one of your three strands. Braid this combined twist-and-braid element back toward your crown, then secure it with a bobby pin or small elastic at the crown or slightly off to one side. You can leave the rest of your hair down and textured, or create another matching twist-braid on the opposite side for a symmetrical effect.
- Don’t twist too tightly; a loose, relaxed twist incorporates better into the braid
- Use bobby pins to anchor the finished twist-braid at your crown rather than relying solely on an elastic
- You can add a decorative wrap or pin at the crown where the twist-braid is secured for extra visual interest
- This style works beautifully with side-swept bangs or a textured, choppy cut
Worth knowing: This style actually improves as your day goes on. After a few hours, it softens slightly and the texture becomes more visible, which actually reads as more intentional and less “trying too hard.”
Final Thoughts
Viking braiding on short hair isn’t a compromise—it’s actually a return to the practical origins of the style. These ancient techniques developed because they served a functional purpose: keeping hair secure and out of the face during work and movement. On short hair, that function becomes more obvious and more authentic. You’re not braiding for drama or length; you’re braiding for structure, intention, and that genuinely fierce aesthetic that comes from confidence rather than volume.
The styles that work best on your short hair will depend on your specific cut, your hair texture, and what you’re trying to communicate visually. If you have an undercut, lean into that contrast. If you have naturally textured hair, use that texture to your advantage rather than fighting it. If you prefer minimalism, a single perfect braid says everything it needs to. The beautiful part about Viking-inspired braiding is that it’s genuinely flexible—it can look warrior-fierce or maiden-delicate, intricate or minimalist, symmetrical or asymmetrical. All of these interpretations are historically grounded and visually legitimate.
Start by experimenting with one or two styles that appeal to you most. Practice them on days when your hair has texture and grip. Use bobby pins generously and don’t hesitate to secure braids with multiple points rather than relying on a single elastic to hold everything in place. Most importantly, remember that the entire point of these styles is intentionality—a braid that’s clearly been thought through and deliberately placed reads as striking and powerful regardless of your hair length. Your short hair isn’t a limitation; it’s actually a canvas that makes every braid choice more visible and more impactful.