Braids are the Swiss Army knife of kids’ hairstyles — they’re practical enough for keeping hair out of the way during math class, creative enough to make your child feel special, and sturdy enough to survive a full day of recess chaos. Whether your kid has stick-straight hair, thick curls, or anything in between, there’s a braid style that’ll work, stay put, and maybe even earn some genuine excitement instead of the usual groan when you mention “hair time.”
The beauty of braids for kids isn’t just about looking polished. A well-executed braid keeps tangles at bay, reduces the need for constant brushing throughout the day, and holds up through playground adventures, sports, and that mysterious hair-mussing that seems to happen between 2 p.m. dismissal and dinner time. Plus, learning to braid — and having braids done by you — is actually a great bonding experience. Kids often feel genuinely proud wearing something they helped create or that they know took a bit of skill to make.
The 18 styles below range from beginner-friendly braids that take five minutes to more intricate patterns you can tackle on a lazy weekend morning. Some are perfect for keeping hair completely secure during sports, while others add enough style that your kid might actually want to wear them to birthday parties. You’ll find classics that never go out of style, fun variations that feel special, and practical options for different hair types and lengths. The key is finding what works for your child’s hair, your comfort level with braiding, and what your kid actually feels good wearing.
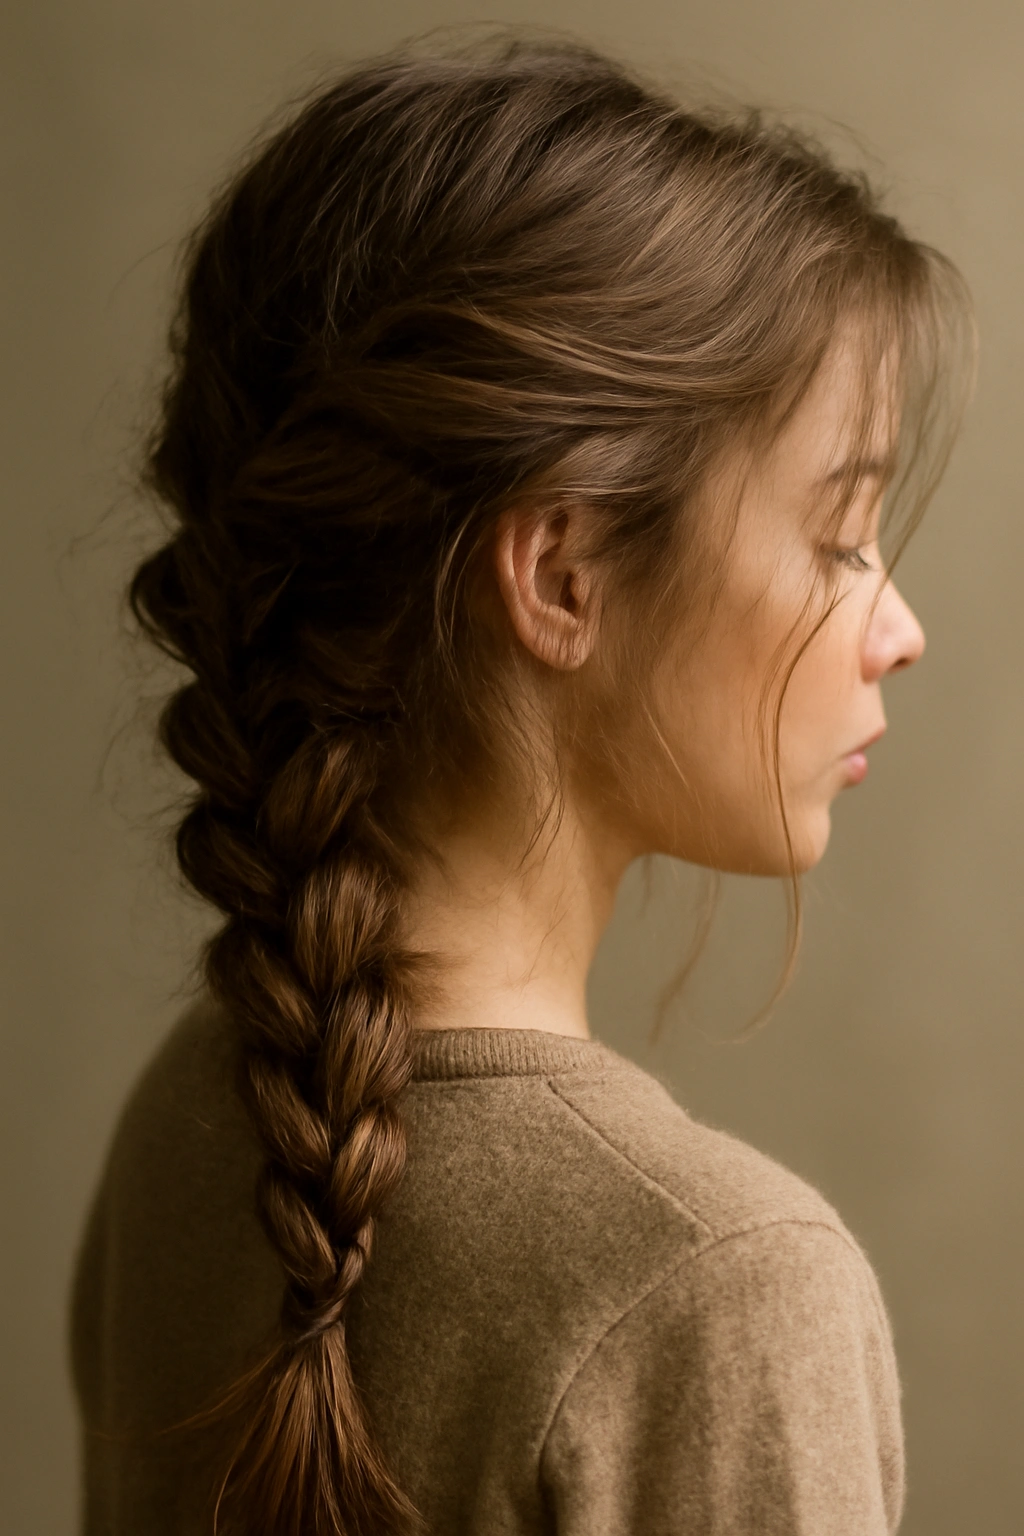
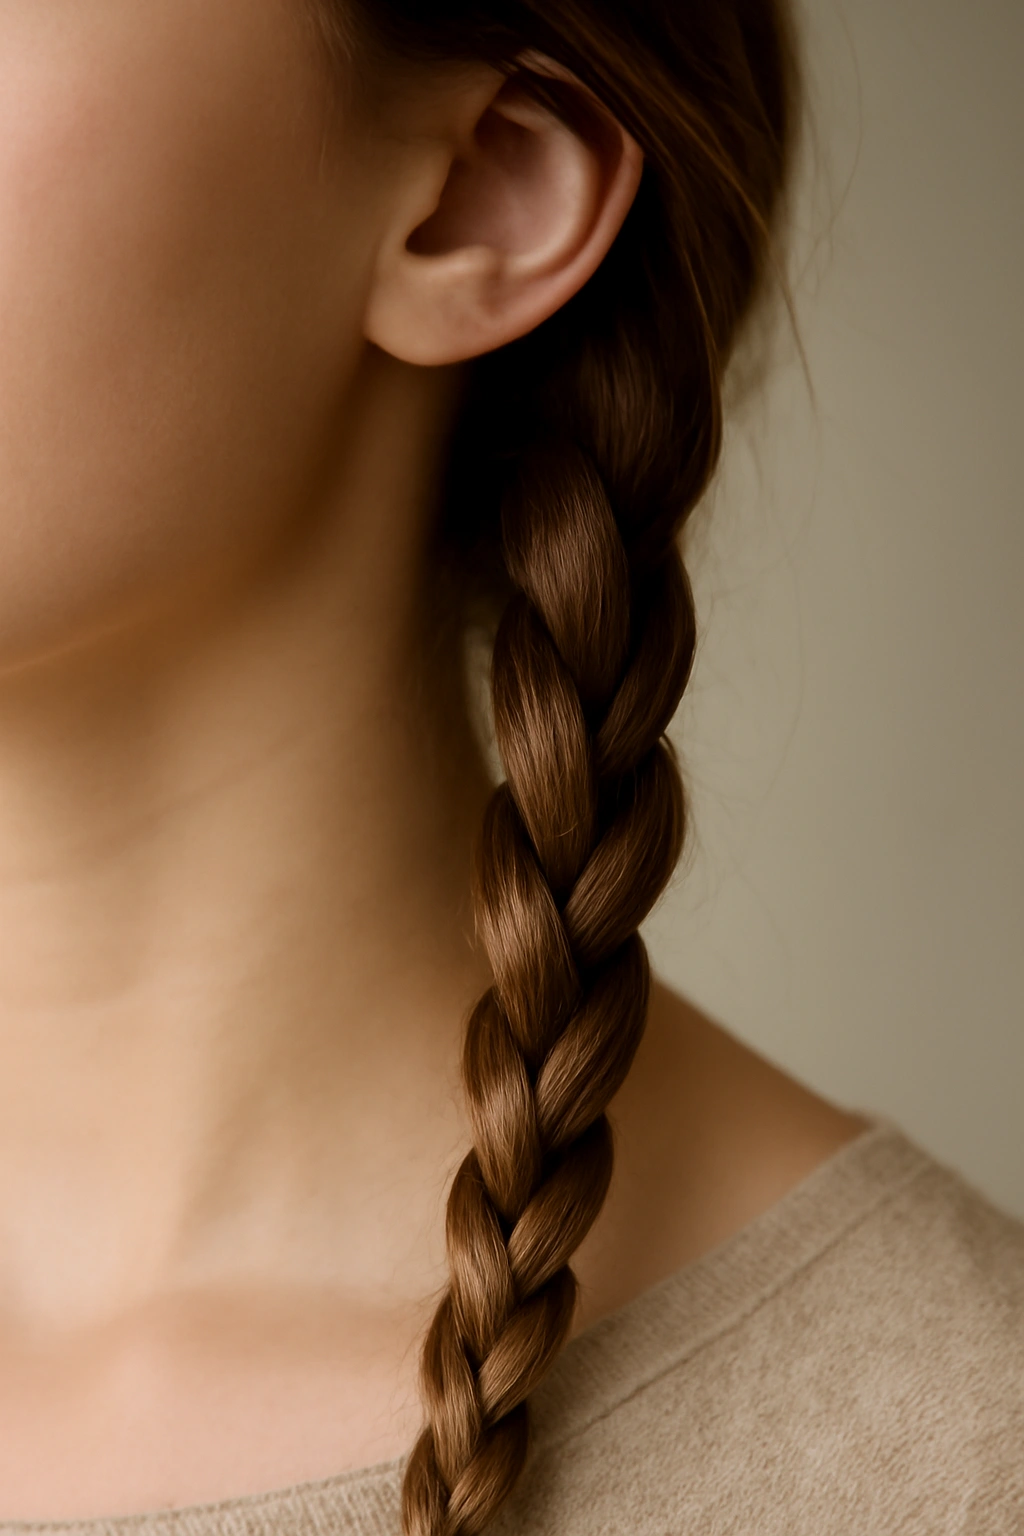
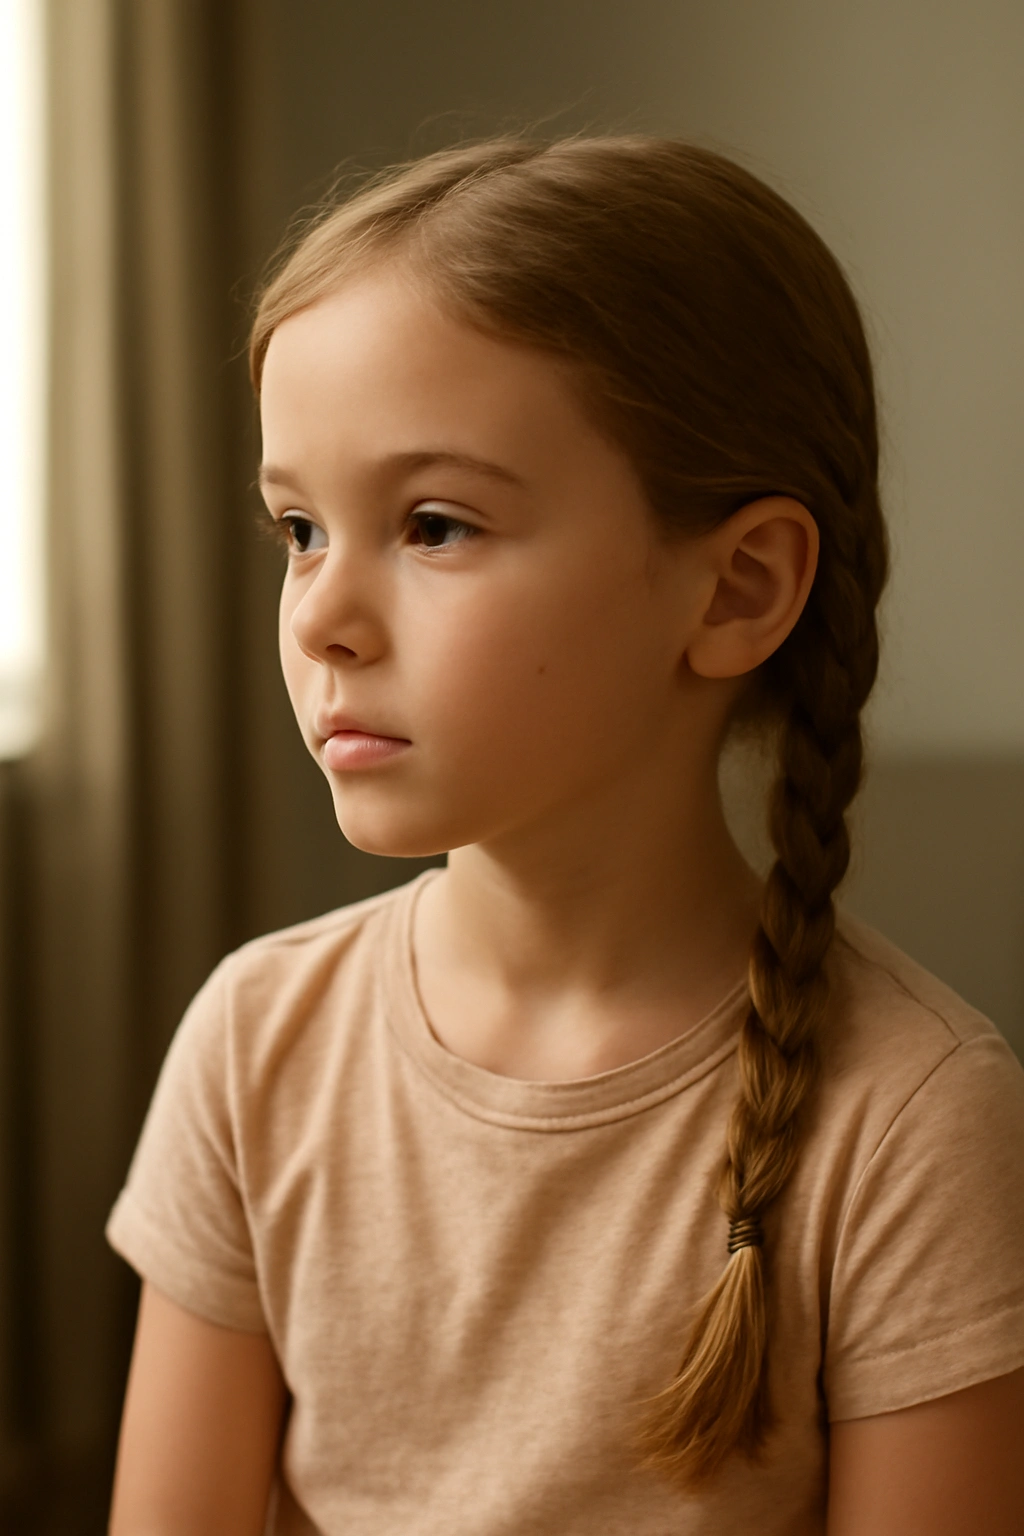
1. Simple Three-Strand Braid
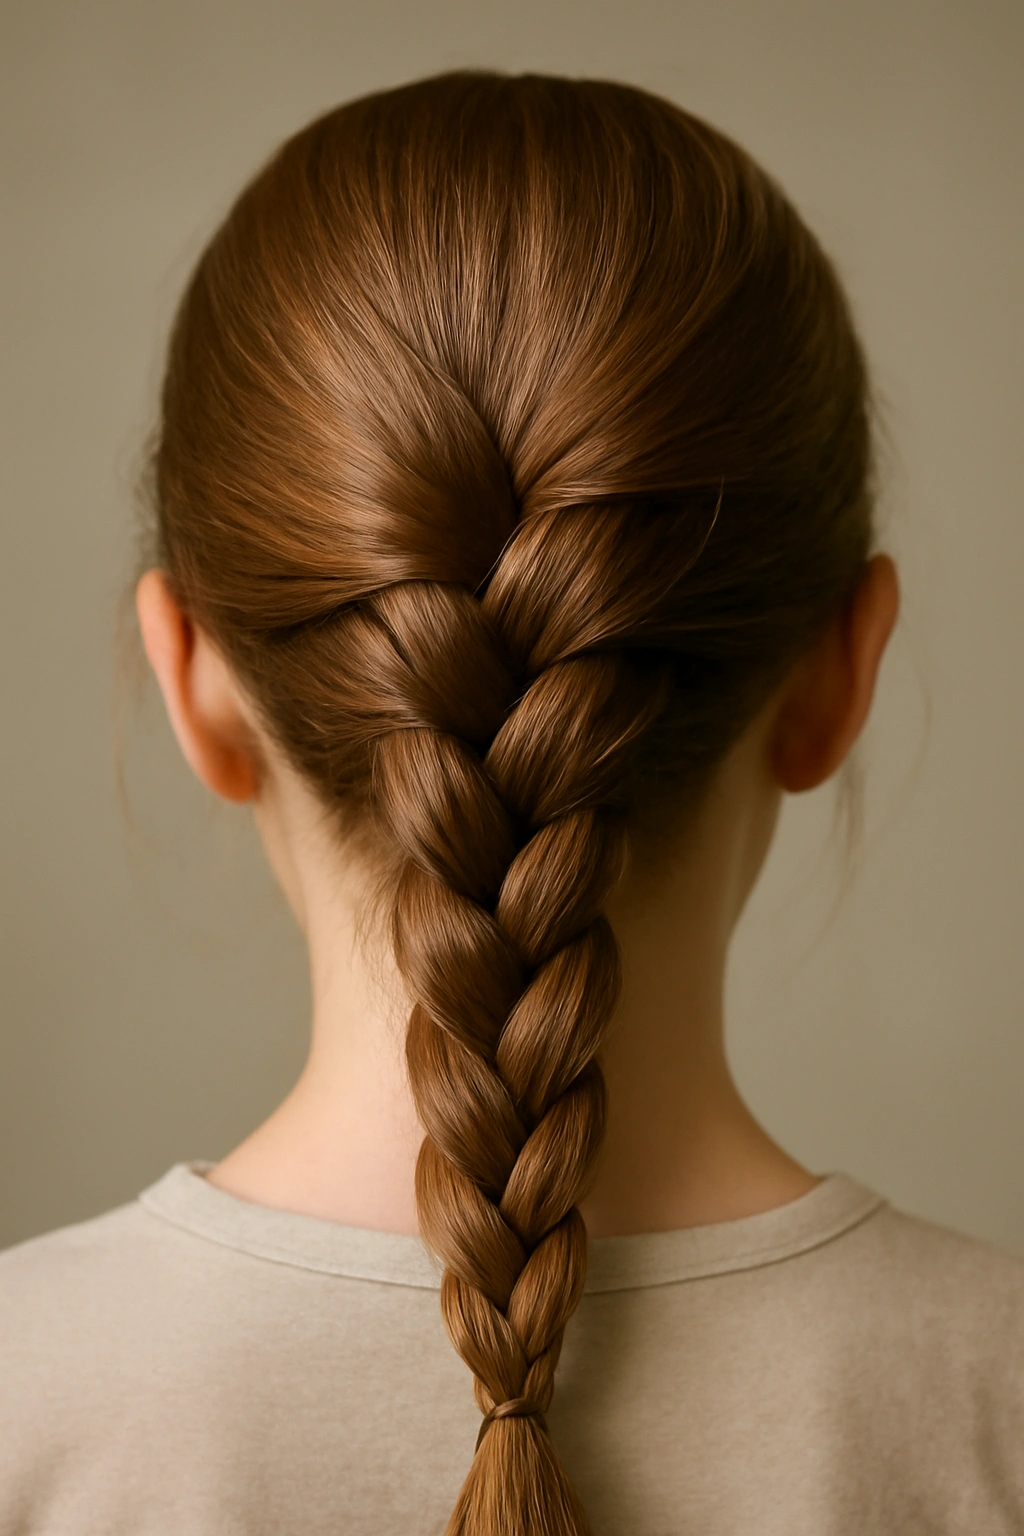
This is the foundational braid, and it’s where most kids start their braiding journey — either learning to do it themselves or sitting patiently while you work. It’s also genuinely one of the most practical styles for keeping longer hair completely secured and out of the way.
Why It’s Perfect for Everyday Wear
A simple three-strand braid stays put through an entire school day without loosening or coming undone, making it ideal for kids who have trouble keeping clips or ties in their hair. The braid actually distributes the weight of the hair evenly, so it’s less likely to give your child a headache by end of day the way some pulled-back styles can. It works on virtually any hair texture and length, and it looks equally good whether your child has baby-fine hair or thick, heavy locks.
How to Make It Work Best
- Start with damp or lightly product-sprayed hair — completely dry hair slips and separates, making the braid look thin and messy
- Divide the hair into three equal sections from the back of the head or from a side part, depending on where you want the braid to sit
- Work slowly and deliberately, keeping even tension so the braid looks intentional and neat rather than haphazard
- Secure the end with a small elastic that matches your child’s hair color for a polished finish
Maintenance tip: This braid typically holds for 2-3 days if you keep the bottom secured. You can refresh it by gently unbraiding, refreshing the waves with a light spray, and re-braiding without washing the whole head.
2. Dutch Braid
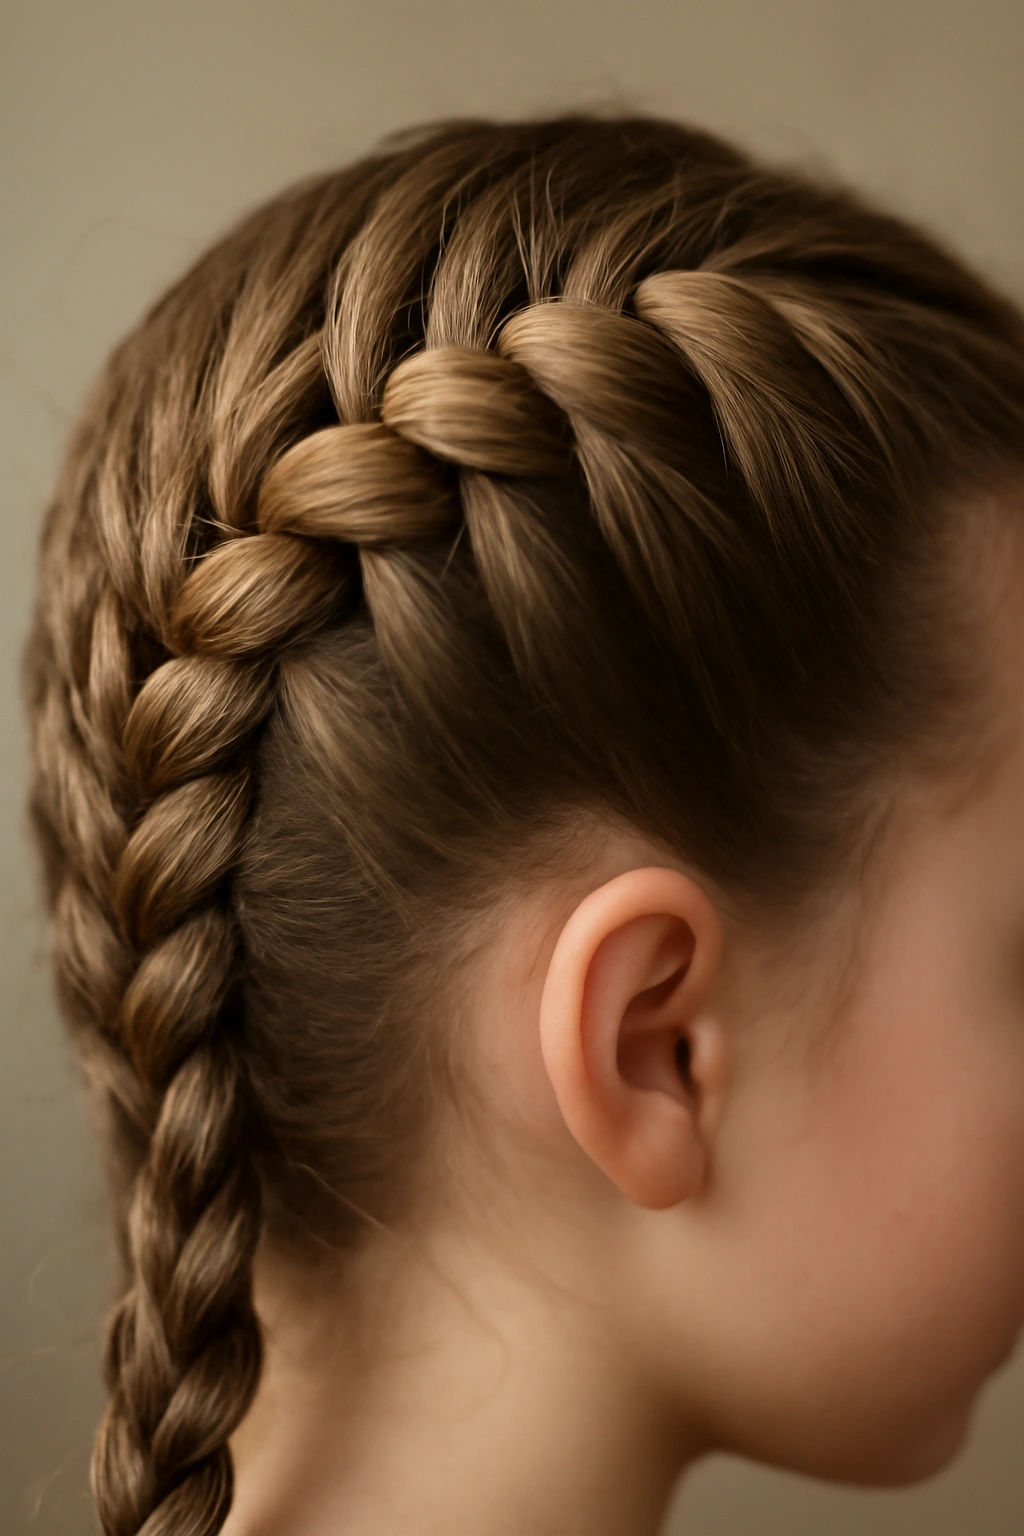
The Dutch braid is the reverse cousin of a French braid — instead of crossing strands over each other, you’re crossing them under, which creates that beautiful 3D, rope-like texture that looks way more complex than it actually is. Kids love this one because it genuinely looks fancier than a standard braid, even though the technique is nearly identical.
What Makes Dutch Braids Special
Dutch braids sit slightly raised off the scalp because of the under-crossing technique, which gives them visual impact and makes them photograph beautifully. The raised texture also means the braid is less likely to flatten or get squished by a backpack or car seat. Because of how the strands pull, Dutch braids hold their shape better throughout the day than some other styles — this matters hugely for kids who are constantly moving.
Getting the Technique Right
- Start by taking a small section of hair at the crown and dividing it into three strands
- Instead of crossing strands over the middle (like a regular braid), cross them under — this is the only difference, but it completely changes the look
- Add new hair to each section as you move down the head, maintaining even tension
- The braid should look thicker and more textured than a regular braid
Pro tip: Dutch braids photograph wonderfully, making them perfect for school picture day or special events. They also work beautifully on both straight and curly hair.
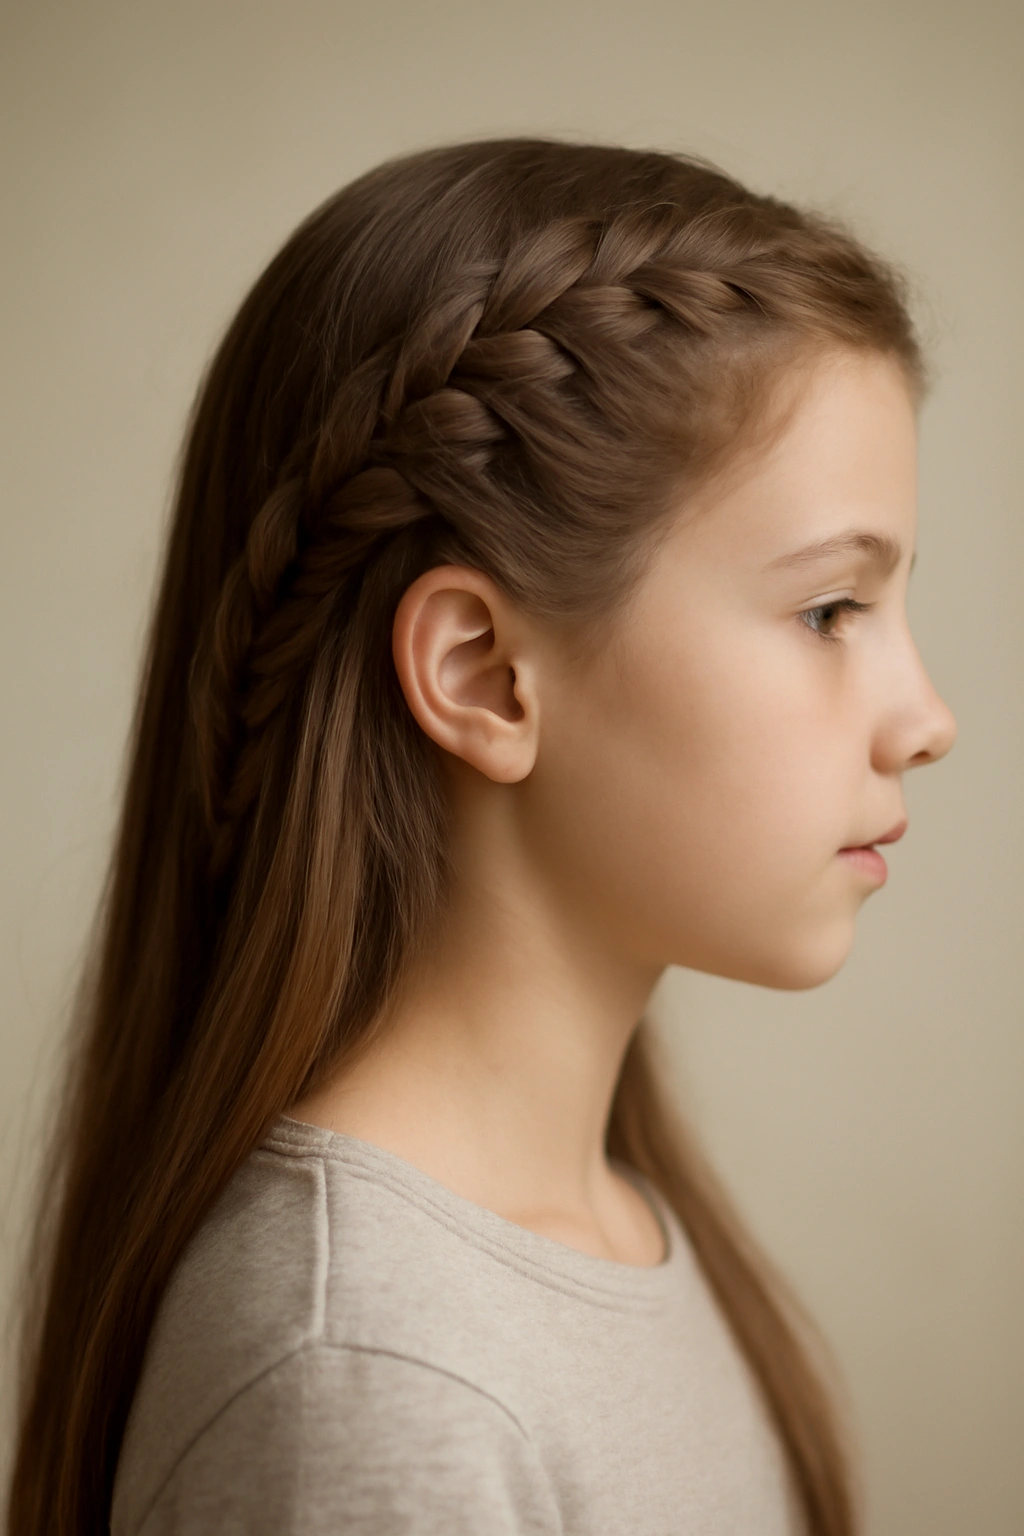
3. French Braid

The French braid is iconic for a reason — it’s elegant, it keeps hair completely secure, and once you master the technique, it becomes muscle memory. It’s also one of the most versatile braids because you can position it down the center back, off to one side, or even do two French braids.
Why French Braids Win for Kids
French braids incorporate hair as you go down the head, so you’re actually securing more of the hair in one braid compared to a standard three-strand. This means less flyaways, less hair escaping, and less need for bobby pins. For kids with naturally frizzy hair or curly textures, a French braid can actually contain the hair better than many other styles.
The Step-by-Step Process
- Start at the crown with a small section divided into three strands
- Cross the right strand over the middle, then the left strand over the middle (this is a regular braid start)
- On the next cross, grab a small amount of new hair from the side and add it to the right section before crossing over
- Continue alternating sides, always adding new hair from the side as you go down the head
- The braid grows wider as you incorporate more hair
Worth knowing: Beginners often struggle with the tension and adding-new-hair simultaneously. A helpful trick is to pin the front sections with small clips while you work, or have your child practice on a doll head first.
4. Fishtail Braid
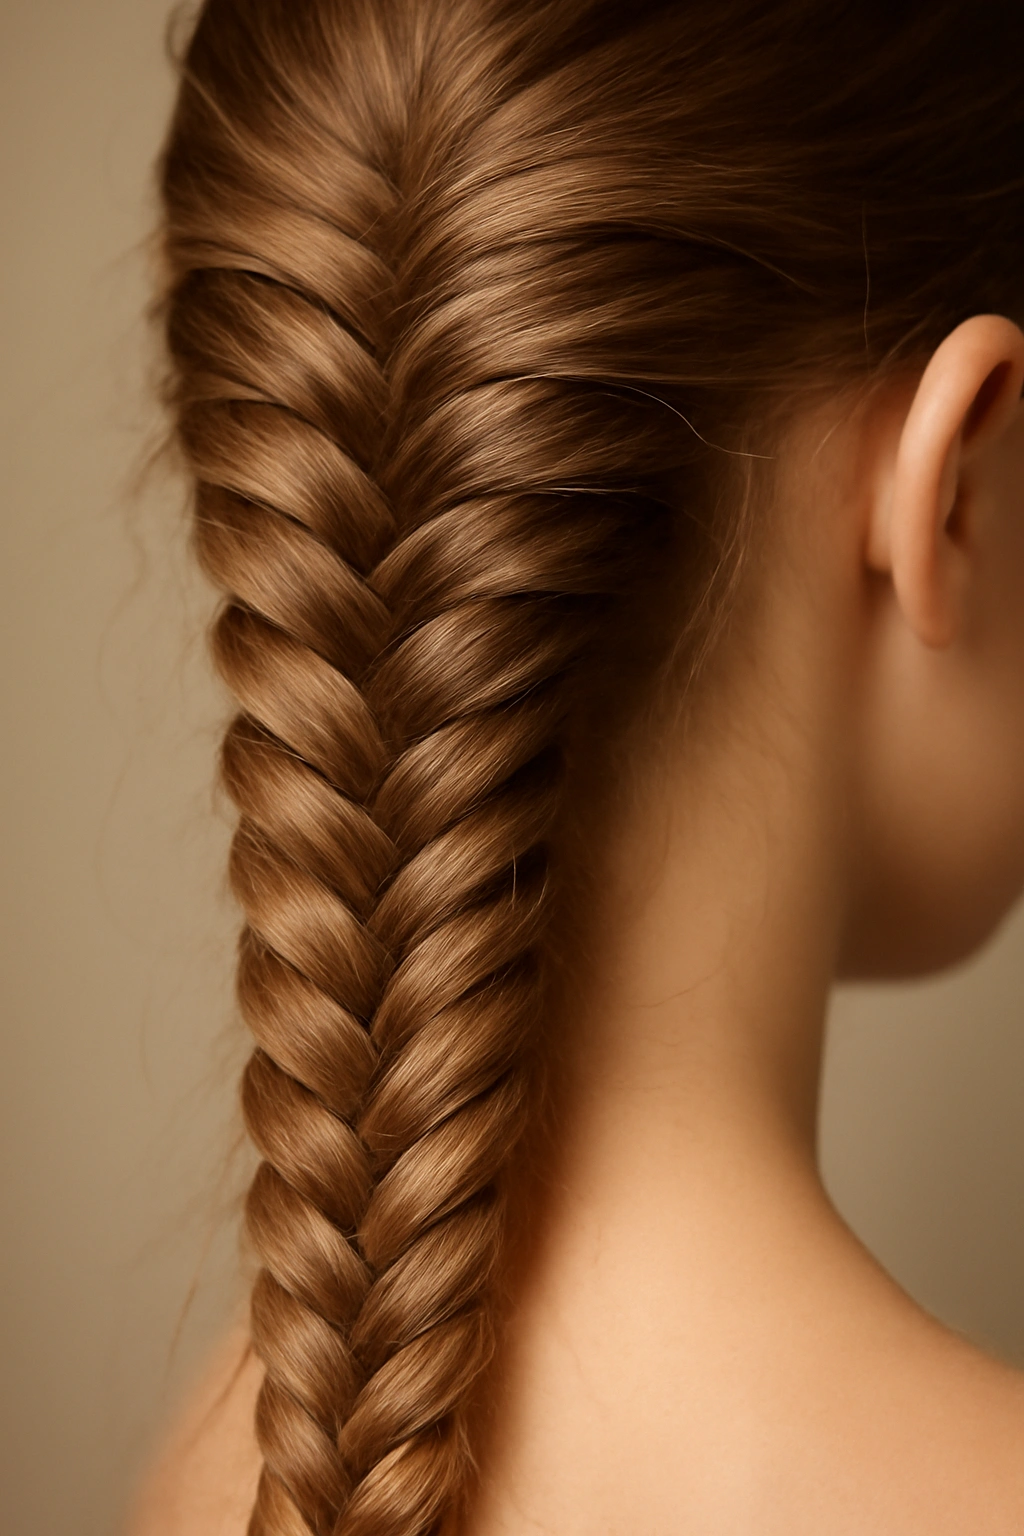
Fishtail braids create an intricate, delicate-looking pattern that kids absolutely adore — they feel like a special occasion style even though they’re actually simpler to execute than they look. The name comes from the resemblance to a fish’s tail, and the final result looks like you spent 30 minutes braiding when it actually took maybe 10.
What Makes Fishtail Braids Work
Fishtail braids work beautifully on all hair types, but they’re particularly stunning on wavy or textured hair where the individual strands show definition. Because the braid is woven with smaller sections rather than thick strands, it appears fuller and thicker than a standard three-strand braid, making it feel more substantial and intentional.
How to Create a Fishtail Braid
- Divide the hair into two thick sections (not three like a standard braid)
- Take a small piece of hair from the inside edge of the right section and cross it over to the left section
- Take a small piece from the inside edge of the left section and cross it over to the right section
- Continue alternating, always taking from the inside edges and crossing to the opposite side
- The result should look like interlocking small pieces rather than three distinct strands
Insider note: Fishtail braids hold their style for multiple days and actually look better slightly messy or loosened. You can do a fishtail, sleep on it, and it still looks intentional the next morning.
5. Waterfall Braid
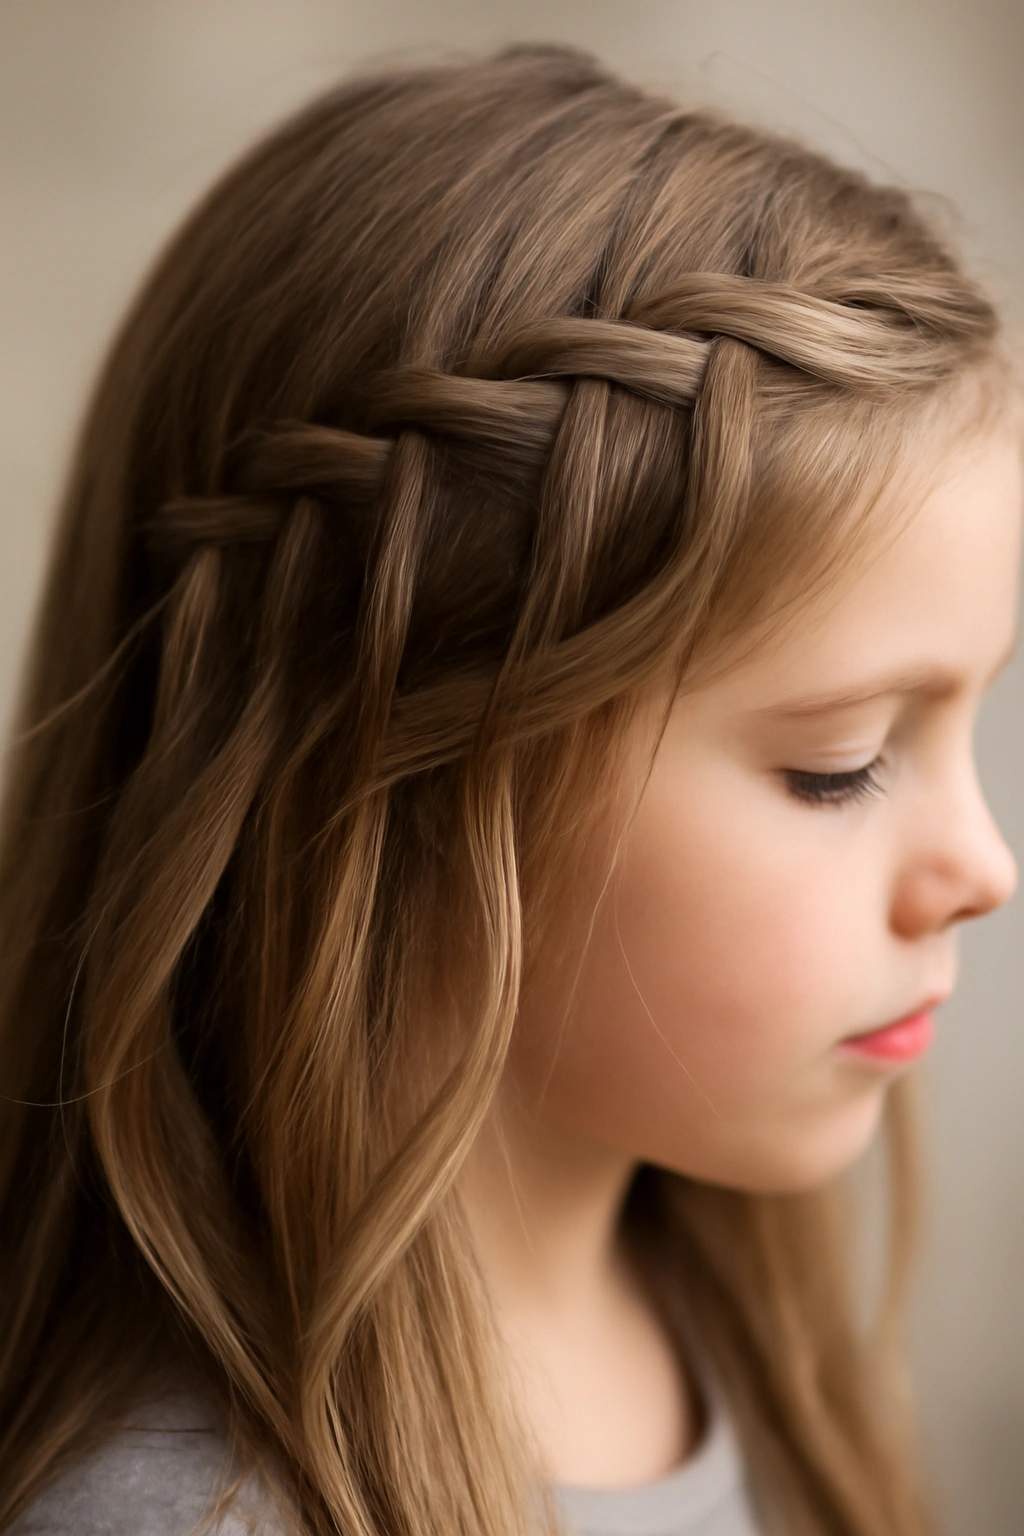
The waterfall braid is technically a hybrid between a French braid and a regular braid — it creates the visual effect of hair cascading down like water, which is both beautiful and endlessly appealing to kids who love anything with a magical or elegant vibe. It’s also one of the most impressive-looking braids to show friends.
Why Kids Love Waterfall Braids
Waterfall braids showcase your child’s hair length and layers beautifully while keeping the crown and sides controlled. They work wonderfully for kids with longer hair who want something that feels special but not overly complicated. The “waterfall” effect means some hair is left loose, which appeals to kids who find completely pulled-back styles uncomfortable or who dislike the sensation of hair being tightly braided.
Creating a Waterfall Effect
- Start with a regular French braid on one side of the head
- As you braid, every few stitches, drop a strand of hair and let it hang loose — this creates the waterfall effect
- Pick up a new piece of hair to replace the dropped strand and continue braiding
- The loose strands fall naturally around the side of the face and down the back
What to watch for: This style works best on hair that’s at least shoulder-length, and it’s easier to execute if your child’s hair has some weight to it. Very fine or very short hair may not create the waterfall effect as dramatically.
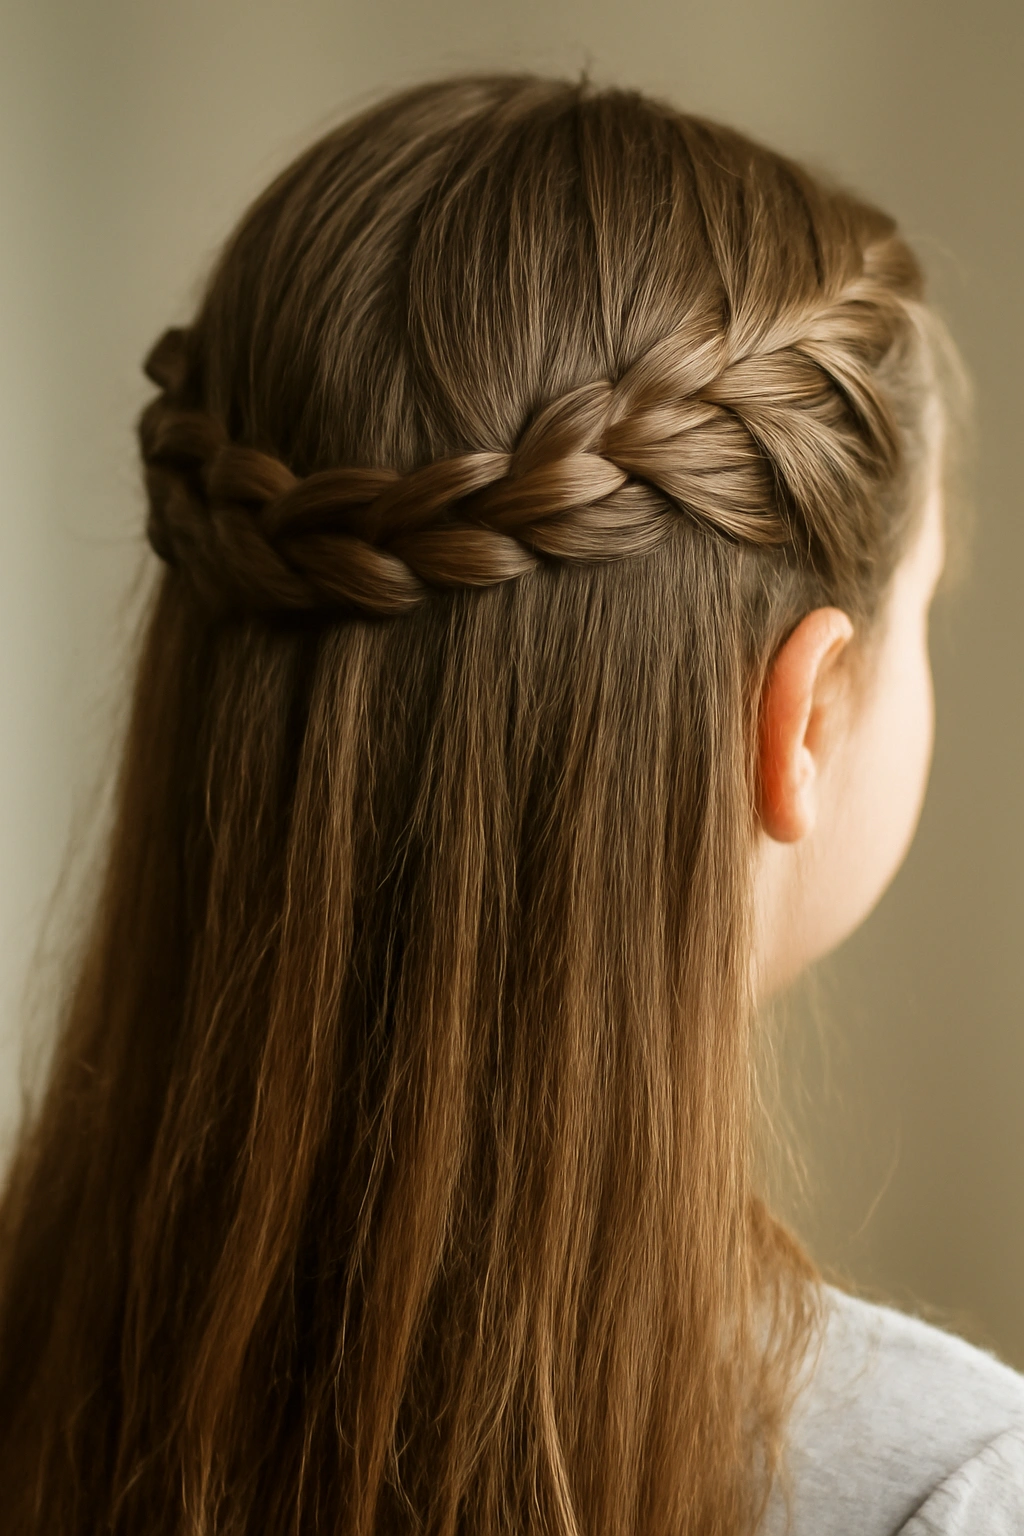
6. Crown Braid
Crown braids sit literally like a crown around the head — either a single braid that goes from one side to the other, or dual braids that circle the entire head. It’s an absolutely magical-feeling style for kids who love the fairy-tale aesthetic, and it’s surprisingly practical for keeping all the hair off the face and neck.
The Appeal of Crown Braids
Crown braids are photogenic, they work for both casual and dressy occasions, and they make any kid feel special wearing them. Because the braid circles the head, there are virtually no loose pieces or flyaways — everything is secured. For kids with sensitive scalps or who find regular braids uncomfortable, crown braids actually feel gentler because the weight is distributed around the entire head rather than in one central location.
How to Position and Execute
- Start at one temple and braid toward the back of the head (using Dutch or French technique for more impact)
- Angle the braid so it follows the natural curve from temple to ear to the nape of the neck
- Continue to the opposite temple, creating a crown effect
- Secure the end invisibly so the braid looks unbroken
Pro tip: Crown braids are perfect for kids who need hair completely off their face for sports or outdoor activities. They also stay put exceptionally well.
7. Side Braid
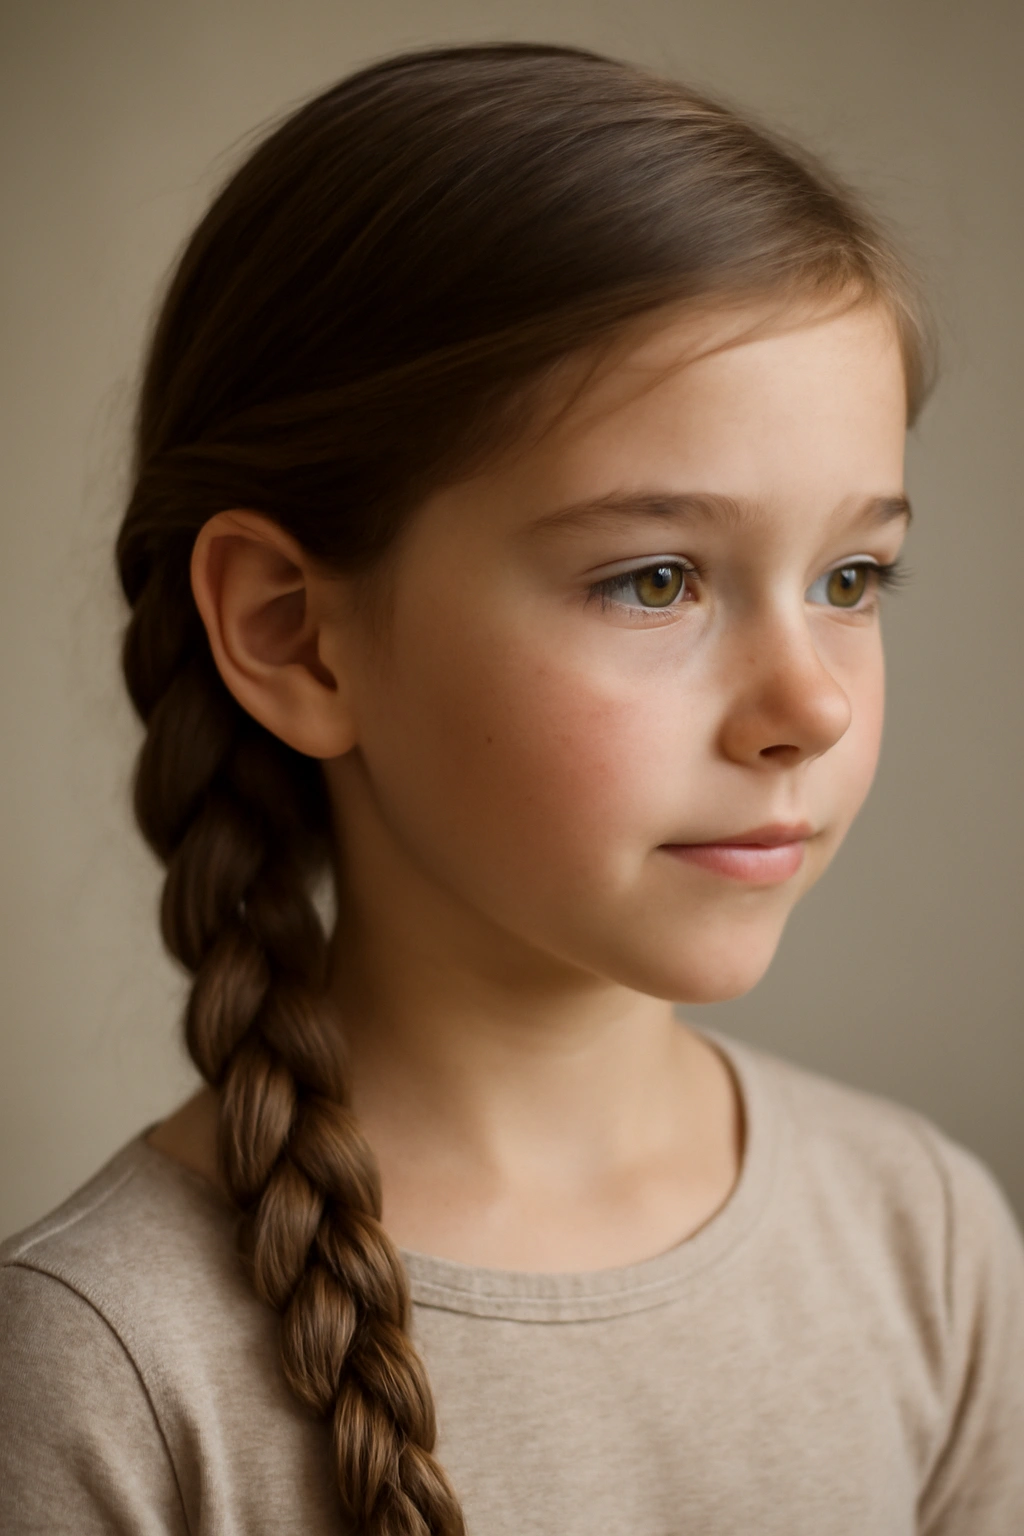
The side braid is the effortless workhorse of kids’ braiding — it’s quick to create, it looks polished without feeling overdone, and it solves the problem of hair-in-the-face that plagues so many kids during the school day. A side braid can be as simple or as intricate as you want to make it.
Why Side Braids Are Underrated
Side braids keep hair off the face and neck without pulling the entire head backward (which some kids find uncomfortable). They work beautifully on different hair textures and lengths, and they’re flattering on all face shapes. A side braid can be small and subtle, or you can incorporate most of the hair for a more dramatic effect — the flexibility is huge.
Making a Side Braid Look Best
- Part the hair slightly to one side to create natural flow
- Gather the hair on the chosen side, starting at the temple or ear area
- Braid the section using your preferred technique (three-strand, Dutch, or French all work)
- Secure the end and gently pull and loosen the braid slightly for a softer, more intentional look
Maintenance note: Side braids survive the entire school week without needing to be re-done. Many kids develop a kink in the hair from the braid, which actually looks like intentional waves and can be refreshed with a light spray.
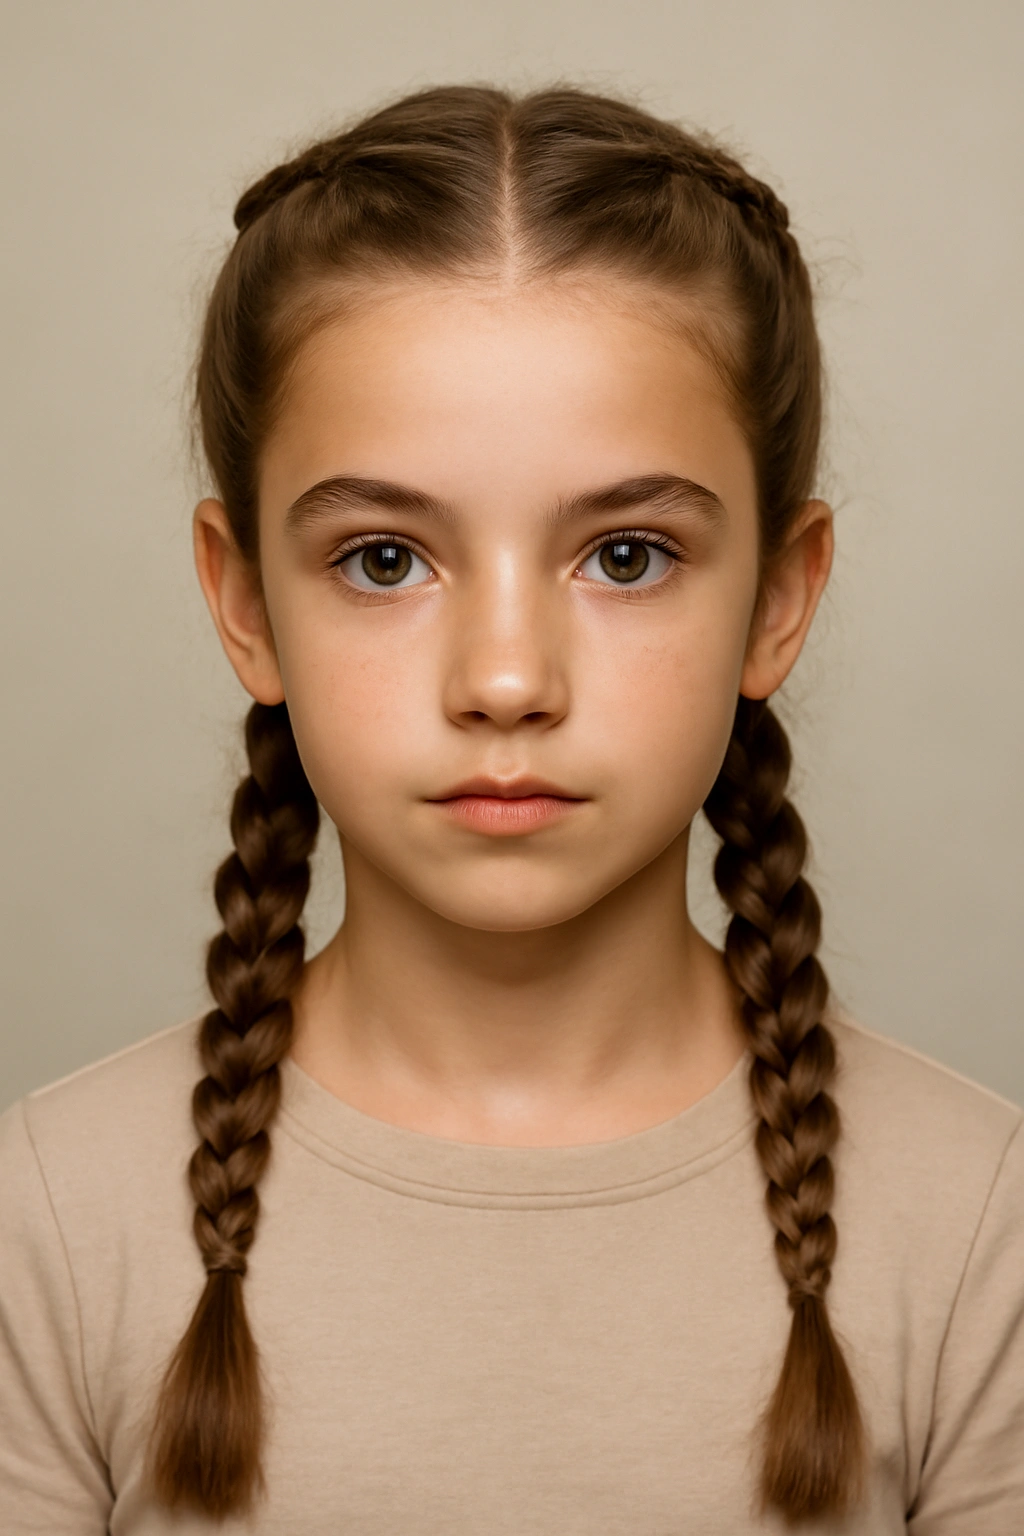
8. Pigtail Braids

Pigtail braids are the classic option for younger kids — they’re adorable, age-appropriate, and practical. Basically, it’s two braids instead of one, which means double the securing power and a totally different aesthetic from a single center braid. Pigtails also make even short hair feel special and braided.
The Practical Benefits of Pigtails
Two smaller braids hold better than one large braid for very young children or kids with fine or slippery hair. They’re easier to execute when your child is squirmy (you do one side while they watch a show, then the other). Because the weight is split between two braids, they’re more comfortable for kids who find having all their hair pulled to the back bothersome.
Creating Balanced Pigtail Braids
- Create a center part from the crown to the nape of the neck
- Section one side and braid it completely from near the scalp to the ends
- Repeat on the opposite side, aiming for matching tension and positioning
- Secure each braid with a matching elastic for cohesion
Worth knowing: Pigtail braids look intentionally playful, making them perfect for kids ages 4-10, but they also work adorably on older kids who want a fun, less formal style for certain occasions.
9. Boxer Braids
Boxer braids are essentially two Dutch braids (not regular three-strand braids) positioned close together, creating that sleek, athletic look that’s inspired by actual boxers’ hairstyles. They’re practical, they look cool, and they’re the go-to braid for kids who do gymnastics, play sports, or just like the edgy aesthetic.
Why Boxer Braids Win for Active Kids
Boxer braids keep every single strand in place, making them ideal for kids who run, tumble, or play hard. There are zero flyaways, zero loose pieces, and zero concern about the braid coming undone mid-soccer-game. The sleek, tight look is modern and stylish without feeling babyish, which appeals to older elementary and middle school kids.
The Execution
- Create a center part from the crown to the nape of the neck
- Starting at the crown on one side, Dutch braid down toward the nape
- Repeat on the opposite side, keeping the braids parallel and even
- Secure both braids at the nape with elastics (you can let them hang separate or combine them into one elastic for a different look)
Pro tip: Boxer braids are actually easier to execute than they look because you’re doing two smaller braids instead of one large, complex braid. The tight, controlled look is very forgiving of imperfections.
10. Dutch Pigtail Braids
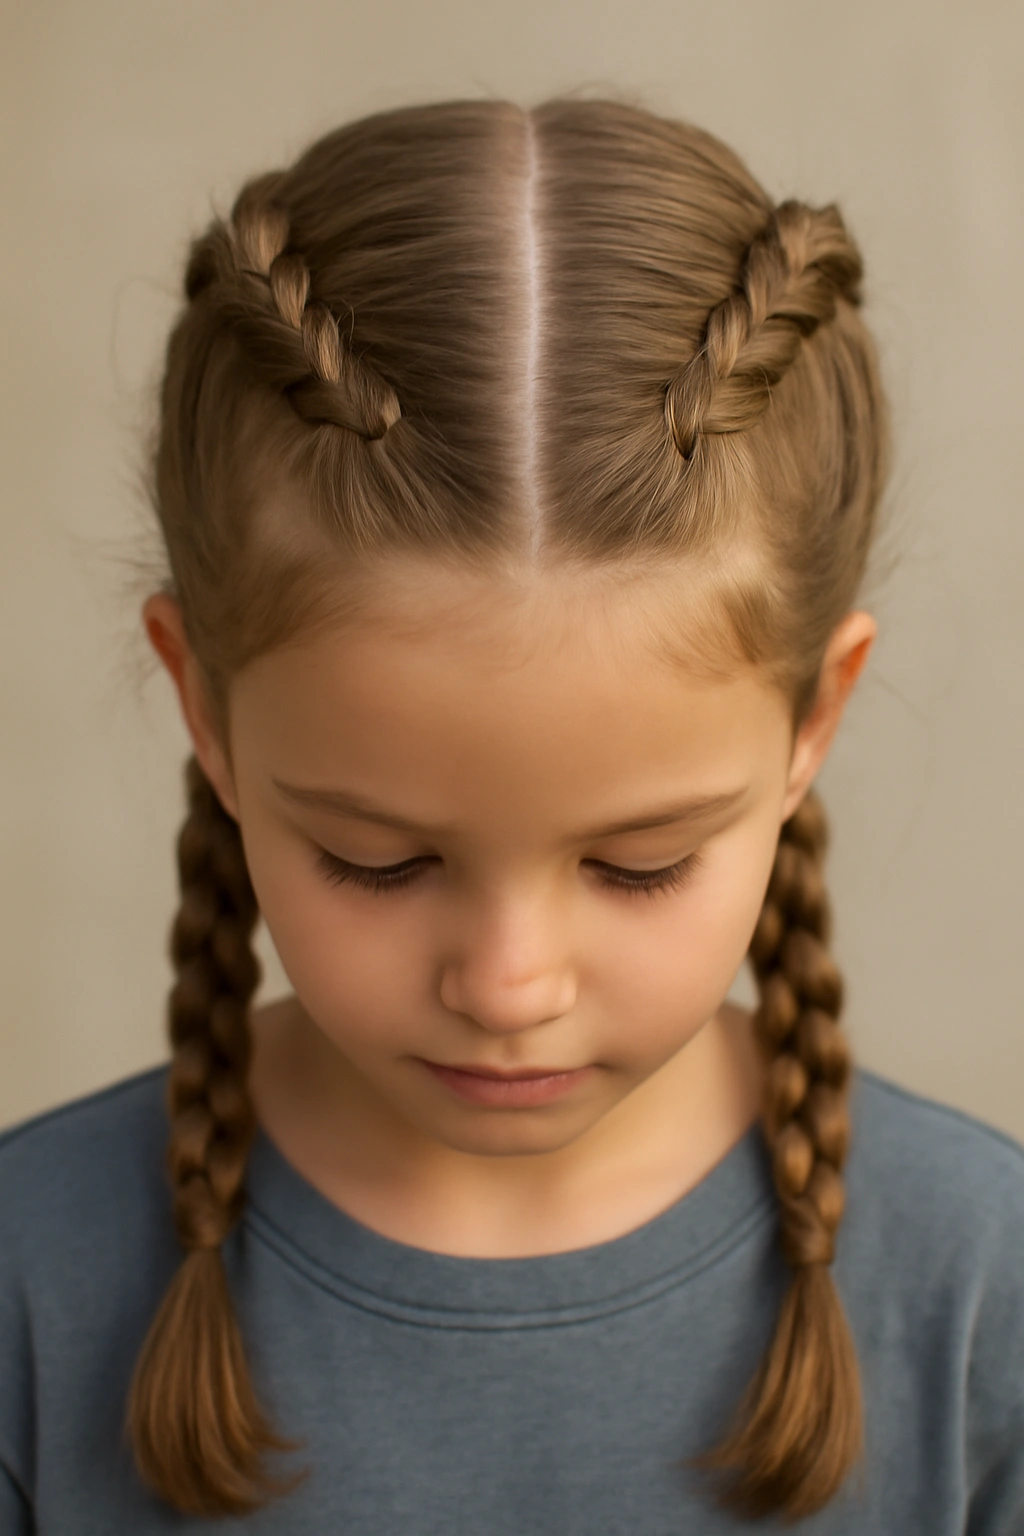
Combine the visual interest of Dutch braids with the practical simplicity of pigtails, and you’ve got Dutch pigtail braids — basically, two Dutch braids instead of regular three-strand pigtails. This gives you all the benefits of pigtails (lighter weight, easier to manage) with the elevated, textured look of Dutch braids.
The Aesthetic Appeal
Dutch pigtail braids look more sophisticated and intentional than regular pigtail braids, making them suitable for kids who want something more interesting but still age-appropriate. The raised texture creates visual dimension, and they photograph beautifully. For kids with straight hair, the Dutch technique adds the illusion of thickness and texture.
Executing Dutch Pigtails
- Create a center part running from crown to nape
- Section one side and Dutch braid it from crown to ends (crossing strands under rather than over)
- Repeat on the opposite side
- Secure both braids with small elastics that match the hair color
What to watch for: Dutch braids require slightly more precision than regular three-strand braids. If your child has very fine or slippery hair, pre-apply a light texturizing spray to help the sections grip together.
11. Bubble Braid
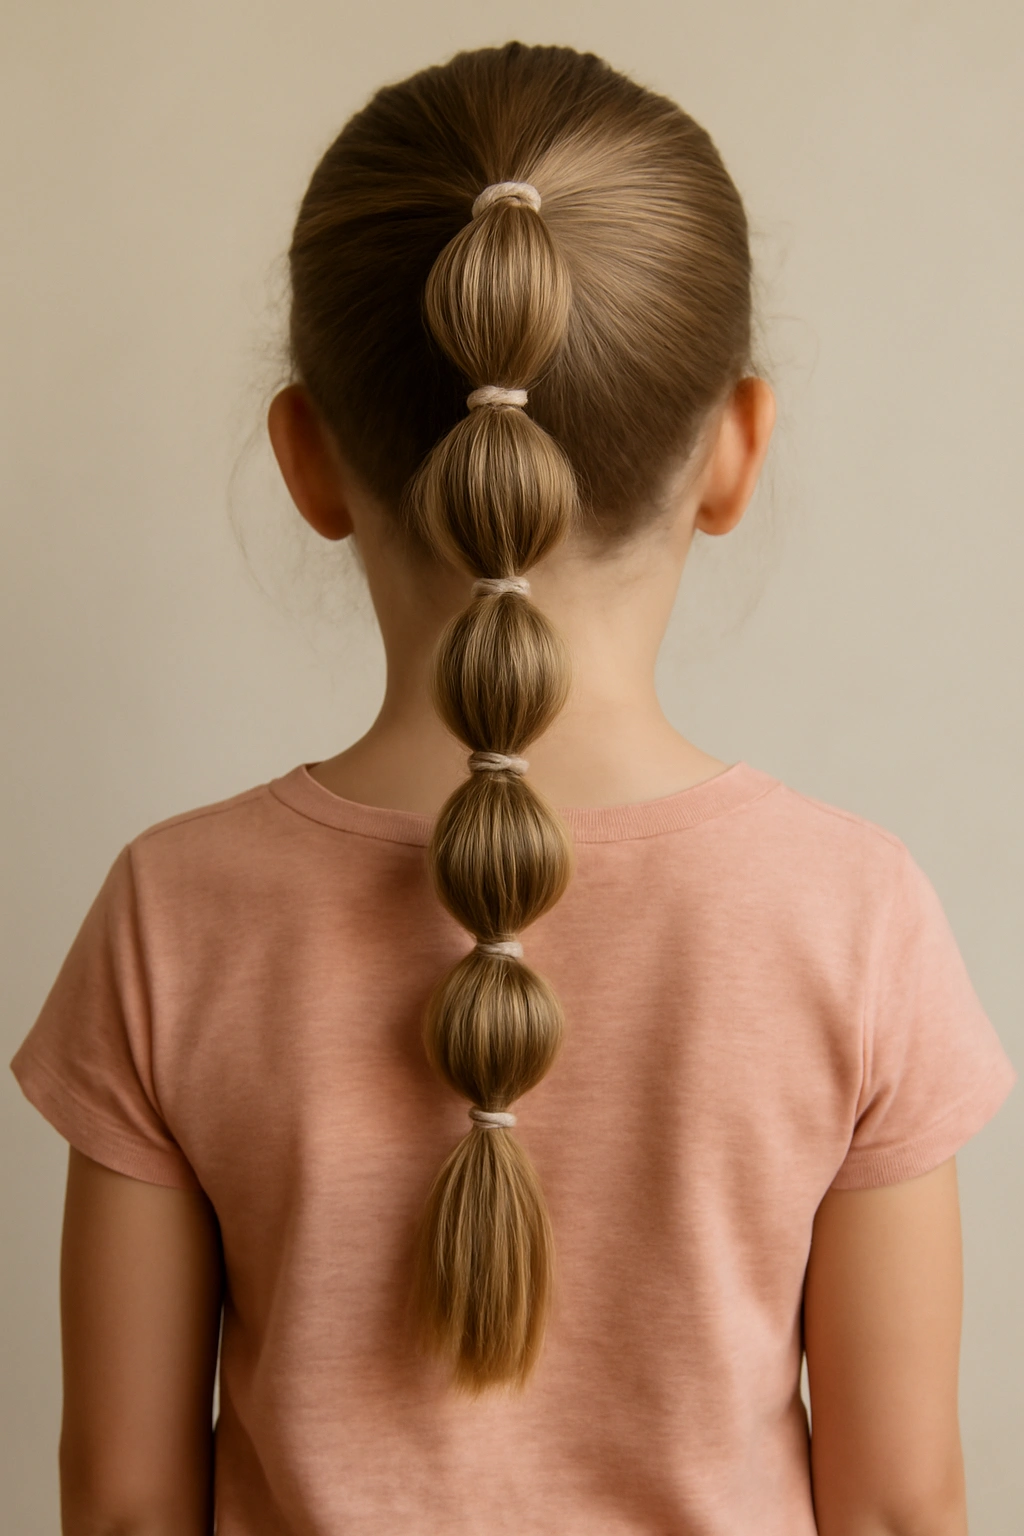
The bubble braid creates a playful, dimensional look by sectioning a single braid into distinct “bubbles” using small elastics — it looks far more complicated than it is, and kids genuinely love the visual interest. It’s perfect for kids who want something that looks special and intentional without needing to learn a complex braiding technique.
Why Bubble Braids Feel Magical
Bubble braids are visually striking — the segmented sections create dimension and movement even in straight hair. They’re also surprisingly practical: the multiple elastics mean the braid is secured at multiple points, so even if one elastic loosens, the braid still holds. Kids feel like they’re wearing something genuinely special.
Creating Bubble Braids
- Start by creating a regular three-strand or Dutch braid down the back
- About an inch down from the top, secure a small elastic around the entire braid
- Pull the section above the elastic slightly to loosen it and create the “bubble” effect
- Move down another inch or two and secure another elastic
- Continue creating bubbles down the length of the braid
Insider tip: Bubble braids hold beautifully for days and actually look intentionally textured and casual the longer they stay in. You can create them on a fresh braid or on braids that are already a day or two old.
12. Lace Braid
A lace braid is essentially a French or Dutch braid where you only braid on one side of the head, creating a delicate, lace-like pattern that frames the face. It’s beautiful, it’s sophisticated, and it works for kids who don’t want their entire head braided but still want something intentional and styled.
The Elegant Look of Lace Braids
Lace braids keep some hair down and loose while securing the braided portion, making them perfect for kids who find fully pulled-back styles uncomfortable or who love the softer aesthetic of partially loose hair. The braiding pattern resembles lacework, which is where the style gets its name. This style works beautifully on all hair textures and feels equally appropriate for school and special occasions.
How to Execute a Lace Braid
- Start at the temple or behind the ear
- French or Dutch braid horizontally across the side of the head toward the back
- Only add new hair from one side (the top edge of the braid) — don’t add from the bottom, which creates the lacework effect
- Secure the end at the back or side, allowing the rest of the hair to hang loose
Worth knowing: Lace braids look modern and intentional without being overdone. They’re particularly beautiful on kids with shoulder-length or longer hair.
13. Spiral Braid
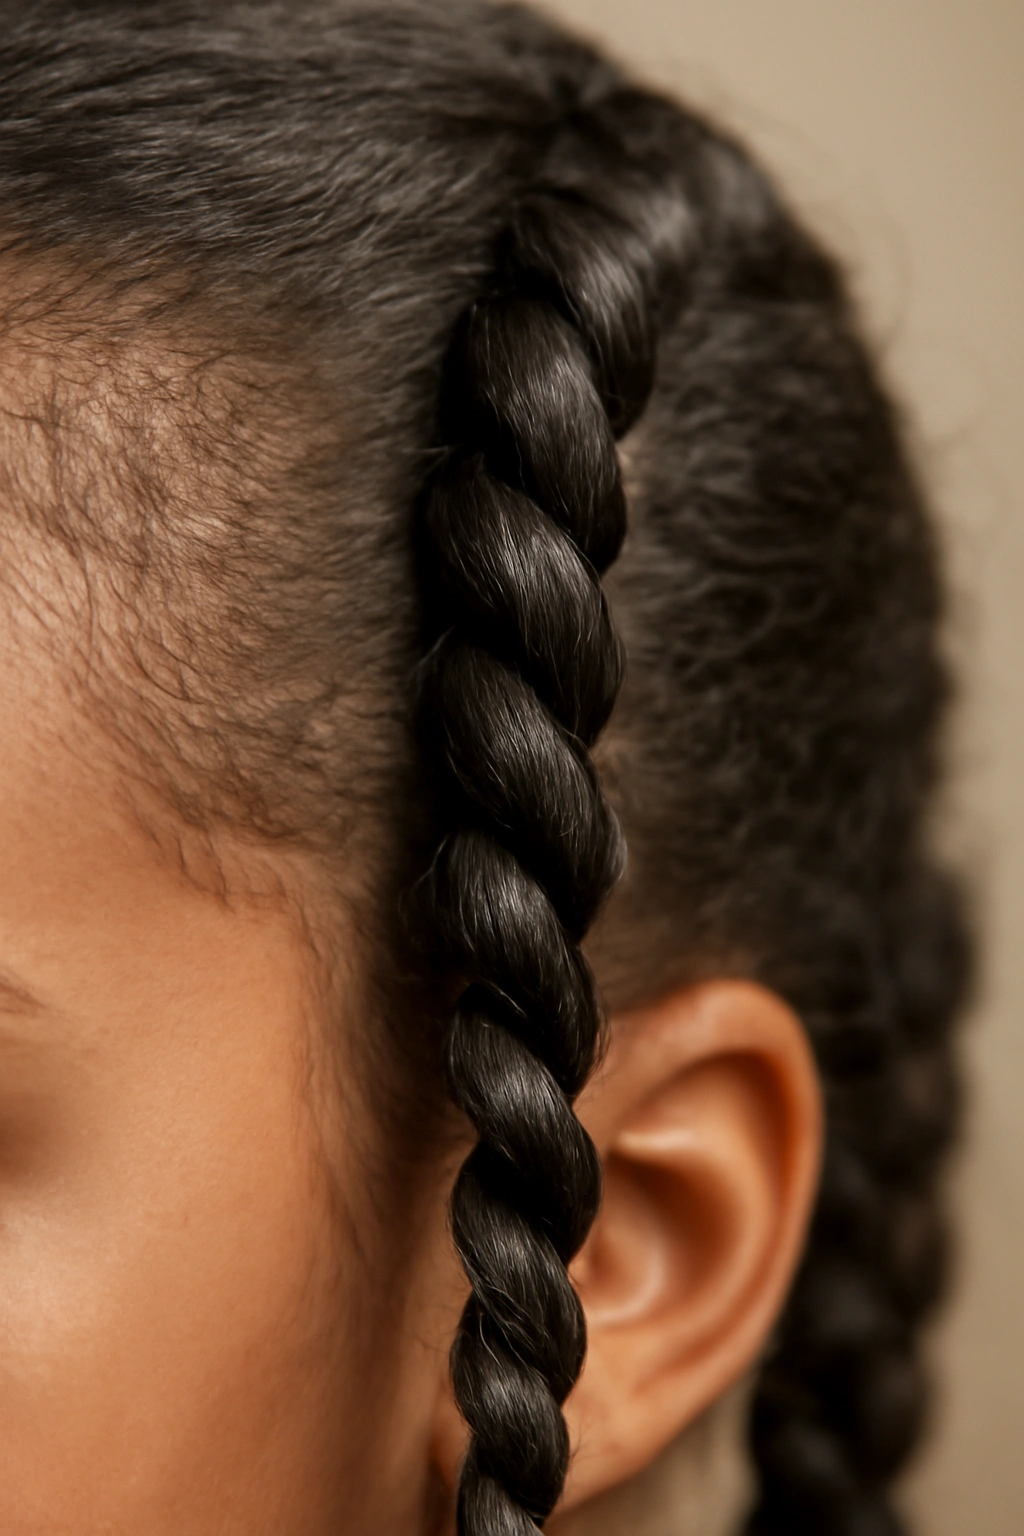
Spiral braids create a twisted, rope-like effect that’s visually interesting and surprisingly easy to execute — they’re actually simpler than three-strand braids once you understand the technique. The result looks intricate and special, which makes kids genuinely excited to wear them.
What Makes Spiral Braids Special
Spiral braids use only two sections of hair instead of three, and they’re twisted rather than braided, making them faster to create than traditional braids. The visual texture is stunning, and they hold their shape beautifully throughout the day. For kids with curly or textured hair, spiral braids integrate seamlessly with their natural texture.
Creating a Spiral Braid
- Divide a section of hair (or the entire head for a center spiral) into two thick sections
- Twist one section over the other, consistently twisting in the same direction
- As you twist down the length, keep the twist tight and even
- Secure the ends with an elastic
Pro tip: Spiral braids are the perfect introduction to advanced braiding for kids who are learning to braid themselves — it’s simpler than a three-strand braid but looks far more impressive.
14. Half-Up Braid
The half-up braid combines the controlled, styled look of a braid with the freedom of having some hair down. It solves the “I want my hair out of my face but I don’t want it all pulled back” dilemma that so many kids express, and it’s perfect for kids who don’t want a full-head commitment to a braided style.
Why Half-Up Works for School Days
Half-up braids keep hair off the face and neck without requiring the entire head to be styled. They’re quick to create, they work on all hair types and lengths, and they feel less restrictive than fully braided styles. For kids who find having all their hair pulled back uncomfortable or who want the versatility of loose hair, half-up braids are perfect.
Styling a Half-Up Braid
- Take a section of hair from the crown area (from temple to temple)
- Braid that section using your preferred technique
- Secure the braid and allow the lower hair to hang loose
- You can leave the rest completely smooth or add some waves for texture
Maintenance tip: Half-up braids are particularly good for second-day or third-day hair because they blend the loose waves with the braided section beautifully.
15. Infinity Braid

The infinity braid (also called a figure-eight braid or double braid) creates a geometric, interlocking pattern that looks like an infinity symbol or the number 8 when viewed from above. It’s visually stunning, it’s a conversation starter, and it’s perfect for kids who love geometric or mathematical concepts.
The Visual Impact of Infinity Braids
Infinity braids are absolutely show-stopping — they look professionally done and far more complex than they actually are. Kids feel genuinely proud wearing something so visually interesting. The pattern creates an optical illusion that makes the braid look thicker and more textured than it actually is.
Executing an Infinity Braid
- Create a center part or a side part, depending on where you want the pattern centered
- Start one French or Dutch braid from one side, braiding diagonally toward the center
- Start another braid from the opposite side, also braiding diagonally toward the center
- Where the braids meet, weave or interlock them to create the continuous infinity pattern
- Secure both braids together at the bottom
Worth knowing: This braid requires some practice and spatial reasoning, but the result is absolutely worth the effort. It’s perfect for special occasions or for kids who want their style to truly stand out.
16. Messy Braid
The messy braid is intentionally undone — it’s looser, airier, and deliberately imperfect in a way that feels cool and intentional rather than accidentally messy. Ironically, a messy braid takes deliberate styling to look right, but once you master it, it becomes quick and effortless.
The Appeal of Intentionally Messy Braids
Messy braids feel modern, they work on all hair types (and actually disguise uneven tension better than tight braids), and they’re genuinely comfortable for kids. There’s less pull on the scalp, and the looser construction means less likelihood of headaches. Many kids also prefer the slightly undone aesthetic to perfectly tight braids.
Creating a Beautifully Messy Braid
- Braid a regular three-strand, Dutch, or French braid, working quickly rather than obsessing over perfect tension
- Once complete, gently pull and loosen each section of the braid, working from bottom to top
- Pull the braid slightly wider and fuller until it has the desired level of messiness
- Secure the end
Pro tip: Messy braids actually hold better over multiple days than perfectly tight braids because the looseness allows the hair to settle and mold to the shape.
17. Twisted Braid
The twisted braid is created by twisting two sections of hair around each other rather than doing a traditional three-strand braid. It’s simpler to learn than a full braid, it’s faster to execute, and the final result is elegant and intentional. It’s perfect for kids who want something that looks styled without the time commitment.
Why Twisted Braids Deserve More Attention
Twisted braids create a smooth, refined look that works for casual and dressy occasions. They’re easier to execute on very young kids or kids with fine hair because they require less precision than three-strand braiding. The twist also works beautifully on curly or textured hair, where the pattern complements the natural texture.
The Twist Technique
- Section off the hair you want to braid (can be a side section, a crown section, or a full ponytail)
- Divide that section into two thick pieces
- Twist the two pieces around each other, consistently working in the same direction, down the length of the hair
- Secure the end with an elastic
Insider note: You can create a single twisted section or multiple twists for a more complex look. Multiple twists intertwined create a beautiful, intricate pattern.
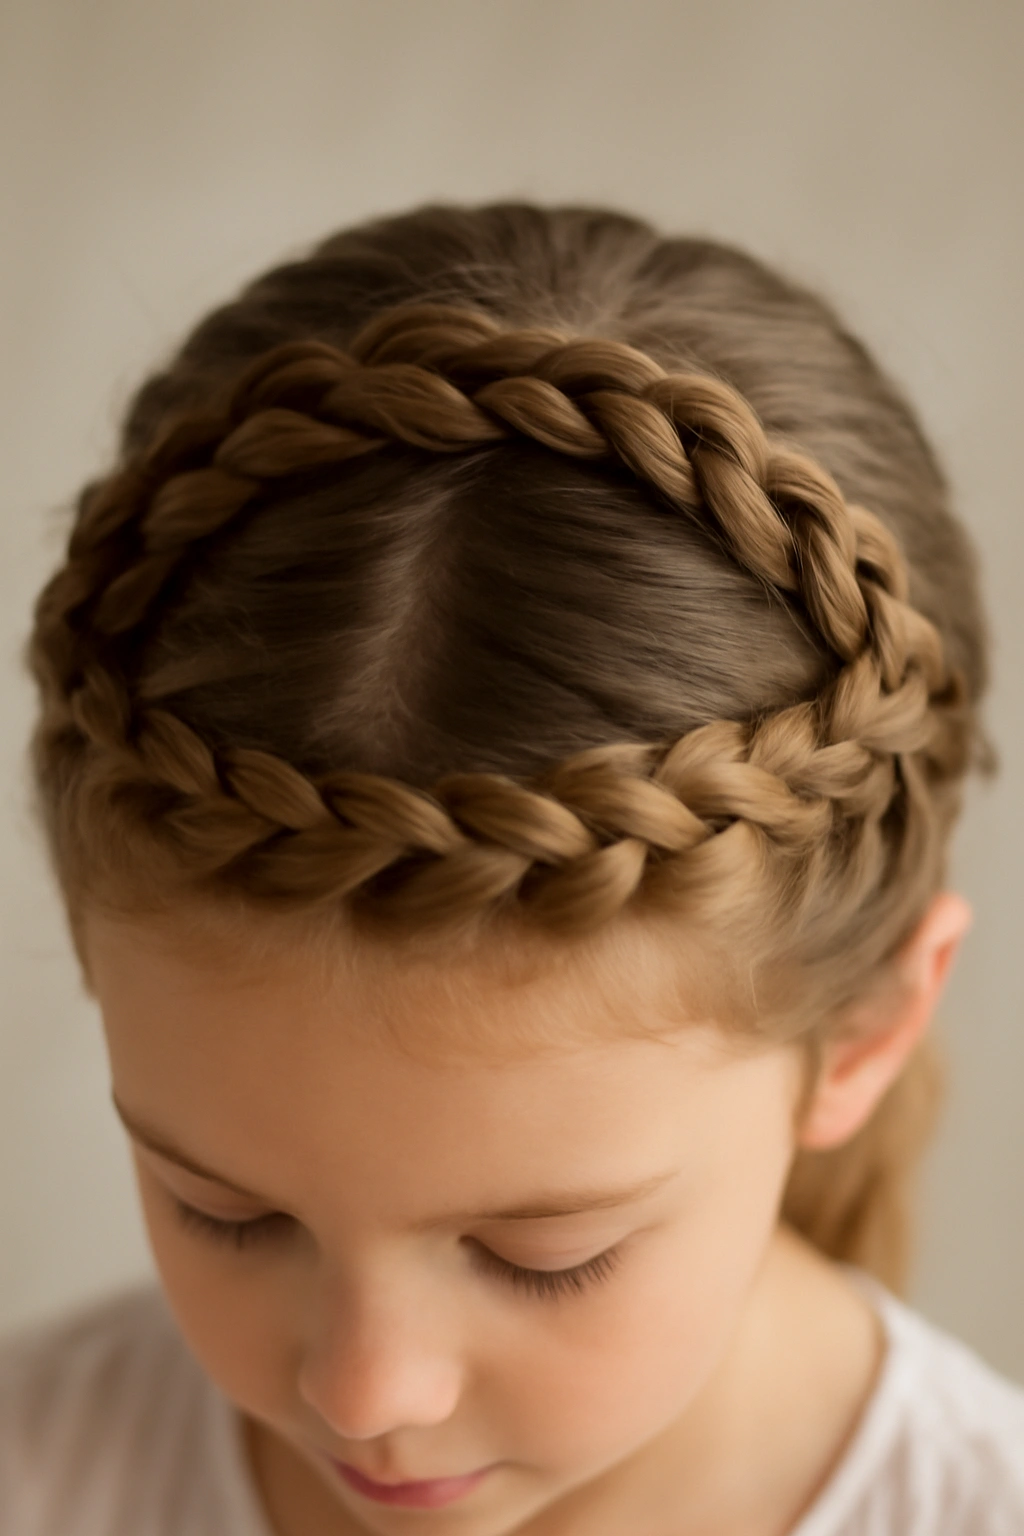
18. Halo Braid
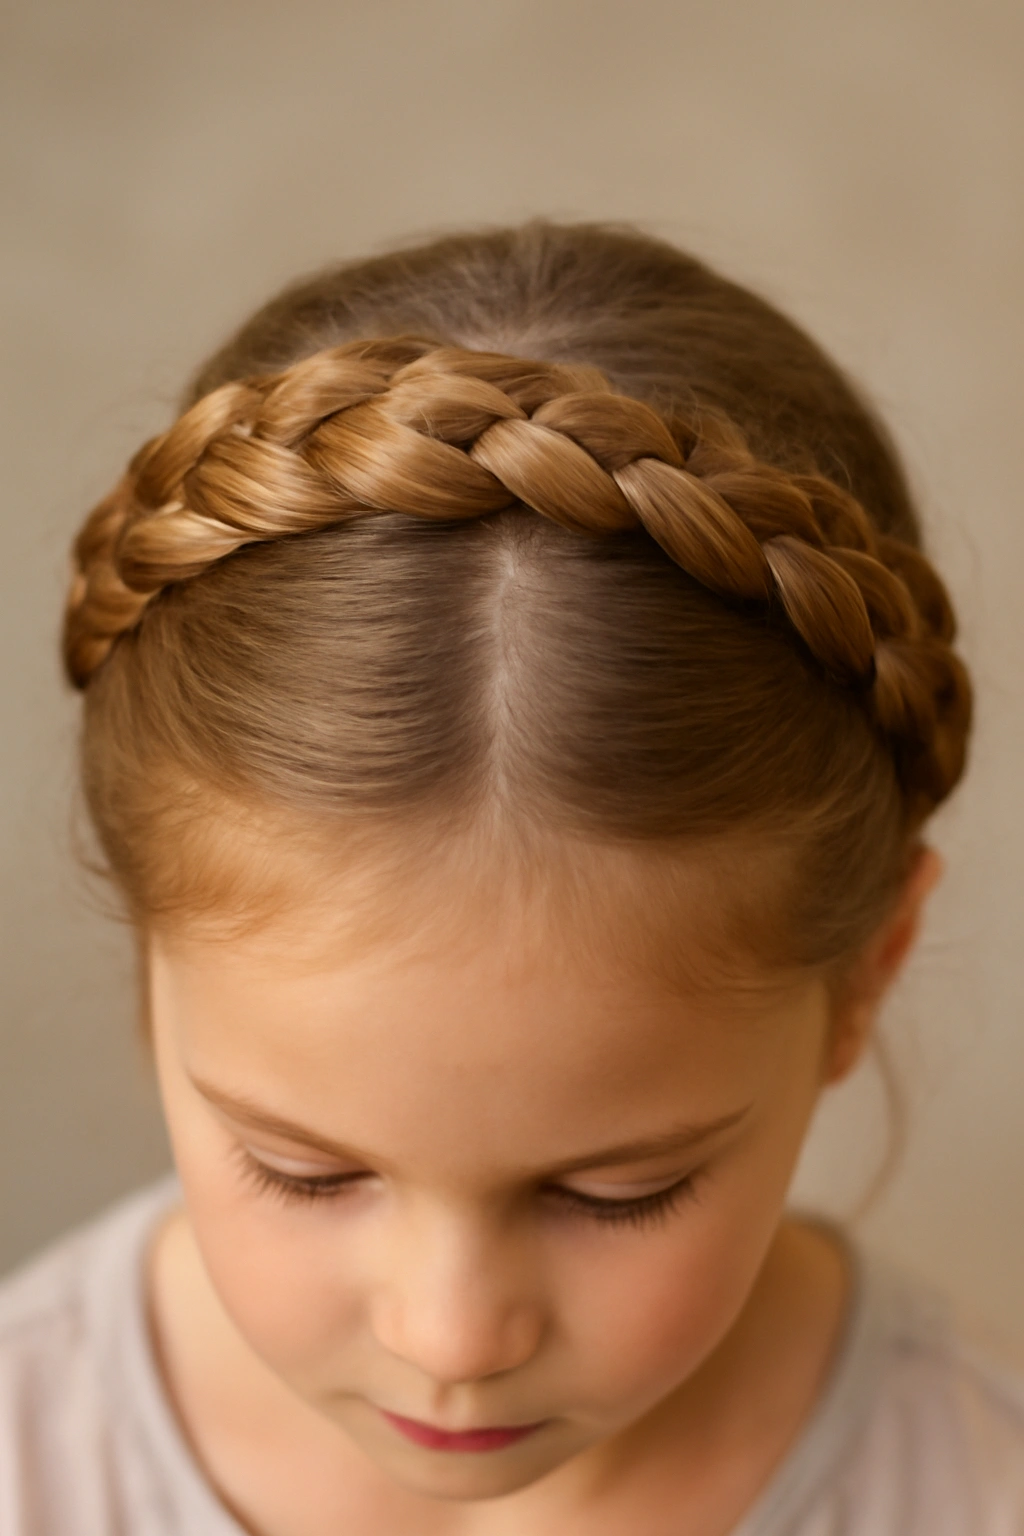
The halo braid circles the entire head like a crown or wreath, creating an absolutely magical aesthetic that feels both elegant and playful. It’s the ultimate special-occasion braid, but it’s also practical enough for everyday wear if you’re willing to spend a few extra minutes on hair day.
The Magic of Halo Braids
Halo braids keep every strand in place while creating that ethereal, fairy-tale look that kids adore. The braid circles the head, meaning there are virtually no loose pieces, no flyaways, and no hair falling into the face. This is the braid to choose when you want your child to feel absolutely special.
Creating a Halo Braid
- Start at one temple and create a French or Dutch braid, angling it around the back of the head
- Keep braiding as you circle around the head toward the opposite temple
- Tuck the end of the braid under the beginning to create a seamless circle
- Secure with bobby pins hidden within the braid
Worth knowing: Halo braids require either longer hair or enough hair thickness to make a substantial braid. They work beautifully on shoulder-length hair or longer. The braid holds for several days and actually looks better slightly softened or loosened over time.
Final Thoughts
The best braid is the one your child will actually wear, which means considering not just how it looks but how it feels, how long it takes, and whether your child enjoys the braiding process itself. Some kids light up at the idea of spending quiet time getting their hair braided — they see it as bonding time and attention. Others find it tedious and would rather spend that five minutes doing literally anything else.
Start with the simplest styles and work up to more complex ones as you both get more comfortable. A simple three-strand braid that your child actually wears beats an elaborate halo braid that stays unwanted in a ponytail holder. The most successful braids are the ones that fit into your actual life — quick enough to do on a school morning, sturdy enough to survive the day, and cute enough that your kid feels genuinely good wearing them.