Short hair doesn’t mean boring hair — especially when you’re trying to look put-together before classes, sports practice, or social events at school. The truth is, a great short hairstyle can take you from bed head to confident in minutes, and that’s exactly what you need during a hectic school day when your morning is already packed. The right style works with your hair texture, doesn’t require professional tools or skills to maintain, and actually looks better with a little imperfection. Whether your hair is naturally straight, wavy, or curly, there’s a short hairstyle that’ll save you time, keep your hair out of your face, and make you feel genuinely good about how you look.
The styles in this list aren’t complicated updos that demand bobby pins and products you don’t own. They’re practical, achievable, and designed specifically for the reality of a school day — you need something that survives passing periods, doesn’t flop by lunch, and won’t make you self-conscious in your afternoon classes. Many of these can be styled in under five minutes once you know the basic technique, and several actually improve throughout the day as they settle. The key is understanding the fundamentals of what makes each style work, what texture or length it works best on, and exactly what to do to make it look intentional rather than accidental.
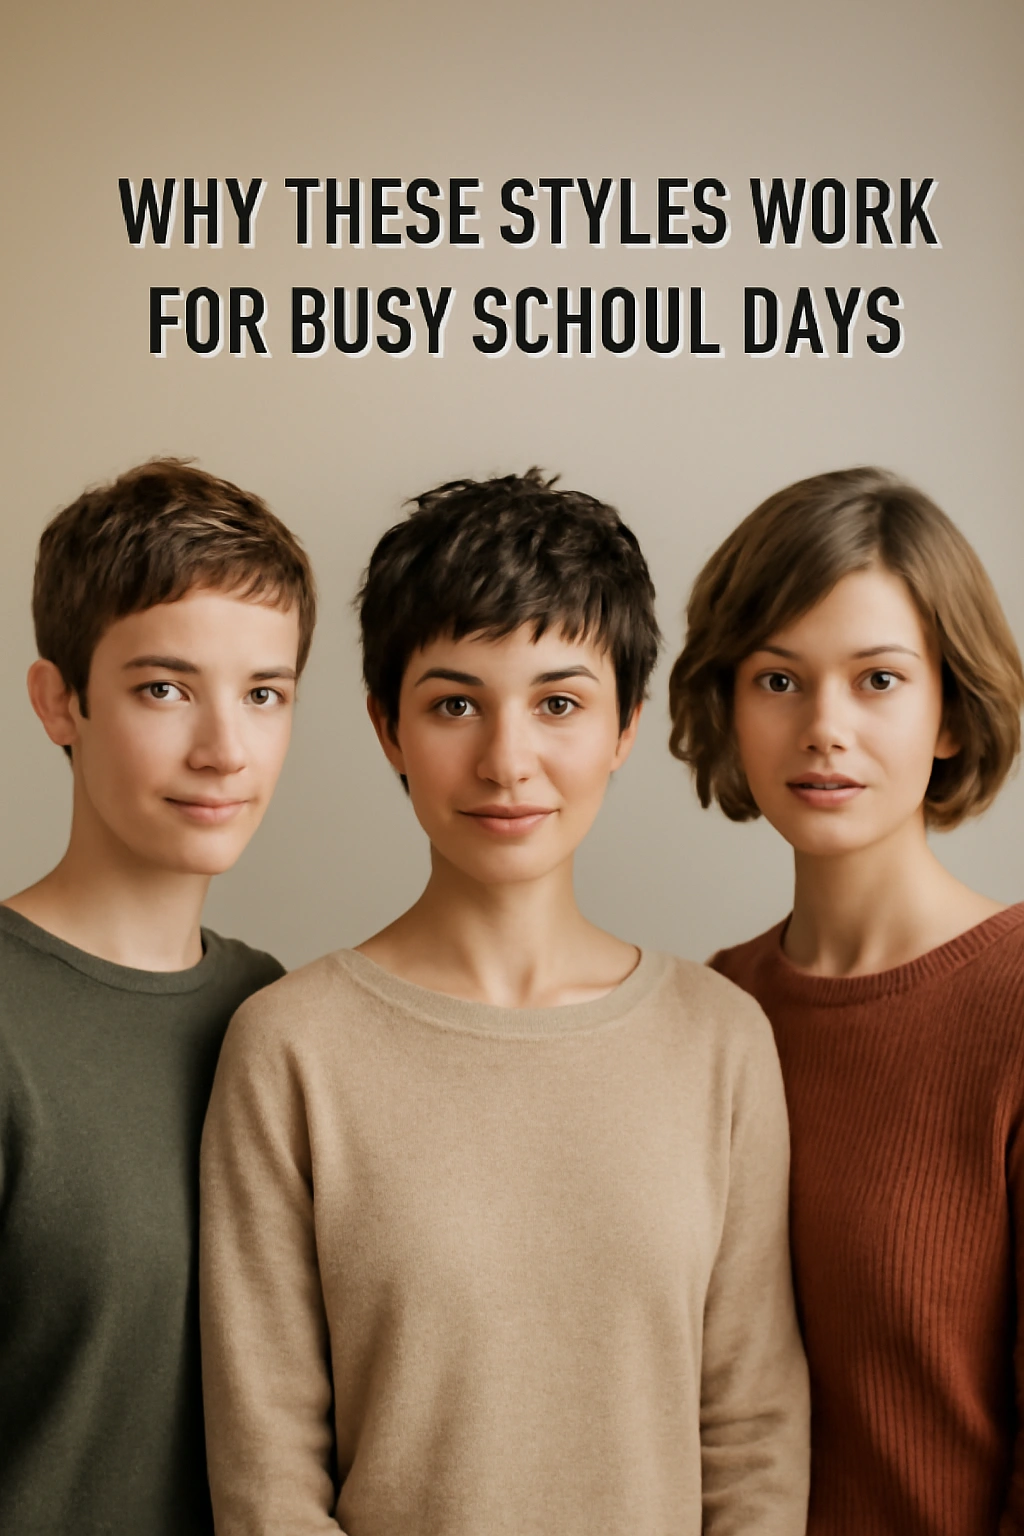
Why These Styles Work for Busy School Days
Short hairstyles have a major advantage that longer hair simply doesn’t offer: they’re genuinely low-maintenance without looking lazy. When your hair is shorter, you’re not fighting against gravity trying to keep it styled all day. You’re also not dealing with flyaways, ends tangling around jacket zippers, or that moment after gym class when your hair looks like it lost a battle with a hair dryer. Short styles frame your face, which means they actually make a visual impact when you’ve got them styled intentionally — they’re the opposite of disappearing into the background.
The styles below work because they capitalize on what short hair does naturally: movement, texture, and shape. A five-minute messy bun doesn’t work well on short hair because there’s nothing to gather, but that same length becomes the perfect canvas for a tousled, textured style that looks effortlessly put-together. You’ll notice several of these styles actually benefit from a little texture in your hair — slightly unwashed or with a texture product — so they’re forgiving on days when you’re pressed for time.
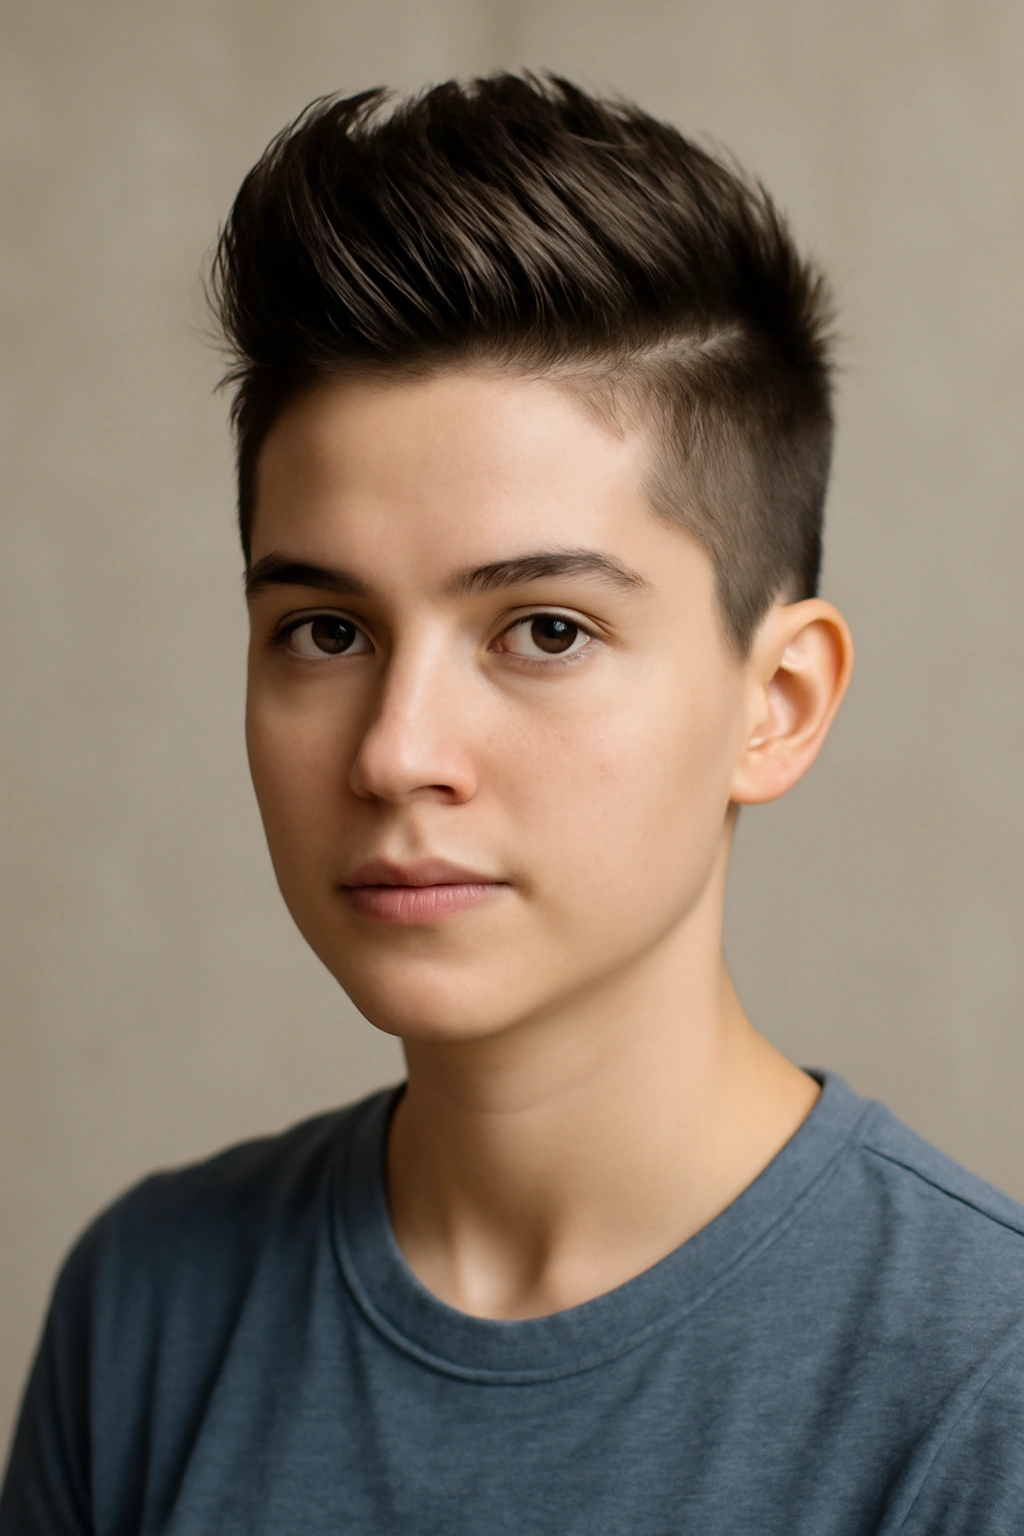
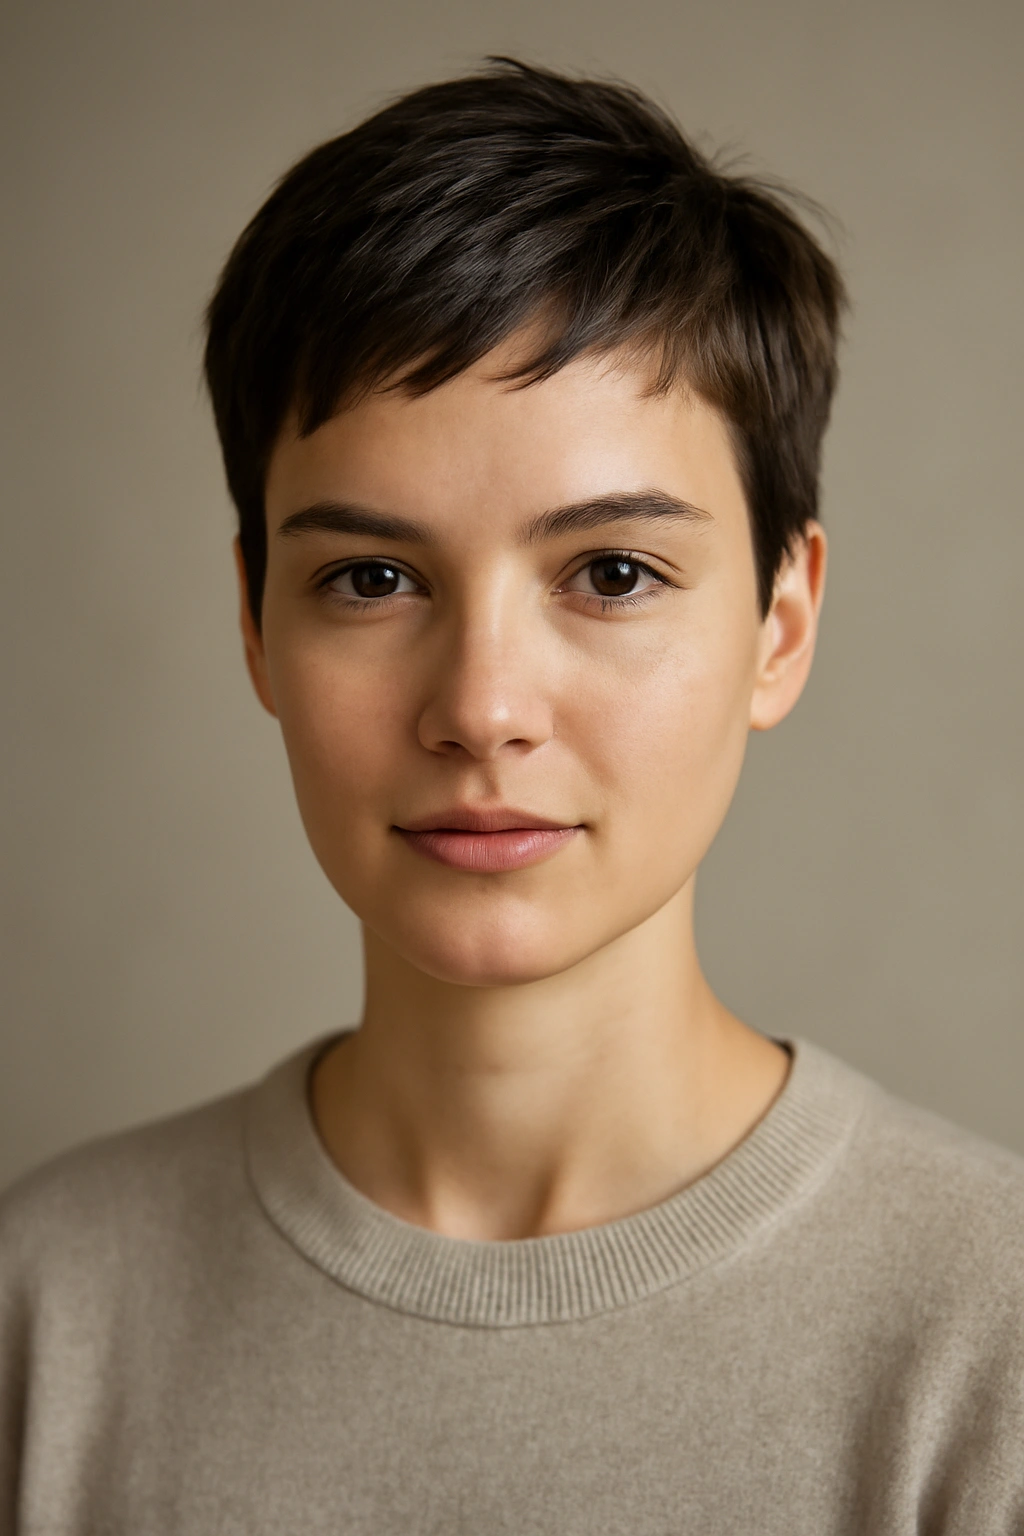
1. The Textured Pixie with Tousled Pieces
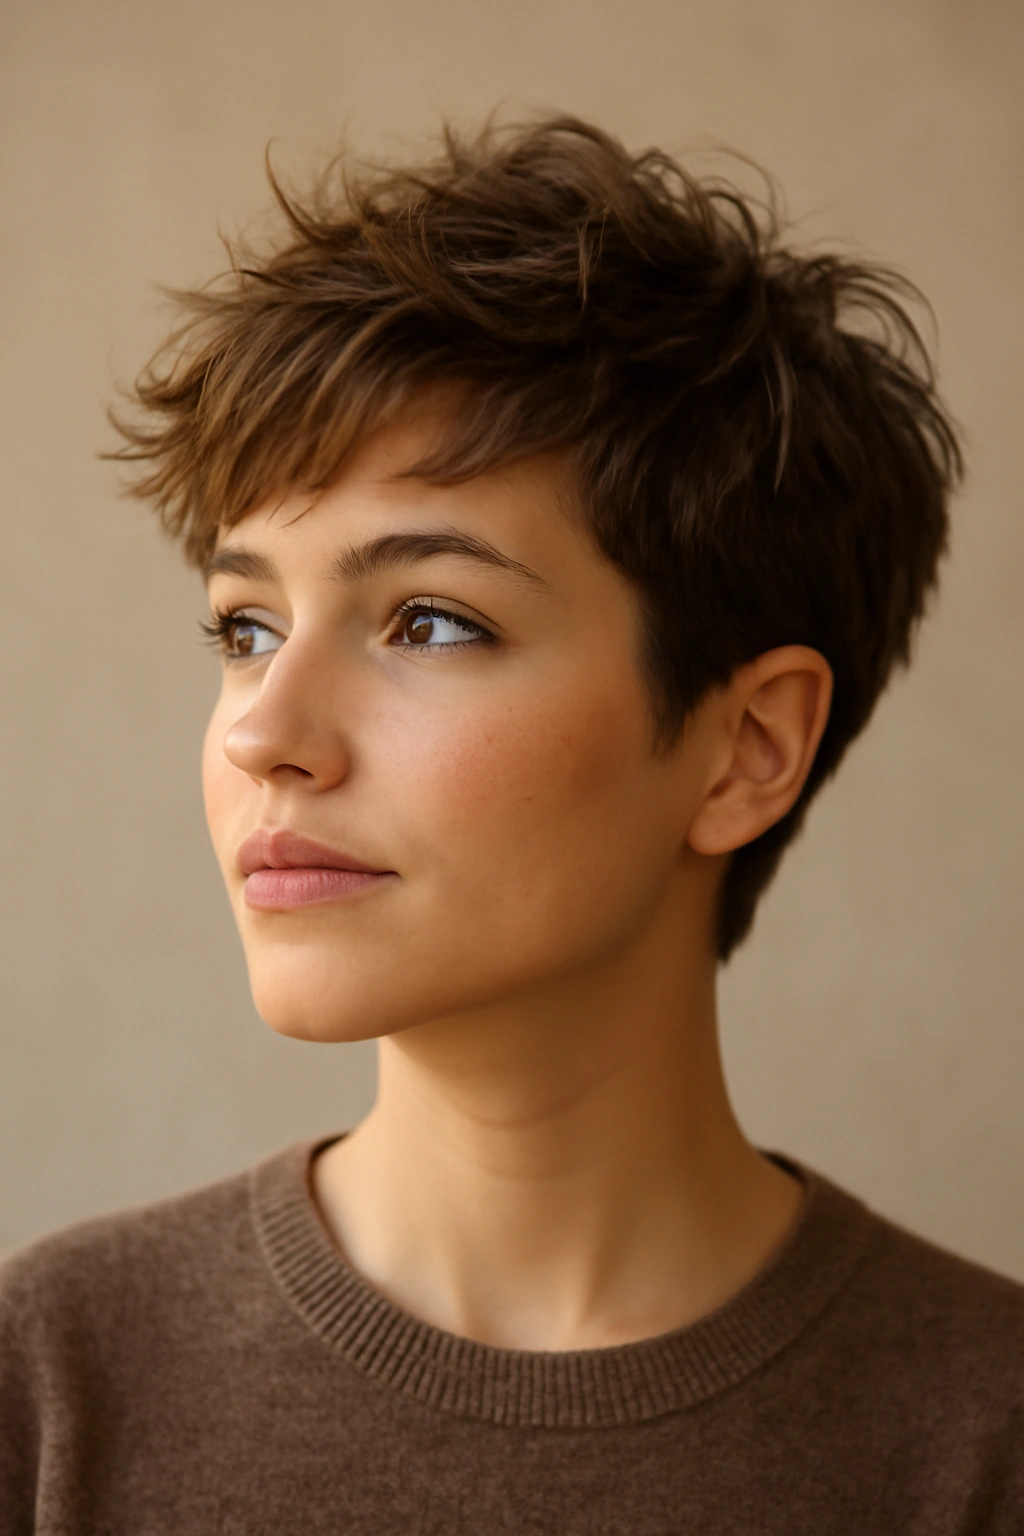
A textured pixie isn’t the severe, super-short style you might picture from old movies — it’s actually got real personality and movement, especially when you work texture into the top while keeping the sides neat. The beauty of this style is that it gets better as the day goes on; those tousled pieces actually settle into a more intentional look by afternoon. You can wake up, run your fingers through the top, and you’re essentially done, or you can spend two minutes using a little texture spray and a light hand to create more defined separation between pieces.
Why It Works for School
This style is a total time-saver because it doesn’t require blow-drying to look good. The short length means it dries incredibly fast on its own, and the whole point of a textured pixie is that imperfection is the goal. If your hair has a bit of a case of bedhead, that actually adds to the look rather than ruining it. You’re not fighting against your hair’s natural texture — you’re working with it and letting it show.
How to Get the Look
- Keep the top roughly 2-3 inches long for enough length to create texture and movement
- Ask your stylist to keep the sides and back shorter, around 1 inch or less, for clean definition
- Request choppy, textured layers throughout the top section — these create natural separation
- Use a lightweight texture spray or dry shampoo on clean or slightly damp hair for grip without weight
- Tousle pieces upward and apart with your fingers rather than trying to smooth anything down
Pro tip: Apply texture spray the night before and sleep on it lightly — you’ll wake up with even more natural separation and movement.
2. The Classic Bob with Soft Layers
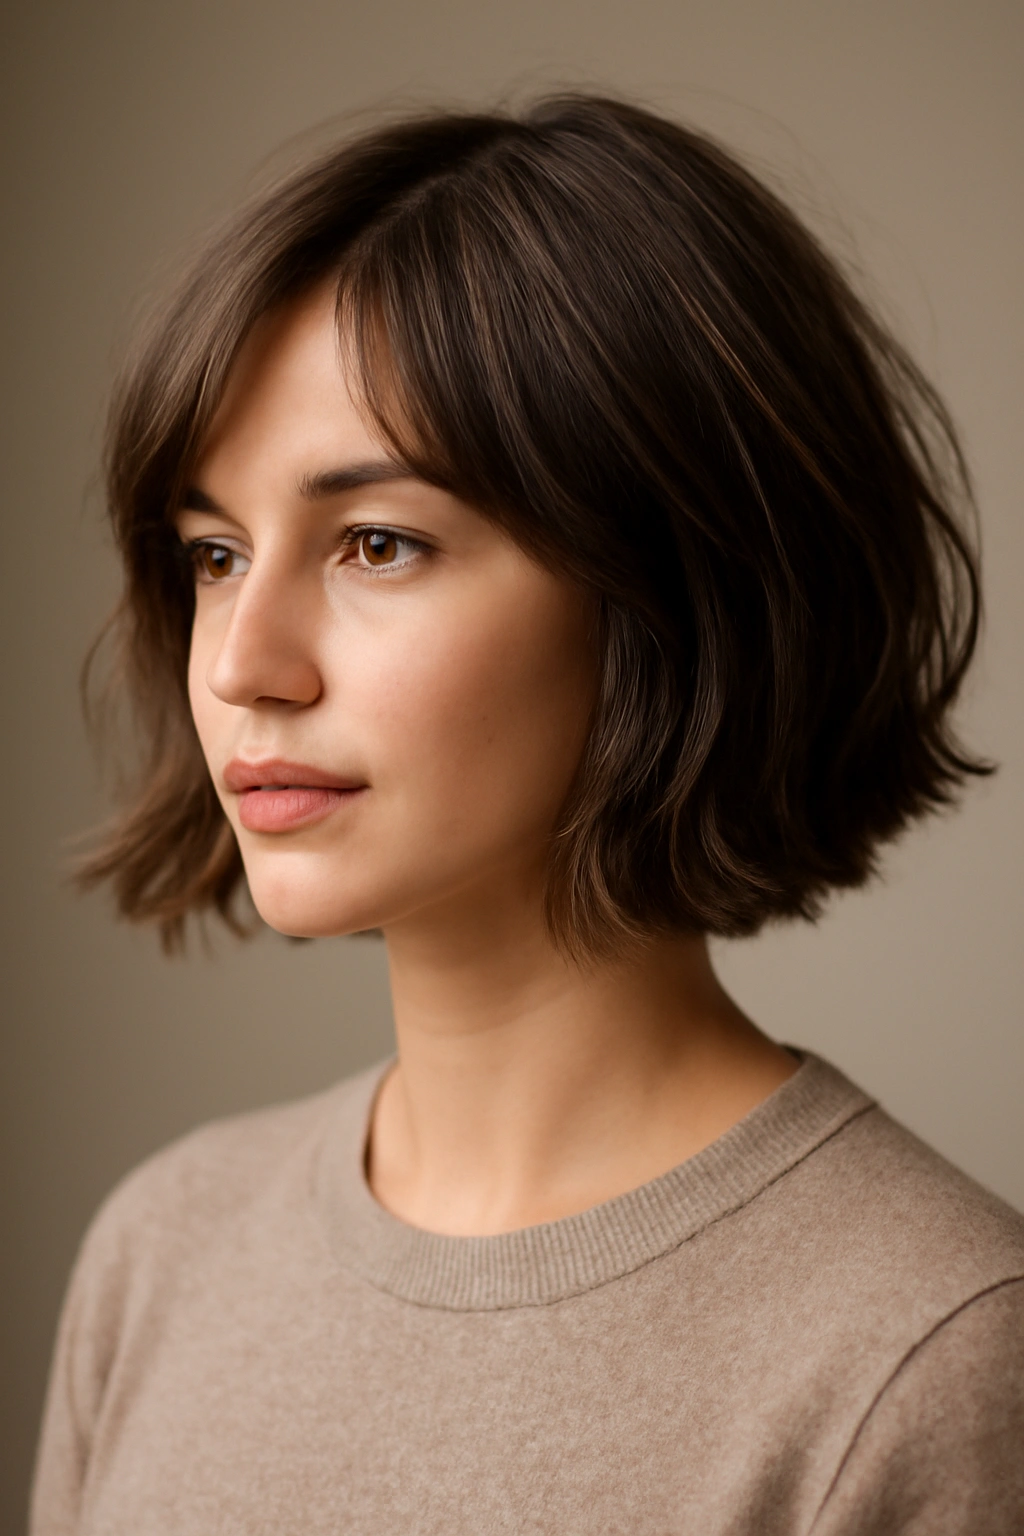
Don’t write off the bob just because it sounds traditional — a modern bob with soft layers is anything but dated, and it’s genuinely one of the easiest styles to manage during a school day. The layers create movement and texture that prevent the style from looking blunt or severe, and because the cut is relatively short all over, you don’t have to do anything complicated to make it look intentional. A simple style here means running a brush through it and maybe adding a tiny bit of texture spray if you want definition, and you’re done.
What Makes This Version Different
A modern layered bob sits right around jaw-length or slightly shorter, with choppy texture throughout rather than blunt ends. This gives the style way more personality and makes it work with more hair types than a super-sleek, perfectly-straight bob would. The layers also mean that even if you don’t style it perfectly, it still looks intentionally tousled rather than just unstyled.
How to Style It
- Brush through damp hair or apply a texturizing spray to dry hair for grip
- You can blow-dry it straight for a sleek version, or scrunch it slightly as it dries for texture
- If you want more definition, use a flat iron to press down some sections while leaving others textured
- A light mist of flexible hold spray keeps everything in place without that stiff, over-styled feeling
- Takes about 5-10 minutes total, or literally 2 minutes if you’re just brushing and going
Worth knowing: This style works on pretty much any hair type, but it looks especially good on straight-to-wavy hair. If your hair is very curly, ask your stylist for a cut that works with your curl pattern rather than against it.
3. The Slicked-Back High Pony
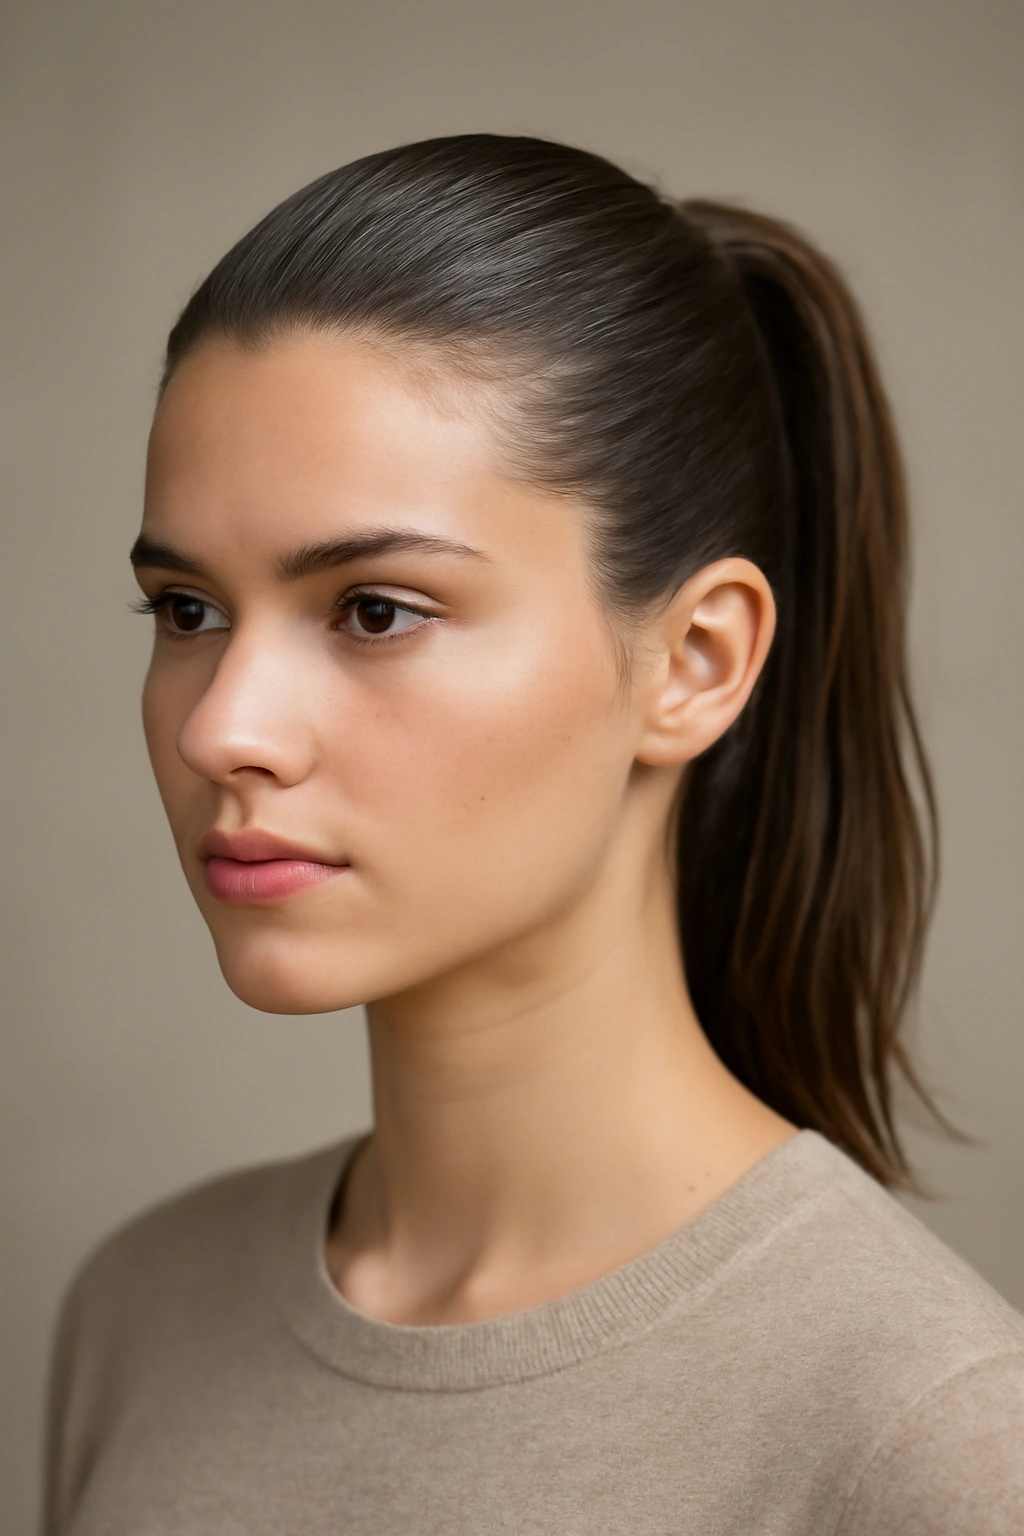
A slicked-back ponytail on short hair is a total game-changer for days when you want your hair completely off your face but don’t have enough length for a traditional ponytail. The key is that “slicked-back” part — you’re using product and brushing technique to create a really clean, polished look that takes maybe two minutes and makes you look intentional and put-together. This style is perfect for days after gym class, after sports practice, or when you just don’t want any hair touching your face.
Why It’s Perfect for School Days
You get your hair completely off your face and neck, which is huge when you’re sitting in a classroom for eight hours. You’re not dealing with hair falling forward while you’re trying to take notes or hair sticking to your neck when you’re warm. The sleek, polished look also reads as intentional and put-together, so it’s great for days when you want to look more formal or polished without actually doing complicated styling.
How to Create a Polished Slicked-Back Pony
- Start with damp or slightly damp hair — dry hair is harder to slick smoothly
- Apply a styling cream, gel, or mousse to your hands and run them over your hair, smoothing everything back
- Use a fine-tooth brush or comb to brush hair straight back away from your face, smoothing as you go
- Gather everything into a high pony at the crown and secure with an elastic
- Smooth any flyaways with a little more product on your fingers or a fine brush
- You can leave the pony loose and fluffy, or twist it and wrap it around the base for a more polished bun
Quick facts about this style:
- Works on all hair types and textures
- Takes 2-5 minutes depending on how polished you want it
- Stays in place all day without needing touch-ups
- Great for preventing hair from getting in your face during sports or active classes
4. The Messy Textured Top Knot
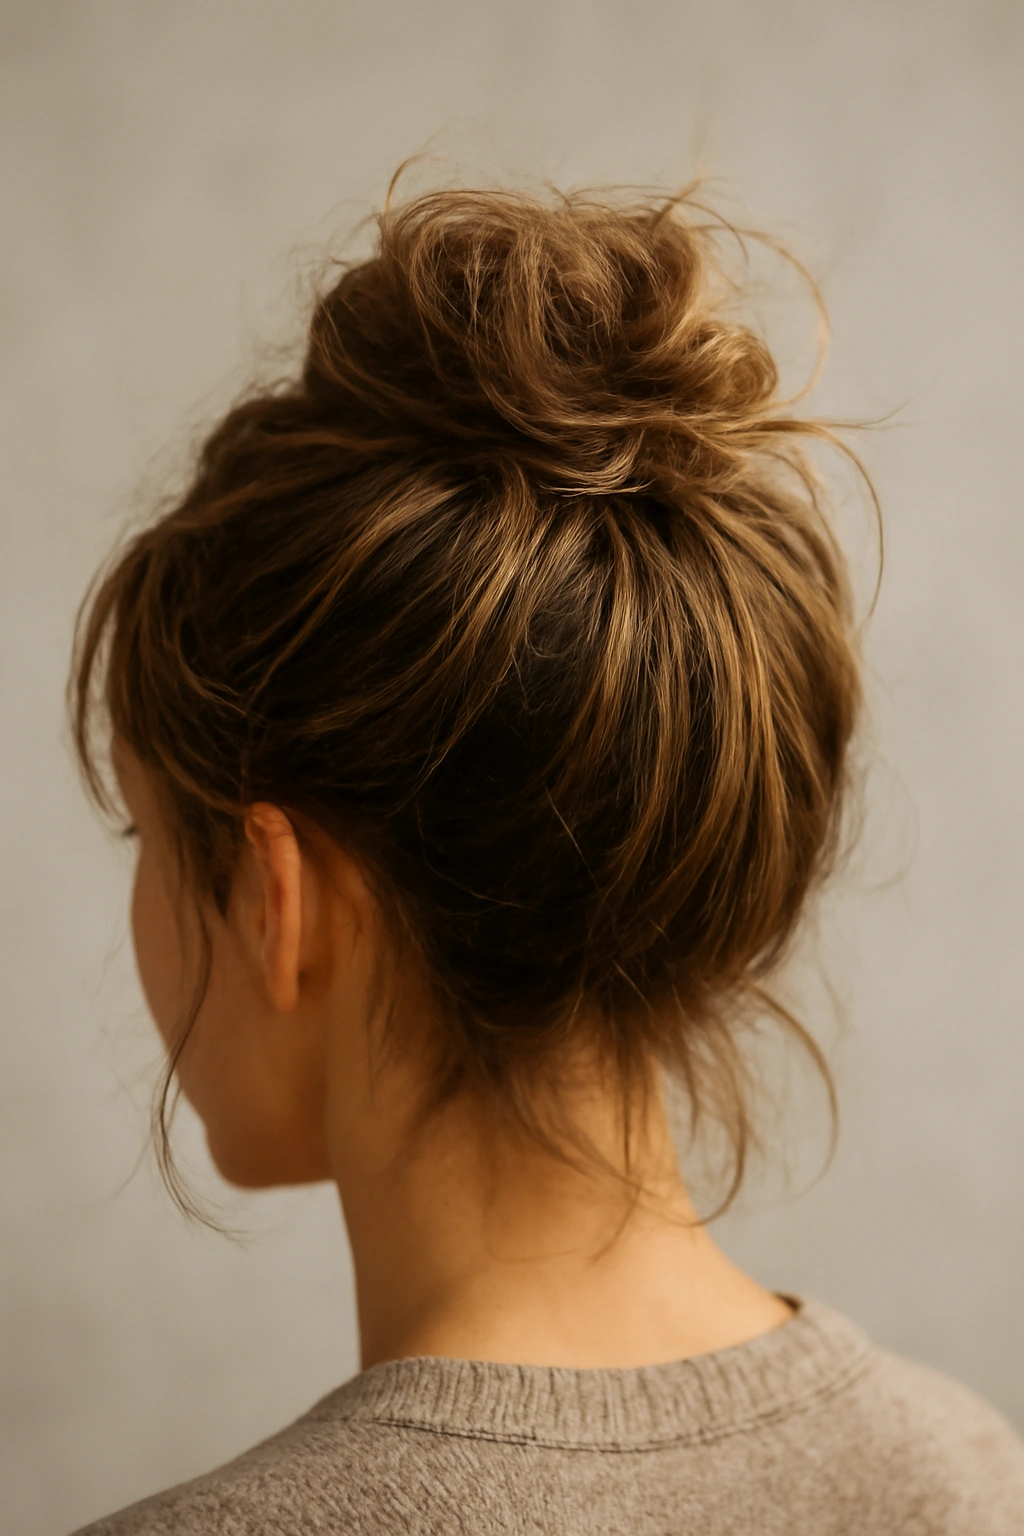
A top knot on short hair is easier to pull off than you’d think, and it’s a fantastic option for days when you want your hair off your face but don’t want the sleek, polished vibe of a slicked-back style. The “messy” part is actually the whole point here — you’re creating intentional texture and looseness that looks cool and casual. This style works best if your hair has at least some natural texture or wave, or if you’re willing to add texture with a spray, and it takes about three minutes max.
The Technique That Makes It Work
The trick to a good messy top knot is starting with texture before you tie it up. If your hair is completely smooth, a top knot can look a little thin and overdone. But if you’ve got some wave, curl, or texture — either natural or created with a texture spray — the knot becomes full, interesting, and intentionally tousled.
Step-by-Step
- Apply texture spray to damp or dry hair, or use dry shampoo for grip and texture
- Tousle and scrunch your hair with your fingers to build texture throughout
- Gather your hair loosely at the crown, but don’t pull it too tight
- Twist the gathered section loosely and wind it around the base to create a knot
- Pull out a few pieces around your face and let some shorter pieces fall — this prevents the “too polished” look
- Secure with bobby pins and set with a flexible hold spray if you need it to last all day
Why this works: The looseness and texture are what make this style look intentional and cool rather than just messy. You’re not trying to hide that it’s not perfect — you’re celebrating the texture and movement.
5. The Choppy Curtain Bangs
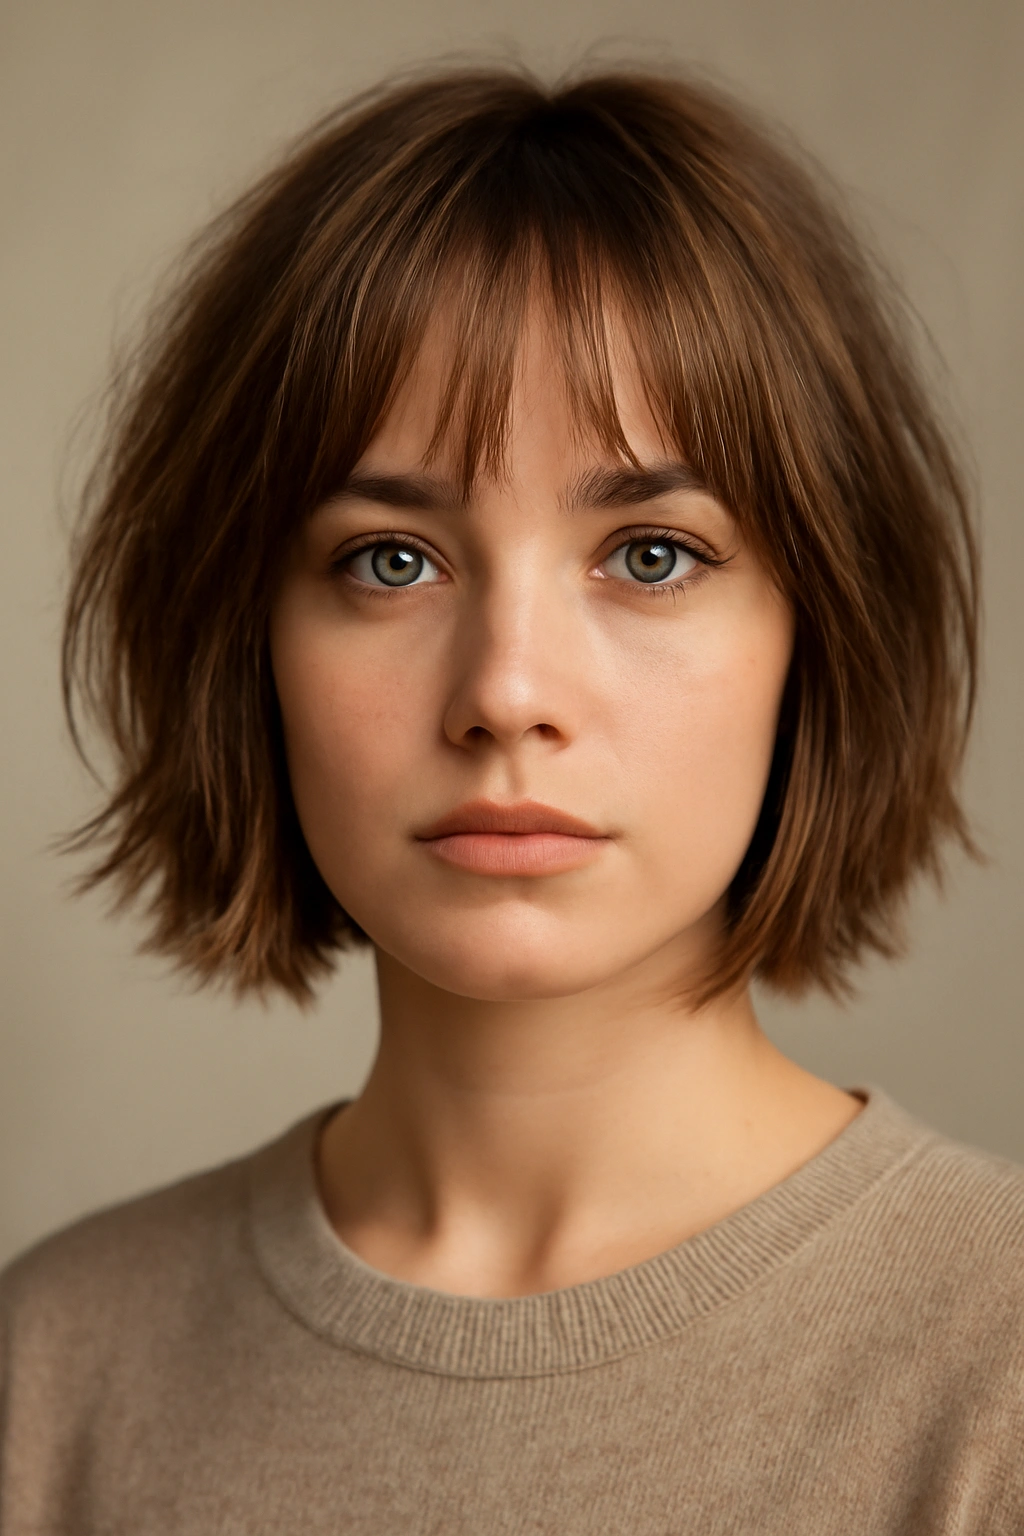
Choppy curtain bangs framing your face is a short hairstyle that’s been gaining popularity because it’s genuinely flattering and surprisingly easy to manage. The bangs create dimension and draw attention to your eyes, while the rest of your short hair sits at a length that’s long enough to have texture but short enough to be super low-maintenance. The choppy, textured nature of the cut means that even on days when you’re not actively styling, it still looks intentional and current.
Why Curtain Bangs Work So Well
Bangs can seem high-maintenance, but curtain bangs specifically are forgiving because they’re longer and textured rather than blunt. They fall naturally to the sides of your face rather than straight down, so they don’t require precise blow-drying to look good. You can brush them to the side, let them dry naturally, and they look effortlessly cool — the textured, choppy cut means imperfection is actually the aesthetic.
How to Style Choppy Curtain Bangs
- Brush hair through or apply a light texture spray for separation
- Blow-dry or air-dry — the cut does most of the work for you
- You can brush bangs straight down and to the sides for a fuller look, or brush them up and back for a more tousled effect
- A light texturizing spray or dry shampoo on the bangs adds grip and prevents them from looking flat
- Takes 3-5 minutes, or zero minutes if you’re just air-drying and brushing through
Good to know: This style works best on straight-to-wavy hair. If you have very curly hair, the choppy layers can read as too textured and piecey, though some curly-haired people absolutely rock this look. Talk to your stylist about adapting it to your specific curl pattern.
6. The Sleek Side Part with Behind-the-Ear Tuck
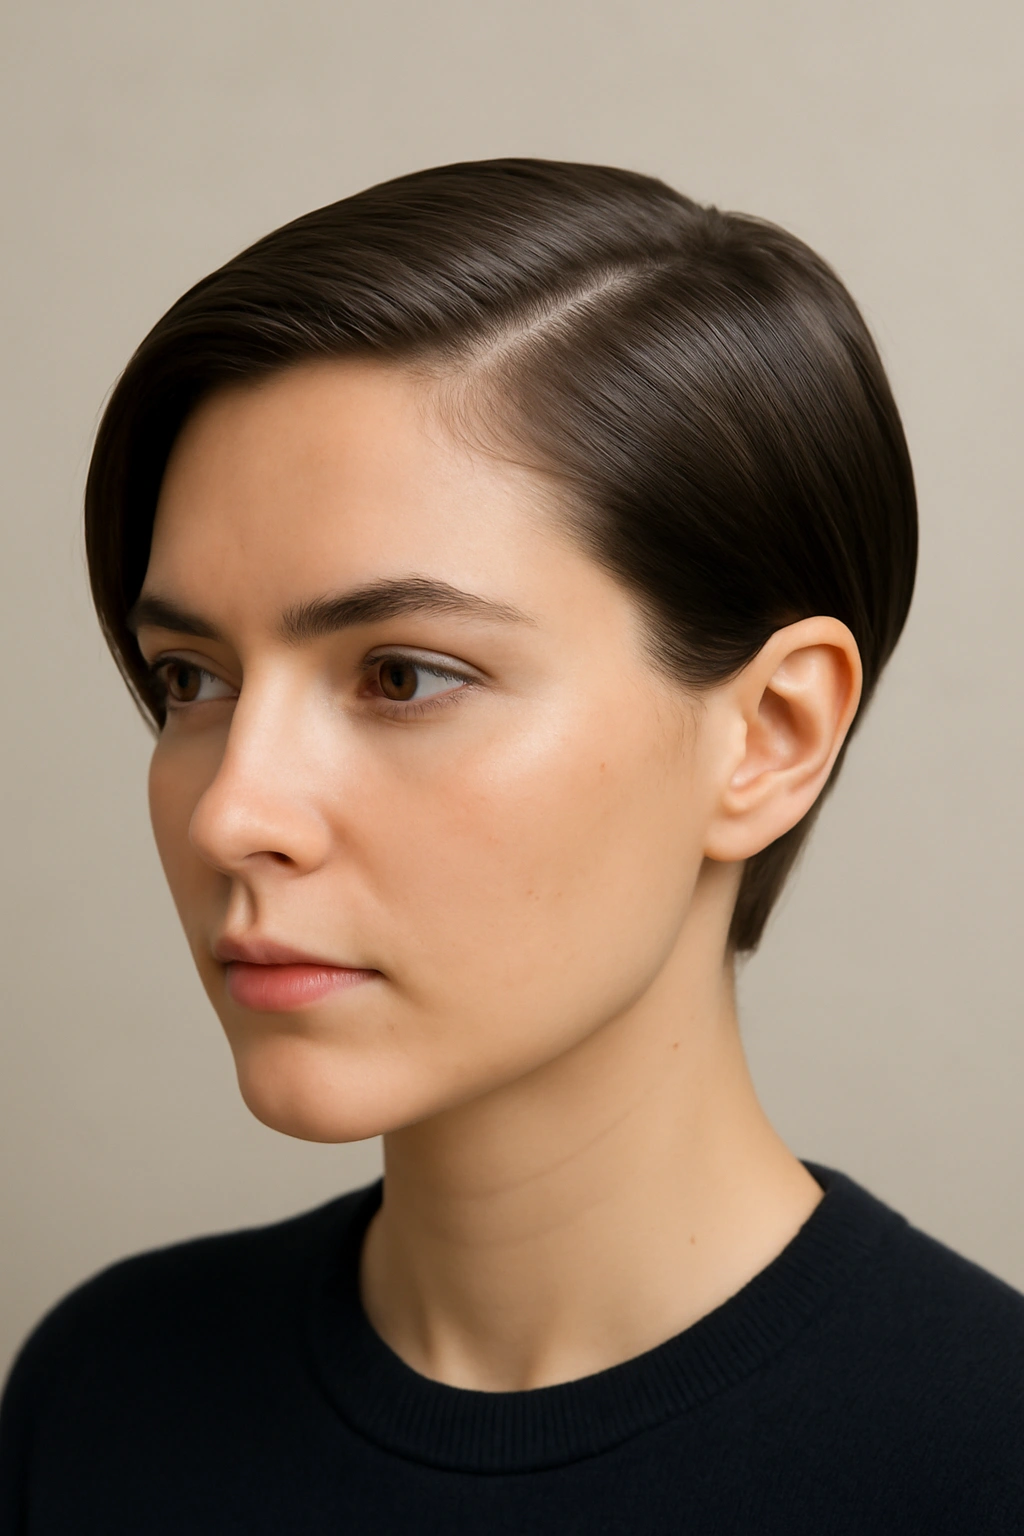
Sometimes the simplest styles are the most effective, and a sleek side part with your hair tucked behind one ear is proof of that. This is the kind of style that takes literally two minutes but reads as intentional and polished. It works on almost any short hair length, and because you’re moving hair to one side, it looks asymmetrical and interesting rather than boring. It’s especially great on days when you want a clean, tidy look without looking like you spent hours styling.
The Power of Asymmetry
A perfectly symmetrical style can sometimes read as flat or one-note, but asymmetry instantly makes something more interesting to look at. By putting more volume on one side and tucking the other side behind your ear, you’re creating visual balance and movement that makes the style feel more dynamic. You’re also showing off the shape of your face better, since one side is more exposed than the other.
Creating the Look
- Apply a smoothing product or light styling cream to damp hair
- Blow-dry with a side part, pushing more volume to one side than the other
- Tuck the shorter side behind your ear or use a small bobby pin to anchor it there
- Smooth the longer side down and let it fall naturally across your forehead a bit
- A light hairspray keeps everything in place without that stiff feeling
Pro tip: This style looks especially good if you’ve got some length on top but shorter sides — ask your stylist for an undercut or fade if you want to really emphasize the asymmetry.
7. The Half-Up Twisted Knot
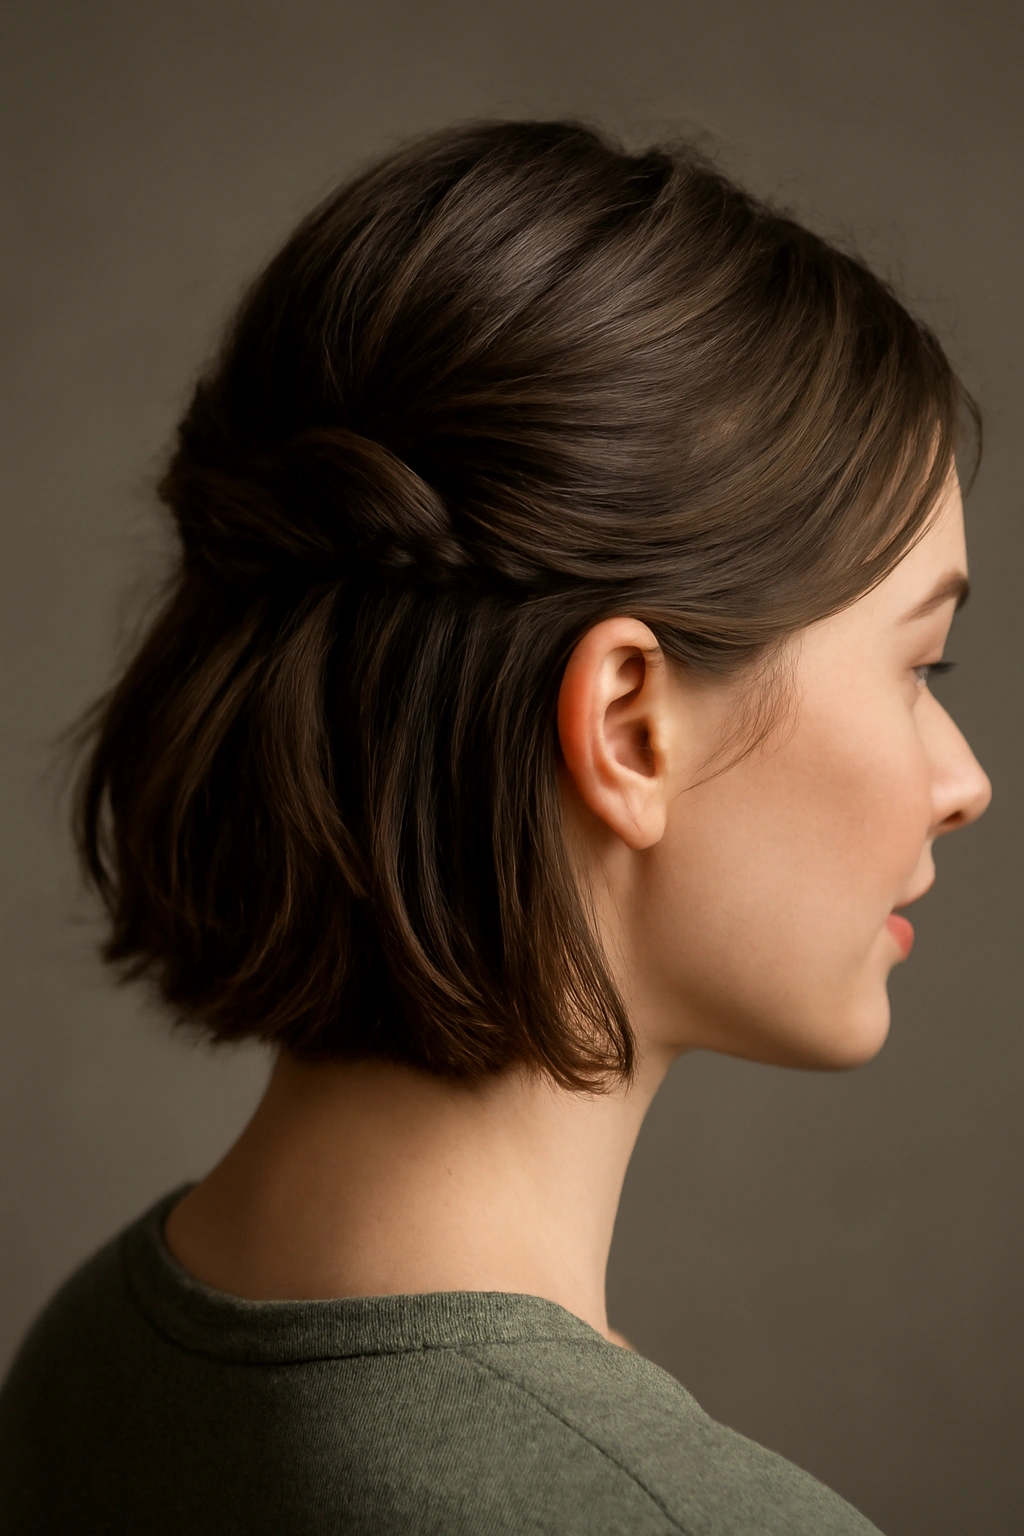
A half-up style on short hair is trickier than on longer hair, but a twisted knot version actually works beautifully and only takes about three minutes. You’re gathering the top half of your hair and twisting it into a loose knot, which keeps hair off your face while leaving the bottom half down and textured. This gives you the benefits of an updo without the commitment of putting your whole head of hair up, and it’s a great option for days when you want to look more put-together than your usual style.
What Makes Half-Up Work on Short Hair
The trick here is having enough texture and layers that the top half actually has some substance to gather and twist. If your hair is cut blunt all over with no layers, a half-up style can look sparse and disappoint. But if your hair has choppy layers or natural texture, you’ve got plenty of hair to work with in that top section, and the twist creates a nice visual anchor point.
The Steps
- Start with slightly textured hair — use dry shampoo or texture spray if your hair is completely smooth
- Take a section from each temple and twist each one loosely toward the back
- Bring both twists to meet at the back of your head, about midway down
- Secure the twists together with a bobby pin or small elastic, or wrap one twist around the other and pin
- Leave the bottom half of your hair loose and textured
- Pull out a few face-framing pieces if you want them
Worth knowing: This style actually looks better if it’s slightly undone and a little loose. You’re not going for polished perfection here — you want it to look cool and effortlessly put-together.
8. The Slicked Faux Hawk
A faux hawk sounds more intense than it actually is, and on short hair, it’s a fun way to add some personality and volume to your everyday look. You’re not actually creating a mohawk — you’re creating the illusion of one by styling your hair so the center top section has maximum height and volume while the sides are smoother and flatter. It takes about five minutes, and it’s a great statement look for days when you want to feel confident and stand out a little.
How to Build Height Without It Being Extreme
The key is that you’re creating volume and movement in the center, not actually shaving or slicking down the sides completely. You want the overall effect to be cool and intentional, not like you’re trying too hard. This is more subtle than a true hawk, which is what makes it perfect for school.
Building Your Faux Hawk
- Start with damp hair and apply a volumizing mousse or texture spray
- Blow-dry the top section upward and back, using your brush to lift and direct hair toward the center
- Smooth the sides down with a brush or by applying a little smoothing cream
- You can leave the top textured and loose, or use a little pomade or gel to define the center section
- Don’t make it too sleek or too tall — you want it to look intentional but not costume-y
Quick facts:
- Works best on straight or wavy hair with some natural body
- Takes 5-10 minutes with blow-drying
- A great confidence booster for days when you want to feel bold
- Can be toned down by smoothing the center a bit if you want a more understated version
9. The Braided Side Sweep
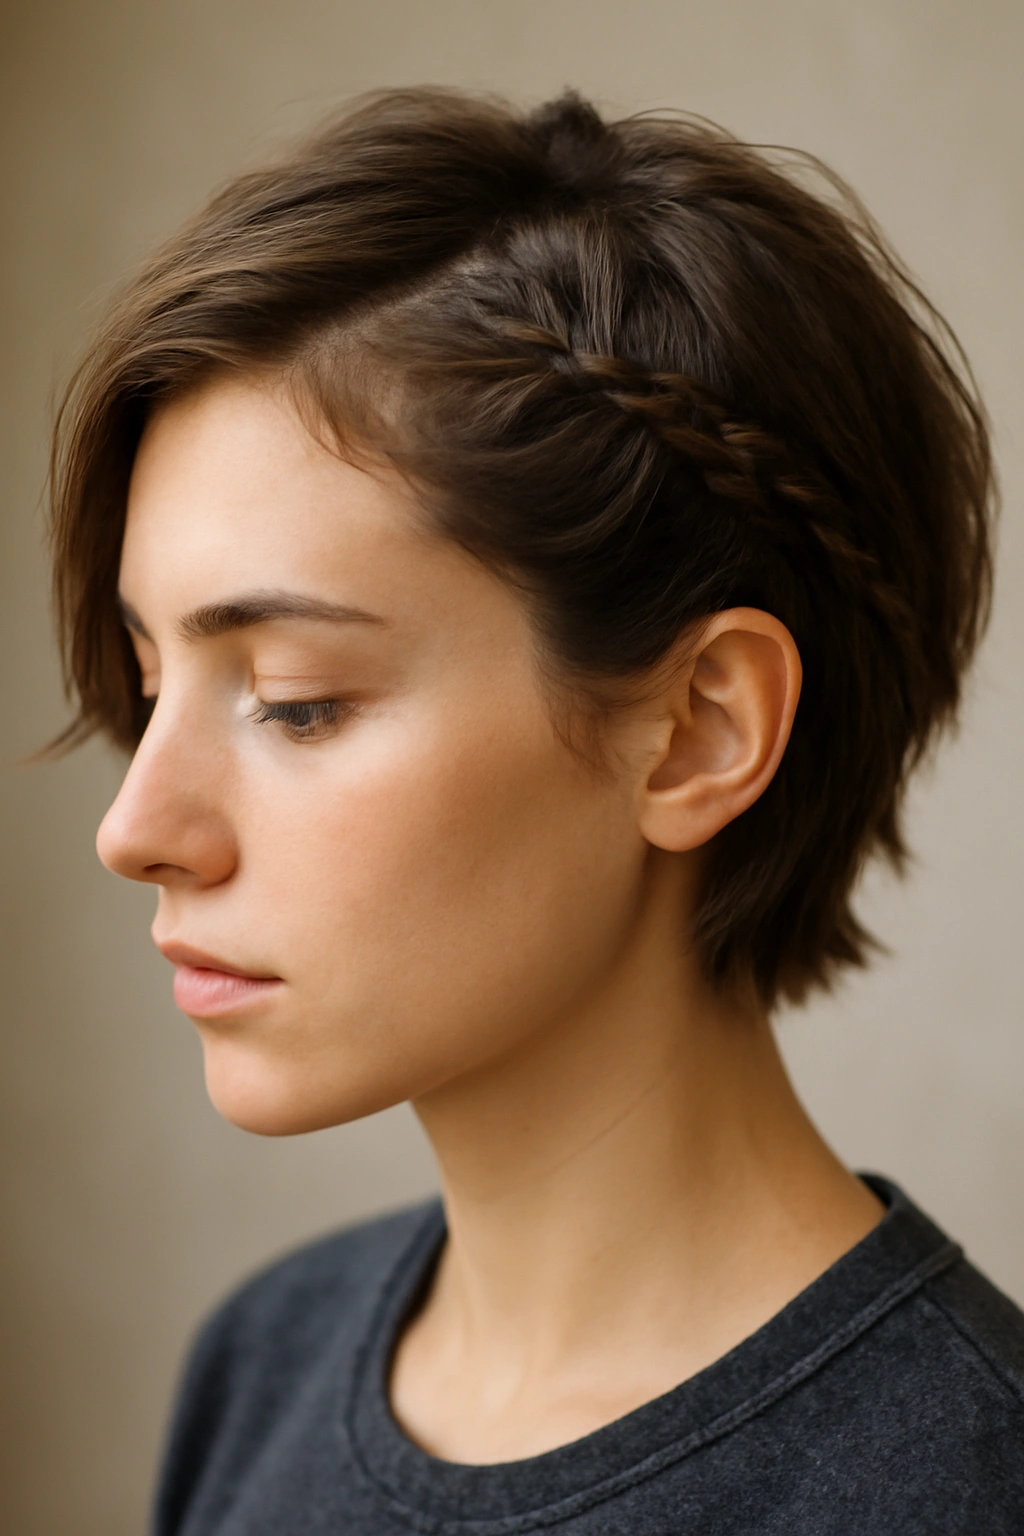
A simple braid that sweeps to one side is a classic short-hair style that works beautifully and takes less time than you’d expect. The braid draws attention to one side of your face, creates interesting texture and dimension, and keeps hair off your face and neck. You don’t need much hair to create a braid on short hair — even if you’re working with length that barely reaches the middle of your head, a small braid still reads as intentional and styled.
Why Braids Work on Short Hair
The key is that you’re not trying to create a long, elaborate braid. You’re creating a small, loose braid that sits to the side and actually becomes part of the overall texture of your style. Because the braid is small and your hair is short, it looks modern and interesting rather than Little House on the Prairie, and it only takes a minute or two to create.
Creating a Side Braid on Short Hair
- Start with slightly damp or textured hair so the braid has grip
- Take a section of hair from one side, starting near your temple or ear
- Braid loosely, aiming to braid down toward the back of your head or all the way to where your hair ends
- Secure the end with a tiny elastic or bobby pin tucked into your hair
- Pull the braid slightly to loosen it and create texture — tight braids look too formal and finished
- Let a few pieces fall loose around your face
Pro tip: A slightly imperfect, loose braid looks way cooler than a perfect, tight one. Tousle it and let strands come partially loose — that’s the whole point.
10. The Textured Shag
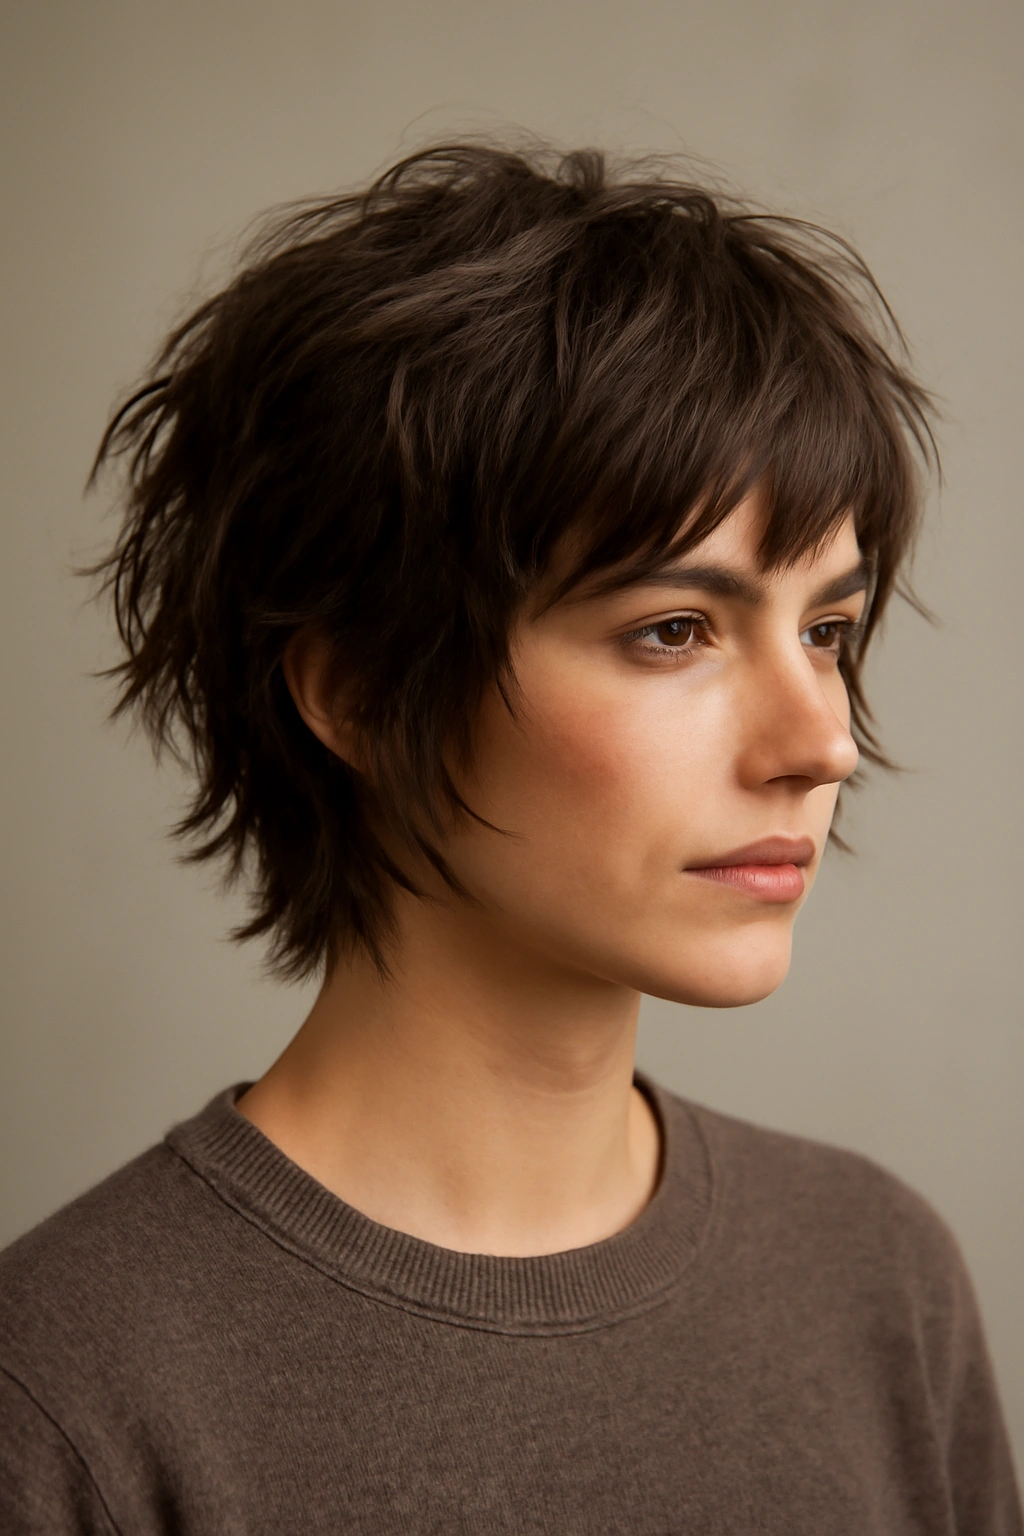
A modern shag is having a moment because it works on almost every hair type and requires basically zero styling to look good. The whole point of a shag cut is that it’s textured, layered, and meant to look a little tousled and imperfect, which means you can wake up, run your fingers through it, and be done. If you love an effortless, rock-and-roll vibe, a shag is the answer — it’s one of the lowest-maintenance short styles you can get.
What Makes Modern Shags Different
A shag isn’t the ’70s feathered mess you might picture — a modern version is more refined while still keeping that textured, lived-in feeling. The layers are intentional and flattering, the lengths work together to create shape and movement, and the whole aesthetic is about embracing your hair’s natural texture rather than fighting against it. You can have straight, wavy, or curly hair and rock a shag successfully.
How to Style a Textured Shag
- The beautiful thing about a shag is that you barely have to style it — that’s the whole point
- Brush through with your fingers or a brush to separate layers and create texture
- If you want more definition, use a texture spray or dry shampoo for grip
- You can blow-dry it for a smoother version, or air-dry it for maximum texture
- Add a light texturizing spray or sea salt spray if you want to enhance the textured, lived-in look
- Takes 2-5 minutes depending on how much you want to actively style it
Why it works: Because the cut is designed to be textured and layered, imperfection is actually the goal. Your hair doesn’t have to be perfectly straight or perfectly curled — it just needs to have texture and movement, which happens naturally.
10+ Styling Products and Tools That Actually Help
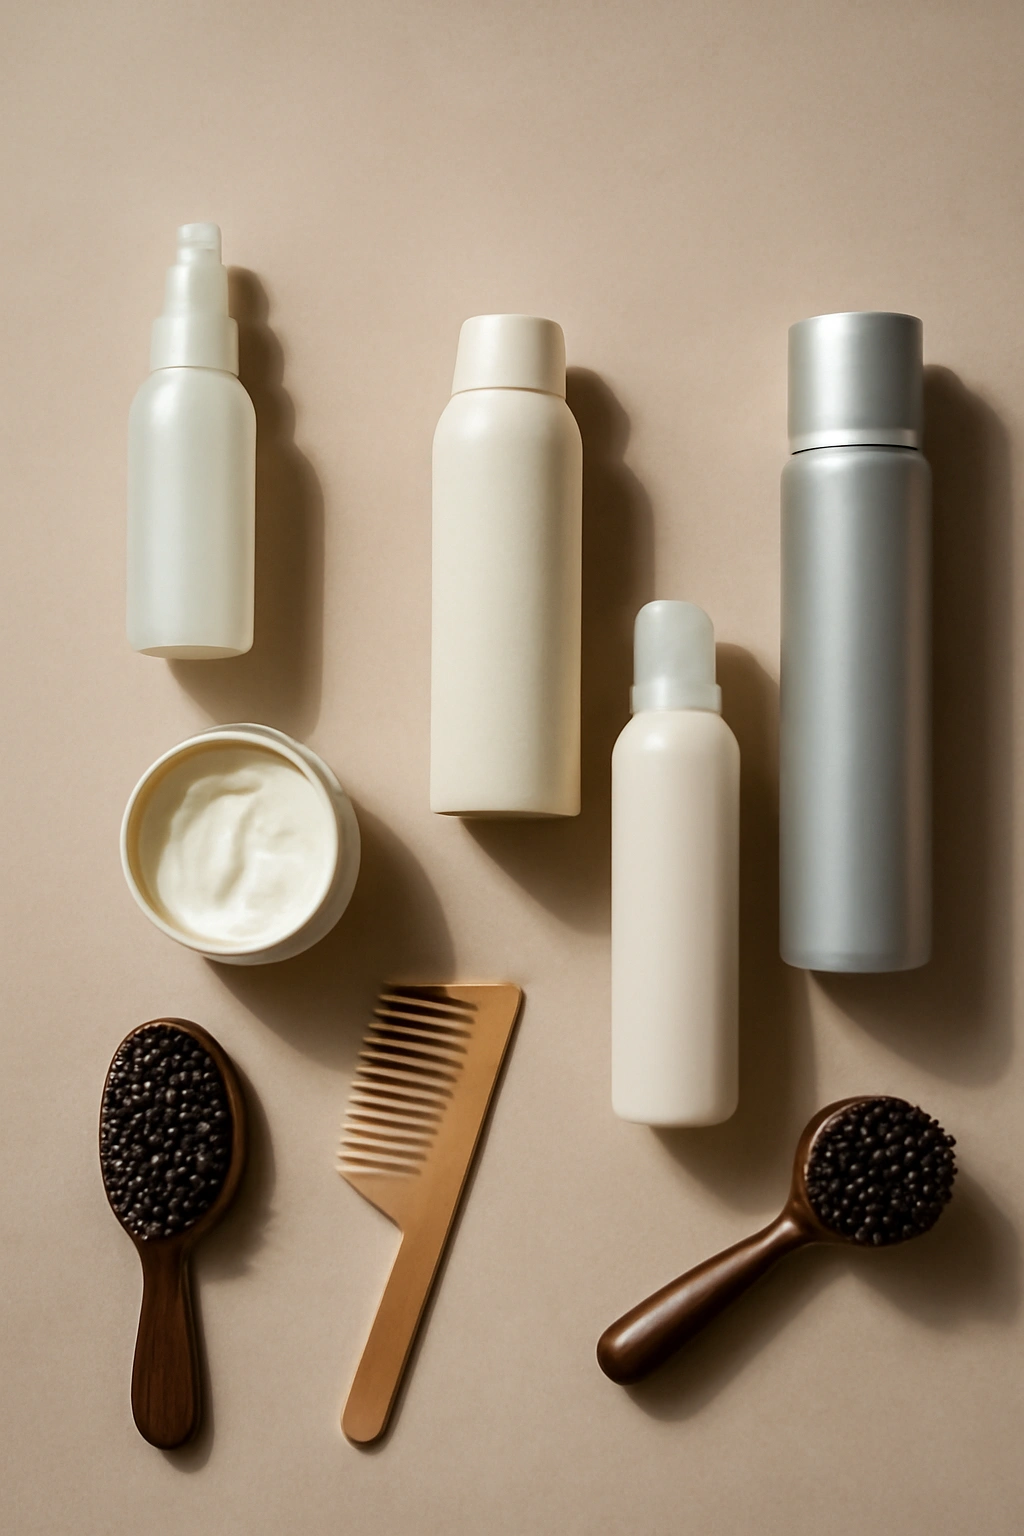
You don’t need a ton of products to make these styles work, but having a few key ones on hand makes everything easier. A lightweight texture spray is genuinely one of the best investments for short-hair styling because it adds grip and separation without weighing your hair down. Dry shampoo works the same way and also adds volume, which is helpful if you’re going a day or two between washes. A lightweight smoothing cream or styling mousse helps you create sleek sections when you need them, and a flexible-hold hairspray keeps everything in place without that crunchy, overly-done feeling.
You don’t need fancy salon products either — drugstore options work perfectly fine for short hair styling. The real key is understanding what each product does and using just a little of it rather than dolloping it on. With short hair, a tiny amount of product goes a long way, so start small and add more if you need it.
A simple brush or comb is helpful for creating clean lines and smoothing sections, and a small round brush makes blow-drying way easier if that’s part of your routine. Most of these styles don’t even require blow-drying though, so you can keep it simple.
Key Takeaways
The best short hairstyle for school is one that makes you feel confident and doesn’t demand more time than you’ve got in the morning. Most of these styles take between two and ten minutes once you understand the basic technique, and several of them actually look better when they’re slightly undone and imperfect. The key is choosing a cut that works with your hair texture and daily habits, learning how to style it, and then giving yourself permission to play around with variations that feel good to you.
Short hair is genuinely low-maintenance compared to longer hair, but that doesn’t mean it has to be boring or look lazy. These ten styles prove that short hair can be just as versatile and interesting as any other length — you just need to understand what works with your specific hair and how to create intentional texture and shape. Pick one that speaks to you, bring this article to your stylist, and give yourself a week or two to get comfortable with styling it. You’ll probably find that you actually enjoy having short hair, especially on school days when you’re already juggling a million things.