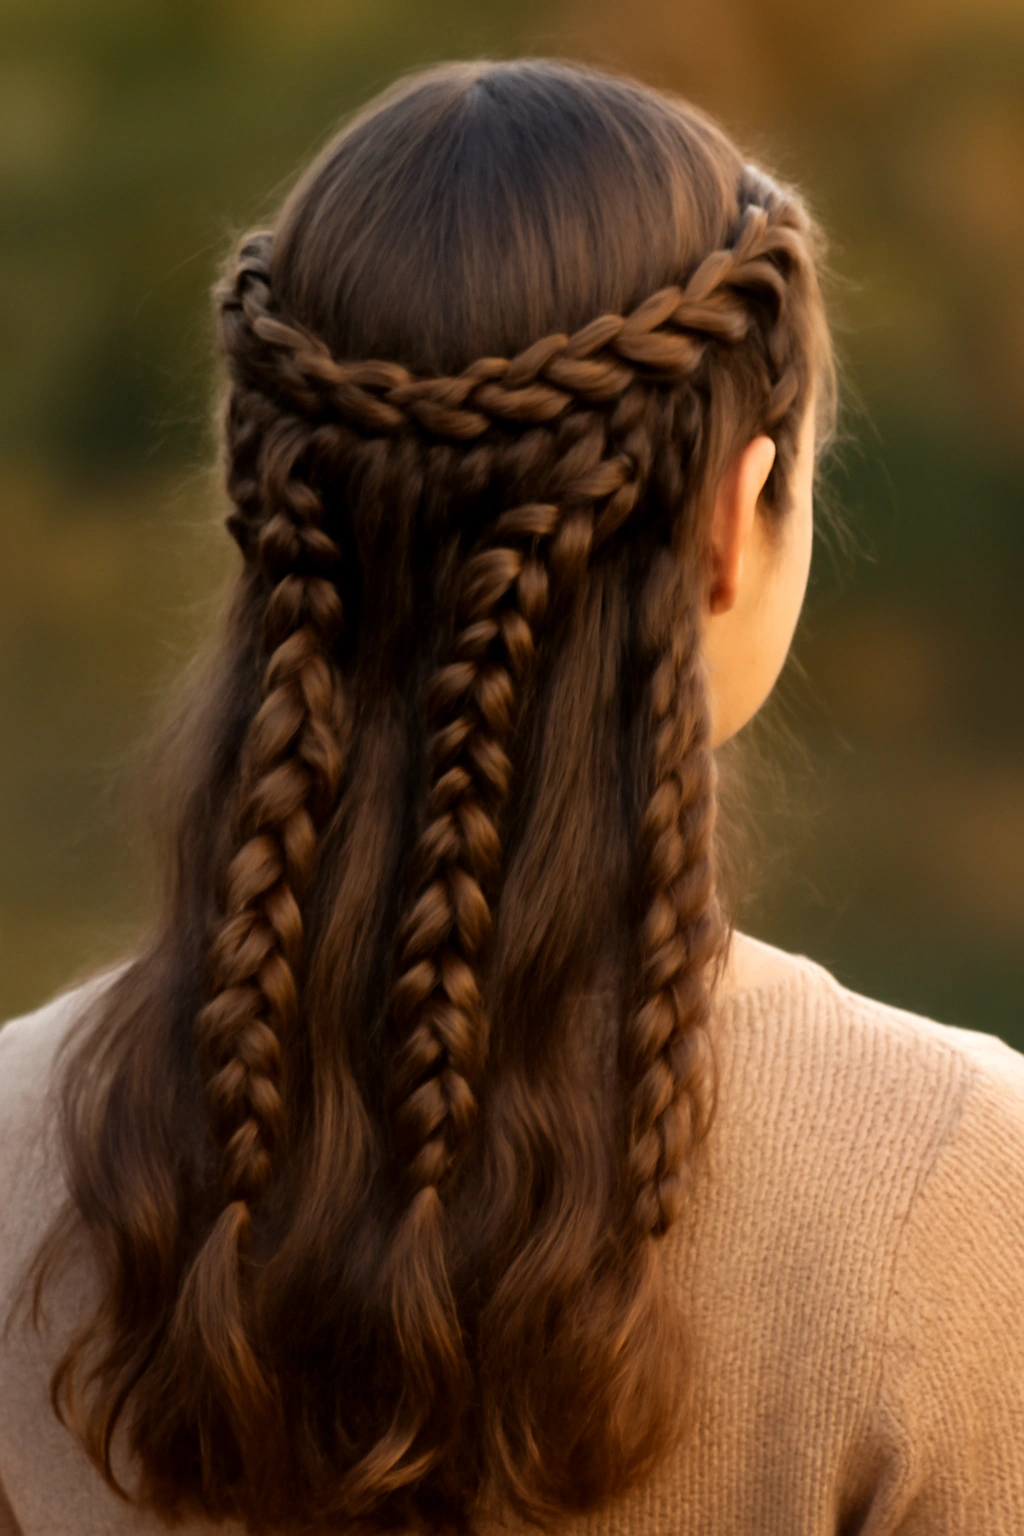
A spiral braid is one of those hairstyles that looks incredibly intricate and professional until you realize you can actually create it yourself at home. The beauty of this technique is that it sits somewhere between basic and advanced—complex enough to turn heads, but learnable for anyone willing to practice a few times. Unlike traditional three-strand braids that hang vertically, a spiral braid wraps around your head in a circular or helical pattern, creating a stunning dimensional effect that works for casual outings, date nights, or even formal events.
The real secret to nailing a spiral braid isn’t magic or years of training—it’s understanding the underlying structure and then breaking the technique into manageable sections. Most people struggle on their first attempt because they’re thinking of it as one continuous braid, when it’s actually a series of connected loops that build on each other. Once you grasp that concept and practice the hand movements a few times, the whole thing becomes muscle memory. You’ll find yourself doing this braid on autopilot within a week or two of regular practice.
This guide walks you through everything you need to know, from preparing your hair and gathering the right tools to executing the braid with clean technique and finishing it beautifully. You’ll learn what commonly goes wrong and exactly how to fix it, plus creative variations that let you personalize the look to match your style.
Understanding the Spiral Braid Structure

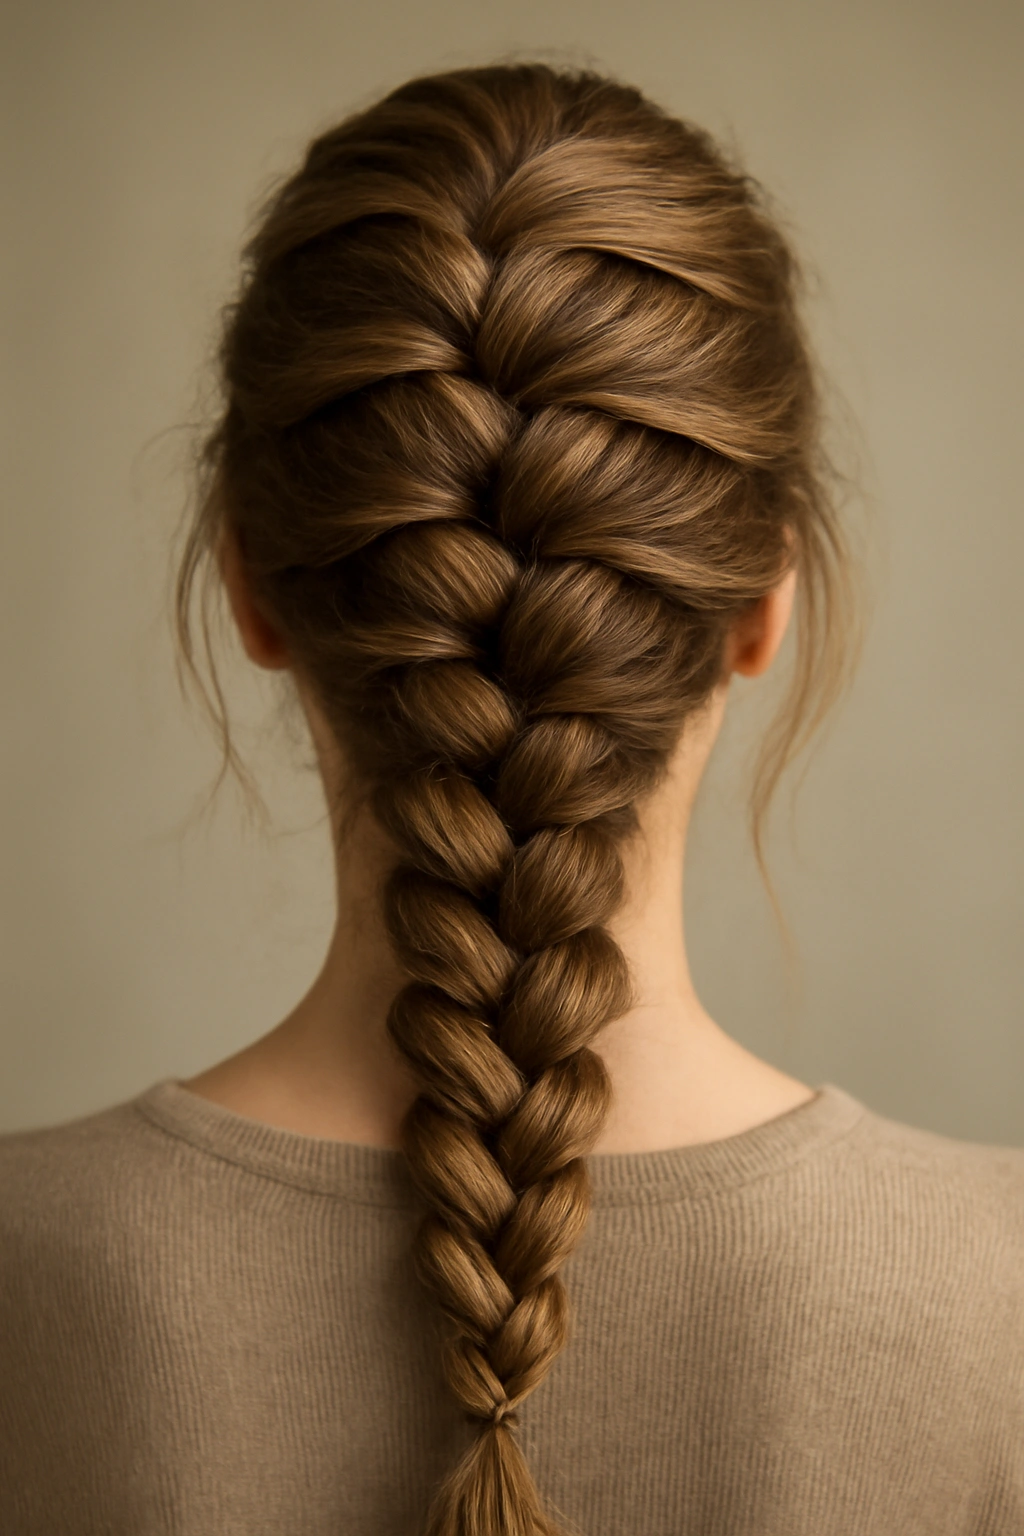
A spiral braid works by creating overlapping loops of hair that circulate around a central point, rather than moving downward like a standard braid. Think of it like drawing a spiral on paper—you’re moving outward or inward in a circular motion, with each loop slightly offset from the one before it. The most common version starts at the crown or center of the head and spirals outward toward the edges, though you can also start at the edge and work inward depending on the look you’re going for.
The technique uses a modified three-strand braiding motion, but instead of working vertically downward, you’re rotating your hands around the head. This circular movement is what creates that distinctive wrapped appearance. Once you understand that each section is a three-strand braid that rotates rather than descends, the whole technique becomes much less intimidating.
Spiral braids work beautifully on a variety of hair types and lengths, though you’ll have the easiest time with hair that’s at least shoulder-length. Shorter hair can work, but you’ll have fewer loops and less dramatic impact. The texture of your hair matters too—wavy or textured hair naturally grips the braid and holds it longer, while very straight hair might need some texturizing products to maintain hold throughout the day.
Assessing Your Hair Type and Length
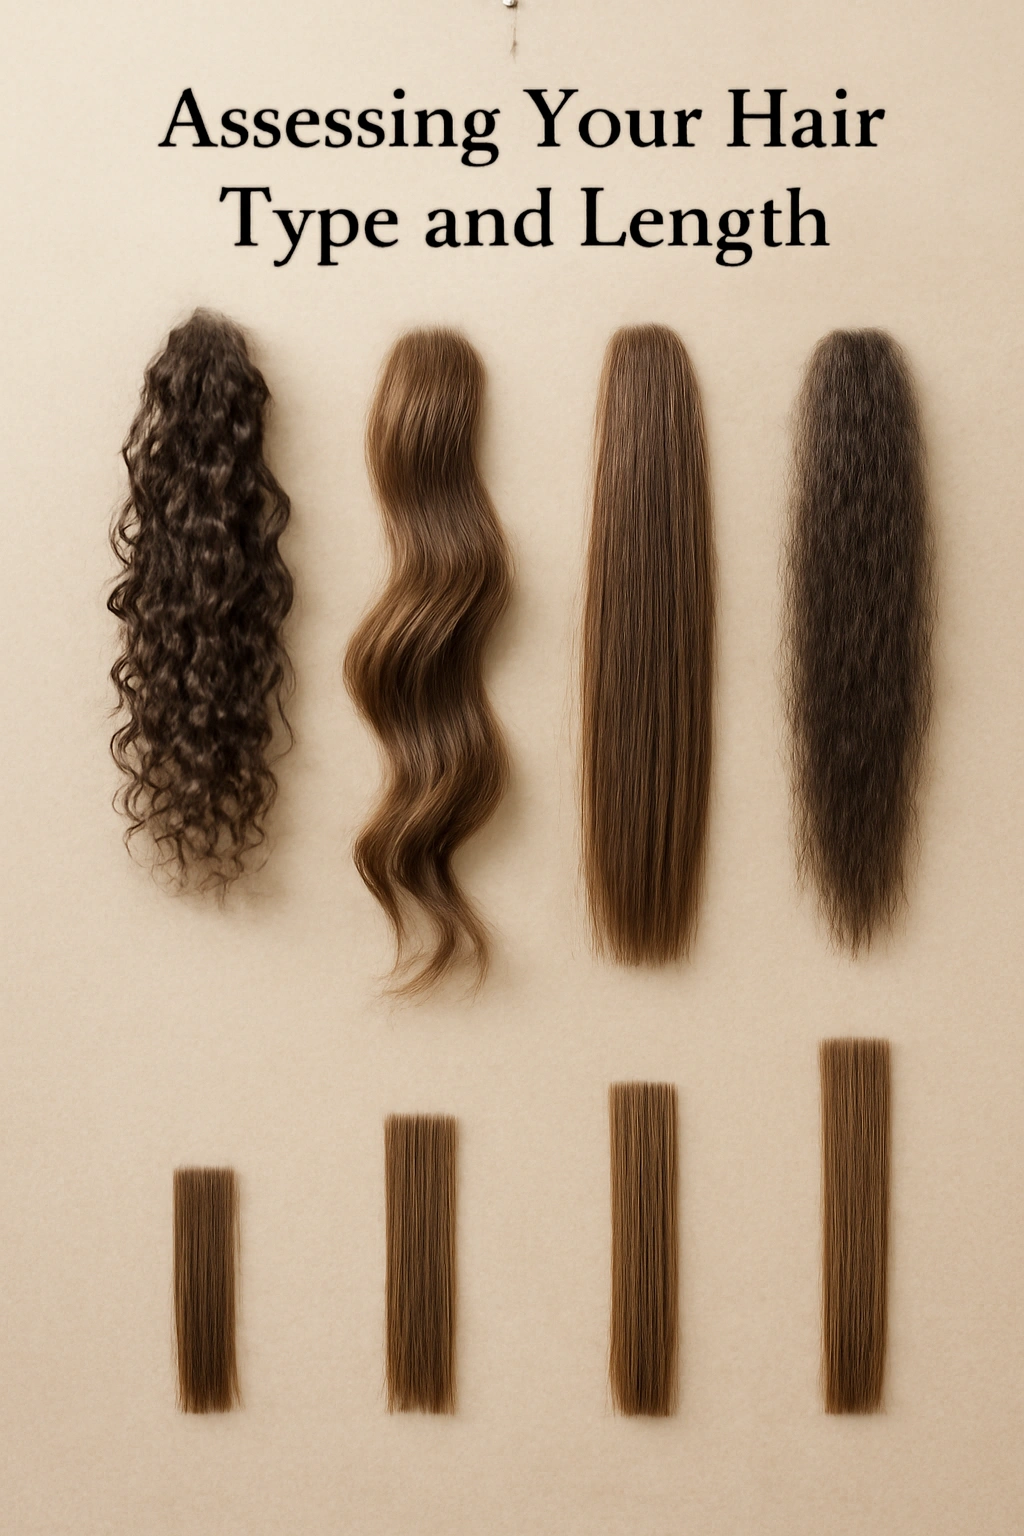
Different hair types will behave differently as you braid, and knowing your hair’s tendencies helps you plan your approach. Curly or wavy hair has natural grip and texture, which means the braid will hold together more easily and last longer without slipping. Straight hair is slicker and tends to separate slightly between strands, which isn’t a problem if you use the right products to add grip, but you’ll need to be more intentional about tension.
Fine or thin hair requires careful handling because too much tension can look sparse or emphasize the scalp. Thick or coarse hair is forgiving and holds braids beautifully, though you might need slightly more product to keep everything smooth and polished. Medium-textured hair is arguably the easiest to work with because it has natural grip without requiring heavy product.
Length matters significantly. Shoulder-length or longer gives you enough hair to create at least three or four full spiral loops, which creates the impact you’re looking for. If your hair is shorter than shoulder-length, you can still do a partial spiral braid—perhaps starting at one side and spiraling only partway around the head, or creating a smaller spiral rather than one that goes all the way around. Longer hair (mid-back or beyond) lets you create multiple spirals or very large, dramatic loops.
Gathering the Right Tools and Products
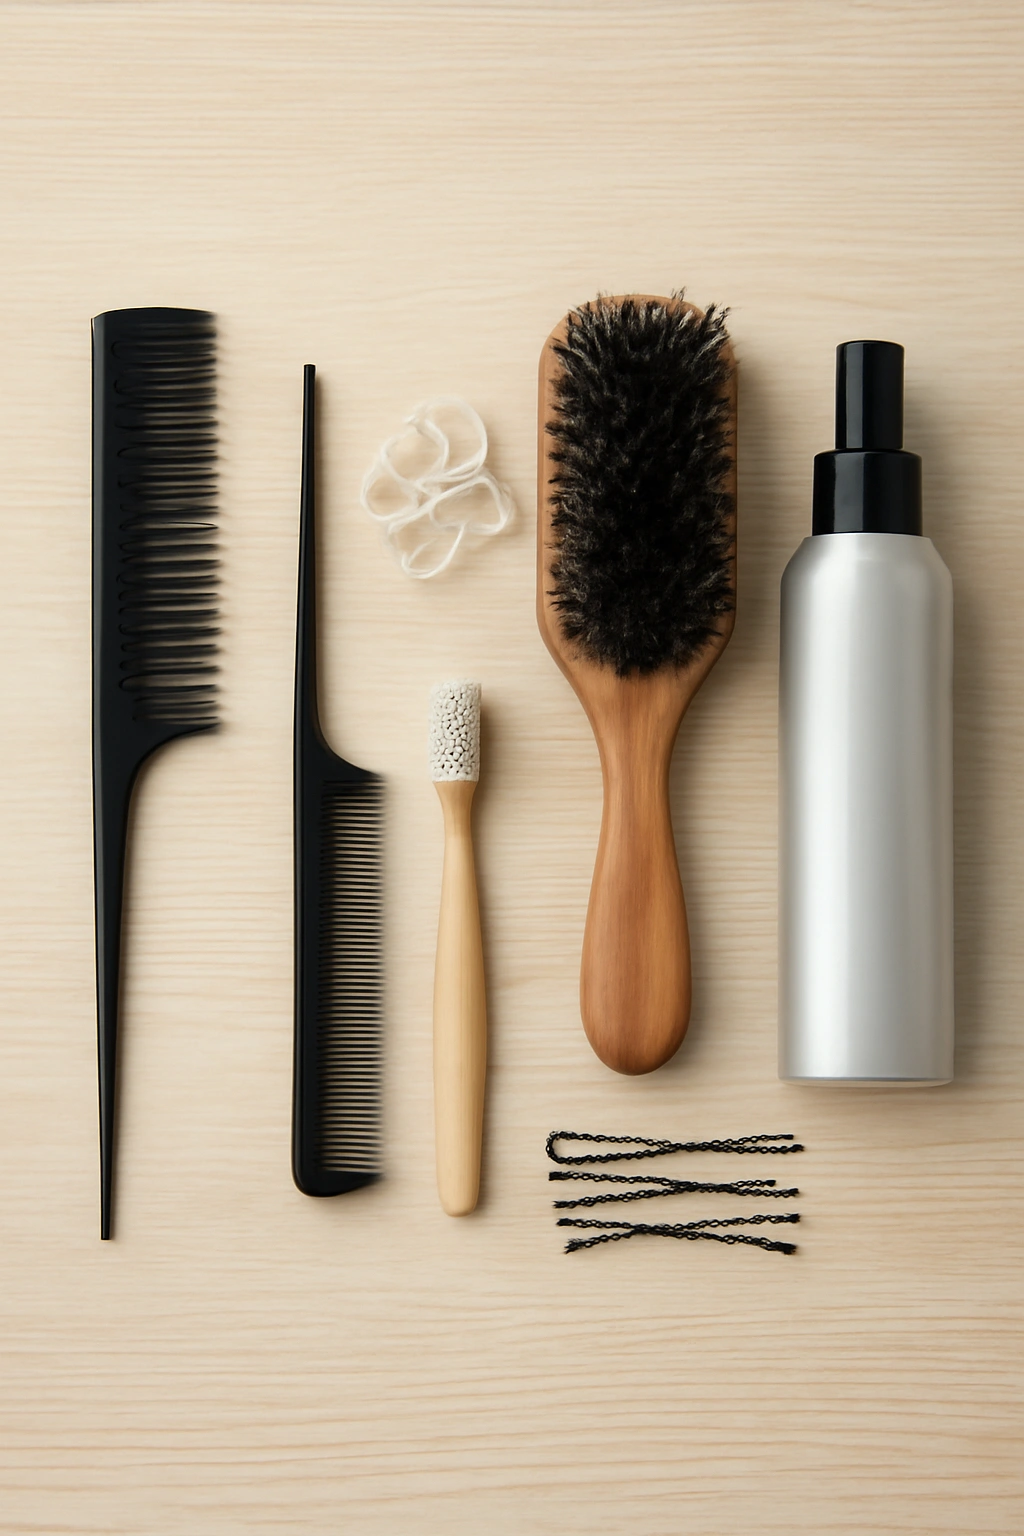
You’ll want to have a few specific supplies on hand before you start, so you’re not scrambling mid-braid. A fine-tooth comb is essential for creating clean sections and smoothing out any tangles before you begin. Unlike thick-tooth combs, fine-tooth combs help control flyaways and make sectioning precise. A rat-tail comb—the thin, pointed comb attached to many salon combs—is incredibly useful for creating clean partitions and picking up small sections.
Clear elastic bands keep the braid secure without creating visible tension marks. A boar bristle brush smooths the hair as you work and helps integrate any loose pieces back into the braid structure. An old toothbrush is weirdly useful for controlling tiny flyaways and smoothing hairs back into place. Bobby pins should be on hand for tucking any stray sections or securing the braid at the end if you’re not using an elastic.
For products, a light texturizing spray or dry shampoo adds grip to slippery hair and helps sections hold together. A smoothing cream or anti-frizz serum keeps flyaways minimal and makes the braid look polished. A flexible-hold hairspray—one that’s not super stiff—locks everything in place without making your hair feel crunchy. Avoid heavy products or deep oils right before braiding; they’ll make the hair too slick to grip properly.
Preparing Your Hair for Braiding

The foundation of a successful spiral braid is hair that’s clean and properly prepped. Ideally, braid your hair when it’s been a day or two since you last shampooed—hair with a tiny bit of natural oil grips better than freshly washed hair, which is slick and wants to slide apart. If you’ve just washed your hair, let it air-dry completely (damp hair is harder to control) and then apply a light texturizing spray or dry shampoo to add grip.
Brush through your hair completely to remove all tangles and knots before you even think about starting the braid. Trying to braid around a snag will create an uneven braid and frustrate you halfway through. Work from the ends upward, gently teasing through tangles rather than yanking, which can break hair and create frizz. Spend a full minute or two on this step—it’s worth it for smooth results.
If your hair is very straight or slippery, apply a light mist of texturizing spray throughout, focusing on the roots and mid-lengths where you’ll be gripping the hair as you braid. You don’t need much—just enough to create a tiny bit of friction between the strands. Smooth it through with your boar bristle brush, distributing the product evenly so no section is drenched while another is dry.
Creating a Clean Section for the Base
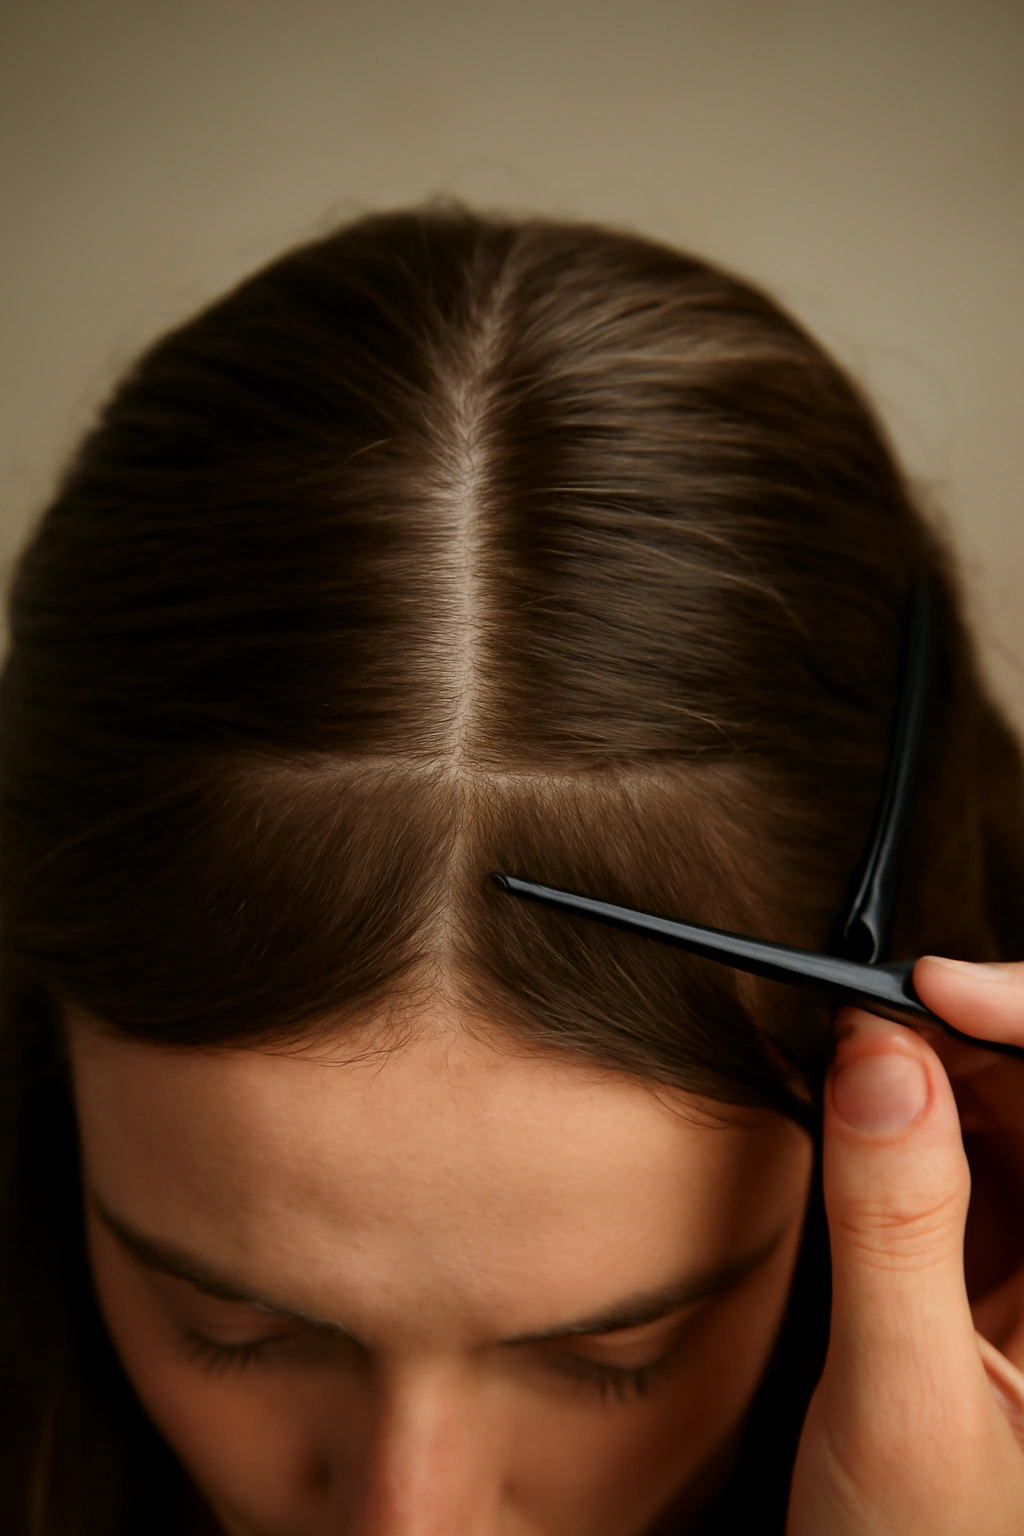
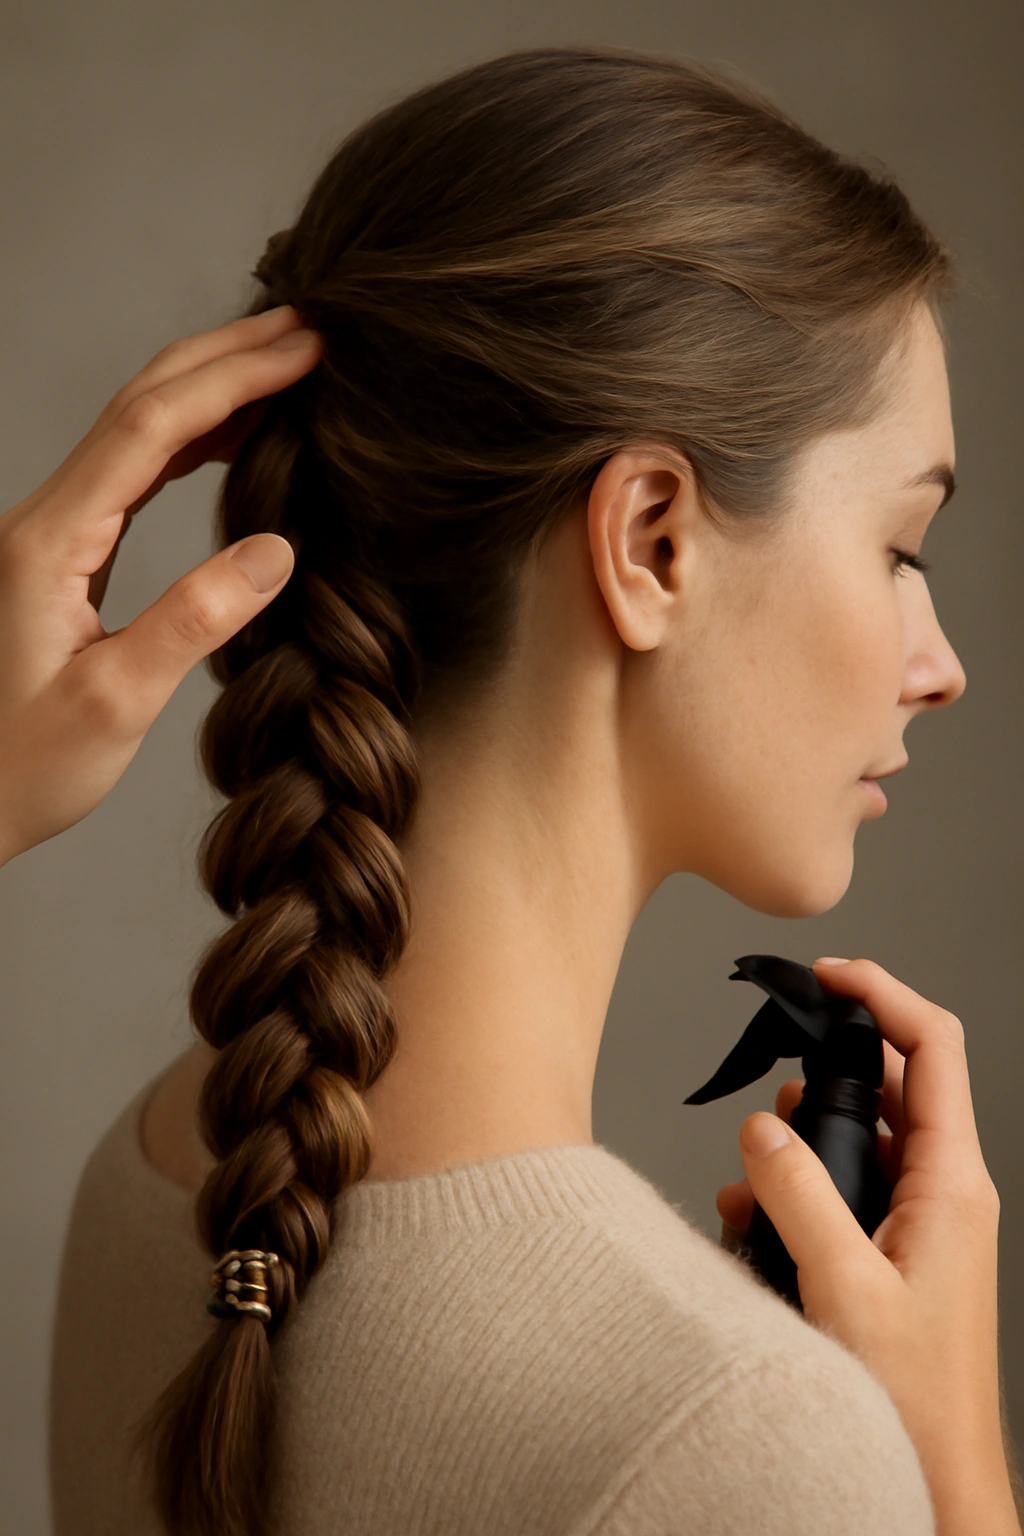
The starting point of your spiral braid should be clean and well-defined. Most people begin at the crown or slightly off-center toward the back, though you can start anywhere that feels comfortable. Use your rat-tail comb to create a clean three-inch square or triangle section where you’ll begin the braid. Make the section slightly larger than you think you need—it’s easier to control a thicker section of hair than a thin one.
Clip or hold the rest of your hair back and out of the way so you’re only working with your base section at first. This prevents other hair from accidentally getting tangled into your braid before you’re ready to incorporate it. Smooth this section with your boar bristle brush and divide it into three even strands. Each strand should be roughly equal in thickness—eyeball it rather than obsessing over exact measurements, but noticeable unevenness will show up in the finished braid.
Take a second to feel the hair in your hands and get used to the weight and texture. Is it slipping, or does it have good grip? If it’s slipping significantly, add just a touch more texturizing product to those sections. If you’ve got good grip, you’re ready to move forward. This is your moment to build confidence in handling the hair before you start the actual braiding motion.
Starting Your Spiral Braid Foundation
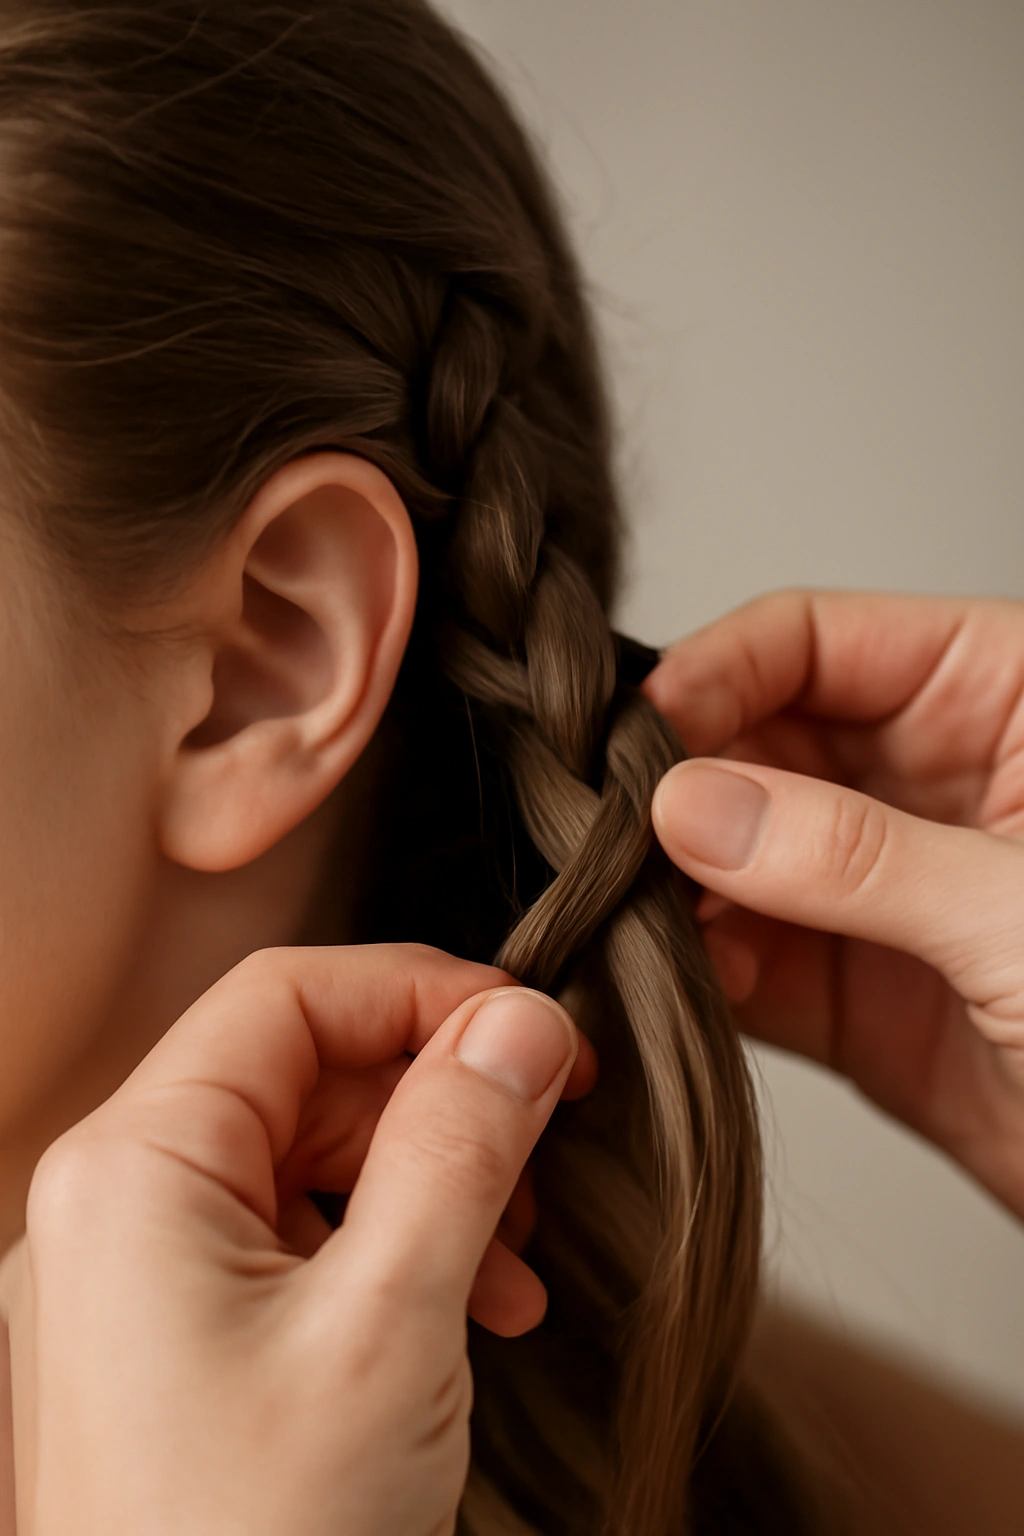
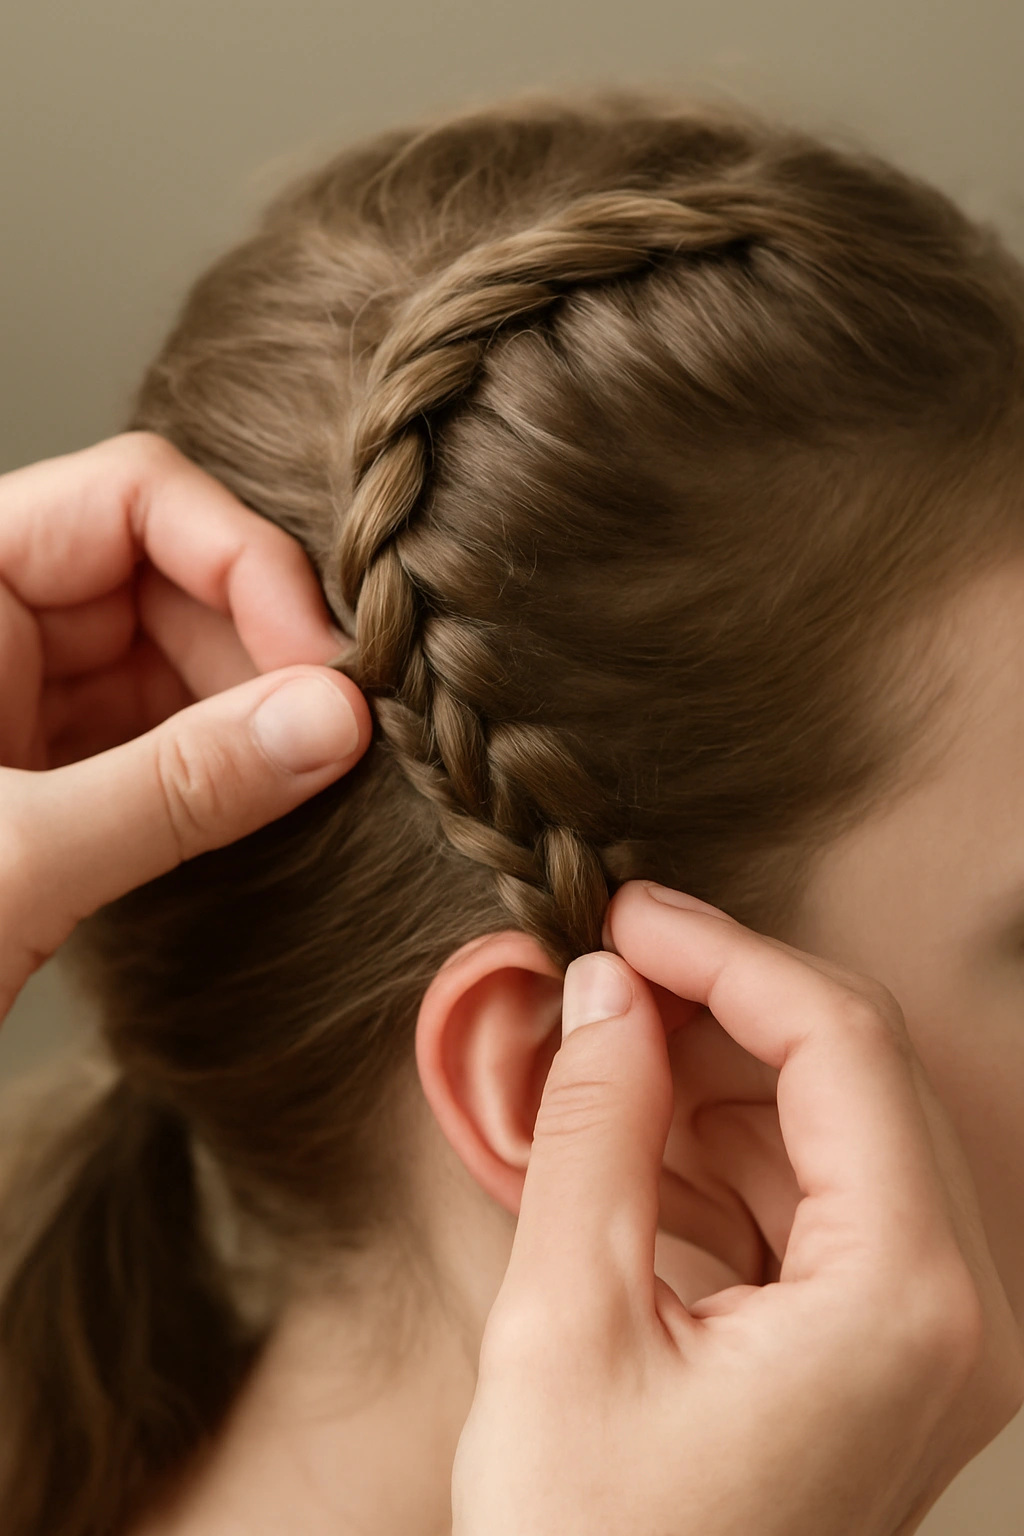
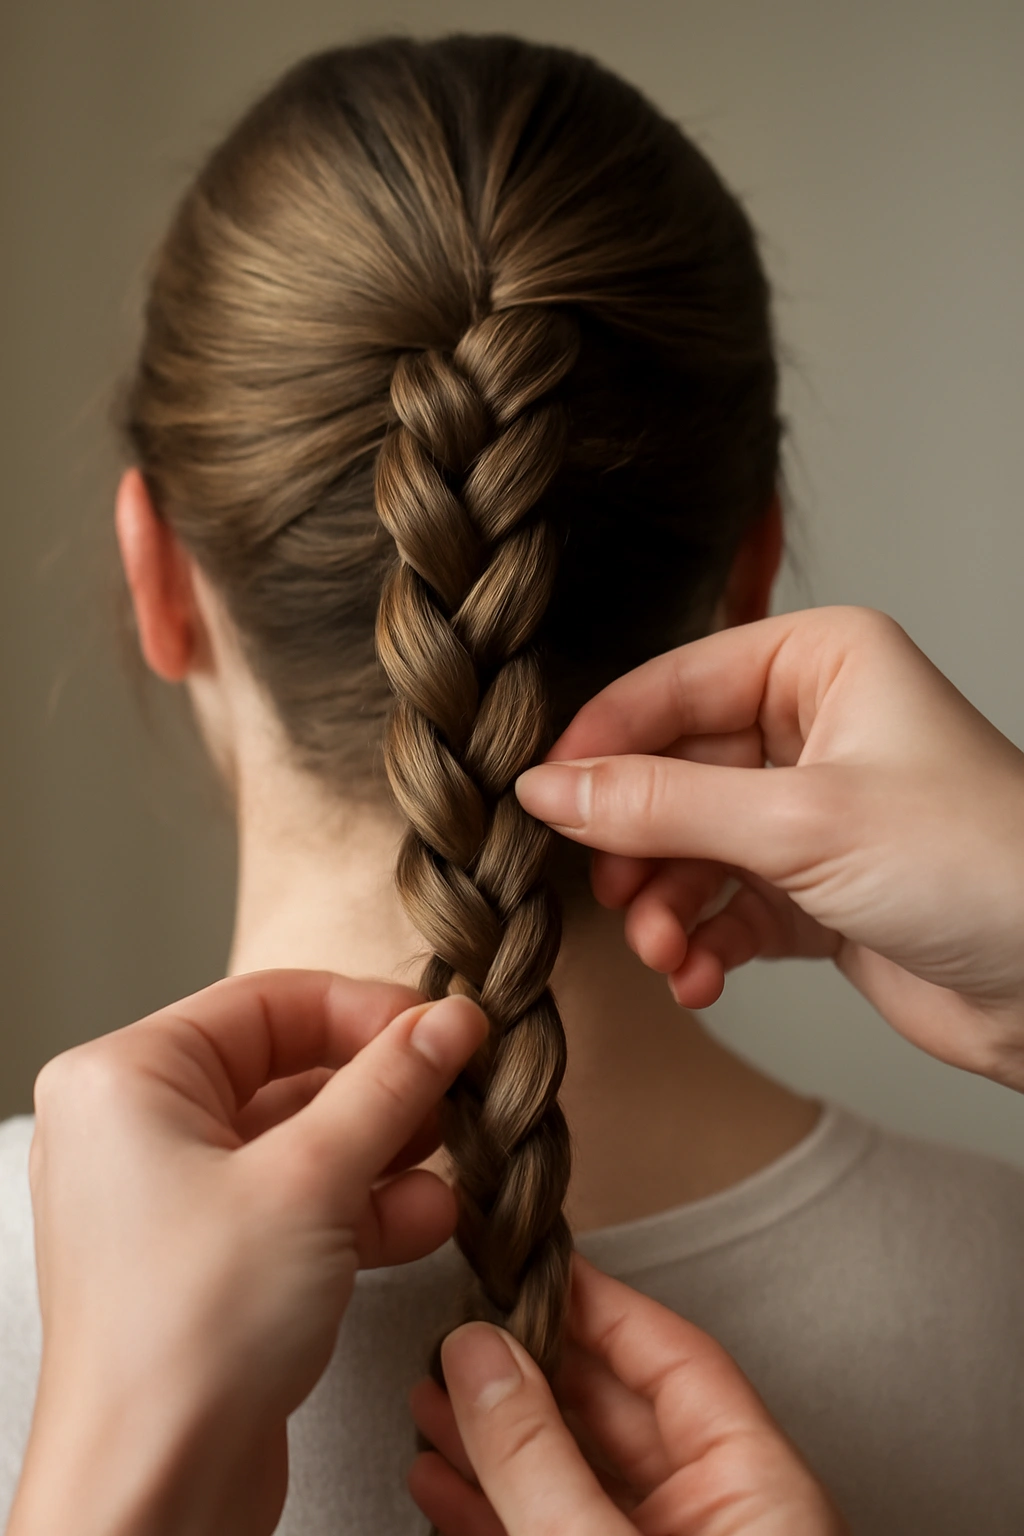
Hold your three strands at the base with your fingers positioned as if you’re about to do a regular three-strand braid. The right hand holds the right and center strands separated, and the left hand holds the left strand (or reverse if you’re left-handed). Begin with a normal three-strand braid motion—right strand over center, left strand over center—completing one full braid cycle.
After that first cycle, here’s where the spiral technique begins: instead of continuing straight down, you’re going to rotate your entire hand position about 45 degrees around your head. Think of the head as a clock face and you’re moving from 12 o’clock toward 11 o’clock if you’re spiraling leftward, or toward 1 o’clock if you’re spiraling rightward. This rotation is what creates the spiral effect rather than a linear braid.
Complete another three-strand braid cycle while maintaining this rotated position. Your hands should be moving in a circular arc around your head, not straight down. The braid is naturally following the curve of your skull and your hands are rotating to match that curve. This feels awkward the first time or two, but it becomes intuitive quickly. The key is not fighting the rotational motion—lean into it and let your hands naturally move around the head.
Building the Spiral Pattern Step by Step
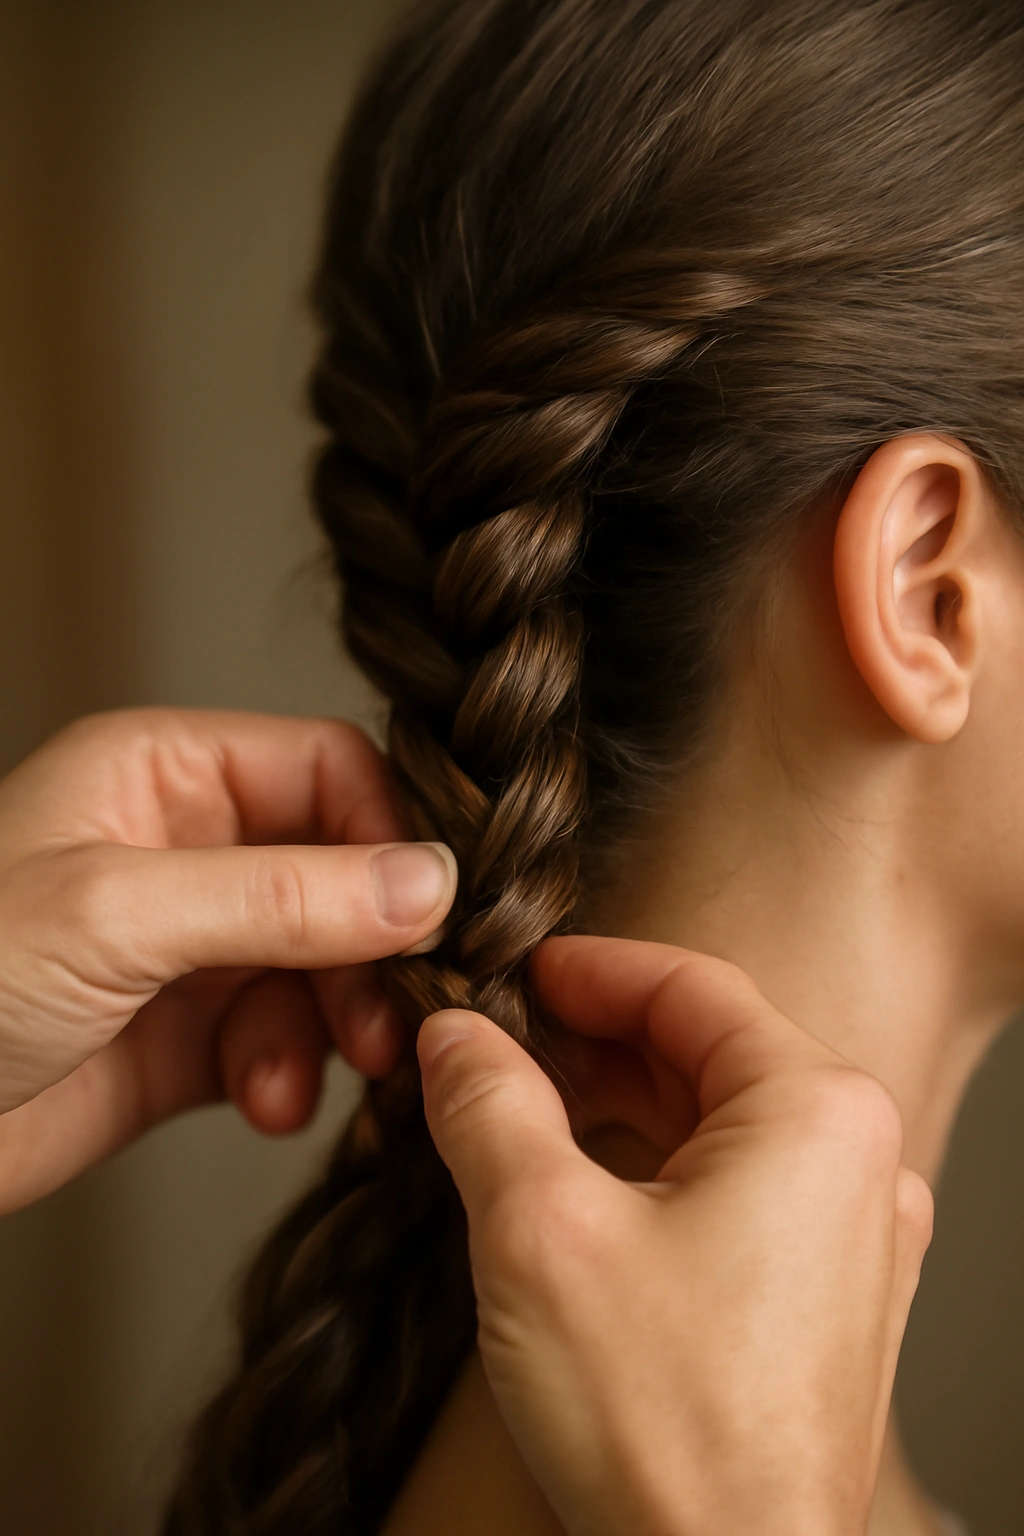
Now that you’ve established the foundational spiral direction, continue the pattern by repeating the braid-then-rotate sequence. Complete one three-strand braid cycle, rotate your hand position about 45 degrees further around the head, complete another cycle, rotate again. The rhythm is braid-rotate, braid-rotate, braid-rotate. You’re not trying to pick up new hair yet—just establishing the spiral pattern with your base section.
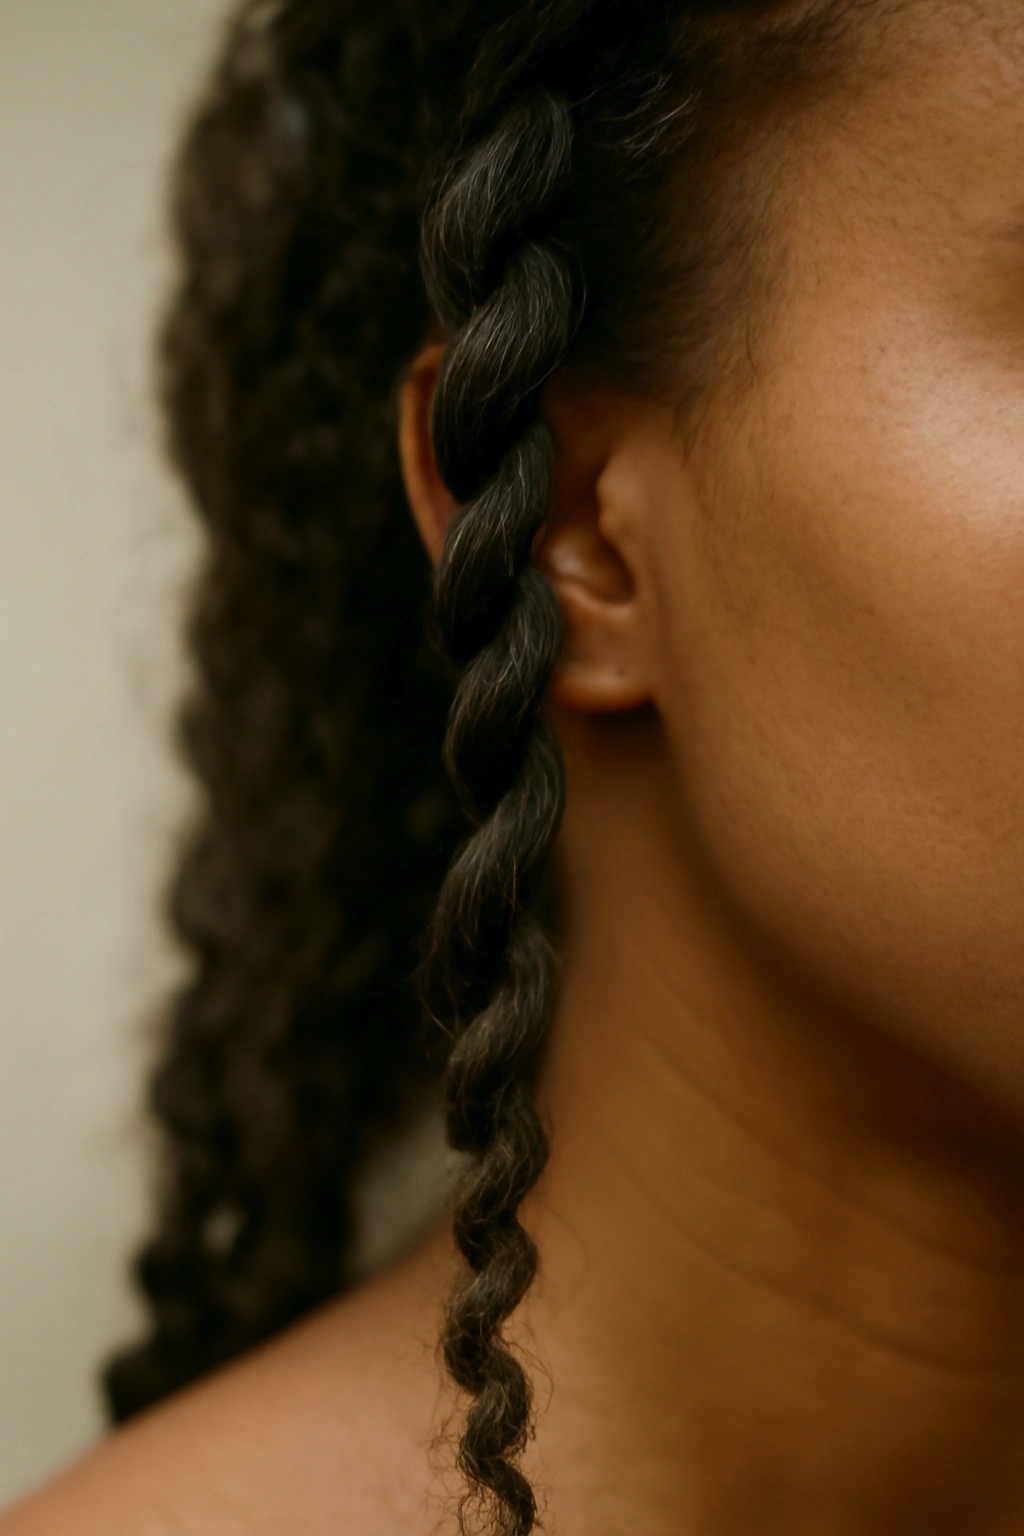
After you’ve completed about three or four rotations (roughly one-third of the way around your head), you can start picking up loose hair and incorporating it into the braid, similar to how you’d do a French braid that graduates around the head. As you braid, take a thin section of loose hair from near the outer edge of your braid and integrate it into one of the three strands. Usually, it’s easiest to add hair to the outer strand—the one that’s on the outside edge of the spiral.
The tempo of this motion is important: braid, rotate, add hair, braid again, rotate again, add hair again. Don’t try to add hair and braid in the same motion—they’re separate steps. Add a small section of hair to one of your three strands, complete the braid cycle with that thickened strand, then rotate. This methodical approach keeps you from getting confused about which hair goes where.
Maintaining Consistent Tension Throughout
Tension is what makes a braid look intentional and polished rather than sloppy and loose. As you braid, keep your strands pulled firmly enough that the braid feels secure and compact, but not so tight that you’re straining or pulling uncomfortably hard. Imagine you’re braiding at about 70 percent of maximum tightness. This leaves room for adjusting later if needed, but creates a braid that holds its shape.
Pay special attention to the outer edges of your spiral. The hair on the very outside of each loop tends to relax more than the hair at the center, so deliberately keep that outer hair slightly tighter than the rest. You can do this by positioning your fingers so the outer strand has a bit more tension as you cross it over the center strand. This prevents the braid from splaying out and losing definition as the day goes on.
Check your tension every two or three rotations by gently tugging the entire braid. It should feel secure and firm, not wiggly. If you notice the braid is loosening up—which often happens as you get tired or lose focus—deliberately tighten your strands for the next few cycles. Think of it like tuning a guitar: you’re constantly making micro-adjustments to maintain the right level of tension.
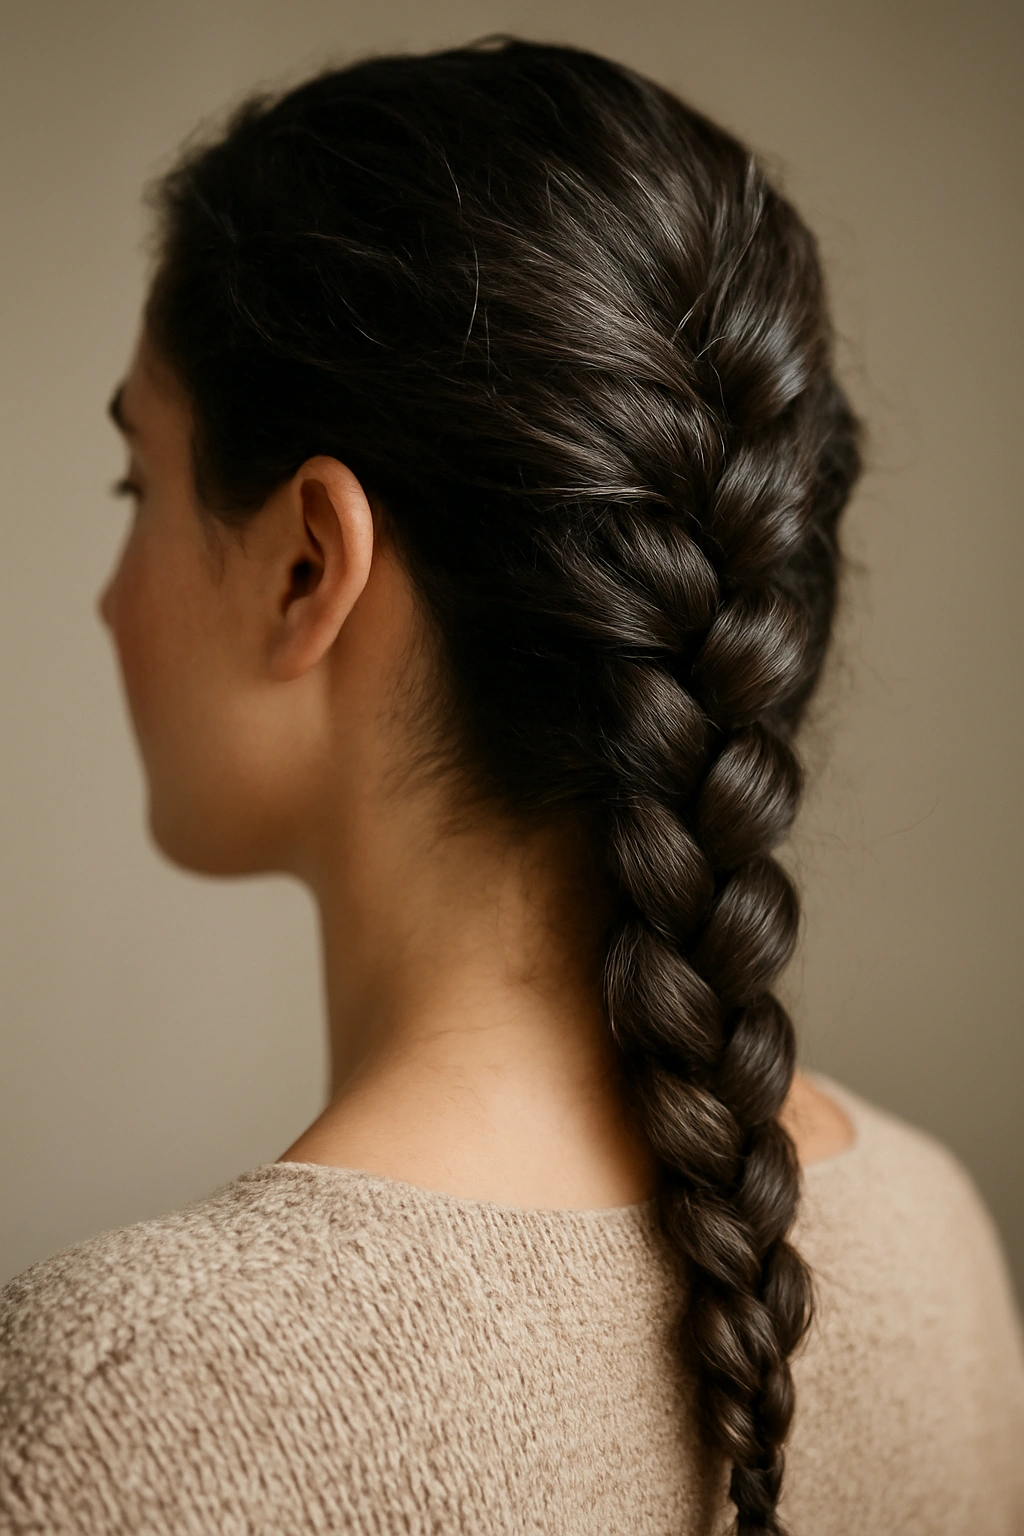
Adding Volume and Dimension to the Spiral
Once your spiral braid is complete and secure, you can add dimension and visual interest by slightly loosening certain sections. This is called pancaking or fluffing the braid, and it makes even a simply constructed braid look fuller, more textured, and more professionally finished. Starting from the bottom of the spiral and working upward, gently tug on the outer edge of each loop to slightly loosen and widen it.
Don’t yank aggressively—you’re making very subtle adjustments. Tug gently on the very outer strands just enough to create a tiny ruffle or wave in that section. Work your way around the entire spiral, giving each loop the same amount of subtle loosening. This opens up the braid’s structure and creates depth that reads beautifully in photos and from a distance.
You can be more or less dramatic with this step depending on the look you want. For a tight, sleek look, skip the pancaking entirely. For a softer, more romantic appearance, pancake generously. For something in between, pancake just the outer sections while leaving the inner areas closer to the scalp more compact. This gives you visual balance—tighter at the crown where you want definition, fuller toward the edges for softness.
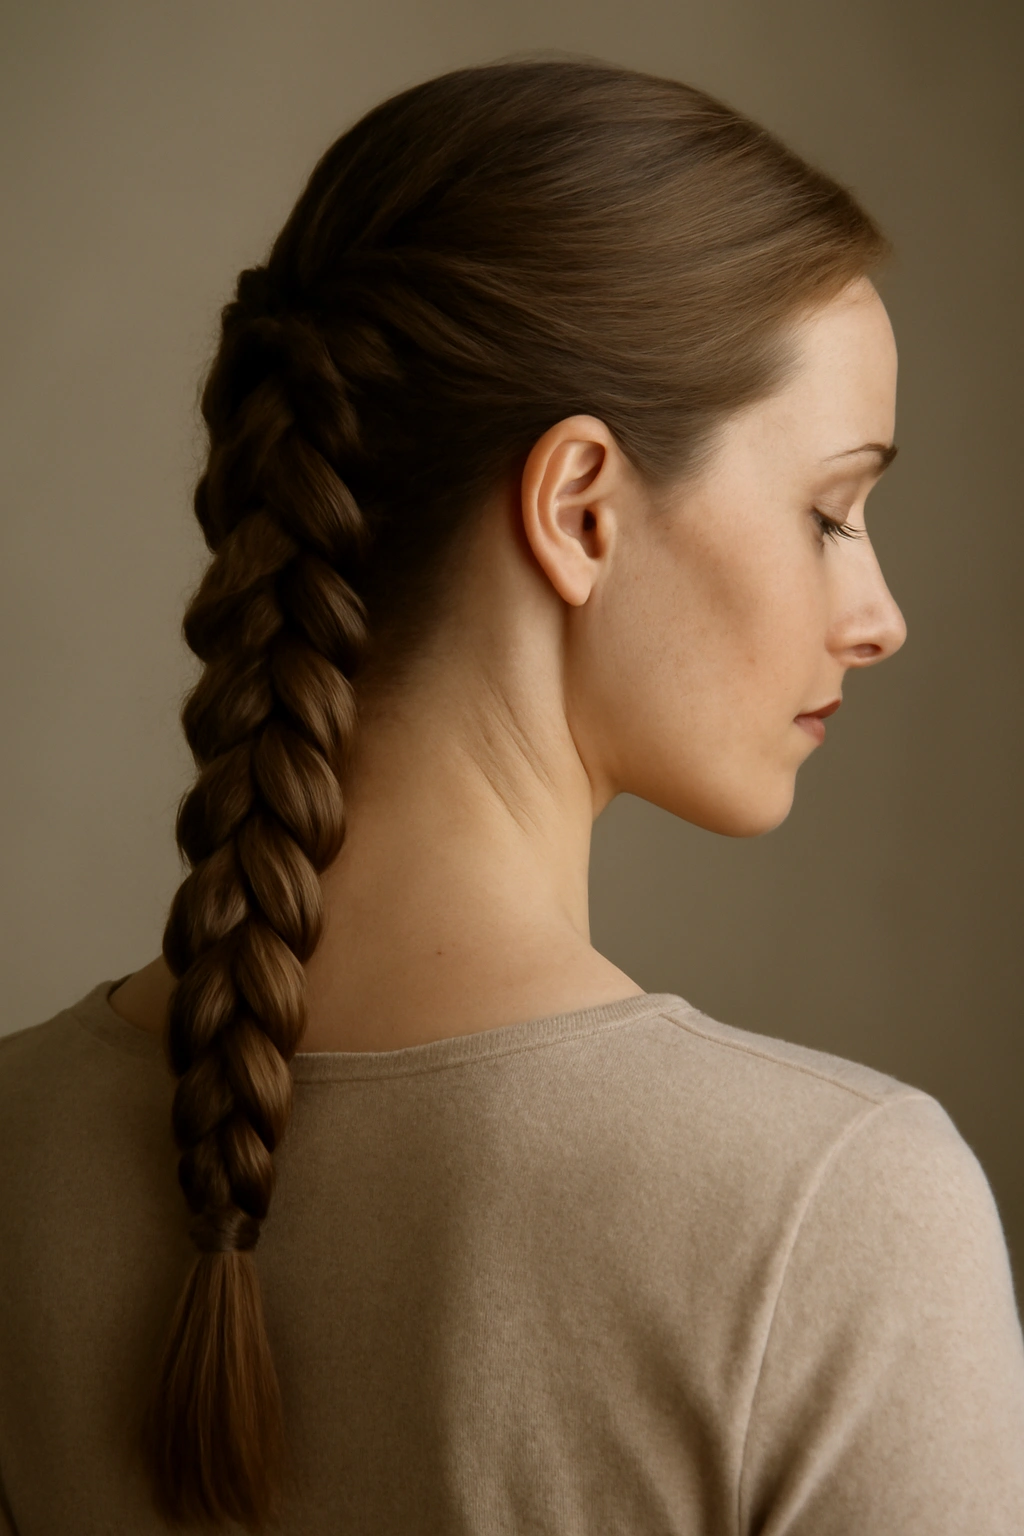
Securing the Braid at the End
As you spiral around the head, you’ll eventually reach a point where you’ve incorporated most of your hair and you’re approaching the end. At this point, you have two options: continue with the remaining hair and finish with a small three-strand braid at the end, or tuck the remaining length under and secure it with pins. Most people choose to create a small continuation of the spiral—finish the three-strand braiding and rotating pattern one or two more times until you reach the ends of your hair.
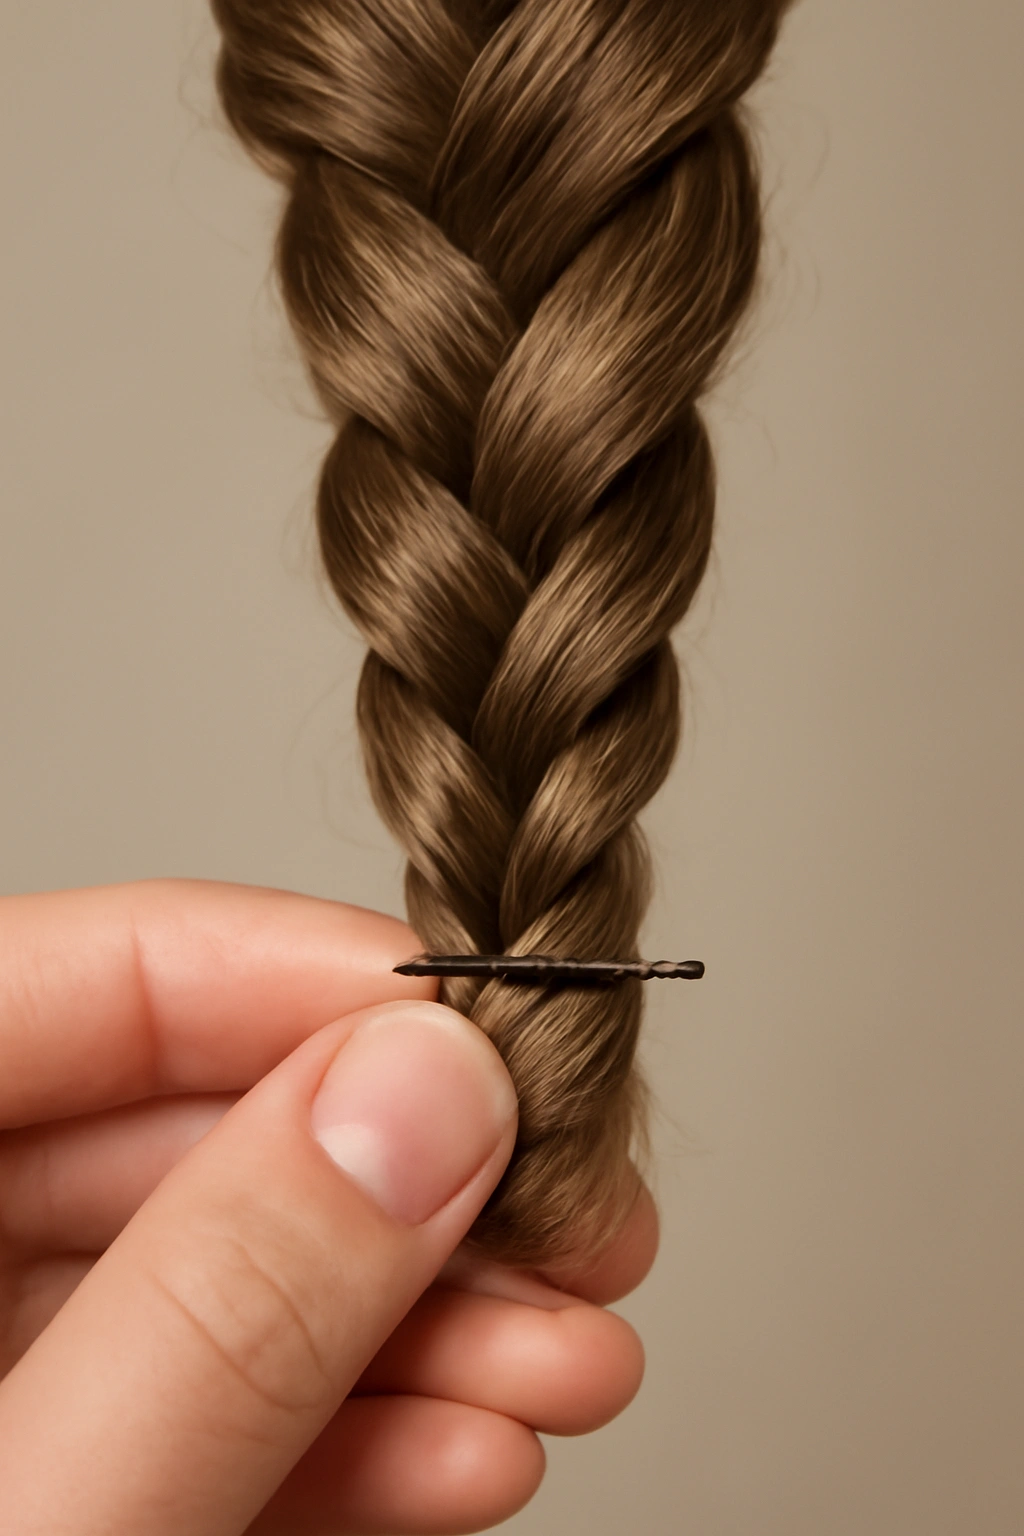
Once you’ve reached the ends, secure the braid with a clear elastic band or a small bobby pin. If using an elastic, wrap it around the very end to hold all three strands together. If using a bobby pin, tuck the ends under the braid (where they’re less visible) and pin them in place. Some people wrap the tail hair back around the spiral and pin it, creating a more seamless appearance where the braid seems to end naturally rather than abruptly.
If you haven’t incorporated all your hair into the spiral by the time you’ve gone around the head, you’ll have a length of unbraided hair remaining. You can either braid this into a simple three-strand braid as a continuation, wrap it around the base of the spiral and pin it, or leave it loose for a bohemian effect. The choice depends on your overall look and how much remaining length you have to work with.
Styling and Finishing Touches
Once the braid structure is complete and secured, take a step back and assess. Are there any obvious bumps, loops that are much tighter or looser than others, or areas that look unbalanced? Walk around and look at it from different angles, including in a hand mirror held up so you can see the back and sides. Even experienced braiders find things to adjust during this final inspection.
Apply your flexible-hold hairspray lightly over the entire braid, paying special attention to any areas with flyaways. Don’t soak it—you want a light mist that tames small hairs without making the braid look stiff or wet. Let the hairspray dry for 30 seconds, then use your old toothbrush to gently smooth any flyaways back into place. This brush is gentler than a regular comb and won’t disturb the braid structure.
Add any finishing touches that match your style: a delicate clip near the base of the spiral, a few small bobby pins with pearls or crystals tucked into loops for a formal look, or simply a sleek finish with no additional embellishment. Some people like to leave a few face-framing pieces loose around the temple and sides, which softens the overall look. Others prefer everything neatly incorporated for a more formal, polished appearance. Choose what feels right for the occasion and your personal style.
Common Mistakes and How to Avoid Them
The most frequent error people make is inconsistent tension between their left and right hands, which results in a lopsided braid where one side is noticeably tighter or looser than the other. Pay conscious attention to both hands throughout the process. Check in with yourself every few rotations: are both hands pulling equally? Is one hand taking over more of the work? Actively balance the effort between both hands, even if you’re naturally dominant with one hand.
Another common issue is forgetting to rotate, which results in a braid that travels vertically down the head rather than spiraling around it. It’s easy to fall into the rhythm of regular braiding and forget about the rotational component. To prevent this, verbally remind yourself as you work: “braid, rotate, braid, rotate.” Or count your rotations out loud. This external reinforcement helps you remember the pattern, especially during your first few practice attempts.
Picking up too much hair at once and trying to incorporate it all into one strand is another typical mistake. This creates an uneven, bulky area where you’ve added too much and thin areas where you picked up too little. Instead, add just a thin pinch of hair to one strand at a time. Think of it as adding small, controlled amounts rather than grabbing a chunk. This method takes slightly longer but results in a much more even, professional-looking braid.
Troubleshooting Uneven or Loose Spirals
If you notice that one side of your spiral is significantly looser or tighter than the other, the issue is usually inconsistent tension or rotating too much or too little. If rotating too much (more than 45 degrees per cycle), your braid spirals too tightly and gets cramped. If rotating too little (only 20 degrees per cycle), your braid doesn’t spiral enough and starts to look more linear. Aim for that 45-degree rotation as a consistent standard.
If the spiral is loose and floppy, you’re likely not maintaining enough tension or you’re rotating so much that you’re stretching the hair too thin. Tighten up your grip on the strands and make sure you’re not pulling so hard that you’re creating tension, but keeping the braid compact and snug. Practice on a day when your hair has slightly more natural oil or texture—freshly washed, bone-straight hair is the hardest to work with.
If you’ve nearly finished the spiral and realize it’s uneven, resist the urge to completely redo it. Instead, work on the final rotations with extra attention to consistency. When you reach the end and secure the braid, do the pancaking/fluffing step very intentionally—loosen the looser sections more generously and loosen the tighter sections more subtly. This balances out the overall appearance and makes uneven tension less obvious.
Tips for Long-Lasting Hold
The durability of a spiral braid depends heavily on your hair type and the texture of your hair before braiding. If you’re doing this braid on day-two or day-three hair (hair that’s had a couple of days to accumulate natural oils and texture), it’ll hold beautifully for 24 hours or more. If your hair is freshly washed and extremely slippery, even a perfectly executed braid might start to separate by evening.
Applying a light texturizing product before you braid makes a huge difference in longevity. A dry shampoo or texturizing spray adds grip that prevents the braid from slipping apart. You can also use a light hold hairspray during the process—spray your hands lightly before you start, and the product transfers to the hair as you braid. This holds the braid more firmly without making your hair feel stiff.
Sleep on the braid in a specific way to preserve it overnight. Instead of sleeping flat, wrap the braid in a silk scarf or keep your head elevated on a silk pillowcase. This reduces friction and prevents the braid from unraveling. In the morning, if the braid has loosened slightly, you can re-tighten individual sections by gently pulling on them, or give the entire braid a light refreshing mist of hairspray.
Variations and Creative Styling Ideas
Once you’ve mastered the basic spiral braid, you can play with variations that add interest and match different occasions. A double spiral braid involves creating two parallel spirals, one on each side of the head—this works best on very thick hair. Start each spiral at a temple and spiral both toward the back of the head, then secure both spirals together or separately.
A reverse spiral changes the direction of the rotation—instead of spiraling clockwise, you spiral counter-clockwise (or vice versa). This creates a mirror image and works beautifully for side-part spirals. A side spiral braid starts at one temple and spirals toward the opposite ear, creating an off-center look that’s romantic and slightly edgy.
A halo spiral circles the entire head like a crown, incorporating hair as you go all the way around. This requires longer hair but creates a stunning formal look. A half-spiral incorporates the top half of your hair into a spiral pattern, then leaves the bottom half loose or creates a low bun beneath the spiral.
You can also add texture to a spiral braid by starting with waves or curls rather than straight hair, weaving ribbons or thin braids through the spiral, or tucking small flowers or decorative pins into the loops. These variations let you customize the spiral braid to match whatever aesthetic you’re going for—preppy, bohemian, romantic, edgy, or minimal.
Final Thoughts
A spiral braid is an impressive-looking style that’s absolutely achievable with practice and patience. The first time you execute one perfectly, you’ll feel genuinely proud—and rightfully so, because you’ve learned a skill that many people pay professionals to do. The spiral braid proves that complex-looking hairstyles aren’t necessarily complicated; they’re just different from the basics you already know.
The key to success is breaking the technique into its component parts and practicing those parts repeatedly. Spend your first few attempts focusing purely on the rotation and the spiral pattern, without worrying about adding hair or achieving perfect tension. Once the rotational movement feels natural, layer in the other elements. Most people find that they can execute a decent spiral braid after three or four practice sessions.
Don’t get discouraged if your first attempts are uneven, loose, or don’t look quite right. Even experienced braiders have off days where tension is inconsistent or the spiral isn’t as tight as they’d like. The more you practice, the more automatic the technique becomes—eventually, you’ll be able to spiral braid while watching television or chatting with friends, without really thinking about it. That’s when you know you’ve truly mastered the skill.