Short haircuts on type 3 curly hair can feel risky. You’re cutting away length that typically protects curl definition, dealing with shrinkage that makes precise styling harder, and trying to find styles that actually work with your curl pattern rather than fighting against it. But here’s what most people don’t realize: the right short cut actually enhances curl definition, reduces daily styling time, and lets you embrace your natural texture without compromise. The key is understanding which cuts honor the way your curls naturally fall, how your specific curl pattern responds to shorter lengths, and what styling approach brings out the best in each style.
Type 3 curly hair—those beautiful, well-defined spirals and bouncy S-patterns—actually thrives at shorter lengths when the cut is strategized correctly. Short hair on type 3 curls means less weight dragging down your curl definition, less frizz from repeated manipulation, and a totally different aesthetic that can range from effortlessly textured to deliberately styled, depending on your vibe. The challenge isn’t whether short hair works for your curls; it’s choosing the right cut for your specific curl pattern, face shape, and how much daily styling you actually want to do.
What makes a short cut work on type 3 curls comes down to three fundamentals: the overall shape (whether you want layers, a blunt edge, or something textured), how the cut interacts with your shrinkage (type 3 curls typically shrink 25-40%, so what looks shoulder-length wet becomes significantly shorter when dry), and how you’ll style it to bring out definition rather than flattening the curl. Below are twelve proven short haircuts specifically designed to complement type 3 curly hair, plus the styling approach each one requires.
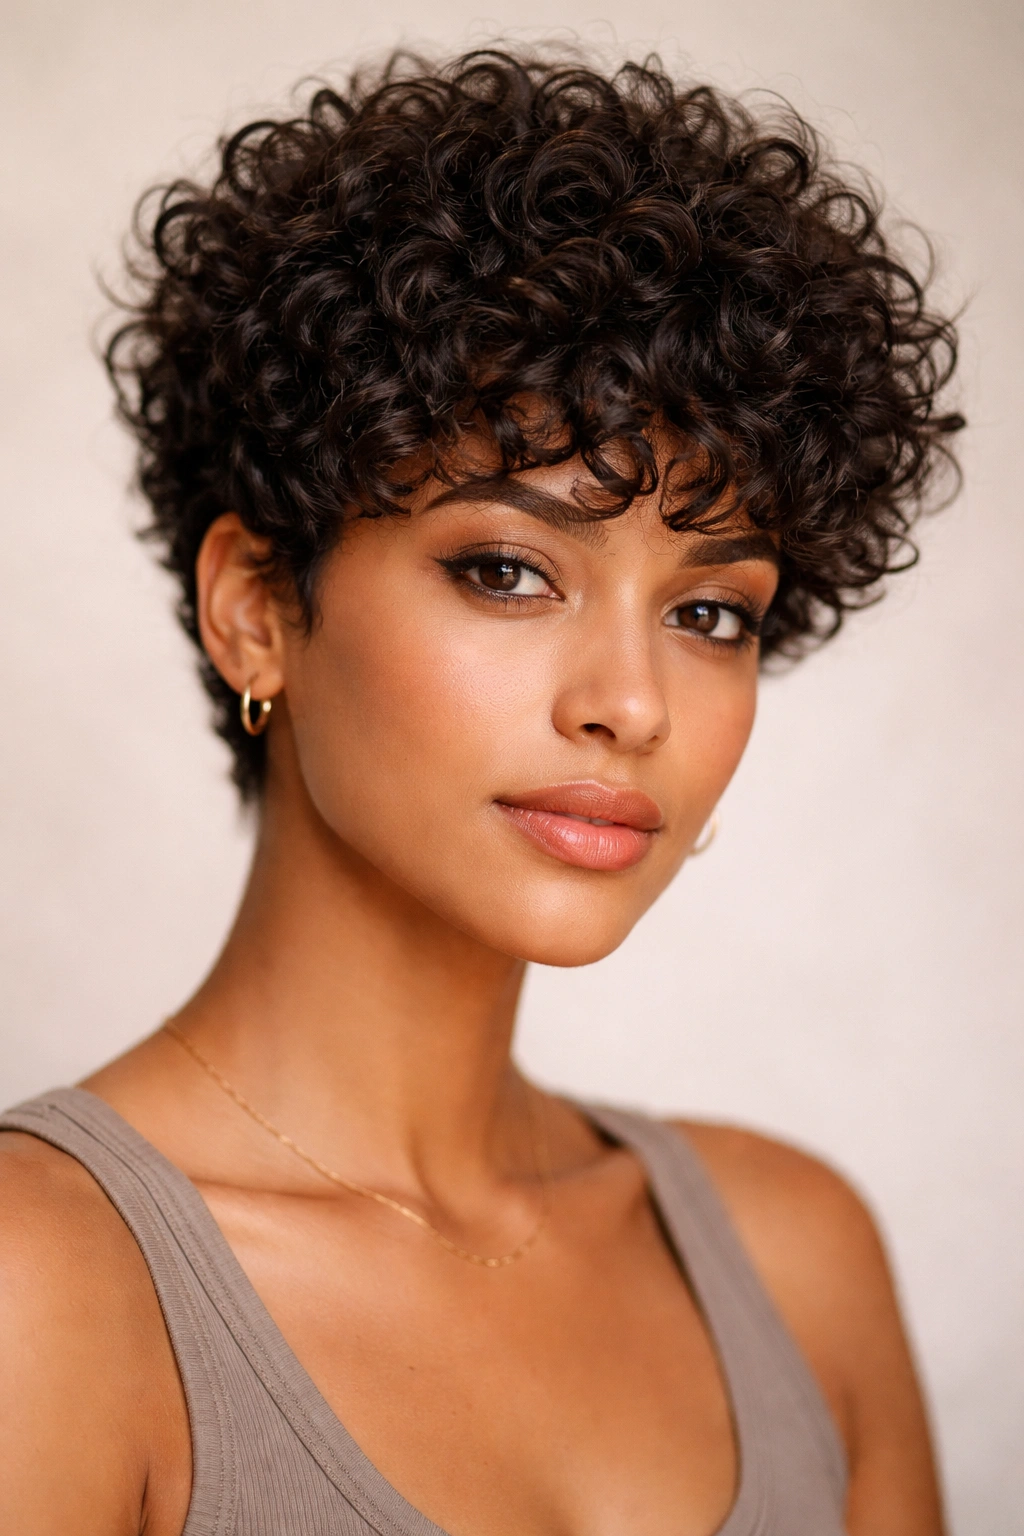
1. The Textured Pixie
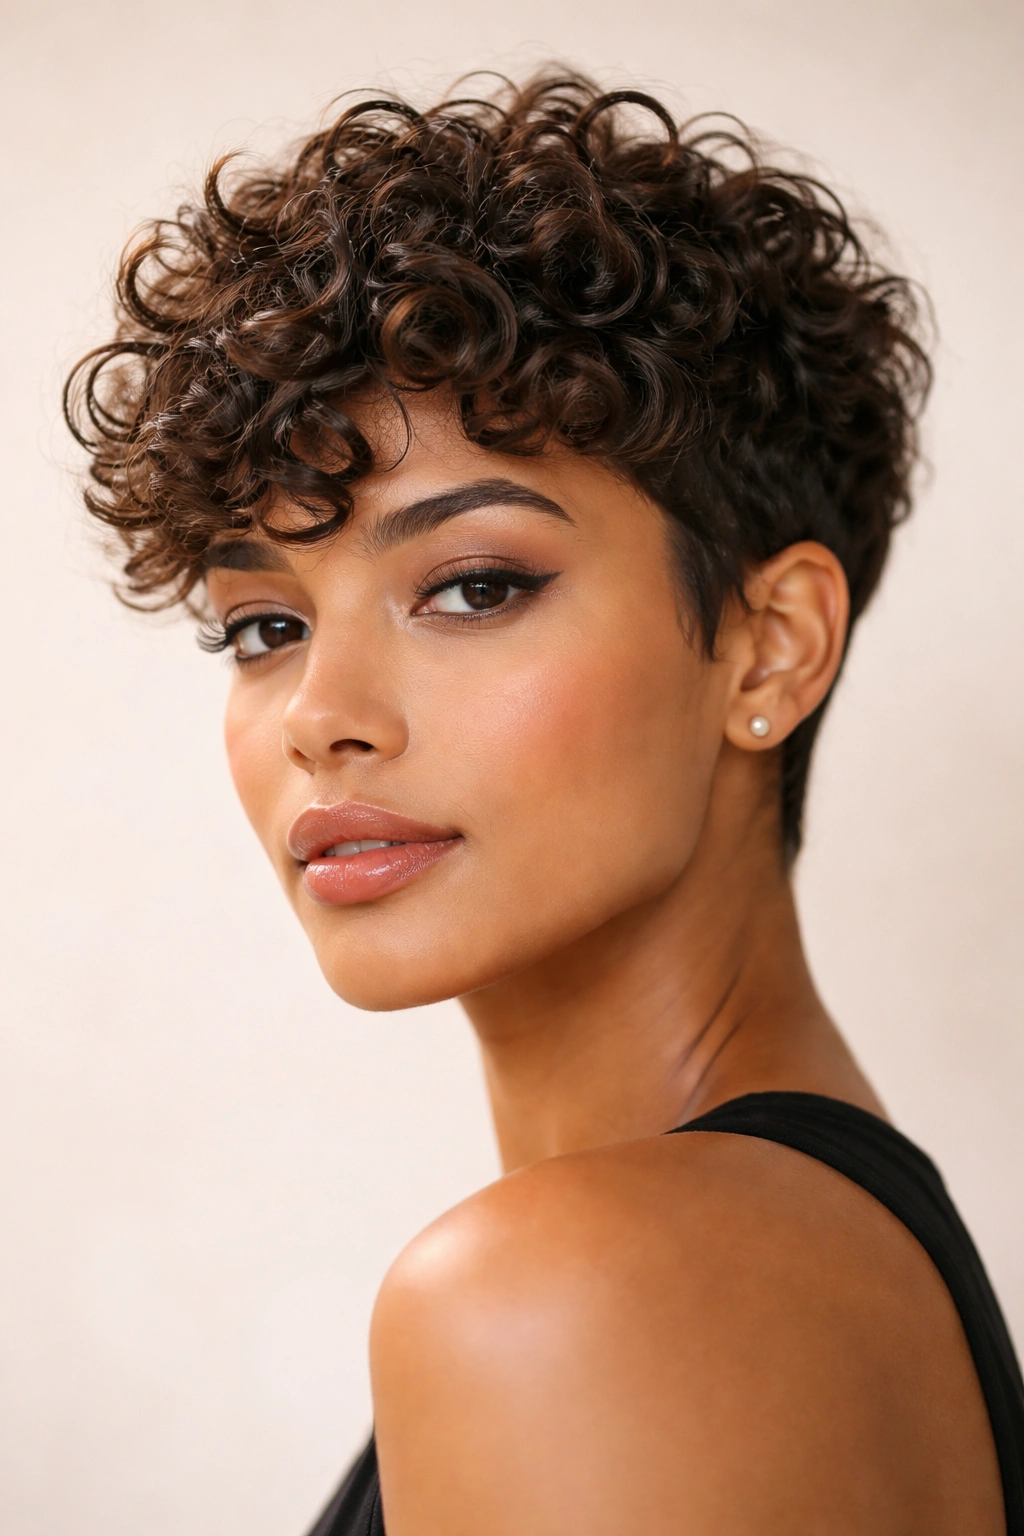
A textured pixie takes the classic short cut and reimagines it for curly hair by using choppy layers and strategic shorter pieces on top to let your curls stack vertically instead of lying flat. This cut works beautifully on type 3 curls because it uses your natural curl pattern as the actual texture of the style—you’re not fighting the curl, you’re celebrating it. The result feels intentional and modern rather than accidental or undone, and it requires far less daily manipulation than you’d expect.
Why It Works for Type 3 Curls
The textured pixie keeps weight minimal while maintaining plenty of curl-friendly length on top to show off your actual curl pattern. Because type 3 curls are defined spirals, they naturally create visual dimension and interest when cut short—you don’t need length to create shape. The choppy layers prevent any flat, helmet-like appearance and encourage your curls to separate and show individual definition rather than clumping together. This cut also photographs beautifully and feels fashion-forward without requiring a pixie cut’s aggressive shorter sides if you prefer more versatility.
Styling and Maintenance Essentials
- Apply curl cream or defining gel to soaking-wet hair and scrunch upward from the roots to enhance curl formation
- Use a diffuser attachment on a medium heat setting for 60-70% dryness, then air-dry the rest to prevent frizz
- A light touch of dry oil or curl serum on dry curls adds shine and defines individual spirals
- Sleep in a bonnet or silk pillowcase to preserve curl shape overnight and reduce morning frizz
- Reactivate curls with a curl-refreshing spray and light scrunching on day two and three without rewashing
Pro tip: This cut looks especially striking on people with face-framing preference or those who like showing off their jawline—the pieces around the face add movement and dimension that balances both angular and rounded face shapes.
2. The Curly Bob
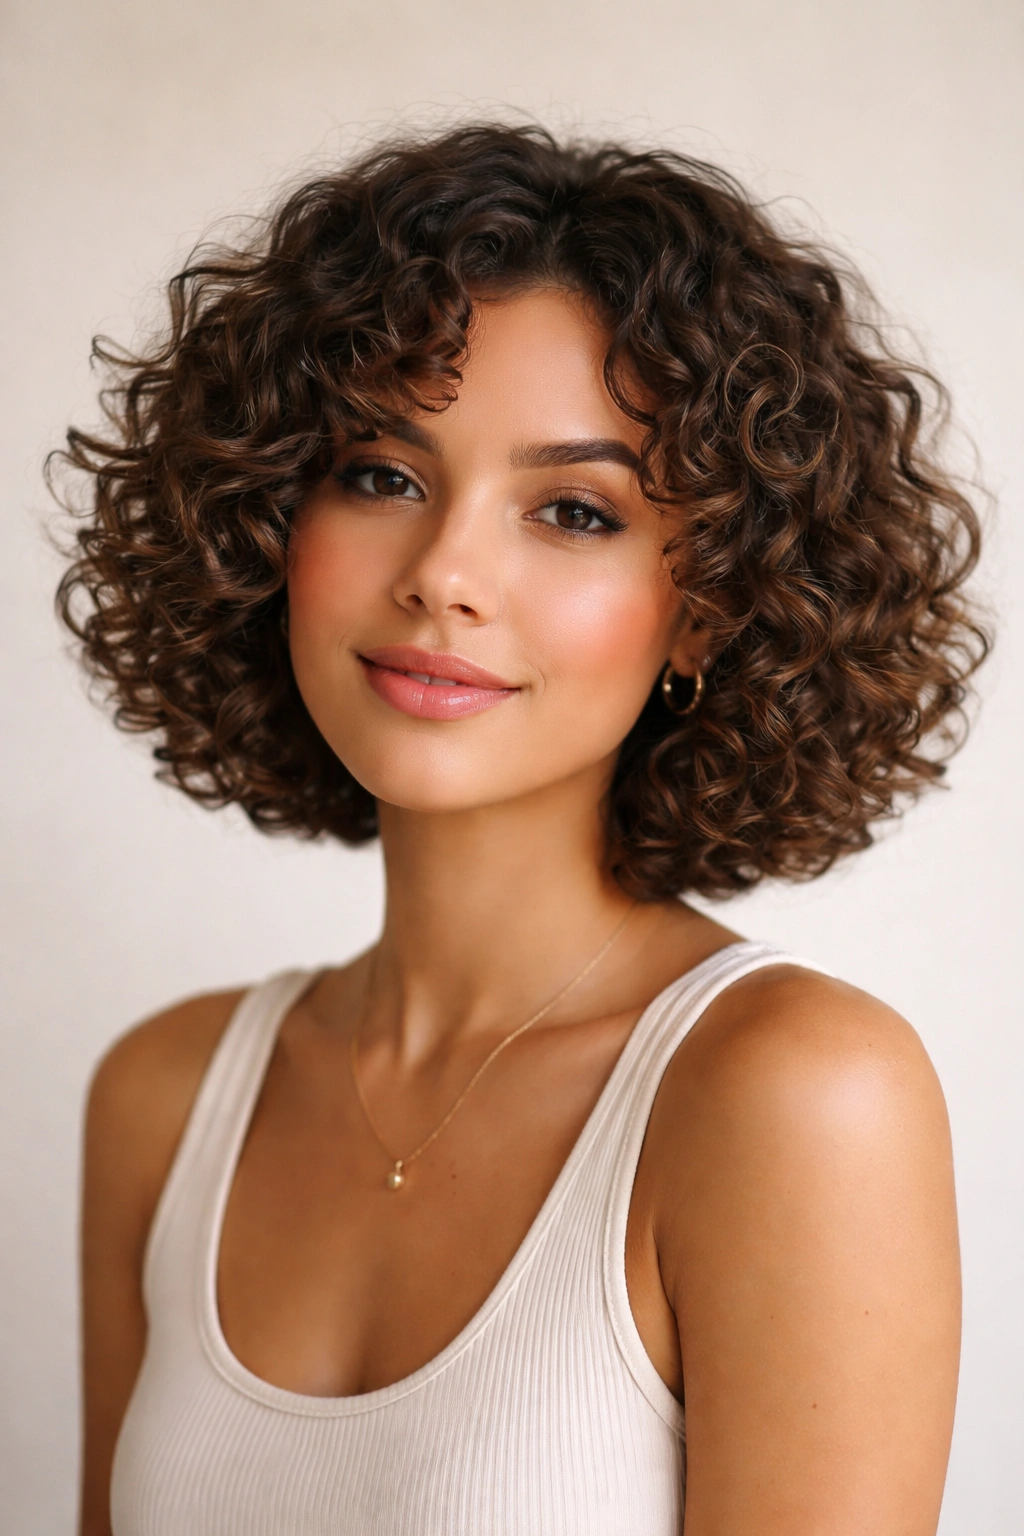
A chin-length or slightly longer bob cut specifically designed for curly hair differs from a straight-hair bob because it accounts for shrinkage and uses layers strategically to prevent the heavy, blunt appearance that often results when type 3 curls get cut into a standard blunt shape. The curly bob sits somewhere between playful and polished, and it’s remarkably versatile—you can style it with maximum curl definition for intentional texture, or smooth it slightly for a more refined look depending on the occasion.
Why This Cut Enhances Curl Pattern
A properly cut curly bob works with your curl pattern by incorporating internal layers that prevent the cut from looking too dense or heavy once your curls dry and potentially shrink. The layers create negative space within the shape so your individual curls have room to move and express themselves rather than getting compacted by weight. Type 3 curls especially benefit because they’re defined enough to show off internal layering beautifully—the cut reveals dimension and movement that straighter hair types would lose.
Cut and Styling Details
- Get the cut dry if possible, or have your stylist wash and style it before cutting to account for your actual shrinkage
- Layers should fall at slightly different lengths to create movement, not blunt perfection
- Face-framing pieces should graze your jawline or cheekbones for maximum flattering effect
- Diffuse curls with a creamy leave-in conditioner and curl cream for full definition and bounce
- On non-wash days, refresh by misting lightly with water and reactivating with curl cream, scrunching from underneath
Worth knowing: This cut typically requires a follow-up trim every 6-8 weeks to maintain shape as the layers start to blend together and look less intentional.
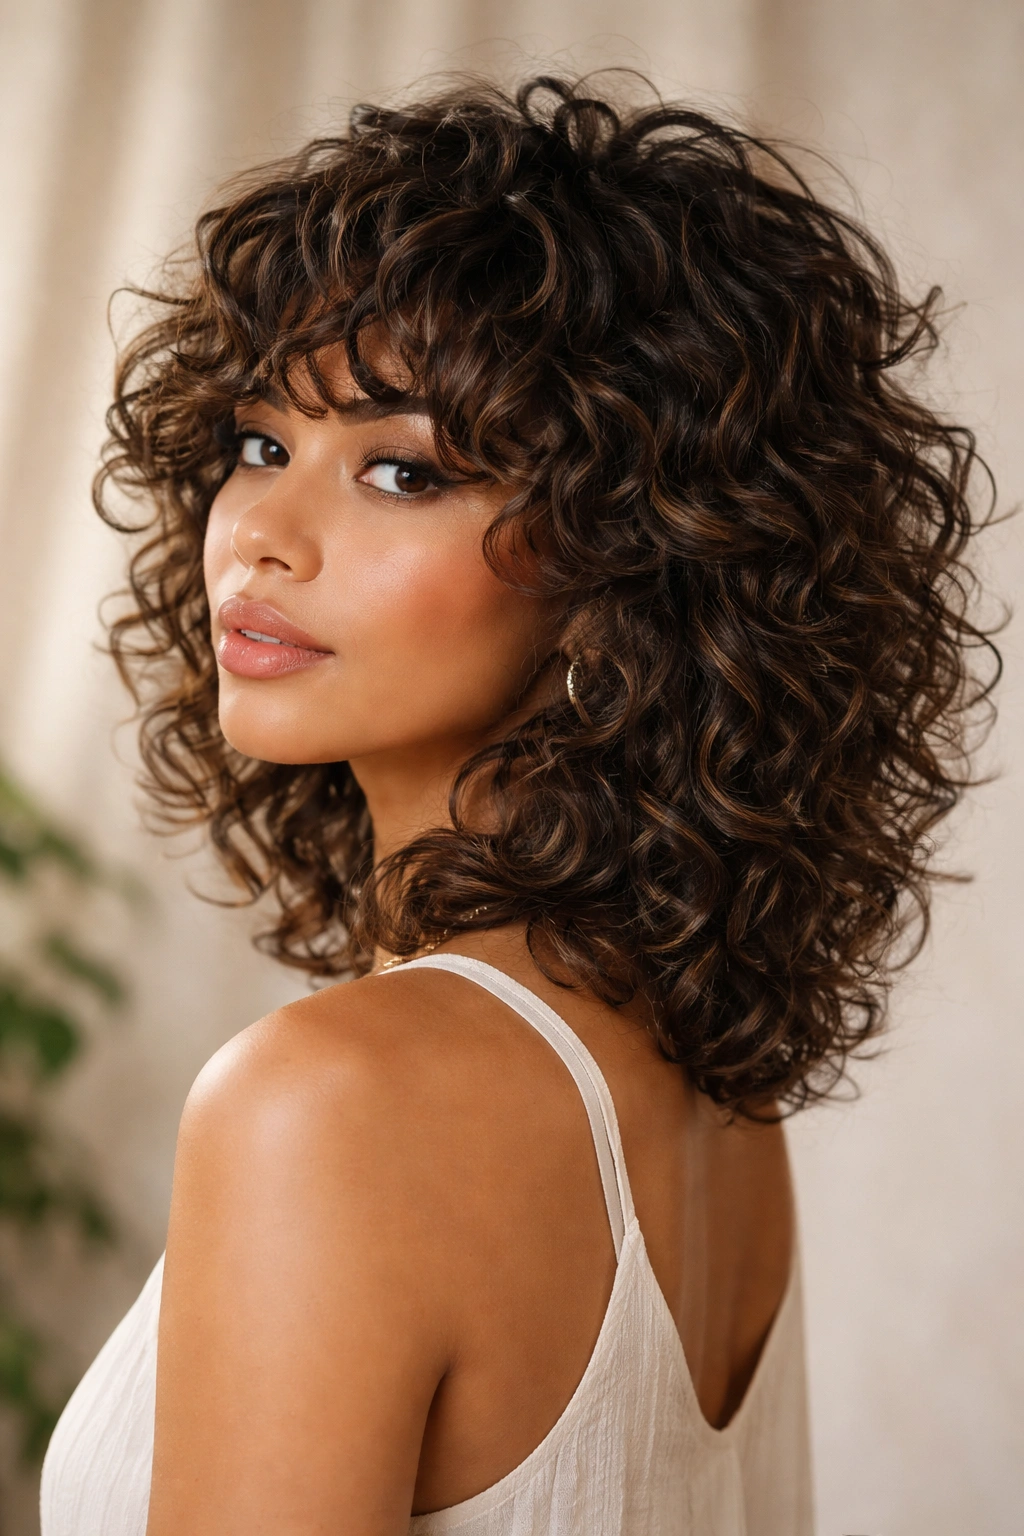
3. The Shaggy Textured Cut
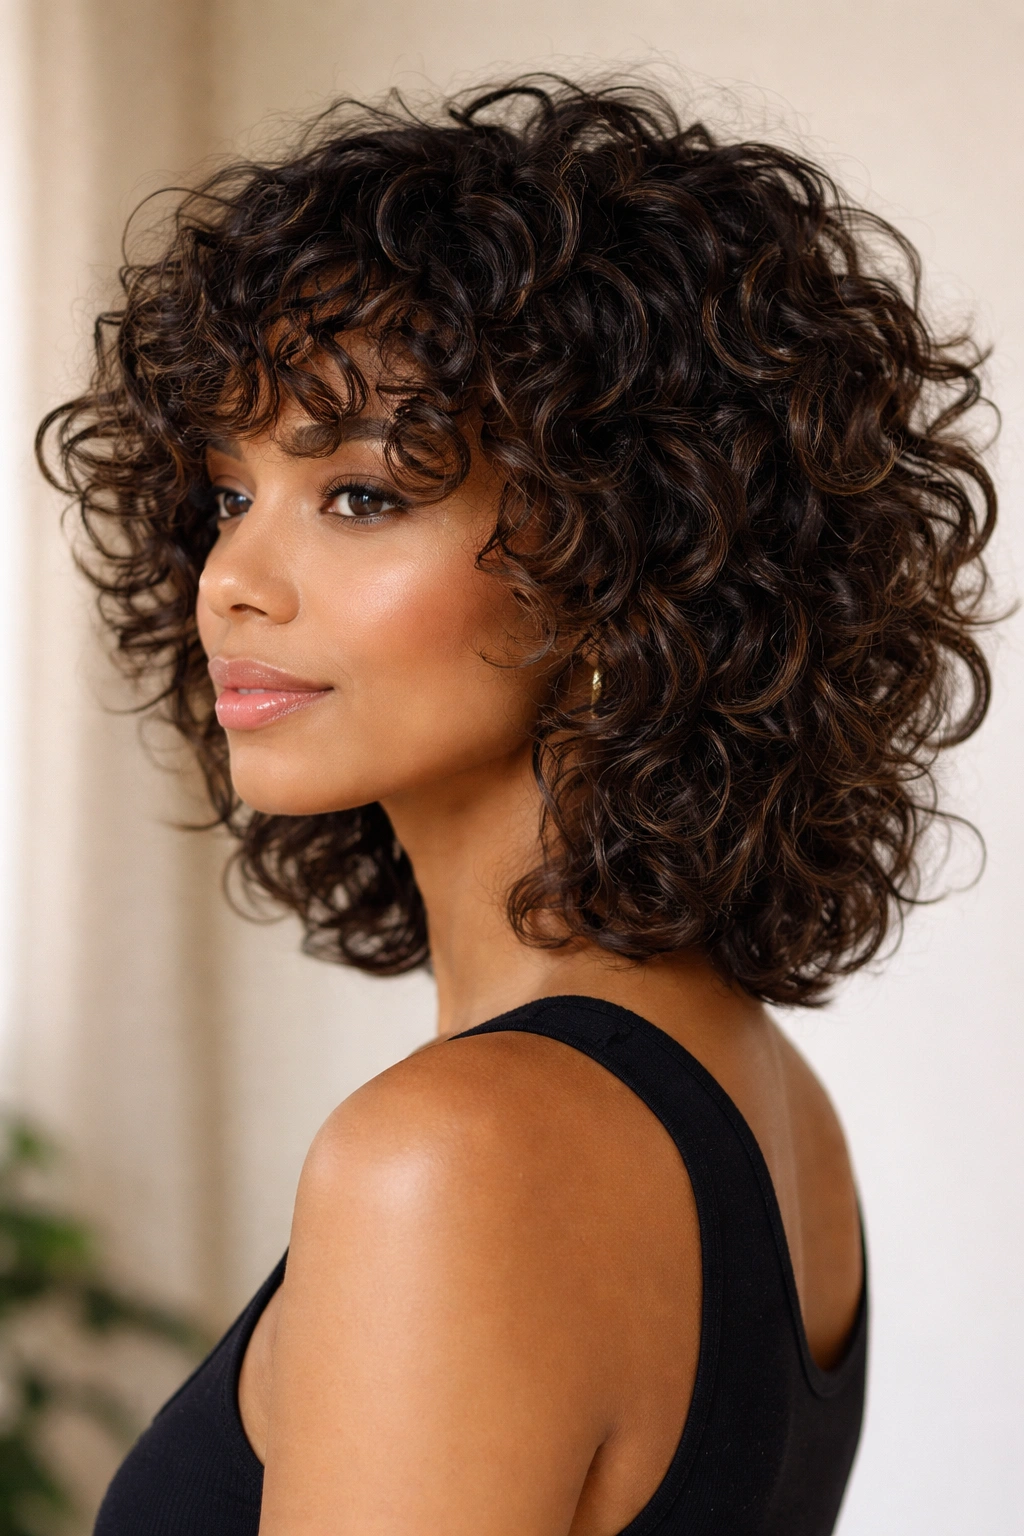
Shag haircuts have made a major comeback, and they’re particularly stunning on type 3 curly hair because the choppy layers naturally align with how your curls break apart into smaller sections. This cut combines short, choppy layers throughout with longer pieces underneath, creating a lived-in, undone aesthetic that feels current and fashion-forward while being genuinely easy to maintain. The shag works especially well if you like a more casual, effortless vibe or you’re interested in a cut that looks intentionally textured rather than perfectly groomed.
How Shag Layers Work With Curly Spirals
The beauty of a shag on type 3 hair is that each layer naturally emphasizes a different curl spiral or section of your curl pattern, creating dimension that’s already built into your hair’s structure. You’re not layering smooth hair; you’re layering curls that will sit at slightly different angles and create visual movement and interest. The shorter pieces on top give volume and lift without needing blow-dryer manipulation, and the longer pieces underneath provide length and movement. Shags also work beautifully with face-framing pieces that add softness around your face.
Styling the Shag for Best Results
- Use a generous amount of curl cream or mousse on soaking-wet hair and scrunch to encourage coil formation
- Diffuse about 50% of the way through drying, then allow air-drying to finish to prevent frizz and heat damage
- The shag looks best when individual layers are clearly visible—avoid scrunching so hard that layers blend into one mass
- On day two, refresh with a curl spray and a tiny bit of light oil through the lengths, scrunching gently
- Sleep protection is essential because shag layers can’t hide sleep creases—use a bonnet or silk pillowcase without fail
Insider note: Shags look especially good on those with type 3 curls on the tighter end of the spectrum (closer to 3C) because the chop-layer pattern shows off tightly spiraled curls beautifully; looser 3A curls can look a bit scattered in a shag unless the layers are carefully shaped.
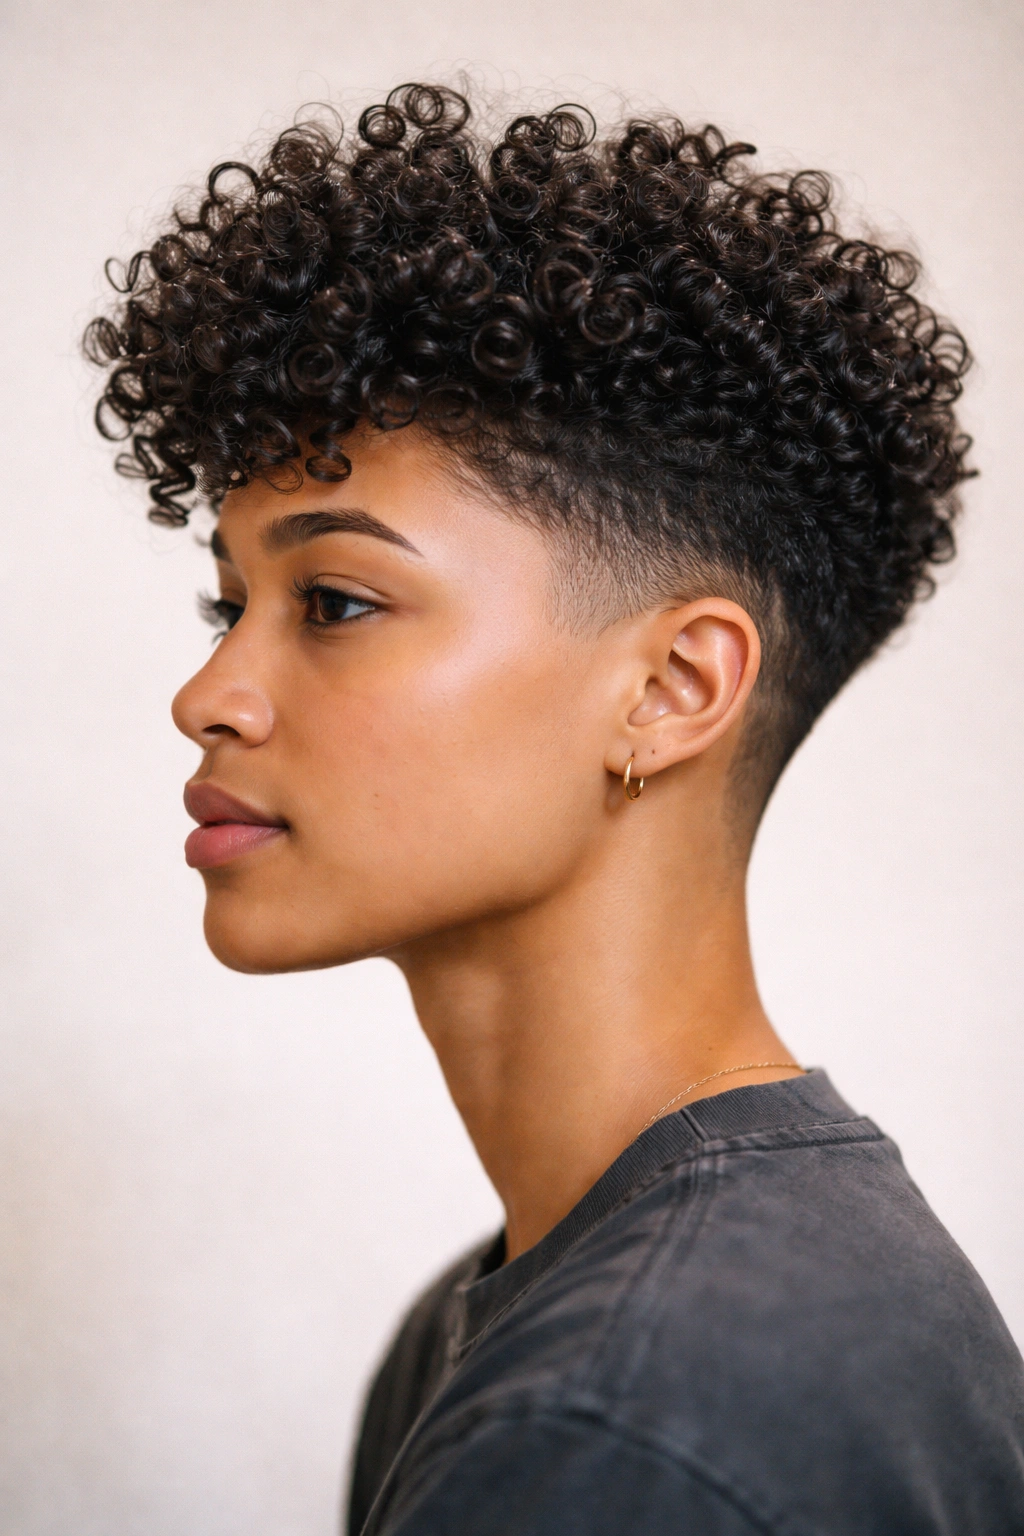
4. The Cropped Fade With Textured Top
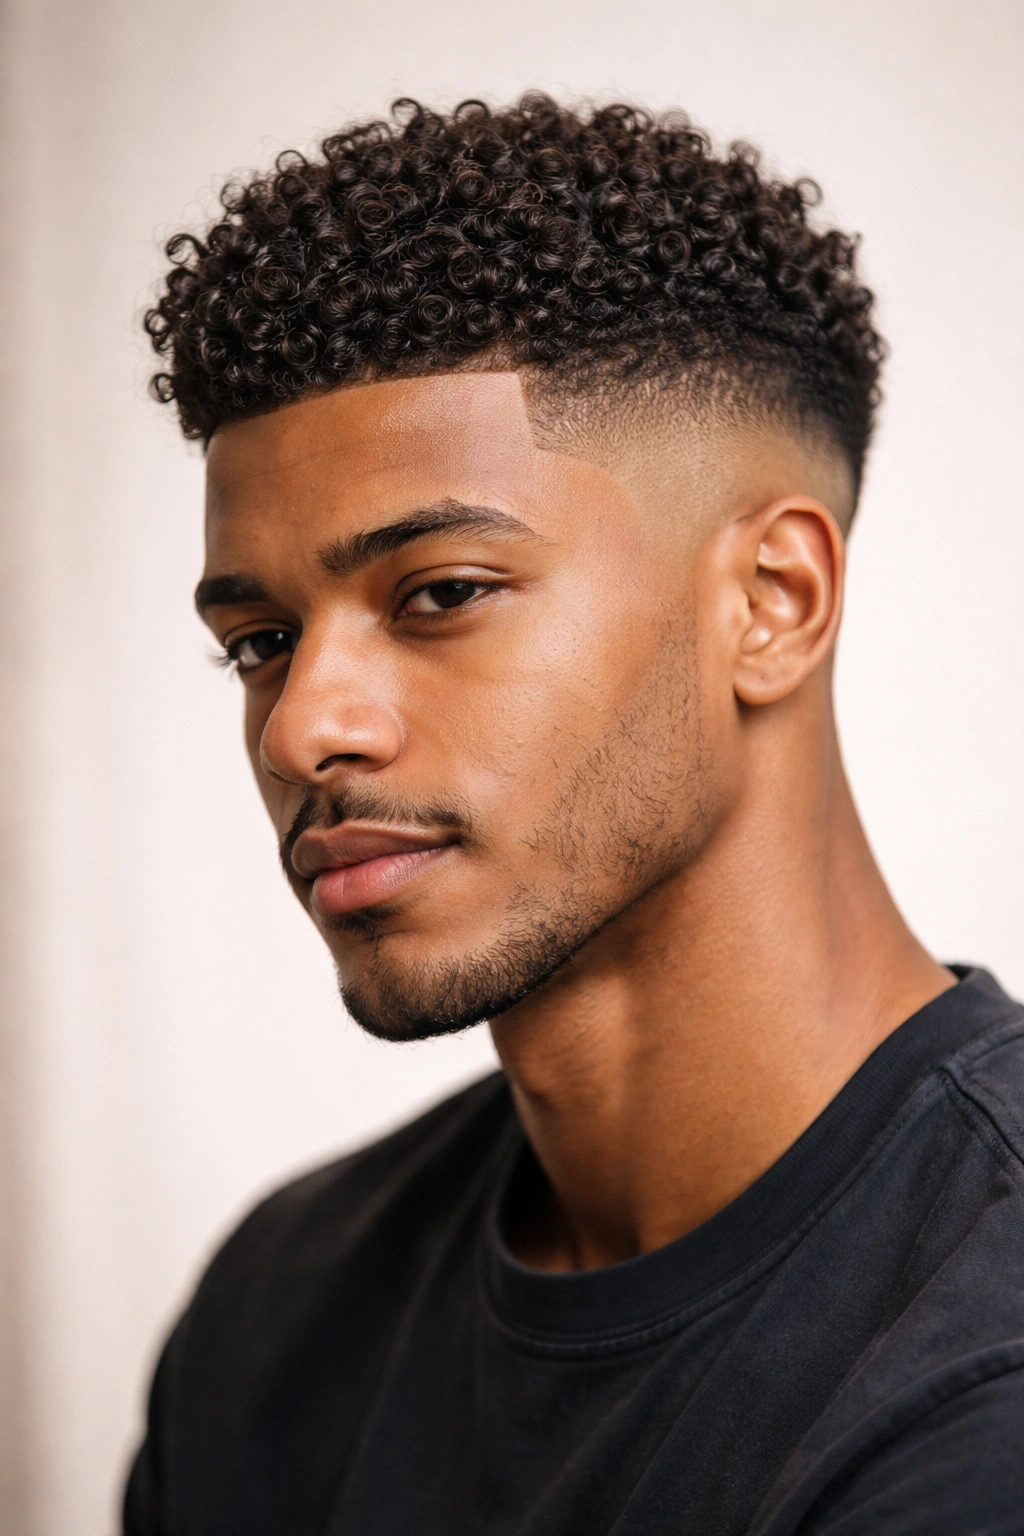
If you want something shorter and more masculine-leaning or gender-neutral, a cropped fade that’s buzzed or very close on the sides with more substantial curl-friendly length on top gives you a deliberate, contemporary look that absolutely works on type 3 curls. The contrast between the clean faded sides and the textured, curly top is striking, and it’s a fantastic cut if you want something low-maintenance on a daily basis while still showing off your curl definition where it matters.
Why the Fade-Top Combo Works
The faded sides create clean lines and visual interest without requiring your curls to do any heavy lifting, while the textured top gets to be fully itself—undefined, bouncy, and three-dimensional. Type 3 curls on top of a fade read as intentional and fashion-forward because there’s a clear contrast between the deliberate short sides and the textured crown. This cut also has the built-in advantage of requiring minimal daily styling—wash, apply curl cream, diffuse, and you’re done.
Cutting and Styling Considerations
- Have your stylist cut the top while dry to ensure they’re working with your actual curl length, not wet-hair length
- The fade should be genuinely sharp and well-maintained—this cut requires a refresh every 3-4 weeks
- Use a lightweight curl cream or gel on the top; heavier products will weigh down the texture and flatten your curls
- Diffuse on medium heat for the top section—the goal is curl definition, not volume that fights against itself
- A beard oil or lightweight dry oil through the curls adds shine without creating greasiness
Real talk: This cut is incredibly forgiving on second and third days because faded sides hide any sleep creases and the texture on top naturally disguises product buildup—you can absolutely stretch out time between washes.
5. The Textured Crop
A textured crop sits between a pixie and a shag—short enough to feel fresh and modern, but with enough length to show off actual curl definition rather than just having a close-cropped texture. This cut keeps length fairly uniform throughout (unlike a fade with longer top), but uses choppy layers and texturization techniques to create movement and prevent flatness. It’s great if you want short hair that still feels distinctly curly rather than just textured or pixie-like.
The Approach to Layering for Curls
A textured crop on type 3 hair works best when your stylist uses point-cutting or texturizing techniques to remove bulk and encourage curl separation rather than relying solely on blunt scissors. The goal is to create a shape that hugs your head while individual curls maintain their definition and expression. Choppy layers throughout prevent any heavy feeling, and the overall effect is contemporary and intentional. This cut also works well as an in-between style if you’re transitioning from longer hair and aren’t quite ready for a true pixie or shag.
Styling a Textured Crop Daily
- Apply curl cream or lightweight gel to soaking-wet hair, scrunching from roots to ends
- Diffuse with medium heat for 60-80% dryness, then let air-dry completely to avoid frizz
- The crop requires minimal daily intervention on good curl days—just a light mist of water and a quick scrunch
- Use a curl refresher spray on day two instead of rewashing; add a tiny amount of light oil if needed
- This cut looks fresh for a solid week with proper nighttime protection in a bonnet or on a silk pillowcase
Pro tip: The textured crop photographs beautifully from every angle because the choppy layers and movement look intentional and polished both in person and in pictures—it’s especially great if you post on social media or want a cut that always looks styled.
6. The Layered Lob
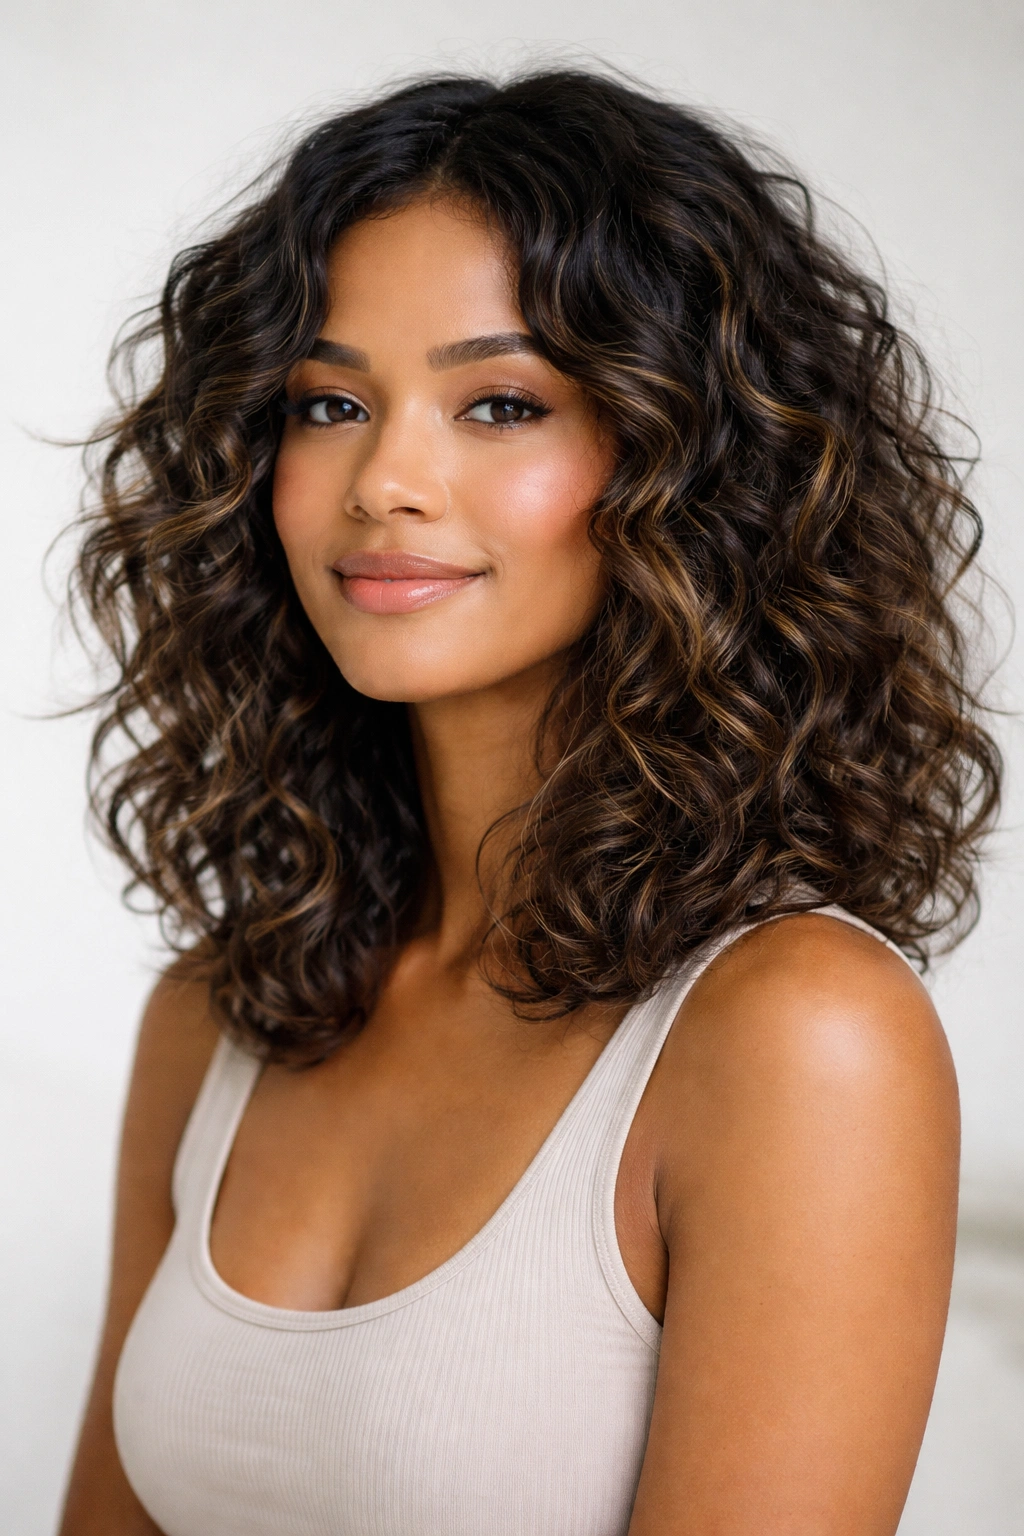
A lob (long bob) with strategic internal layers gives you the length-and-movement appeal of longer hair but with significantly reduced weight and maintenance compared to growing your curls out past shoulder length. On type 3 curls, a layered lob sits around bra-strap to collarbone length and uses layers to create the illusion of lightness and movement. This is the cut to choose if you want to keep some serious length but need that short-hair benefit of curl definition and manageability.
Layering Strategy for Lobs on Type 3
The layering in a curly lob should never be uniform throughout; instead, keep longer, denser layers closer to the scalp for support and anchor, then graduate to shorter, choppier layers through the mid-lengths and ends. This approach prevents the common lob problem where curls get too heavy and lose definition. Type 3 curls actually show off internal layers beautifully because each layer represents a different section of your curl pattern, creating depth and visual interest that straighter hair types lose.
Maintaining a Layered Lob
- Trim every 6-10 weeks because layers blend together and lose their intentional appearance relatively quickly
- Use a generous amount of curl cream or gel on soaking-wet hair; this length requires more product support than very short cuts
- Diffuse with medium heat for 70-80% dryness, then air-dry to completion
- Plopping (wrapping your hair in a microfiber towel for 15-20 minutes) before diffusing helps enhance curl formation and reduces frizz
- Style-wise, the lob works beautifully with partial updos, half-buns, or styled-back looks for day-to-evening versatility
Worth knowing: If you have looser 3A curls, a layered lob might lose more definition at length than you’d like—this cut works best on 3B and 3C curls that maintain spiral definition even at longer lengths.
7. The Ombré or Curtain-Framed Cut
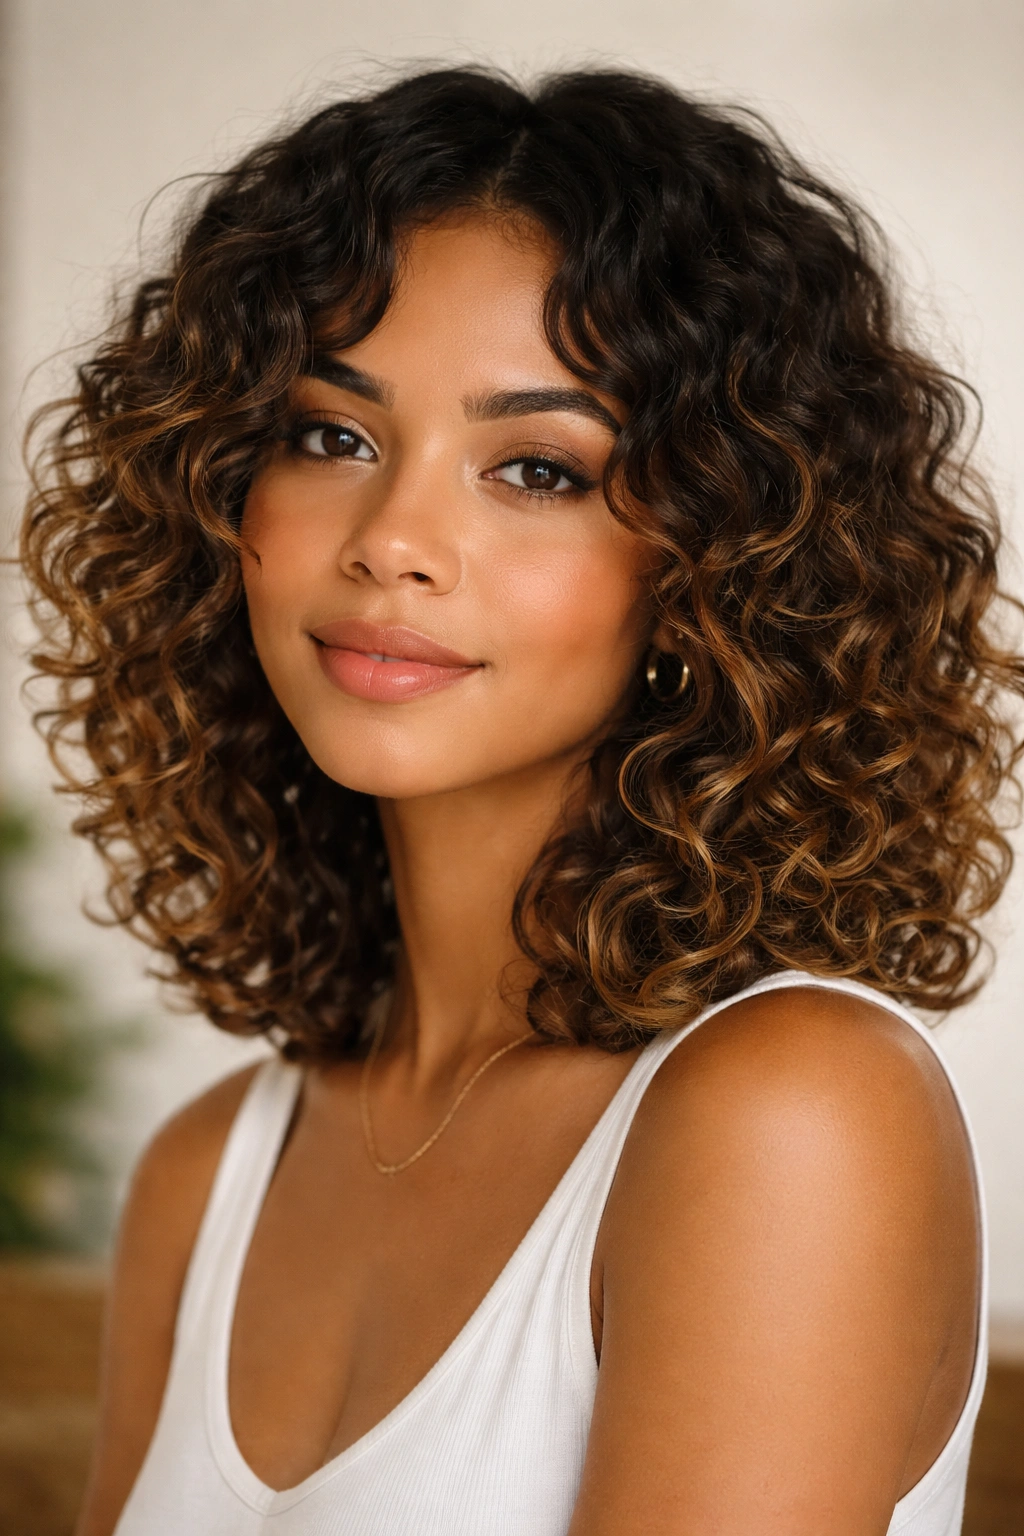
This cut uses shoulder-skimming to collarbone length with intentional face-framing pieces that create a look reminiscent of the 90s, but styled as a specifically curly-hair cut where each piece of the frame is designed to move and enhance your face shape. The curtain-framed approach works beautifully on type 3 curls because the strategically shorter pieces around your face create movement and softness, while the slightly longer pieces underneath maintain shape and bounce. This cut is versatile enough to look both casual and intentionally styled depending on how you approach the styling.
Face-Framing on Curly Hair
Proper face-framing on type 3 curls means the shorter, frame-surrounding pieces should be just shy of your jawline or cheekbones—short enough to create definite movement around your face, but not so short that they stick straight out and look disconnected. The curtain effect happens naturally when these pieces curve away from your face as they dry, creating a softening effect. This cut works across different face shapes, but it’s particularly flattering on rounder or angular faces because the movement around the face creates balance.
Styling Tips for Curtain-Framed Cuts
- Apply curl cream and gel to soaking-wet hair, then flip your head upside down and scrunch vigorously for maximum definition
- Diffuse roots first, then work through the mid-lengths and ends—this prevents the face-frame from drying flat
- Use your fingers to gently direct face-framing pieces away from your face while diffusing, encouraging them to curl away naturally
- Refresh on day two with a curl spray and very light oil through the lengths; re-scrunch gently
- This cut benefits from nighttime protection—sleep in a bonnet or use a silk pillowcase to preserve the face-framing movement
Real talk: The curtain frame requires a bit more intentional morning styling than some other cuts, but the effort is worth it because the movement around your face is what makes this style shine.
8. The Choppy Spiral Cut
A choppy spiral cut takes advantage of your type 3 curl pattern by specifically texturizing and chopping the hair to encourage individual spirals to separate and express themselves rather than clustering into one mass. This cut is shorter overall (think pixie to crop length), but it’s deliberately designed around your curl pattern rather than being a default short cut that happens to work on curly hair. The result is a cut that looks intentional, fashion-forward, and like it was specifically designed for your hair texture.
How Choppy Spirals Enhance Type 3 Curls
Each choppy layer in a spiral cut aligns with a different section of your curl pattern, so individual spirals sit at different heights and angles, creating the illusion of more dimension and movement than you’d get from a blunt cut at the same length. This cut also prevents the unfortunate appearance of curls clumping together into one dense mass—instead, each spiral gets space to express itself. Type 3 curls are defined enough to maintain individual spiral shape even at shorter lengths, which is exactly what this cut capitalizes on.
Daily Styling for Spiral Definition
- Use a creamy curl cream or gel on soaking-wet hair and scrunch vigorously to activate spiral formation
- Diffuse with medium heat, allowing the diffuser to sit on each section for a few seconds to encourage coil formation
- Avoid touching the hair while it’s drying to prevent frizz and allow spirals to set
- On dry curls, use a light touch of dry oil or curl serum to define individual spirals and add shine
- This cut looks best when you’re visibly embracing the texture—it’s not a “smooth, polished” cut; it’s a “textured, spiraled” cut
Pro tip: This cut is absolutely worth investing in a skilled curl specialist stylist because the choppy spiral approach requires understanding how your specific curl pattern works—a stylist without curly-hair expertise might just cut it short without the intentional spiral design.
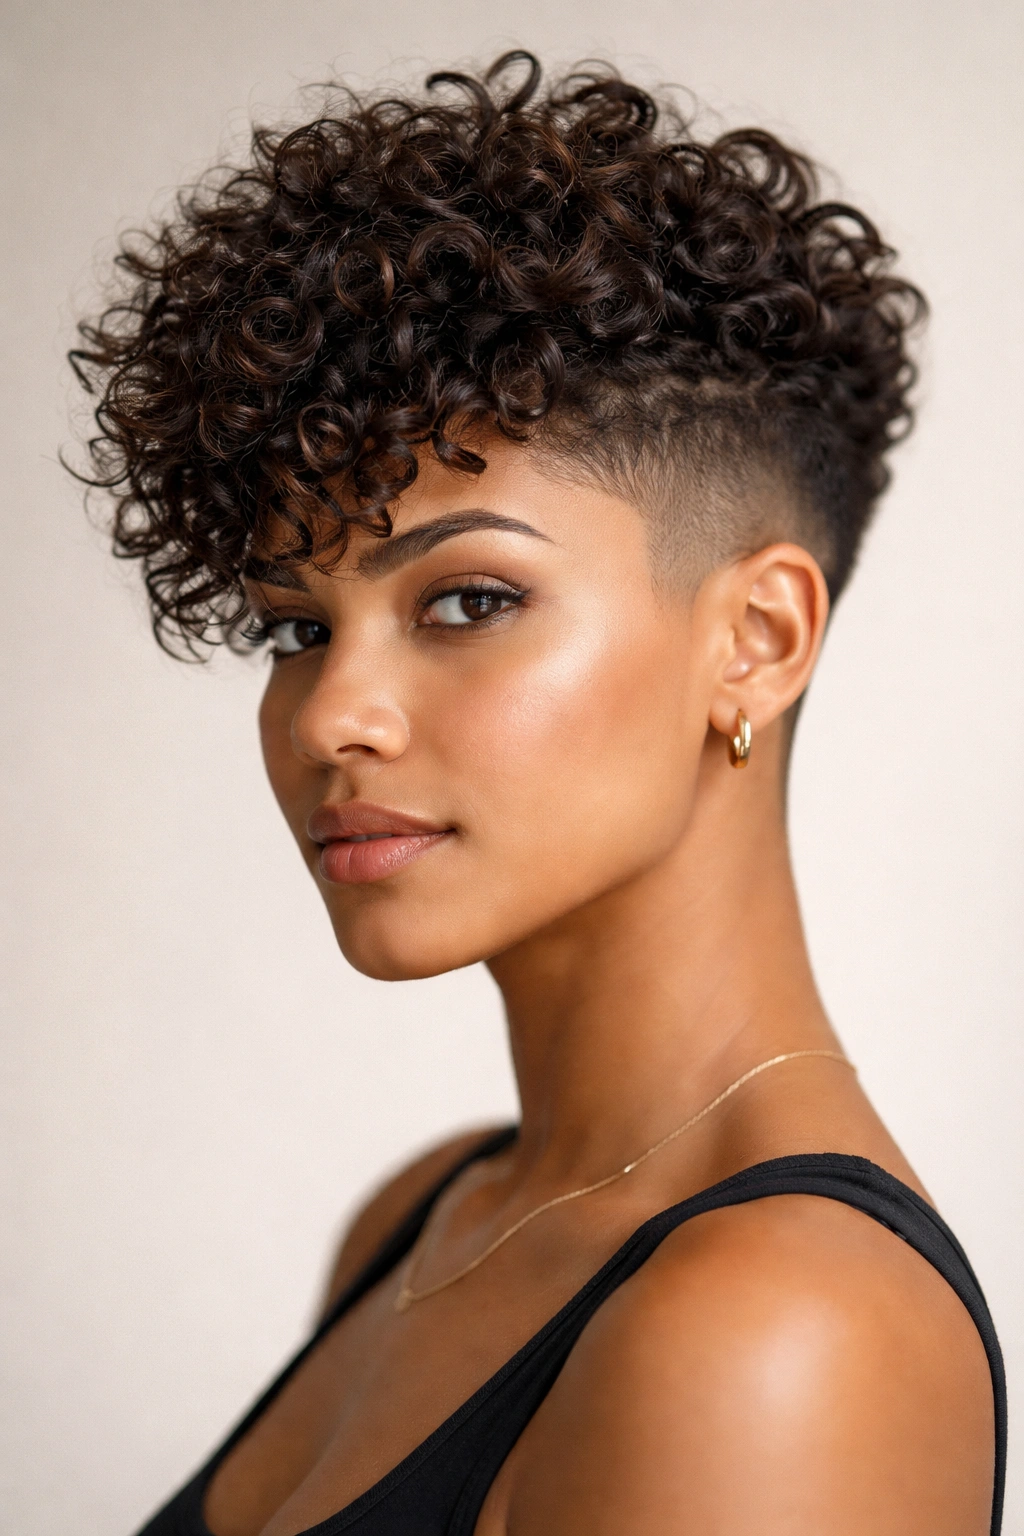
9. The Tapered Sides With Curly Crown
Similar to the fade with texture on top, but slightly softer, a tapered sides with curly crown cut uses gradually shorter sides (not a sharp fade, but visibly tapered) combined with fuller, curlier length on top. This creates a silhouette that feels balanced and modern, with the curly crown getting to be the star of the show. It’s a fantastic cut if you want something short and low-maintenance but still distinctly curly, and it works beautifully across different gender presentations.
Tapering Versus Fading for Curly Hair
A taper is gentler than a fade—the sides gradually get shorter rather than transitioning abruptly, which gives a softer overall appearance while still creating clear definition and intentionality. On type 3 curls, this softer transition looks less aggressive than a hard fade while still giving you the benefit of managed sides and a textured, curly crown. The taper approach also requires less frequent maintenance than a fade—you can stretch to 6-8 weeks between trims rather than 3-4 weeks.
Maintaining Tapered Sides With Curly Crown
- Have the taper cleaned up every 6-8 weeks to maintain the intentional transition
- Use lightweight product on the crown—a curl cream is ideal because it defines curls without weighing them down
- Diffuse the crown thoroughly while letting the tapered sides air-dry
- This cut actually looks great on second and third days because the taper hides any awkward new-growth texture
- Sleep protection is less critical on this cut than others because the shorter sides hide creases
Worth knowing: This cut is particularly flattering on those with oval or rectangular face shapes because the height on top creates proportion and the tapered sides create visual interest without adding width.
10. The Textured Undercut
An undercut on type 3 curly hair uses dramatically shorter hair underneath (think undercut or even partially buzzed) with longer, textured curls on top that create complete contrast. The longer top can be anywhere from a few inches to full curl-length depending on your preference, but the key is that there’s a distinct, visible difference between the short underneath and the longer, curlier top. This cut is bold, fashion-forward, and makes a statement while being genuinely practical for curly-hair maintenance.
Why Undercuts Work on Type 3 Curls
The undercut reveals your scalp and neck, which creates visual interest and a sense of lightness that works beautifully with the texture of type 3 curls on top. The shorter underneath doesn’t have to do any curl-definition heavy lifting; it just creates a clean contrast against the textured crown. This cut also has the practical benefit of using less product (only the top section needs curl products), and it’s incredibly low-maintenance because the shorter underneath has virtually no styling needs.
Styling and Maintenance Considerations
- Have the undercut cleaned up every 3-4 weeks to maintain crispness and intentionality
- Apply curl cream and gel only to the top section, concentrating on the crown and lengths
- Diffuse the top section thoroughly, then let it air-dry completely
- The undercut shows every bit of hair growth, so commitment to regular trims is essential
- Consider your comfort level with a bold, statement-making cut—this isn’t subtle or conservative styling
Insider note: This cut requires confidence and buy-in from your stylist—make sure they understand that undercuts on type 3 curls should look intentional and fashion-forward, not accidental or undercut-by-mistake.
11. The Graduated Shag With Movement
A graduated shag takes the shag concept but refines it slightly, with shorter pieces at the crown creating height and volume, then gradually longer pieces through the mid-lengths and ends. This creates a distinct graduated effect rather than random choppiness, and on type 3 curls, it’s incredibly flattering because the graduated layers naturally align with how your curl pattern breaks apart into different sections. This cut bridges the gap between textured and shaped, offering intentional styling while still feeling effortless.
Graduation and Curl Pattern Alignment
Graduated layers work beautifully on type 3 curls because each layer sits at a slightly different length, and your curl pattern naturally creates movement at those transition points. Rather than random choppiness, there’s a logical progression—shorter at the roots, gradually longer through the lengths—that creates a sense of intentional shape. This approach also prevents the common curly-hair problem of having too much weight at the ends, which can drag down curl definition and make styling feel heavy.
Styling a Graduated Shag
- Apply curl cream to soaking-wet hair and scrunch upward with the product to encourage coil formation
- Diffuse with medium heat, allowing the crown to dry first (shorter pieces) and the lengths to follow
- Use your fingers to separate layers while diffusing to ensure each one dries distinctly rather than blending together
- On day two, refresh with curl spray and very light oil through the lengths, then scrunch gently
- This cut requires consistent nighttime protection to maintain the graduated shape—use a bonnet or silk pillowcase
Pro tip: This cut photographs beautifully from the back because the graduated layers create visual depth and movement that reads as intentional and well-styled in every angle.
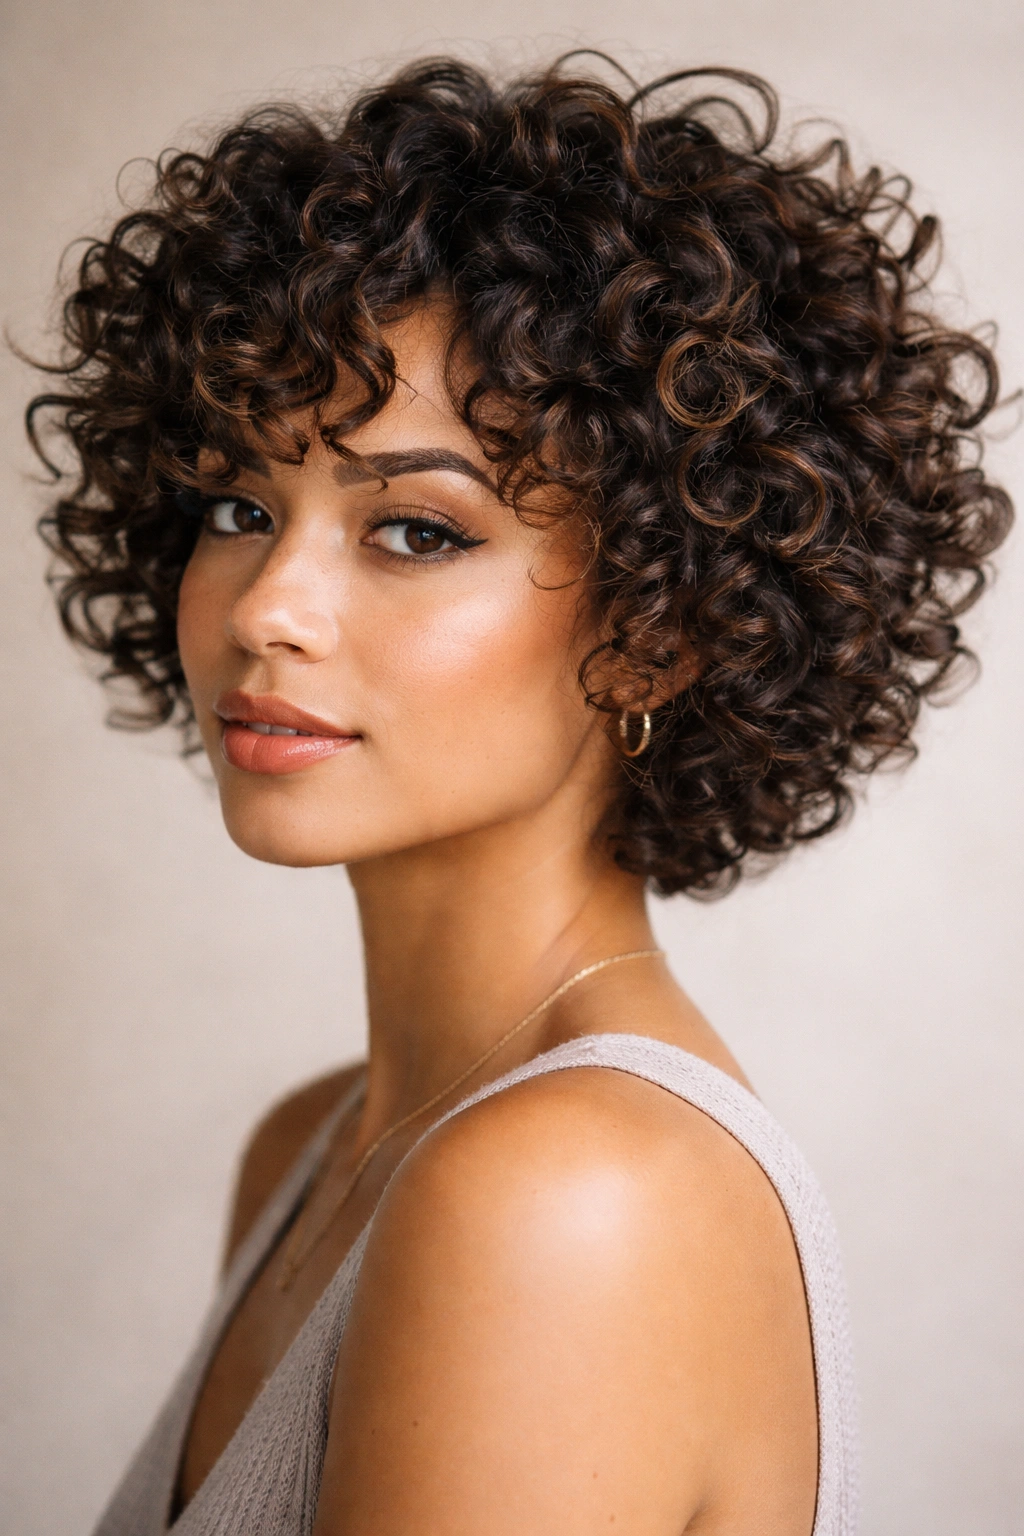
12. The Precise Chin-Length Bob With Texture
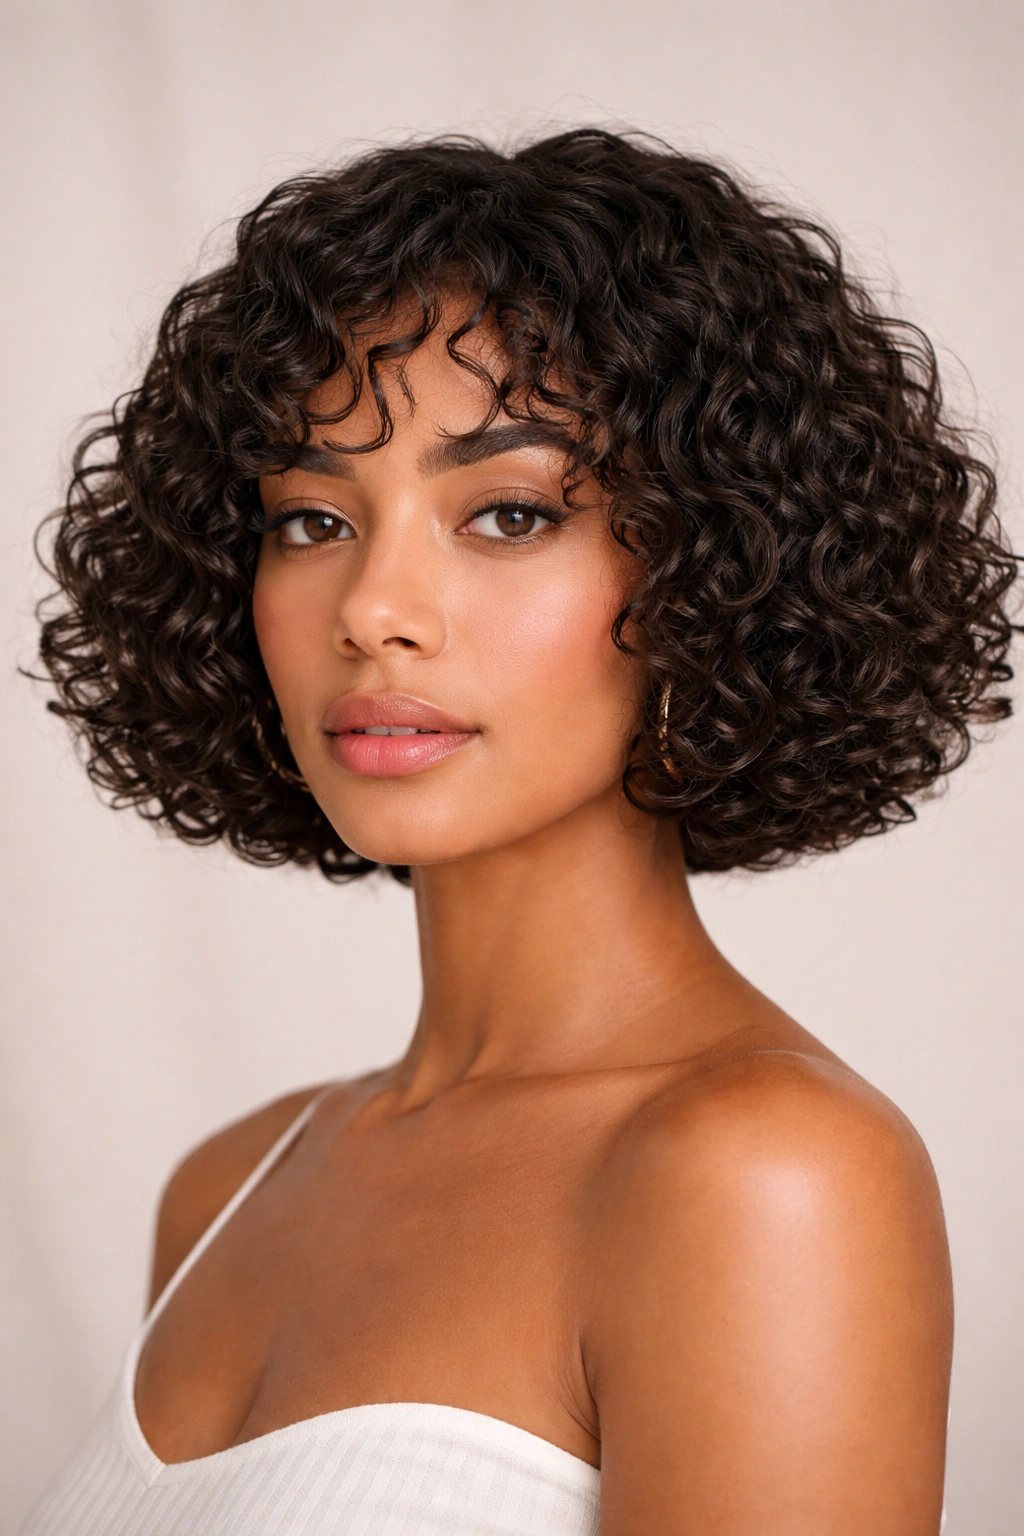
A precisely cut chin-length bob specifically designed for type 3 curls differs from a casual, choppy bob because it uses exact lengths and internal layering to create a shape that feels both polished and curl-friendly. The chin-length measurement puts it short enough to feel modern and easy to maintain, but long enough to show off substantial curl definition. This cut is perfect if you want something professional-looking and intentional that still celebrates your natural curl pattern.
Precision Cutting for Defined Curls
A precise chin-length bob works by using internal layers to remove weight while keeping the perimeter relatively neat—not blunt-cut, but more deliberate than a choppy, undone bob. On type 3 curls, this precision approach creates a silhouette that feels shaped and intentional while still allowing individual curls to express themselves. The internal layers prevent any heavy, dense appearance, and the defined perimeter (even if it’s textured) creates a sense of polish and purpose.
Styling a Precision Bob
- Cut the bob while your hair is dry so the stylist can account for shrinkage and see your actual curl pattern
- Apply curl cream and gel to soaking-wet hair, concentrating on roots and mid-lengths
- Diffuse with medium heat until about 80% dry, then allow air-drying to completion
- This cut benefits from weekly deep conditioning because the shorter length means more frequent trims and manipulation
- Tuck pieces behind your ears or style back for a polished, intentional look; or leave them forward and let them move naturally for a softer appearance
Real talk: This bob requires a follow-up trim every 6-8 weeks to maintain the precision and defined perimeter—it’s not a “grow it out and adapt” cut like some others; it’s a “maintain the shape” commitment.
Key Takeaways
The right short cut for your type 3 curls isn’t about following trends—it’s about understanding how your specific curl pattern responds to different lengths, layers, and shapes. Every single one of these cuts works beautifully on type 3 curls, but the best one for you depends on how much daily styling you actually want to do, your face shape, how much texture versus defined ringlets you prefer, and your lifestyle. A textured pixie demands different maintenance than a precise bob; a fade with textured top requires different product strategy than a graduated shag.
The most important step is finding a stylist who specializes in curly hair and can cut your curls while they’re dry, after you’ve washed and styled them the way you actually will at home. That’s how they see your true curl pattern, understand your actual shrinkage, and cut the shape that will actually work for you—not just in theory, but in practice on a Tuesday morning when you’re running late. A great curly-hair stylist is genuinely worth investing in, because the difference between a cut that’s designed for your curls and a cut that just happens to work on them is night-and-day.
Once you’ve got the cut, the styling consistency matters more than product perfection. Whether you’re using high-end curl cream or an affordable drugstore option, applying it to soaking-wet hair, using a diffuser, and allowing your curls to air-dry the final percentage makes an enormous difference in how your cut looks and performs. Type 3 curls are forgiving and rewarding once you’ve got the foundation right—a good cut plus consistent styling approach means you’ll spend less time fighting your hair and more time actually enjoying it.