There’s something about wedding day hair that goes beyond just looking polished—it’s about feeling like yourself but elevated. The right hairstyle frames your face, complements your dress, stays secure through hours of celebration, and photographs beautifully under every type of lighting. Whether you’re the bride, a member of the wedding party, or a guest attending a special celebration, your hair choice sets the tone for how confident and stunning you feel all day long.
What makes wedding hair different from everyday styles is the combination of durability, elegance, and personalization. Your hair needs to withstand hugs, dancing, outdoor weather, and potentially emotional moments—all while maintaining that fresh, intentional look from ceremony to last dance. At the same time, wedding hairstyles offer the perfect permission to try something you might not wear on a regular Tuesday, whether that’s dramatic volume, intricate braiding, a statement accessory, or a bold departure from your usual length and texture.
The beauty of modern wedding hair is that there’s no single “correct” choice. Short pixie cuts can look just as elegant and intentional as flowing waves down to your waist. An architectural updo works just as well as a soft, romantic half-up style. What matters is finding the style that makes you feel incredible and that actually works with your hair texture, face shape, and the overall vision you’ve created for the day. Let’s explore 25 wedding hairstyle options that span from daring short cuts all the way to luxurious long waves—so you can find the approach that feels authentically you.
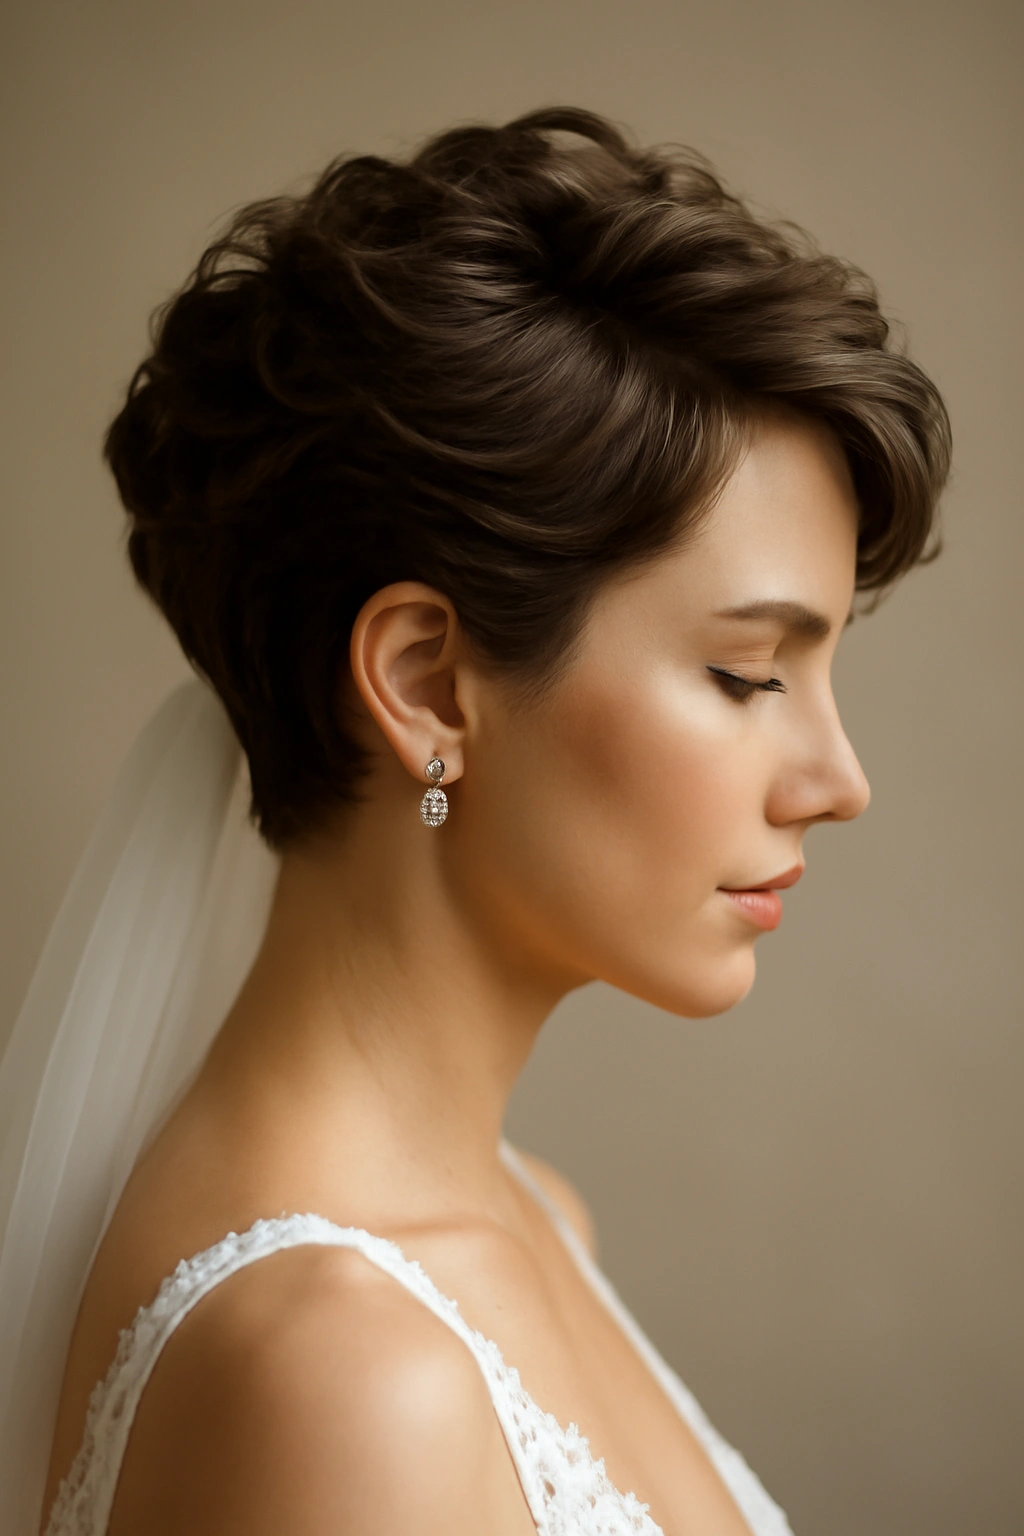
1. Modern Pixie with Embellished Details
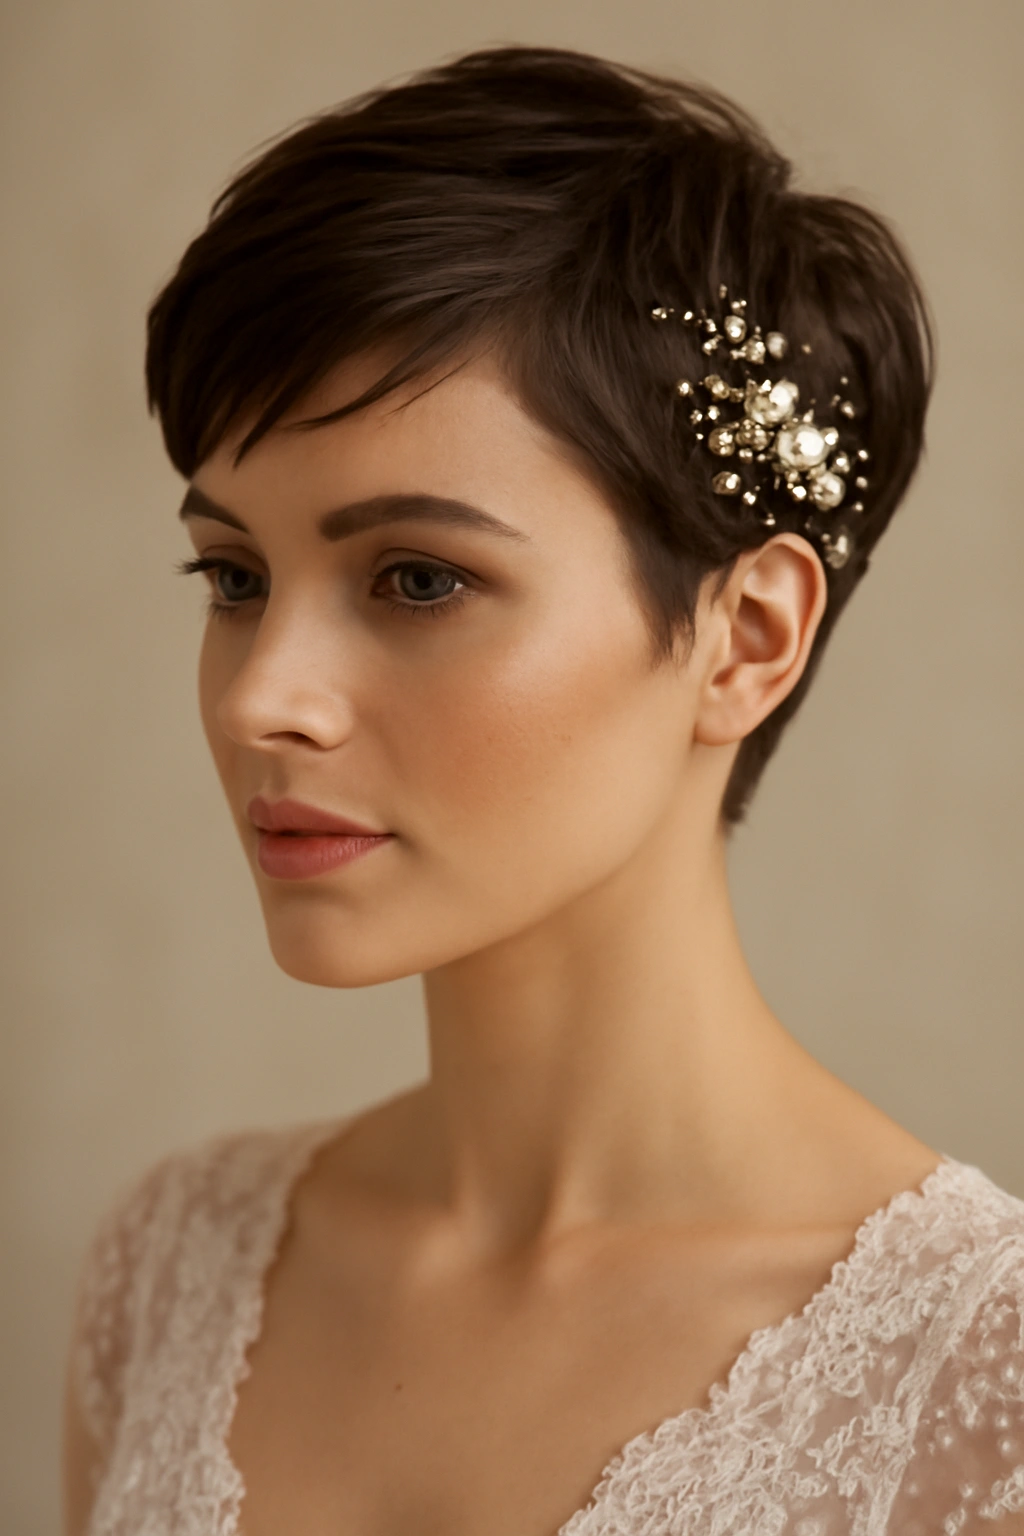
A well-cut pixie is far from plain or too casual for a wedding—when it’s paired with intentional styling and the right accessories, it becomes a statement of elegance and confidence. Modern pixies for weddings often feature slightly longer length on top (around 2-3 inches) with carefully shaped sides, creating a flattering silhouette that works across different face shapes. The key to making a pixie feel wedding-appropriate rather than everyday is all in the polish and adornment.
Why This Works for Weddings
A pixie allows your facial features, jewelry, and makeup to be the absolute star of the show—there’s no competition from hair volume. It’s incredibly practical for warm weather celebrations, outdoor ceremonies, or any bride who wants maximum comfort without sacrificing impact. The style also feels bold and intentional, signaling confidence and sophistication.
Styling and Accessory Ideas
- Add a delicate wire tiara, pearl-studded hair comb, or decorative hair clips scattered through the sides and back
- Style with subtle waves or texture using a curling iron to add dimension and softness
- Apply shine serum for a luminous finish that photographs beautifully
- Consider a sleek, gel-slicked look for a more architectural, modern aesthetic
- Pair with chandelier earrings, a statement lip, or dramatic eye makeup to balance the short length
Pro tip: A pixie actually photographs remarkably well—the clean lines catch light beautifully, and you’ll see your face and smile clearly in every photo without hair obscuring details.
2. Sleek Blunt Bob with Side Part

The blunt bob is having a major moment in wedding fashion, and for good reason—it’s modern, wearable, and surprisingly versatile. A well-cut blunt bob sits around chin length or just below, with a geometric precision that feels intentional and polished. The side part adds an elegant asymmetrical element that can be subtle or dramatic depending on how far you part and style it.
Why This Works for Weddings
This style bridges the gap between modern and timeless. It photographs sharply, requires relatively low maintenance throughout the day, and works beautifully with a wide range of face shapes, dress styles, and wedding aesthetics. The straight lines convey sophistication and intention, while the clean cut shows that serious thought went into the look.
Styling and Accessory Ideas
- Style with a deep side part and keep the lines sharp and polished
- Add a thin metallic or pearl hair comb just above the ear on the shorter side
- Tuck one side gently behind the ear to show off that side part and facial features
- Keep the texture smooth and luminous with a quality shine spray
- A simple clip or barrette at the back can add interest without overwhelming the clean lines
- This style pairs beautifully with minimal jewelry since the hairline is so visible
Pro tip: A blunt bob needs to be cut perfectly for a wedding—book your stylist at least two weeks before the event to ensure the cut is fresh and sharp. If your natural hair texture is wavy, ask about blow-dry styling techniques the night before, or plan to have your stylist blow it straight on the morning of.
3. Textured Shag with Face-Framing Layers
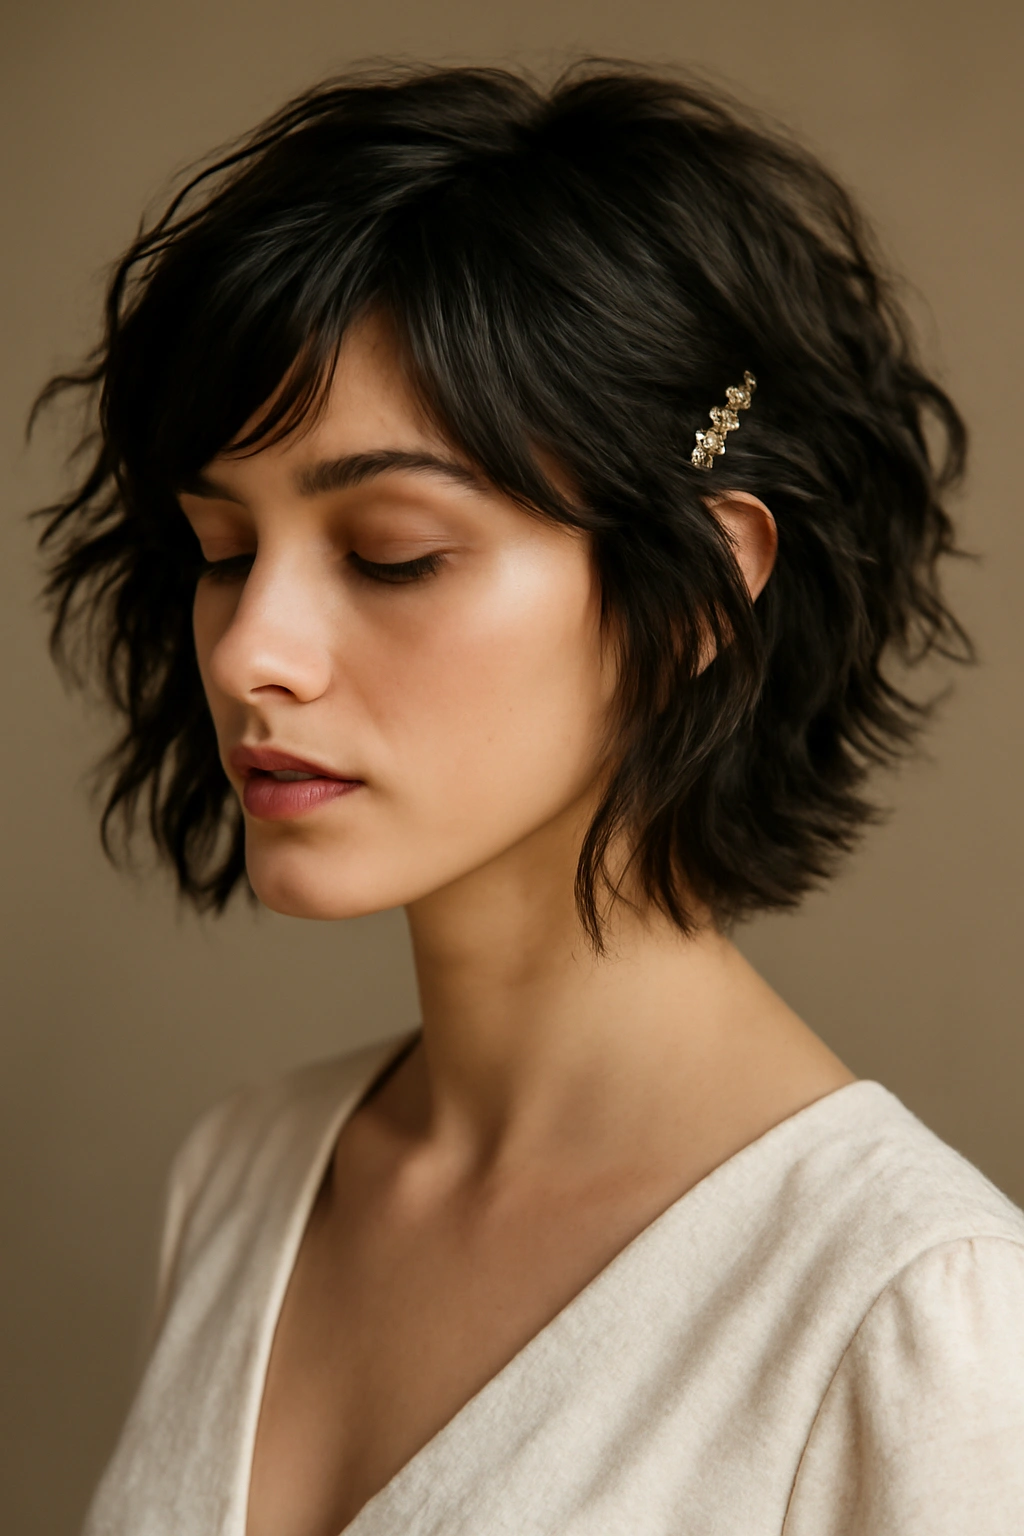
The shag has evolved beyond its 1970s reputation and now appears regularly on red carpets and at sophisticated celebrations. A modern wedding shag features choppy layers throughout that create movement and dimension, with slightly longer face-framing pieces that soften the overall look. The texture is intentional—this isn’t a blunt cut, but rather a deliberately layered approach that celebrates dimension and movement.
Why This Works for Weddings
A textured shag feels contemporary and edgy while still being romantic and flattering. The layers catch light beautifully in photographs, the face-framing pieces complement most face shapes, and the overall effect is one of effortless elegance. This style works particularly well for brides with naturally wavy or curly hair who want to lean into their texture rather than fight it.
Styling and Accessory Ideas
- Enhance the natural texture with soft waves using a curling iron, or embrace your hair’s natural movement
- Add a delicate hair clip or comb on one side to anchor some of the layers
- Consider a thin metallic hair tie or silk scrunchie to loosely gather some of the texture at the nape if desired
- A single statement earring or cascading earring works beautifully with the exposed neckline this style creates
- Pair with a flowing, romantic dress for maximum impact
Pro tip: Schedule a styling consultation with your stylist specifically to discuss how your natural texture will interact with humidity, movement, and time. Test the style at least once before the wedding so you know exactly how it will behave.
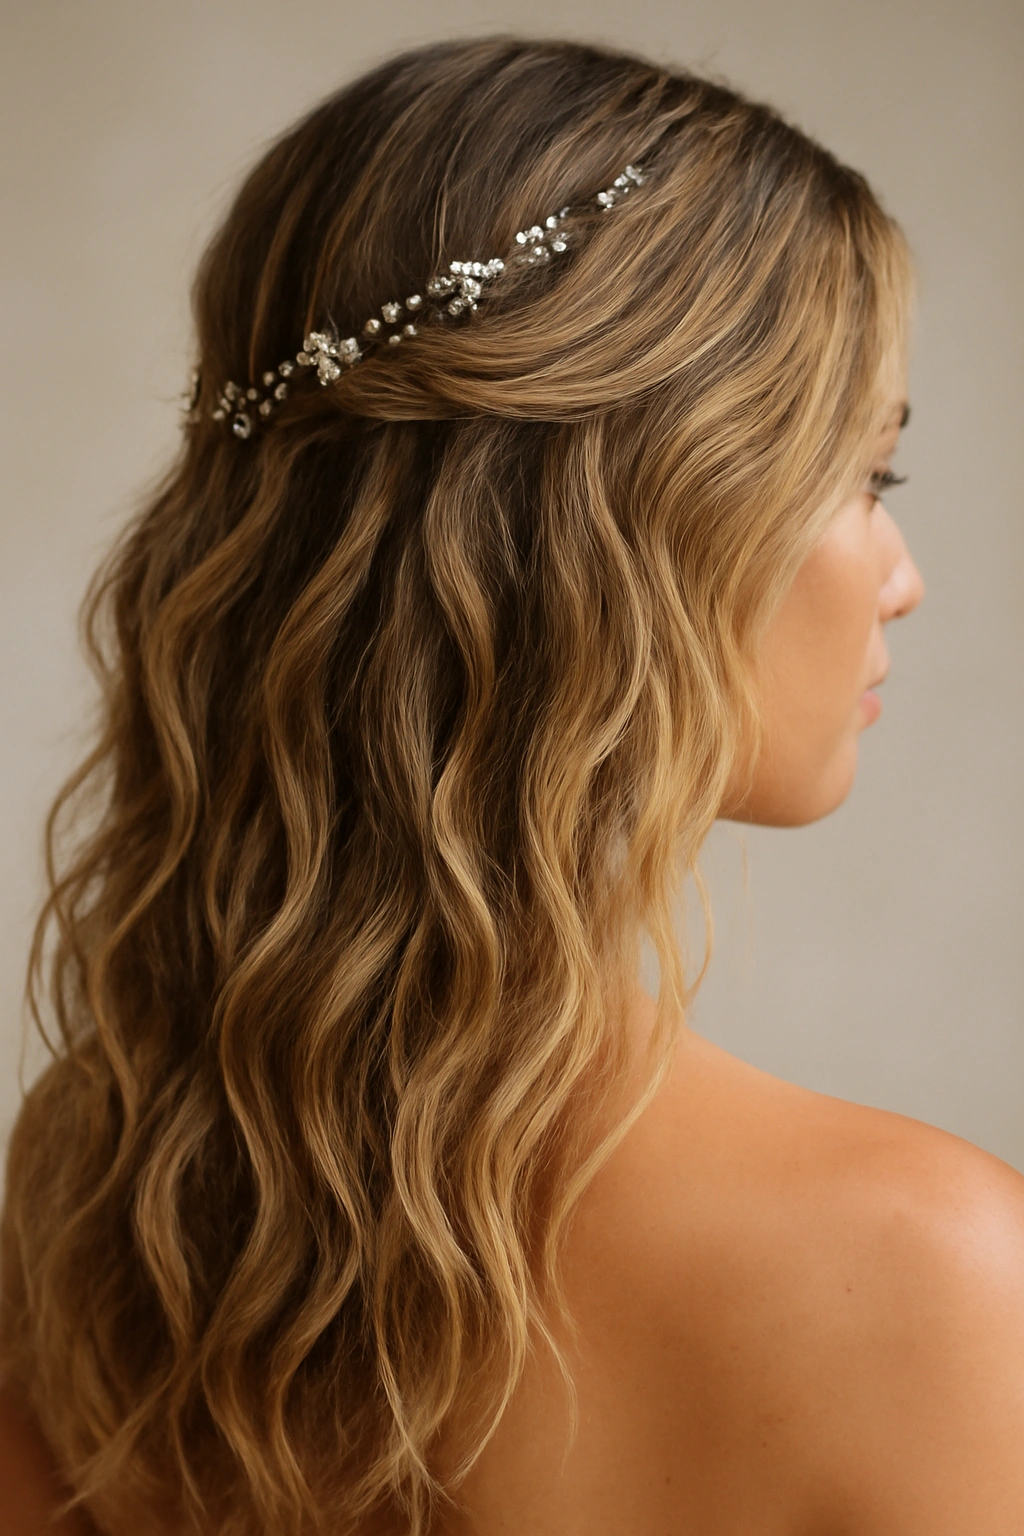
4. Romantic Waves with Loose Curls
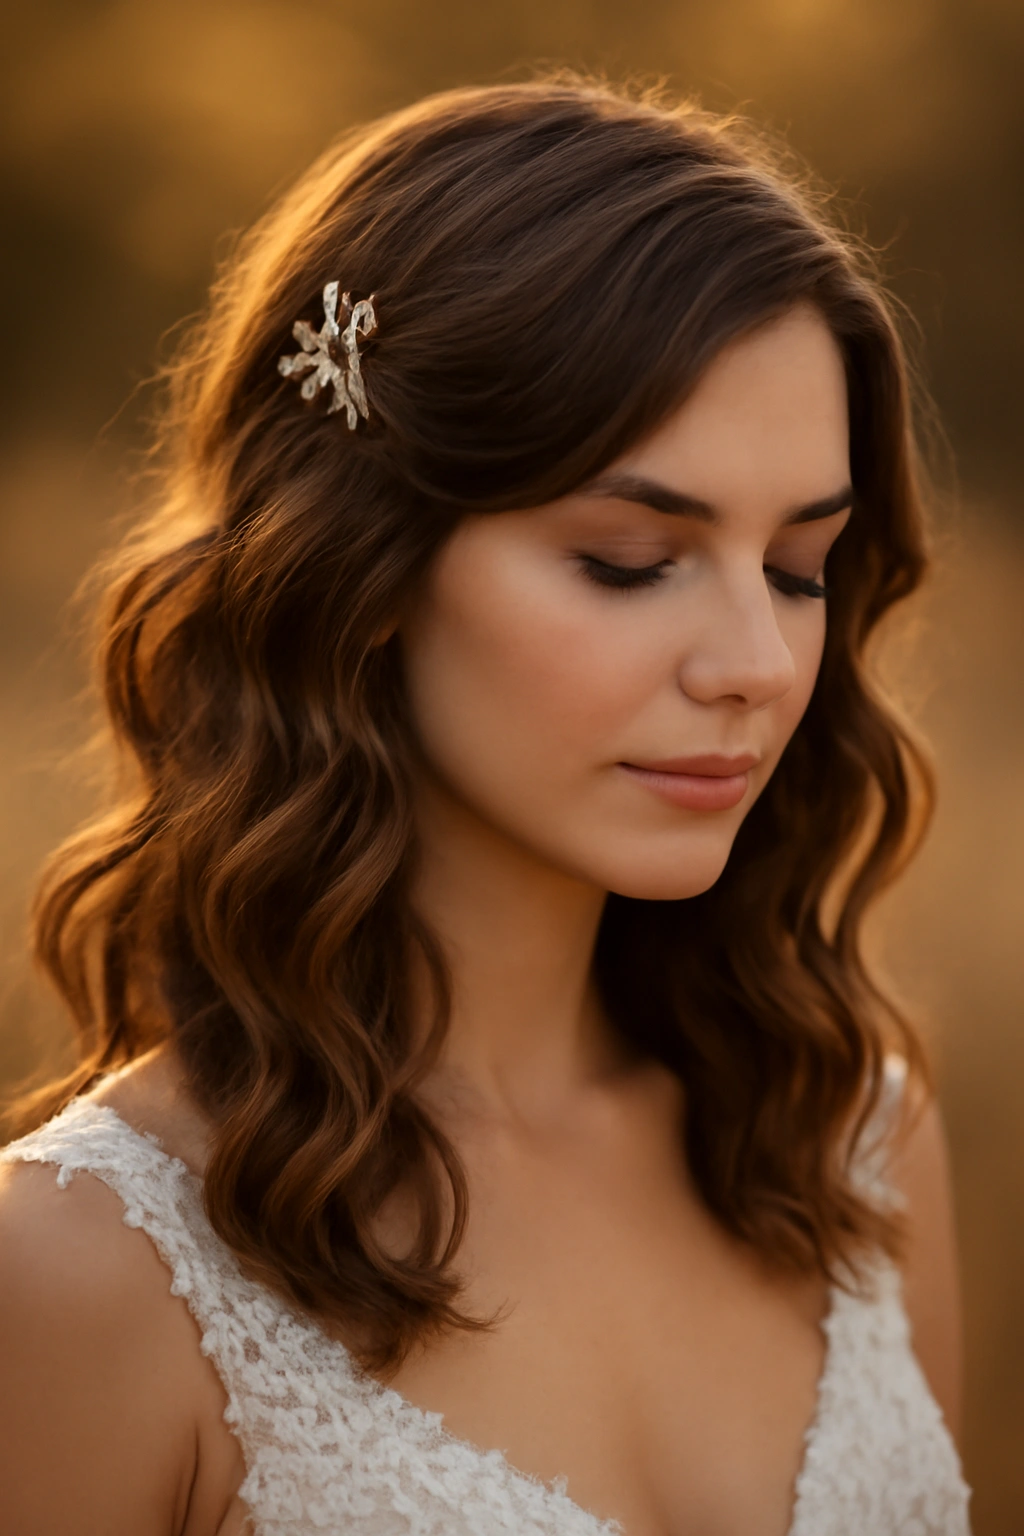
Soft, romantic waves remain a classic wedding choice because they’re universally flattering, photograph beautifully, and work across virtually every dress style and wedding aesthetic. The key to modern romantic waves is that they should look effortless rather than overly controlled—think soft movement and dimension rather than tight, uniform curls. This style works at any length from shoulder-length to floor-length hair.
Why This Works for Weddings
Waves frame the face beautifully, add volume and dimension without being dramatic, and convey romance without being overly fussy. The movement catches light wonderfully in photographs, especially during golden hour, and the soft nature of the style makes it feel accessible and beautiful rather than costume-like. Waves also tend to hold well throughout a long day of celebration.
Styling and Accessory Ideas
- Create waves using a combination of a large-barrel curling iron or waver for loose, piece-y curls
- Brush through gently to soften the curls into waves rather than defined ringlets
- Tease gently at the crown for subtle volume
- Add a delicate hair comb, thin headband, or small decorative clip on one side
- Consider a hair vine or delicate gold piece woven subtly into the waves
- A simple silk hair tie or decorative claw clip can create a half-up variation of this style
Pro tip: Waves hold much longer when you style hair that’s been lightly texturized or when you use the right texturizing product before curling. Ask your stylist about products that will help your waves last 8+ hours without looking stiff.
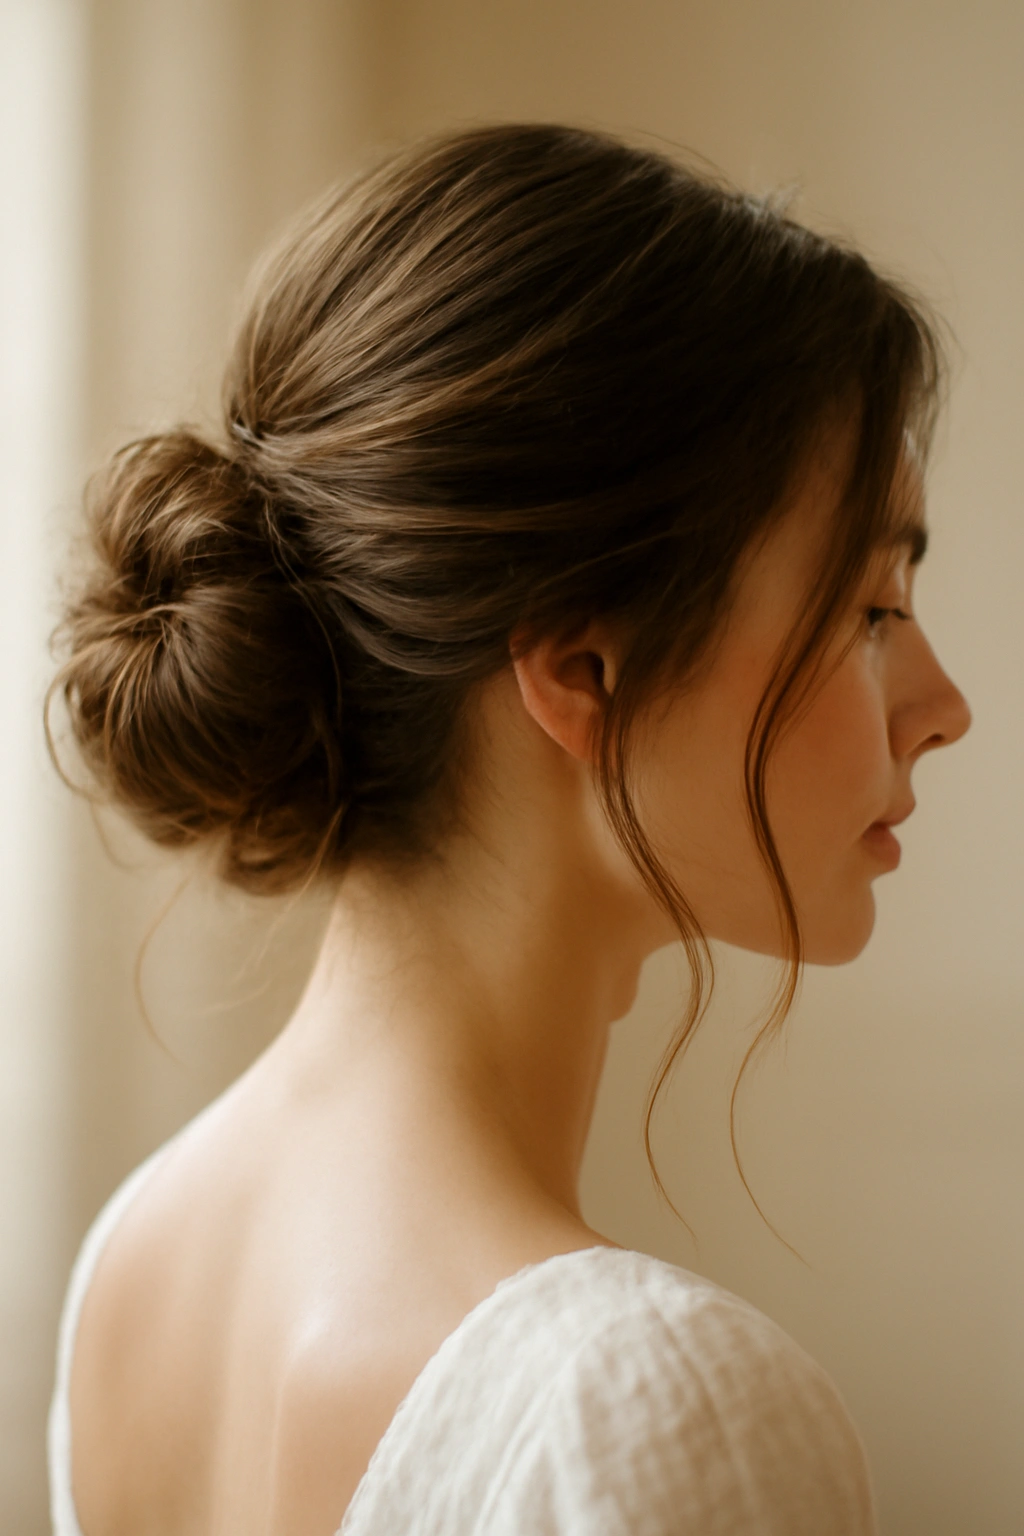
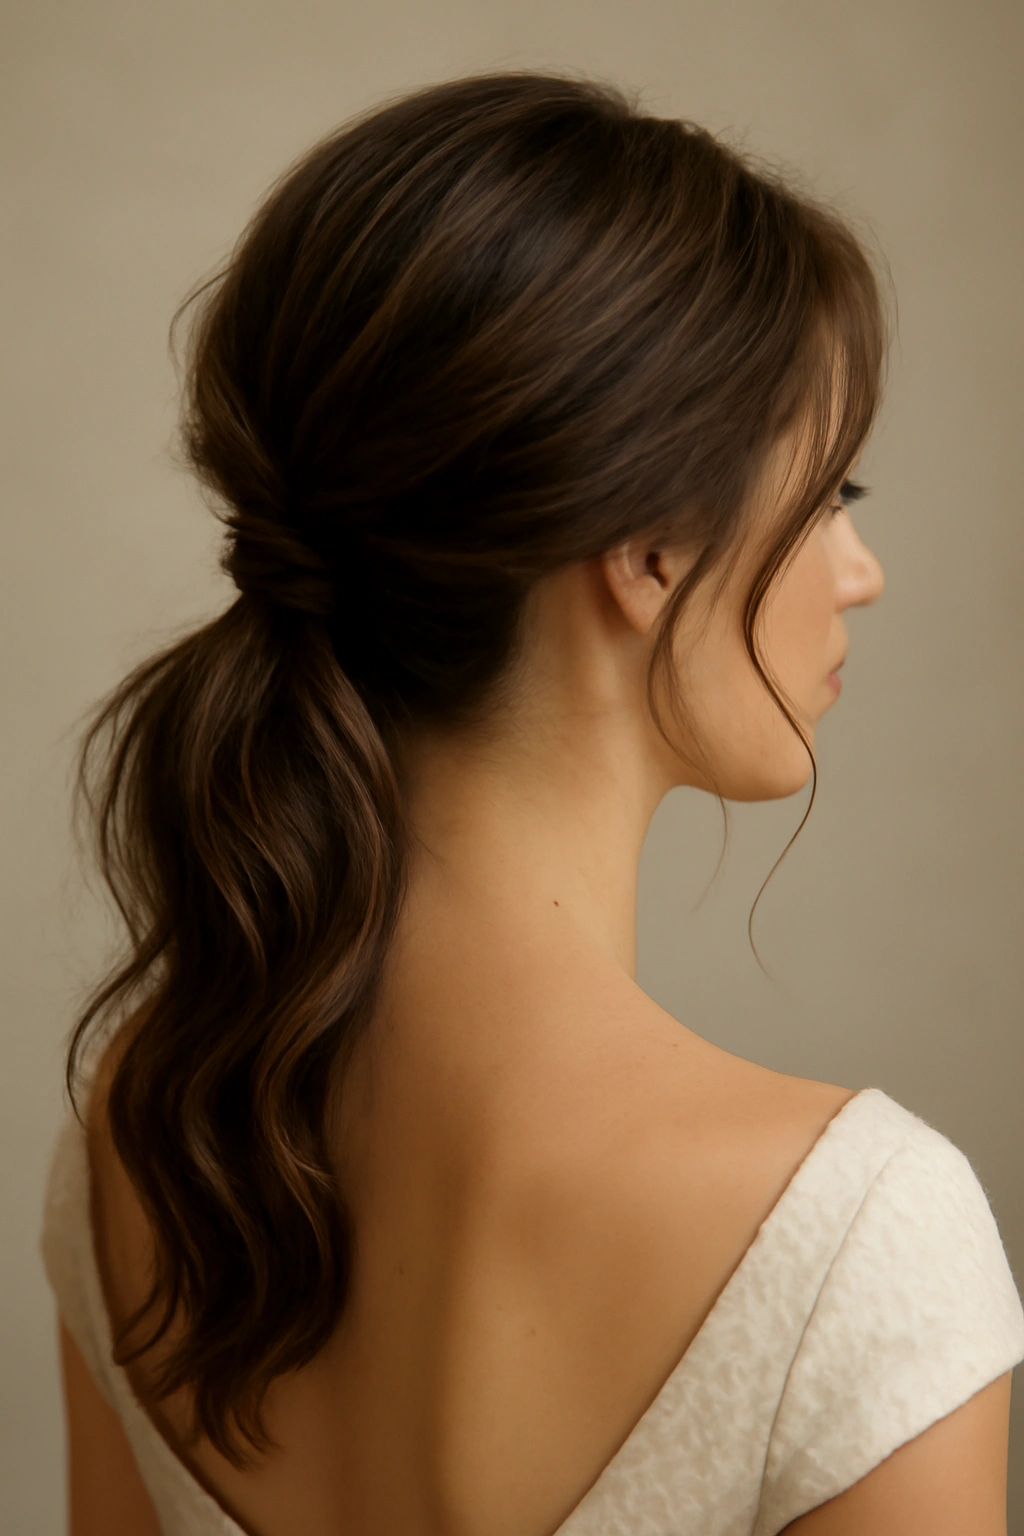
5. Low Bun with Cascading Tendrils
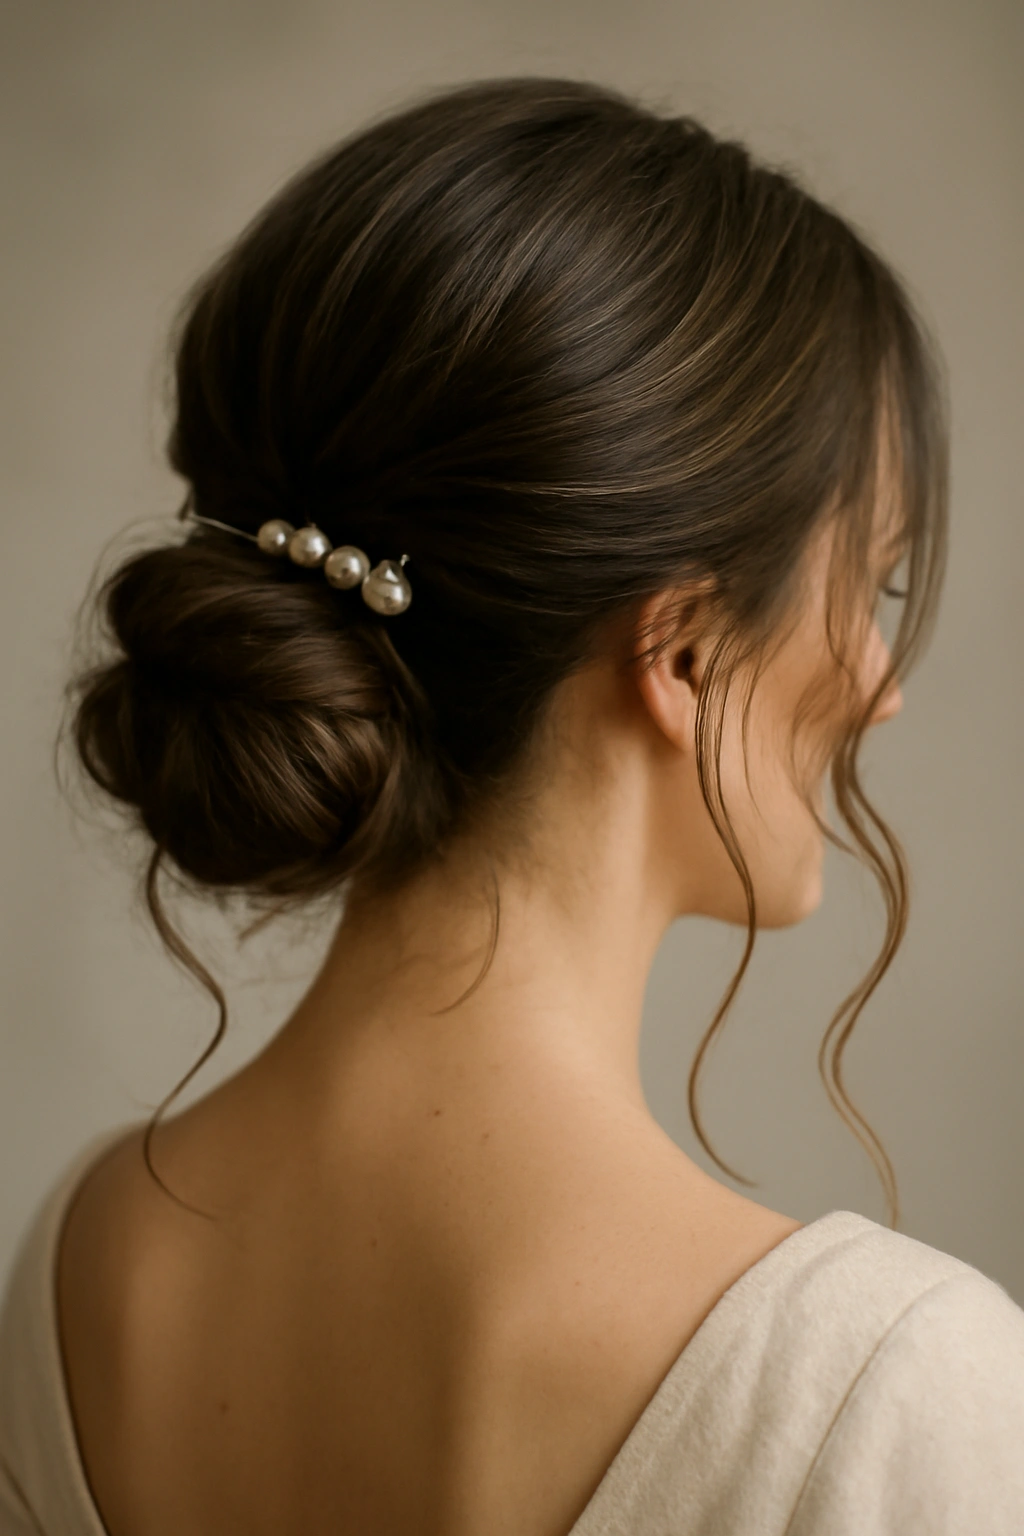
A low bun is the sophisticated answer for those who want elegance and practicality combined. The key to making it feel wedding-worthy rather than corporate is to keep the bun intentionally soft and loose, with strategically placed face-framing tendrils that escape the base of the bun. This style offers the best of both worlds—secure, polished hair that also feels romantic and intentional.
Why This Works for Weddings
A low bun is incredibly practical—it keeps hair off your face and neck while remaining completely wedding-appropriate. The style showcases your facial features, jewelry, and the neckline or back of your dress depending on how you style it. The softness comes from texture, not-too-tight tension, and those cascading tendrils that add movement and romance to an otherwise structured look.
Styling and Accessory Ideas
- Create the bun using a texturized wave or loose curl rather than starting from straight hair
- Position it low at the nape, slightly off-center for a more romantic feel
- Pull out 2-3 soft tendrils around the face and gently curl them
- Secure with bobby pins and a light-hold hairspray to allow some movement
- Add a decorative comb, jeweled hair stick, or pearl pins directly into the bun structure
- Consider a delicate hair vine or pearl drop clip positioned at the base where the tendrils meet the bun
Pro tip: Practice your bun placement and tendency before the wedding day. Some buns look best positioned lower and off to one side, while others feel better more centered—it depends on your dress, your face shape, and what feels comfortable to you.
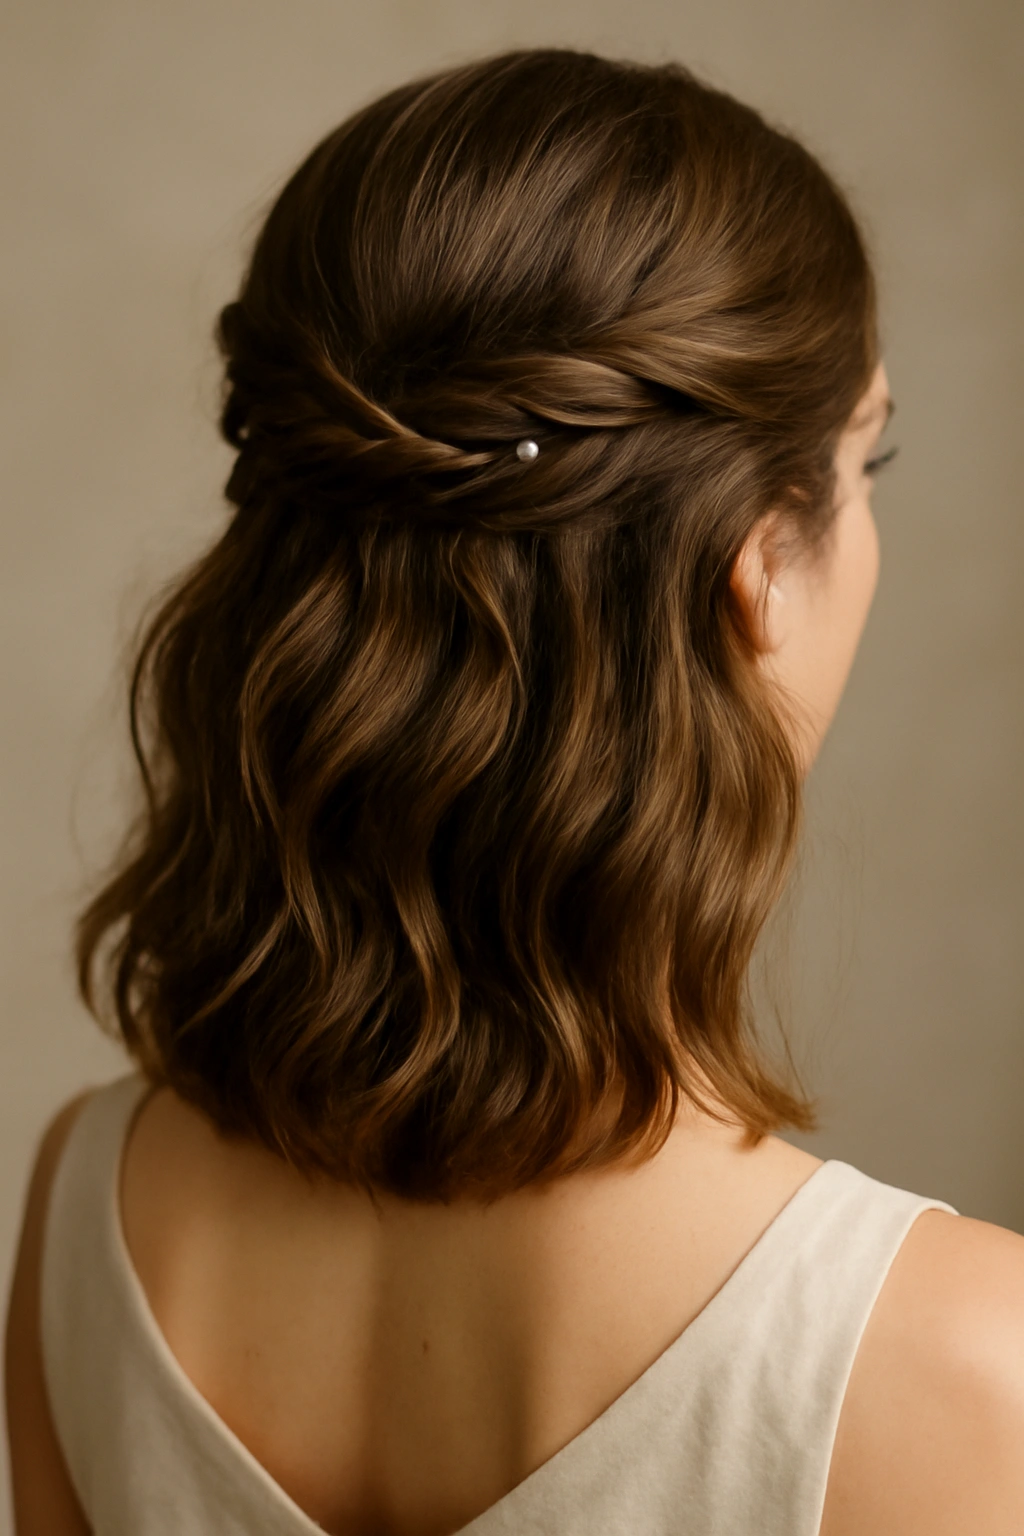
6. Half-Up Half-Down with Pearl Clips
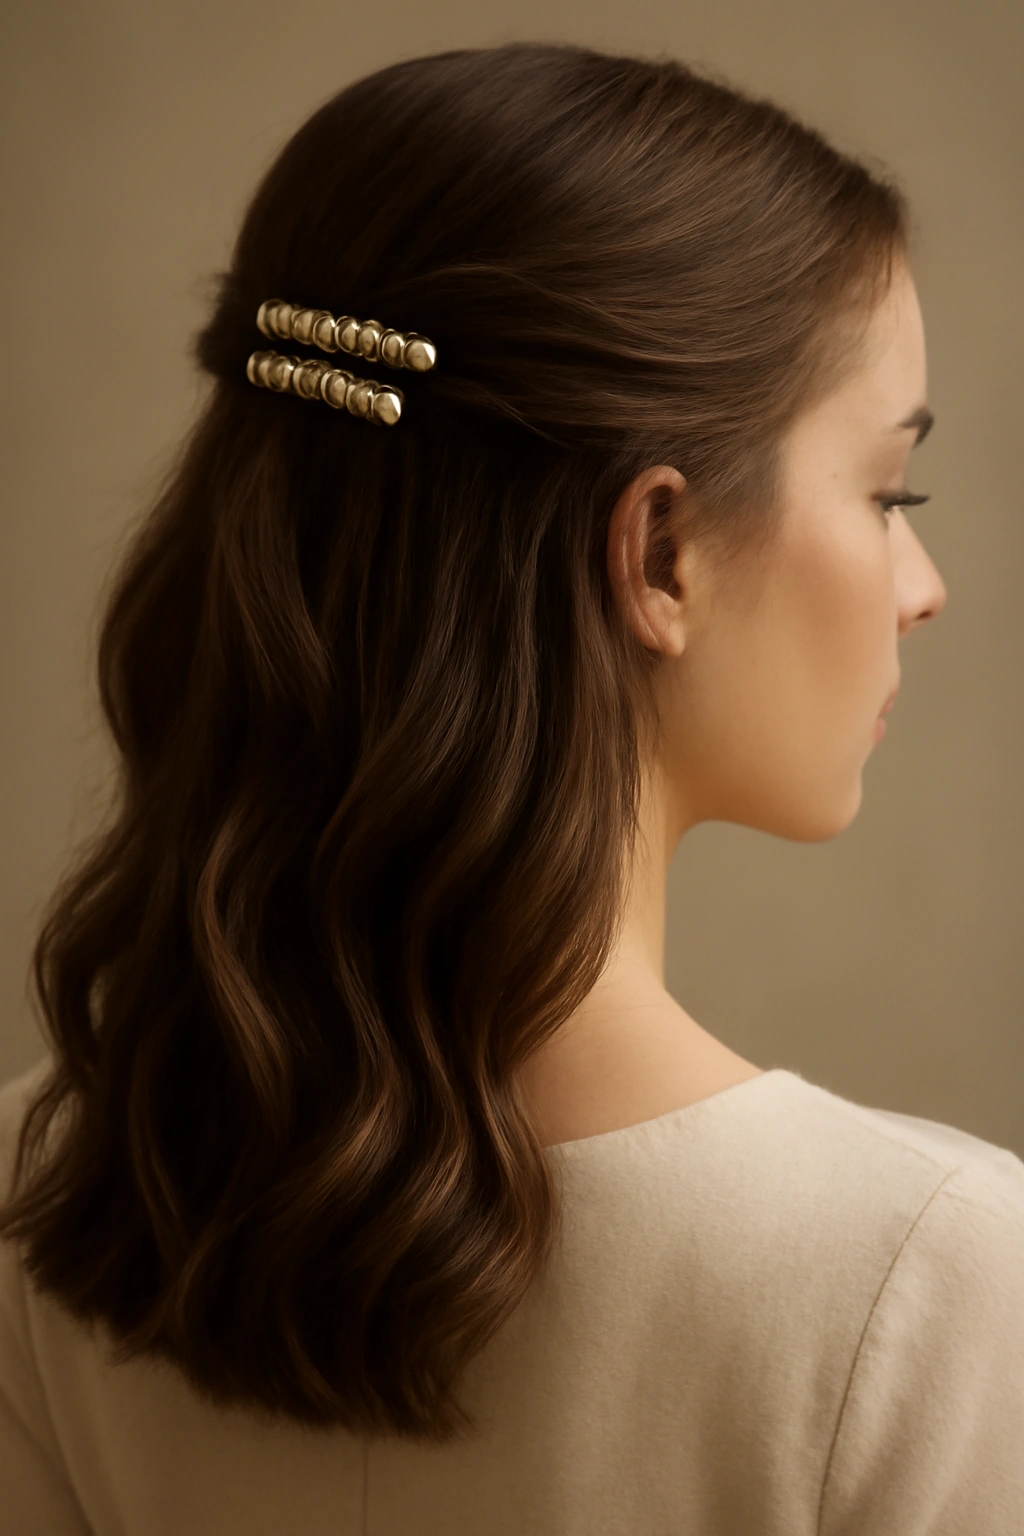
The half-up half-down style has become hugely popular for weddings because it offers the best of both worlds—volume and movement below, a pulled-back polished area on top that keeps hair off your face. When you add delicate pearl clips or vintage-inspired barrettes to secure the half-up section, it instantly becomes wedding-appropriate rather than casual.
Why This Works for Weddings
This style is incredibly romantic and forgiving—it works with nearly any hair length, texture, and face shape. The pulled-back portion keeps hair elegantly off your face without requiring a full updo, and the released hair below creates beautiful movement and volume. Pearl clips add just the right touch of elegance and intentionality, signaling that this is a special-occasion look.
Styling and Accessory Ideas
- Start with soft waves or curls throughout for texture and movement
- Section out the hair from temple to temple across the crown and gently pull back
- Secure with 2-3 decorative pearl clips or vintage barrettes positioned across the back of the gathered section
- Leave the sides softly framing the face rather than pulling them back too tightly
- Let the rest of your hair fall in loose waves down your back and shoulders
- Consider adding a delicate hair vine or pearl pin among the released hair below the clips for extra detail
Pro tip: The weight distribution of this style matters—if you have very thick or very long hair, you might need to gently tease the crown before pulling back to add grip and prevent the clips from slipping throughout the day.
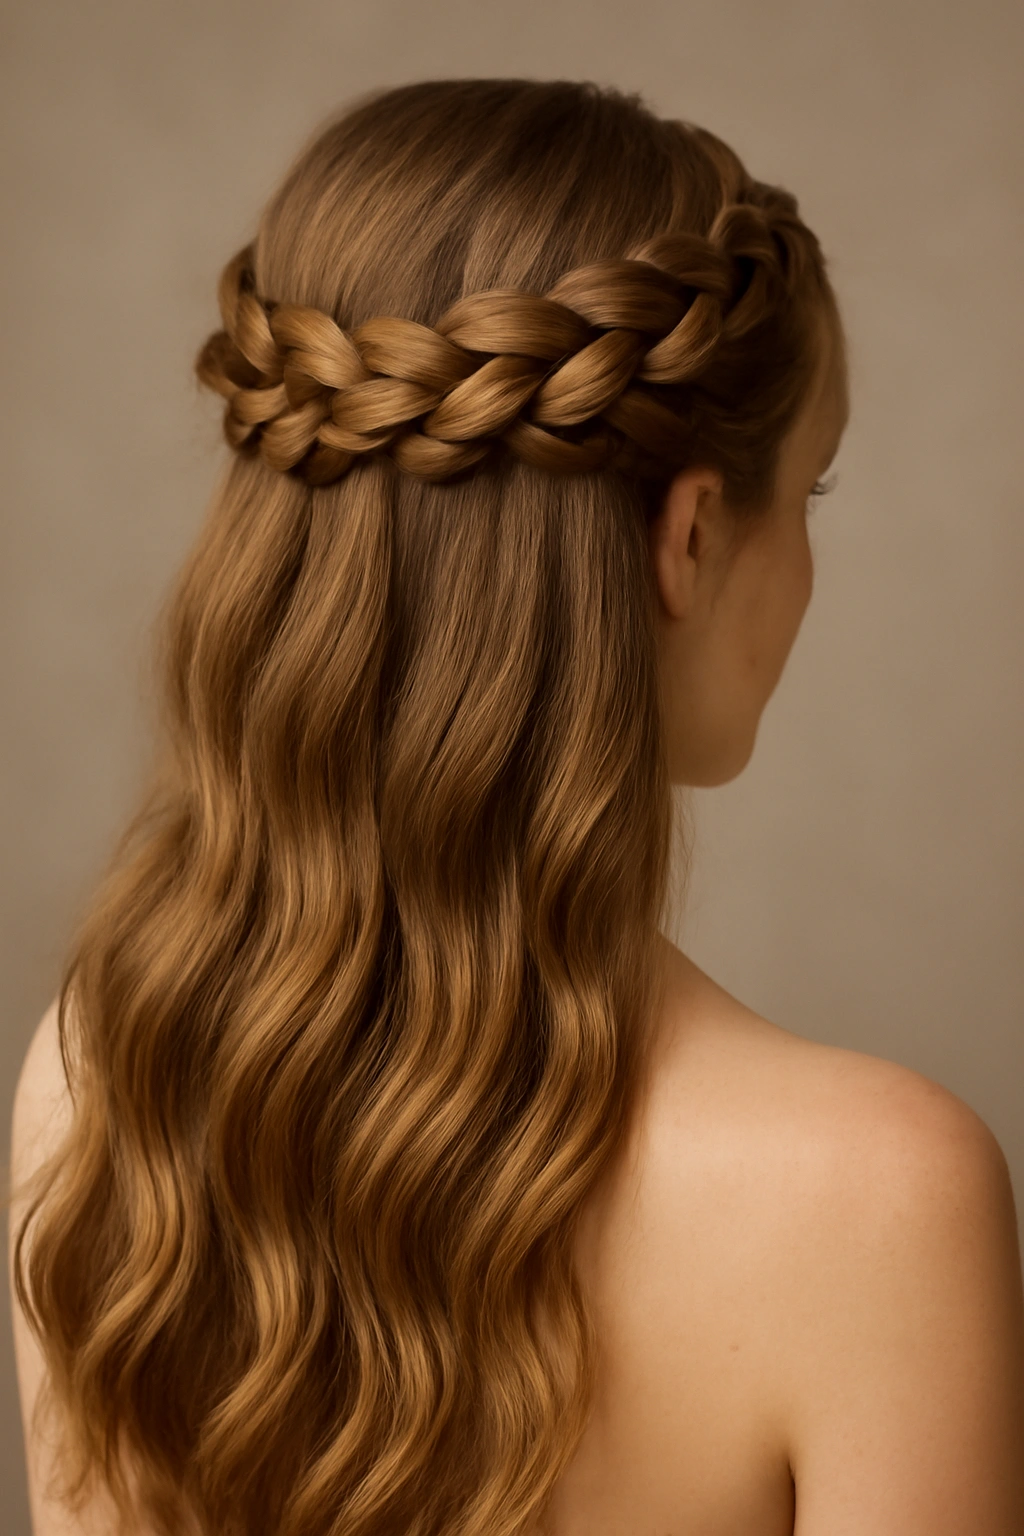
7. Braided Crown Style
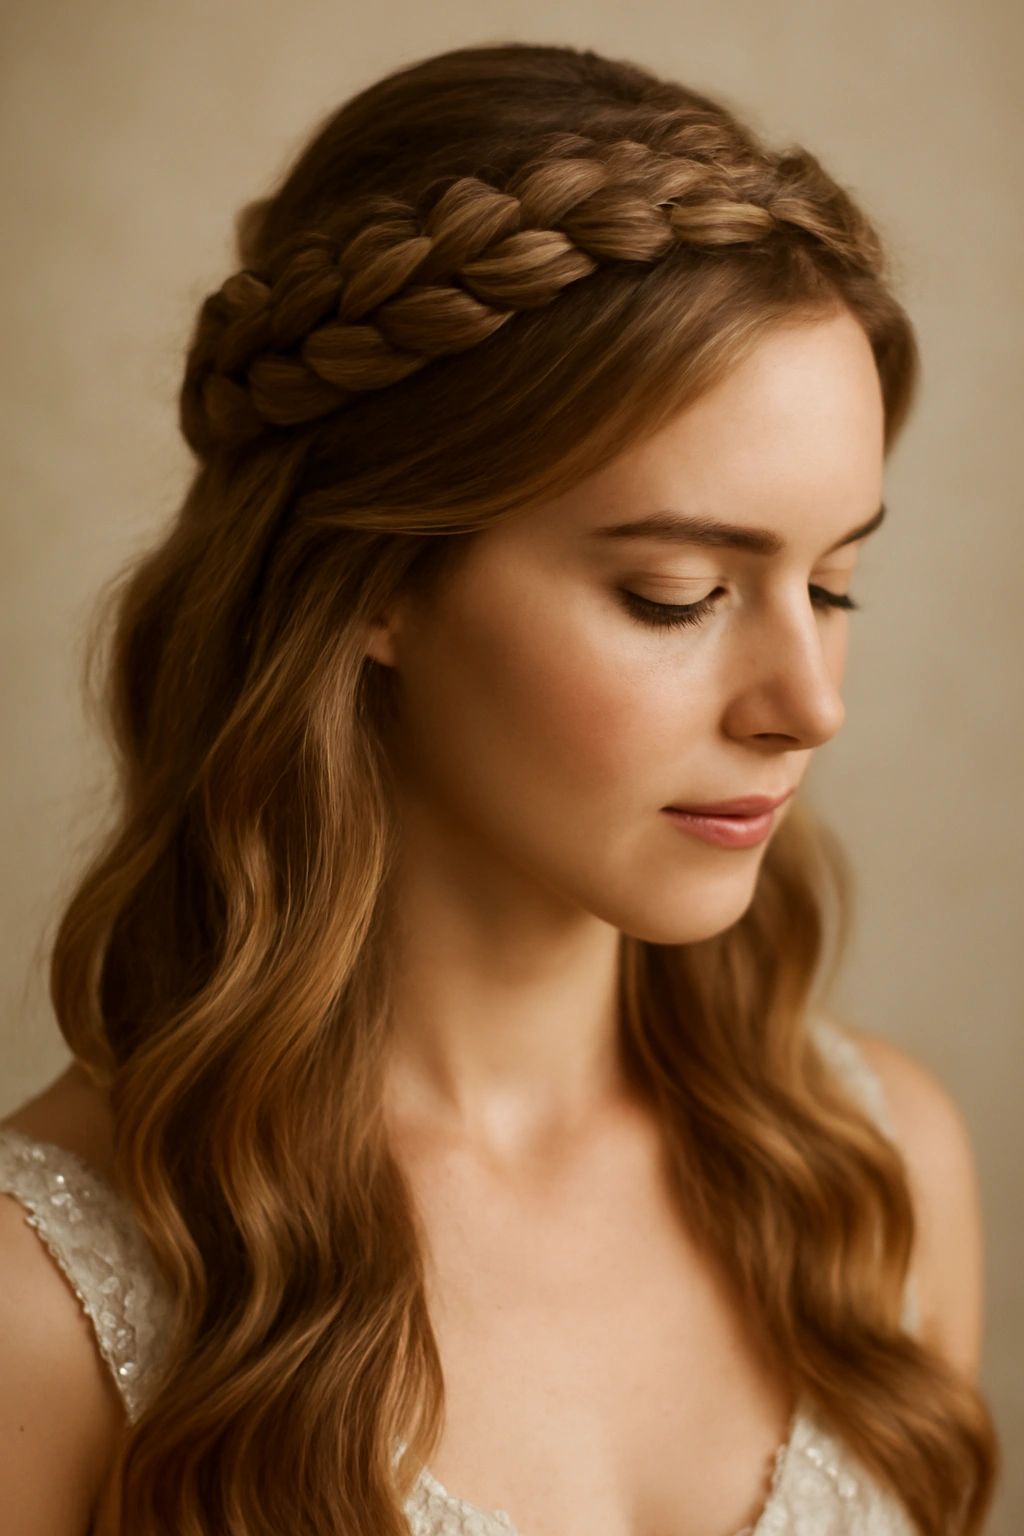
A braided crown is perhaps one of the most romantic and intentional-looking hairstyles available, yet it’s surprisingly approachable. The crown braid runs across the top of the head, anchoring the hair and creating an effortless, ethereal effect. This style works beautifully with long hair (shoulder length or longer) and looks particularly lovely when paired with soft waves flowing below.
Why This Works for Weddings
A braided crown feels fairytale-like without being costume-y. It’s elegant, intentional, and deeply romantic. The style is also quite practical—it keeps hair off your face and neck while creating maximum visual interest. A crown braid photographs beautifully from every angle and works equally well whether your hair is loose below or gathered into a bun.
Styling and Accessory Ideas
- Create two French braids starting from each temple and braid backward toward the center back of the head
- Weave baby’s breath, small flowers, or delicate pearl strands directly into the braids as you create them
- Secure the braids at the back and allow the remaining hair to flow loose in waves
- Alternatively, gather the loose hair into a low bun beneath the braids for a more structured look
- Add a thin hair vine or delicate gold piece woven through the braids for subtle sparkle
- Small pearl pins or clips can secure any flyaways and add intentional detail
Pro tip: If you’re nervous about braiding, ask your stylist to create the crown braid the day before if possible, let it set in that loose braid overnight, then gently release and restyle it the morning of your event. This creates a beautifully textured, romantic effect.
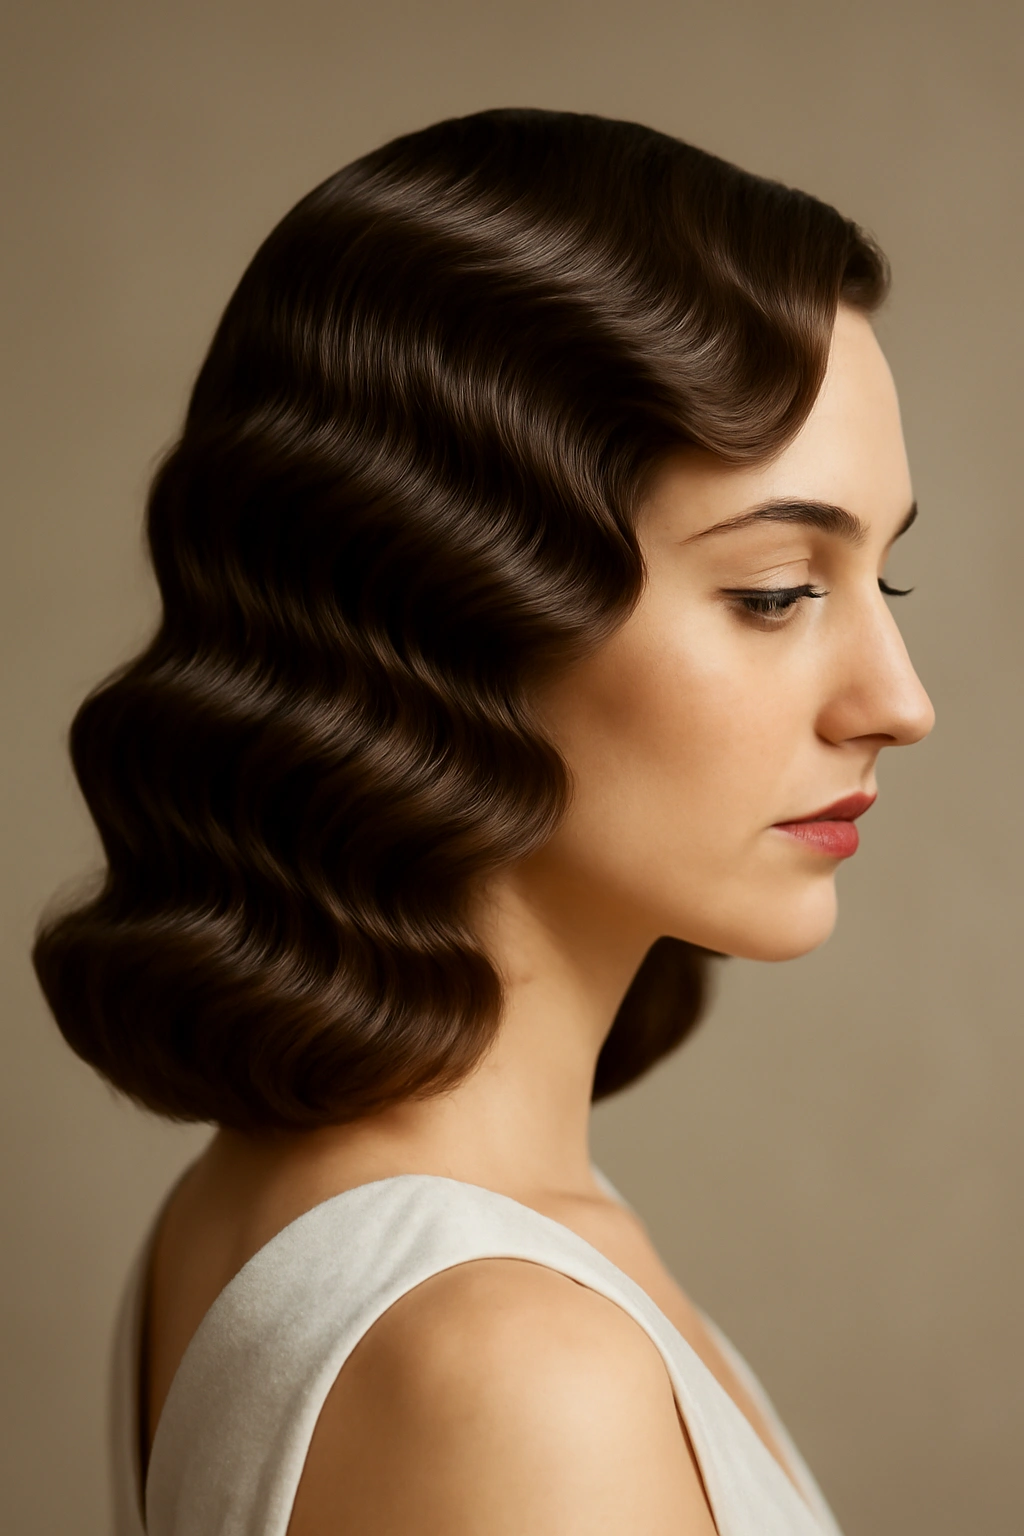
8. Deep Side Part Finger Waves
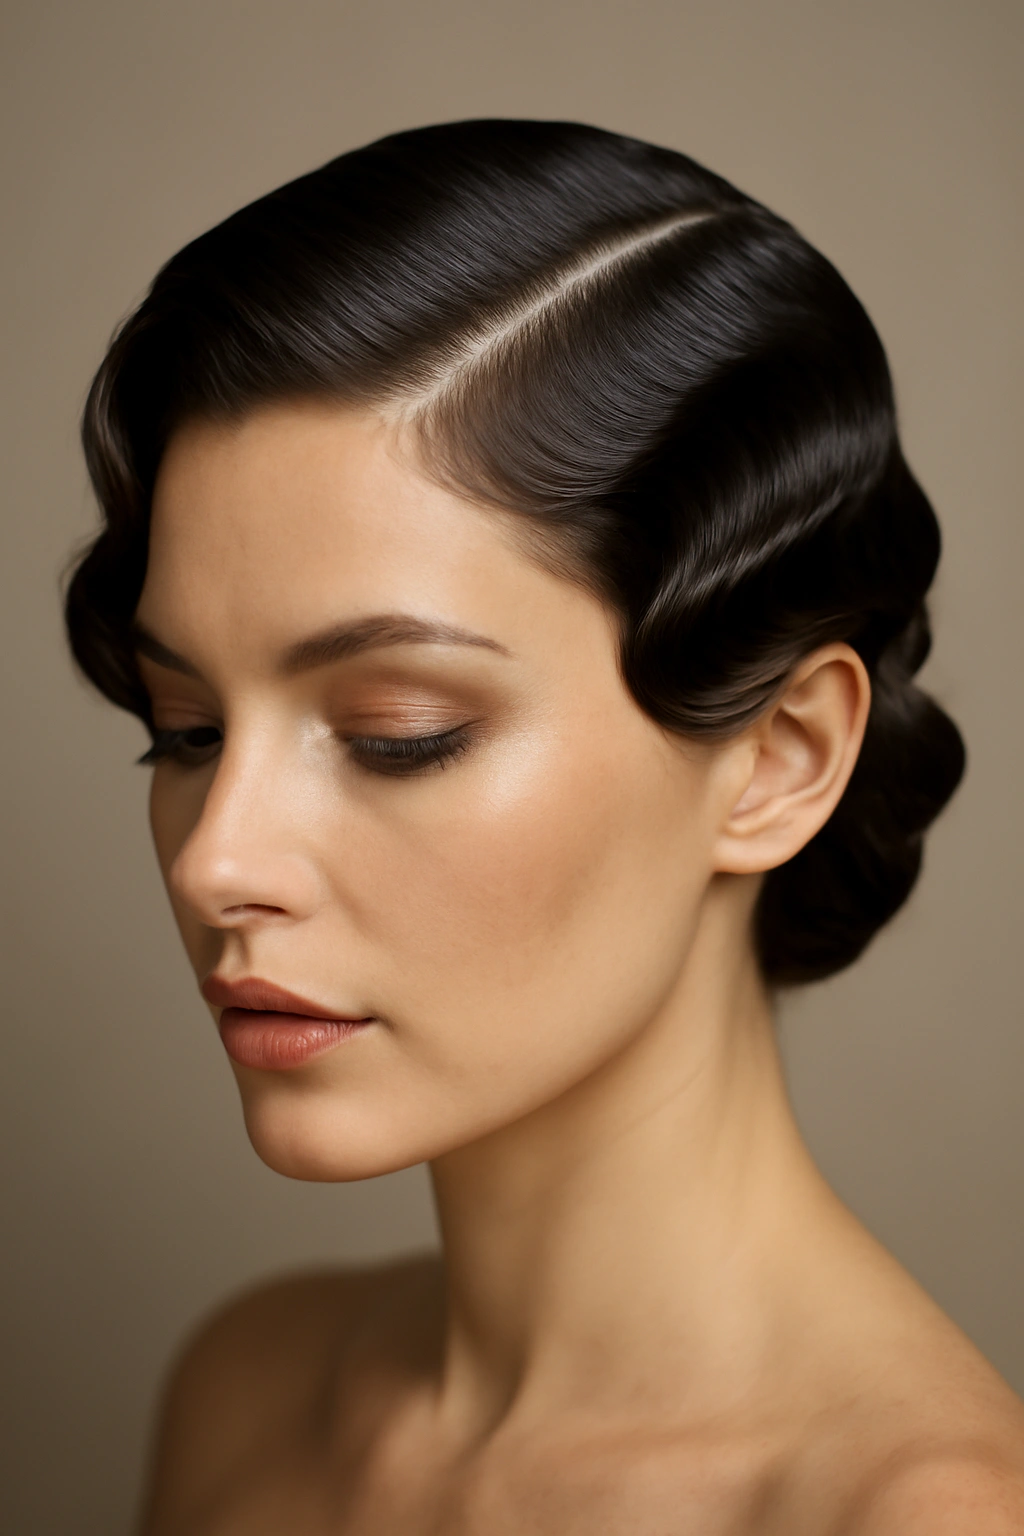
Finger waves are a classic, vintage-inspired style that reads as intentional and glamorous. A deep side part enhances the effect, creating an asymmetrical, sophisticated silhouette. When executed with the right products and technique, finger waves look fresh and modern—not costumey or overly retro. This style works beautifully at any length from shoulder-length to long hair.
Why This Works for Weddings
Finger waves convey elegance, sophistication, and intentionality. The style is remarkably flattering across different face shapes, and the deep side part adds drama and visual interest. When styled with the right products, finger waves feel modern and fresh rather than costume-like. The style photographs beautifully and maintains its shape well throughout a long day.
Styling and Accessory Ideas
- Create a very deep side part, potentially starting almost at the temple on one side
- Use a curling iron or wave iron to create defined waves, working section by section
- Brush gently to blend the waves into a cohesive style rather than uniform curls
- The shorter side of the part can be tucked behind the ear to show off your face and jewelry
- Add a single statement clip or comb on the tucked side, or keep it accessory-free for a cleaner look
- A sleek, shiny finish works best with this style—use a quality smoothing serum or shine spray
Pro tip: Finger waves are easier to create when you use a texturizing spray or product that gives your hair a bit of grip before you curl. Ask your stylist about the specific products they’ll use to ensure the waves stay defined but still look fresh.
9. Slicked-Back High Pony
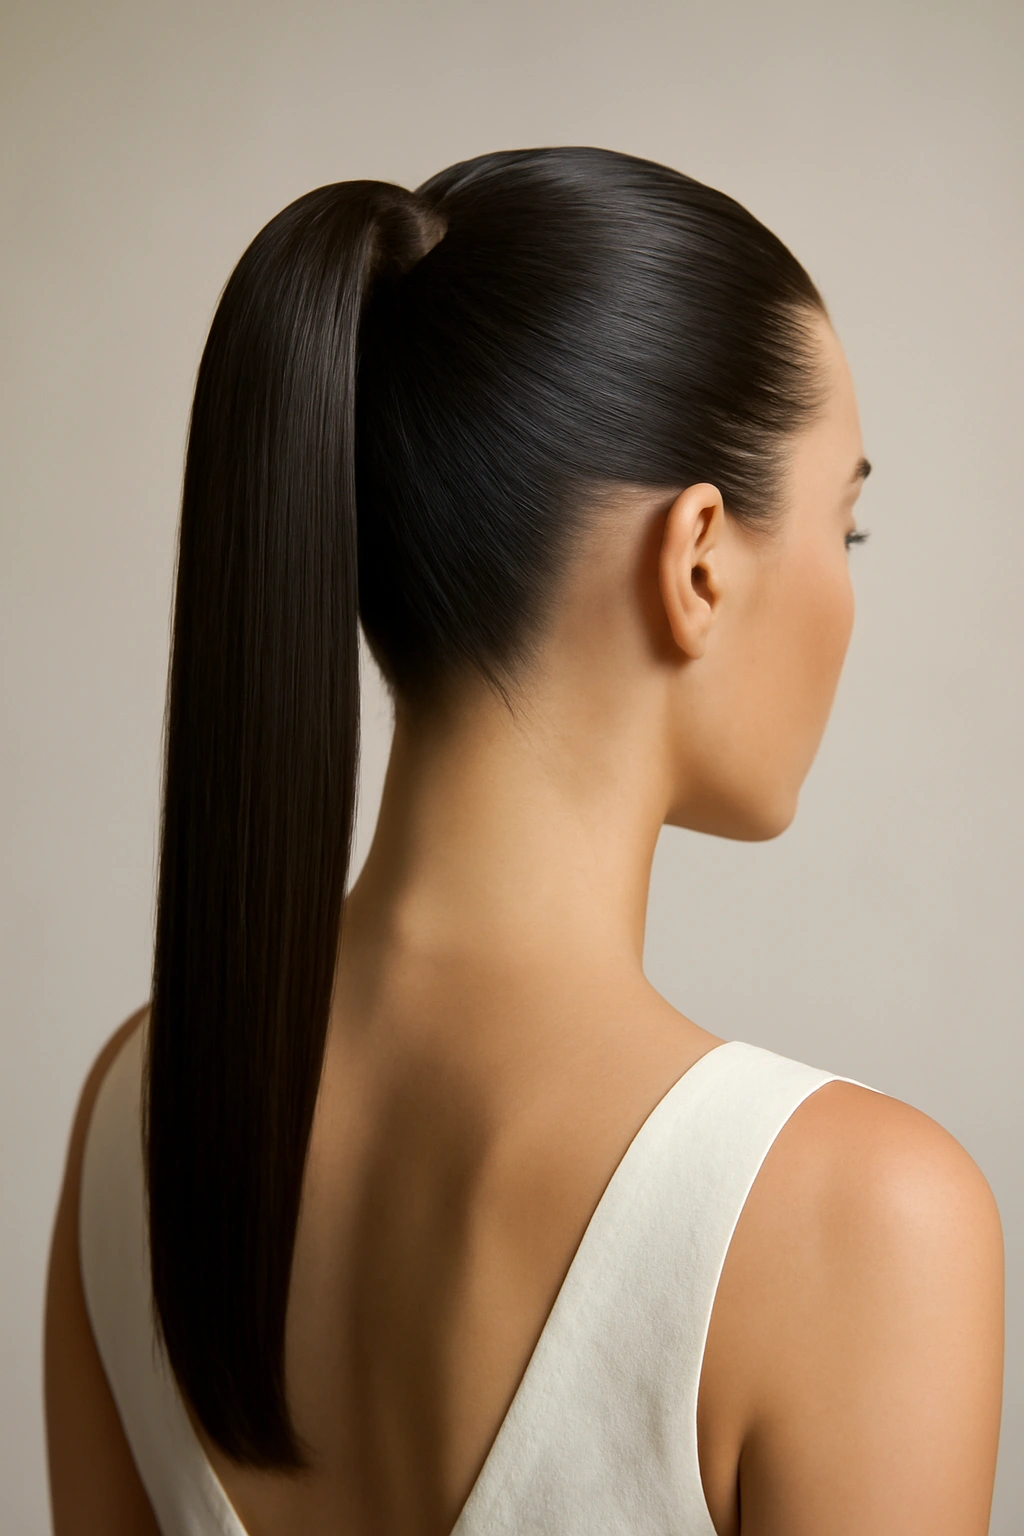
A slicked-back high ponytail is modern, bold, and surprisingly elegant when executed with intention and the right finishing details. Rather than a casual gym-class ponytail, this version features very sleek, polished hair pulled tightly back and up, often with a decorative base or elaborate elastic. The exposed face and neck create a sophisticated, fashion-forward aesthetic.
Why This Works for Weddings
A high ponytail is incredibly practical, keeps all hair completely off your face and neck, and looks polished and intentional. The style works beautifully with statement earrings, a necklace, and a strapless or low-back dress where you want the focus on your neckline and shoulders. It’s also refreshingly different from traditional bridal styles, signaling a modern, confident bride or guest.
Styling and Accessory Ideas
- Start with completely straight, polished hair smoothed back with a smoothing cream or gel
- Gather at a high point on the crown, creating a sleek, tight ponytail
- Wrap a section of your own hair or a decorative elastic around the base to conceal the tie
- Consider adding a jeweled hair cuff, metallic band, or elaborate elastic designed specifically as an accessory
- Finish the ponytail with waves, curls, or even leave it straight and sleek depending on your aesthetic
- Let a few ultra-fine face-framing pieces escape if desired for a slightly softer effect
Pro tip: Use a fine-tooth comb to smooth any flyaways and a lightweight smoothing product to prevent frizz. A slicked-back style only works when it looks genuinely polished, so attention to detail with product and technique is crucial.
10. Soft Romantic Updo
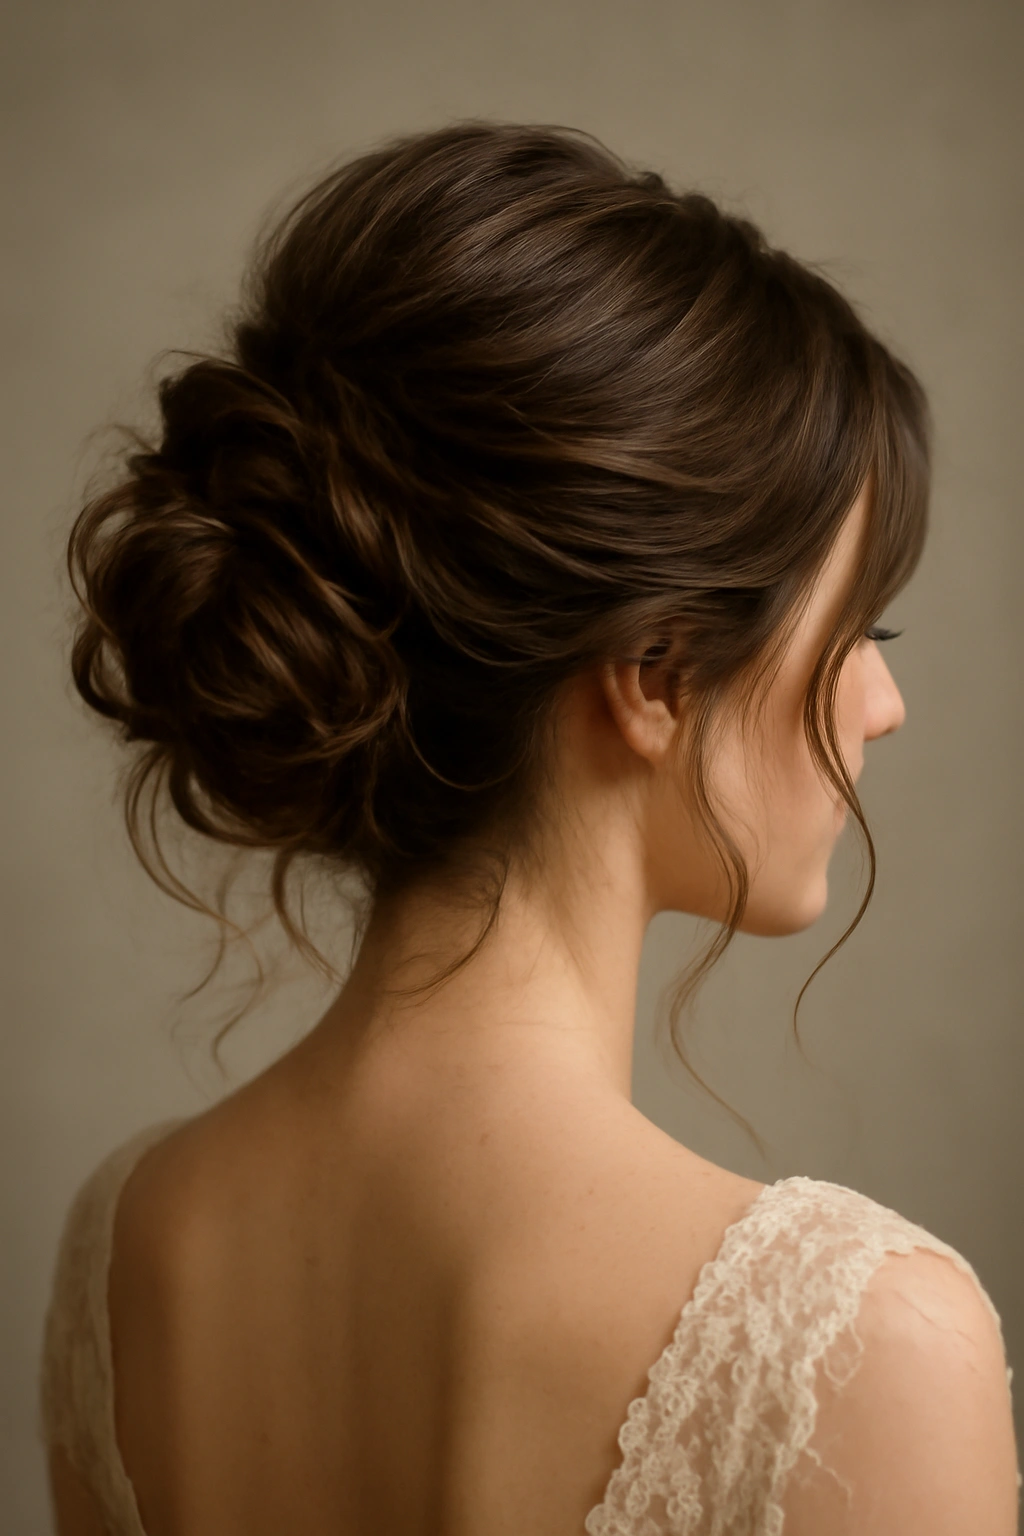
A soft romantic updo is the middle ground between completely structured updos and loose, flowing styles. The hair is gathered and loosely pinned into an updo at the back of the head, but the overall effect is one of effortless beauty rather than architectural precision. Pieces deliberately escape, tendrils frame the face, and the whole look reads as romantic rather than formal.
Why This Works for Weddings
This style is utterly romantic and works beautifully across virtually every dress style and wedding aesthetic. It feels intentional and special while remaining accessible and wearable. The style keeps hair off your neck and face while maintaining that soft, romantic quality that many brides are seeking. It photographs beautifully and remains secure throughout hours of celebration.
Styling and Accessory Ideas
- Create soft waves or curls throughout your hair before pinning the updo
- Gather the hair loosely at the back of the head and secure with bobby pins, creating a soft, undone-looking bundle
- Allow 3-4 face-framing pieces to escape gently, curling them slightly for softness
- Add a delicate hair comb, pearl pins, or small floral arrangement directly into the updo
- Consider a thin hair vine or delicate gold piece woven throughout for subtle sparkle
- The structure of the updo can be looser on one side, creating an asymmetrical, organic feel
Pro tip: This style holds better when you use a light-hold hairspray that allows some movement rather than locking everything in place. You want it to feel alive and romantic, not stiff and artificial.
11. Twisted Half-Up with Hairpins
A twisted half-up style combines the practicality of pulling hair back with the romance of loose waves below. Rather than braiding, the top section is created by twisting sections of hair and pinning them back, which creates a softer, more organic look. This style is less formal than many updos but more intentional than simple half-up styles.
Why This Works for Weddings
The twisted approach feels modern and less predictable than traditional half-up styles. The twists catch light beautifully in photographs, and the style remains secure while maintaining that soft, romantic quality. It works well for brides who want some hair pulled back but prefer the softer look of twists to structured braids.
Styling and Accessory Ideas
- Create soft waves throughout your hair starting before you begin the twists
- Take a section from one temple and twist it loosely, moving backward toward the center back
- Repeat from the other side, meeting the first twist at the center
- Secure both twists together at the back using decorative bobby pins or small pearl clips
- Add delicate hairpins scattered through the twists and the released hair below
- Consider a thin hair vine or pearl drop positioned among the twists for extra detail
- Let the remaining hair flow in soft waves down your back
Pro tip: Twisted styles look more romantic when the twists are slightly loose and imperfect rather than tightly wound. Let your stylist know you’re going for an effortless rather than polished effect.
12. Long Mermaid Waves

Long mermaid waves are pure romance and elegance—long hair cascading in soft, undulating waves down the back and sides. This style showcases length and movement beautifully, works across various dress styles, and photographs like a dream. The waves should have dimension and texture, not looking like a single uniform curl, but rather like natural movement throughout.
Why This Works for Weddings
If you have long hair and want to showcase it, mermaid waves are the ultimate choice. The style is romantic, feminine, and beautifully documented in photographs. The waves catch light gorgeously during golden hour or with any type of lighting. The style works particularly well with flowing, romantic dresses and creates a sense of elegance and movement throughout the celebration.
Styling and Accessory Ideas
- Create waves using a combination of large-barrel curling irons or a wave iron, working section by section
- Brush through gently to blend the waves into a cohesive style with dimension rather than defined curls
- Add subtle volume at the crown with light teasing
- A delicate hair comb, thin tiara, or small hair accessory positioned on one side
- Consider a hair vine or delicate gold piece positioned at the crown or woven subtly through the waves
- A decorative claw clip or silk hair tie can gather some of the hair at the back if you prefer a half-up variation
Pro tip: Long mermaid waves hold significantly better when you use texturizing products and the right hairspray before curling. Ask your stylist about products designed to help waves last 8+ hours in various weather conditions.
13. Art Deco-Inspired Waves
Art Deco styling brings 1920s glamour to modern weddings—geometric wave patterns created throughout the hair, often combined with a deep side part. This style is bold, intentional, and deeply romantic in a vintage way. It works beautifully at shoulder-length or longer and creates a truly distinctive, memorable look.
Why This Works for Weddings
Art Deco waves feel sophisticated, glamorous, and intentional. The style is instantly recognizable and memorable, making it perfect for brides who want a distinctive look that stands out in photographs. The geometric precision conveys elegance and intention, while the romantic softness prevents it from feeling costume-like. This style pairs beautifully with vintage-inspired dresses or modern dresses with dramatic details.
Styling and Accessory Ideas
- Create very defined, deliberate waves using a wave iron or curl-and-brush technique
- Maintain the wave pattern throughout, creating a cohesive geometric effect
- Pair with a deep side part for maximum Art Deco impact
- Add a beaded headband, jeweled hair comb, or chandelier clip positioned at the crown
- Consider a longer decorative hair stick or ornamental clip positioned among the waves
- Keep makeup and accessories classic to let the architectural hair be the statement
Pro tip: This style requires precision and ideally should be created by a professional stylist experienced with vintage wave patterns. It’s worth scheduling a practice session to ensure the waves will hold and that you love the effect.
14. Loose Undone Bun
A loose, undone bun is the epitome of effortless elegance—hair gathered and loosely pinned into a bun that looks intentionally messy rather than sloppy. This style works beautifully at any length from shoulder-length to long hair and conveys a sense of relaxed confidence and romance. The key is that it should look intentionally undone, not accidentally messy.
Why This Works for Weddings
A loose bun feels modern, accessible, and deeply romantic. It keeps hair off your face and neck while maintaining that soft, beautiful quality that photographs well. The style is practical, comfortable, and works equally well for brides who want their hair off their shoulders or guests wanting a polished but approachable look. It’s also relatively easy to create, which reduces stress on the morning of the event.
Styling and Accessory Ideas
- Create soft waves or curls throughout your hair before gathering into the bun
- Gather the hair at the nape and loosely twist or coil it, securing with bobby pins
- Let pieces escape intentionally around the face and throughout the bun structure
- Add a delicate hair comb, pearl pins, or small floral piece directly into the bun
- Consider a thin hair tie, silk scrunchie, or decorative elastic to secure the bun
- Allow tendrils to cascade down the nape and around the face for softness
Pro tip: This style holds better when you use texturized hair and a light-hold hairspray. You want it to feel alive and romantic, not frozen in place. Practice it beforehand to ensure you’re comfortable with the balance between intentional and messy.
15. French Braid Around the Crown
A French braid that travels around the entire crown of the head creates a princess-like, fairytale effect that’s surprisingly wearable. The braid anchors the hair while allowing loose waves to flow below, and the effect is one of romance and intention. This style works beautifully with long hair and photographs beautifully from every angle.
Why This Works for Weddings
A French braid crown is instantly romantic and fairytale-inspired without feeling costume-like. The style keeps hair partially off your face and neck while showcasing your length and creating maximum visual interest. The braid photographs beautifully, catches light in gorgeous ways, and the loose waves below maintain that soft, romantic quality. It’s also a truly distinctive style that makes for memorable photographs.
Styling and Accessory Ideas
- Create soft waves or curls throughout your hair before starting the braid
- Begin the French braid at one temple, braiding around the crown toward the opposite temple
- Incorporate baby’s breath, small flowers, or delicate pearl strands directly into the braid
- At the end of the crown, secure the braid and allow all remaining hair to flow loose in waves
- Add decorative pins or clips scattered through the loose hair below the braid
- Consider a thin hair vine or pearl drop positioned among the released hair for extra detail
Pro tip: If you’re nervous about creating a French braid around your crown, ask your stylist to create it the day before, let it set in loose braided texture overnight, then gently release and restyle it for a beautifully textured romantic effect.
16. Hollywood Glam Waves
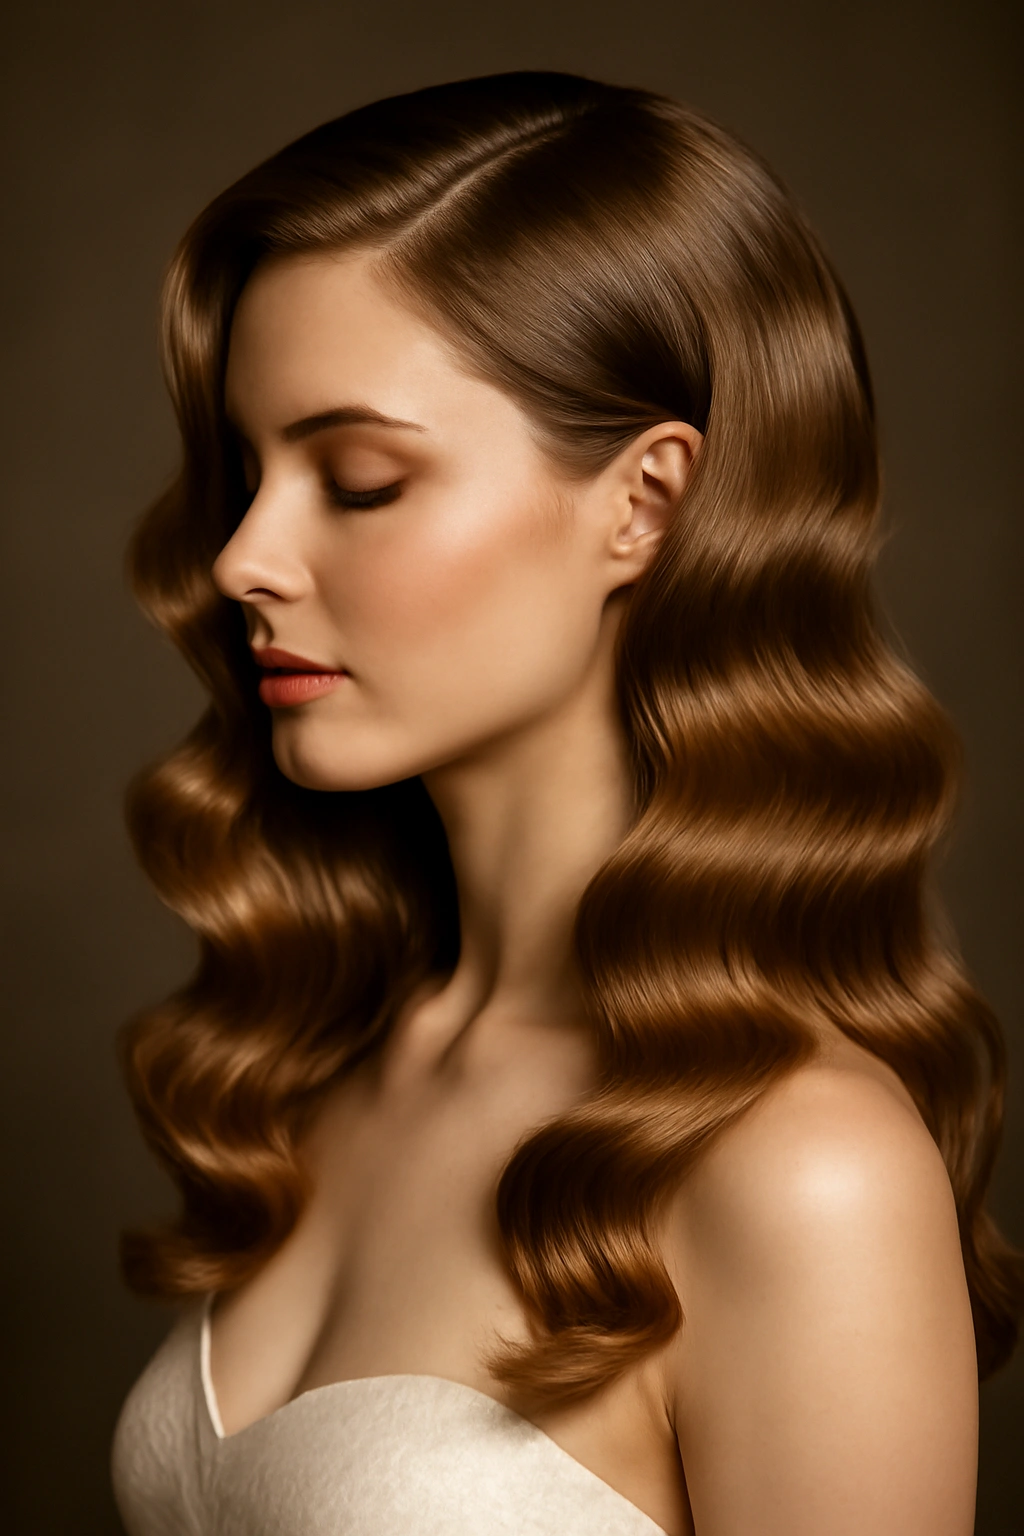
Hollywood glam waves are the ultimate in classic, timeless elegance—old-school waves created throughout the hair with a polished, luminous finish. This style feels expensive, intentional, and deeply romantic. It works beautifully at any length and creates a universally flattering silhouette that photographs like a dream.
Why This Works for Weddings
Hollywood glam waves convey luxury, confidence, and timeless elegance. The waves photograph beautifully in any lighting and create a sense of movement and dimension that’s instantly flattering. The style works across different face shapes, dress styles, and wedding aesthetics. It’s also a safer choice if you’re uncertain what you want—Hollywood waves are universally beautiful and timelessly romantic.
Styling and Accessory Ideas
- Create waves using a combination of curling irons and brushing to achieve that seamless, blended effect
- Use a large barrel curling iron or wave iron to create defined waves throughout
- Brush gently to blend the waves while maintaining dimension
- Apply a luminous shine spray or serum for that expensive, polished finish
- Add a delicate hair comb, thin tiara, or small jeweled clip on one side
- Consider a side part that adds dimension and shows off your face
- Minimal accessories work best—let the waves be the statement
Pro tip: This style requires quality products and often benefits from professional styling. Ask your stylist about products that create shine and hold without looking wet or sticky.
17. Textured Messy Bun
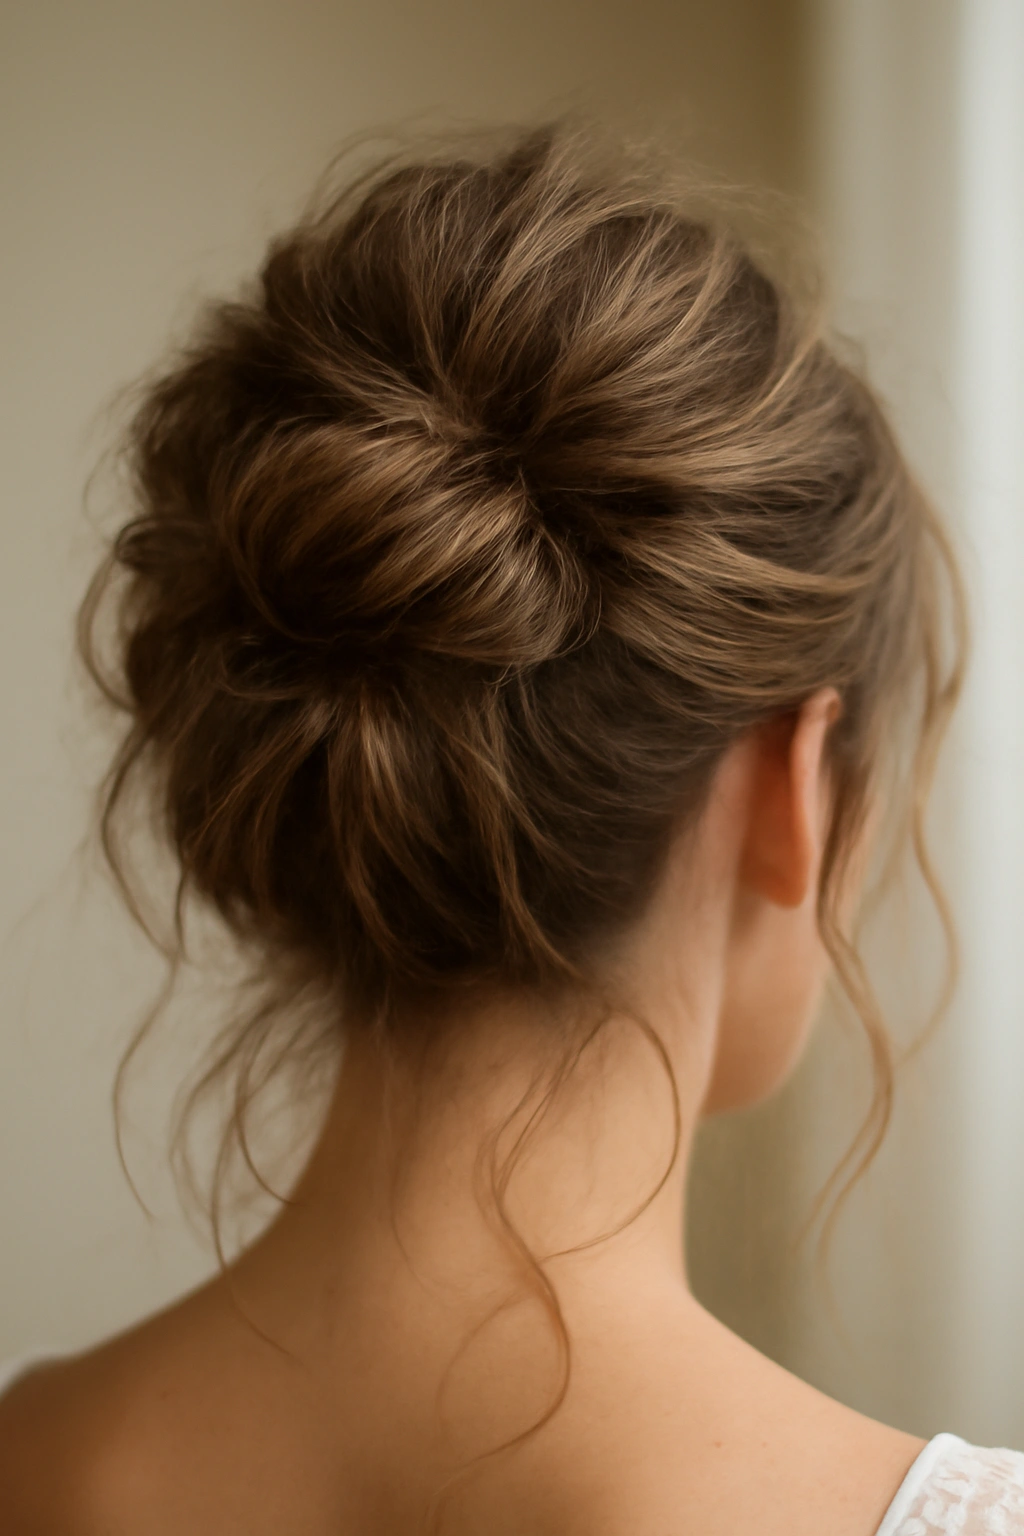
A textured messy bun is modern, approachable, and surprisingly wedding-appropriate when created intentionally. The key is that it should look beautifully messy rather than accidentally sloppy. This style works at virtually any length, keeps hair off your face and neck, and conveys confidence and modern sensibility.
Why This Works for Weddings
A well-executed messy bun is incredibly practical and modern while still being romantic and intentional. It photographs well, works across different dress styles and wedding aesthetics, and is comfortable to wear for hours. The style also works beautifully if your hair is having a texture day—slightly imperfect, textured hair actually enhances a messy bun’s appeal.
Styling and Accessory Ideas
- Create textured waves or curls throughout your hair
- Gather the hair into a high or mid-level bun, leaving it slightly loose and undone
- Let pieces escape around the face and throughout the bun structure
- Use decorative bobby pins, a jeweled hair cuff, or metallic elastic as the bun holder
- Add a delicate hair comb or small clip among the escaped pieces for intentional detail
- Consider a thin hair vine or pearl pins scattered through the released hair and bun
Pro tip: Use a texturizing spray or dry shampoo before creating the bun—it gives your hair grip and makes the messy effect look intentional rather than sloppy.
18. Half-Up Dutch Braid

A Dutch braid is like a French braid in reverse, creating a raised, three-dimensional effect that’s visually striking. When you create a Dutch braid on the top half of your hair and secure it, you get a style that’s modern, intentional, and beautifully photogenic. This style works at any length and appeals to brides wanting something distinctive and a bit unexpected.
Why This Works for Weddings
A Dutch braid is distinctly modern and creates visual interest that photographs beautifully. The raised, textured effect of the braid is flattering and works well with both romantic and modern wedding aesthetics. The style keeps hair off your face while maintaining that textured, romantic quality. It’s also relatively easy to create with practice, making it accessible even for brides doing their own hair.
Styling and Accessory Ideas
- Create soft waves or curls throughout your hair before starting the braid
- Begin the Dutch braid at the crown and braid down toward the nape
- Weave delicate elements like baby’s breath or pearl strands into the braid
- Secure the braid at the nape and allow loose hair to cascade below in waves
- Add decorative pins or clips scattered through the released hair
- Consider positioning a hair vine or delicate accessory among the waves below the braid
Pro tip: Practice your Dutch braid multiple times before the wedding day. It’s easier than a French braid once you understand the technique, but it requires a bit of practice to make it look intentional rather than backwards.
19. Cascading Waterfall Braid
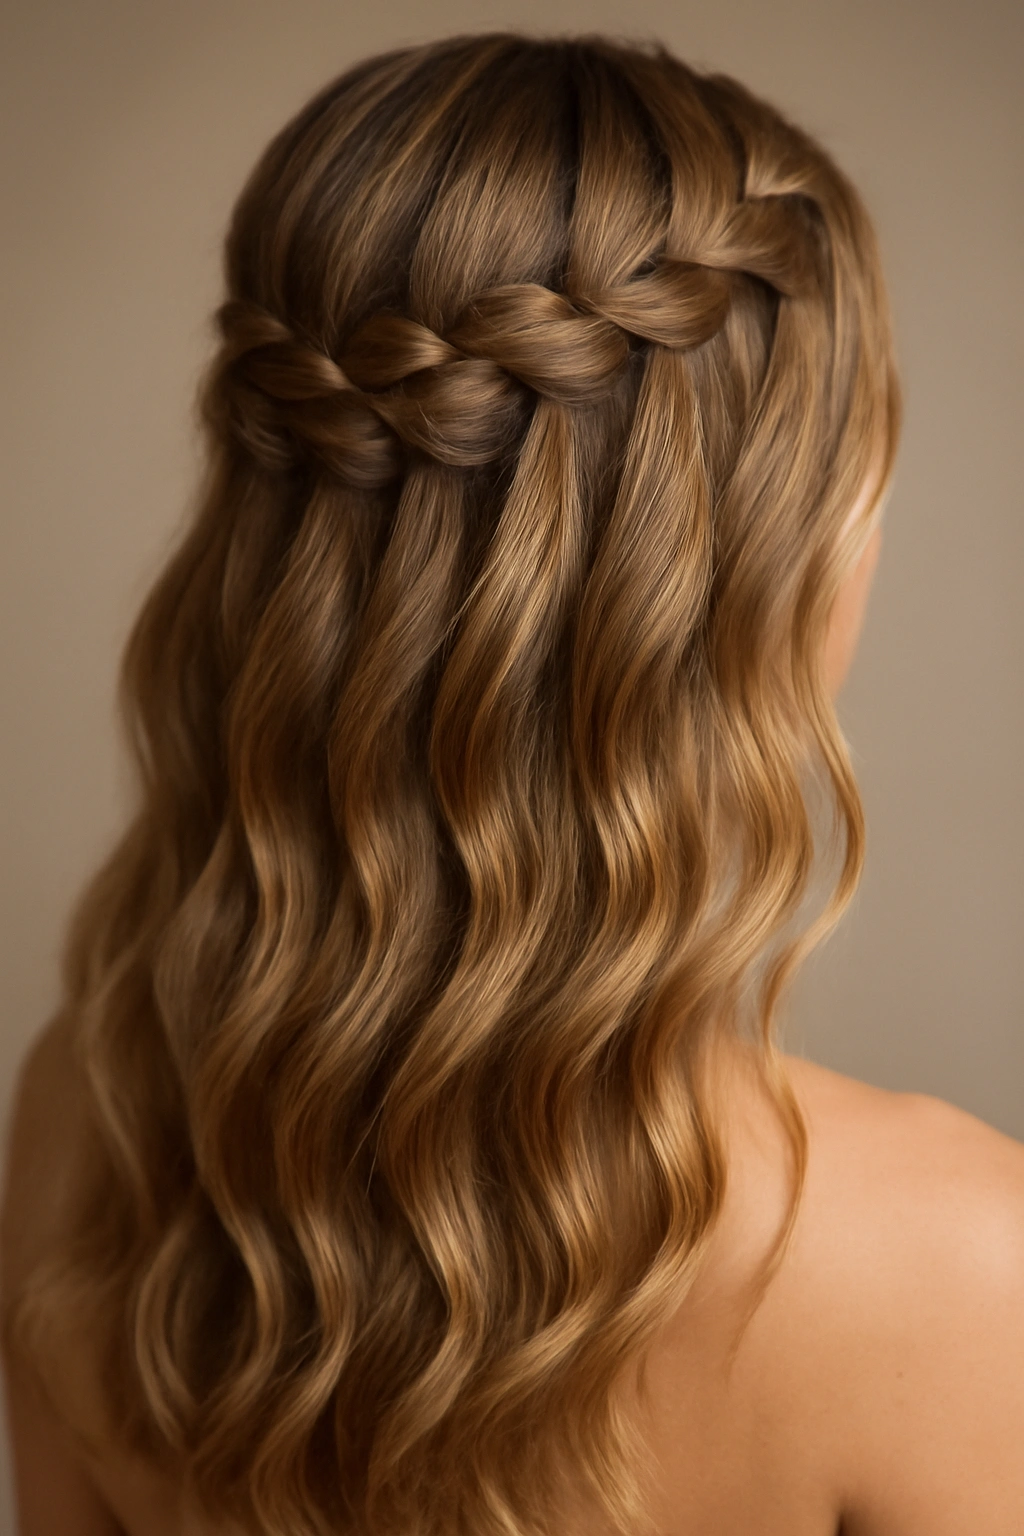
A waterfall braid is perhaps one of the most romantic and visually interesting braided styles available. Rather than gathering all hair into the braid, sections are left to cascade, creating a waterfall effect with loose waves flowing below. This style is distinctive, fairytale-inspired, and absolutely stunning in photographs.
Why This Works for Weddings
A waterfall braid is instantly romantic and visually distinctive. The style photographs beautifully, creates movement and dimension that’s flattering, and maintains that soft, romantic quality that many brides love. The waterfall effect is surprising and lovely, making it perfect for brides wanting something that feels special and unique. It works beautifully with both classic and modern wedding aesthetics.
Styling and Accessory Ideas
- Create soft waves throughout your hair before starting the braid
- Begin the waterfall braid at one temple, creating the signature effect where hair cascades down
- Continue the braid around toward the back, maintaining the waterfall effect throughout
- Weave delicate elements into the braid as you create it
- Let all cascading sections and remaining hair flow in soft waves
- Add decorative clips or pins scattered through the cascading hair for intentional detail
- Consider a thin hair vine or pearl pins positioned among the cascading sections
Pro tip: Waterfall braids look most romantic when the cascading sections are softly waved rather than stick-straight. Plan to create your waves before starting the braid so the cascading sections have texture and movement.
20. Romantic Low Ponytail
A low ponytail positioned at the nape of the neck is classic, practical, and romantically elegant. Rather than a tight, sleek version, the wedding-appropriate version features soft texture, gracefully escaped face-framing pieces, and decorative details that elevate it beyond casual. This style works beautifully across different hair lengths and maintains that soft, romantic quality.
Why This Works for Weddings
A low ponytail keeps hair off your face and neck while remaining completely romantic and elegant. It’s practical, secure, and works across virtually every dress style and wedding aesthetic. The style photographs beautifully, allows your facial features to be visible and prominent, and works equally well for brides, bridesmaids, and guests. It’s also comfortable to wear for extended periods.
Styling and Accessory Ideas
- Create soft waves or curls throughout your hair
- Gather at a low point at the nape, slightly off-center for a more romantic feel
- Let 2-3 face-framing pieces escape gently and curl them
- Secure the ponytail with a decorative elastic, metallic band, or wrap a section of hair around the base
- Add a jeweled hair cuff, decorative clip, or delicate pin at the base of the ponytail
- Consider adding a thin hair vine or delicate elements woven through the ponytail itself
Pro tip: A low ponytail works beautifully if you have some texture and aren’t aiming for a completely sleek effect. The softness of the style comes from imperfect, textured hair and deliberately escaped pieces.
21. Sleek High Bun with Metallic Accessory
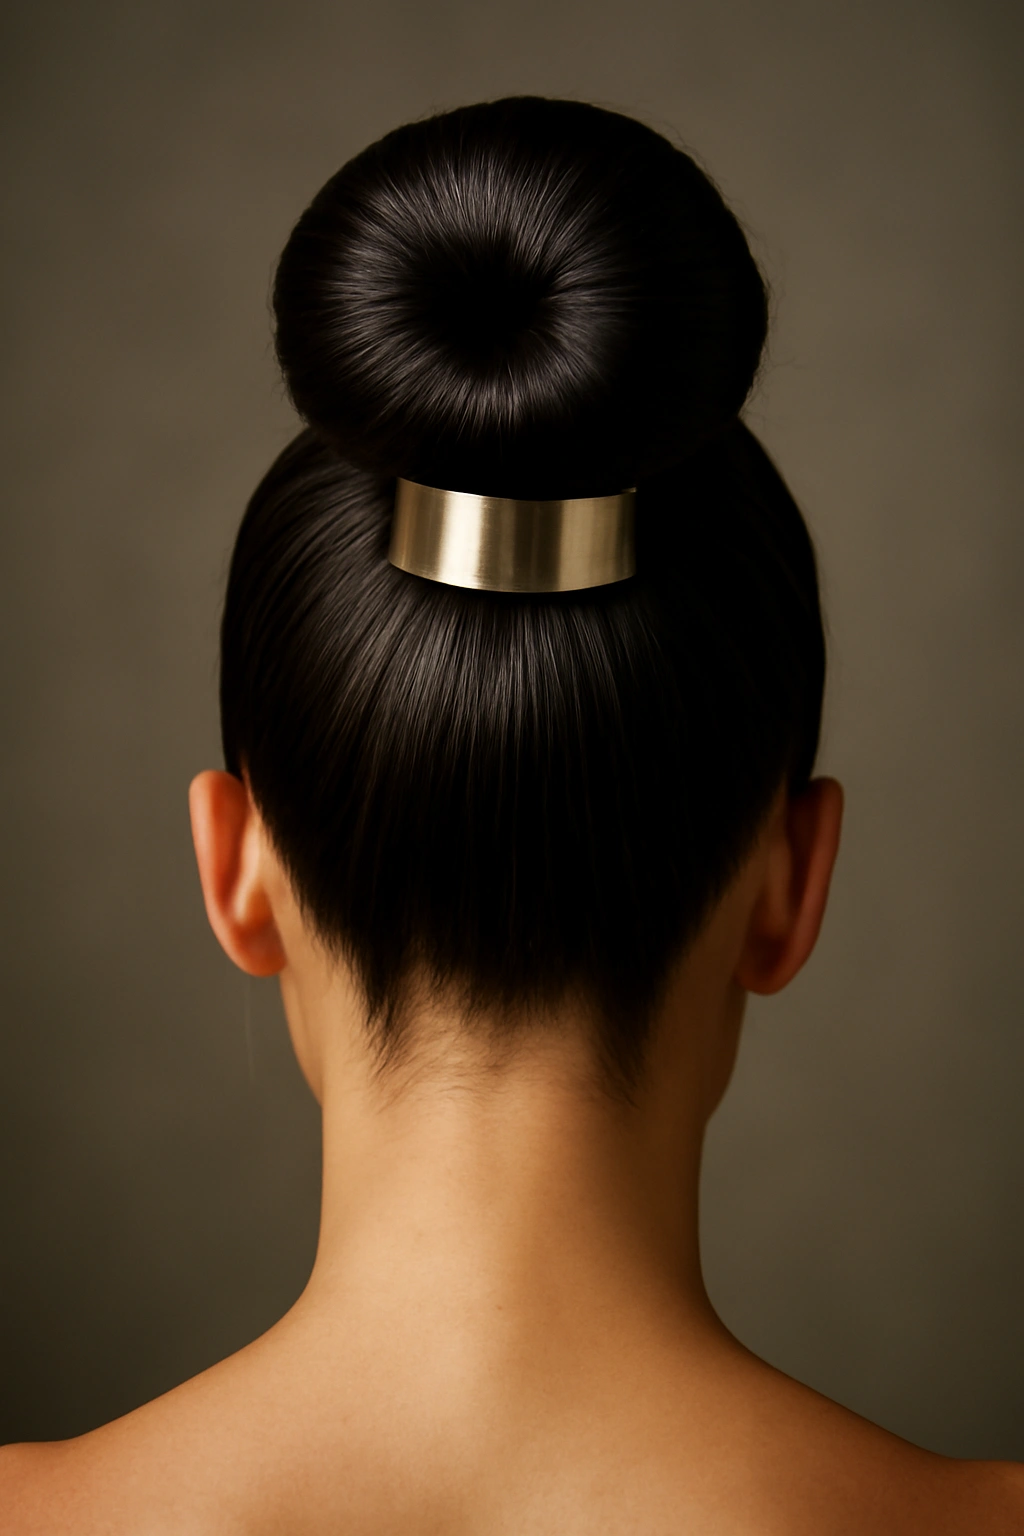
A sleek high bun positioned at the crown is modern, polished, and unexpectedly elegant. When paired with a metallic accessory like a gold or silver hair cuff, decorative comb, or ornamental pin, it becomes a statement piece rather than a simple style. This look works beautifully across different face shapes and wedding aesthetics.
Why This Works for Weddings
A high bun is modern, sleek, and fashion-forward. It completely showcases your face, jewelry, and the neckline or back of your dress. The style photographs beautifully, conveys confidence and intention, and is quite practical and secure. The metallic accessory elevates the look from simple to intentional, adding that special-occasion element that makes it appropriate for a wedding.
Styling and Accessory Ideas
- Start with completely smooth, polished hair
- Gather at the crown into a sleek, tight bun
- Create the bun smoothly using a bun maker or by coiling the hair and pinning carefully
- Add a statement metallic hair cuff, gold or silver decorative comb, or ornamental pin
- Consider a jewelry-like hair stick or elaborate accessory designed specifically to be visible
- Keep makeup and the rest of your styling balanced so the statement bun and accessory are the focus
Pro tip: This style requires perfect smoothness and a truly polished finish. Use a quality smoothing cream and fine-tooth comb to eliminate any flyaways. The impact of the look depends entirely on how sleek and polished the bun appears.
22. Tousled Waves with Silk Tie
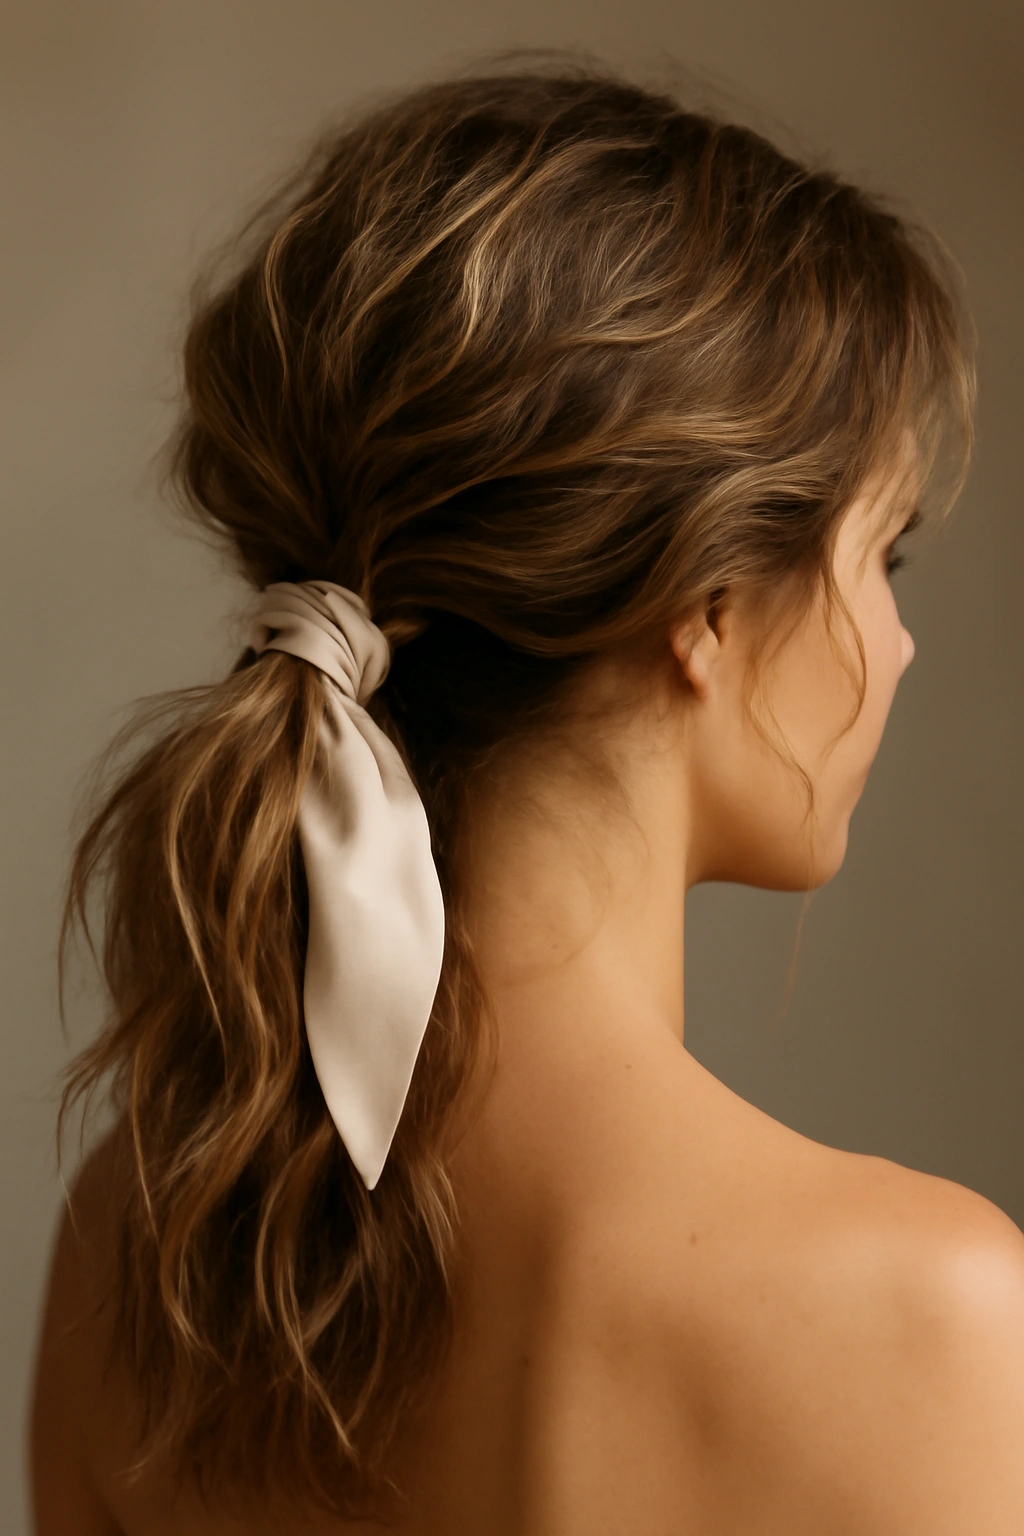
Tousled waves with a decorative silk tie are the definition of effortless elegance—soft, textured waves with a gathered low ponytail secured by an elegant silk scrunchie or ribbon. This style feels modern, accessible, and deeply romantic. The silk element adds intentionality and polish without requiring a perfectly structured look.
Why This Works for Weddings
This style bridges the gap between undone and intentional—it looks like you woke up with perfect hair and tied it with a pretty silk tie, but it actually requires careful styling and product work. The effect is romantic, approachable, and works beautifully across different wedding aesthetics. The style photographs well and works equally for brides and guests.
Styling and Accessory Ideas
- Create soft, touchable waves throughout your hair
- Gather loosely at a low point, creating a relaxed ponytail rather than a tight one
- Secure with a silk scrunchie, velvet hair tie, or decorative ribbon in a complementary color
- Let face-framing pieces escape intentionally around the face
- Consider adding a decorative clip or pin near the silk tie for extra detail
- The waves should look slightly imperfect and textured rather than uniform
Pro tip: Silk or velvet hair ties are genuinely better for your hair and look more elevated than standard elastics. Invest in quality versions in colors that complement your dress and overall aesthetic.
23. Twisted Low Knot
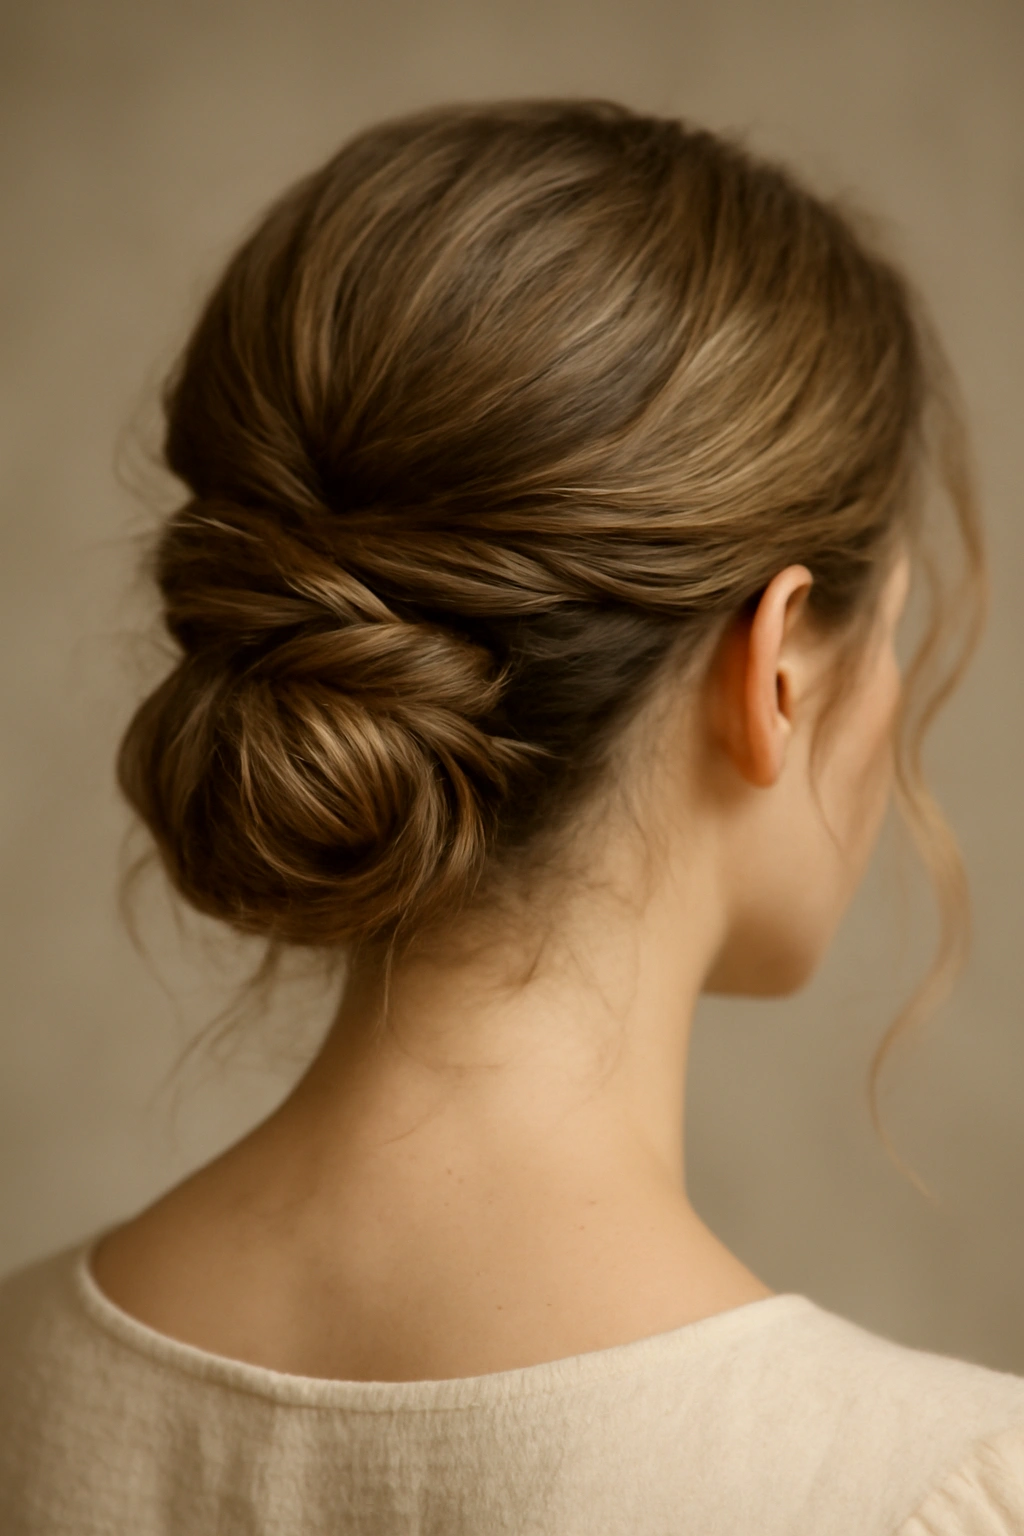
A twisted low knot is created by twisting sections of hair together rather than braiding, resulting in a softer, more organic-looking upstyle. The knot sits low on the head, secured with bobby pins, and the effect is romantic and effortless. This style works beautifully with long or medium-length hair and creates visual interest without requiring complicated techniques.
Why This Works for Weddings
A twisted knot feels modern and less predictable than many traditional updos. The twists catch light beautifully in photographs, and the overall effect is one of romantic intention. The style is relatively straightforward to create, making it a good option for brides doing their own hair or working with a stylist. It keeps hair partially off your face while maintaining softness.
Styling and Accessory Ideas
- Create soft waves or curls throughout your hair
- Take sections from either side and twist them loosely, meeting at the back
- Coil and pin the twists together into a loose knot at the nape
- Let 2-3 face-framing pieces escape gently
- Add decorative pins, a jeweled comb, or small clip directly into the knot
- Consider a thin hair vine or delicate elements woven through the knot and released hair
Pro tip: Twisted knots look more romantic when the twists are slightly loose and imperfect. Aim for a relaxed effect rather than tight, controlled twists.
24. Beachy Waves with Hair Jewelry
Beachy waves paired with delicate hair jewelry create a bohemian, effortless aesthetic that’s perfect for casual celebrations, destination weddings, or brides wanting to feel relaxed and romantic. The waves are textured and tousled, and the jewelry—whether gold chains, pearl strands, or delicate hair cuffs—adds intentionality and elegance without requiring a structured style.
Why This Works for Weddings
This style works beautifully for laid-back wedding celebrations, outdoor events, or destination weddings. The beachy waves are universally flattering and feel accessible, while the jewelry elevates the look to wedding-appropriate. The style photographs beautifully, especially in natural light and outdoor settings. It conveys a sense of relaxed confidence and romance that many modern couples are embracing.
Styling and Accessory Ideas
- Create tousled, textured waves using a curling iron or by braiding damp hair overnight
- Leave the waves loose and deliberately imperfect for maximum beachy effect
- Add delicate gold chains woven through the hair at the crown or sides
- Consider a delicate hair cuff, pearl strand, or decorative hair jewelry positioned at the crown
- Let hair flow loose around the shoulders and back
- Pair with minimal makeup and jewelry for a cohesive, effortless aesthetic
Pro tip: Beachy waves hold much better when you use texturizing spray, sea salt spray, or dry shampoo before creating the waves. These products give your hair grip and enhance the tousled, imperfect texture.
25. Statement Updo with Dramatic Volume
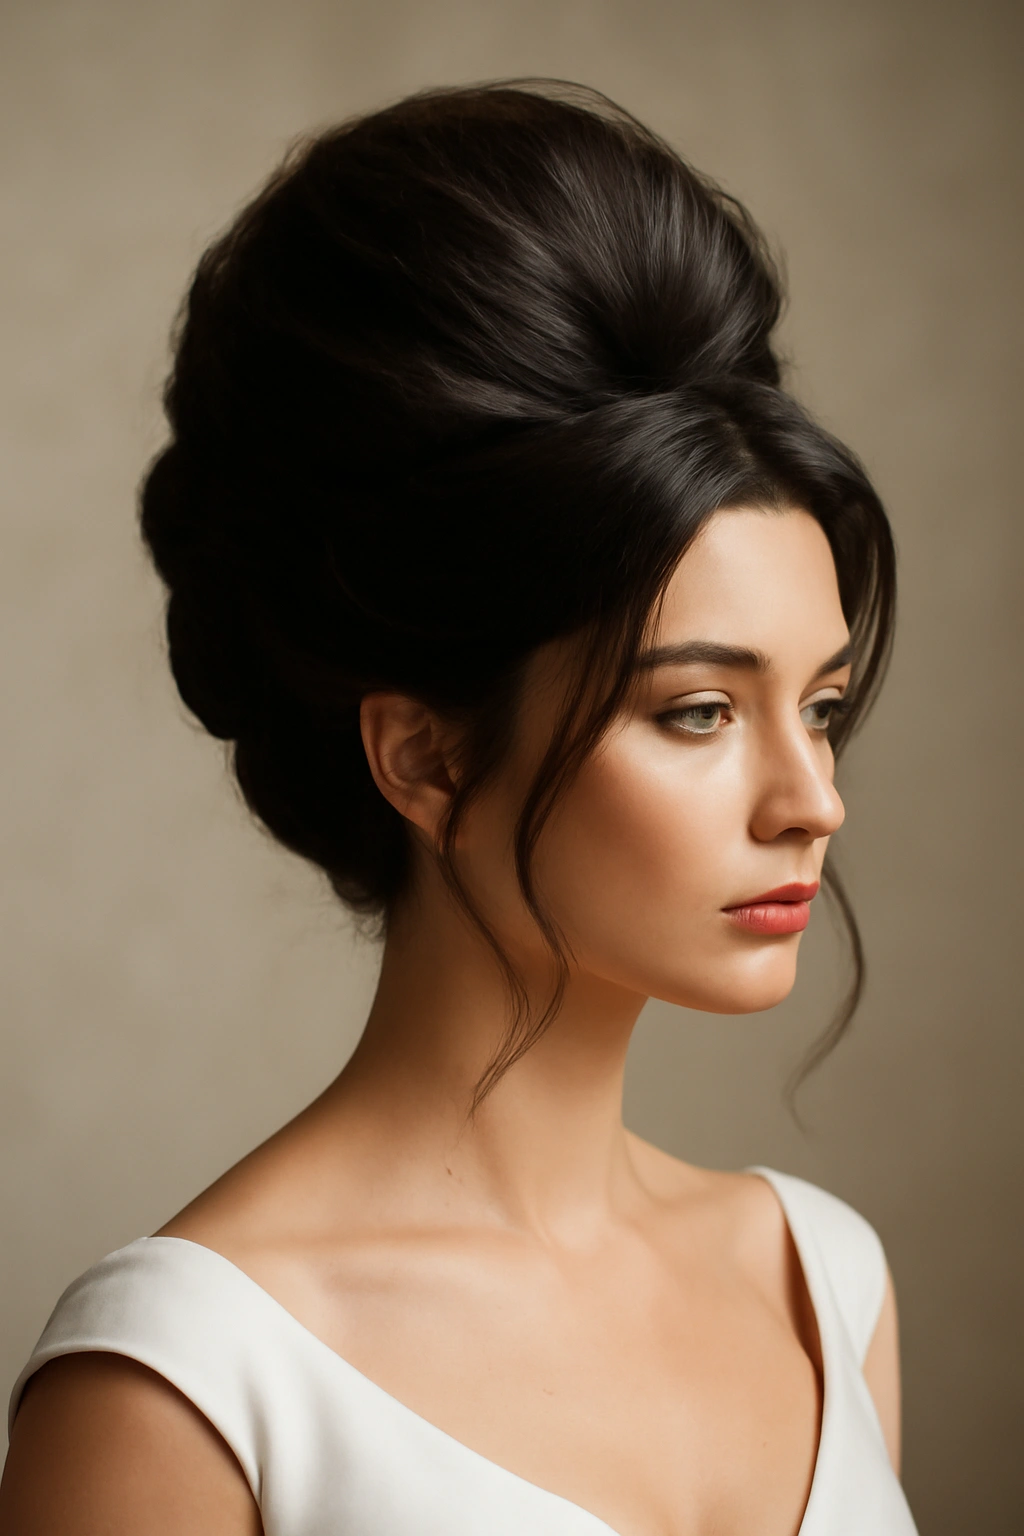
A statement updo with dramatic volume is for brides who want to make a bold, memorable impact. Rather than soft and romantic, this style is architectural, voluminous, and fashion-forward. The updo is gathered and pinned at the crown or mid-head, creating height and dimension that’s impossible to miss. This style works beautifully with dramatic dress silhouettes and modern wedding aesthetics.
Why This Works for Weddings
A statement updo is bold, intentional, and absolutely unforgettable in photographs. The dramatic volume creates an impressive silhouette and shows serious intention and planning. This style works beautifully for brides wanting to feel confident and powerful, or for anyone wanting a distinctly different, fashion-forward approach. The height and volume work particularly well with strapless, sweetheart necklines, and less-structured dress silhouettes.
Styling and Accessory Ideas
- Create volume at the crown using light teasing and strategic pinning
- Gather hair into an updo at or near the crown, maintaining the height and volume
- Pin sections loosely to allow some dimension and architectural interest
- Add dramatic accessories like a statement comb, elaborate hair clip, or sculptural piece
- Consider leaving a few tendrils or face-framing pieces for slight softness if desired
- The updo should feel intentional and designed rather than soft or romantic
- Pair with bold makeup and statement jewelry to balance the dramatic hair
Pro tip: This style requires strong styling skills and often benefits from professional creation. Make sure your stylist understands that you want genuine drama and volume, not a soft, romantic approach.
Final Thoughts
The most important thing to remember when choosing your wedding hairstyle is that it should feel authentically you—elevated and special, absolutely, but not like you’re wearing someone else’s hair. Your hair choice is deeply personal, influenced by your hair texture, face shape, dress style, venue, and the overall energy you want to bring to the celebration. Whether you choose something soft and romantic, bold and architectural, vintage-inspired, or completely modern, the best choice is one that makes you feel genuinely beautiful and confident.
Take time to explore different styles through consultations with your stylist, test runs before the event, and honest consideration of what will make you feel like the best version of yourself. Don’t choose a style simply because you’ve seen it on social media or because you think it’s what you “should” wear. Instead, choose something that aligns with your personality, your aesthetic, and the way you want to feel and photograph on a day that matters to you. Your hair is one of the most visible, personal elements of your appearance—make sure it reflects who you actually are.