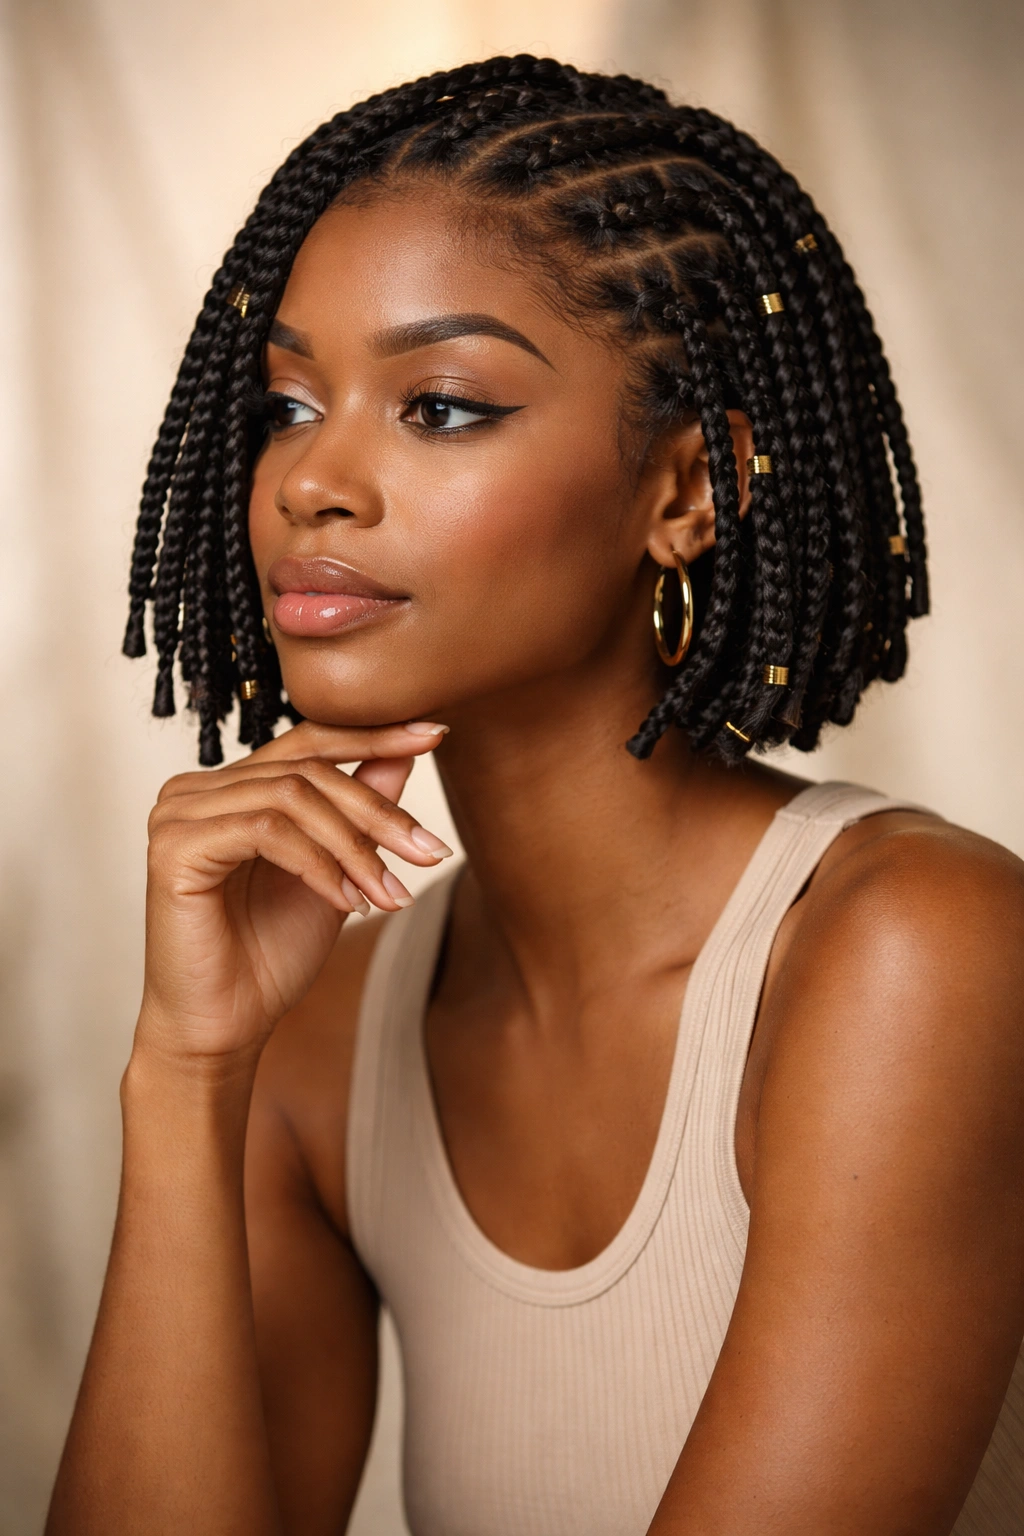
Box braids have earned their place as one of the most versatile protective styles in Black hair culture and beyond. But there’s a common misconception that they only work for long, flowing locks. The truth is that short hair opens up an entirely different universe of creative, bold, and beautifully styled options that many people never explore. Short-hair box braids offer distinct advantages: they’re lighter on your scalp, faster to install, require less maintenance, and can look genuinely striking in ways that longer styles simply can’t achieve.
If you’ve been hesitant about trying box braids because your hair falls short of shoulder length, or if you’re wondering how to refresh your box braid game with something unexpected, this guide is designed specifically for you. We’re diving into 15 distinct styles that transform short hair into a canvas for creativity. Some are sleek and polished for professional settings. Others are playful and textured for everyday confidence. A few push into bold territory with color, accessories, and unique arrangements that make people turn their heads.
The key to rocking short box braids is understanding how different lengths, placements, and styling techniques create different energy and impact. A style that works beautifully on a pixie-length cut needs a different approach than one on a chin-length base. Accessories matter more on shorter lengths—they become architectural elements, not afterthoughts. The way you arrange your braids around your face, how you position them at the crown, and what you do with the ends all matter immensely when you’re working with less length to play with.
Let’s explore what’s actually possible with short box braids, because the answer is far more than most people realize.
1. Sleek Back Cornrows Fading Into Box Braids
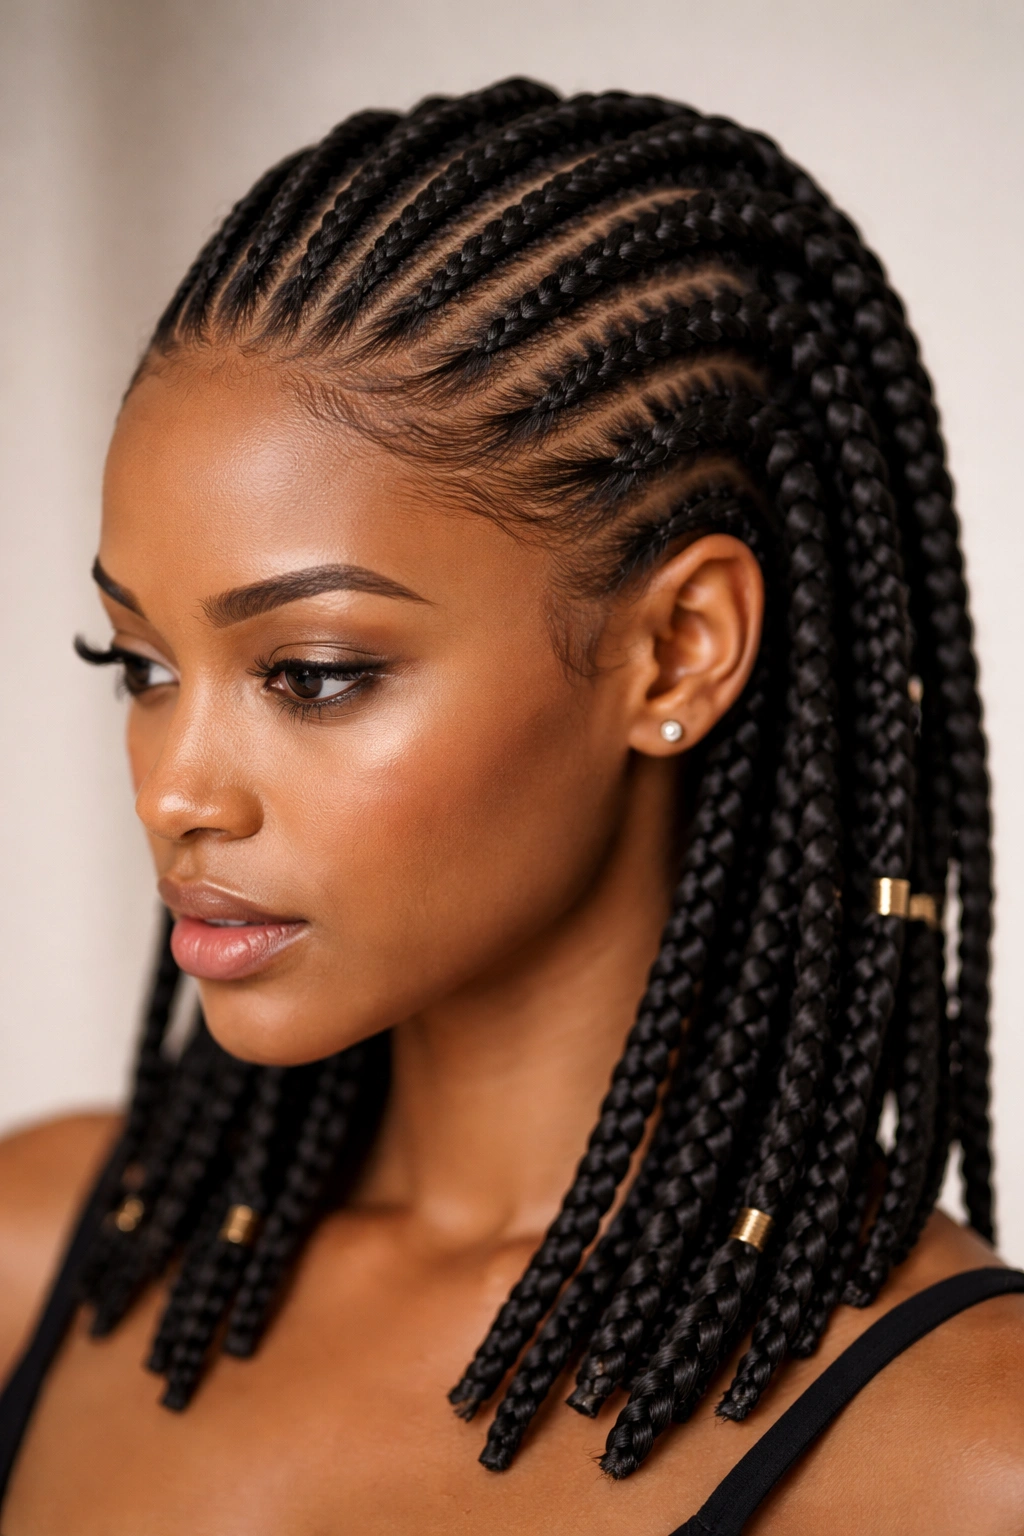
This hybrid style starts with neatly braided cornrows running from your hairline straight back, then transitions into loose box braids at the crown where you have more freedom and length. The cornrows create structure and polish, while the box braids add dimension and movement. The contrast between tight and loose sections is visually striking and keeps the style from feeling too rigid or severe.
Why This Works for Short Hair
The cornrow base adds sophistication and longevity to the style. Because the front is secured tightly, your braids won’t slip or shift around your face, which is essential when you’re working with shorter lengths. The transition point creates a visual anchor that makes the entire style feel intentional and controlled, even though short hair can sometimes feel delicate or hard to style. This approach also distributes tension more evenly across your scalp, reducing strain on your edges.
How to Achieve This Look
- Start with clean, moisturized hair and apply a lightweight leave-in conditioner to enhance definition
- Create 3-5 parallel cornrows from your hairline toward the crown, keeping them taut but not uncomfortably tight
- At the crown, switch to individual box braids using the remaining hair, allowing them to sit slightly looser for texture
- Keep box braid sections to about ¼-inch for manageable size on shorter hair
- Finish with a light oil or edge control on your hairline for a polished appearance
Pro tip: Use colored extensions in your box braids while keeping the cornrows in your natural color—this subtle contrast makes the transition zone even more visually interesting.
2. Goddess Braids Styled Upward

Goddess braids are fundamentally thicker, sculptural versions of traditional box braids, usually created with thicker extension pieces. When styled on short hair and swept upward or pinned into an updo, they create an elegant, almost crown-like effect that reads as intentionally chic rather than simply practical. The thicker braids mean fewer overall braids covering your head, which is actually ideal for shorter lengths where too many thin braids can look busy.
Why This Works for Short Hair
Goddess braids leverage the natural texture and shape of your short hair in ways thin braids sometimes can’t. They’re bold statement pieces that make an impression without needing length to do it. The thicker sections also mean less weight pulling on your roots, which is crucial for short-hair protective styling. When you pin them up, you create instant volume and structure that short hair sometimes lacks naturally.
Installation and Styling Tips
- Work with braids that are roughly ½-inch thick—this is the sweet spot for short hair
- Install them going backward from your face, allowing them to naturally curve upward as they travel toward the crown
- Use bobby pins or small metal cuffs to secure them into an updo once installed
- Leave 1-2 braids loose around your face for softness and dimension
- Smooth your baby hairs with edge control for a polished, intentional look
Worth knowing: Goddess braids typically last 4-6 weeks with proper care, and they’re often quicker to install than thin box braids because there are simply fewer of them.
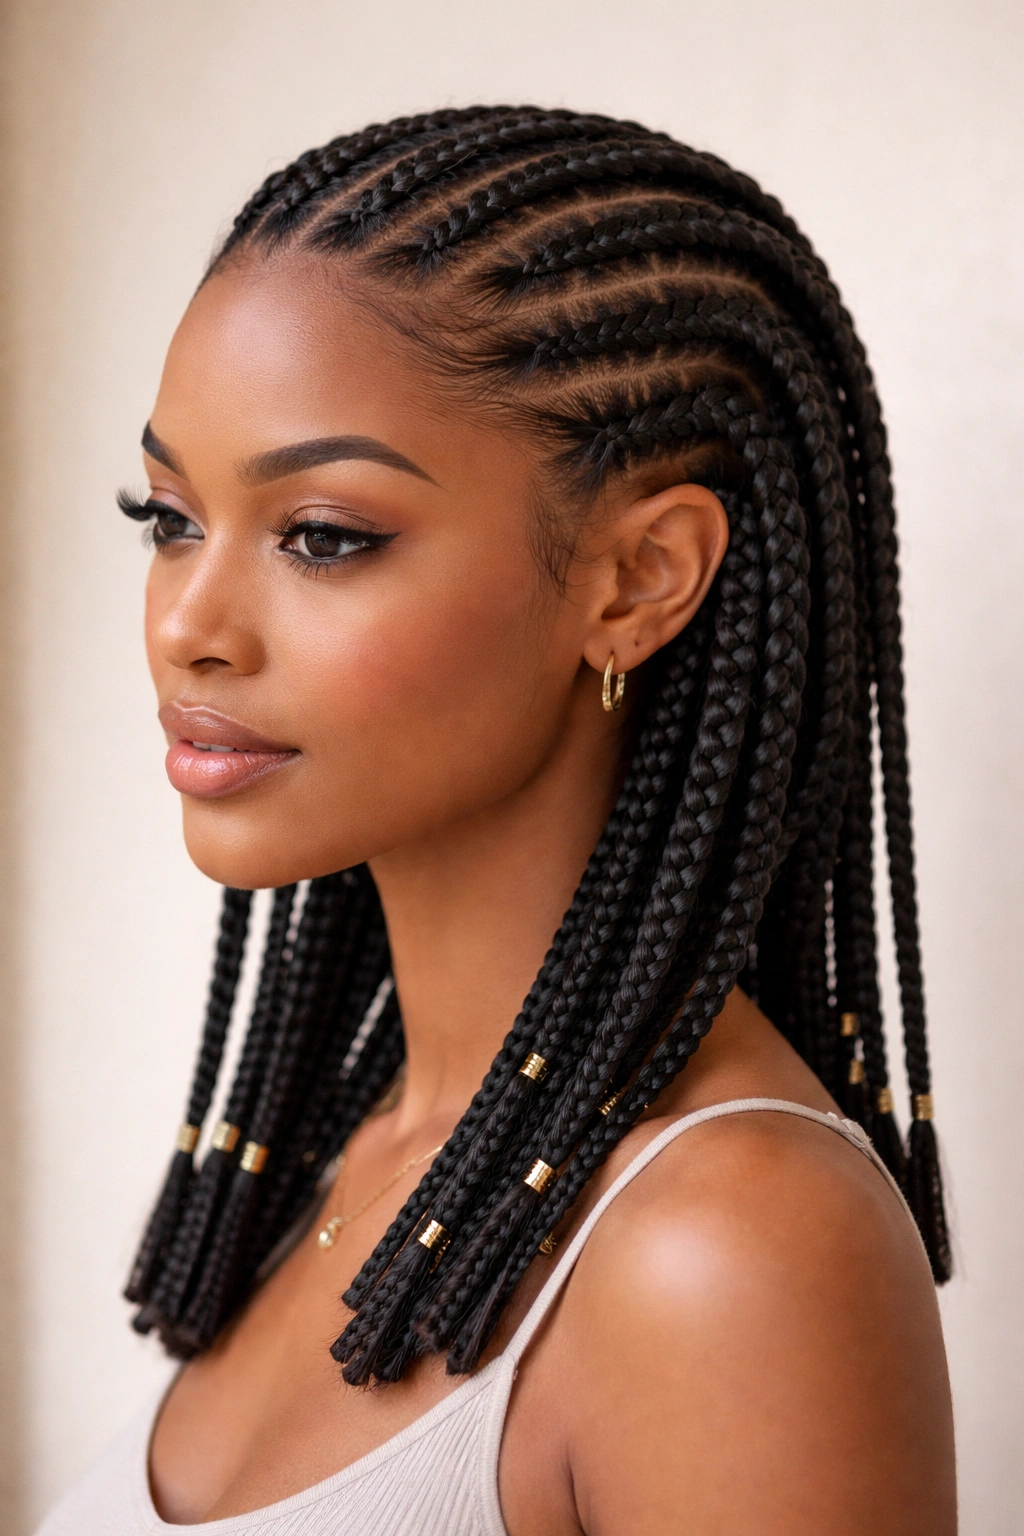
3. Chunky Box Braids with Beaded Ends
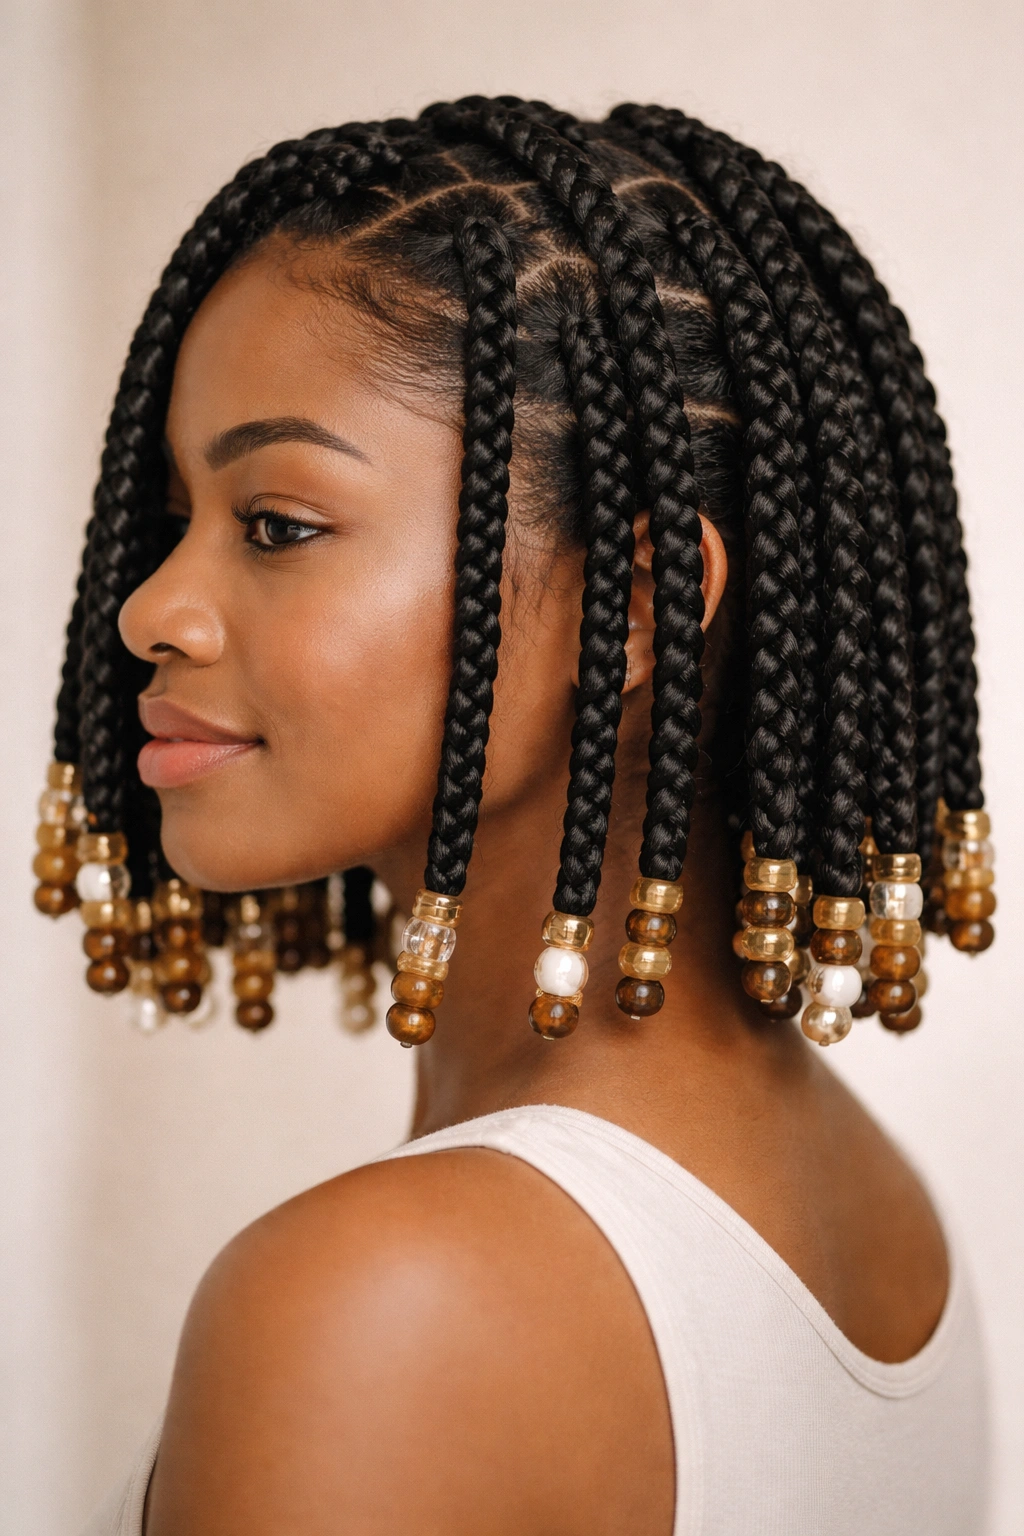
Chunky braids—meaning braids that are roughly ½ to ¾-inch in width—feel like a completely different style category compared to micro braids. When you add beads to the ends, you get movement, visual interest, and a playful vibe that’s hard to achieve with thin braids. The beads catch light and create a rhythmic sound when you move, adding a sensory element that reminds you that your hair is there and feels great.
Why This Works for Short Hair
Fewer, thicker braids mean less installation time and less overall weight on your head. Your short hair gets the protective benefits of braiding without the heaviness that can sometimes come with micro box braids. The beads serve as visual endpoints that give your braids a finished, intentional look even though your length is limited. They’re also deeply practical—beads prevent unraveling and add durability to your style.
Selecting and Placing Beads
- Choose beads with a hole slightly larger than your braid thickness—they should slide freely but not fall off
- Metal beads add a bold, statement look; wooden beads feel warm and organic; acrylic beads offer endless color variety
- Cluster beads toward the very ends of your braids, or space them evenly along the length for different effects
- Place beads at different heights on different braids for organic, unmatched-on-purpose styling
- Lock beads in place with a small rubber band or thread tied beneath them
Pro tip: Add beads gradually over the life of your style—start with a few at week one, add more at week three when you’re getting bored, and switch out bead styles to refresh the look without reinstalling braids.
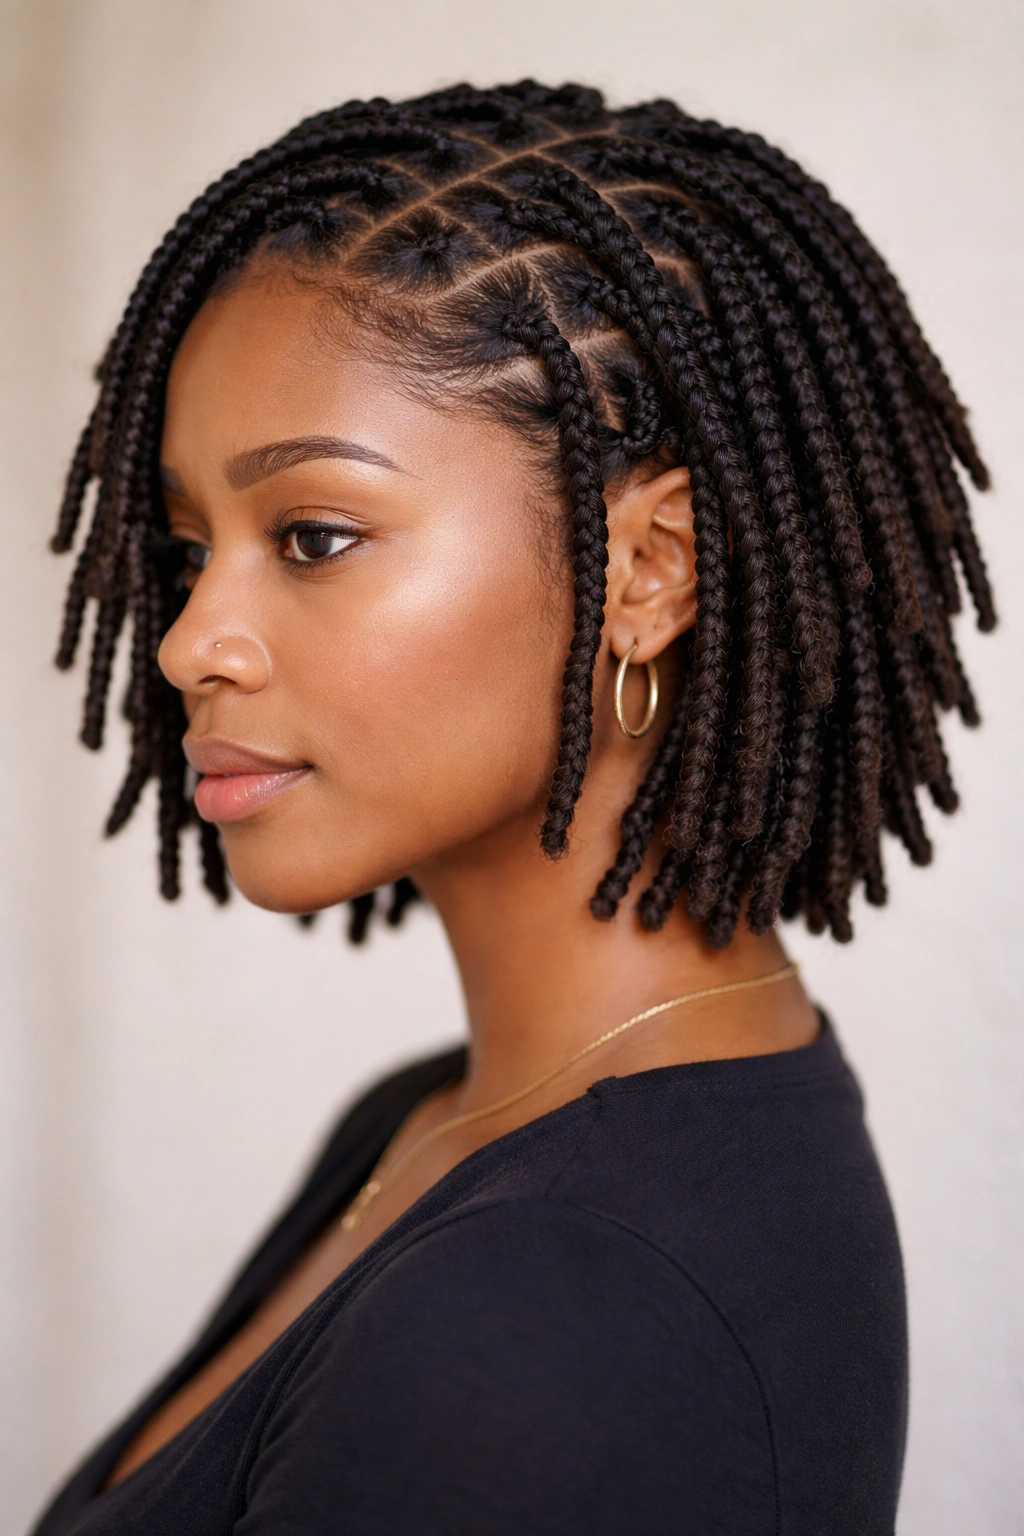
4. Twisted Box Braids with Spiral Texture
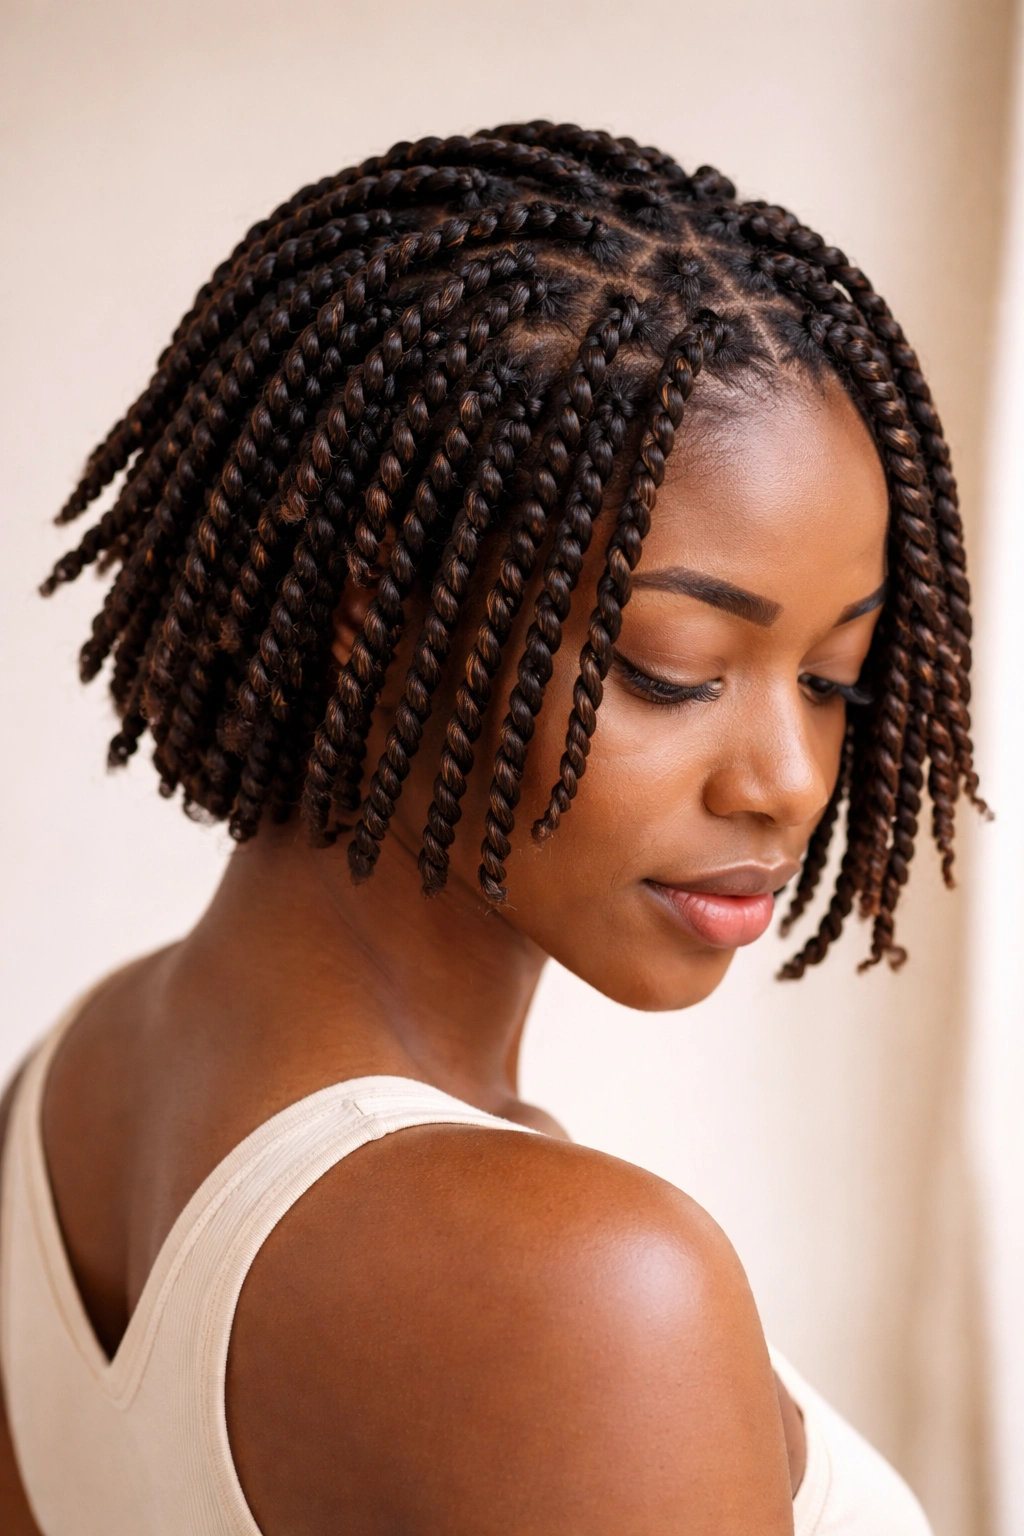
Twisted braids aren’t quite box braids in the traditional sense, but they offer similar protection while creating a distinctly different visual texture. They’re created by twisting two sections of hair together (rather than braiding three sections), resulting in a more rope-like, spiraled appearance. On short hair, this textured variation reads as intentional and artistic rather than a compromise.
Why This Works for Short Hair
Twisted braids actually require less hair per section than box braids, so they work beautifully on finer or shorter textures. The spiral pattern catches light differently than braids, creating dynamic visual interest. Because they’re structurally simpler (two sections instead of three), they’re faster to install and slightly less labor-intensive. The lighter, more delicate appearance suits short hair that might look overwhelmed by thicker braids.
Creating the Twist Texture
- Divide hair into sections similar in size to what you’d use for box braids
- Take two strands and twist them around each other tightly, keeping tension consistent
- Use extensions for length and durability, securing the twist at the base with a small rubber band
- The spiral naturally becomes more pronounced as the twist becomes tighter and longer
- Create soft, loose twists for a more relaxed vibe, or tight twists for a sculptural, defined look
Inside knowledge: Many people find twisted braids more comfortable than box braids on their scalp because the tension is distributed slightly differently—the two-section structure doesn’t pinch quite as intensely.
5. Side-Swept Short Box Braids
Rather than braids distributed evenly across your entire head, a side-swept arrangement pulls most of your braids toward one side of your face, creating dramatic asymmetry. This style works particularly well on short hair because it creates visual length through directional flow and makes your face and bone structure the focal point. It’s a style that feels intentionally fashion-forward rather than purely practical.
Why This Works for Short Hair
Side-swept styling creates an illusion of movement and flow even when your actual hair length is minimal. By concentrating braids on one side, you add volume and presence to that side of your head, which creates visual interest and flatters most face shapes. This asymmetrical approach feels modern and deliberate—like you chose it for style, not just convenience. It also gives you freedom to show off your natural hair texture on the less-braided side.
Achieving the Asymmetrical Look
- Create more braids on your dominant side (the side they’ll sweep toward)
- Create fewer, larger braids on your non-dominant side, or leave some hair unbraided for contrast
- Install braids at a slight angle toward the side you want them to sweep toward
- Use bobby pins and styling product to gently direct braids along your face and over your ear
- Leave some braids loose and full, while smoothing others closer to your scalp for dimensional texture
Pro tip: This style works especially well if you have a fade or undercut on one side—the contrast between the braided side and the sculpted side is genuinely stunning.
6. Cornrow Crown with Hanging Box Braids
This style creates a halo of cornrows around the perimeter of your head—your hairline, temple area, and back—while allowing box braids to hang freely from the crown area. It’s practical because the cornrows protect your edges and create a secure base, while the hanging braids add movement and style. It’s also protective because the cornrows distribute tension away from your most vulnerable hairline.
Why This Works for Short Hair
The cornrow frame adds sophistication and polish that short hair sometimes needs to feel “styled” rather than just practical. The hanging braids in the center get to be playful and free while the structured cornrows keep everything anchored. This is particularly effective for people with sensitive edges or finer hairlines, as the cornrows can be loosened to reduce tension while still keeping braids secure. It’s also a style that evolves beautifully—you can adjust the braids in the center while keeping the cornrow frame intact.
Building the Crown Design
- Map out 2-3 cornrows around your hairline, starting from one temple and ending at the other
- Create additional cornrows along the back if you have enough length and hair density
- Create a circular or oval opening in the center where braids will hang freely
- Install box braids only in this center area, allowing them to fall naturally without being pulled or pinned
- Use coordinating or contrasting extension colors to make the division between cornrows and braids visually clear
Real talk: This style typically lasts longer than all-braids styles because the cornrows don’t experience as much movement and friction as freely hanging braids, so they stay neat and fresh longer.
7. Tiny Micro Braids for Maximum Detail
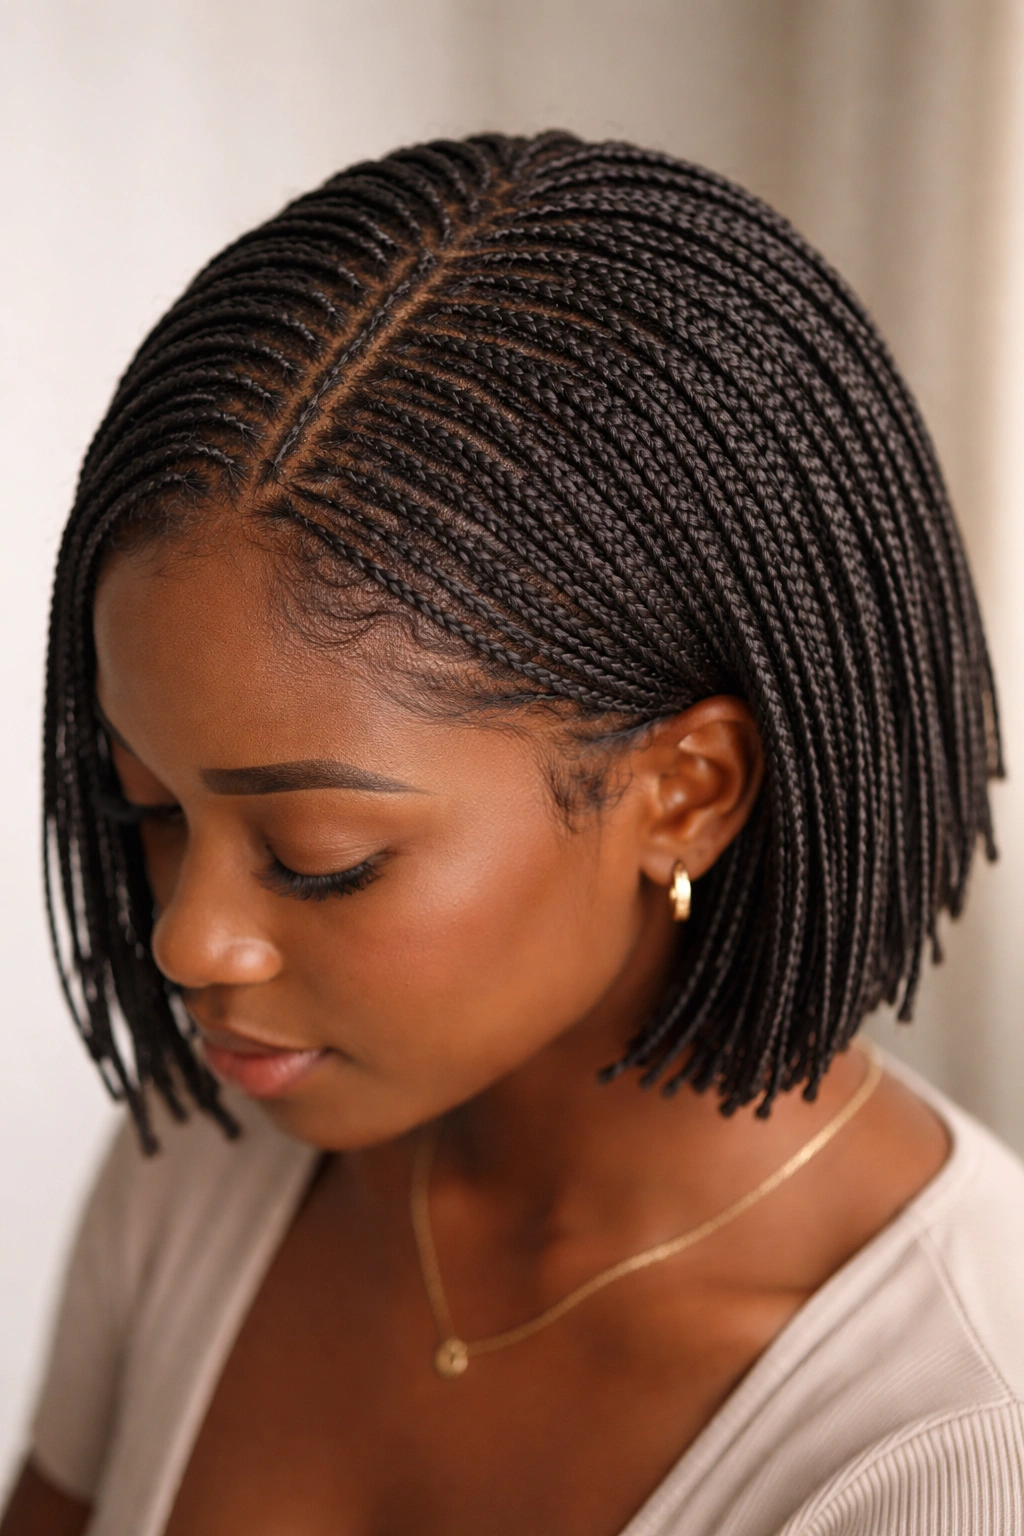
Micro braids are the smallest box braid style option—typically ⅛-inch wide or even thinner. On short hair, micro braids create an almost lace-like, intricate appearance that feels uniquely delicate and detailed. They show off length of your actual hair and create a fuller appearance than thicker braids, which can be visually striking on shorter cuts.
Why This Works for Short Hair
Micro braids make short hair look fuller and more textured because each individual braid is so slender. They’re ideal if you have finer hair texture naturally, as they don’t feel bulky or heavy. The installation is more time-consuming (often 5-8 hours for a full head), but the result is a style that feels intricate, intentional, and delicate. They also age beautifully—as they loosen slightly over time, they develop a softer, more natural texture that’s genuinely lovely.
What to Know Before Getting Micro Braids
- Expect installation to take 6-8 hours for a full head on short hair (still faster than on long hair)
- Use very fine extension thread or hair that matches your natural texture closely
- These braids require gentle handling—avoid excessive manipulation or pulling
- They last 6-8 weeks before needing tightening, longer than some other styles
- Sleep with a silk bonnet or on a silk pillowcase to preserve definition
Worth knowing: Micro braids are often the most protective style option because individual braids are so small and tight that they minimize friction between your hair and the outside world.
8. High Ponytail with Braids Wrapped Around Base
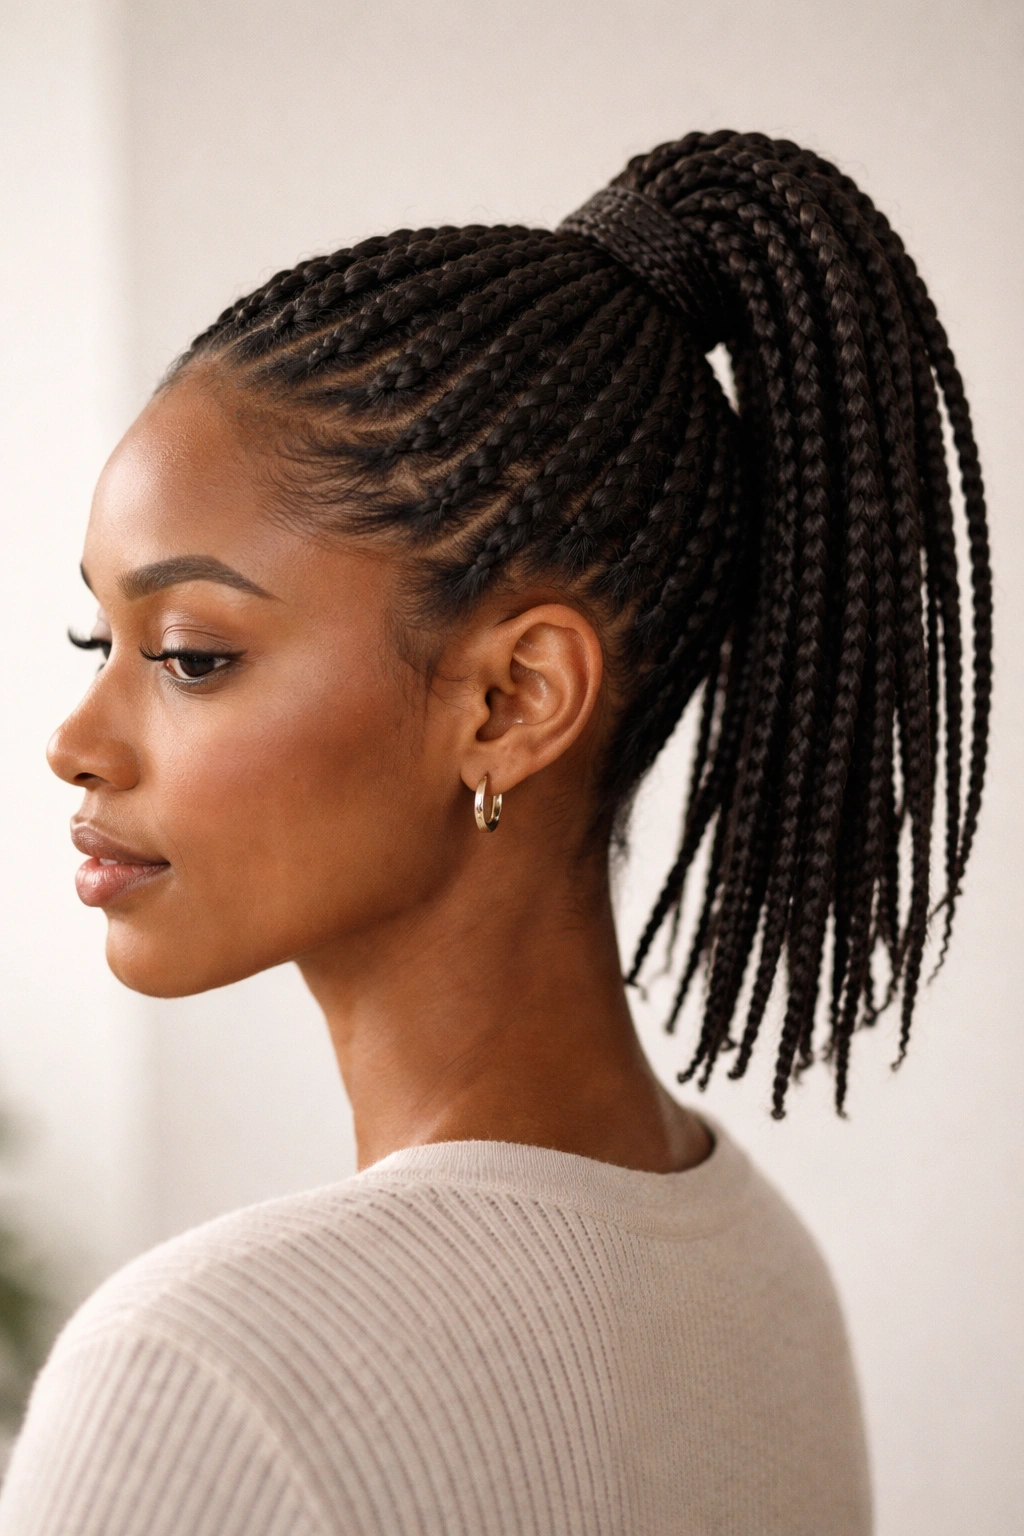
Gather your short box braids into a high ponytail at your crown, then use one or two of the braids to wrap around the base where the elastic is, creating a wrapped, finished look. This transforms your braids into a completely different silhouette while keeping everything secure and neat. It’s a style that works for everything from professional settings to casual days.
Why This Works for Short Hair
A high ponytail instantly adds vertical lift and visual height, which is particularly valuable for short hair. The wrapped base detail feels intentional and polished, transforming simple braids into something more styled and finished. It also gives you a style transition—you can wear your braids down for several days, then gather them up for a completely different look. This versatility extends the lifespan and interest of the style.
Creating the Wrapped-Base Technique
- Install box braids normally across your entire head
- Gather braids at the crown into a secure high ponytail using a clear elastic band
- Select 1-2 braids and gently wrap them around the base of the ponytail, covering the elastic
- Secure the wrapped braids with bobby pins, tucking the ends underneath so they’re hidden
- Fluff the ponytail slightly to add volume and soften the look
- Smooth your hairline and baby hairs with edge control for a finished appearance
Pro tip: You can alternate this style with loose braids throughout the week—ponytail on Monday, loose on Tuesday, creating visual variety without any actual styling work.
9. Braids with Colorful Ribbon Weaving
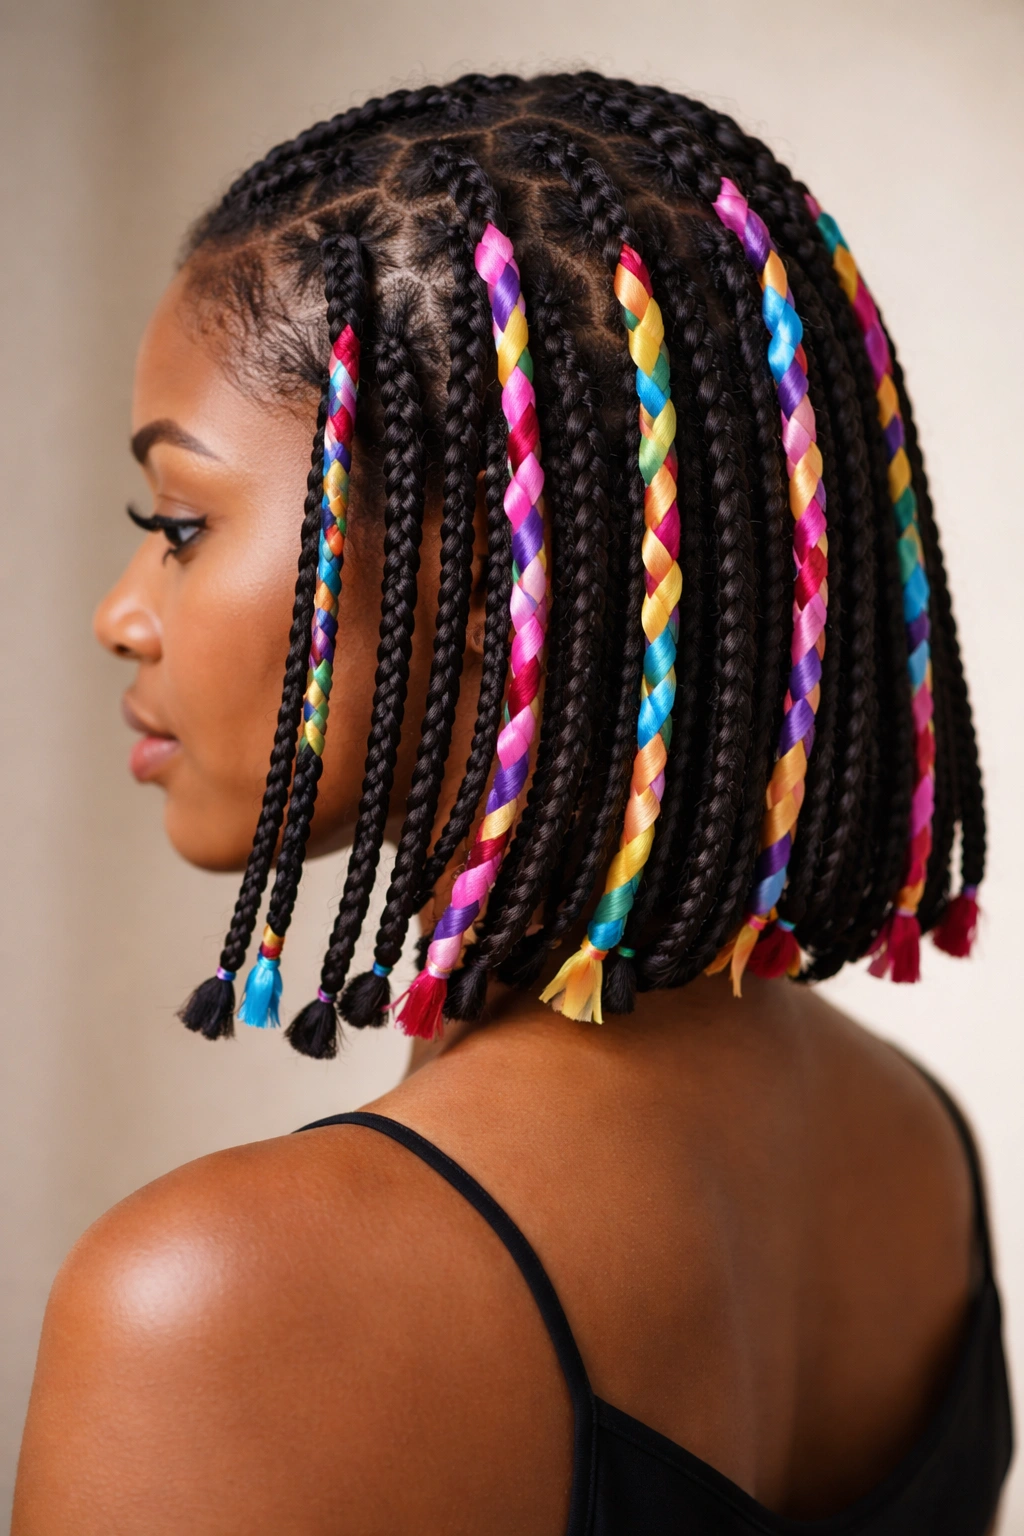
Instead of using traditional hair extensions for box braids, weave thin ribbons, yarn, or embroidery thread through each braid, or braid ribbons alongside your hair. This technique lets you add color and pattern without committing to colored hair extensions. Ribbons can be metalllic, patterned, or richly colored, and they create visual impact with minimal actual color commitment.
Why This Works for Short Hair
Ribbons create visual interest and movement through color and texture without adding bulk or weight. On short hair, they’re particularly effective because they stand out clearly against your natural hair texture and length. The technique is also more affordable than full-head colored extensions, and you can change the ribbon color weekly if you want variety. The weightlessness of ribbon makes it ideal for protective styling without the heaviness of extensions.
Incorporating Ribbons Into Braids
- Choose ribbons in widths from ¼-inch to ½-inch depending on your braid thickness
- Braid your hair, then thread ribbon through the completed braids by using a needle and careful hand-work, or braid ribbon in alongside hair as you create each braid
- Weave different colored ribbons through different braids for rainbow effect, or use coordinating colors for a more subtle look
- Secure ribbon ends inside the braid with a small knot or by braiding them into the final few inches
- Choose moisture-resistant ribbon that can handle the humidity and friction of being worn against your hair
Insider note: Metallic and holographic ribbons photograph beautifully and add an intentional, artistic quality that reads as intentional style choice rather than just length-adding.
10. Zigzag and Diagonal Braid Patterns
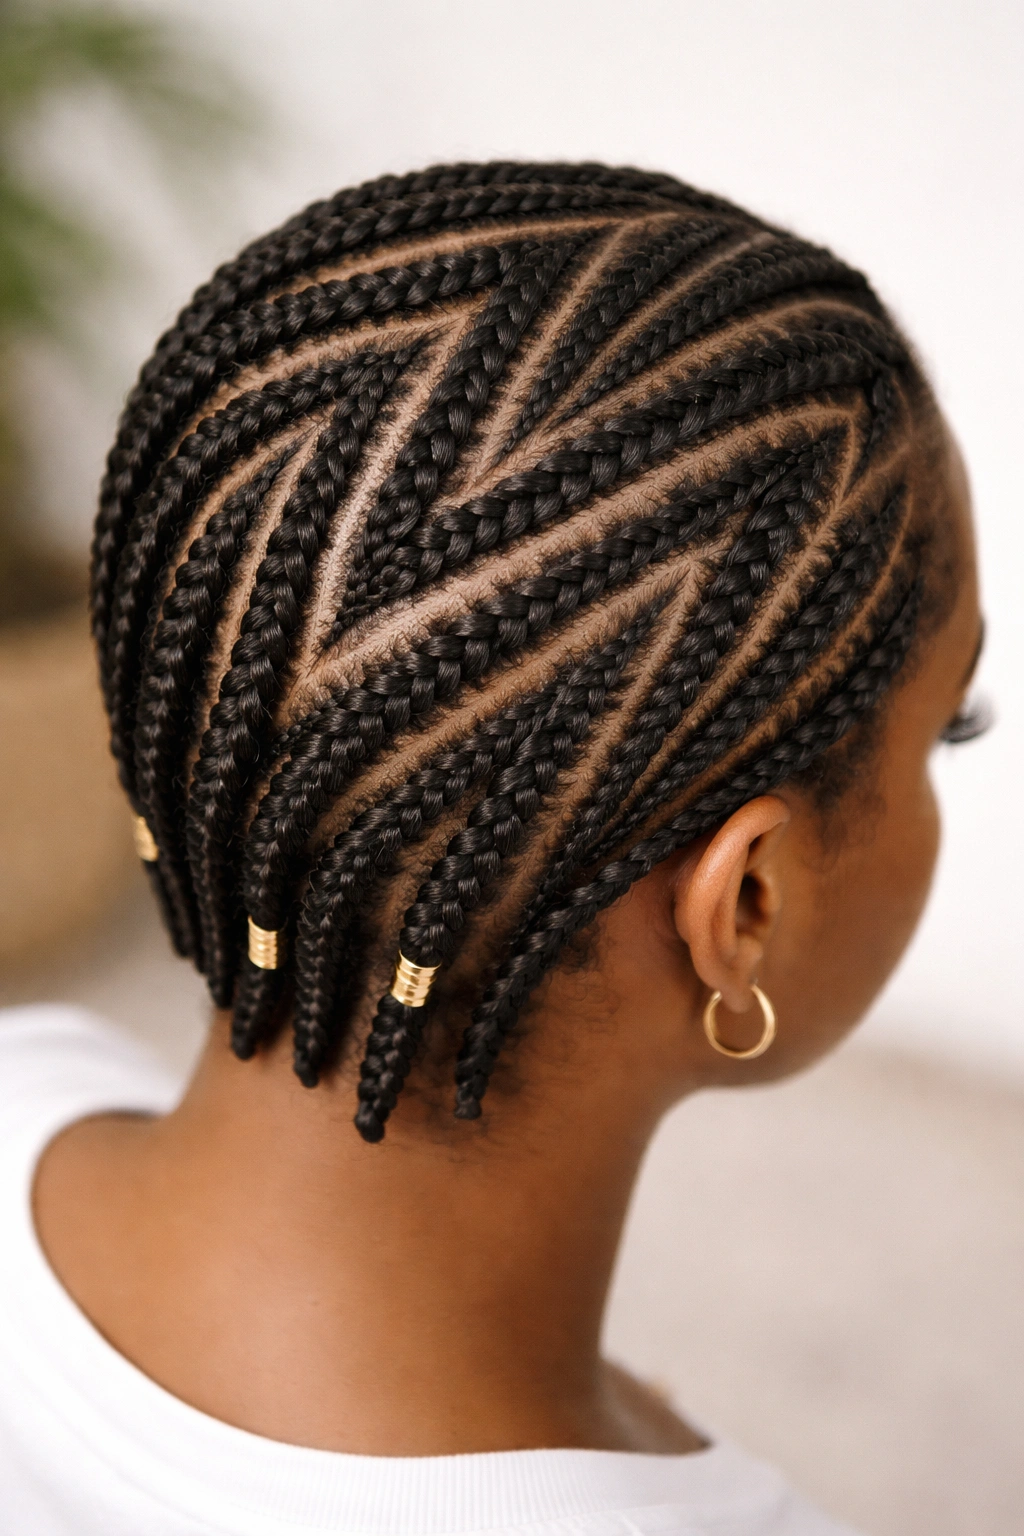
Rather than creating box braids in straight vertical lines, arrange them in a zigzag pattern across your head, or diagonal lines running from your hairline toward the back. This geometric patterning is visually striking and feels architectural and intentional. It’s a style that works beautifully on short hair because the pattern itself becomes the visual focus.
Why This Works for Short Hair
Geometric braid patterns create visual complexity and interest that compensates for shorter length. The pattern itself draws the eye and creates an impression of greater styling intention than simple vertical braids. Zigzag and diagonal patterns also follow the natural contours of your head beautifully, creating lines that are flattering and visually sophisticated. This approach feels less like “I braided my hair for protection” and more like “I designed this intentionally.”
Mapping Your Pattern
- Lightly section your head according to the pattern you want—zigzag, diagonal, triangular, or even more complex geometric designs
- Use a sectioning tool and clips to mark out each section clearly before braiding
- Braid each section following your pattern lines, keeping sections consistent in size for a clean look
- Step back periodically to check that your pattern is visually balanced and reads as intentional
- Use edge control and finishing products to smooth any flyaways and emphasize your pattern lines
Real talk: This approach requires more planning and precision than simple braiding, so either do it yourself if you’re comfortable, or bring your pattern idea to your braider with clear photos or a sketch.
11. Braided Mohawk with Loose Sides

Create a line of box braids running from your forehead straight back along the center of your head, like a Mohawk, while leaving your hair on either side of that line unbraided. This creates dramatic contrast between the structured center and the loose, textured sides. It’s bold, visually striking, and absolutely doable on short hair.
Why This Works for Short Hair
A braided Mohawk creates instant visual drama and height without requiring length. The structured center line draws the eye straight up, creating vertical lift that short hair needs. The loose sides show off your natural texture and create contrast that keeps the style from feeling one-note. This is a style that reads as intentional, artistic, and fashion-forward rather than purely protective.
Creating the Mohawk Effect
- Section hair from your center hairline straight back to the nape of your neck, creating a line about 1-2 inches wide
- Create box braids only within this center section, using medium-sized braids for clean, defined look
- Leave your hair on both sides completely unbraided, allowing it to sit in its natural texture
- Style the unbraided sides with curl cream or styling product to enhance definition
- Smooth and fluff your edges around the braided line for a clean, intentional transition
Pro tip: This style works beautifully if you have distinct curl or coil texture—the contrast between the defined braids and the voluminous natural texture is genuinely artistic.
12. Low Bun with Braids Wrapped and Pinned
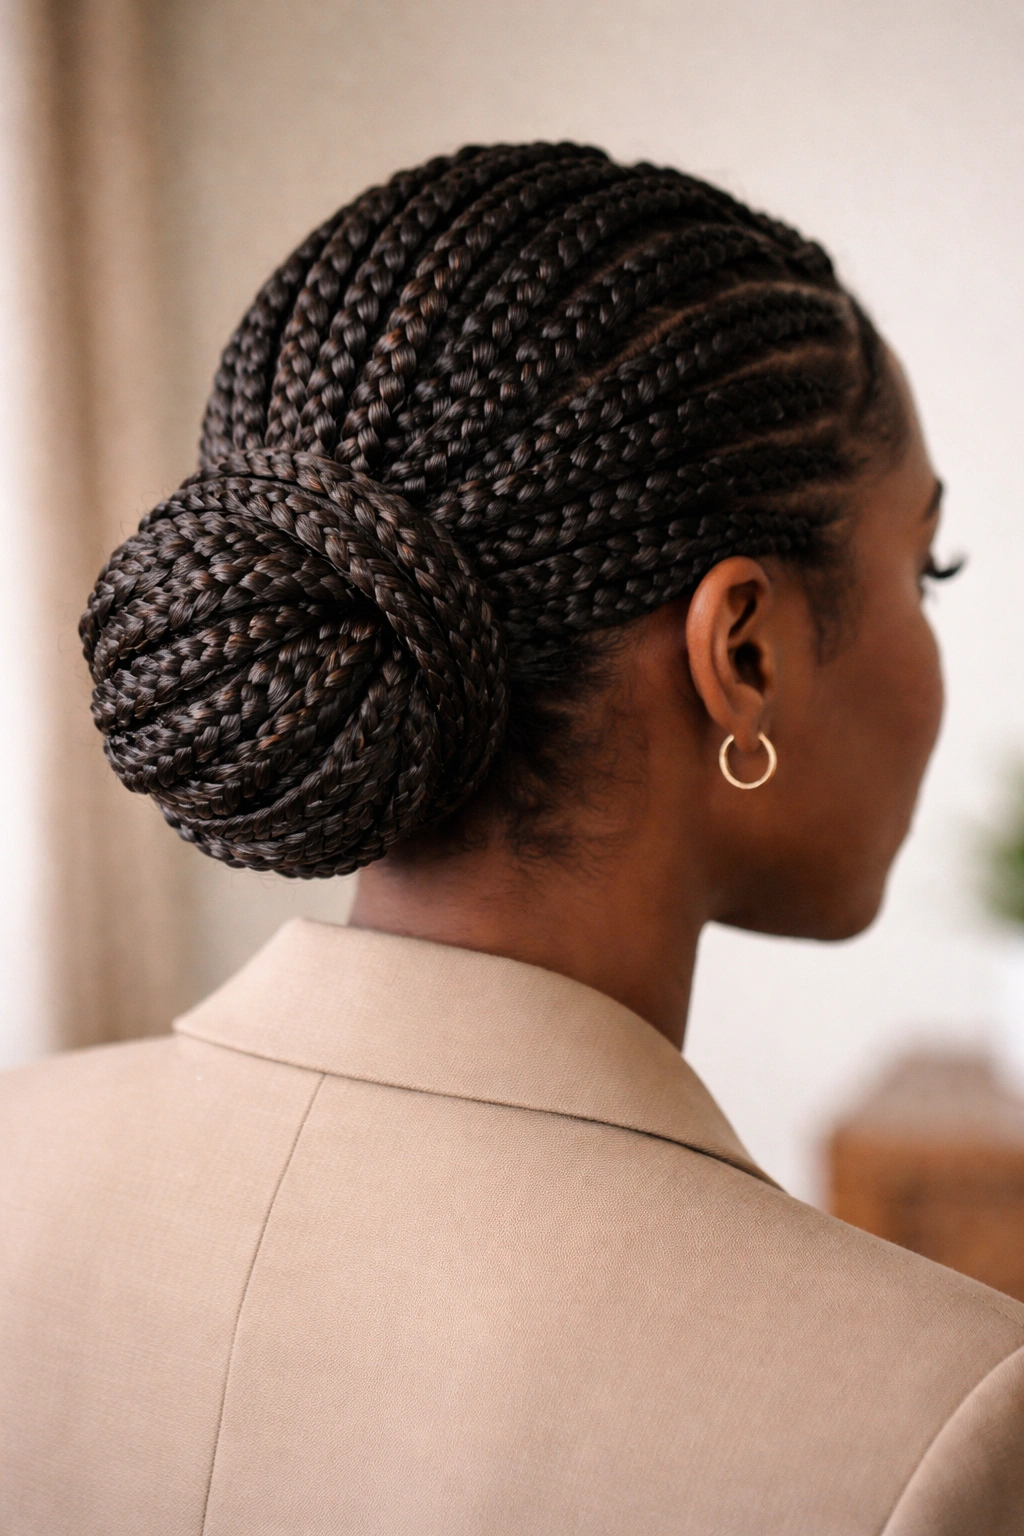
Create box braids across your entire head, then gather them into a low bun at the nape of your neck. This style is professional, elegant, and works for formal settings, workplaces, or anytime you want a polished, put-together look. On short hair, a low bun with braids feels more interesting and textured than a sleek bun would, while remaining completely professional.
Why This Works for Short Hair
A low bun instantly makes short hair look longer visually and creates the impression of more volume and texture. Braids in a bun are much more forgiving than straight hair in a bun—they hold their shape better and look intentionally textured rather than thin or slicked. This style is protective because your braids are gathered safely away from your face, reducing friction and manipulation. It’s also incredibly versatile—you can wear it down for casual days and up for professional settings, getting two distinct styles from one set of braids.
Styling Braids Into a Low Bun
- Create box braids across your entire head, leaving them long enough to gather at the nape
- Gather all braids at the back of your head at approximately ear-level height, securing with an elastic band
- Gently twist the braids together and coil them into a bun shape, tucking loose ends underneath
- Secure the bun with bobby pins, placing pins in multiple directions for stability
- Leave a few small braids slightly loose around the bun perimeter for a softer, less severe look
Worth knowing: This style typically lasts through multiple days of wear—you can wear it down one day and up the next without any braid reinstallation.
13. Colored Ombre Braids Fading From Root to Tip
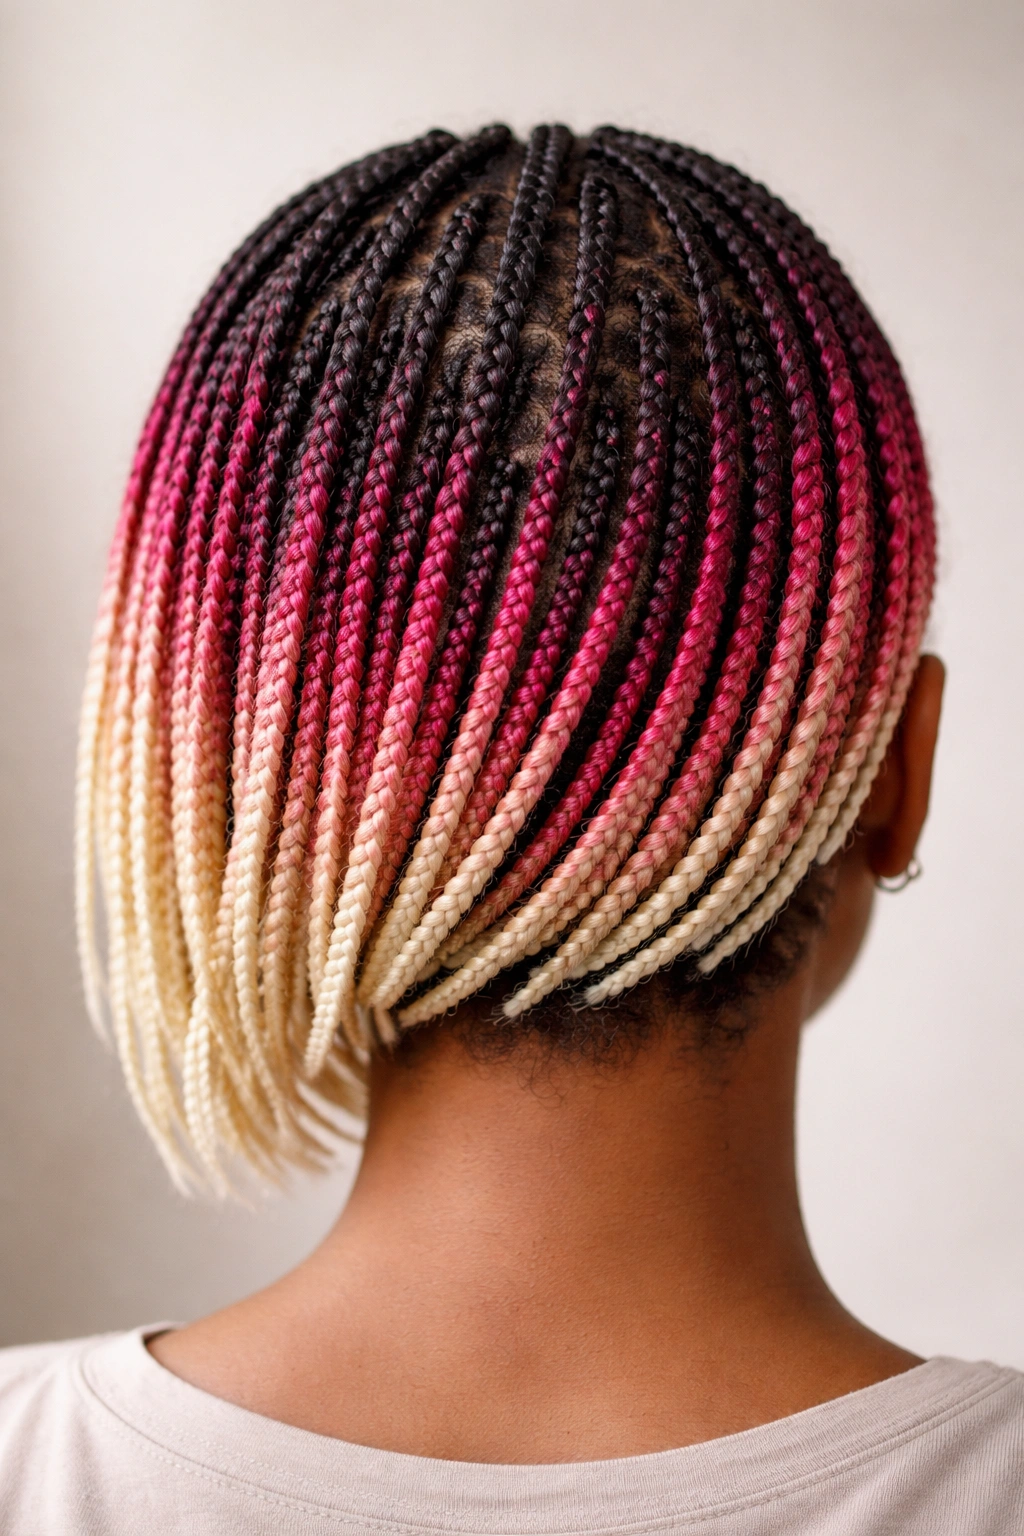
Install box braids using extensions in a color that creates an ombre effect—darker shades near your roots fading to lighter shades toward the ends. This color technique is particularly striking on short hair because the gradient is visible across your entire head rather than just on a few long strands. The color creates depth and movement while the braids provide texture and protection.
Why This Works for Short Hair
Ombre braids create the illusion of longer, multi-dimensional hair through color alone. The gradient draws the eye downward, creating visual length that your actual hair length might not provide. This approach also allows you to try bold color without committing your actual hair—the extensions do the color work. On short hair, the color effect is even more striking because it’s visible from every angle and in different light, whereas it might be more subtle on long hair.
Creating the Ombre Effect
- Choose two or three coordinating extension colors that will create your desired gradient
- Divide your hair into sections and install braids using the darkest color first (closest to roots)
- Gradually transition to lighter extension colors as you move across your head toward the ends
- The transition should feel gradual and blended, not have harsh color breaks (usually 2-3 inches of blend per color change)
- Use braids in the darkest shade closest to your roots, mid-tone colors in the center, and lightest colors toward the tips
Pro tip: Warm-to-cool ombre (warm browns fading to cool ash) is particularly striking and photographs beautifully, as is cool-to-warm (cool silver fading to warm gold).
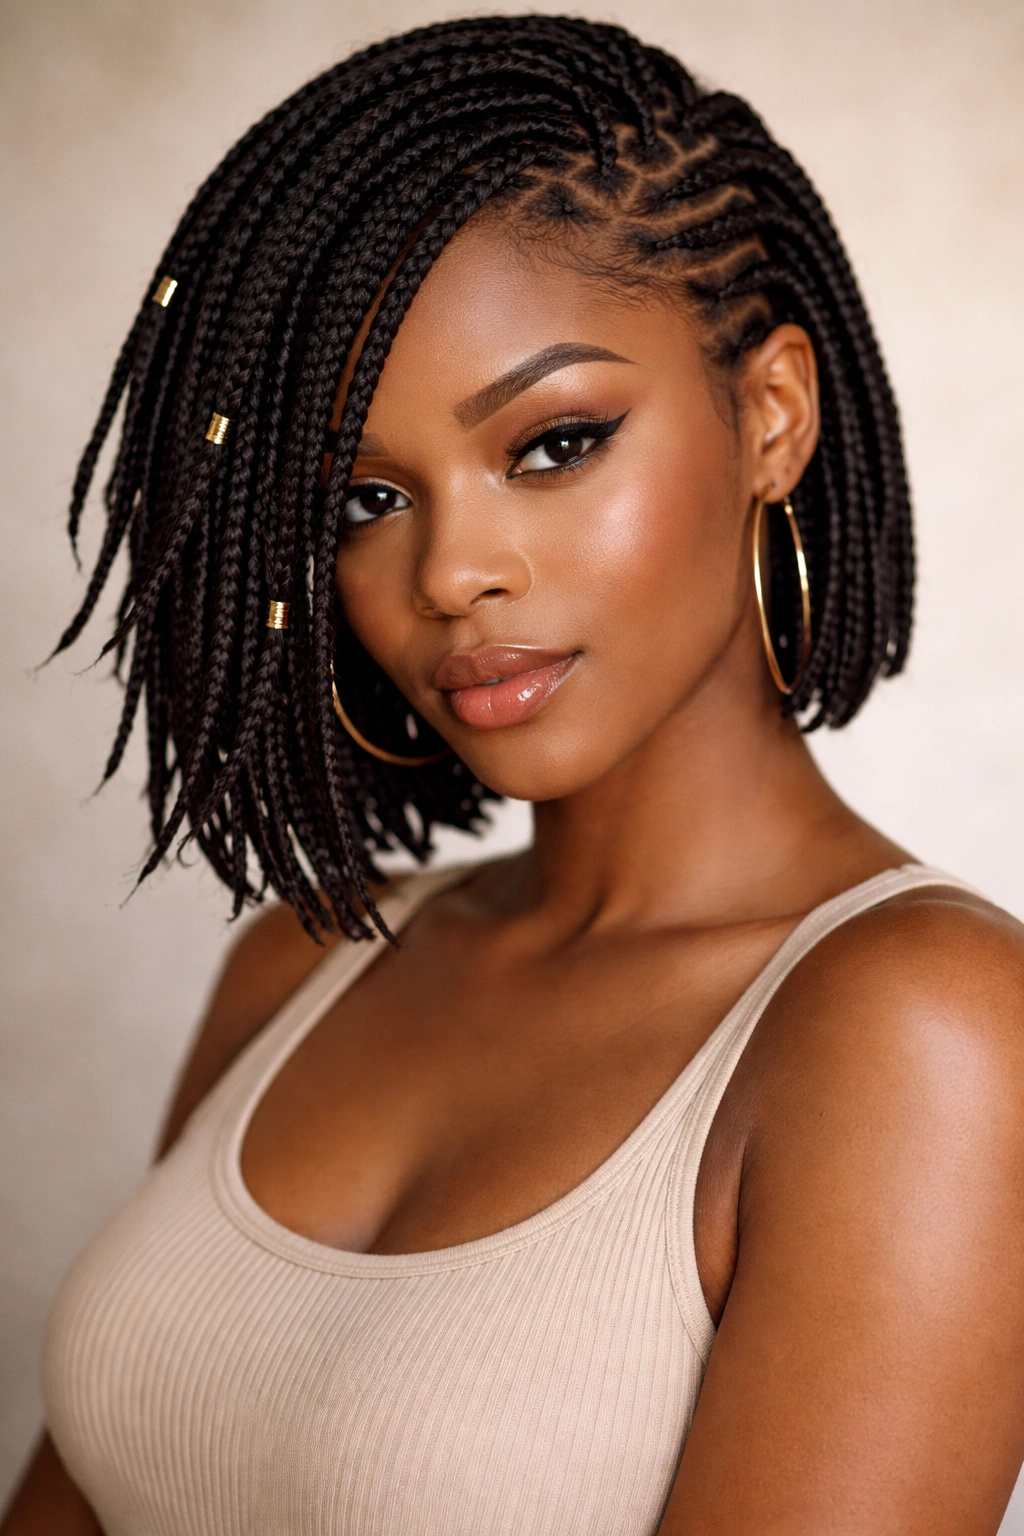
14. Braids with Metallic Cuffs and Accessories

Rather than leaving braid ends plain or using traditional beads, use metallic or decorative cuffs positioned strategically along your braids. Metal cuffs add geometric visual interest and a modern, edgy vibe. They catch light and create visual punctuation along your braids. This approach works beautifully on short hair where accessories become more prominent and architectural elements.
Why This Works for Short Hair
Cuffs positioned along shorter braids create visual segments and structure. They read as intentional styling choices rather than practical additions. The metallic finishes catch light, adding shine and dimension. Cuffs also offer durability benefits—they help prevent unraveling and add longevity to your style. On short hair, a few well-placed cuffs create visual interest without the overwhelming feeling that too many might create on longer hair.
Positioning and Selecting Cuffs
- Choose cuffs in gold, silver, rose gold, or mixed metals depending on your overall aesthetic
- Position cuffs at varying heights along different braids for organic, intentional look
- Space cuffs 2-3 inches apart along a single braid, or place cuffs only on alternating braids
- Use cuffs sized appropriately to your braid thickness—they should grip firmly without being too tight
- Slide cuffs onto braids gently, or purchase cuffs with closing mechanisms that you secure around the braid
Insider knowledge: Stainless steel and brass cuffs are most durable for long-term wear, while acrylic and plastic cuffs offer more color variety and lower cost.
15. Braided Locs Hybrid Style
Create box braids using a locking technique—where you braid tightly and intentionally lock the hair fibers together. Over time (usually 2-4 weeks), these transition toward loc-like texture. This creates a hybrid style that looks like braids initially but develops a fuller, more textured appearance. It’s a low-commitment way to try loc texture while maintaining protective styling benefits.
Why This Works for Short Hair
This hybrid approach gives you the best of both worlds—the initial neatness of braids with the evolving, natural-looking texture of locs. On short hair, this technique is particularly effective because the locked texture develops more quickly on shorter lengths. The style evolves beautifully as it matures, which keeps it interesting over the 6-8 week lifespan. It’s also slightly less maintenance than traditional locs once they’re established, while still offering maximum protection and minimal manipulation.
Creating the Locking Transition
- Install braids using the locking technique, which involves tighter braiding and intentional fiber interlocking
- Use extensions that match your natural hair texture closely for a seamless transition
- Allow braids to sit undisturbed for the first 2-3 weeks—resist the urge to retwist or adjust
- After 2-3 weeks, you can gently palm-roll or retwist sections if needed, which accelerates the locking process
- By week 4-6, sections will feel significantly more locked and textured, developing a distinct loc-like appearance
Real talk: This style requires patience during the transition period—they look like regular braids initially, but the payoff as they mature into textured locked sections is genuinely beautiful and feels like two different styles you got from one installation.
Final Thoughts
Short hair and box braids aren’t just compatible—they’re actually a genuinely exciting combination that opens up styling possibilities many people never explore. The styles above show just how versatile short-hair braiding really is, from sleek and professional to bold and artistic. The key to rocking any of these styles is understanding that length isn’t the limiting factor—creativity, intentional placement, and attention to texture and detail are what actually matter.
The maintenance advantage of short braids is real and worth acknowledging. Installation is faster, your neck and shoulders aren’t carrying extra weight, and you can refresh your style more frequently without the time commitment required for longer braids. These practical benefits actually free you up to experiment more boldly with color, pattern, placement, and accessories than you might with longer protective styles.
Choose the style that matches your lifestyle and personality. If you’re professional and polished, the high ponytail or low bun options will serve you beautifully. If you want to make a statement, the Mohawk, geometric patterns, or colored ombre braids deliver impact. If you’re still exploring and want flexibility, the hybrid textured braids or side-swept arrangement give you freedom to adjust and evolve. Your short hair is absolutely capable of looking stunning in box braids—it just needs a style that’s designed with short hair’s unique advantages in mind.