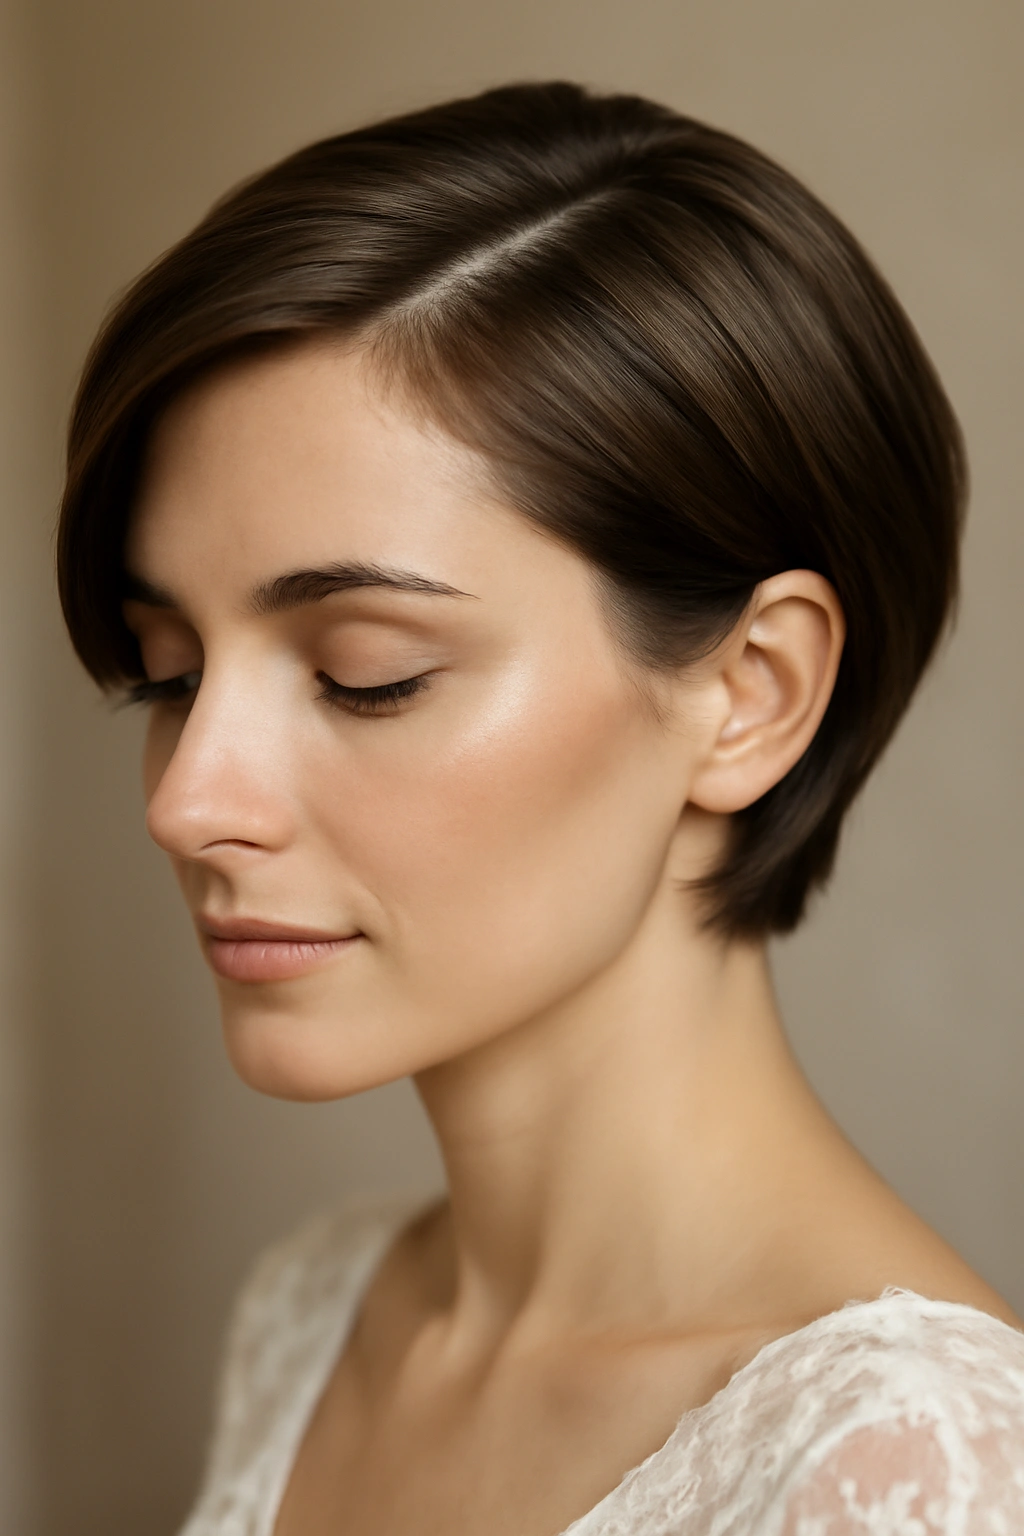
Short hair has undergone a quiet revolution when it comes to wedding styling. Gone are the days when brides with cropped cuts, bobs, or pixies felt limited to simple down styles or minimal adornment. Modern wedding hairstyles for short hair combine texture, movement, dimension, and intentional styling choices that look just as bridal—if not more striking—than their longer-haired counterparts. The secret isn’t length; it’s strategic styling, the right products, and understanding how to work with your hair’s natural characteristics rather than against them.
What makes short hair particularly striking for weddings is that it puts your face, neckline, and the details of your dress or jewelry front and center. Every wave, curl, and pin placement is visible and contributes to the overall look. This requires more precision in execution but also means you can create something genuinely unique that reflects your personality and vision. Whether you’re going for romantic and textured, sleek and sophisticated, or playful and modern, there’s absolutely a bridal style that will make you feel confident and beautiful on your wedding day.
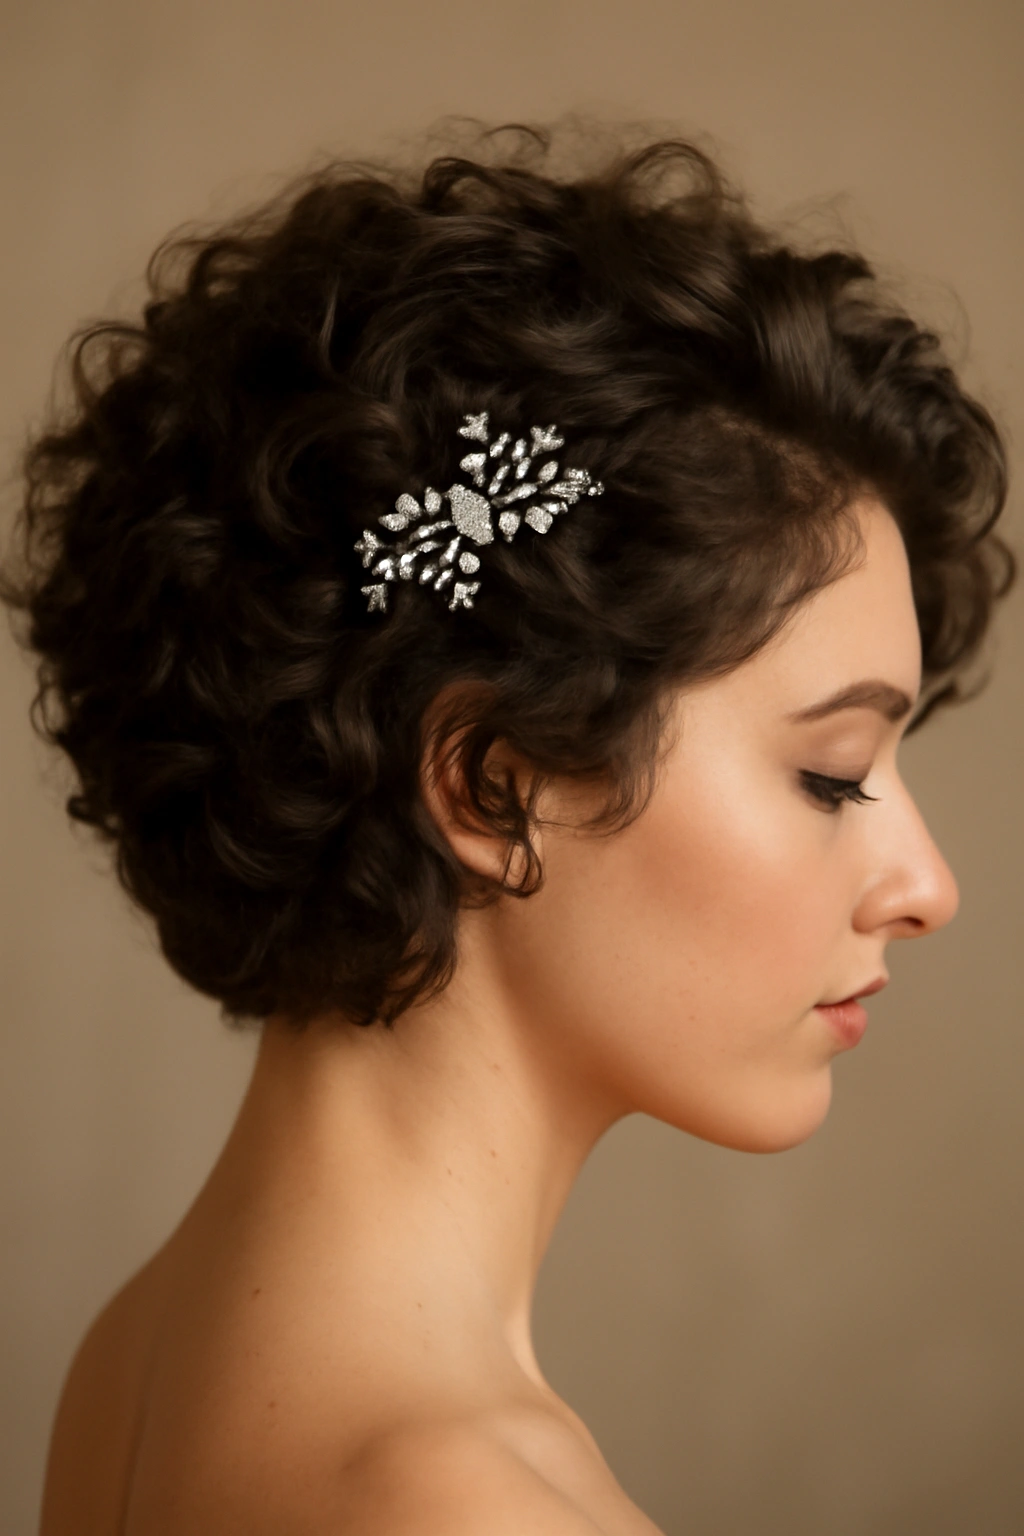
1. Soft Waves with a Jeweled Side Clip
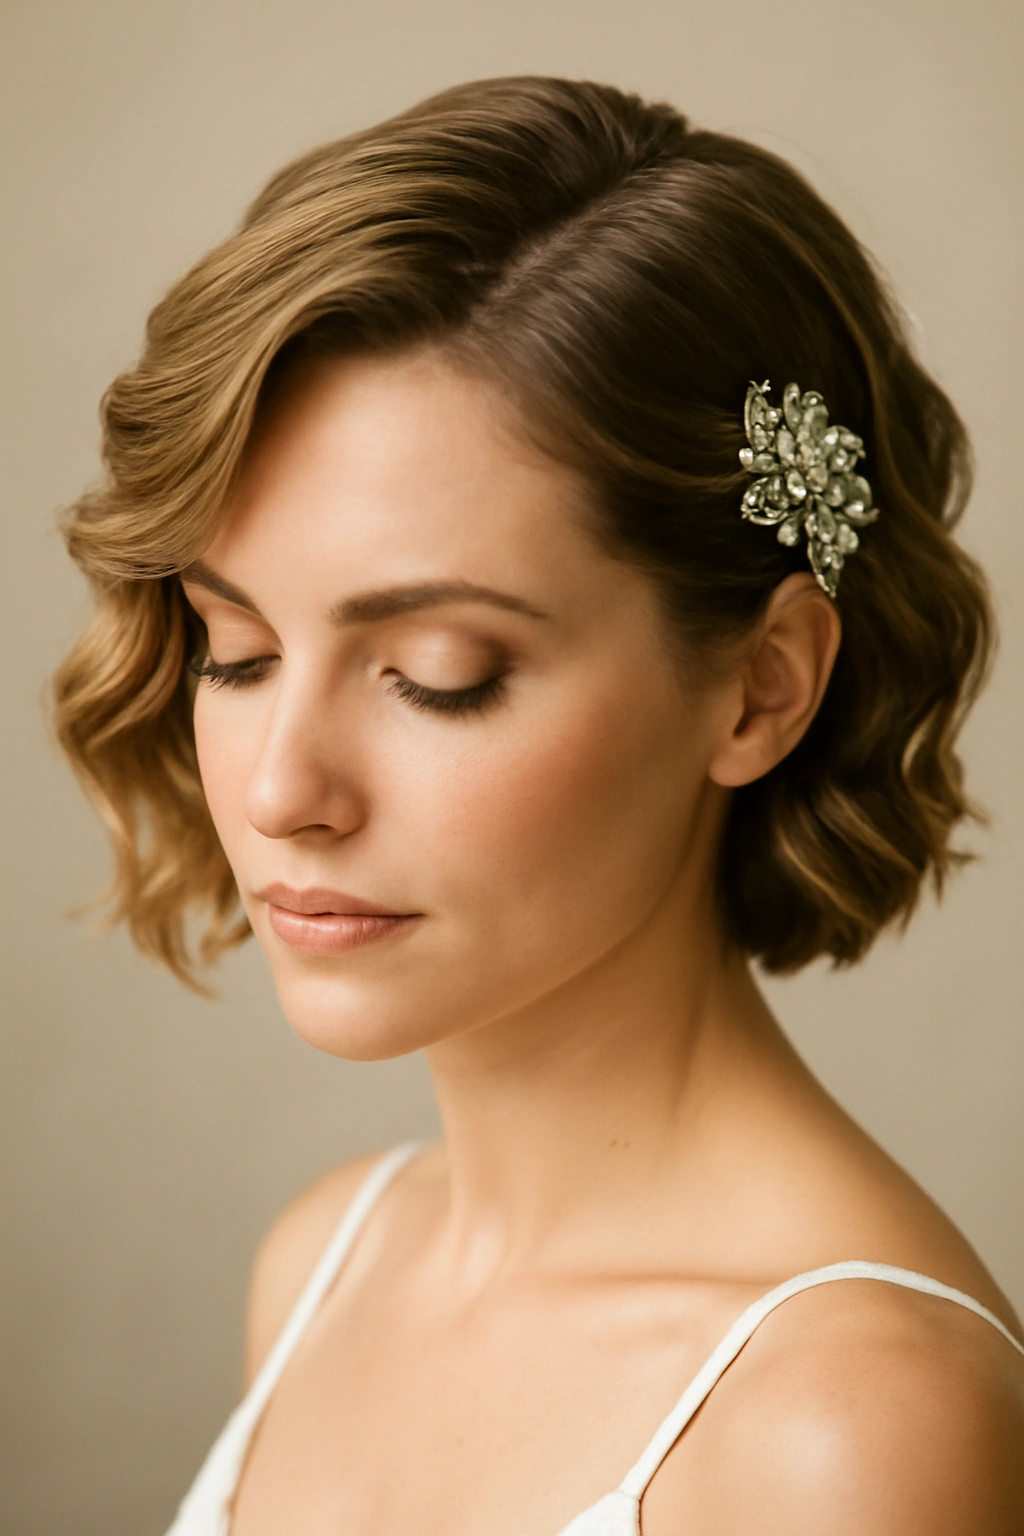
Soft waves work beautifully on short hair because they add volume and movement without requiring length. This classic style begins with creating gentle waves throughout your entire head using a 1.25-inch curling iron, taking small sections and wrapping them away from your face. The waves are then loosely finger-combed through to soften them into a romantic, undone texture rather than tight curls.
Why This Works for Short Hair
The magic of this style is in how waves create the illusion of dimension and fullness. On short hair, soft waves prevent a flat, one-note appearance and give you the romantic bride aesthetic without needing waist-length locks. The waves also frame your face beautifully and add movement when you walk.
Styling Details That Matter
- Use a texturizing spray before waving to give the iron something to grip and prevent slipping
- Pin waves gently with bobby pins while they cool so they hold their shape longer
- Secure a delicate jeweled clip or comb on one side where the waves naturally fall, anchoring the style while adding bridal sparkle
- Finish with a medium-hold hairspray that won’t weigh down the waves or make them feel stiff
- The clip should sit about 2-3 inches back from your temple, creating an asymmetrical, intentional look
Pro tip: Practice creating consistent wave size beforehand — the more uniform your waves, the more polished the overall effect, even though it reads as effortlessly romantic.
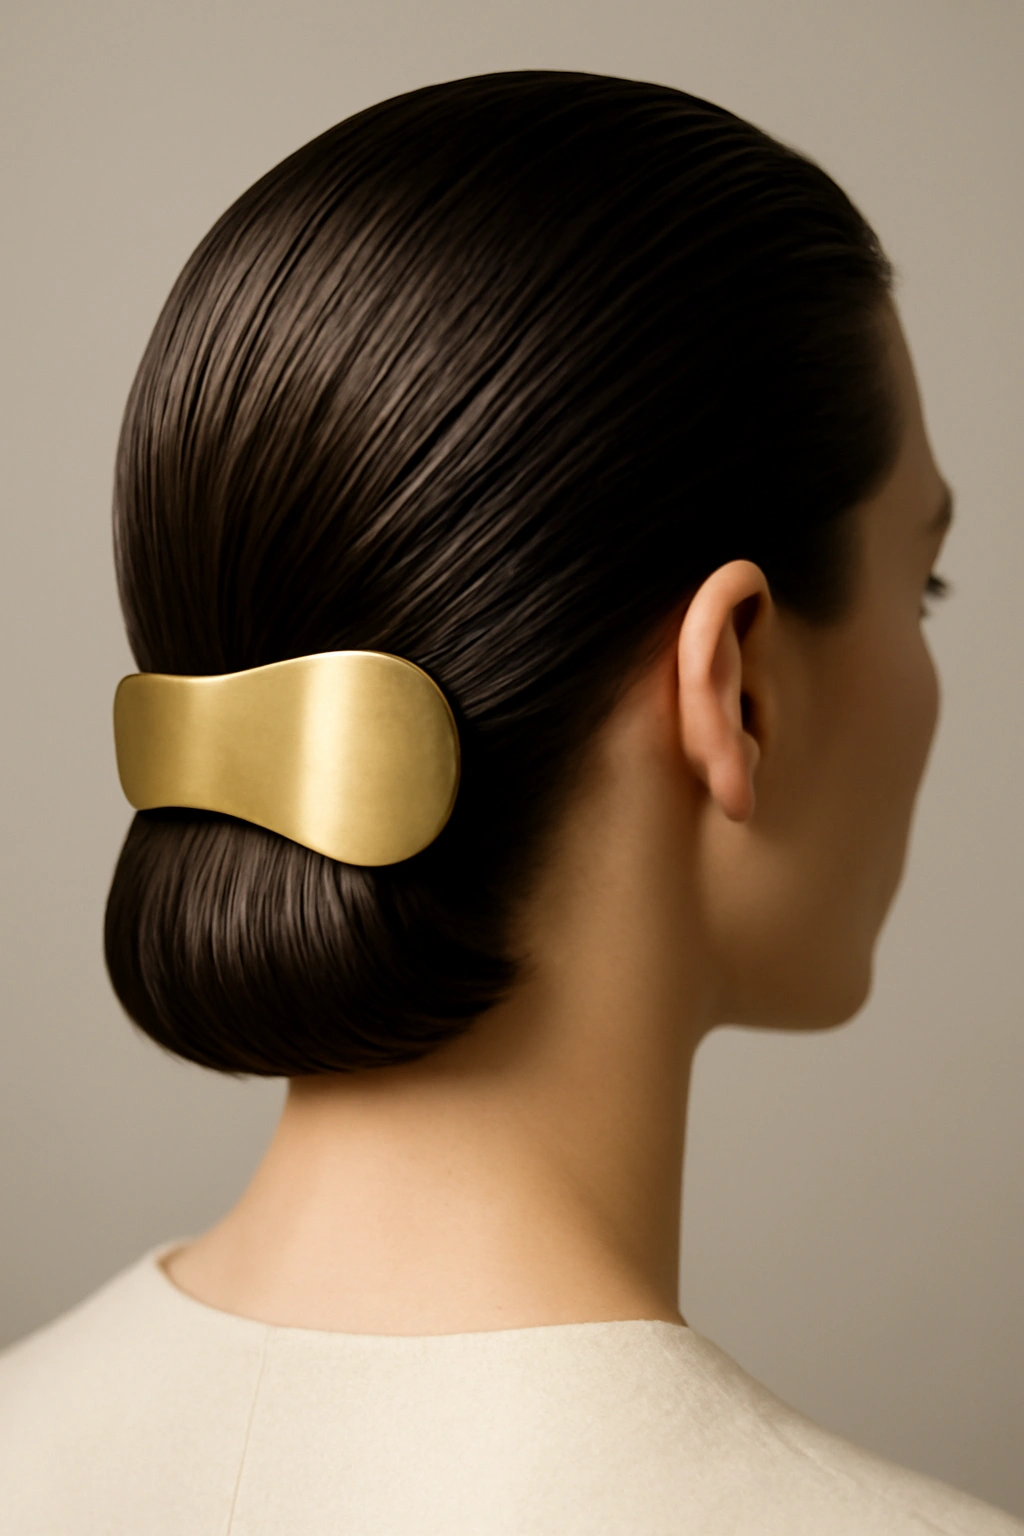
2. Sleek Low Bun with Face-Framing Pieces
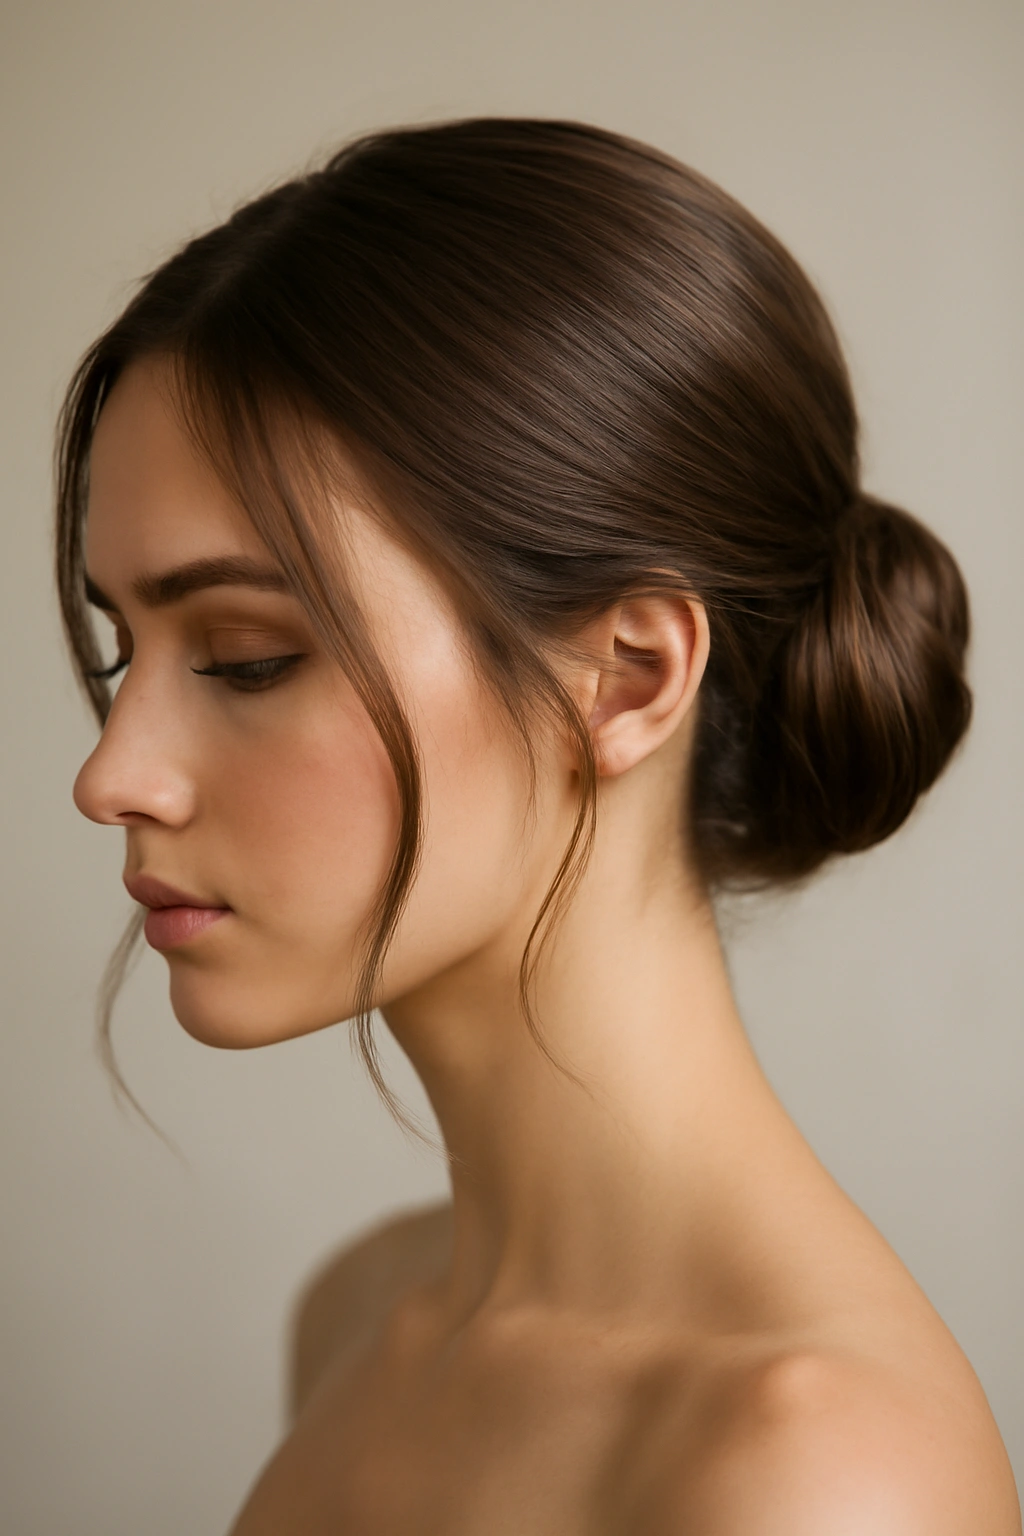
A low bun on short hair creates clean lines and an undeniably elegant silhouette. This style works particularly well for modern, minimalist, or vintage-inspired weddings because it’s polished without feeling fussy. The bun sits just at the nape of your neck, and two or three delicate pieces frame your face, softening the severity of the pulled-back style.
The Precision Required
Creating a low bun on short hair requires slightly more product and careful sectioning. Start by applying a smoothing serum to damp hair, blow-dry straight, then use a fine-tooth comb to slick everything back into a smooth low ponytail at your nape. Twist the ponytail gently and wrap it around itself, pinning it securely with bobby pins that match your hair color.
Customization Options
- Use a velvet or silk hair tie to prevent breakage and add a luxury touch
- Leave 1-2 face-framing pieces at each temple and smooth them with a boar-bristle brush for refined edges
- Add a delicate gold or silver bobby pin for visual interest, or use a geometric hair stick for a modern twist
- Consider a small cluster of baby’s breath or spray roses tucked into or beside the bun for a natural, garden-wedding feel
- Finish with hairspray only where needed — the pulled-back sections should have shine and smoothness, not stiffness
Worth knowing: Short hair buns tend to feel less “heavy” visually than longer buns, which actually makes them look more modern and less pageant-like. This is an advantage, not a limitation.
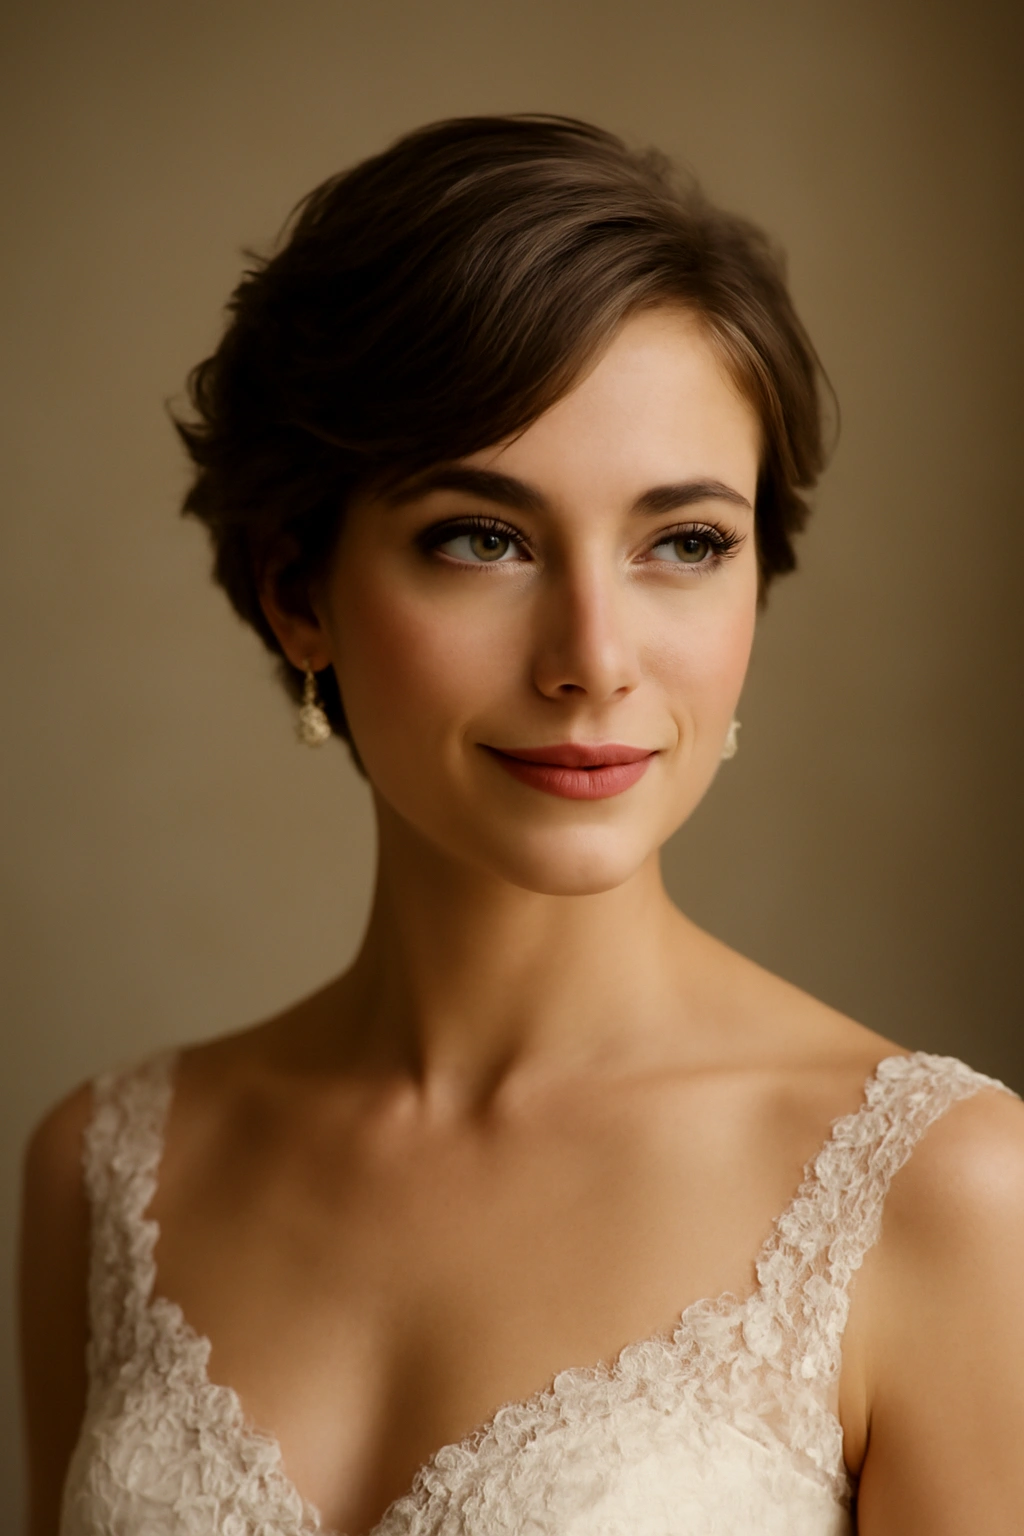
3. Textured Pixie with Pearl Accessories
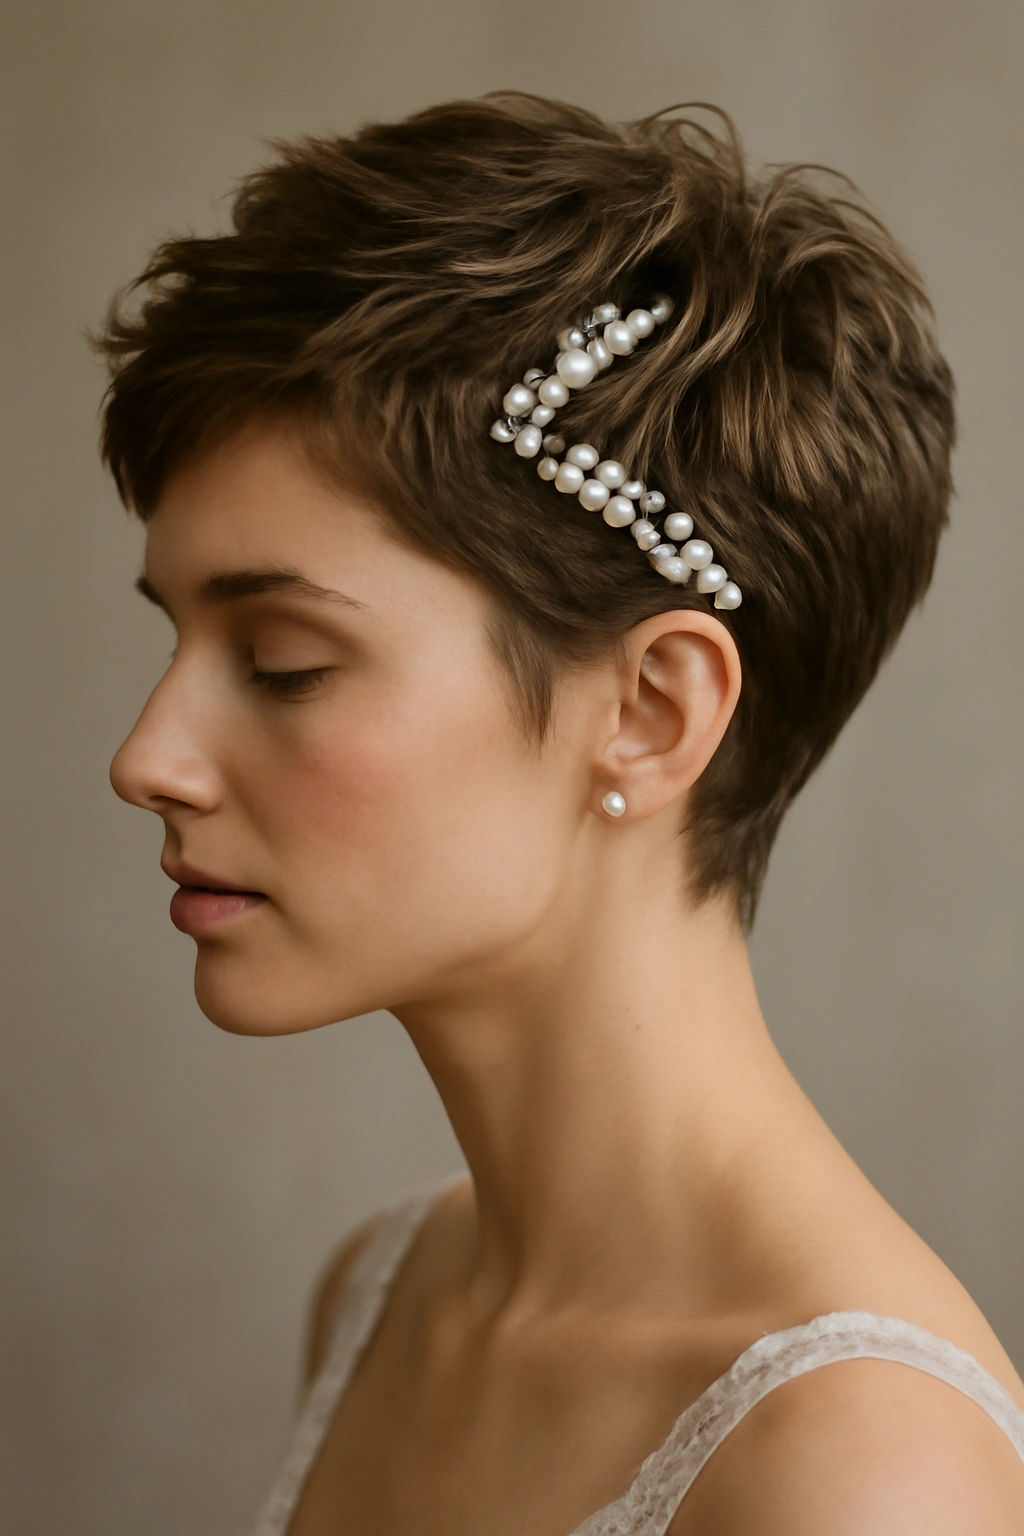
If you’re wearing a short pixie cut, lean into its natural texture and movement rather than trying to tame it into something your hair isn’t. A textured pixie styled with a light touch and elevated with pearl accessories reads as effortlessly chic and undeniably bridal. This approach celebrates your cut rather than masking it.
Creating Movement on a Pixie
Work a texturizing cream through damp hair and blow-dry with your fingers or a round brush, directing the hair slightly away from your part and creating shape at the crown. You’re aiming for directional texture, not frizz — the difference is intentionality and product choice. Use a cream rather than a spray so it doesn’t look brittle or dry.
Pearl Placement Strategy
- Position a small pearl hair clip above your ear or at your temple where it catches light and frames your face
- Consider a delicate pearl hair pin worn at an angle, tucked into the hair at your crown for dimension
- A thin pearl-studded headband worn across the front adds bridal sparkle without competing with the cut
- Pair the pearls with gold or rose gold accessories for warmth, which complements pixie cuts beautifully
- Keep accessories minimal — one or two pieces maximum so your cut remains the focal point
Real talk: A well-cut, well-maintained pixie is genuinely one of the most striking bridal looks possible. Short hair can look incredibly polished and intentional in a way that longer, more “standard” wedding hair sometimes doesn’t.
4. Tousled Bob with a Thin Hair Vine
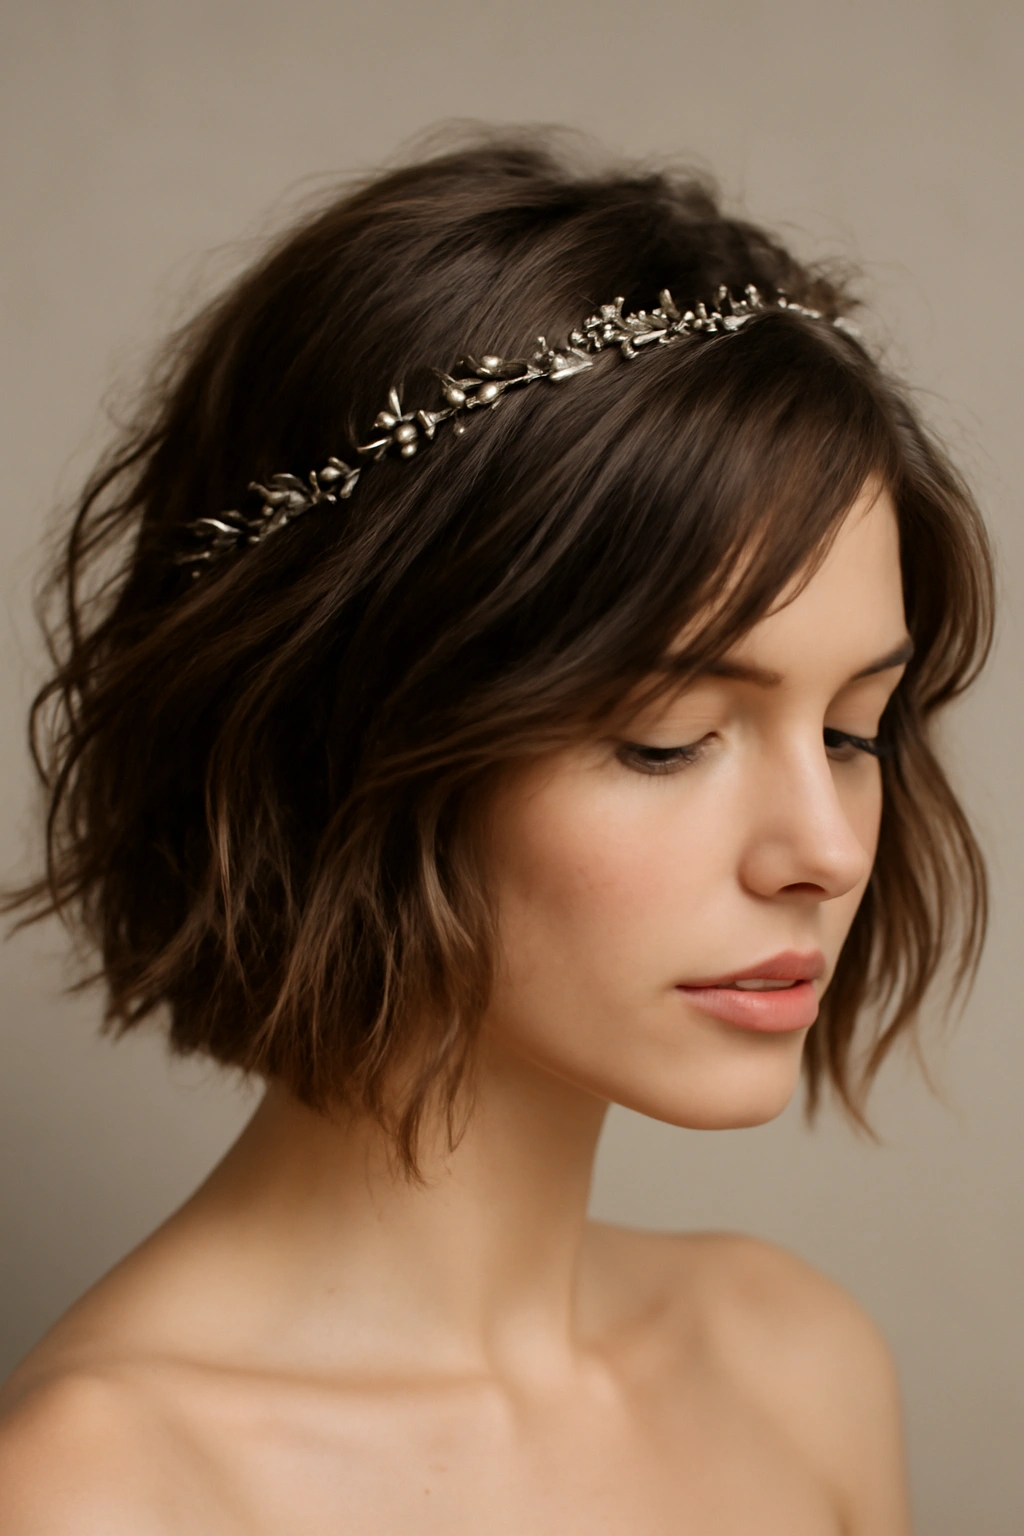
A shoulder-length bob or chin-length bob gains unexpected bridal sophistication when you add texture and a delicate hair vine. The vine — whether it’s a thin gold wire adorned with tiny crystals, pearls, or just leaves — wraps around the crown or sits across the back, adding height and visual interest without adding actual bulk.
Achieving Tousled Texture on a Bob
Start with dry shampoo applied to roots for grip and volume. Using a 1-inch curling iron, take vertical sections and wave them loosely, focusing the heat on mid-lengths and ends rather than blasting the entire section. Tousle everything with your fingers once cooled, allowing waves to intermingle in a lived-in, intentional way rather than an “I just rolled out of bed” way.
Hair Vine Application
- Measure the vine around your head before securing it, starting at one ear, curving over the crown, and ending at the opposite ear
- Use bobby pins to anchor the vine at multiple points along the curve, hiding pins underneath the waves for a seamless appearance
- If the vine has dangles or crystals, position heavier elements toward the back so they don’t create an imbalanced look
- The vine should sit about 1-1.5 inches above your hairline for a ethereal, crown-like effect
- Finish with medium-hold spray that maintains texture without making hair feel crunchy
Pro tip: Apply hairspray section by section as you create waves rather than waiting until the end — this allows product to set each wave as you go and gives you longer hold throughout the day.
5. Slicked-Back Undercut with Decorative Detail
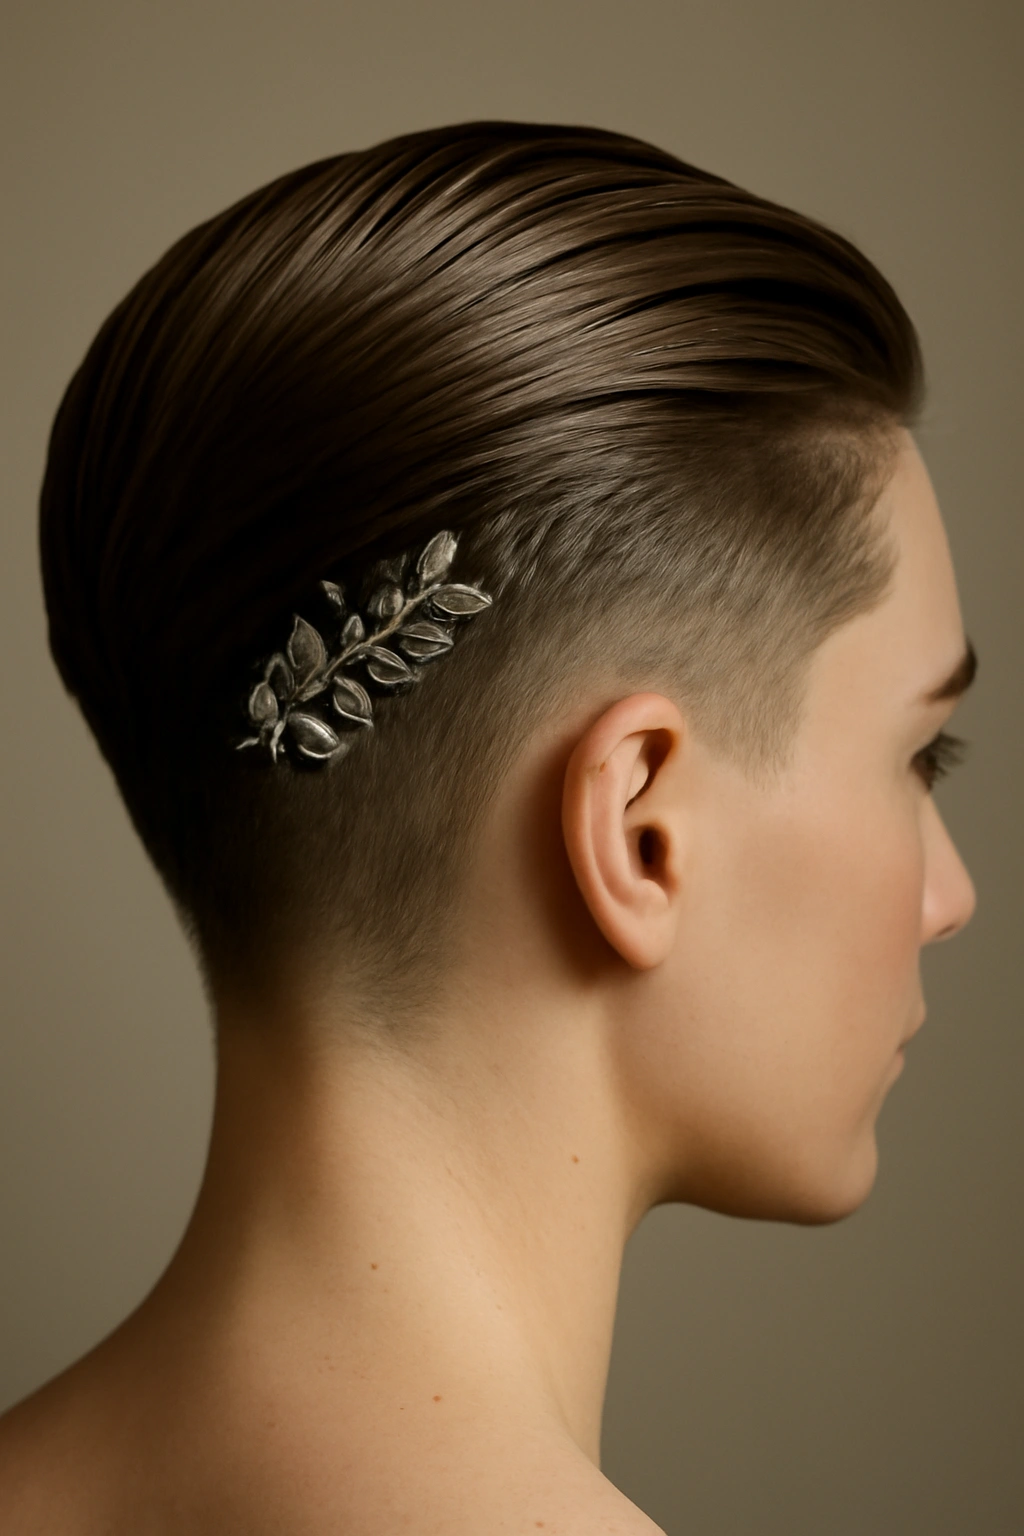
For a bold, modern bride with short, layered hair and an undercut, embracing the cut entirely creates a stunning bridal look. Slick the top layers back with a pomade, allowing the undercut to show, and anchor a decorative element — a jeweled clip, a small crown, or a geometric comb — at the back or side where it’s visible.
Creating Glossy Slickness
Use a gel or pomade specifically designed for hold and shine rather than a standard hair product. Apply it to damp hair, work it through thoroughly, then blow-dry smooth, directing everything in the direction you want it to go. You’re aiming for polished and sleek, not greasy or wet-looking, so the product choice matters significantly.
Styling the Undercut Intentionally
- Ensure your undercut is freshly trimmed (within the last week or two) so the cut lines are clean and the shape is defined
- Slick the top section smoothly so the transition to the undercut is stark and intentional
- Position your decorative element to frame the undercut — this draws attention to the shape you’ve chosen rather than hiding it
- Consider adding a small tattoo-inspired design shaved into the undercut if you’re extremely bold, or keep it simple with clean lines
- Finish with a light hairspray that adds shine without weight
Worth knowing: This look requires confidence, but it’s absolutely bridal. You’re communicating that you’re intentional, modern, and comfortable being different — and that reads as powerfully beautiful.
6. Romantic Curls with a Decorative Hairnet
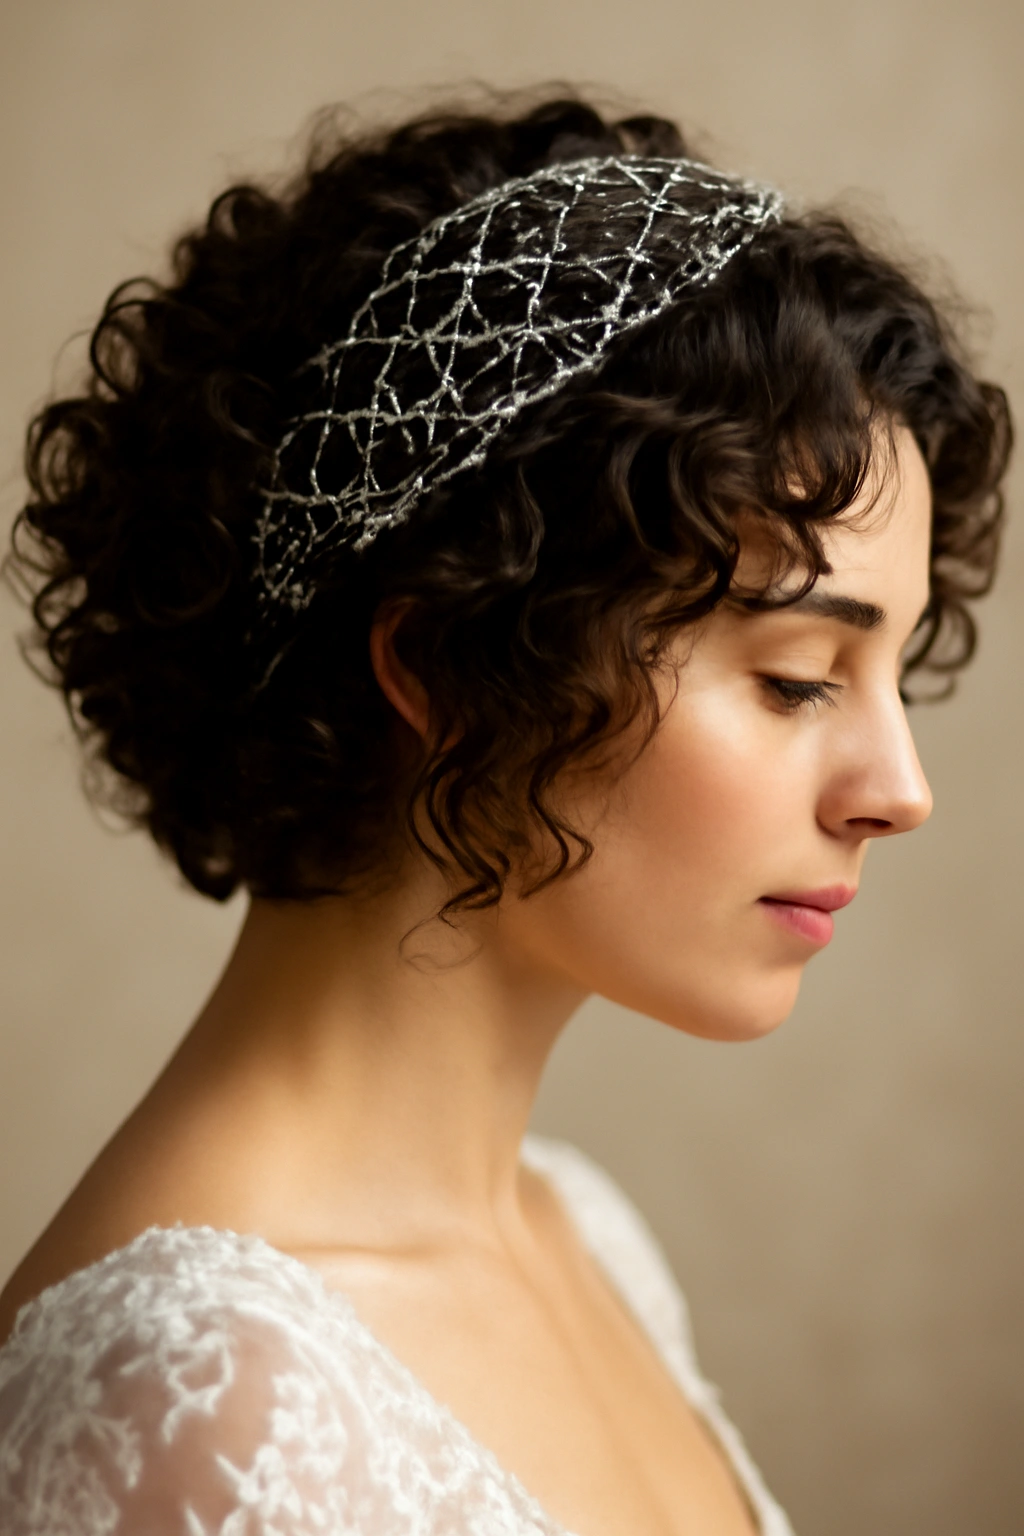
Embrace your natural curls or create defined ringlets, then layer a delicate decorative hairnet over the crown and sides. Haircloths, geometric net accessories, and vintage-inspired mesh add dimension, sparkle, and undeniable elegance without requiring a veil or other traditional covering. This works beautifully for short curly hair because the texture takes center stage.
Defining Curls Without Frizz
Start with a curl-defining cream applied to soaking-wet hair, scrunching it in rather than combing it through. Diffuse dry using a low heat setting and low speed, tilting your head in different directions so curls dry evenly. Once completely dry, you can gently separate curls with your fingers if you want more definition, or leave them chunked together for a more compact look.
Incorporating the Hairnet
- Choose a hairnet that coordinates with your dress (pearl, gold, silver, or crystal-studded versions all exist)
- Position it so it sits on top of your curls rather than flattening them — it should enhance, not compress
- Secure it with bobby pins hidden under curls, placed at multiple points around your crown so it stays put
- If the net has a comb attachment, use that as your primary anchor and add pins for security
- The net should cover only the crown and top portion, leaving curls visible at the sides and back for movement and texture
Pro tip: If you have naturally curly hair, invest in a curl-defining product and a diffuser attachment for your blow dryer before the wedding. These tools make a dramatic difference in how intentional and refined your curls appear.
7. Deep Side Part with Tucked Layers
A deep side part creates instant sophistication and elongates your face, making it flattering for nearly every face shape. On short hair, a deep part combined with smoothed layers tucked strategically at the back adds polish and visual interest without requiring complicated styling.
The Deep Part Technique
Create the part on the opposite side of where your hair naturally falls — if your hair naturally falls to the right, part it on the left, and vice versa. A deeper part (starting nearly at your ear) versus a center part creates drama and asymmetry. Use a fine-tooth comb to section the hair cleanly and secure each side with bobby pins in hidden places.
Strategic Layer Tucking
- Identify the layers around your crown and sides that naturally want to move forward
- Smooth these layers back and secure them with bobby pins or small clips just behind your ear where they’re hidden
- Allow shorter layers at your nape or around your face to remain loose for movement and softness
- Create texture by softly waving or curling the loose pieces with a small curling iron
- Use a smoothing serum on the tucked sections and texturizing spray on the loose pieces for contrast
Worth knowing: The contrast between sleek, tucked sections and textured, loose pieces creates a really sophisticated, intentional look. It’s the styling equivalent of a tailored dress with delicate embroidery — structured but romantic.
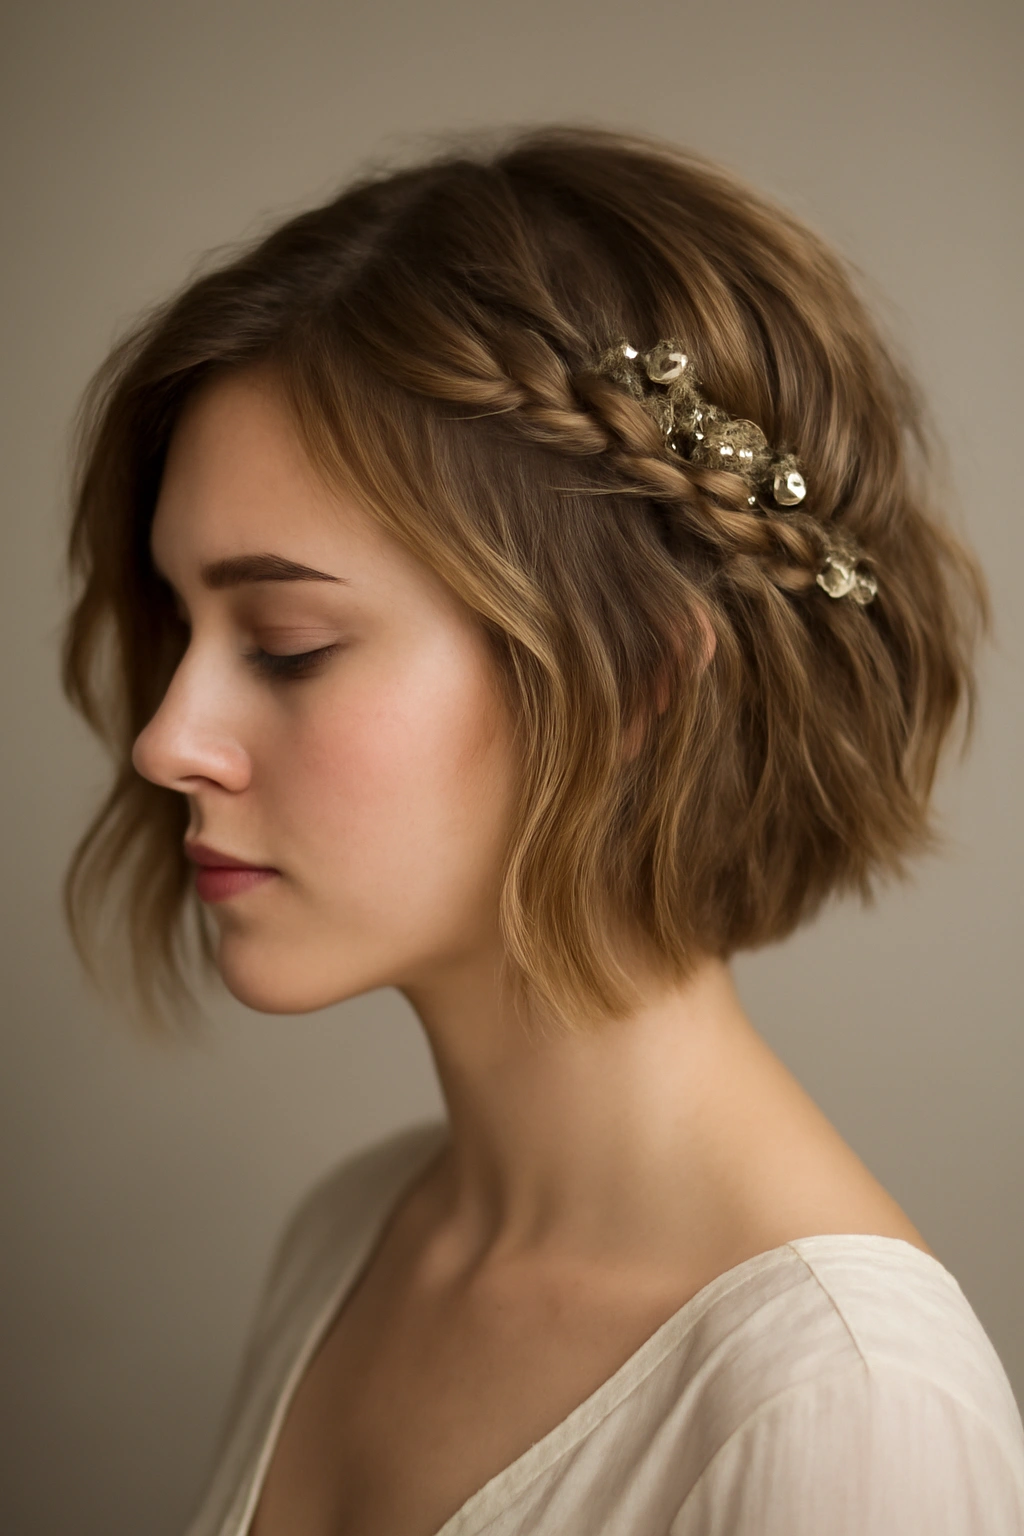
8. Structured Waves with a Thin Metal Headband
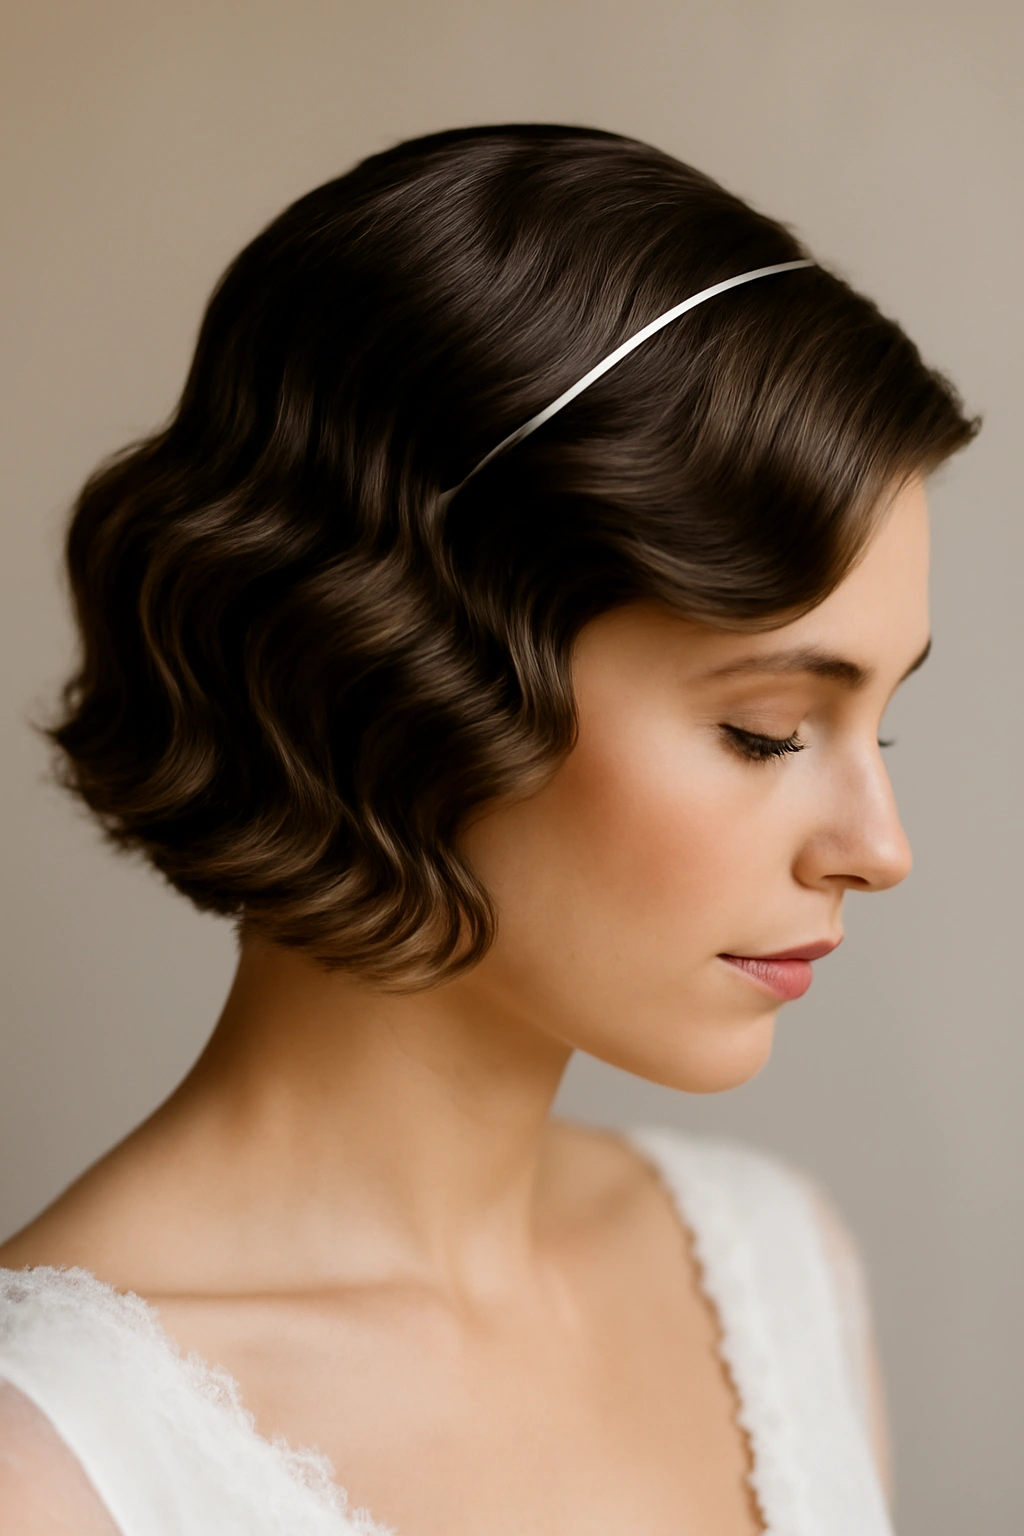
Create glossy, structured waves (rather than the softer waves from the first style) by using a smaller curling iron and pinning each wave as you go. Once the waves cool and you release them, layer a thin metal headband across your crown. This approach works on bobs, lobs, and even pixies because the waves add volume and the headband adds bridal elegance.
Achieving Structured Waves
Use a half-inch or 3/4-inch curling iron for tighter, more defined waves. Wrap each section and hold the iron in place for 8-10 seconds so the curl sets fully. Pin the curl up while it cools so it holds the shape rather than relaxing into a softer wave. This takes longer than creating loose waves, but the hold is significantly better throughout your wedding day.
Headband Selection and Placement
- A thin metal headband (gold, rose gold, or silver) worn across your crown adds bridal detail without overshadowing your hair
- Position it so it sits about one inch above your hairline, anchored securely with bobby pins hidden under the waves
- The headband should be smooth and modern-looking rather than ornate — let your waves do the visual work
- Pair it with minimal other accessories so nothing competes for attention
- Finish with a firm-hold hairspray that locks the waves in place without making them feel stiff
Pro tip: Structured waves photograph beautifully because the individual waves catch light and create definition in photos — you’ll have incredible hair in your wedding photos.
9. Romantic Twisted Crown with Flyaway Softness
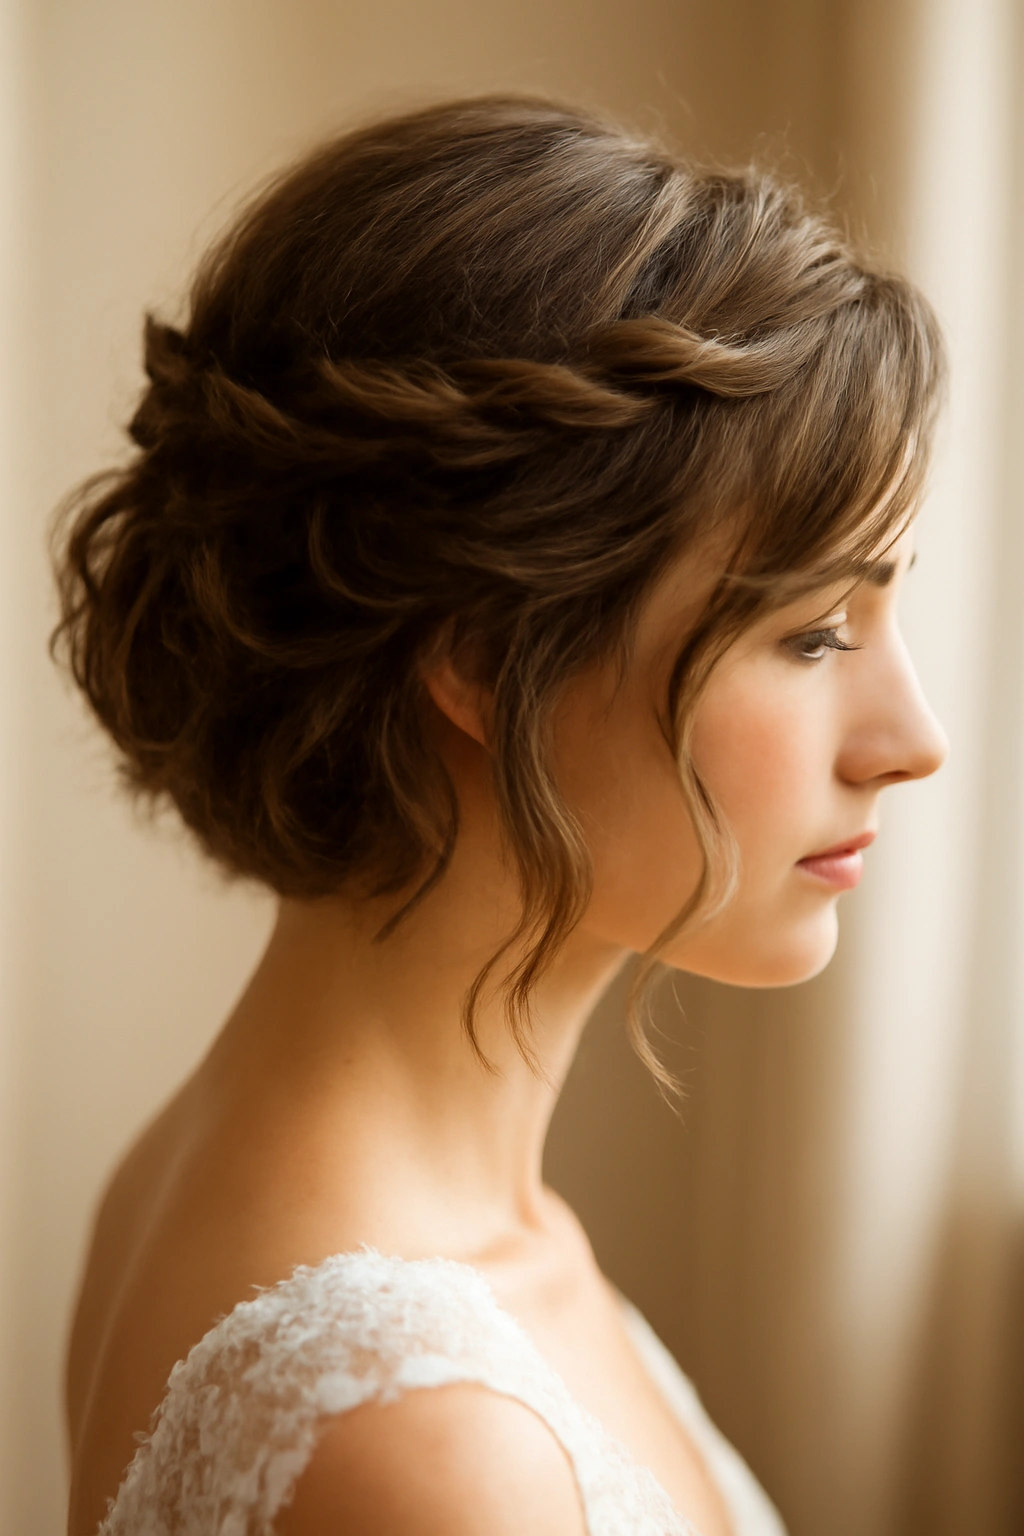
Create a twisted crown by taking sections from one side of your head, twisting them loosely, and pinning them across the back of your crown to the opposite side. Leave short pieces around your face and at your nape completely loose and slightly waved for a romantic, undone quality that softens the structured twist.
Creating the Twisted Crown
Section your hair from the temple on one side and take approximately one-inch sections. Twist each section loosely (not tightly, or it will look severe and dated) and pin it across your crown as you go, layering the twisted sections slightly so they cover the crown area. The twist should be visible and intentional, not hidden.
Balancing Structure with Romance
- Don’t twist too tightly — a looser twist reads as intentional rather than secure
- Allow the twisted sections to be slightly textured before twisting so they catch light and look dimensional
- Leave multiple short pieces around your hairline and nape completely loose and softly curled
- The contrast between the structured twist and the soft, loose pieces is what creates romance without sacrificing elegance
- Use bobby pins that match your hair color and hide them as much as possible so the focus stays on the style
Worth knowing: This look works beautifully on bobs because the layering naturally creates pieces of varying lengths that can be left loose. On a more blunt cut, you might have fewer pieces to work with, but the style still reads beautifully.
10. Slicked Wet-Look Style with Statement Earrings
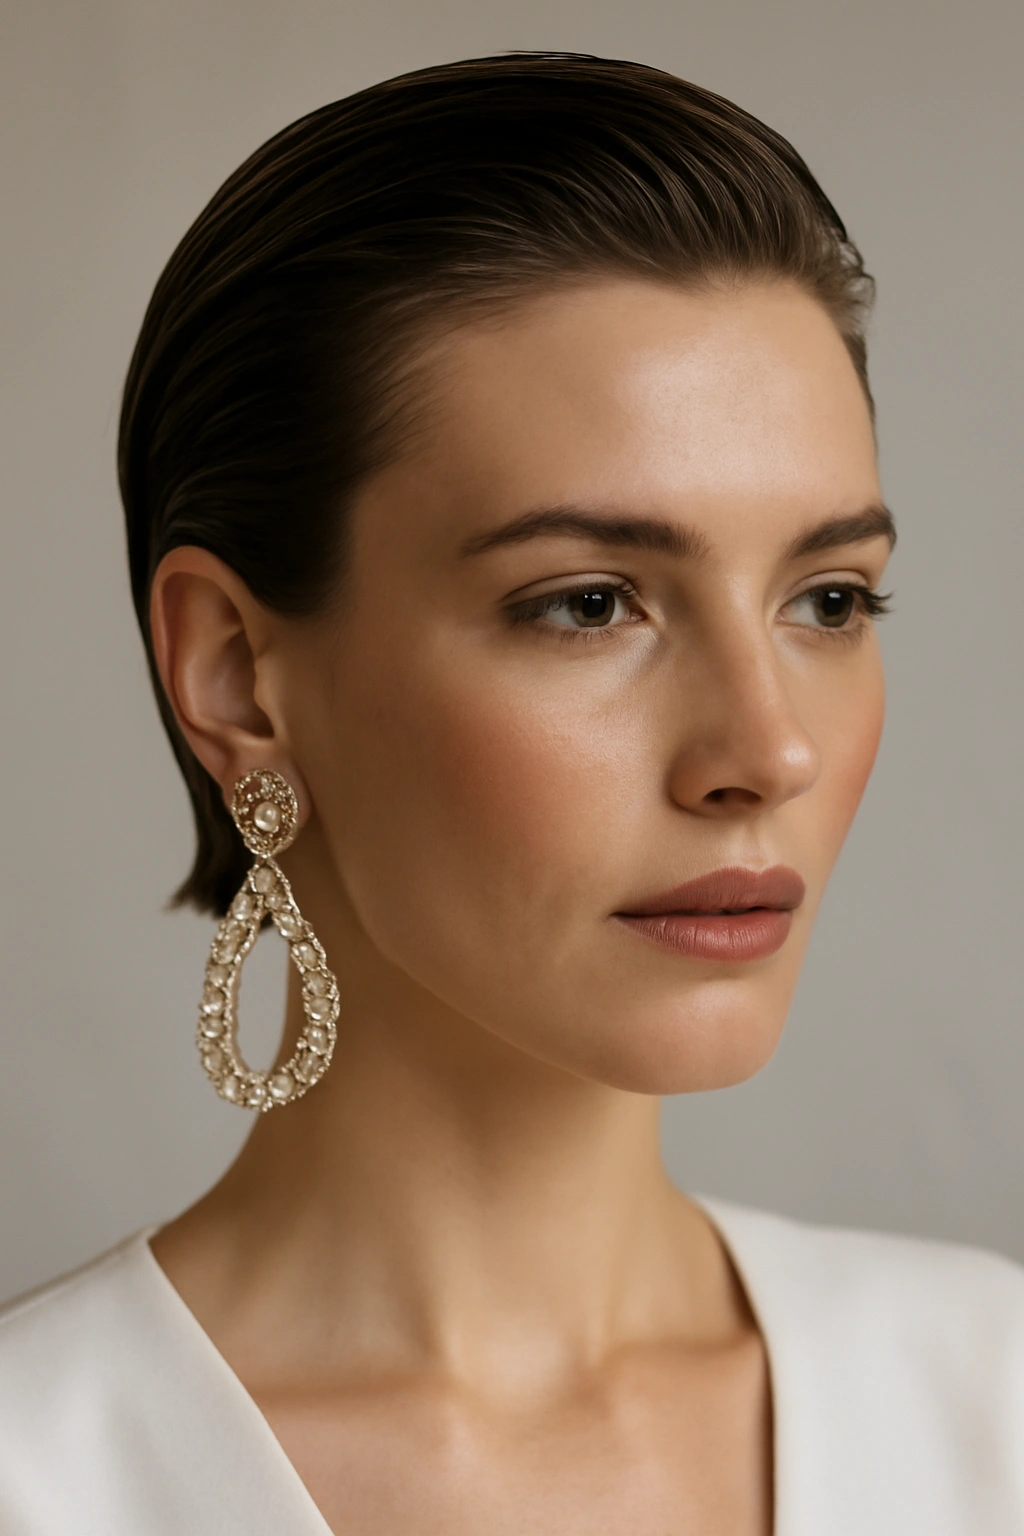
For a sleek, minimalist, fashion-forward bride, a wet-look slicked style paired with bold statement earrings creates undeniable impact. Apply a gel that creates shine and hold, smooth everything back and to the side, and let your face, neckline, and jewelry be the focal points. This style works especially well on pixies and very short bobs.
Achieving the Wet Look
Use a gel or mousse specifically formulated for wet-look shine — not just any styling product. Apply it generously to damp hair and smooth it back and slightly to one side using a fine-tooth comb or your fingers. Blow-dry on low heat with your hand or a brush, maintaining the sleek shape as it dries. The goal is glossy shine that looks intentional, not wet or greasy.
Maximizing the Impact
- Since your hair is minimal, your face and accessories become the main visual focus — make sure your makeup is flawless
- Choose statement earrings that coordinate with your dress but have presence (chandelier, geometric, or pearled styles all work)
- The simplicity of the hairstyle means your earrings, neckline, and facial features carry all the visual weight
- Consider a bold lip color or dramatic eye makeup since your hair isn’t competing for attention
- Finish with a light hairspray that adds hold without interfering with the glossy shine
Pro tip: This look requires a fresh blowout the morning of your wedding and touch-ups with product throughout the day. Plan for a quick refresh time in the hours before your ceremony.
11. Soft Half-Up With Scattered Baby’s Breath
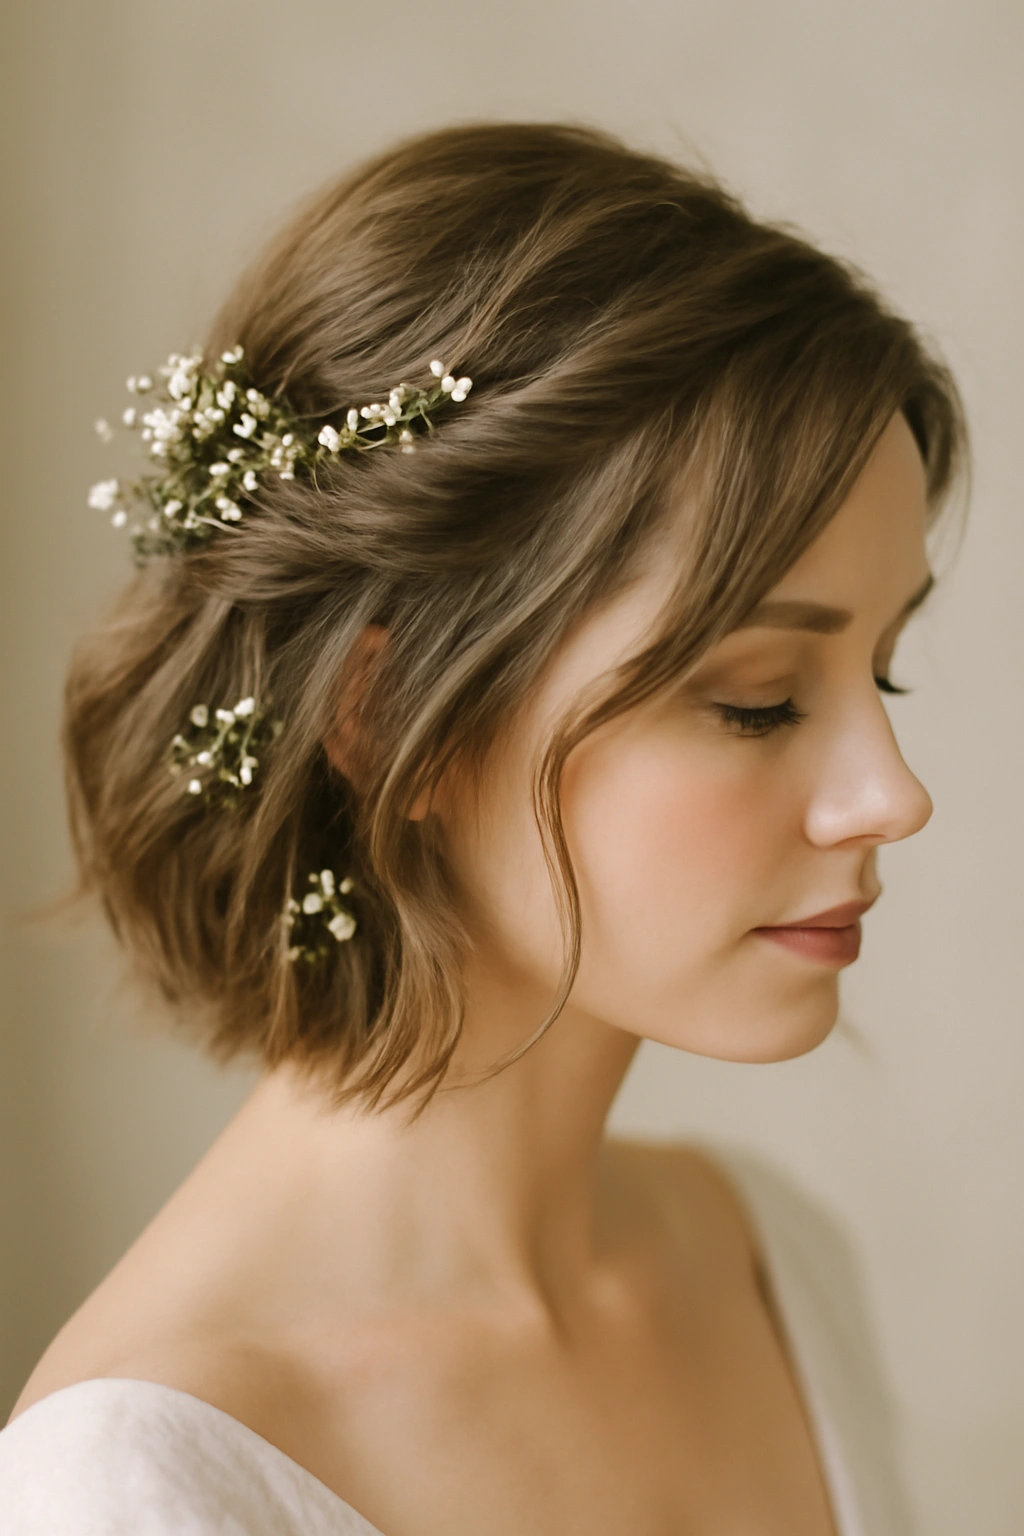
A half-up style on short hair creates height and movement while allowing the bottom length to fall freely. Secure the top section at your crown, leave soft pieces framing your face, and scatter fresh or silk baby’s breath throughout the secured section and loose hair below. This approach is romantic, garden-inspired, and incredibly flattering on short hair.
Securing the Half-Up
Take a section from your crown (approximately the size of your palm) and gently backcomb it at the roots for grip. Smooth the top layer with a fine-tooth comb and secure it with bobby pins at your crown. This creates instant height without looking severe. Leave 1-2 face-framing pieces out on each side.
Incorporating Florals
- Scatter baby’s breath throughout the pinned section so it appears naturally interspersed rather than clustered in one spot
- Add a few stems in the loose hair below the half-up section so the flowers continue down and create flow
- Secure florals with floral tape wrapped around the stems and pinned invisibly into your hair
- For longevity, use dried or silk baby’s breath rather than fresh, which wilts quickly
- Add greenery or eucalyptus alongside the baby’s breath for texture and movement
- The florals should feel organic and scattered, not precisely arranged or stiff
Worth knowing: Baby’s breath is delicate and creates a genuinely romantic look. It’s one of the most flattering florals for bridal hair because it adds texture without weight, even on very short cuts.
12. Sleek Gel-Slicked Style with a Geometric Hair Clip

Similar to the wet-look style but with a modern twist, a sleek gel-slicked style paired with a geometric or architectural hair clip creates fashion-forward elegance. The clip becomes jewelry, adding visual interest to an otherwise minimal style. This works beautifully on undercuts, layered pixies, and very short bobs.
Application and Hold
Apply a medium-to-firm hold gel that creates shine, smooth everything back with a comb, and allow it to dry completely. The gel should hold your style in place for hours without feeling sticky or crunchy. For extra security, you can use a light hairspray over the gel once it’s dry, but the gel alone should provide adequate hold.
Choosing Your Clip
- Look for a clip with architectural lines — geometric shapes, angles, or modern patterns read as bridal without being ornate
- Position the clip at your crown, slightly off-center, so it’s visible and becomes a focal point
- Gold, rose gold, or gunmetal finishes all work beautifully depending on your dress and overall aesthetic
- The clip should be your only hair accessory — let it be the statement piece
- Choose a clip with a secure mechanism (not a slip-on style) so it doesn’t move throughout the day
Pro tip: A geometric clip in a mixed metal (gold and silver together, or gold and gunmetal) adds sophisticated detail that reads as intentionally curated rather than randomly chosen.
13. Textured Bob With a Delicate Side Braid
A textured, tousled bob becomes bridal when you incorporate a delicate side braid that anchors one side and creates asymmetry. The braid doesn’t need to be large or intricate — a thin, loose braid pinned behind your ear adds just enough structure to elevate the casual texture.
Creating Texture and Tousle
Apply a texturizing spray to dry hair, then use a curling iron to create loose waves throughout. Allow waves to cool and finger-comb them to a soft, undone texture. The texture should feel deliberate and styled, not like bed head — the difference is in how intentional your waves are.
The Side Braid Details
- Take a thin section from the temple area (about an inch wide) and create a loose three-strand or Dutch braid
- The braid should be imperfect and slightly fuzzy — pull gently on the braid edges to loosen it and add texture
- Pin the braid behind your opposite ear using bobby pins that match your hair color
- Leave the braid ends slightly loose and textured rather than smoothly finished
- The braid should be subtle enough that it’s not immediately obvious, but clear enough that it’s intentional
- You can weave baby’s breath or small flowers into the braid for additional romance
Worth knowing: A loose, slightly undone braid reads as effortlessly beautiful, while a tightly structured braid can look almost severe. Prioritize looseness and texture over precision.
14. Voluminous Curls With a Jeweled Comb
If you have naturally curly or wavy short hair, celebrate the curl and add bridal elegance with a jeweled comb. Define your curls, add volume at the crown with strategic teasing, and secure a delicate jeweled comb at the side or back. This approach is romantic, visually interesting, and works beautifully on curly pixies and textured bobs.
Defining Curls and Adding Volume
Apply a curl cream to soaking-wet hair, scrunching it in thoroughly. Diffuse dry on low heat, allowing curls to form naturally. Once dry, gently backcomb at the crown to create height — you’re not creating a pouf but rather encouraging the natural curls to stand up slightly taller. Separate curls with your fingers if you want definition, or leave them chunked if you prefer texture over individual curl definition.
Comb Placement and Selection
- Choose a jeweled comb that coordinates with your dress and skin tone (gold for warm undertones, silver for cool undertones)
- Position it on one side of your crown where it sits visibly but doesn’t interfere with movement
- Secure it with bobby pins hidden under curls and a small amount of strong-hold gel or hairspray around the base
- The comb should feel secure enough that it won’t shift or fall throughout the day
- Pair it with minimal other accessories so the comb and your curls are the focal points
Real talk: Curly hair is genuinely stunning on its own. Adding one jeweled accessory elevates it without requiring you to fight your hair’s texture or spend hours straightening and restyling.
15. Modern Slicked Back With a Statement Clip
Similar to previous sleek styles but with a different accessory focus, a slicked-back smooth style paired with a statement clip offers modern minimalism. Unlike geometric clips, a statement clip might be larger, sculptural, or feature an interesting material like tortoiseshell, acrylic, or decorative enamel.
Creating Smooth Slickness
Use a smoothing serum on damp hair, blow-dry completely straight with a paddle brush, then apply a light gel or pomade for hold and shine. The goal is glossy smoothness with no texture or frizz. This style requires your hair to be perfectly smooth, so straight-hair techniques are essential — consider a blowout appointment the morning of your wedding if your hair is naturally textured.
Making Your Clip the Statement
- Choose a clip with personality — interesting shape, color, or material that reflects your style
- Position it low on the back of your head so it’s visible and becomes a focal point without dominating your face
- A tortoiseshell clip adds warmth and visual interest; a geometric acrylic clip reads as modern and bold
- Consider a clip with a slight curve so it sits securely on your smooth, slicked-back hair
- Keep other accessories minimal — the clip should be your only hair jewelry
Pro tip: A statement clip in an unexpected material or color (blush pink, sage, pale gold) adds personality while remaining sophisticated. Your hair might be minimal, but your accessory choice tells your story.
Final Thoughts
The assumption that short hair limits your bridal styling options couldn’t be further from the truth. Short hair actually offers distinct advantages for wedding day styling: your look will photograph beautifully with sharp definition, you won’t battle all-day frizz and sagging in longer lengths, and you’ll feel comfortable and confident with minimal hair weight throughout your celebration.
The styles above prove that whether you’re wearing structured waves, textured curls, sleek slickness, or adorned twists, short hair can be just as bridal, romantic, and polished as any longer style. The secret is choosing a styling approach that complements your hair’s natural texture, works with your dress and overall aesthetic, and most importantly, makes you feel beautiful and like yourself — just elevated for your wedding day.
Work with your stylist on a test run before your wedding, bring reference photos of at least 2-3 of these styles so you’re both on the same page, and don’t hesitate to experiment. Your short hair is a feature, not a limitation. Own it, style it intentionally, and walk down the aisle knowing your hair is absolutely stunning.