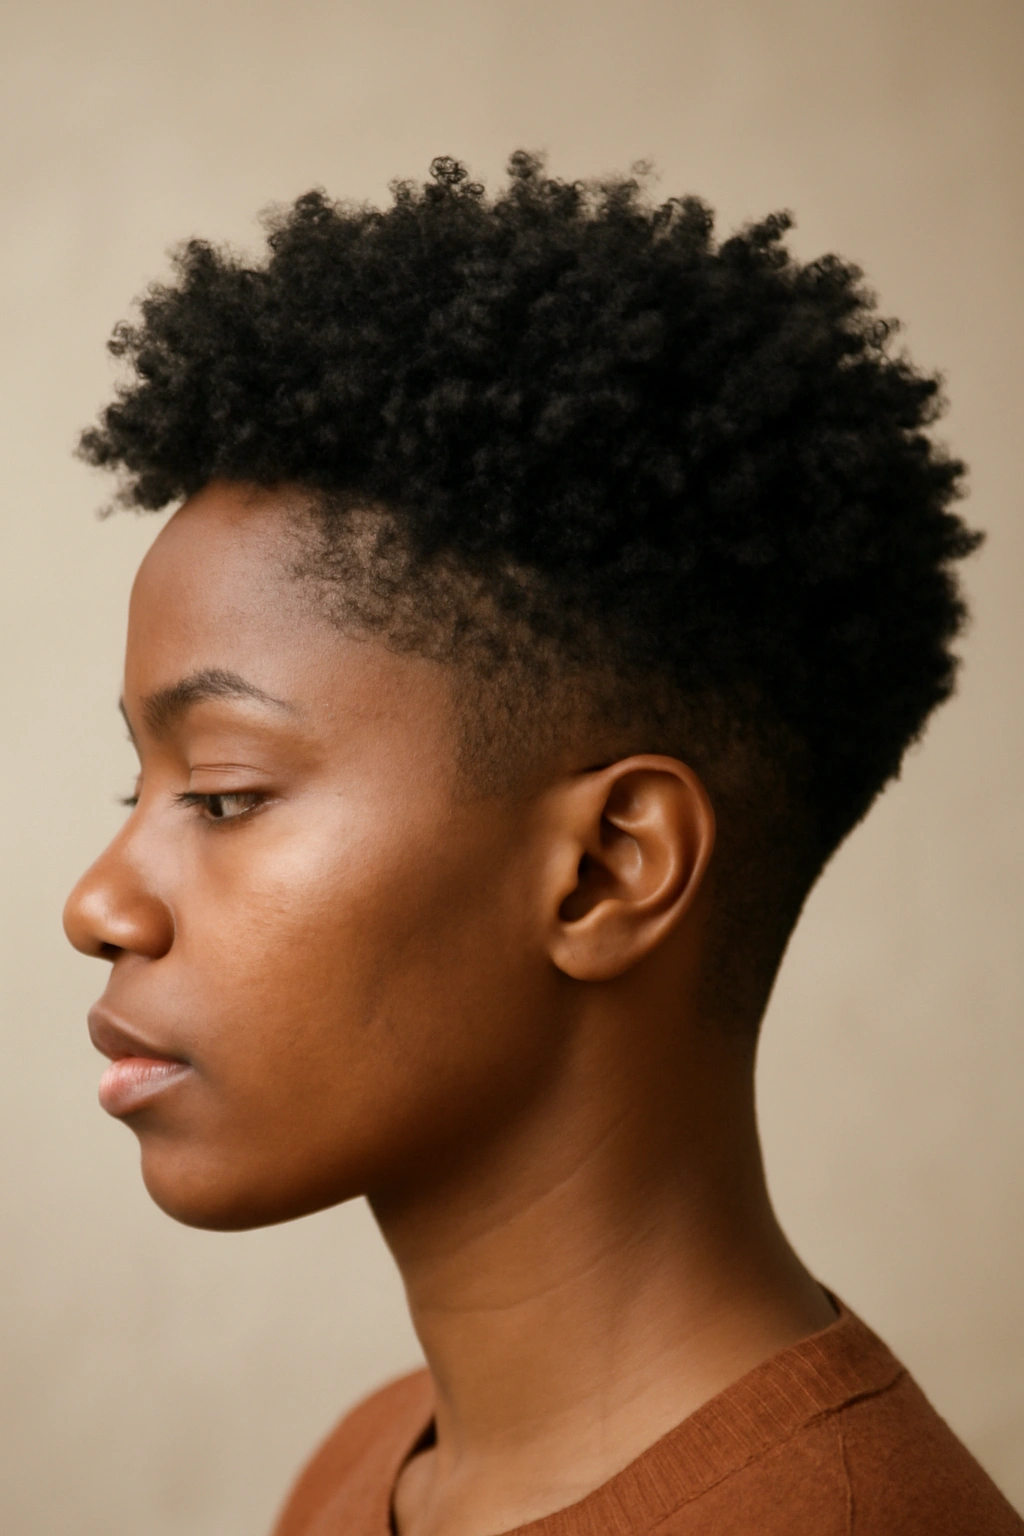
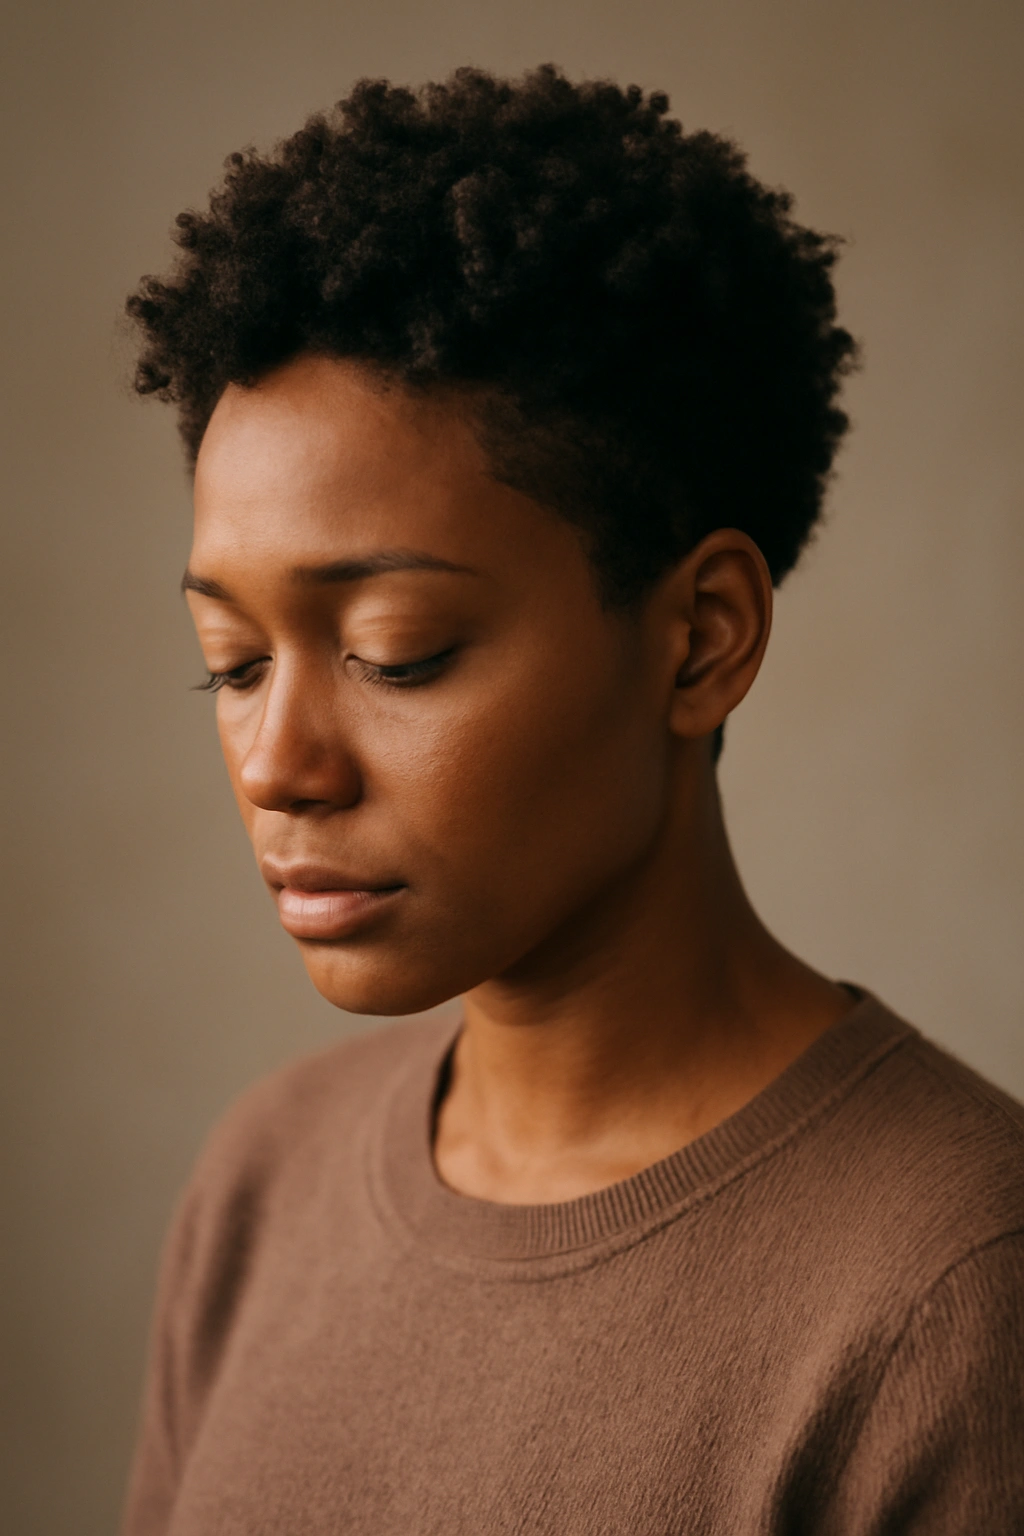
A tapered cut is one of the best-kept secrets in natural hair styling, yet so many people with curls and coils overlook it entirely. The beauty of a taper is that it creates definition, removes weight from overly dense areas, and actually enhances the texture you already have—rather than fighting against it like blunt cuts sometimes do. But here’s the thing: not every taper works the same way on every curl pattern, and this is where most stylists miss the mark.
The difference between a tapered cut that makes your curls pop and one that leaves you feeling deflated comes down to understanding how your specific curl type responds to length, layering, and fade placement. A Type 3A curl needs something completely different than a Type 4C coil, and even within those categories, the angle of the cut, the amount of graduation, and where the taper sits matter enormously. When done right, a taper cut becomes invisible—it works quietly in the background, letting your natural texture be the star while giving you a polished, intentional shape.
What I’m sharing here are cuts that actually work with natural hair’s architecture, not against it. Each one is organized by curl type so you can find cuts that suit your specific texture, understand exactly why they work, and walk into your next appointment with the specific language and references to show your stylist exactly what you want. These aren’t cookie-cutter styles—they’re thoughtfully designed cuts that respect how your curls actually behave, grow, and move.
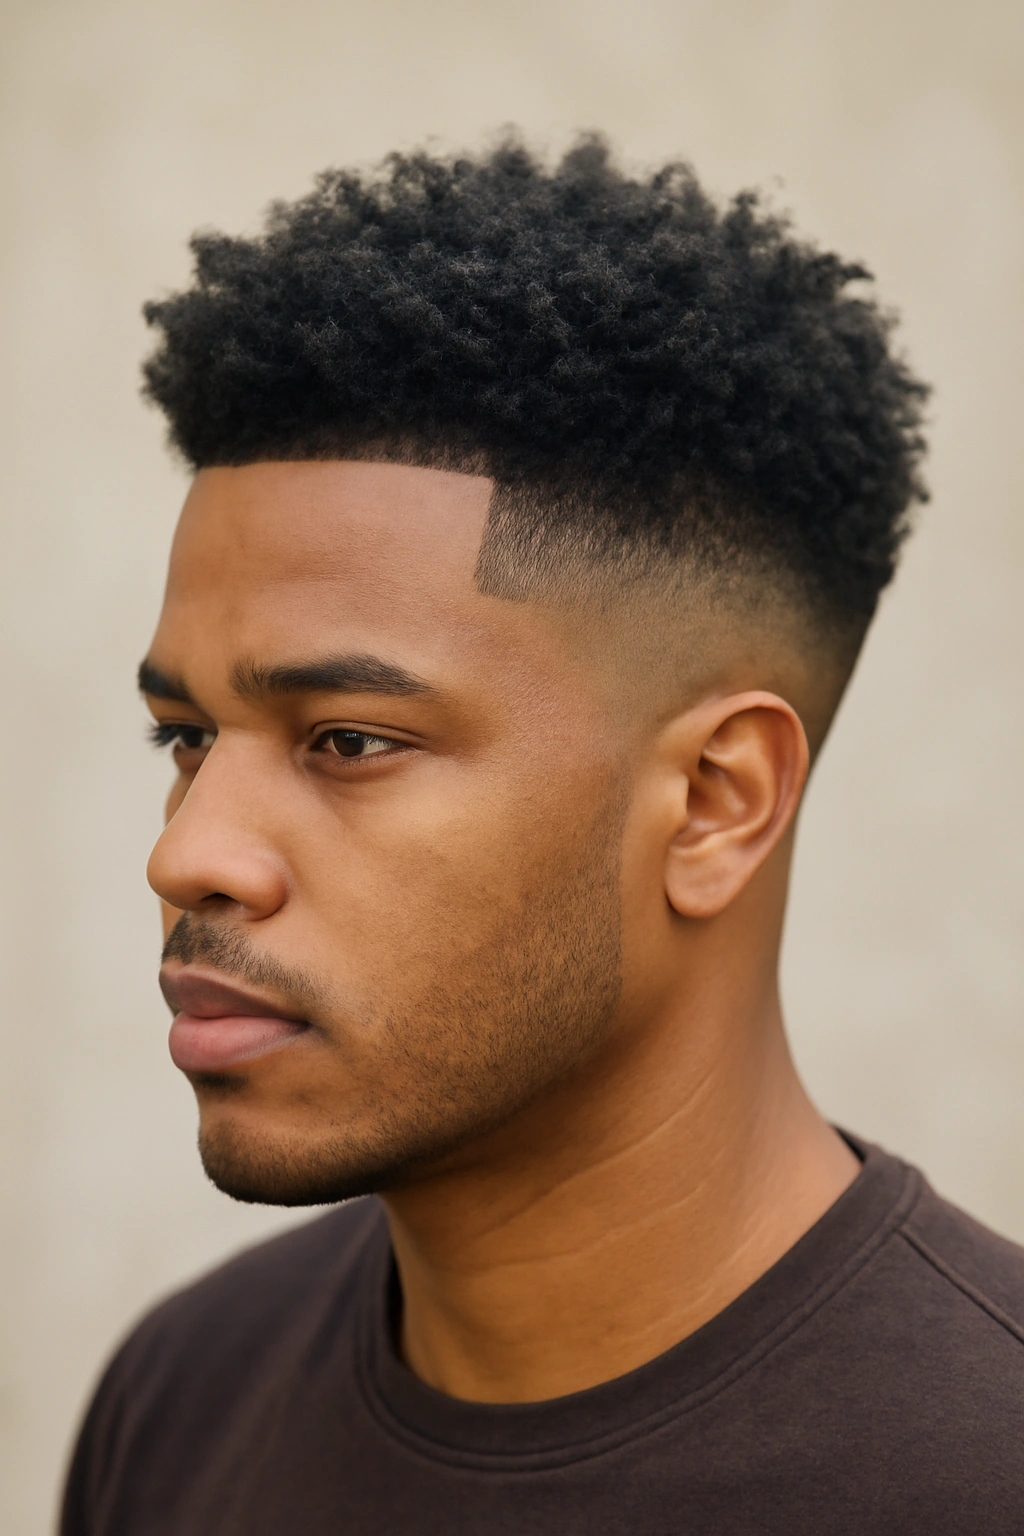
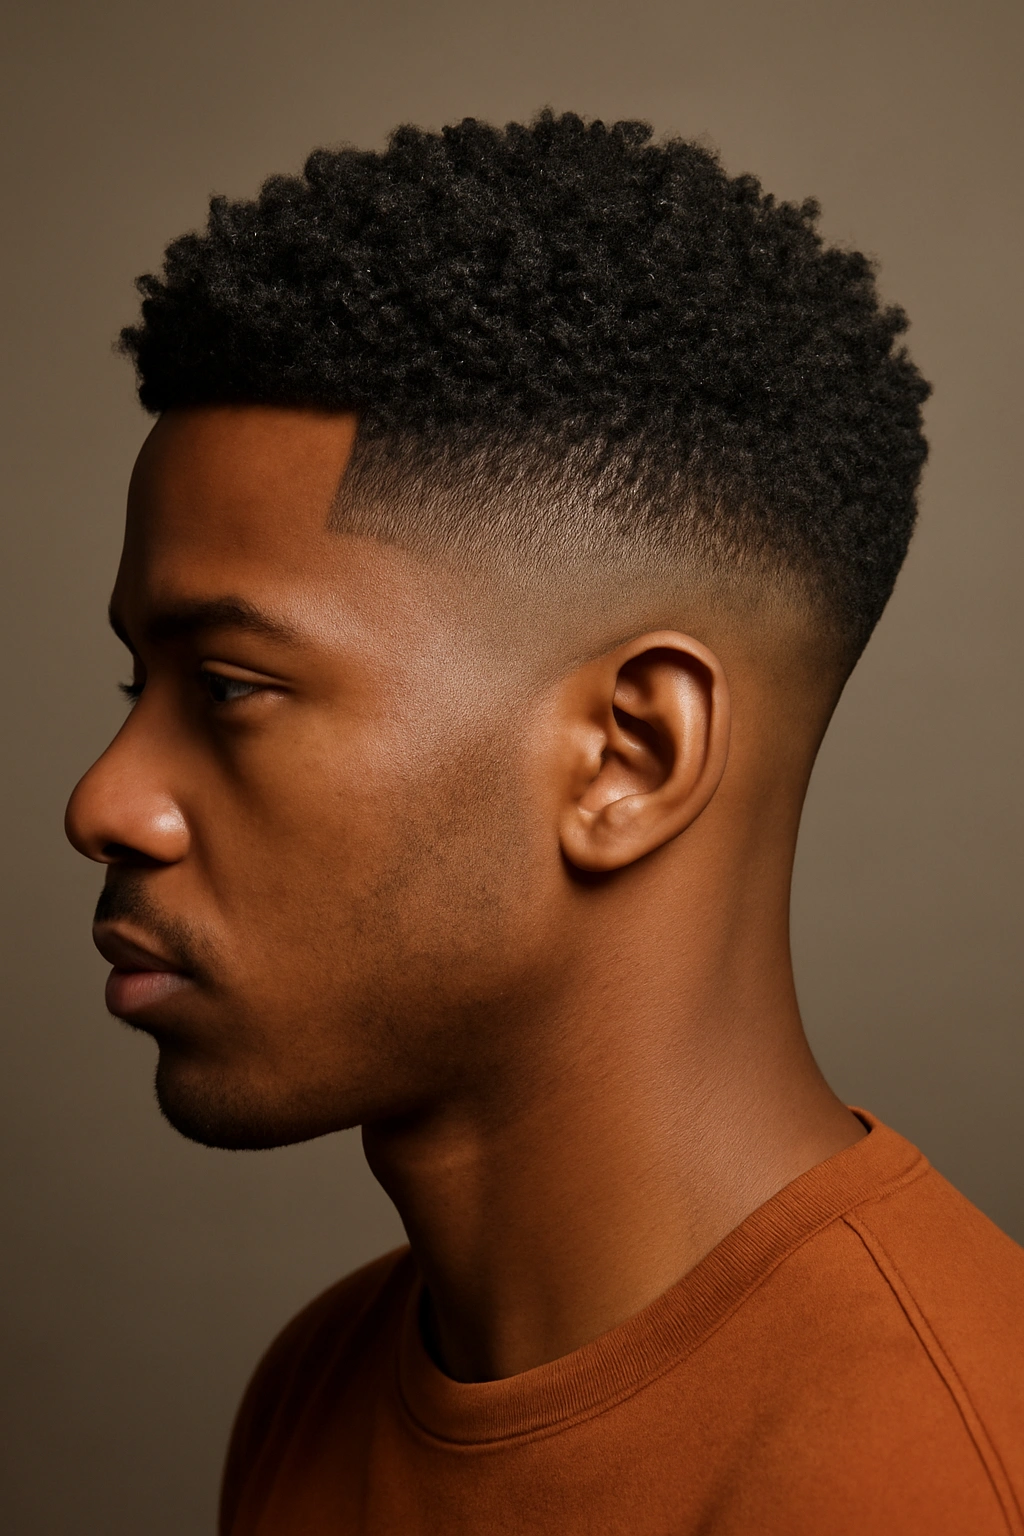
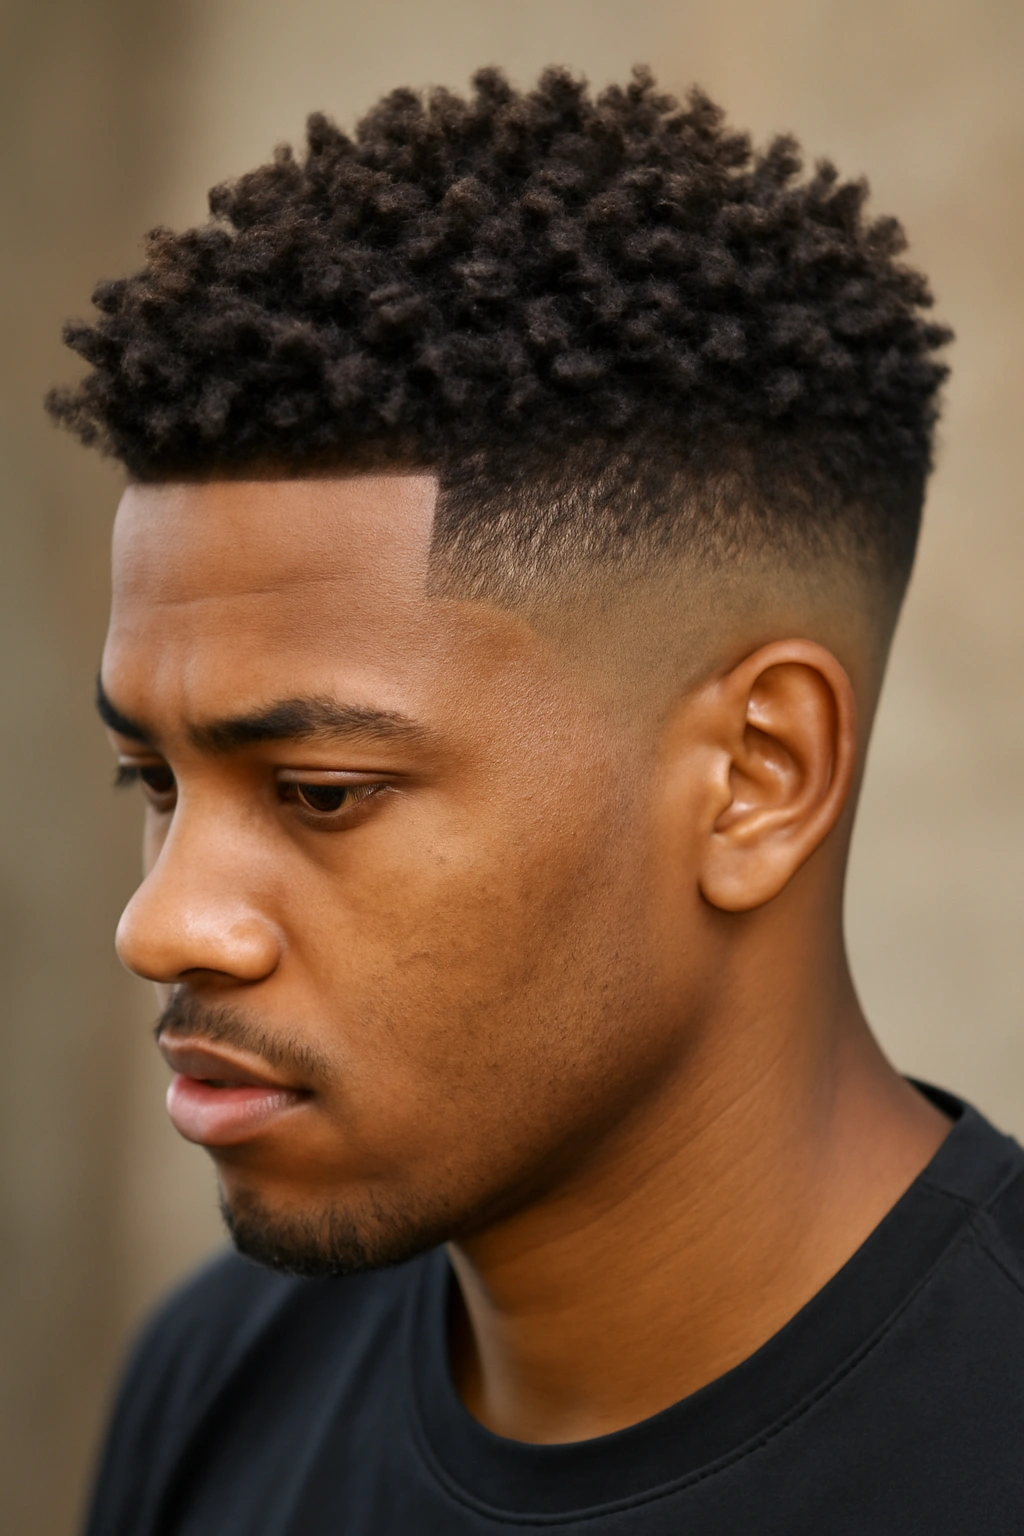
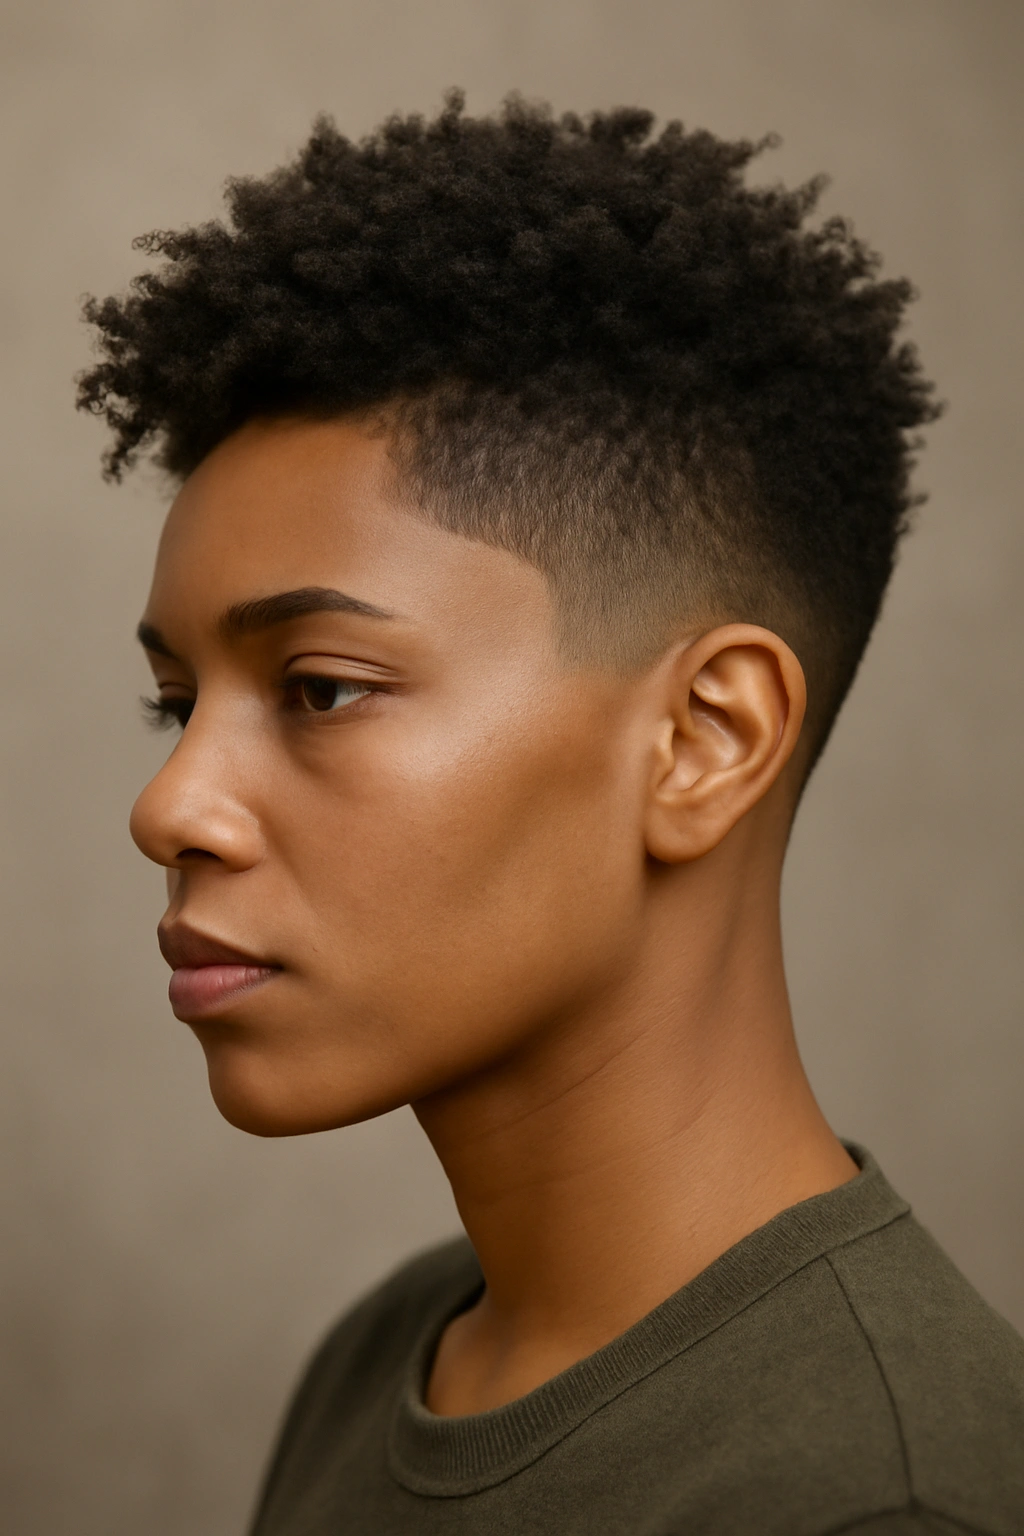
1. The High-Fade Taper with Textured Crown
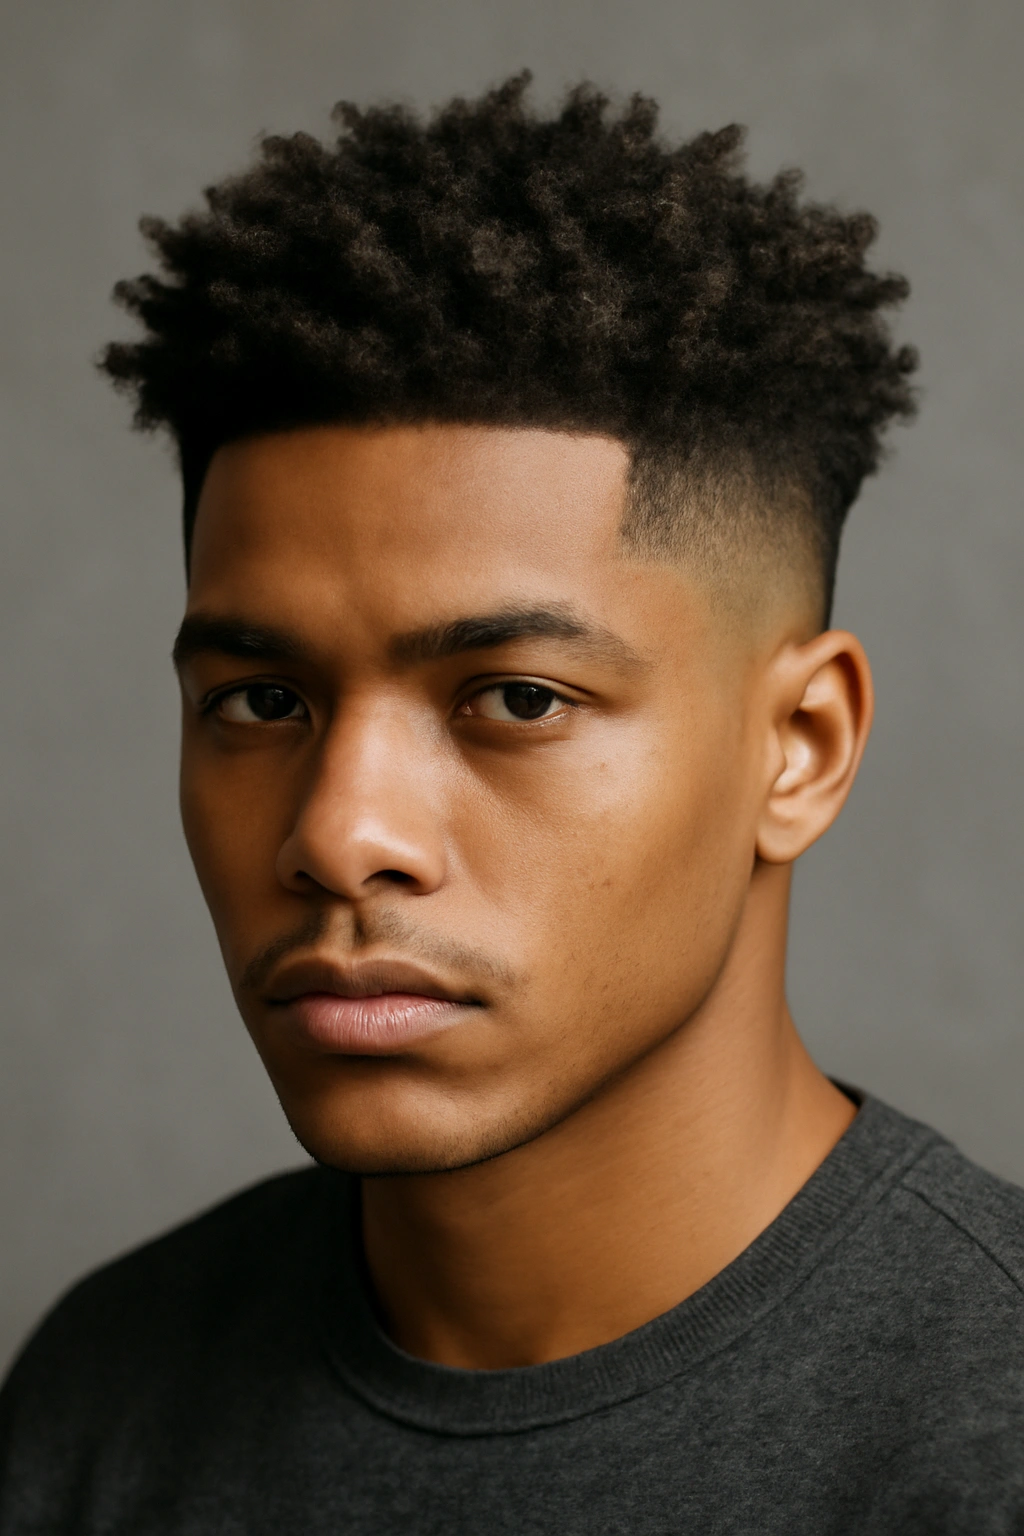
This cut is the go-to for Type 3A and Type 3B curls (loose, bouncy ringlets), and it’s particularly flattering on rounder or square face shapes. The sides fade high—usually starting the taper at the temples and working down to a very short fade by the nape—while the crown stays full and voluminous. The key is that the top isn’t layered aggressively; instead, the stylist uses point-cutting or texturizing to remove bulk while keeping curl length intact.
Why It Works for Loose Curl Patterns
High fades on looser curls create instant contrast and make the crown’s volume read as intentional rather than accidental. Because Type 3A and 3B curls naturally want to stretch and elongate, the taper actually helps them bounce back into shape instead of getting weighed down by their own length.
What to Communicate to Your Stylist
- Request the fade to start around the temple and finish at the nape—ask for “skin fade” if you want it super short, or “shadow fade” if you prefer slightly more length on the sides
- Ask for texturizing on top using point-cutting or dry-cutting methods (cutting when the hair is in its natural state, not wet)
- Specify how much volume you want on top—show a reference photo of the crown height you’re aiming for
- Ask about the timeline: how quickly the fade grows out and when you’d need a touch-up (usually every 3-4 weeks for skin fades, 6-8 for shadow fades)
Worth knowing: The fade grows out visibly because of the stark contrast between cut and uncut hair. If you like a cleaner look, you’ll need regular trims. If you prefer lower maintenance, a shadow fade or even a mid-fade gives you more time between visits.
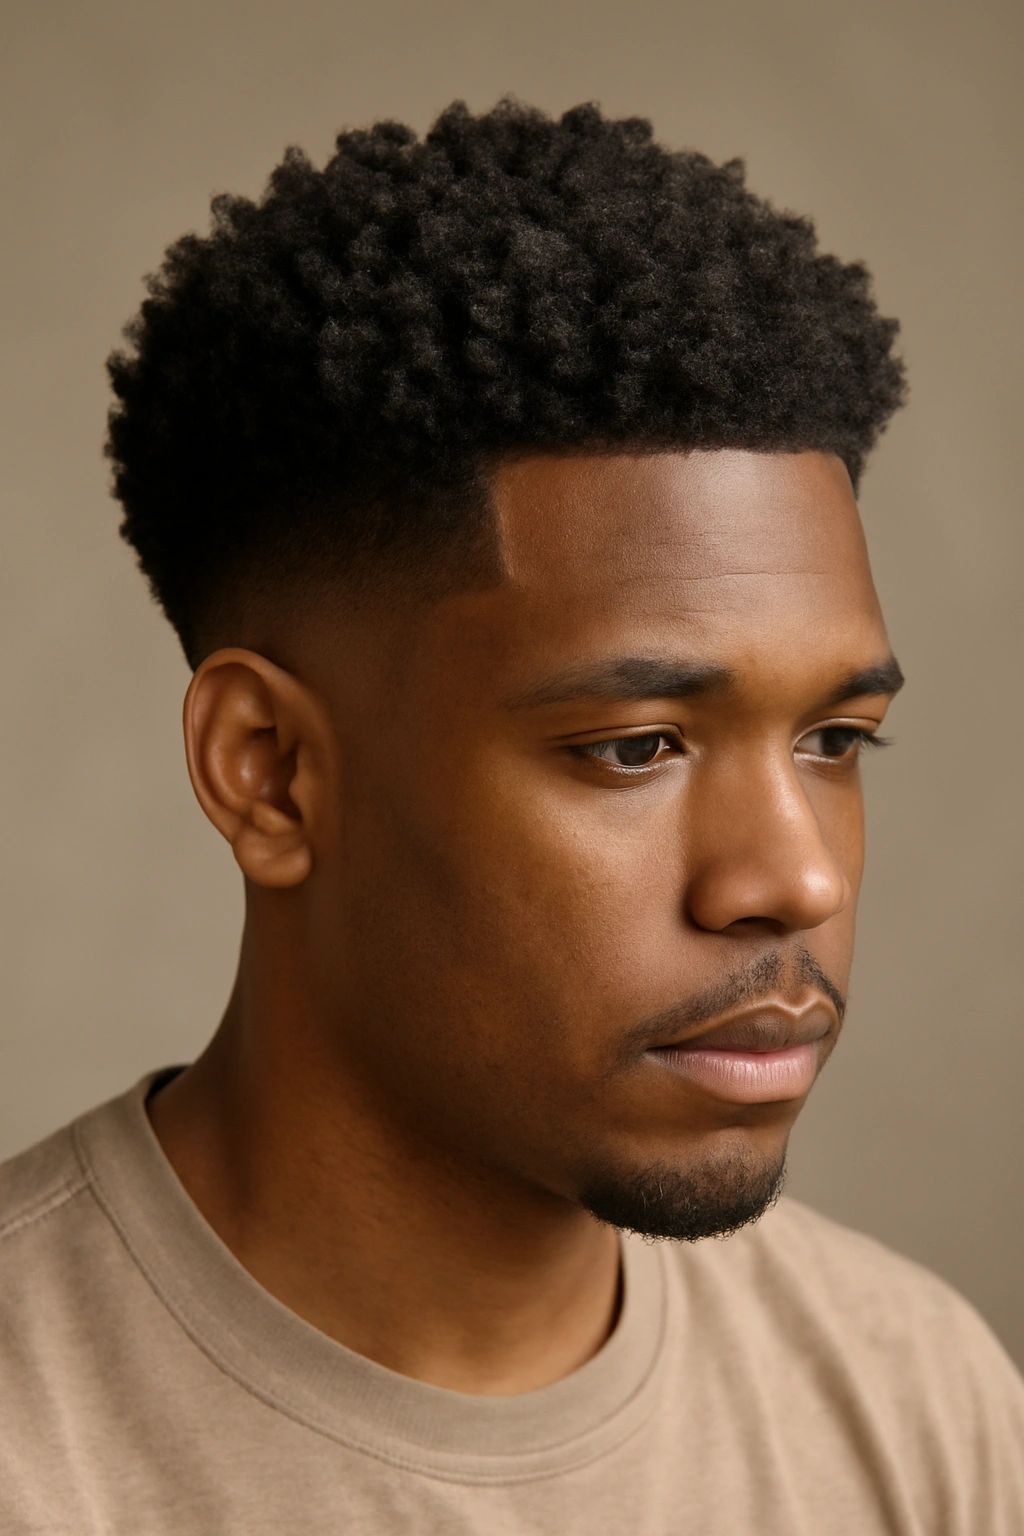
2. The Textured Mid-Length Taper for Type 3B Curls
Type 3B curls have that sweet spot where they’re dense enough to hold shape but not so coily that they need aggressive shortening. This cut keeps the crown at shoulder length or slightly shorter, tapers gradually on the sides starting around mid-ear, and removes weight through strategic texturizing rather than heavy layering. The result is a cut that looks effortless but intentional.
How the Taper Supports Medium-Density Curls
Type 3B curls can get frizzy and undefined if there’s too much weight pressing down on them, but they also lose their beauty if they’re cut too short and short-curl-fragmented. This mid-length taper hits the balance—it removes enough weight to let curls spring up, but preserves enough length that each curl has somewhere to go.
Styling and Maintenance Notes
- This cut works beautifully with a cream-based leave-in conditioner and a lightweight oil—the texture allows products to distribute evenly
- Use a denman brush or wide-tooth comb on wet hair to encourage curl clumping; avoid brushing when dry
- The sides will need touch-ups every 6-8 weeks to maintain the taper line, but the crown grows more naturally
- Sleeping in a pineapple or bonnet helps this cut maintain its shape overnight
Pro tip: Ask your stylist to cut your hair while it’s dry and in its natural curl state, not soaking wet. Wet curls stretch longer than they actually are, so cutting dry prevents over-shortening.
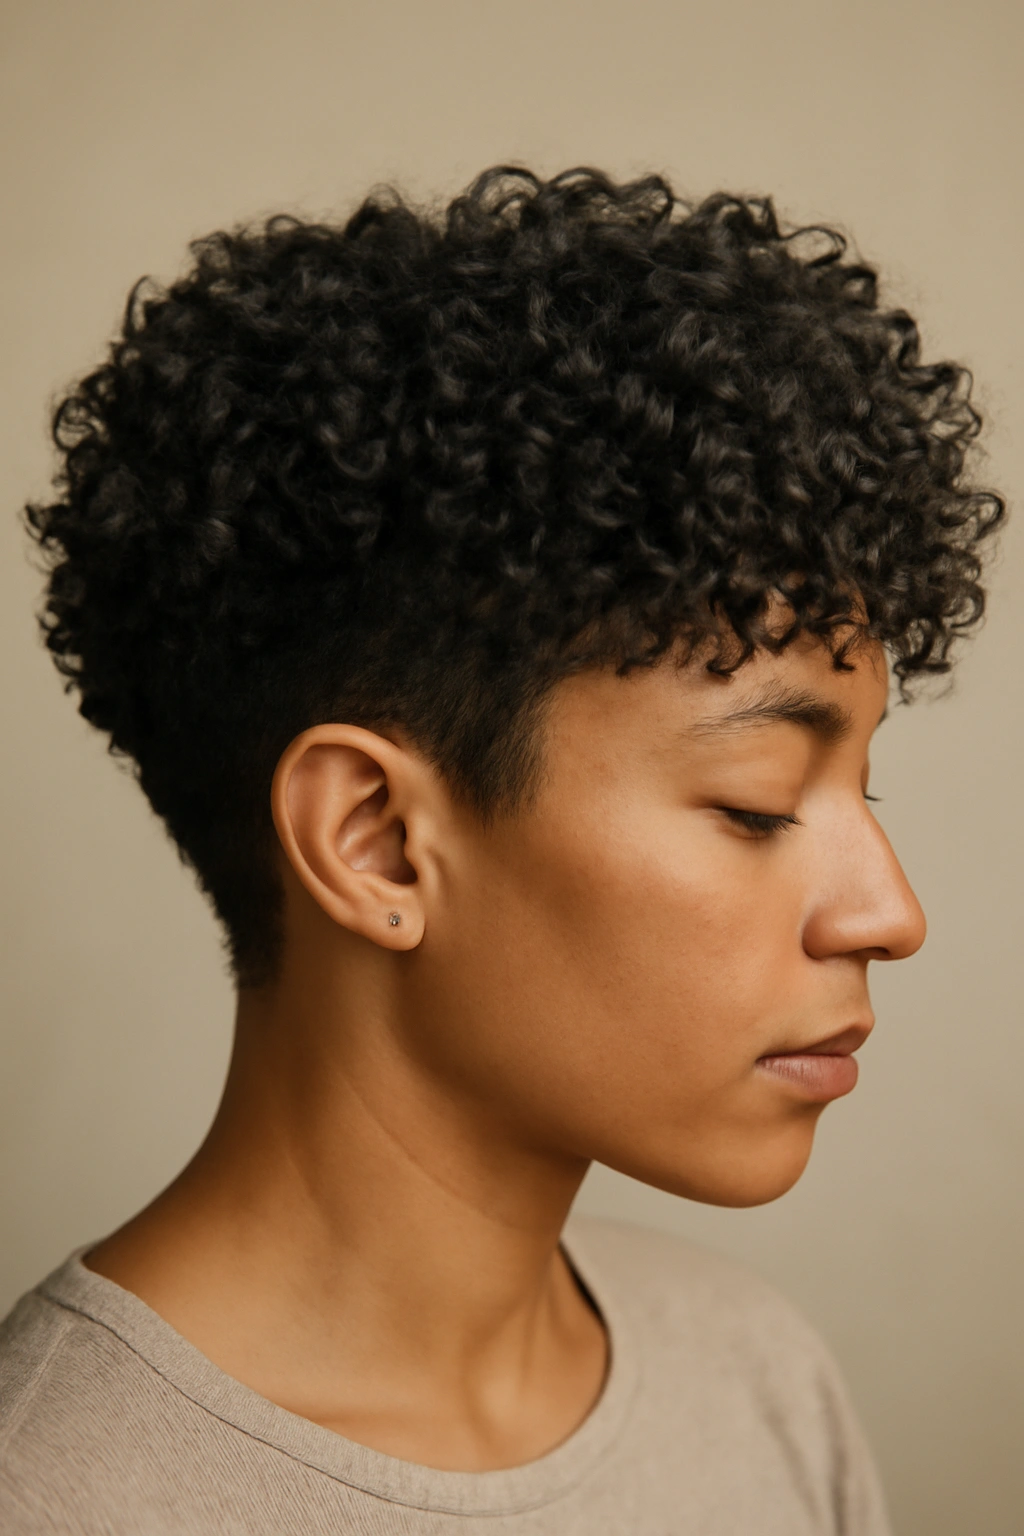
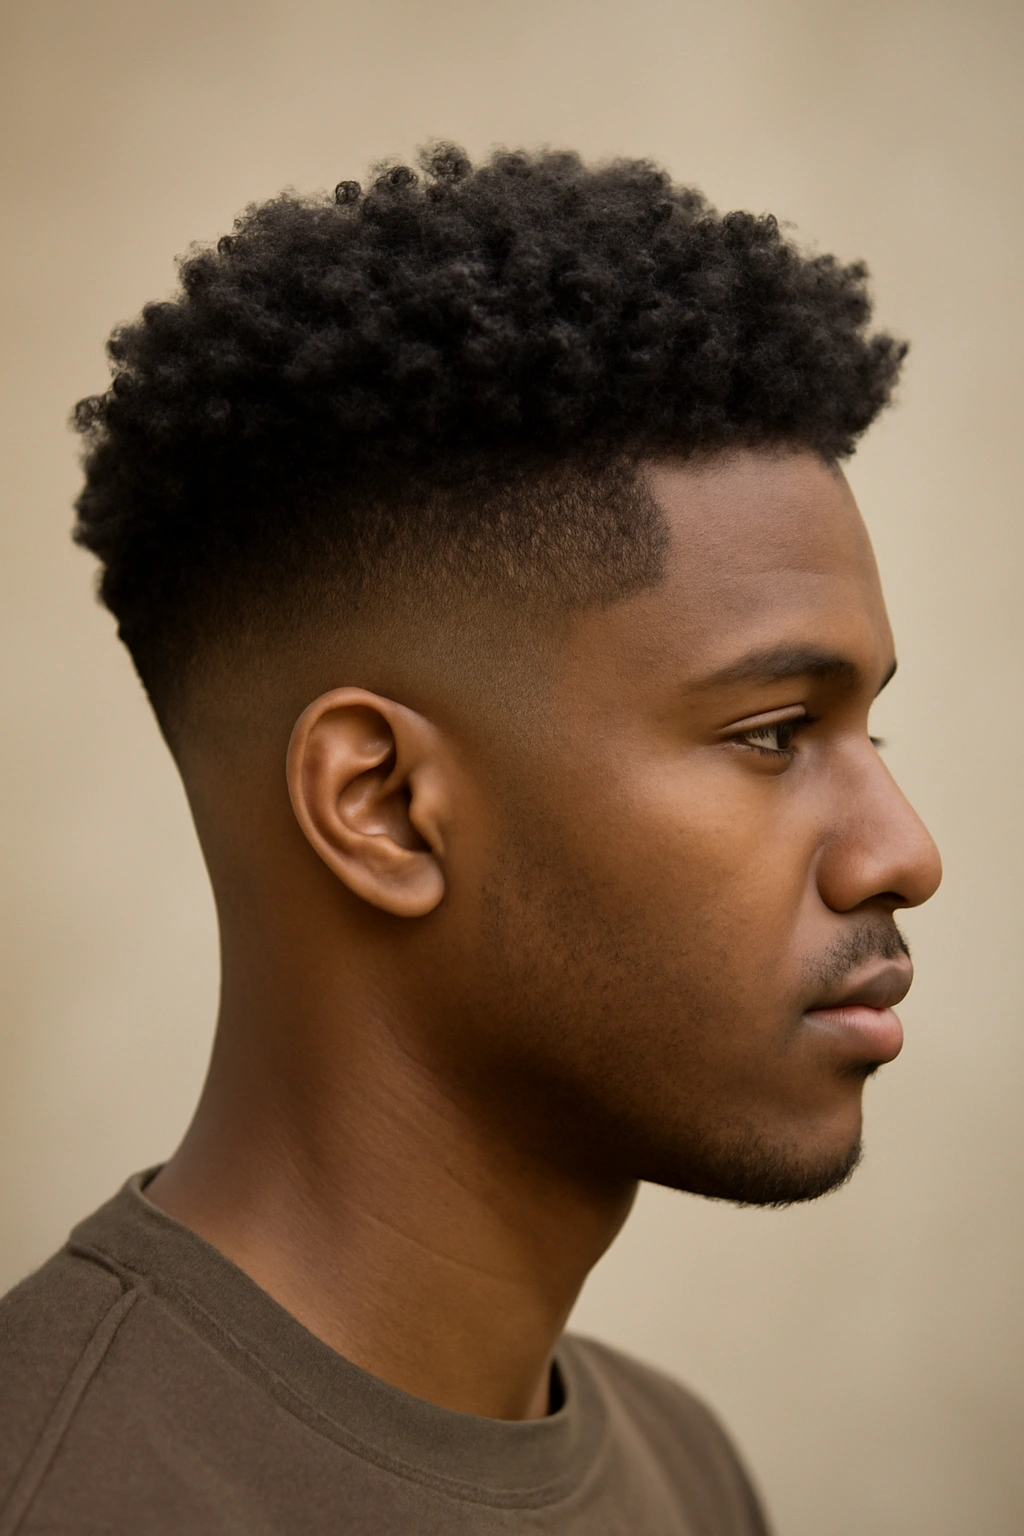
3. The Low Fade with Textured Length for Type 3C Curls
Type 3C curls are tighter and denser than 3B—they’re on the border between wavy-curly and full coily. This cut keeps the fade low, starting around the ear and tapering down gradually, while the crown stays longer (usually chin-length or longer) with strategic point-cutting to create texture without destroying the curl formation. It’s a cut that celebrates the density of Type 3C hair rather than fighting it.
Why Low Fades Work Best for Tighter Curl Patterns
Type 3C curls can look bottom-heavy and shapeless if the sides are too full, but they don’t need the extreme contrast of a high fade. A low fade removes just enough weight on the sides to let the curls read as intentional while keeping enough length to maintain the connection between curl and hair flow.
Execution Details Your Stylist Needs to Know
- A low fade starts around ear level and finishes with maybe a 1-2 inch length at the nape (not skin-tight)
- The crown should feature point-cutting rather than blunt layers—this removes weight while keeping curl definition intact
- Ask for a “blend” or “gradient” fade rather than a sharp line so the transition looks organic
- Specify if you want any design elements (like a tapered line or shape) on the sides
Worth knowing: Type 3C curls show off texture beautifully with this cut, but they also show every product buildup and every day without moisture. This cut needs consistent deep conditioning (weekly or bi-weekly) and clean, lightweight products.
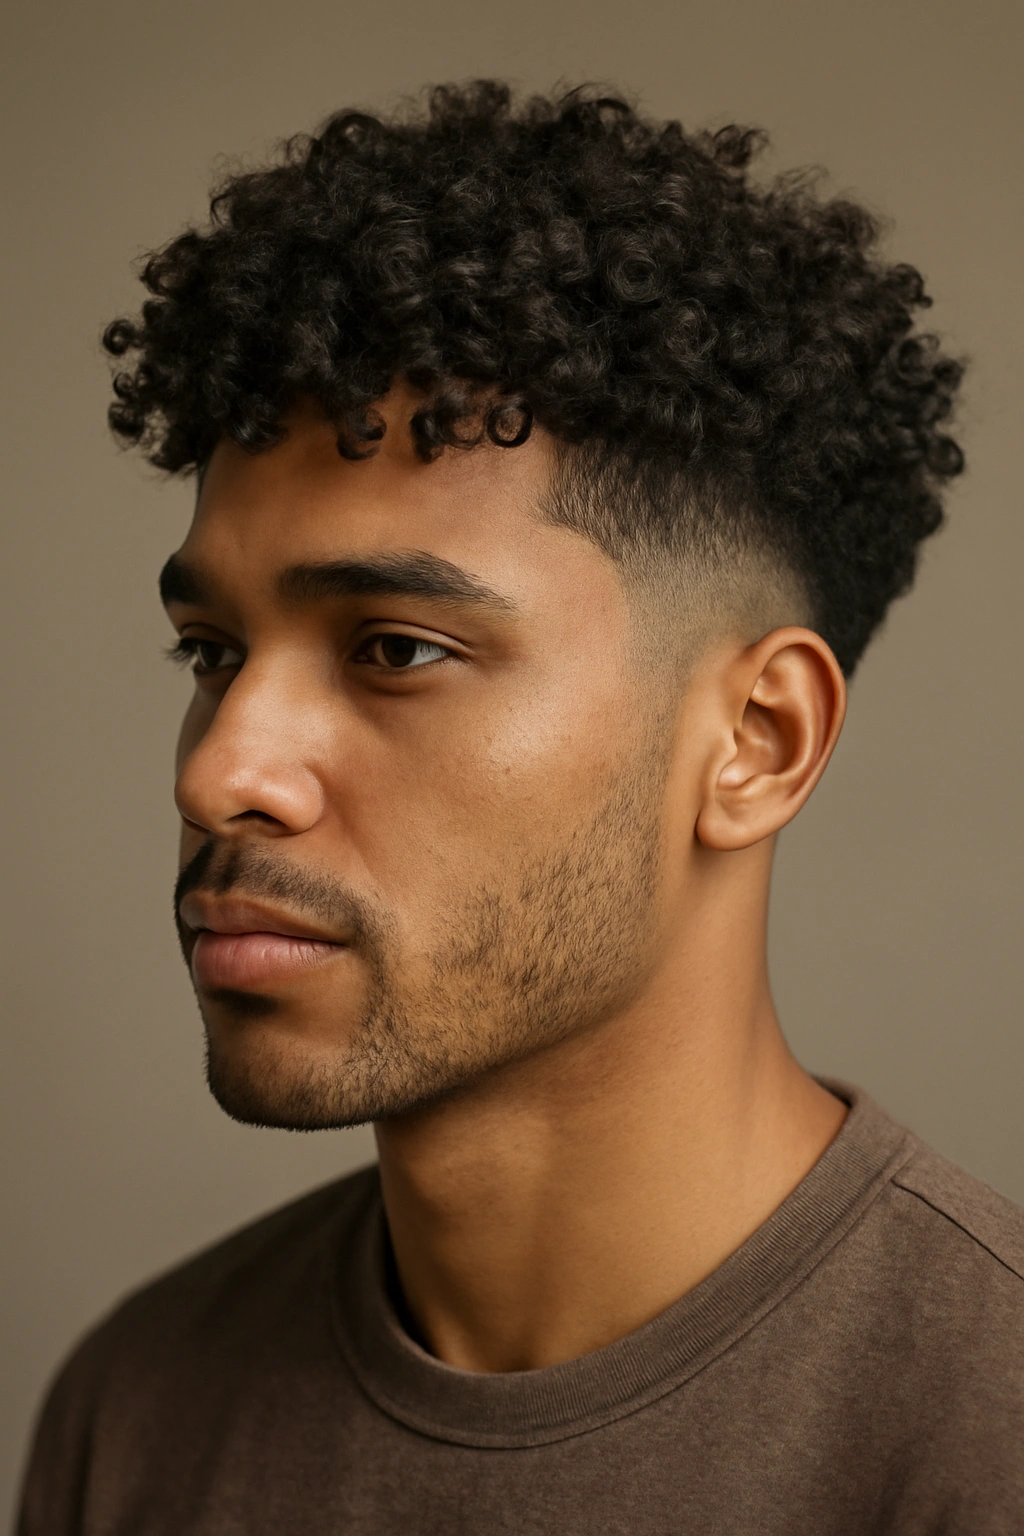
4. The Blended Taper with Defined Curl Clumps for Type 4A Coils
Type 4A coils are beautiful and bouncy—they’re that perfect coil pattern that shows off texture instantly. This cut uses a blended fade on the sides (no sharp lines) and focuses heavily on the crown with curl-clump shaping rather than traditional layering. The stylist uses wet-cutting techniques to identify individual curl clumps and cuts to enhance them rather than fragment them.
Why Clump-Cutting Changes Everything for Type 4A
Type 4A coils are most beautiful when they’re allowed to clump into their natural groupings. If you just layer the hair randomly, you end up with frizz and undefined texture. This cut respects the coils’ natural pattern and actually increases definition by removing weight in strategic places only.
Styling Strategy After the Cut
- This cut shows up best when you use the “praying hands” or “squishing” motion to apply products (no brushing or combing)
- Use a hydrating gel or mousse that lets coils clump naturally; avoid heavy creams
- This cut pairs beautifully with braids, twists, or banding for moisture retention and shape development
- The fade grows relatively quickly on Type 4A hair, so plan for touch-ups every 4-6 weeks
Pro tip: Bring a reference photo of Type 4A curls with visible clumping—many stylists understand coils differently, and seeing exactly what you mean by “clump definition” prevents miscommunication.
5. The Extended Fade with Tapered Texture for Type 4A-4B Blend
Some people have a mix of Type 4A and Type 4B coils across their head. This cut uses an extended fade (longer than a low fade but shorter than a mid-fade) to accommodate the density variation, while the crown gets texturized to remove bulk without cutting too close to the coil base. It’s a cut that works with whatever curl pattern you’re showing rather than forcing one look across your whole head.
Managing Mixed Curl Patterns with One Cut
Mixed curl patterns often grow at different rates and have different needs. An extended fade gives you enough length on the sides to work with both patterns, while texturizing on top removes weight across the entire crown rather than focusing on one specific area. This approach creates visual balance even when your texture varies.
Application and Touch-Up Timeline
- Extended fades are typically trimmed every 4-6 weeks to maintain the taper and blend
- Ask your stylist to texturize the crown using wet-cutting and twist-out methods to ensure you’re not cutting into individual coils
- Request a blend at the back of the head so the transition from crown to fade looks intentional, not accidental
- Discuss whether you want any definition lines on the sides or a completely soft blend
Worth knowing: If your curl patterns vary significantly, mention this to your stylist upfront. Some parts of your hair might need more aggressive texturizing than others, and that’s totally normal.
6. The Rounded Taper Fade with Coil-Respecting Texture for Type 4B Coils
Type 4B coils are denser and more angular than Type 4A—they spring straight up and create incredible volume. This cut uses a rounded fade on the sides and back (creating an almost halo effect) while the crown features minimal cutting, mostly just removing tangled or damaged hair and allowing the coils to expand naturally. It’s a cut that celebrates the coils’ natural geometry.
The Science of the Rounded Taper for Dense Coils
Type 4B coils are densest right at the base, so aggressively cutting or layering them actually creates bald spots or thin areas. This cut respects that density by fading the sides smoothly and avoiding heavy layering on top. The rounded shape frames the natural shrinkage and bounce that Type 4B hair creates.
Styling and Maintenance Strategy
- This cut looks best with moisturizing gels or creams that encourage coil definition—thin serums often get lost in the density
- Protective styling (braids, twists, buns) actually helps maintain this cut’s shape because it sets the curl clumps
- Touch-ups are needed every 4-6 weeks to keep the fade crisp and rounded
- Deep condition weekly or every other week—Type 4B hair needs consistent moisture to show off this cut’s definition
Pro tip: Ask your stylist to cut this while your hair is slightly damp (not soaking wet, not completely dry)—this helps them see your true coil pattern and avoid cutting too short.
7. The Textured Undercut with Length on Top for Type 4B-4C Blend
If you have a mix of Type 4B and Type 4C coils, an undercut-style taper is your secret weapon. The sides get cut very short (but not faded all the way to skin) while the crown stays significantly longer—creating visual contrast that makes the whole look intentional. The top gets texturized to remove weight without cutting into the coil base, and the short sides actually let longer crown hair appear fuller.
Why Undercuts Work for Mixed Dense Patterns
The undercut creates height and definition for patterns that can get visually heavy. By keeping significant length on top while the sides are much shorter, you’re using contrast to create the illusion of better shape. This is a cut that works particularly well if you have a rounder face and want to elongate it.
Styling Approach and Timeline
- Keep the undercut precise by trimming every 3-4 weeks, or let it grow out deliberately if you want a softer look over time
- The crown can be worn in multiple ways: textured and airy, twisted, braided, or in twists-outs for definition
- Use heavyweight gels or creams on top; the undercut can handle the weight of these products without looking flat
- This cut pairs beautifully with statement earrings or head wraps that frame the tapered sides
Worth knowing: Undercuts require confidence and good maintenance. If you love low-fuss styling, this might be higher-maintenance than you want. But if you like a statement look and don’t mind regular trims, it’s worth the effort.
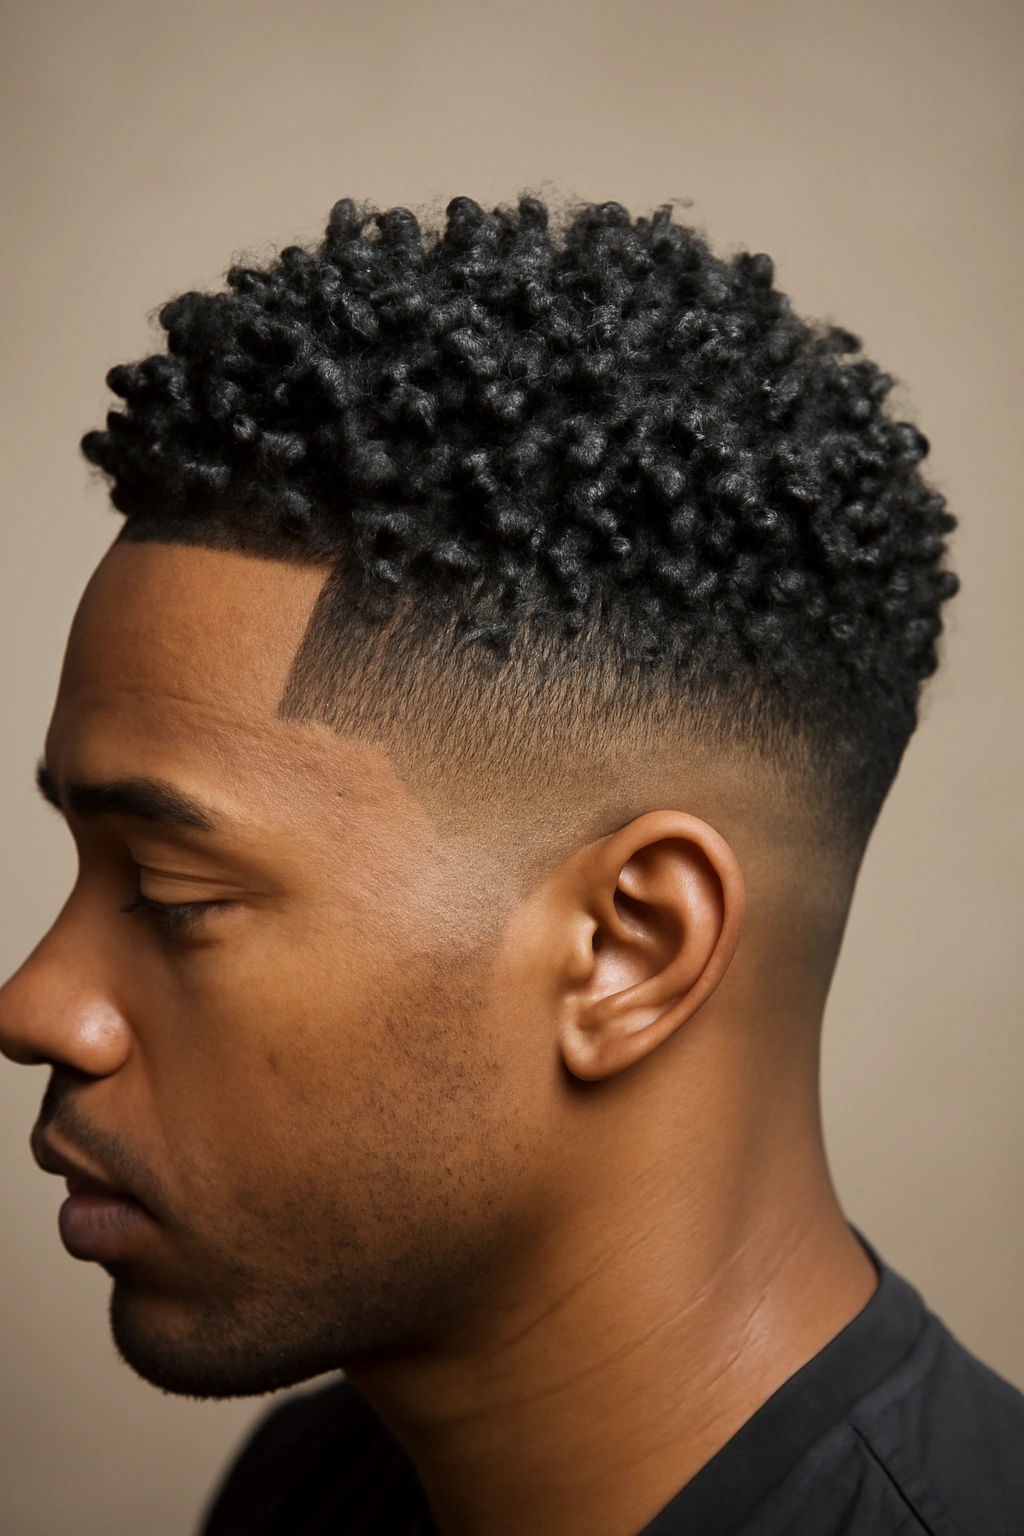
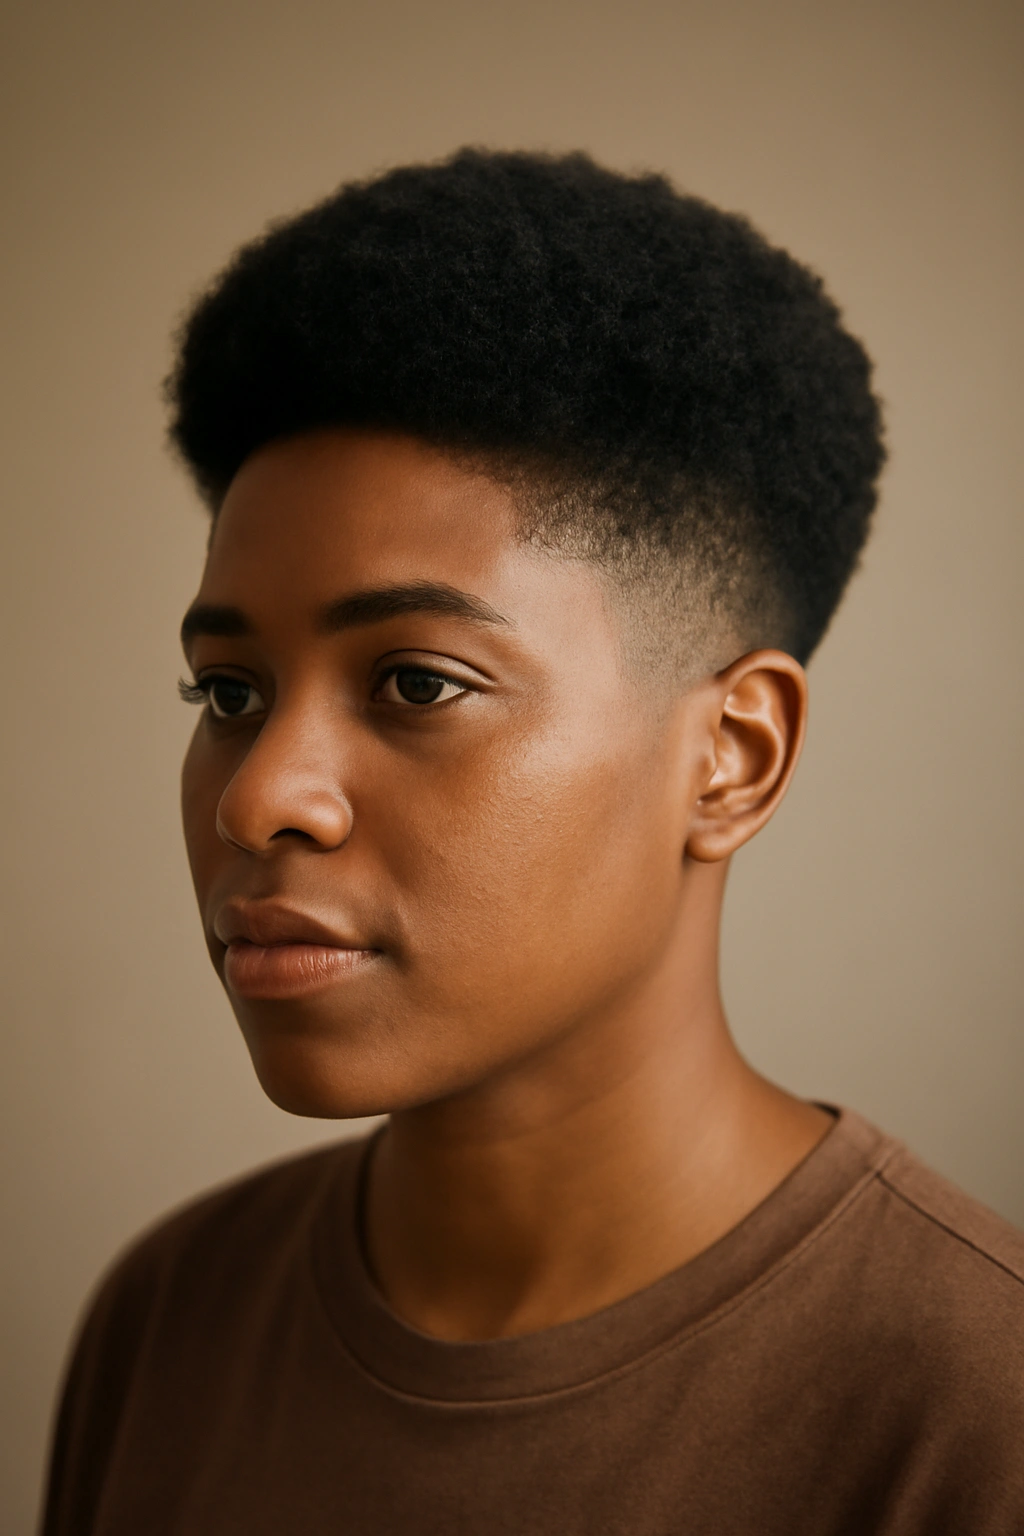
8. The Precise Fade Taper with Minimal Crown Texturizing for Type 4C Coils
Type 4C is the tightest coil pattern—coils spring straight up with minimal definition between them, creating incredible density and shrinkage. This cut uses a super-sharp fade on the sides (sometimes even a skin fade) and removes almost nothing from the crown except damaged hair and shed strands. The cut relies entirely on the fade for shape, letting the Type 4C coils exist in their most natural state.
Understanding Type 4C’s Unique Needs
Type 4C shrinks up to 75% or more, so cutting it is tricky—what looks like a certain length wet might be half that length dry. This cut solves that problem by focusing the cut work on the sides (where you can see exactly what you’re doing) and leaving the crown mostly alone. It’s less about “layering” and more about “removing what’s dead or damaged.”
The Real Maintenance Picture
- This cut can look beautifully defined and intentional wet, but dramatically different dry—you need to be prepared for that shift
- Protective styling is often the default look, and this cut actually sets up beautifully for braids, twists, and buns
- The fade needs touch-ups every 4-6 weeks to maintain crispness
- Deep condition at least weekly; Type 4C hair needs consistent moisture to show off its true definition
Pro tip: If you’re nervous about cutting Type 4C hair, ask your stylist to cut it while it’s saturated and stretched (freshly washed and soaking wet), then verify the dry length before finalizing. This prevents the “it’s too short when dry” problem.
9. The Gradual Taper Fade with Twist-Out Readiness for Type 4C
This variation of the Type 4C cut adds slightly more texture work to the crown, specifically designed to set up beautifully for twist-outs or braid-outs. The fade is still precise on the sides, but the crown gets subtle sectioning lines or minimal point-cutting that helps define where you’ll place twists. It’s a cut that’s designed for protective styling.
Strategic Texturizing for Protective Style Prep
Type 4C hair looks its absolute best when twisted or braided, and this cut makes that process easier by creating natural sectioning guides on the crown. The texturizing also removes weight just enough that twists won’t sit flat against the head, giving you more volume and definition in protective styles.
How to Work with This Cut
- Plan to wear twists, braids, or braids-outs within a week of getting this cut—that’s when the benefits show up most
- Ask your stylist to create light sectioning lines if you always use the same twist or braid pattern
- The fade should be maintained every 4-6 weeks, but the crown can go 8-10 weeks between cuts since minimal texturizing was done
- This cut is ideal if you rotate between protective styles and wash-and-gos
Worth knowing: This cut looks less visually defined as a dry wash-and-go than some others, because Type 4C coils don’t separate easily. But in a protective style, it looks incredible—so know what your main styling intention is before committing to this cut.
10. The Curved Taper with Mid-Length Crown for Type 4 Mixed Textures
If your natural hair is all over the place—Type 3C curls on top, Type 4A on the sides, Type 4B in the back—a curved taper might be the answer. Instead of a straight fade line, this cut creates a curved, flowing taper that works with wherever your different textures sit. The crown stays mid-length (usually ear-length or longer) with minimal texturizing, letting density do the work.
Working with What Your Head Actually Has
Rather than forcing one unified curl pattern to conform to a geometric fade, this cut honors the fact that natural hair is rarely uniform. The curved taper follows your head’s natural contours and transitions between different texture areas smoothly, making the whole cut look intentional and cohesive.
Styling and Maintenance Notes
- This cut looks best when you work with your natural texture variation, not against it
- Use different products on different sections if needed (heavier cream in the coily areas, lighter gel in the curly areas)
- The fade still needs maintenance every 4-6 weeks, but the curved line is easier to maintain than precise geometric shapes
- This cut pairs beautifully with braids, twists, or even natural texture showcased wet
Pro tip: Bring multiple reference photos showing the cut from different angles, so your stylist understands the curved line you want rather than assuming you want a traditional geometric fade.
11. The Textured Crop with High Definition Fade for Bold Type 4 Statement
If you want a cut that’s undeniably short—usually 1-2 inches on top—the textured crop is the move. This cut uses aggressive texturizing on the crown (point-cutting, dry-cutting, or even razor techniques) to create separation and definition within the short length, while the sides fade high and sharp. It’s a bold, statement-making cut that works for all Type 4 patterns but especially for Type 4B and 4C.
Making Short Hair Look Defined Rather Than Matted
The key to a good textured crop is aggressive texturizing that actually increases volume and definition at a short length. Done right, this cut shows off the beauty of coils and coarse texture. Done wrong, it looks matted or unkempt. The difference is in the texturizing technique—your stylist needs to understand how to separate coils at short length.
Confidence and Styling Reality
- Textured crops require complete confidence in your natural texture and willingness to let it be the statement
- Morning styling is usually just re-wetting and applying gel or cream, then letting air dry
- This cut is higher-maintenance in the sense that it needs trims every 3-4 weeks to maintain definition
- But it’s lower-maintenance in terms of daily styling—no detangling, no complicated techniques
Worth knowing: Textured crops look best with very simple products—usually just a good moisturizing gel and maybe a light oil. Heavy creams can weigh down the defined separation you paid for.
12. The Sleek Fade with Defined Edges for Professional Natural Hair
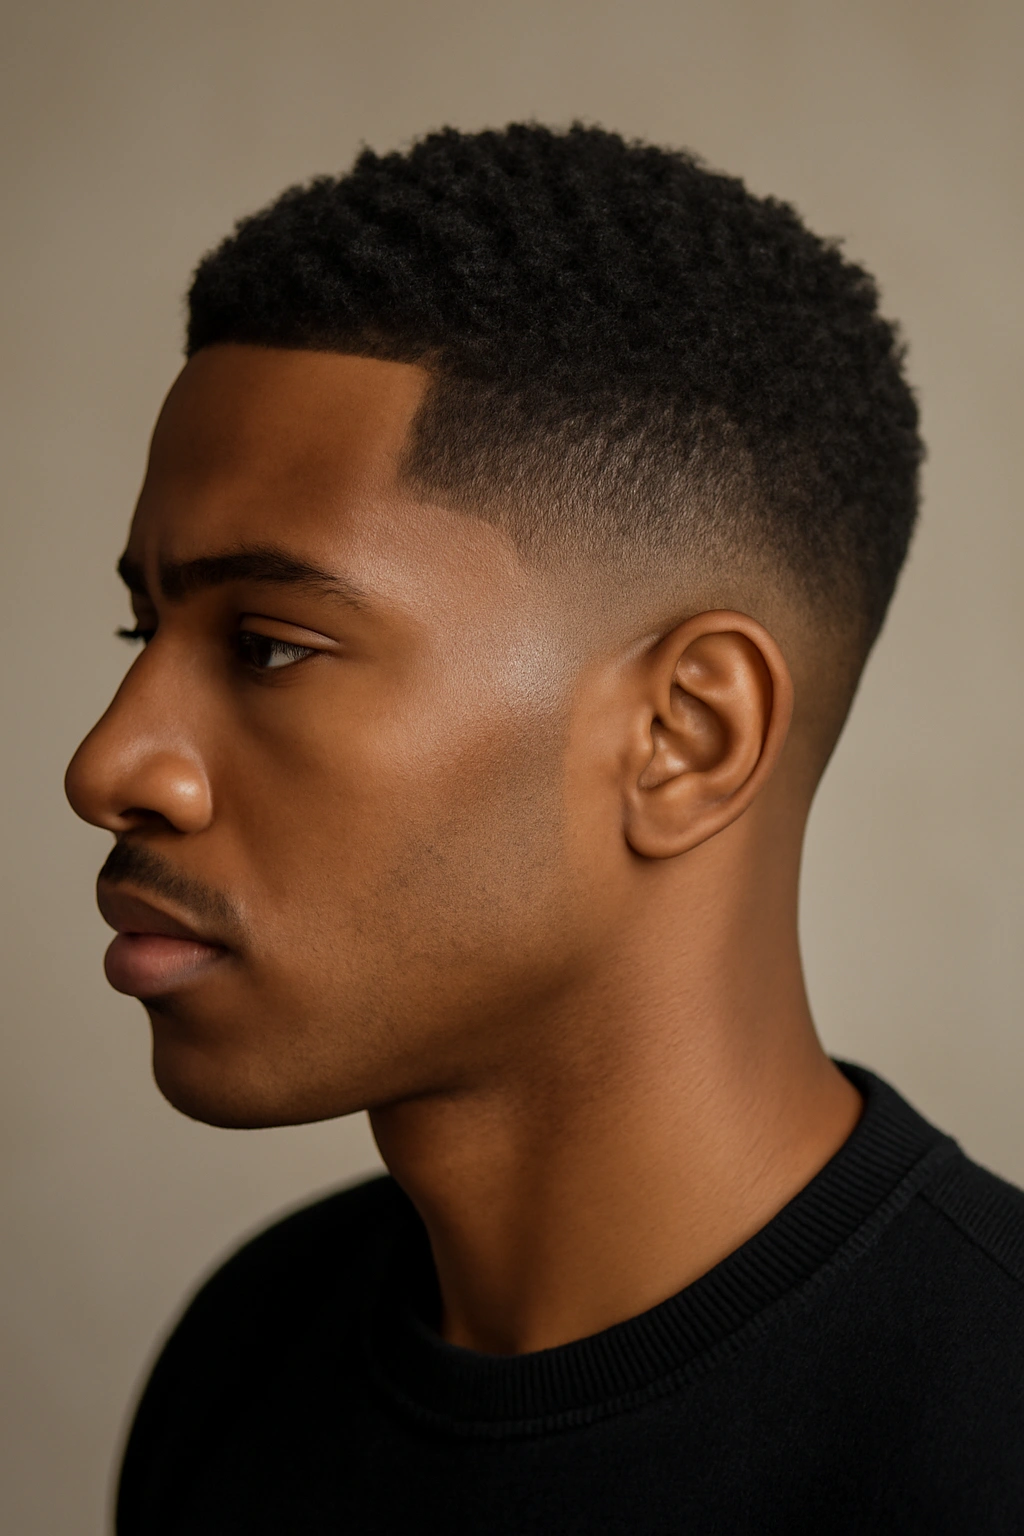
Some situations demand a cut that’s undeniably polished and professional-looking, even though you’re wearing your natural texture. This cut features a very precise, clean fade on the sides (usually a mid-fade or shadow fade), sharp definition lines, and a carefully shaped crown that reads as intentional and controlled. It works across all curl types but especially for Type 3B and Type 4A, where coils have good definition.
Professional Doesn’t Mean Giving Up Your Natural Texture
This cut is proof that you can have a sleek, professional look while celebrating your natural curls and coils. The precision comes from the fade and edge work, not from relaxing your hair or fighting your texture. When done right, it’s a cut that works in any professional environment.
Styling and Maintenance Strategy
- This cut usually requires styling product (gel, mousse, or cream) to look its most polished
- Define curl clumps using praying hands or squishing techniques when wet
- The fade and edges need maintenance every 3-4 weeks to keep that polished look
- This cut pairs beautifully with twisted edges, defined curl clumps, or even sleek gel for a sophisticated finish
Pro tip: Ask your stylist to define the edges with precision lines—not super thick, but visible enough to frame your face intentionally. This is what makes the whole look read as “intentional” rather than “just woke up.”
13. The Angled Taper with Forward Momentum for Angular Face Shapes
If you have an angular face (square jaw, prominent cheekbones), an angled taper works with your features rather than against them. The fade is longer in the front, gradually getting shorter as it moves toward the back, creating visual forward momentum. The crown stays layered and textured to move with the angle, creating a cohesive look that flatters angular features.
How Angle Flatters Face Shape
An angled fade creates an optical illusion of softening angular features. The longer length in the front draws the eye forward, and the movement of the textured crown adds softness. It’s a cut that’s specifically designed with face shape in mind, not just texture.
Making the Angle Work for You
- Specify exactly how much longer you want the front to be (usually ½ to 1 inch longer than the back)
- Ask for the angle to be subtle enough that it’s not obvious it’s angled, or dramatic if you want it to be a statement
- Layer the crown to follow the angle—you want the hair to move forward, not sit flat
- This cut works best with products that encourage movement, like creams or mousses rather than heavy gels
Worth knowing: Angled tapers need maintenance every 4-6 weeks because the angle is what makes them work—once the back catches up to the front, the visual effect disappears.
14. The Rounded Taper with Soft Blend for Maximum Versatility
If you want a cut that looks intentional but works for multiple styling options (protective styles, twist-outs, wash-and-gos, sleek gels), the rounded taper with a soft blend is incredibly versatile. The fade isn’t sharp—it blends gradually from short to longer, and the crown stays around ear-length with light texturizing. It’s the Swiss Army knife of natural hair cuts.
Versatility Without Sacrificing Definition
This cut doesn’t commit hard to any one aesthetic, which means you have the freedom to style it differently depending on your mood or the occasion. Sleek on Monday, textured on Wednesday, twisted for the weekend—this cut handles it all because nothing about it is too extreme.
Styling Options and Timeline
- This cut works beautifully with minimal products (just a spray bottle of water and one product) or multiple styling techniques
- Maintenance is needed every 6-8 weeks because the soft blend means there’s no sharp line that needs constant refreshing
- You can style the crown curly, coily, twisted, braided, or even sleek without the cut looking “wrong”
- This is ideal if you’re still figuring out your styling preferences
Pro tip: Ask for a soft blend on the sides and minimal texturizing on top. This gives you maximum flexibility without requiring constant trims to maintain your look.
15. The Precision Undercut with Sculptural Crown for Artistic Expression
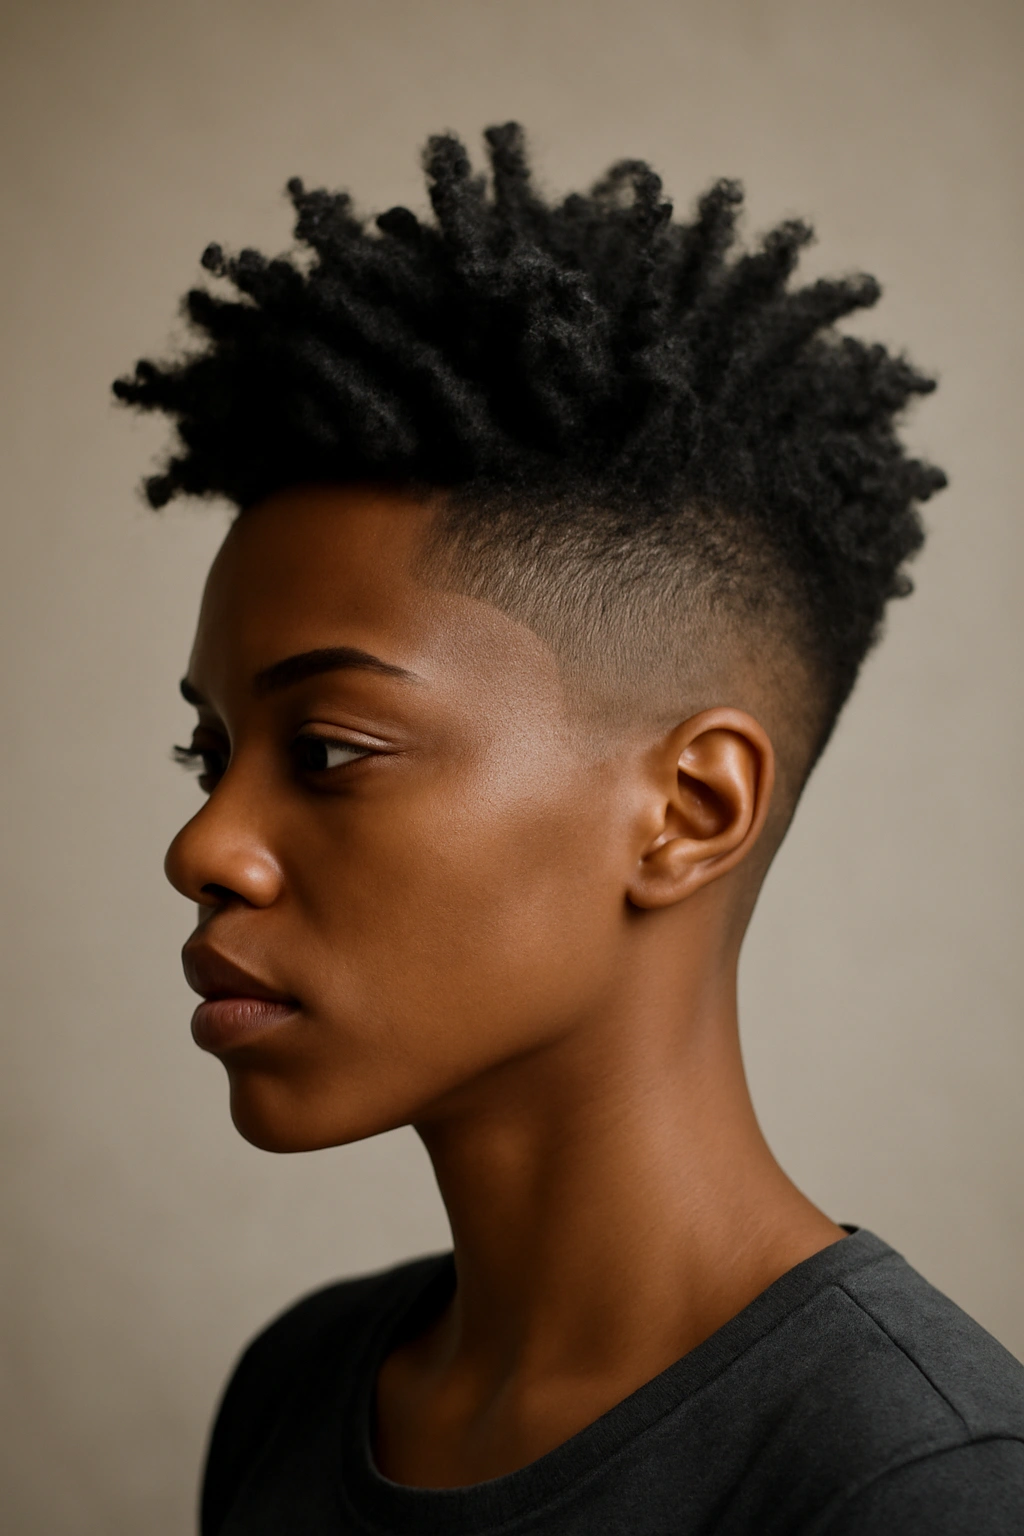
If you’re someone who sees your hair as an art form and wants a cut that shows that, a sculptural undercut is the ultimate statement. The sides are cut very short and precisely (often with design work or fades that have intentional pattern or shape), while the crown is left longer and textured to create sculptural dimension. This cut is for people who want their hair to be a conversation starter.
Hair as Art and Personal Expression
This cut isn’t about “professional” or “practical”—it’s about expression. The sculptural crown might have intentional volume in certain areas, the undercut might feature designs or clean geometric shapes, or the whole thing might just defy convention. It’s a cut for people who use their hair to communicate something about who they are.
Executing and Maintaining Artistic Vision
- Bring specific reference photos showing exactly what sculptural elements you want—this is too personal for vague descriptions
- Work with a stylist who has experience with artistic cuts, not just basic tapered fades
- Maintenance is needed every 3-4 weeks for the undercut to stay sharp, but the crown can go longer between trims
- Be prepared for this cut to elicit comments and questions—that’s kind of the point
Worth knowing: This cut requires commitment and a level of hair confidence. It’s not a “safe” cut, and it’s not designed to be. But if you love it, it becomes part of your identity and style in the best way possible.
Final Thoughts
The right tapered cut doesn’t just shape your hair—it actually works with your natural texture instead of fighting against it. When you find a stylist who understands your specific curl pattern and can execute the taper that’s actually suited to it, everything changes. Your hair looks healthier, feels easier to manage, and suddenly your natural texture becomes the feature instead of something you’re trying to control.
The cuts in this list aren’t interchangeable. A cut that looks incredible on Type 3B curls might not work for Type 4C coils, and that’s okay. Your curl type is specific, your face shape is specific, and your styling preferences are specific—so your cut should be too. Walk into your appointment with a clear understanding of which texture category you’re in, bring references that show exactly what you want, and communicate openly about maintenance, styling reality, and what success looks like to you.
The best natural hair cuts are the ones you feel confident wearing, that make your texture look intentional rather than accidental, and that actually fit your life. A sculptural undercut is stunning on someone who loves high-maintenance styling, but it’s a nightmare for someone who wants wash-and-go ease. A simple fade with minimal crown texturizing is perfect if you wear protective styles regularly, but it might look less defined if your main style is a wash-and-go. Know yourself, know your texture, and choose the cut that’s actually right for you—not just the one that looks best in a photo.