Braids have been a cornerstone of hairstyling for centuries, and they continue to reign as one of the most versatile and transformative options available. Whether you’re preparing for a casual weekend or a formal celebration, whether you’re working with pixie-length hair or waist-length waves, there’s a braided style that fits perfectly into your life. The beauty of braided hairstyles lies in their incredible range — from sleek and professional to romantic and whimsical, from intricate and statement-making to simple and effortless.
What makes braids so special is their adaptability. The same basic technique can be styled dozens of different ways depending on your hair texture, length, and the occasion. You can wear a braid to the office, the gym, a wedding, or a casual lunch with friends, and it’ll look entirely appropriate. Braids also offer practical benefits beyond aesthetics — they protect your hair from heat damage and environmental stressors, they keep hair out of your face for hours at a time, and they often require less daily maintenance than other styles once you’ve mastered the basic techniques.
The following collection covers 25 distinct braided hairstyles that work across different hair lengths, from short bobs to long flowing locks, and across different occasions, from professional environments to celebrations and everything in between. Some of these styles are ideal for beginners, while others require more practice or assistance. Some work best on specific hair textures, while others are beautifully adaptable. What they all share is proven wearability and genuine appeal — these aren’t trends that last a season, but timeless options that keep reinventing themselves.
1. Classic Three-Strand Braid

The three-strand braid is the foundation of nearly every braiding technique, making it essential knowledge for anyone interested in braided styles. This simple yet elegant braid divides hair into three equal sections and weaves them together in an over-and-under pattern that creates a clean, structured column of interwoven strands.
Why This Style Works
This braid suits virtually every occasion because its appearance changes dramatically based on how tightly you braid and how you finish it. Braided loosely with a few face-framing pieces left out, it reads as romantic and effortless. Braided tightly and secured close to the scalp, it becomes polished and professional enough for interviews or client meetings. You can wear a three-strand braid over your shoulder, down your back, wrapped around your head, or even as a crown.
Best For and Styling Tips
- Works on all hair lengths from shoulder-length and longer
- Takes approximately 3-5 minutes once you’ve practiced
- Works beautifully on straight, wavy, or curly hair — though curly hair may require a texturizing product to grip properly
- Pairs equally well with casual jeans or formal evening wear
- Create texture and interest by gently pulling at the finished braid to make it look slightly undone and fuller
Insider note: This braid holds best when you work with second-day hair or use a light texturizing spray beforehand — freshly washed hair can slip and feel too smooth to grip.
2. Dutch Braid

The Dutch braid is essentially the inverse of a traditional three-strand braid, where you weave the outer strands under the center strand instead of over it. This creates a braid that appears raised and dimensional, almost like a rope sitting on top of your hair rather than sitting within it.
What Makes Dutch Braids Stand Out
Dutch braids have a bold, athletic aesthetic that photographs beautifully and reads as intentional and polished rather than casual. Because the braid sits prominently on the scalp, it draws attention to the crown and the overall shape of your head, making this style particularly flattering on people with round faces who want to elongate their proportions. The braid also appears thicker and more substantial than a traditional braid because of how the light catches the raised woven strands.
How to Achieve the Style
- Start at the crown and work the braid down the back of your head
- Use the same three-section technique as a traditional braid but reverse the weaving direction
- Practice on yourself in a mirror before attempting to braid the back of your head without one
- Dutch braids work best on hair at least shoulder-length, though skilled braiders can work with shorter lengths
- Finish by pulling gently at each loop of the braid to add fullness and dimension
Pair a Dutch braid with a leather jacket for a sporty vibe, or dress it up with delicate earrings and a formal dress for unexpected contrast.
3. French Braid

A French braid begins with a three-strand braid at the crown and systematically adds sections of hair from the scalp as you braid downward, creating the illusion that the entire head of hair is being braided into one continuous strand. This technique creates a braid that feels intricate and complex, though it’s surprisingly straightforward once you understand the mechanics.
Why French Braids Reign Supreme
French braids are the style that non-braiders often admire most because they appear more complicated than they actually are. You start with a small braid at the crown and keep pulling in small sections from either side as you work your way down — it’s this “picking up” of new hair that makes the technique feel special. The result is a braid that encompasses more hair as you progress, creating visual interest and movement.
Execution and Variations
- Takes 10-15 minutes to master on yourself
- Works on all hair lengths, though longer hair gives you more canvas to work with
- Creates a naturally polished appearance suitable for everything from office meetings to weekend gatherings
- Experiment with tightness — a loose French braid reads as romantic, while a tight one reads as athletic or professional
- Try reverse French braids by pulling the outer sections under the center section instead of over
French braids work particularly well on wavy or textured hair because the slight grip helps the braid hold together. On very straight, slippery hair, add a light texturizing spray before braiding.
4. Fishtail Braid

The fishtail braid uses a completely different technique than traditional three-strand braiding — instead of three sections, you work with two sections and weave thin strands from the outside of one section to the inside of the other. The result is a delicate, woven appearance that resembles the skeleton of a fish, hence the name.
Why Fishtail Braids Feel Special
Fishtail braids have an intrinsically beautiful, organic quality. They look simultaneously simple and intricate, and they drape with an elegance that’s difficult to achieve with other techniques. Fishtail braids also naturally have a slightly undone, textured appearance even when freshly braided, which makes them feel modern and approachable rather than fussy.
How to Master the Technique
- Start by dividing hair into two equal sections
- Take a thin strand from the outside of the right section and weave it across to the inside of the left section
- Repeat on the opposite side, taking a thin strand from the outside of the left section and moving it to the inside of the right section
- Continue alternating sides until you reach the end
- Gently pull at the finished braid to add fullness and make the weave more visible
- Works beautifully on all hair lengths and types
Fishtail braids read as romantic and effortless, making them ideal for date nights, casual gatherings, or situations where you want to look polished without appearing to have tried too hard.
5. Double Dutch Braids

Double Dutch braids are two Dutch braids created simultaneously on either side of your head, running from the crown down to the nape of your neck. This style provides maximum visual impact, creates a playful and youthful aesthetic, and distributes the weight of the braids evenly across your scalp.
The Appeal of Symmetrical Braiding
Double braids immediately transform your appearance and make a statement about intentionality. This style suits sporty settings, outdoor activities, festivals, and casual social events. The symmetry of two identical braids creates a balanced, harmonious look that’s difficult to achieve with other styles. Double Dutch braids also hold well throughout an active day, making them practical for gym sessions, hiking, or any situation where you need your hair securely contained.
Tips for Executing Double Braids
- Section your hair down the middle with a rattail comb for a clean part
- Create the first Dutch braid on one side, starting at the temple and working toward the nape
- Mirror the braid on the opposite side, keeping the size and tightness consistent
- Takes 15-20 minutes once you’ve practiced the technique
- Pull gently at both braids to add fullness and dimension
- Tie the ends with small elastics that match your hair color for a seamless finish
For a more polished version, wrap each braid around the back of your head and secure them together at the nape with bobby pins, creating a braided crown effect.
6. Boxer Braids

Boxer braids are essentially two very tight Dutch braids that run parallel down the back of your head, starting near the temples and extending to the nape. The name refers to the style’s popularity among boxers and athletes who need hair secured firmly in place during training or competition.
Why Athletes and Active People Love Boxer Braids
Boxer braids are the most secure braided style available for movement and activity. The tightness of the braids combined with the structural integrity of the Dutch technique means that even vigorous movement won’t create flyaways or require restyling. This style works beautifully for workouts, sports activities, outdoor adventures, or any situation where you need maximum security. The tight, streamlined appearance also reads as athletic and strong, which many people find appealing as an everyday look.
Creating Secure, Polished Boxer Braids
- Work on slightly damp hair or use a texturizing spray for grip
- Section your hair down the middle for symmetry
- Create tight Dutch braids from your temples back, pulling evenly to maintain tension
- Takes 15-20 minutes and becomes faster with practice
- Works best on hair at least shoulder-length
- Finish with a strong-hold hairspray to prevent frizz and maintain the braids throughout the day
The sporty aesthetic of boxer braids pairs well with athleisure, casual wear, baseball caps, or headbands. You can also dress up boxer braids with jewelry or a statement lip for an unexpected contrast.
7. Waterfall Braid

A waterfall braid is a hybrid between a regular braid and a French braid where you pick up hair sections and braid them, but you let sections of hair “fall” freely down the sides of your head, creating the impression of water cascading down. The result is a romantic, dimension-filled style that feels delicate and intentional.
The Romance of Waterfall Braids
Waterfall braids are particularly popular for special events and celebrations because they combine the polish of a braid with the softness and movement of down-worn hair. Unlike a full braid that contains all your hair, a waterfall braid incorporates loose strands throughout, creating a layered, romantic appearance. This style works beautifully on wavy or curly hair, where the loose sections add natural texture and volume.
How to Create a Waterfall Braid
- Start with a regular three-strand braid at the crown on one side of your head
- Braid for a section, then drop one strand and pick up a new piece of hair from your scalp instead
- This creates the “waterfall” effect where strands flow downward while others are woven into the braid
- Continue this pattern as you work your way across the back of your head
- Takes 12-18 minutes depending on your familiarity with the technique
- Works beautifully on shoulder-length or longer hair with some wave or texture
- Pair with soft waves, curls, or straight-ironed hair depending on your preference
Waterfall braids suit romantic occasions like weddings, anniversaries, or formal events, but they also work for everyday wear when you want to look put-together without appearing overdone.
8. Crown Braid

A crown braid (also called a halo braid) wraps around the crown of your head like a tiara or crown, creating a regal and romantic appearance. This style is created by braiding along the hairline from one side to the other, essentially framing the face with braided hair while loose hair flows below.
The Regal Impact of Crown Braids
Crown braids instantly elevate your appearance and create a sense of occasion, making them ideal for weddings, formal events, or any time you want to look especially polished. The style also has practical benefits — it keeps shorter layers or bangs secured while allowing longer hair to flow freely. The circular placement of the braid draws attention upward, making it flattering on a variety of face shapes, and it works beautifully as the base for an updo if you want to incorporate the braid into a more complex style.
Executing a Crown Braid
- Start by creating a braid at one temple, using a French or Dutch braiding technique
- Braid across the back of your head, following the natural hairline
- Continue braiding to the opposite temple, picking up hair as you go
- Secure the end with bobby pins and a small elastic hidden by remaining hair
- Takes 15-20 minutes depending on technique and hair thickness
- Works best on hair at least shoulder-length
- Pair with soft waves or curls throughout the loose hair for a romantic, cohesive appearance
For a more relaxed version, loosen the braid after completing it by gently pulling at each section, creating a fuller, less formal appearance suitable for casual events and everyday wear.
9. Dutch Crown Braid with Space Buns

This playful style combines a Dutch crown braid with space buns — two buns positioned on either side of the crown. The crown braid frames the face while the space buns sit nestled within or on top of the braid, creating a whimsical, youthful appearance perfect for festivals, casual outings, or anyone looking to make a fun, fashionable statement.
When to Wear This Hybrid Style
This style works beautifully for casual events, music festivals, beach days, or creative professional environments where personality is valued. The space buns add playfulness while the Dutch braid adds polish, creating an interesting contrast. This style reads as intentional and fashionable rather than childish when executed with attention to neatness and proportion.
Creating Dutch Crown with Space Buns
- Create a Dutch braid that starts at one temple and curves around the back of your head, ending at the opposite temple
- Finish the braid and secure it
- Gather the remaining hair into two sections on either side of the crown
- Create one bun on each side, positioning them to sit within or just above the braid
- Takes 20-25 minutes depending on your skill level
- Works on all hair lengths and types
- Add small accessories like hair clips or ribbons to the buns for additional visual interest
This style photographs beautifully and suits anyone who enjoys expressing their personality through fashion and isn’t afraid of standing out in a crowd.
10. Fishtail Crown Braid

Combining a fishtail braid with a crown placement, this style wraps a delicate fishtail braid around the crown of your head, creating an ethereal, romantic appearance. The fishtail technique creates a more intricate visual than a traditional crown braid, making this style ideal for special events where you want to appear polished and elegant.
The Ethereal Quality of Fishtail Crowns
Fishtail braids naturally have a delicate, romantic quality that makes them ideal for formal occasions. When placed as a crown, this effect is magnified. The style works beautifully on all hair types and lengths, though longer hair gives you more flexibility in how you style the remaining loose sections. The fishtail technique also creates a visual that reads as more complex and intentional than simpler braiding techniques.
How to Execute a Fishtail Crown
- Section off the hair that will become your crown, roughly from temple to temple across the top of your head
- Create a fishtail braid using this sectioned hair
- Pin the completed braid around the crown of your head
- Let the remaining hair flow loose, styled in waves, curls, or left straight
- Takes 15-20 minutes once you’re comfortable with fishtail technique
- Works beautifully on shoulder-length or longer hair
- Pairs well with minimalist or delicate jewelry to maintain the ethereal aesthetic
This style suits weddings, romantic celebrations, formal events, or anywhere you want to appear graceful and intentional.
11. Side Braid with Loose Waves

A side braid involves braiding hair on one side of your head in a traditional or Dutch style, then letting it drape over your shoulder. The contrast between the structured braid and loose waves creates visual interest and works beautifully for both casual and formal occasions.
Why Side Braids Suit Nearly Everyone
Side braids are incredibly flattering because they frame one side of your face, drawing attention to your features while keeping hair somewhat contained. This placement creates a softer, more romantic appearance than a center-parted braid, and it works equally well with casual outfits or formal wear. Side braids are also practical for situations where you want some of your hair controlled without committing to a fully braided look.
Styling a Side Braid
- Create a deep side part, roughly from your temple on one side to the nape of your neck on the other
- Braid the larger section of hair using your preferred technique (traditional, Dutch, or fishtail all work)
- Leave the smaller section of hair loose and wave it with a curling iron or wand
- Pin the end of the braid to the back of your head or secure it with an elastic hidden beneath other hair
- Takes 10-15 minutes depending on braid complexity
- Works on hair at least shoulder-length
- Add delicate bobby pins to the braid for subtle glamour, or skip pins entirely for a more casual appearance
Side braids work beautifully for date nights, casual lunches, professional settings, or outdoor activities where you want to look polished without appearing overly formal.
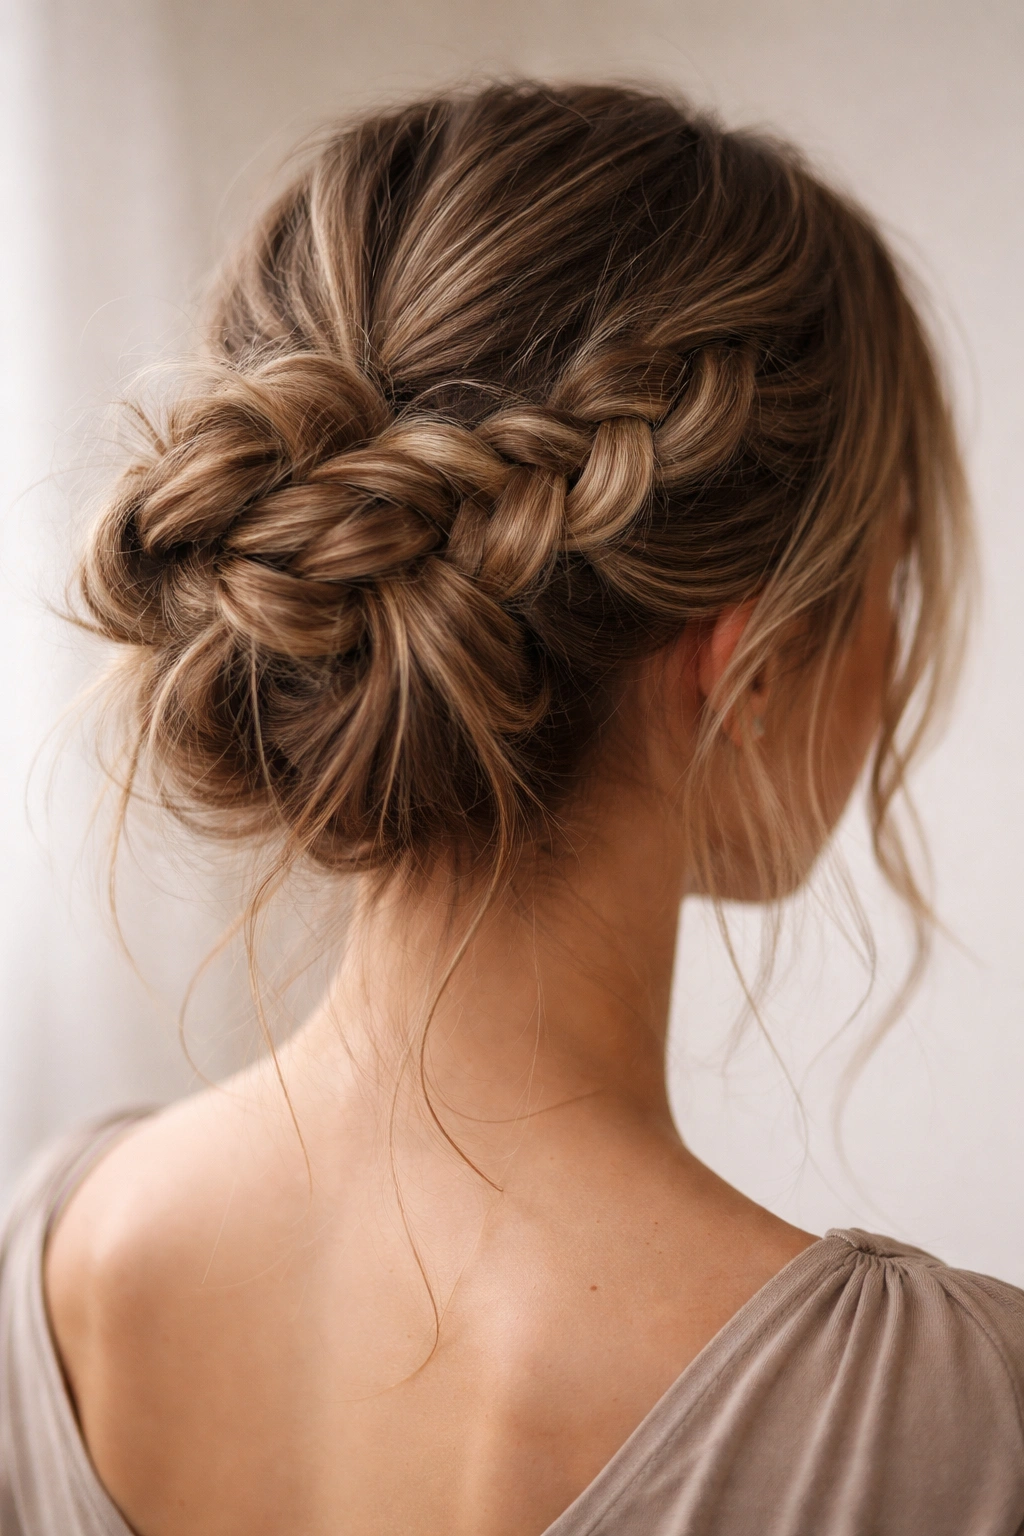
12. Halo Braid with Braided Bun

This style combines a crown braid (halo) with a braided bun at the back of the head. Instead of leaving the hair loose, you gather the remaining hair into a braid and wind it into a bun, creating a completely braided updo that’s elegant and thoroughly polished.
When This Updo Works Best
This style is ideal for formal events like weddings, galas, or professional occasions where you need your hair fully off your face and secured firmly in place. The braided elements create visual interest and sophistication, while the updo placement keeps hair from being in your way throughout an entire event. This style also works beautifully for everyday wear if you prefer updos and want something more visually interesting than a simple bun.
Creating a Braided Halo Bun
- Create a Dutch or French braid around the crown of your head from temple to temple
- Gather the remaining hair at the nape and create a braided ponytail
- Wind the braided ponytail into a bun shape and secure with bobby pins
- Gently pull at the halo braid to add fullness and dimension
- Takes 20-25 minutes with practice
- Works on all hair lengths, though longer hair creates fuller braids
- Finish with a strong-hold hairspray for security throughout the day
This style suits any hair type and works particularly well on thick, voluminous hair where the braids create substantial visual impact.
13. Four-Strand Braid

A four-strand braid is more complex than a three-strand braid, using four sections of hair instead of three. The technique creates a thicker, more substantial-looking braid with interesting visual depth because of how the four strands interact.
The Visual Impact of Four-Strand Braiding
Four-strand braids appear more intricate and intentional than three-strand braids, making them ideal for situations where you want to signal that you’ve put effort into your appearance. The braid also reads as thicker and fuller, even with the same amount of hair, because the four-strand pattern creates different shadows and depth. This style works beautifully for special events and occasions where you want to stand out.
How to Execute a Four-Strand Braid
- Divide your hair into four equal sections
- Cross the first section over the second
- Cross the third section over the first
- Cross the fourth section over the third
- Cross the first section (now on the outside) over the fourth
- Continue this pattern until you reach the end — it’s essentially weaving the strands together in a specific sequence
- Takes 10-15 minutes once you’ve practiced
- Works on all hair lengths from shoulder-length upward
- Creates beautiful results on all hair types and textures
- Pull gently at the finished braid to add fullness and dimension
Four-strand braids work beautifully as statement styles for special events, but they also work for everyday wear if you enjoy more complex hairstyling techniques.
14. Feed-In Braid

A feed-in braid is a French braiding technique where you gradually add small sections of hair as you braid down, creating the appearance of a thicker, fuller braid. The technique is popular in protective styling because it distributes tension evenly across the scalp rather than concentrating it in one area.
Why Feed-In Braids Are Beloved
Feed-in braids create the impression of a much thicker braid than you’d have if you simply braided existing hair without adding new sections. The gradual incorporation of new hair makes the braid appear fuller as you progress down the head. This style is particularly popular for protective styling and works beautifully for anyone looking to give their hair a break from daily manipulation while maintaining an attractive appearance.
Creating a Feed-In Braid
- Start with a small three-strand braid at your crown
- As you braid downward, consistently add small sections of new hair to each of the three strands
- This gradual feed-in creates a thick, full-looking braid that incorporates more hair as you progress
- Takes 15-20 minutes depending on braid thickness
- Works on all hair types and lengths
- Finish by gently pulling at sections of the braid to add fullness and dimension
Feed-in braids work beautifully as everyday styles and are particularly popular in protective styling communities because they’re secure, attractive, and maintain hair health.
15. Half-Up Braid

A half-up braid secures the top half of your hair into a braid while leaving the bottom half flowing loose. This style combines the polish of a braid with the flow and movement of down-worn hair, creating a balanced, flattering appearance.
The Balance of Half-Up Braids
Half-up braids work beautifully in situations where you want to signal that you’ve done your hair without committing to a fully braided or updo style. This style keeps hair somewhat out of your face while maintaining softness and movement. It works equally well for casual outings, professional settings, and formal events depending on how you finish the style.
Executing a Half-Up Braid
- Section off the top half of your hair from temple to temple across the crown
- Create a braid using your preferred technique — French, Dutch, three-strand, or fishtail all work beautifully
- Secure the braid with an elastic
- Leave the bottom half of your hair loose, either straight or styled with waves or curls
- Takes 8-12 minutes depending on braid technique
- Works on all hair lengths from shoulder-length upward
- For added interest, pull gently at the braid to add fullness after securing it
Half-up braids work beautifully for everyday wear, casual outings, workouts, or professional settings where you want a polished appearance without appearing overly formal.
16. Twisted Half-Up Braid

A twisted half-up combines a twisted section of hair with braided elements, creating visual interest through mixed textures. The top half of your hair is divided into sections that are twisted and braided, then secured together, while the bottom remains loose.
Creating Dimension Through Mixed Techniques
This style works beautifully when you want something more visually interesting than a simple braid or twist, but you’re not quite ready to commit to a full, complex braided style. The mixed techniques create dimension and appear more intentional than single-technique styles. This style also works as a great transitional look for people learning different braiding techniques.
How to Execute Twisted Half-Up
- Section the top half of your hair from temple to temple
- Create sections within this top portion
- Twist some sections and braid others, or create a hybrid braided-twisted pattern
- Secure everything together with an elastic at the crown
- Leave the bottom half loose
- Takes 12-15 minutes depending on how many sections you incorporate
- Works on all hair lengths and types
- Pairs beautifully with loose waves or curls in the remaining hair
This style suits casual outings, office settings, or anywhere you want to appear thoughtful about your appearance without looking overdone.
17. Braided Ponytail

A braided ponytail involves creating a standard ponytail, then braiding the ponytail section rather than leaving it as a simple gathered bunch. This technique adds visual interest and makes a standard ponytail feel more intentional and polished.
Elevating the Simple Ponytail
Braided ponytails are ideal for situations where you’d normally wear a traditional ponytail but want to add a touch of polish or visual interest. This style works beautifully for workouts, casual outings, professional settings, or anywhere a ponytail would be appropriate. The braiding adds complexity without requiring additional time once you’ve sectioned the hair.
Creating a Braided Ponytail
- Gather your hair into a ponytail at your preferred height
- Secure with an elastic
- Divide the ponytail into sections and braid using your preferred technique
- Takes 8-12 minutes total
- Works on all hair lengths from shoulder-length upward
- For added dimension, gently pull at the braid to loosen it slightly after completing it
Braided ponytails work beautifully with athletic wear, casual outfits, or professional attire. You can also wrap a small section of hair around the elastic where your ponytail is gathered to hide the elastic entirely.
18. Bubble Braid

A bubble braid (also called a “stacked” braid) involves creating sections of hair secured with elastics down the length of a ponytail, then pulling each section slightly out to create a bumpy, bubble-like texture along the ponytail. The result is a playful, whimsical style that works beautifully for casual occasions.
The Playful Appeal of Bubble Braids
Bubble braids are visually distinctive and immediately draw attention, making them ideal for anyone who enjoys expressing personality through their hair. This style works beautifully for casual outings, festivals, parties, or creative professional environments. It’s also a fun style to create with children and provides a fresh take on the standard ponytail.
Creating a Bubble Braid
- Create a high or mid-height ponytail and secure with an elastic
- Moving down the ponytail, place a small elastic every 2-3 inches
- After placing each elastic, gently pull the hair section above the elastic outward and downward to create a bubble shape
- Continue until you’ve created bubbles all the way down the ponytail
- Takes 8-10 minutes
- Works on all hair types and lengths
- Add small hair clips or ribbons to the elastics for additional visual interest
Bubble braids photograph beautifully and suit anyone who wants a fun, distinctive style that immediately signals creativity and personality.
19. Rope Braid

A rope braid (also called a twisted braid) is created by dividing hair into two sections and twisting each section individually in one direction, then twisting the two sections around each other in the opposite direction. The result is a braid that appears twisted rather than traditionally woven.
The Elegant Simplicity of Rope Braids
Rope braids are deceptively simple to create once you understand the technique, yet they appear more complex than they actually are. This style works beautifully for all occasions from casual to formal, and it reads as elegant and polished. Rope braids also create interesting visual texture and work particularly well on straight hair where the twisting pattern is clearly visible.
How to Create a Rope Braid
- Divide your hair into two equal sections
- Twist the right section clockwise (or counterclockwise — choose a direction and stick with it)
- Twist the left section in the same direction
- Wrap the two twisted sections around each other in the opposite direction
- Secure with an elastic
- Takes 5-8 minutes once you’ve practiced
- Works on all hair types, though straight hair shows the pattern most clearly
- Pull gently at the finished braid to add fullness
Rope braids work beautifully as side braids, crown braids, or standard down-the-back braids. They’re ideal for situations where you want to appear polished without putting in significant effort.
20. Infinity Braid

An infinity braid (also called a figure-eight braid or goddess braid) creates a looped, symmetrical pattern that resembles an infinity symbol or figure eight when viewed from above. This style is created by braiding sections of hair and looping them back over themselves.
The Sophistication of Infinity Braids
Infinity braids are visually distinctive and create the impression of more complex styling than most braids require. This style works beautifully for special events and occasions where you want to appear exceptionally polished. The looped pattern also provides practical benefits — it keeps more hair contained than a simple braid while still allowing some movement.
Creating an Infinity Braid
- Create a braid starting at one side of your head
- Instead of braiding straight down the back, curve the braid in a loop
- Braid back across the head, creating a second loop that mirrors the first
- Secure the end with bobby pins
- Takes 15-20 minutes depending on your skill level
- Works on hair at least shoulder-length
- Works beautifully on all hair types
- This style requires practice and may benefit from watching video tutorials initially
Infinity braids suit special occasions, formal events, or anywhere you want to demonstrate that you’ve invested thoughtful effort into your appearance.
21. Braided Updo with Accessories

A braided updo with accessories incorporates braiding as part of a secured updo style, then adds decorative elements like hairpins, clips, or jewelry to create visual interest. This style combines multiple techniques for maximum impact and works beautifully for special occasions.
Customizing Your Braided Updo
The beauty of this style is its adaptability — you can incorporate your preferred braiding techniques, updo placement, and accessory choices to create a look that feels entirely personalized. You might create a low braided bun with delicate pins, a high twisted updo with a statement hair clip, or a side-swept braid secured into a textured knot. The possibilities are nearly endless.
Executing a Decorated Braided Updo
- Choose your preferred braiding technique and updo shape
- Create the braids and secure them into an updo style using bobby pins
- Add decorative accessories like pins, clips, coms, or jewelry
- Takes 20-30 minutes depending on complexity
- Works on all hair types and lengths
- Works beautifully for weddings, formal events, or any occasion calling for an elegant updo
This style allows for complete creative expression and can be customized to match your personal aesthetic, the event you’re attending, or the overall look you’re creating.
22. Two-Braided Pigtails

Two braided pigtails (also called space braids or double braids) involve creating two separate braids, one on each side of your head, typically positioned lower than at the crown. This playful style works beautifully for casual occasions and any time you want to express a more youthful, creative side.
The Fun, Confident Appeal of Braided Pigtails
Braided pigtails read as playful and confident, ideal for festivals, casual outings, beach days, or creative professional environments. Unlike space buns, pigtails feel slightly less whimsical and more wearable as an everyday style. This is also an excellent style for anyone with shorter hair who might struggle with longer braided styles.
Creating Braided Pigtails
- Create a center part from your forehead to the nape of your neck
- Section off one side and create a braid starting near your ear
- Repeat on the opposite side
- You can position the braids high (near the temples) or lower (near the ear level)
- Takes 12-15 minutes depending on braid complexity
- Works on all hair lengths from shoulder-length upward, though shorter hair creates a different proportion
- Works beautifully with all hair types
Braided pigtails pair well with casual outfits, athletic wear, or creative ensembles where personality is celebrated.
23. Braided Bangs with Loose Hair

This style incorporates a braid within or adjacent to your bangs or face-framing pieces, creating visual interest while keeping shorter pieces somewhat controlled. This works beautifully for people with bangs or longer face-framing layers who want to style those pieces intentionally.
Adding Detail to Face-Framing Pieces
Braiding bangs or face-framing pieces draws attention to your face and creates a focal point that can make an entire style feel more intentional. This technique works with virtually any overall hairstyle — you can braid bangs while wearing your hair down, in a ponytail, in an updo, or in any other configuration. The braided element adds polish and shows attention to detail.
How to Braid Bangs or Face-Framing Pieces
- If you have traditional bangs, create a small braid or twist beginning at one side and ending at the other, securing it with a small elastic or bobby pin
- If you have face-framing layers, braid a small section on one or both sides, securing the braid to the back of your head
- Takes 5-8 minutes
- Works on all hair lengths and types
- Works beautifully with all face shapes
- This subtle detail elevates any hairstyle from simple to intentional
This styling option works beautifully for professional settings, casual outings, or any time you want to appear thoughtful about your appearance.
24. Braided Low Bun

A braided low bun involves creating a braid or multiple braids and securing them into a bun positioned at the nape of your neck. This sophisticated style works beautifully for professional settings, formal occasions, or any time you need your hair fully off your face and secured firmly in place.
The Sophistication of a Braided Low Bun
Low braided buns read as polished, professional, and elegant — they’re ideal for office settings, professional events, interviews, or formal occasions. The braiding adds visual interest and signals that you’ve invested effort into your appearance without appearing overly casual. This style also works beautifully for people with longer hair who want an updo option that feels secure and intentional.
Creating a Braided Low Bun
- Create a low ponytail at the nape of your neck
- Braid the ponytail using your preferred technique
- Wrap the braided ponytail into a bun shape and secure with bobby pins
- Takes 12-15 minutes
- Works on all hair lengths from mid-length upward
- Works beautifully on all hair types, especially thick hair where the braid creates substantial visual impact
- Finish with bobby pins that match your hair color for a seamless appearance
This style suits professional environments, formal events, weddings, or any occasion where polished elegance is appropriate.
25. Messy Braided Bun
A messy braided bun combines the ease and comfort of a bun with the visual interest of braiding. This style involves creating one or more braids and securing them loosely into a bun shape, then intentionally loosening and messying the style to create a relaxed, undone appearance.
The Effortless Elegance of Messy Braided Buns
Messy braided buns are ideal for situations where you want to appear put-together without appearing to have spent much time on your hair. This style works beautifully for casual outings, work-from-home days, weekend activities, or any time you want to look intentional while maintaining comfort. The messiness of the style also makes it practical for active days where you need secure hair without the rigidity of a tight updo.
Creating a Messy Braided Bun
- Create one or multiple braids using your preferred technique
- Gather the braids together at the crown or nape, depending on where you want the bun
- Loosely wrap them into a bun shape and secure with bobby pins
- Gently pull at the braids and bun to create a relaxed, slightly undone appearance
- Leave some face-framing pieces loose for softness
- Takes 10-12 minutes
- Works on all hair types and lengths
- The messier appearance actually makes this style more forgiving — perfection isn’t the goal
This style suits anyone who appreciates the balance between appearing put-together and maintaining comfort and ease throughout the day.
Final Thoughts
Braided hairstyles offer something genuinely special — they’re practical, beautiful, adaptable, and endlessly customizable. Whether you’re drawn to the simplicity of a classic three-strand braid, the elegance of a crown braid, the playfulness of bubble braids, or the sophistication of a braided updo, there’s a style on this list that suits your hair length, your personality, and the occasions in your life. The techniques themselves become easier with practice, and once you’ve mastered a few basic patterns, you’ll find yourself naturally experimenting with variations and combinations that feel entirely your own.
The real magic of braiding is that it requires nothing but your own two hands and your hair — no heat tools, no expensive products, just patience and willingness to practice. Start with whichever style appeals to you most, give yourself grace as you learn, and recognize that mastery comes through repetition. Braids get better every single time you weave them, and the investment you make in learning these techniques pays dividends throughout your life. You’ll find yourself reaching for braids in moments where you want to look polished, in situations where you need secure hair, and in times when you simply want to express a bit of creativity and care toward your appearance.